
Для работы проектов iXBT.com нужны файлы cookie и сервисы аналитики.
Продолжая посещать сайты проектов вы соглашаетесь с нашей
Политикой в отношении файлов cookie
Если вы работали с GitHub по SSH и вдруг встретились с ошибкой @ WARNING: REMOTE HOST IDENTIFICATION HAS CHANGED! @, у меня для вас две новости: хорошая и плохая. Хорошая: ошибку исправить можно. Плохая: придётся немного заняться камасутрой.
24 марта 2023 года GitHub изменил свой серверный SSH ключ из-за кратковременной утечки внутренней информации компании. Простыми словами, они выложили не тот файл не в то место, но быстро среагировали и написали об этом.
Фанаты сервиса могли прочитать новость в блоге компании. Но если вы не фанат GitHub, то вы, скорее всего, узнали об этом из страшного сообщения в консоли при попытке взаимодействия со своим репозиторием на сайте:
@@@@@@@@@@@@@@@@@@@@@@@@@@@@@@@@@@@@@@@@@@@@@@@@@@@@@@@@@@@

@ WARNING: REMOTE HOST IDENTIFICATION HAS CHANGED! @

@@@@@@@@@@@@@@@@@@@@@@@@@@@@@@@@@@@@@@@@@@@@@@@@@@@@@@@@@@@

IT IS POSSIBLE THAT SOMEONE IS DOING SOMETHING NASTY!

Someone could be eavesdropping on you right now (man-in-the-middle attack)!

It is also possible that a host key has just been changed.
В официальном сообщении из блога GitHub предлагают такое вот решение:
1. Удалить старые ключи простой командой:
$ ssh-keygen -R github.com
2. Затем вручную добавить следующую строчку в файл known_hosts:
github.com ssh-rsa AAAAB3NzaC1yc2EAAAADAQABAAABgQCj7ndNxQowgcQnjshcLrqPEiiphnt+VTTvDP6mHBL9j1aNUkY4Ue1gvwnGLVlOhGeYrnZaMgRK6+PKCUXaDbC7qtbW8gIkhL7aGCsOr/C56SJMy/BCZfxd1nWzAOxSDPgVsmerOBYfNqltV9/hWCqBywINIR+5dIg6JTJ72pcEpEjcYgXkE2YEFXV1JHnsKgbLWNlhScqb2UmyRkQyytRLtL+38TGxkxCflmO+5Z8CSSNY7GidjMIZ7Q4zMjA2n1nGrlTDkzwDCsw+wqFPGQA179cnfGWOWRVruj16z6XyvxvjJwbz0wQZ75XK5tKSb7FNyeIEs4TT4jk+S4dhPeAUC5y+bDYirYgM4GC7uEnztnZyaVWQ7B381AK4Qdrwt51ZqExKbQpTUNn+EjqoTwvqNj4kqx5QUCI0ThS/YkOxJCXmPUWZbhjpCg56i+2aB6CmK2JGhn57K5mj0MNdBXA4/WnwH6XoPWJzK5Nyu2zB3nAZp+S5hpQs+p1vN1/wsjk=
Файл known_hosts располагается:
- ~/.ssh/known_hosts в ОС семейства Linux
- C:\Users\USERNAME\.ssh в ОС Winodws
Если вы работаете на Linux, можно поступить ещё проще — выполнить две команды:
$ ssh-keygen -R github.com
$ curl -L https://api.github.com/meta* | jq -r '.ssh_keys | .[]' | sed -e 's/^/github.com /' >> ~/.ssh/known_hosts
Но если вы используете Windows, велика вероятность того, что официальная инструкция вам нихрена не поможет. Мне не помогла, даже после ручного редактирования файла known_hosts пуш в GitHub по SSH у меня не получился.
Короче, официальный метод не работает. Что делать дальше? Поскольку я значительно глупее чем Chat GPT 4, мне потребовалось несколько часов, много нецензурных ругательств и тонна нервных клеток, чтобы найти решение.
1. Установите сервер Open SSH. Перейдите в: Параметры системы (звёздочка в меню пуск) > Приложения и возможности > Управление дополнительными компонентами > Добавить компонент > Сервер OpenSSH
2. Дождитесь завершения установки. Если при установке произошёл сбой, проверьте, возможно у вас уже есть установленный сервер OpenSSH в папке C:\Windows\System32\OpenSSH. Честно сказать, не припоминаю, чтобы я что-то такое выполнял при первоначальной установке Git.
3. Затем настраиваем переменные среды — подсказываем системе, где искать SSH-сервер. Правой кнопкой мыши на «Мой компьютер» > свойства > Дополнительные параметры системы > Переменные среды > Создать переменную. Можно создать на уровне пользователя, а можно на уровне системы, без разницы.
4. Создайте переменную с именем GIT_SSH и значением C:\Windows\System32\OpenSSH.
5. Проверьте работоспособность SSH-сервера. Откройте Powershell под администратором И выполните последовательно команды:
> Get-Service ssh-agent

Status   Name               DisplayName
------   ----               -----------
Stopped  ssh-agent          OpenSSH Authentication Agent
Команда проверит, где располагается служба SSH-сервера.
> Get-Service ssh-agent | Select StartType

StartType
---------
Disabled
Команда покажет статус службы SSH-сервера. В ответ можно получить три варианта ответа: Disabled — служба остановлена, Manual — служба запускается вручную и Automatic — служба запускается автоматически. Дальше необходимо указать то, как служба будет запускаться.
> Get-Service -Name ssh-agent | Set-Service -StartupType Automatic
Укажите любой желаемый вариант. Я предпочитаю не думать и дать службе запускаться автоматически. То же самое можно выполнить из меню управления службами Windows.
6. По идее на этом шаге всё, можно бежать клонировать репозитории по SSH. Но мне пришлось потупить ещё немного.
7. Сперва пришлось запустить сам SSH-агент так, чтобы система его обнаружила.
Часто рекомендуют сделать это при помощи следующей команды:
eval "$(ssh-agent)"
Но вы им не верьте, это команда для Linux, в Винде она не работает. Поэтому используйте вот эту команду:
ssh-agent bash
8. И вот теперь можно добавить SSH-ключ стандартной командой:
ssh-add <путь-до-ключа>
9. Если команда не сработала, а вы уже на взводе, есть решение. Идите в диспетчер задач и остановите все-все сервисы ssh.
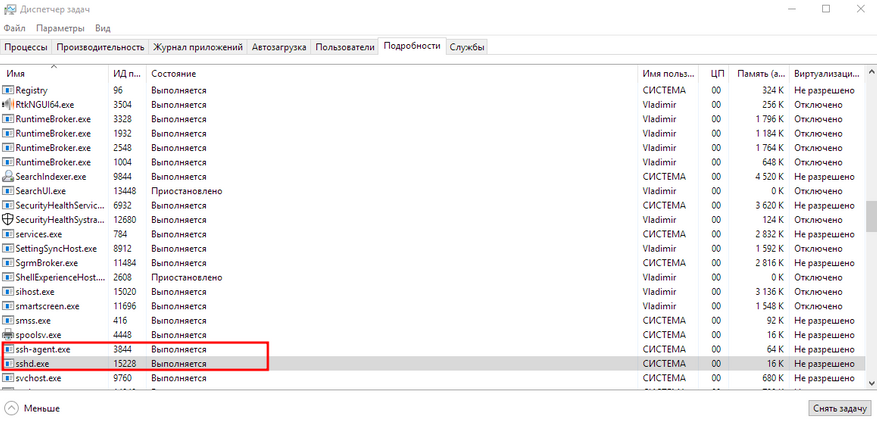
Затем повторите шаги 7-8.
10. Если система всё ещё упорно отказывается воспринимать ключи, придётся действовать радикально. Идите в каталог C:\Users\USERNAME\.ssh и снесите всё к чёртовой бабушке.
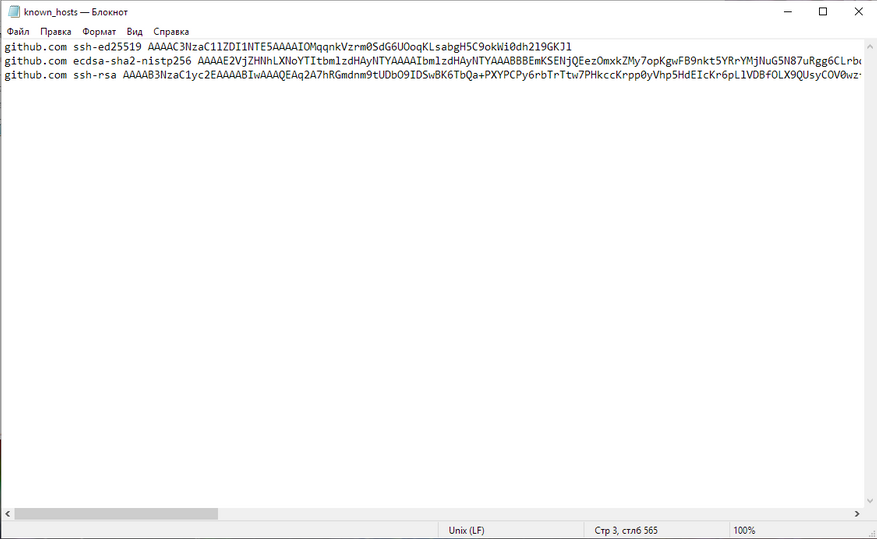
Заново создайте в папке файл с именем known_hosts без расширения, добавьте в него строки, предоставленные GitHub:
github.com ssh-ed25519 AAAAC3NzaC1lZDI1NTE5AAAAIOMqqnkVzrm0SdG6UOoqKLsabgH5C9okWi0dh2l9GKJl
github.com ecdsa-sha2-nistp256 AAAAE2VjZHNhLXNoYTItbmlzdHAyNTYAAAAIbmlzdHAyNTYAAABBBEmKSENjQEezOmxkZMy7opKgwFB9nkt5YRrYMjNuG5N87uRgg6CLrbo5wAdT/y6v0mKV0U2w0WZ2YB/++Tpockg=
github.com ssh-rsa AAAAB3NzaC1yc2EAAAADAQABAAABgQCj7ndNxQowgcQnjshcLrqPEiiphnt+VTTvDP6mHBL9j1aNUkY4Ue1gvwnGLVlOhGeYrnZaMgRK6+PKCUXaDbC7qtbW8gIkhL7aGCsOr/C56SJMy/BCZfxd1nWzAOxSDPgVsmerOBYfNqltV9/hWCqBywINIR+5dIg6JTJ72pcEpEjcYgXkE2YEFXV1JHnsKgbLWNlhScqb2UmyRkQyytRLtL+38TGxkxCflmO+5Z8CSSNY7GidjMIZ7Q4zMjA2n1nGrlTDkzwDCsw+wqFPGQA179cnfGWOWRVruj16z6XyvxvjJwbz0wQZ75XK5tKSb7FNyeIEs4TT4jk+S4dhPeAUC5y+bDYirYgM4GC7uEnztnZyaVWQ7B381AK4Qdrwt51ZqExKbQpTUNn+EjqoTwvqNj4kqx5QUCI0ThS/YkOxJCXmPUWZbhjpCg56i+2aB6CmK2JGhn57K5mj0MNdBXA4/WnwH6XoPWJzK5Nyu2zB3nAZp+S5hpQs+p1vN1/wsjk=
Я не стал запариваться, просто скопировал все три строки и вставил их в пустой файл.
11. Затем я снова остановил все SSH-агенты и заново выполнил команду:
ssh-add <путь-до-ключа>
Теперь всё заработало. Надеюсь, эта инструкция вам помогла.
Инструкция, как сгенерировать SSH-ключ уже любезно предоставлена GitHub по ссылке.
* — Компания Meta (социальные сети Instagram и Facebook) — признана экстремистской организацией на территории Российской Федерации
A secure internet connection is not just the ideal — it’s essential. In fact, we’re going as far as saying it’s the number one priority for your website. The “Warning: Remote host identification has changed” error protects your connection from certain malicious attacks, although in some cases, you can inadvertently cause the error too.
The error is related to your Secure Shell (SSH) keys and the server “fingerprint” a client will check for. If Secure Shell thinks there’s an issue, it will block access to your server and throw an error. But you can fix this in a few steps, on Windows or Mac:
- Fix on Windows
- Fix on Mac
Click on the links above if you want to jump straight to the solutions or keep reading for more details on the error message itself.
What is the “Warning: Remote host identification has changed” error
One of the most secure ways to connect to a web server is to use SSH. It’s a command-line tool that lets you access an insecure network securely. Consider it like a “super-SFTP” type of setup, although it’s not a 1:1 comparison in practice.
You can access your site from almost anywhere you can use the internet, as long as you have the right login credentials. What’s more, most macOS and Linux machines have an SSH client built into the operating system (OS). For Windows, you use a dedicated interface (we talk about this in more detail later).
As for the “Warning: Remote host identification has changed” error, it relates to the security checks your client will do. An SSH connection uses dedicated “keys” — small files stored on your computer — as authentication. It’s sort of like a Secure Sockets Layers (SSL) handshake, and in fact, there are some high-level similarities between SSH and SSL.
One aspect the keys help with is to provide a permanent fingerprint of its host server. This makes sure the connection is accurate and that you’re not subject to a “machine-in-the-middle” attack.
If the client thinks those fingerprints differ from what it understands to be correct, you get the “Warning: Remote host identification has changed” error at the point of login:
[user@hostname ~]$ ssh root@user

@@@@@@@@@@@@@@@@@@@@@@@@@@@@@@@@@@@@@@@@@@@@@@@@@@@@@@@@@@@

@ WARNING: REMOTE HOST IDENTIFICATION HAS CHANGED! @

@@@@@@@@@@@@@@@@@@@@@@@@@@@@@@@@@@@@@@@@@@@@@@@@@@@@@@@@@@@

IT IS POSSIBLE THAT SOMEONE IS DOING SOMETHING NASTY!

Someone could be eavesdropping on you right now (man-in-the-middle attack)!

It is also possible that a host key has just been changed.

The fingerprint for the RSA key sent by the remote host is

xx:xx:xx.

Please contact your system administrator.

Add correct host key in /home/hostname /.ssh/known_hosts to get rid of this message.

Offending RSA key in /var/lib/sss/pubconf/known_hosts:4

RSA host key for user has changed and you have requested strict checking.

Host key verification failed.
As errors go, this is detailed and clear — it tells you what’s happened, a potential reason for why, and how you might fix it.
However, there’s one aspect we can touch on a little further before showing you how to fix the “Warning: Remote host identification has changed” error.
How the known_hosts file helps SSH authentication
You notice that the error message references a known_hosts file. The name should give you a clue as to what it contains, but for clarity, it’s a list of SSH remote hosts known to the computer. It’s used as a reference client file for the authentication process.
When you first connect to a server, you often get a confirmation request through your interface, asking whether you want to connect. If so, this fingerprint becomes part of your known_hosts file.
Of course, if the fingerprint differs from what is in the known_hosts file, this could indicate a malicious user is targeting you. In other cases, you may already know why there’s a difference, although it pays to be vigilant regardless.
How to fix the “Warning: Remote host identification has changed” error (on Windows and Mac)
You can fix the error for Windows and macOS. However, you have more flexibility for doing so on Mac.
We cover lots of the ways you can make things right again, starting with Windows.
1. Windows
It’s important to note that Windows machines might not have a known_hosts file. However, if you use the OpenSSH client, there is a file. To find it, open the Windows search bar, and navigate to your user folder with the %USERPROFILE% command.
This opens the directory within the File Explorer. There’s also be a .ssh folder within:

The file we want in this folder is known_hosts. You can open this with Notepad (or your favorite text editor). Inside is a list of keys:

Here, you can delete the key that’s causing the problem, then resave the file.
Some users may prefer the PuTTY client. The keys sit in the Registry, although they perform the same purpose as OpenSSH.
Next, open the Windows Registry Editor (otherwise known as “regedit”). You can do this in whatever way you’re comfortable, but the quickest way is to type the app’s name into Window’s search bar:

Here, look for the following destination within regedit:
HKEY_CURRENT_USER/Software/SimonTatham/PuTTY/SshHostKeys/A list of entries is shown here relating to the saved connections on your computer. Your job is to delete whichever one is causing an issue:

Once you click on the Delete button, you also need to confirm that you want to remove the key:

Clicking Yes here means the key is gone for good, and you shouldn’t get the “Warning: Remote host identification has changed” error any longer.
2. Mac
The Mac has a couple of ways to fix the “Warning: Remote host identification has changed” error — either through a premium app such as SSH Config Editor or the Terminal. The results is the same, so we advise you to choose whichever option is more comfortable (and budget-friendly).
Our preferred approach is to access the file within a terminal window (or iTerm2 if you use that app), and also open it with a dedicated Nano or Vim editor. This is because it’s accessible to everyone and straightforward to use regardless of your experience level.
Here, we use Nano. First, open your terminal using whatever process is most comfortable:

Next, run the nano ~/.ssh/known_hosts command in your window. This opens a new Nano instance and displays the keys within your known_hosts file:

You should delete the key causing the “Warning: Remote host identification has changed” error, then save your changes.
You might also want to delete the entire known_hosts file, especially if you only use SSH for one or two sites. To do this, run rm .ssh/known_hosts in a terminal window.
There’s one more method to alter the known_hosts file on Mac: using the ssh-keygen utility from the command line. This is great if you don’t want to dig into the file itself, or if you want to work with only one site or key.
To achieve this, open a terminal window and run ssh-keygen, followed by your server hostname. For example:
ssh-keygen -R server.example.comThis won’t ask you if you want to delete the specified lines, so make sure you’re removing the right ones before proceeding:

Once this is done, you shouldn’t get the “Warning: Remote host identification has changed” error from there on out.
Summary
Web security isn’t just about installing plugins and creating a strong password. The connections you use to log into servers need your utmost attention. If you don’t want to be subject to a machine-in-the-middle attack, you’ll want to use SSH access when you log in.
However, the system works almost too well. You may get the “Warning: Remote host identification has changed” error for a few reasons, and some are innocent.
Regardless, you can fix the error in no time through a Command Prompt or Terminal, using just a handful of commands.
Давайте разберемся с известнейшей проблемой, часто возникающей при подключении по протоколу ssh!
По умолчанию, для большей безопасности, в настройках ssh значение параметра StrictHostKeyChecking установлено в ‘yes’. Именно поэтому при первом подключении к удаленному хосту можно увидеть следующее:
The authenticity of host '192.168.0.166 (192.168.0.166)' can't be established.
ECDSA key fingerprint is f0:74:54:33:93:bd:73:d1:ef:d6:fe:47:d3:93:e0:7f.
Are you sure you want to continue connecting (yes/no)? yes
Warning: Permanently added '192.168.0.166' (ECDSA) to the list of known hosts.
Введя в консоли ‘yes’, мы подтверждаем, что действительно хотим подключиться к этому хосту и отпечаток его ssh-ключа добавляется в файл ~/.ssh/known_hosts.
При повторной попытке подключения к хосту после изменения ключа на удаленном сервере (как правило, он меняется если была переустановлена операционная система или sshd), появляется сообщение с ошибкой:
@@@@@@@@@@@@@@@@@@@@@@@@@@@@@@@@@@@@@@@@@@@@@@@@@@@@@@@@@@@
@    WARNING: REMOTE HOST IDENTIFICATION HAS CHANGED!     @
@@@@@@@@@@@@@@@@@@@@@@@@@@@@@@@@@@@@@@@@@@@@@@@@@@@@@@@@@@@
IT IS POSSIBLE THAT SOMEONE IS DOING SOMETHING NASTY!
Someone could be eavesdropping on you right now (man-in-the-middle attack)!
It is also possible that a host key has just been changed.
The fingerprint for the ECDSA key sent by the remote host is
ae:a6:0b:8d:14:e4:3c:67:f0:a3:ec:a9:9e:2a:26:72.
Please contact your system administrator.
Add correct host key in /root/.ssh/known_hosts to get rid of this message.
Offending ECDSA key in /root/.ssh/known_hosts:75
  remove with: ssh-keygen -f "/root/.ssh/known_hosts" -R 192.168.0.166
ECDSA host key for 192.168.0.166 has changed and you have requested strict checking.
Host key verification failed.
lost connection
Для устранения данной проблемы необходимо удалить строку с указанным ssh-ключом из файла /root/.ssh/known_hosts. Сделать это можно несколькими способами.
Первый (указан в самом сообщении с ошибкой):
ssh-keygen -f "/root/.ssh/known_hosts" -R 192.168.0.166
# Host 192.168.0.166 found: line 75 type ECDSA
/root/.ssh/known_hosts updated.
Original contents retained as /root/.ssh/known_hosts.old
Второй вариант удаления ключа:
sed -i '75d' /root/.ssh/known_hosts
Примечание. Номер строки с ssh-ключем, который нужно удалить, указывается с помощью ‘75d’.
Третий вариант удаления ключа (с использованием perl):
perl -pi -e 's/\Q$_// if ($. == 75);' /root/.ssh/known_hosts
После проделанных действий пробуем подключиться по ssh к удаленному хосту — проблема должна исчезнуть.
The “Warning: Remote Host Identification Has Changed” error is especially annoying when it pops up while trying to SSH into a server. This warning indicates a potential security issue which is designed to guard you against possible man-in-the-middle (MITM) attacks. However, it can also happen because of a genuine change in the configuration of your server.
In this tutorial, we will examine the most prevalent reasons and the solutions for the “Warning: Remote Host Identification Has Changed!” issue.
Common Causes of the Error
During the first time doing an SSH to a server, a new entry gets created in the form of a file known as known_hosts. It serves as a verification, enabling the user to SSH onto the server. However, in case the server loses its host key, then the matching SSH folder might result in an alarming issue:

SSH uses certain cryptography keys to enable the identification of various remote servers. A new server’s key gets stored in a folder titled /~/.ssh/known_hosts. On further connections, the rest of the keys are checked against the folder. As this gets done over multiple times, in case there is any change with it, a warning is displayed.
Here are the common reasons:
- Server Reinstallation or OS Upgrade: The SSH host key gets regenerated. It occurs within a scenario where a server is reinstalled, or reconfigured along with changing the SSH key.
- IP Address Reassignment: You’re connecting to a different server with the same IP or hostname.
- Legitimate Key Rotation: Some administrators periodically change SSH keys.
- MITM Attack (Rare but Serious): An actual man-in-the-middle attack, or an alternative form known as DNS spoofing, could have occurred, but it’s infrequent and severe.
Fix Remote Host Identification Error With Our SSH
Experience Ultahost’s SSH-enabled hosting to take full control of your server environment and avoid errors like Remote Host Identification Has Changed.
First, if the change of the key is expected, ensure that your server administrator has been consulted prior. If it is legitimate, do the following:
Method 1: Remove the Old Host Key (Recommended)
The error can be fixed by deleting the outdated SSH key, which is stored in the known_hosts directory on your machine. Whenever you connect to a server for the first time, the SSH client identifies the server with the fingerprint stored in the file. In case the fingerprint has been modified for any reason, like changing the IP address, you will receive the warning.
The easiest solution is to remove the key causing issues from known_hosts. Find the suspicious record by executing the following command:
ssh-keygen -F
Let’s replace hostname_or_ip with actual IP:
ssh-keygen -F 18

It indicates that lines 8 and 9 of the known_hosts file contain the incorrect key for this host.
Proceed to removing the conflicting key with the following syntax:
ssh-keygen -R <hostname_or_ip>
For instance, the following command will eliminate the exact entry:
ssh-keygen -R 192.168.100.4

It modifies the known_hosts file for you, so you don’t need to manually open or modify anything.
Reconnect to the server. Once again, the latest key will be stored:
ssh user@hostname_or_ip
For example, the following command connects to the computer at IP address 192.168.100.4, and logs in as user anees:
ssh [email protected]

Type yes to storing securely the historical marker and reconciling the saved fingerprints with your known_hosts.
This gives you the added advantage of removing, cleaning up, or restoring recognized markers without the need to disable protective approaches that permit trusting network faces and risk attack. It allows you to modify network trust and verify key values securely and thereby restore the protective barriers that could be undermined.
Method 2: Manually Edit the known_hosts File
If you prefer more control or want to remove only a specific entry, manually editing the known_hosts file is a straightforward way to resolve the “WARNING REMOTE HOST IDENTIFICATION HAS CHANGED” error.
The known_hosts file contains all of the fingerprints (or host keys) of remote servers that you have ever connected to. This record of connection helps SSH confirm that it is connecting with the same trusted server every time a connection is attempted. It also prevents unauthorized access by throwing a warning when a key gets changed (reinstalled, migrated, or is subject to spoofing by another server using her IP).
In case ssh-keygen -R does not resolve the issue, then you can solve this problem by manually editing the file.
To locate the known_hosts file:
nano ~/.ssh/known_hosts

You can open it with Vim, code, or any other preferred editor. As stated previously, this file contains one line per host you have ever connected to.
Proceed to your preferred text editor to find and delete the line containing the problematic line (host/IP). Save the changes and quit the editor. Go ahead to reconnect through SSH:
ssh [email protected]
Keep in mind that the confirmation for adding the new fingerprint to the known_hosts file will need to be accepted as the system prompts for such an action.
Method 3: Disable Strict Host Key Checking (Temporary Fix – Not Recommended)
Disabling strict host key checking avoids the warning completely, which can be quite advantageous in auto-operated setups such as scripts and CI/CD pipelines, as well as provisioning tools like Ansible or Terraform. This particular method instructs SSH to connect to the specified host while ignoring the identity verification process completely, thus skipping the “host key mismatch” warning.
If you are operating within a trusted environment, such as a testing environment, the check can be bypassed temporarily like so:
ssh -o StrictHostKeyChecking=no -o UserKnownHostsFile=/dev/null user@hostname_or_ip
In this example, -o Scrod -o UserKnownHostsFile=/dev/null are sufficient to the requirements.
-o UserKnownHostsFile=/dev/null: This option prevents the saving of host keys to the known_hosts file. Unlike /dev/null, which changes its actual location, thus making verification useless:

None of these changes pose security risks, however, the opposite can be said if applied in a sensitive production server. As noted previously, an important security feature will be completely restrained, which checks if the unit you are connecting to is actually correct. Losing detection measures in case someone attempts to impersonate the server would open uncontrollable gaps for MITM attacks to occur.
Method 4: Update the Key Manually (For Controlled Environments)
Having full access to a remote server (internal servers, dev machines, or even VMs that you manage), resolving this warning by manually changing the SSH host key will be less of a hassle. The procedure for this method is to ensure that you confirm the server’s trust first before replacing the old key in your ~./ssh/known_hosts folder with the new key.
If you have the new host key, you can manually add it:
ssh-keyscan -H hostname_or_ip >> ~/.ssh/known_hosts
As an example, use the command below:
ssh-keyscan -H 192.168.100.4 >> ~/.ssh/known_hosts

Best Practices to Avoid This Issue
As the warning says “SSH REMOTE HOST IDENTIFICATION HAS CHANGED”, it is for your protection. Usually within one or two minutes, the problem can be fixed. Always make sure that it is not a more malicious problem.
- Use DNS or SSHFP Records: They enhance automation in key verification.
- Document Key Changes: Inform users ahead of time when revoking SSH keys.
- Automate Key Deployment: Ansible uses secure methods to distribute the keys.
- StrictHostKeyChecking must never be turned off: This setting should not be changed. So, in /etc/ssh/ssh_config, don’t disable checks forever.
Conclusion
The “Remote Host Identification Has Changed” error arises when the remote server you want to SSH to has a host key that differs from the one at your local machine. Take the time to inspect the changes made to the key. The best command is ssh-keygen -R to remove the key and add it again.
The ssh-keygen -R hostname command is a way to eliminate outdated keys. Always check the key before permitting and avoid skipping the ssh security checks. It could breach them at a point where they fully trust the network.
We hope this article has helped you fix the ‘Warning: Remote Host Identification Has Changed’ error. Upgrade to an Ultahost Linux VPS hosting to diagnose and resolve such errors effectively, with root access and full control over your server configuration. Ultahost takes care of performance and security, and you never have to worry about downtime or unexpected technical issues!
FAQ
What causes this SSH error?
Warning signal appears when the SSH key of a remote server has changed, surpassing the one saved at ~/.ssh/known_hosts. The purpose here is to notify you that something could be off. It could happen due to the server being reinstalled, IP change, or another device taking over the same IP.
Is it always a security threat?
Not always. In most cases, this message appears following legitimate activity on the server. In this specific case, however, it might be an indication of a man-in-the-middle(MITM) attack. Make sure to always check the reason before proceeding.
Where does SSH store known host keys?
Files matching remote servers’ addresses with username and password pairs can be found on the user’s machine at the location ~/.ssh/known_hosts. Each entry in the file has a separate line containing the IP or hostname and their corresponding key. For every connection made, SSH checks whether the remote server has changed since the last connection was made, which means this file is checked with each connection.
How do I remove the old host key?
If the host key causes the underlying issue, you can remove the outdated key and those specific errors will no longer appear using the command: ssh-keygen -R. This command allows for the removal of the entry which means the next time the connection is made, the option to store a new value for the variable will be given.
Can I manually edit the known_hosts file?
Of course. You are free to edit the known_hosts file by using a command line tool such as nano ~/.ssh/known_hosts. Any line-relative IP or hostname that is interfacing with the error can be located on a separate line and removed. This method allows greater precision for users who prefer fixing issues manually.
How do I verify that the new host key is safe?
Check with your server admin or hosting provider to obtain the correct SSH fingerprint. Afterwards, you can use: ssh-keyscan -H for retrieving and comparing the key before trusting it.
Can I bypass this warning in automated scripts?
Yes, you may disable strict checks in trusted environments such as the CI/CD pipelines: ssh -o StrictHostKeyChecking=no user@host. This command disables the prompt and is not recommended in production environments.
you’re trying to connect to a remote server using SSH, and suddenly you’re hit with a big, scary message:
WARNING: REMOTE HOST IDENTIFICATION HAS CHANGED!
IT IS POSSIBLE THAT SOMEONE IS DOING SOMETHING NASTY!
Someone could be eavesdropping on you right now (man-in-the-middle attack)!
It is also possible that a host key has just been changed.
Yikes! That sounds alarming, doesn’t it? If you’ve seen this warning, you might be wondering what’s going on and whether your system is under attack. Don’t worry—I’m here to break it down for you in simple terms. In this guide, we’ll explore what this error means, why it pops up, and how you can fix it safely and securely. Let’s get started!
Table of Contents
This warning comes from SSH (Secure Shell), a tool you use to connect to remote servers securely. It’s like a security guard checking IDs at the door—it’s there to protect you. When you see “WARNING: REMOTE HOST IDENTIFICATION HAS CHANGED!”, SSH is telling you that the “fingerprint” (or host key) of the server you’re trying to connect to doesn’t match the one it remembers from before.
What Are Host Keys?
Think of a host key as a unique digital signature for a server. The first time you connect to a server via SSH, it shares its host key with your computer. Your system saves this key in a file called known_hosts (usually found in ~/.ssh/known_hosts on Linux/macOS or %USERPROFILE%\.ssh\known_hosts on Windows). Every time you connect again, SSH checks this key to make sure you’re talking to the same server.
If the key changes, SSH raises the alarm with this warning. It’s like the security guard saying, “Hold up—this ID doesn’t match the one I have on file!”
Why Does This Warning Appear?
There are two main reasons you might see this message—and one’s harmless, while the other could be serious. Let’s break it down:
Legitimate Reasons (No Need to Panic)
- Server Reinstallation or Update: If the server’s operating system was reinstalled or its SSH software was updated, it might generate a new host key.
- New Server, Same IP: If you’re connecting to a different server that reused an old IP address, the keys won’t match.
- Local File Conflict: If you’ve reinstalled your own system or copied your
known_hostsfile from somewhere else, it might cause a mismatch.
Potentially Dangerous Reasons
- Man-in-the-Middle Attack: Someone could be intercepting your connection, pretending to be the server you trust. This is rare but serious—it’s why SSH warns you about “eavesdropping.”
- Compromised Server: If the server was hacked, its host key might have been altered by an attacker.
So, how do you know which one it is? We’ll figure that out as we go through the fixes!
Is This Warning a Big Deal?
Yes and no. If it’s just a server update, it’s no biggie—just a quick fix. But if it’s a security threat, ignoring it could expose your data or credentials to attackers. The key is to investigate and act carefully. Let’s walk through how to handle it step-by-step.
How to Fix “WARNING: Remote Host Identification Has Changed!”
The fix depends on why the key changed and whether it’s safe to proceed. Here’s how to resolve it across different systems (Linux, macOS, Windows).
Step 1: Don’t Panic—Verify the Change
Before doing anything, check if the server’s host key should have changed. Ask yourself:
- Did the server admin recently update or reinstall it?
- Are you connecting to a new machine with the same IP?
If possible, contact the server administrator to confirm. They can provide the new host key fingerprint to compare with what SSH is showing you. If it matches, you’re good to proceed.
Fixing the Error on Linux and macOS
Most SSH users are on Linux or macOS, so let’s start here.
Option 1: Remove the Old Key Manually
The simplest fix is to delete the outdated key from your known_hosts file:
- Open your terminal.
- Find the offending line in
known_hostsby running:
ssh-keygen -R <hostname>Replace <hostname> with the server’s address (e.g., example.com or 192.168.1.100).
Example: ssh-keygen -R 192.168.1.100
- This removes the old key. Now, reconnect:
ssh user@hostname- SSH will ask you to accept the new key. Type
yesif you trust it.
Option 2: Edit known_hosts Directly
If you want more control:
- Open
~/.ssh/known_hostsin a text editor (e.g.,nanoorvim):
nano ~/.ssh/known_hosts- Look for the line matching the hostname or IP. It’ll look something like:
192.168.1.100 ssh-rsa AAAAB3NzaC1yc2E...- Delete that line, save, and exit.
- Reconnect with
ssh user@hostname.
Option 3: Bypass Temporarily (Not Recommended)
To skip the check just once (useful for testing):
ssh -o UserKnownHostsFile=/dev/null -o StrictHostKeyChecking=no user@hostnameWarning: This disables security checks, so only use it if you’re 100% sure it’s safe.
Fixing the Error on Windows
Windows users might use tools like PuTTY or Git Bash. Here’s how to fix it:
Using Git Bash or WSL
If you’re using Git Bash or Windows Subsystem for Linux (WSL):
- Open your terminal.
- Run the same command as Linux/macOS:
ssh-keygen -R <hostname>- Reconnect:
ssh user@hostname.
Using PuTTY
PuTTY stores keys in the Windows Registry:
- Open PuTTY.
- Try connecting to the server. You’ll see a warning about the key change.
- Click “Accept” to update the key, or “Cancel” to investigate further.
- To clear old keys manually:
- Open
regedit(Windows Registry Editor). - Navigate to
HKEY_CURRENT_USER\Software\SimonTatham\PuTTY\SshHostKeys. - Find and delete the entry for your server.
What If It’s a Security Threat?
If you suspect a man-in-the-middle attack (e.g., you didn’t expect the key to change and can’t verify it):
- Stop Connecting: Don’t proceed until you’re sure.
- Contact the Admin: Ask them to confirm the server’s status and key.
- Check Your Network: Are you on a public Wi-Fi? Switch to a trusted connection.
- Scan for Malware: Ensure your system isn’t compromised.
Better safe than sorry!
Table: Quick Fixes by System
| System | Key Fix Steps | Command/Tool |
|---|---|---|
| Linux/macOS | Remove old key with ssh-keygen | ssh-keygen -R <hostname> |
| Windows (Git Bash) | Remove old key with ssh-keygen | ssh-keygen -R <hostname> |
| Windows (PuTTY) | Update key via GUI or Registry | PuTTY or regedit |
How to Avoid This Warning in the Future
Once you’ve fixed it, here’s how to keep it smooth:
- Backup known_hosts: Save a copy before major changes.
- Coordinate with Admins: Ask for key updates ahead of time.
- Use Key Management Tools: Tools like
ssh-copy-idcan streamline setups. - Monitor Connections: Log SSH attempts to spot oddities.
Conclusion: Stay Secure and Connected
You’re now equipped to fix the “WARNING: REMOTE HOST IDENTIFICATION HAS CHANGED!” error with confidence. Whether it’s a simple key mismatch or a potential threat, you know how to investigate and resolve it. SSH is your gateway to secure remote work—don’t let this warning slow you down!
Have you fixed it yet? Let me know how it went—or if you need more tips, I’m here to help!
Resources
- SSH Man Page
- PuTTY Documentation
- OpenSSH Key Management
- Understanding Man-in-the-Middle Attacks