
Технология Wake on LAN (WoL) используется для удалённого пробуждения (включения) компьютера, который находится в спящем режиме (режиме пониженного энергопотребления). Сетевая карта компьютера инициирует процесс пробуждения компьютера после получение специального широковещательного пакета (magic packet) со своим MAC адресом. В этой статье мы рассмотрим, как настроить Wake on LAN на компьютере под управлением Windows.
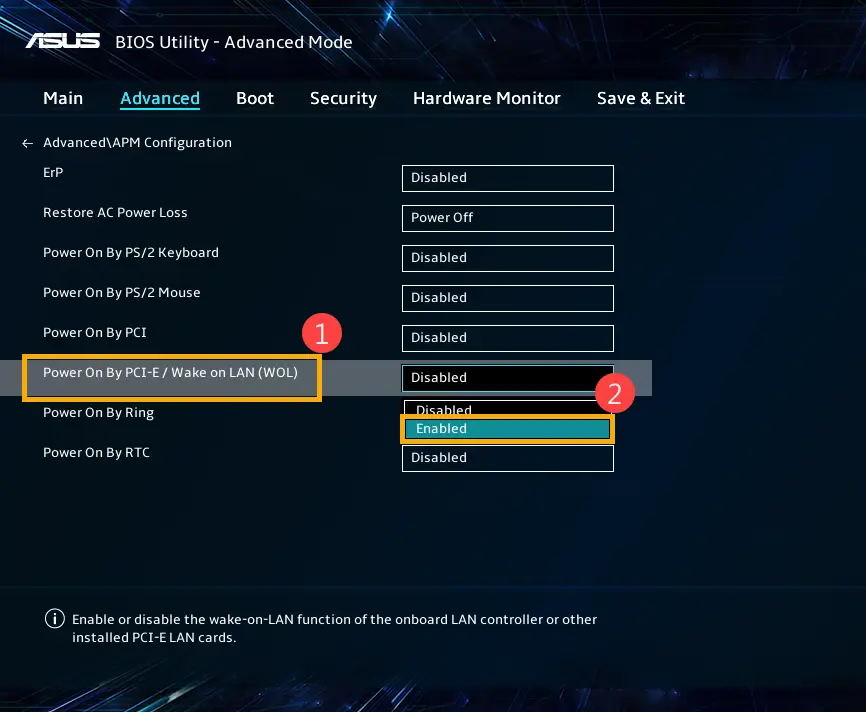
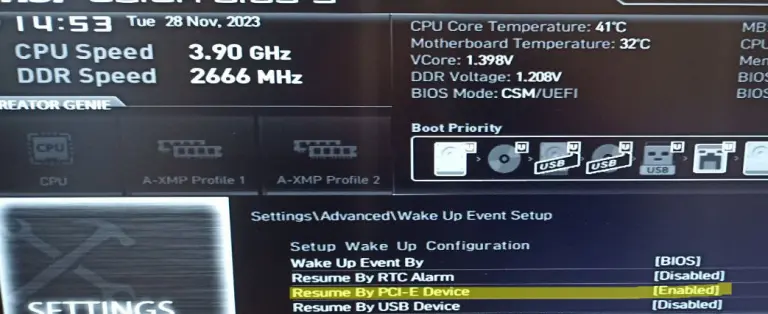
В первую очередь нужно включить функцию Wake-on-LAN в настройках BIOS/UEFI компьютера. В зависимости от модели компьютера и версии прошивки название этой опции может отличаться. Она может называться:
- WOL (Wake-on-LAN)
- Power On By PCI-E
- Resume by PCI-E Device
- Resume by PME
- S4/S5 Wake on LAN
- ErP

На брендовых моделях компьютеров вы можете вывести и изменить настройки BIOS/UEFI с помощью PowerShell. Например, на ноутбуке Lenovo можно включить опцию WOL в BIOS командами:
$getLenovoBIOS = gwmi -class Lenovo_SetBiosSetting -namespace root\wmi
$getLenovoBIOS.SetBiosSetting("WakeOnLAN,Enable")
$SaveLenovoBIOS = (gwmi -class Lenovo_SaveBiosSettings -namespace root\wmi)
$SaveLenovoBIOS.SaveBiosSettings()
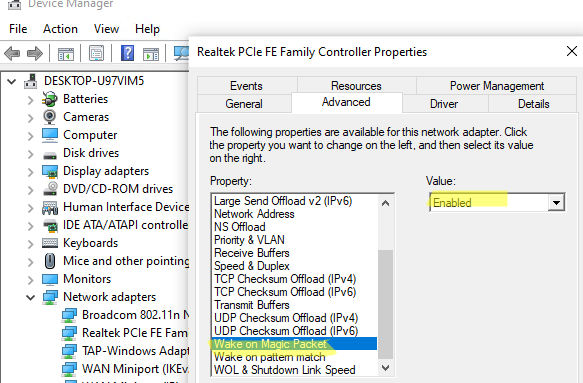
Затем нужно разрешить Wake on LAN (WOL) в настройках сетевого адаптера в Windows.
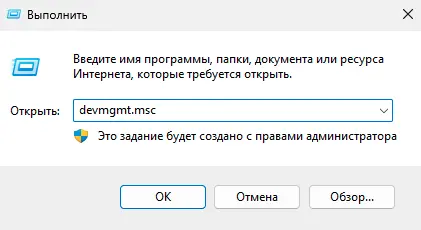
- Откройте диспетчер устройств (
devmgmt.msc
); - Разверните секцию Network Adapters и откройте свойства вашего физического сетевого адаптера;
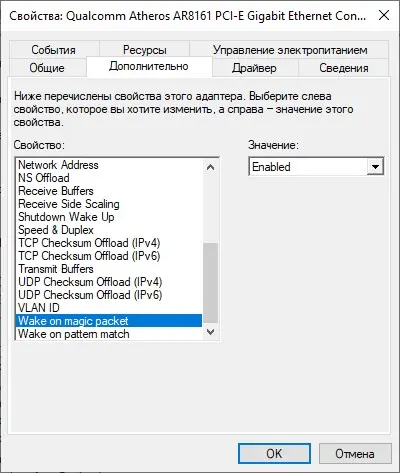
- Перейдите на вкладку Advanced и проверьте, что опция Wake on magic packet включена (название может отличаться в зависимости от сетевой карты). В сетевых картах Intel эта опция может называться PME (Power Management Event);

. Можно с помощью PowerShell проверить, включены ли опции WakeOnLan в настройках сетевого адаптера:
Get-NetAdapter -Physical | Get-NetAdapterAdvancedProperty | where {($_.DisplayName -like '*WOL*') -or ($_.DisplayName -like '*Wake*')}
Чтобы включить WOL с помощью PowerShell в настройках сетевого адаптера, можно использовать такую команду (зависит от драйвера и венднодоа NIC):
Get-NetAdapter -Physical | Set-NetAdapterPowerManagement -WakeOnMagicPacket Enabled -WakeOnPattern Enabled - Затем перейдите на вкладку Advanced и разрешите сетевой карте выводить компьютер из спящего режима. Включите опции Allow this device to wake the computer и Only allow a magic packet to wake the computer.
Можно включить эту опцию с помощью команды:
powercfg /deviceenablewake "Realtek PCIe GbE Family Controller"

Беспроводные Wi-Fi адаптеры также поддерживают удаленное включение. Этот стандарт называется Wake on Wireless LAN (WoWLAN).
С помощью следующей команды можно проверить, каким устройствам разрешено будить компьютер:
powercfg /devicequery wake_armed

В данном случае видно, что сетевой карте Realtek PCIe разрешено выводить компьютер из спящего режима.
Для работы Wake-on-LAN не нужно открывать дополнительный порты в Windows Defender Firewall. Широковещательный UDP пакет WOL (Magic Packet) принимается и обрабатывается непосредственно сетевой картой и не доходит до сетевого стека Windows.
Теперь, вы можете отправить WoL пакет для удаленного включения компьютера с другого устройства в той же локальной сети. Magic Packet содержит аппаратный адрес сетевой карты (MAC адрес), компьютера который нужно включить. Вы можете узнать MAC адрес сетевой карты компьютера из команды
ipconfig /all
или получить его с помощью PowerShell:
Get-NetAdapter -Physical

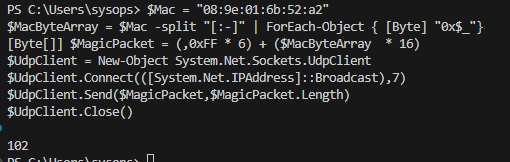
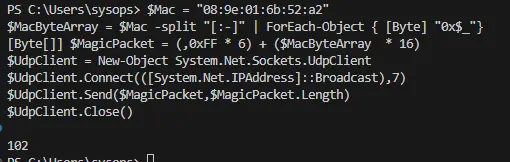
Вы можете сформировать и отправить широковещательный magic пакет WOL с помощью PowerShell. Укажите MAC адрес устройства, которое нужно включить в следующем скрипте и выполните его:
$Mac = "08:9e:01:6b:52:a2"
$MacByteArray = $Mac -split "[:-]" | ForEach-Object { [Byte] "0x$_"}
[Byte[]] $MagicPacket = (,0xFF * 6) + ($MacByteArray  * 16)
$UdpClient = New-Object System.Net.Sockets.UdpClient
$UdpClient.Connect(([System.Net.IPAddress]::Broadcast),7)
$UdpClient.Send($MagicPacket,$MagicPacket.Length)
$UdpClient.Close()
Если вы все настроили правильно, удаленный компьютер должен проснуться.
Для работы WOL в сегментированных сетях или разделенных на VLAN, нужно включать пересылку широковещательных WoL пакетов (
UDP порт 9
) на уровне коммутаторов/маршрутизаторов.
Для удаленного пробуждения компьютеров можно использовать бесплатную Windows утилиту от NirSoft WakeMeOnLan. Утилита позволяет автоматически просканировать LAN и найти все доступные устройства, или вы можете вручную добавить устройства, которые вы хотите включать удаленно через WakeOnLan.
Утилита поддерживает режим работы из командной строки. Чтобы включить компьютер, нужно выполнить команду (утилита отрезолвит IP адрес в MAC по arp таблице):
WakeMeOnLan.exe /wakeup 192.168.31.15
Или по MAC адресу:
WakeMeOnLan.exe /wakeup 08-9E-01-6B-52-A2
Также можно использовать утилиты для смартфонов. Например, Wake On LAN для Android (для удаленного включения компьютера вы должны быть подключены к той же LAN через Wi-Fi точку доступа).
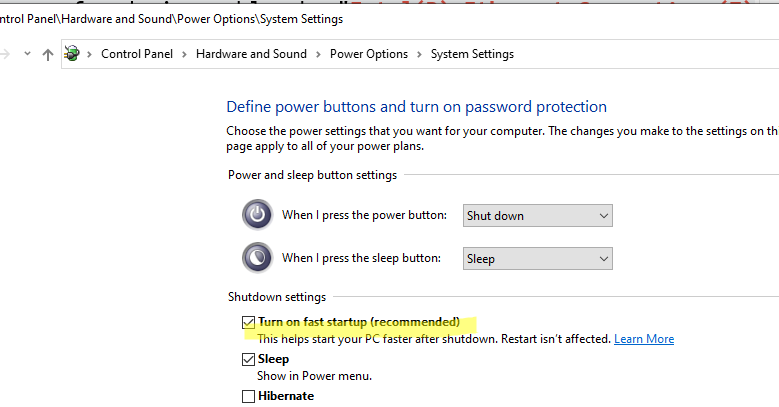
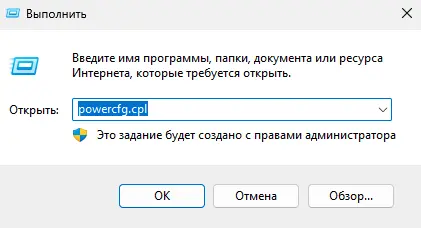
Если компьютер не включается после отправки пакета Wake-on-LAN, возможно нужно LAN нужно отключить быстрый запуск Windows в настройках электропитания (на моих двух тестируемых устройствах с Windows 10 и 11 это не понадобилось). Fast Startup включен по-умолчанию в Windows 10 и 11 и может препятствовать пробуждению компьютера через WOL (или вызывать ситуацию, когда компьютер не выключается после завершения работы Windows).
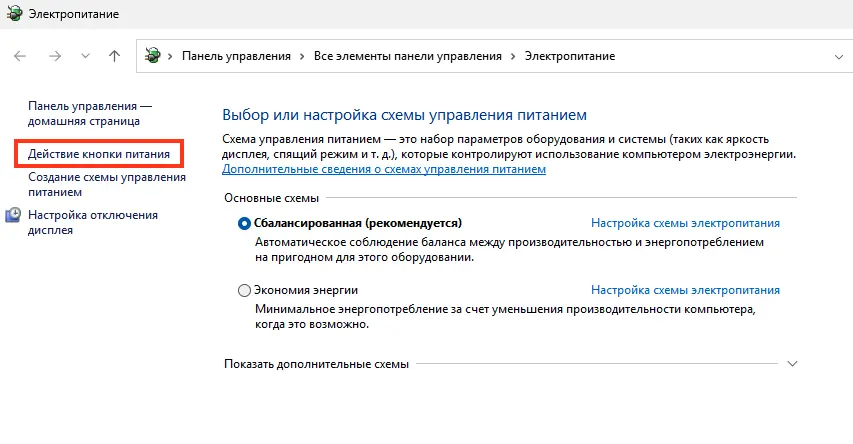
Откройте панель
powercfg.cpl
-> Choose what the power buttons do -> Change settings that are currently unavailable -> отключите опцию Turn on fast startup (recommended).
Технология Wake-on-LAN (WoL) позволяет удаленно включать компьютер из спящего режима или состояния выключения (S4/S5) с помощью специального широковещательного пакета (Magic Packet), содержащего MAC-адрес сетевой карты. В этой статье мы разберем, как настроить WoL в Windows 10 и Windows 11, включая активацию в BIOS/UEFI, настройку сетевого адаптера, отправку пакетов через PowerShell и использование утилит, таких как WakeMeOnLan.
Приобрести оригинальные ключи активации Windows 11 можно у нас в каталоге от 1690 ₽
Требования для Wake-on-LAN
– Сетевая карта с поддержкой WoL.
– BIOS/UEFI с опцией WoL или аналогичной.
– Компьютер в спящем режиме (S3), режиме гибернации (S4) или выключен (S5, если поддерживается).
– Отправляющее устройство в той же локальной сети (LAN) или с настроенной маршрутизацией Magic Packet.
Шаг 1: Включение WoL в BIOS/UEFI
1. Перезагрузите компьютер и войдите в BIOS/UEFI (обычно клавиши Del, F2 или F10).
2. Найдите опцию, связанную с WoL. Возможные названия:
– Wake-on-LAN (WOL)
– Power On By PCI-E
– Resume by PCI-E Device
– Resume by PME
– S4/S5 Wake on LAN
– ErP (установите в Disabled для поддержки S5).
3. Включите опцию (установите Enable) и сохраните настройки (F10).
Управление BIOS через PowerShell (Lenovo)
На некоторых устройствах Lenovo можно включить WoL через PowerShell:
$getLenovoBIOS = Get-WmiObject -Class Lenovo_SetBiosSetting -Namespace root\wmi

$getLenovoBIOS.SetBiosSetting("WakeOnLAN,Enable")

$SaveLenovoBIOS = Get-WmiObject -Class Lenovo_SaveBiosSettings -Namespace root\wmi

$SaveLenovoBIOS.SaveBiosSettings()
Шаг 2: Настройка сетевого адаптера в Windows
1. Откройте Диспетчер устройств (Win+R, devmgmt.msc).
2. Разверните раздел Сетевые адаптеры (Network adapters).
3. Щелкните правой кнопкой мыши по физическому адаптеру и выберите Свойства.

Вкладка Advanced
1. Перейдите на вкладку Дополнительно (Advanced).
2. Найдите опцию, связанную с WoL:
– Wake on Magic Packet
– PME (Power Management Event) (для карт Intel)
– Wake on LAN
3. Установите значение Enabled.
Вкладка Power Management
1. Перейдите на вкладку Управление электропитанием (Power Management).
2. Включите опции:
– Разрешить этому устройству выводить компьютер из ждущего режима (Allow this device to wake the computer).
– Разрешить только «магический пакет» для вывода компьютера из ждущего режима (Only allow a magic packet to wake the computer).

Настройка через PowerShell
Проверьте настройки WoL:
Get-NetAdapter -Physical | Get-NetAdapterAdvancedProperty | Where-Object {($_.DisplayName -like '*WOL*') -or ($_.DisplayName -like '*Wake*')}

Включите WoL:
Get-NetAdapter -Physical | Set-NetAdapterPowerManagement -WakeOnMagicPacket Enabled -WakeOnPattern Enabled
Разрешите адаптеру будить компьютер:
powercfg /deviceenablewake "Realtek PCIe GbE Family Controller"
Проверка устройств с правом пробуждения
Узнайте, какие устройства могут будить компьютер:
powercfg /devicequery wake_armed

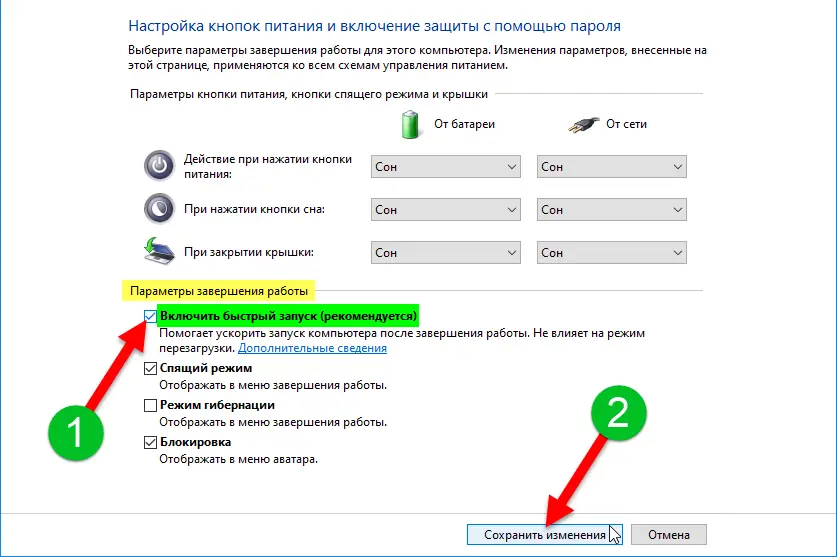
Шаг 3: Отключение быстрого запуска (при необходимости)
Быстрый запуск (Fast Startup) в Windows 10 и Windows 11 может мешать WoL, особенно в режиме S5 (выключение). Для отключения:
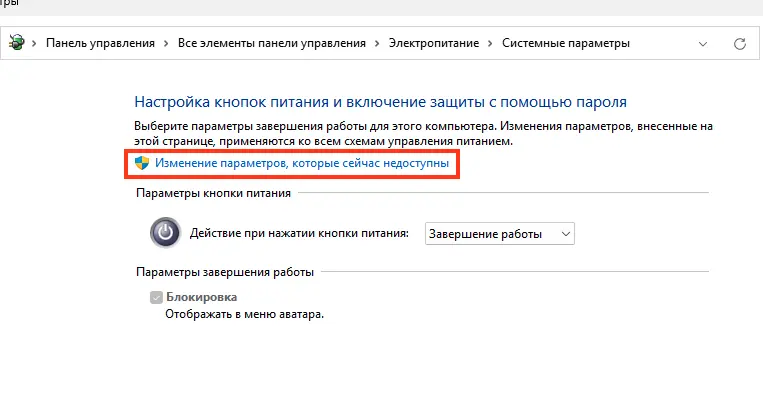
1. Откройте Панель управления → Электропитание (Win+R, powercfg.cpl).
2. Выберите Действия кнопок питания (Choose what the power buttons do).
3. Нажмите Изменить параметры, которые сейчас недоступны.
4. Снимите флажок Включить быстрый запуск (рекомендуется) (Turn on fast startup (recommended)).
5. Нажмите Сохранить изменения.
Шаг 4: Отправка Magic Packet
Magic Packet — это широковещательный UDP-пакет, содержащий MAC-адрес целевого устройства. Пакет отправляется на порт 7 или 9 (обычно UDP 9).
Узнайте MAC-адрес
Получите MAC-адрес сетевой карты:
Get-NetAdapter -Physical

Или:
ipconfig /all
Отправка Magic Packet через PowerShell
Используйте скрипт для отправки Magic Packet:
$Mac = "08:9e:01:6b:52:a2"

$MacByteArray = $Mac -split "[:-]" | ForEach-Object { [Byte] "0x$_"}

[Byte[]] $MagicPacket = (,0xFF * 6) + ($MacByteArray * 16)

$UdpClient = New-Object System.Net.Sockets.UdpClient

$UdpClient.Connect(([System.Net.IPAddress]::Broadcast), 7)

$UdpClient.Send($MagicPacket, $MagicPacket.Length)

$UdpClient.Close()
Замените $Mac на MAC-адрес целевого устройства.
Использование утилиты WakeMeOnLan
1. Скачайте WakeMeOnLan от NirSoft.
2. Запустите утилиту:
– Она автоматически сканирует сеть и отображает устройства.
– Или добавьте устройство вручную, указав IP или MAC-адрес.
3. Отправьте Magic Packet:
– По IP:
WakeMeOnLan.exe /wakeup 192.168.31.15
– По MAC:
WakeMeOnLan.exe /wakeup 08-9E-01-6B-52-A2
WoL с мобильных устройств
Используйте приложение, например, Wake On LAN для Android или iOS. Укажите MAC-адрес и IP устройства, подключившись к той же Wi-Fi-сети.
Настройка сети для WoL
– Локальная сеть: Убедитесь, что отправляющее устройство и целевой компьютер находятся в одной подсети.
– VLAN/разные подсети: Настройте маршрутизатор или коммутатор для пересылки широковещательных пакетов UDP 9 (например, через Directed Broadcast или WoL Relay).
– Брандмауэр: Windows Defender Firewall не требует открытия портов, так как Magic Packet обрабатывается сетевой картой напрямую.
Устранение неполадок
Компьютер не включается:
– Проверьте, включена ли WoL в BIOS/UEFI и сетевом адаптере.
– Убедитесь, что Быстрый запуск отключен.
– Проверьте состояние компьютера (должен быть в S3, S4 или S5).
Пакет не доходит:
– Убедитесь, что устройства в одной подсети.
– Проверьте настройки маршрутизатора для широковещательных пакетов.
– Wi-Fi адаптер: Для WoWLAN (Wake on Wireless LAN) убедитесь, что адаптер поддерживает эту функцию.
Настройка Wake-on-LAN в Windows 10 и Windows 11 включает активацию функции в BIOS/UEFI, настройку сетевого адаптера и отправку Magic Packet через PowerShell или утилиты, такие как WakeMeOnLan. Поддержка WoWLAN расширяет возможности для Wi-Fi. Правильная конфигурация сети и отключение Быстрого запуска обеспечивают надежную работу WoL, позволяя удаленно включать компьютер для удобного администрирования или доступа.
To wake up a computer over the Internet, you can use Wake On Lan Magic Packets. These packets use a special connection between the computer and the Internet. You need Microsoft Windows and the.Net Framework version 2.0 or higher. If you do not have these requirements, you can download these tools and install them on your computer. Once you’ve installed these tools, you can send WoL packets to your computer.
Firstly, you’ll need to enable the Wake on LAN feature in your PC. You can do this by right-clicking your Ethernet controller and selecting Properties. Then, you need to check the Wake on Magic Packet check box. In the Advanced tab, you can enable or disable other options related to WOL. Once these settings are correct, you should see your device’s network status and Wake on LAN.
Wake-on-LAN is a networking standard that allows network computers to be remotely woken up. Wake-on-LAN packets are sent over UDP ports 7 and 9 and enable the computer to enter a Low-Power mode. If you are using Wake-on-LAN to manage remote devices, you can use a program like Syxsense Manage. This tool is free.
How Do I Ship a WOL Package?
When you’re shipping a Windows machine, you’ll likely want to know how to ship a WOL package. This feature is available in Windows 10 and allows you to remotely wake up your PC from another PC on the network. You can configure the settings for this feature on your machine to ensure that it will send a WOL magic packet when it boots up. Then, once you’ve finished the configuration, you can simply hit the Start button to see if it has been configured correctly.
The first step is to enable the “wake on LAN” feature in your computer. Activating this feature requires setting up your PC to receive network packets from other computers. Make sure to enable WOL in your BIOS so that it can see the WOL packets. If you’ve never done this before, you’ll need to download the program that lets you enable this feature. After that, restart your computer and enjoy your new WOL feature!
How Do You Send Magic Packets WOL?
If you are wondering how to send Magic Packets WOL to a remote device, then you’ve come to the right place. This article will show you how to configure your Windows 10 PC to send magic packets to remote devices. WOL uses Directed Broadcasts to wake up low-power devices on your network. Most routers disable this feature by default, but it’s possible to add an access list to allow certain IP addresses or subnets to send this type of packet.
Once you’ve enabled this feature, you need to locate the Ethernet controller. Then, double-click the Ethernet controller. Under the Advanced tab, click the Wake on LAN option and enable it. Once you’ve completed this process, you can enable Wake on LAN. Then, run ethtool to test whether your PC supports Wake on LAN. Afterward, restart your computer.
How Do I Send a WOL Packet Over the Internet?
You may be wondering how to send a WOL packet from your computer to another computer. The good news is that it is relatively simple. There are a few steps you should follow to ensure the packet is received. Firstly, make sure you have a working internet connection. You should be able to use port 7 to do this. Secondly, make sure your computer is set up for WOL mode.
In order to send a WOL packet from another computer, you need to enable the Wake On LAN feature in your computer. This feature is usually found under power management and networking. Once you’ve found it, right-click the NIC to set up its power management options. In the Wake On LAN settings, check the option “Send a WOL packet to another computer” and then click on it.
Once you have enabled this feature on your computer, you must make sure you configure your network adapter so it can receive the WOL packet. You can do this through Windows settings. In the Network and Internet menu, select Change Adapter Settings. Click the Ethernet Connection icon. Click on its properties and then click the Configure button. You’ll see a window with your computer’s network settings and Wake On LAN settings.
How Do I Wake up PC with Magic Packet?
To enable Wake on LAN (WOL) on your computer, you need to enable the option on your device. Right-click on the network adapter and select “properties” to open the device’s properties. Under the Advanced tab, you need to check the Wake on Magic Packet property. If you’ve got it enabled, the PC will respond to these packets and will wake up when they come over the local area network.
If you’re not sure how to do this, you need to know your MAC address. To find your MAC address, connect your PC to the router using a wired Ethernet connection. Disconnect wireless connections from your PC and open Network and Sharing Center from the settings menu. Next, download and install Wake-on-LAN from Microsoft’s website. After that, launch it by selecting File > New Host. You’ll need to enter the name of the machine and the group it belongs to.
You’ll want to make sure your network card supports Wake On LAN. Not all network cards are Wake On LAN-compatible, so check it in the BIOS and make sure your network adapter supports it. Make sure that your network card supports Wake On LAN and has the appropriate drivers and hardware to support it. If you’re not sure whether your network card can support Wake On LAN, you can download a free Wake On LAN driver and follow the directions to enable it.
What Port Does WOL Use?
If you have a Windows 10 computer and are wondering about the wake-on-LAN (WOL) feature, you need to know what port it uses. Generally, Windows computers use UDP port 9 to send and receive WOL messages. Occasionally, other services on your computer may interfere with WOL, including Simple TCPIP services. If you have a device running on UDP port 9, you should disable it. Otherwise, you should enable it to work properly.
If the problem persists, try editing your BIOS. You can find the WakeOnLAN setting under Power Management settings. Make sure that the value data for the Value data field is 0. You can also try changing the settings in the BIOS. If the problem persists, try removing WOL from the BIOS and enabling it again. If all these steps do not help, you can try rebooting your computer.
You can also download the free version of OpUtils by ManageEngines. It has 16 tools. Another tool that matches Windows 10’s GUI is the Depicus WOL Tool. It also has an updated GUI that matches the Windows 7 and 8 GUI. Besides that, Nirsoft and Aquilatech have long lists of tools. The free version only supports Wake On LAN on a single computer, but the Professional version adds more functionality. You can customize the settings and view notification reports. The Professional version stores all data in a local or remote MS SQL database.
How Do I Use WakeMeOnLan?
The command-line tool WakeMeOnLan supports sending and receiving a Wol packet. It can also perform shutdowns. The shutdown tool requires scripting, but does offer functionality for troubleshooting WOL. It can monitor wake packets and scan host machines to detect if they support WOL. The shutdown tool is included in ManageEngine’s free management tool suite, which includes remote command prompt, software inventory, and a task manager.
To send a Wol packet to a remote PC, you must have a MAC address. To obtain the MAC address of your PC, connect it to a wired Ethernet network and disconnect any wireless connections. From the Settings menu, open the Network and Sharing Center. Click on “Network” and locate “Network” under “Network and Sharing Center.” Note the MAC address of the PC. Next, download WakeMeOnLan software from Microsoft’s website and install it. You can launch the program by selecting “File” > “New Host”. Select the MAC address of your device and group.
To disable WakeMeOnLan in Windows 10, you should uncheck the option “Allow fast startup” and run a command-line tool. Alternatively, you can try turning off WakeMeOnLan using a MAC address from the Network Settings tab. In addition, you can also try hibernating your PC while enabling this feature.
What is Wake on Magic Packet Windows 10?
What is Wake on Magic Packet Windows 10, and how does it work? First, you must enable Wake on LAN in your computer’s Basic Input Output System (BIOS), UEFI, or USB to Ethernet adapter. To enable Wake on LAN, you need to go into the Advanced tab and look for the Value list box that says Wake on Magic Packet. Check the box and then click OK. Wake on LAN is now enabled on your computer.
To use Wake on LAN, you need to be connected to an Ethernet network. When you use an Ethernet connection, the NIC will receive the magic packet. Once it receives the packet, it will send a signal to the motherboard and power supply, triggering the system’s wake-on-LAN function. Once this happens, the computer will boot automatically. If you don’t have an Ethernet connection, you can use Wi-Fi instead.
Learn More Here:
1.) Android Help Center
2.) Android – Wikipedia
3.) Android Versions
4.) Android Guides
Setting up Wake-on-LAN (WoL) on Windows 10 allows you to remotely power on your computer using a magic packet. This is handy for remote access when you’re away from your machine but need to access its resources. Follow these steps to configure WoL on Windows 10 and you’ll be up and running in no time.
Step-by-Step Tutorial for Sending Wake on LAN Packet in Windows 10
This tutorial will guide you through enabling Wake-on-LAN (WoL) on a Windows 10 machine and how to send a WoL packet to wake the computer remotely.
Step 1: Enable Wake-on-LAN in BIOS/UEFI
Ensure that Wake-on-LAN is enabled in the BIOS or UEFI settings of your computer.
To get into BIOS/UEFI, restart your computer and press the designated key (usually F2, F10, or Delete) to enter the BIOS/UEFI menu. Navigate to the Power Management settings and find the option to enable Wake-on-LAN. Save your changes and exit.
Step 2: Enable Wake-on-LAN in Device Manager
Open Device Manager and enable the Wake-on-LAN feature for the network adapter.
Press the Windows key + X and select Device Manager. Find your network adapter under «Network adapters,» right-click it, and choose «Properties.» Go to the «Power Management» tab and check the boxes for «Allow this device to wake the computer» and «Only allow a magic packet to wake the computer.»
Step 3: Configure Network Adapter Settings
Adjust the network adapter settings to support Wake-on-LAN.
In the Device Manager, go back to the «Advanced» tab under the network adapter properties. Scroll down to find settings such as «Wake on Magic Packet» and ensure they are enabled. This is essential for receiving the magic packet that wakes the computer.
Step 4: Obtain the MAC Address
Retrieve the MAC address of the network adapter you want to wake.
Open Command Prompt by pressing Windows key + R, typing «cmd,» and hitting Enter. Type ipconfig /all and press Enter. Look for the «Physical Address» under your network adapter—this is your MAC address. Note it down, as you’ll need it to send the magic packet.
Step 5: Send the Wake-on-LAN Packet
Use a third-party tool to send the WoL magic packet to your computer.
There are several tools available online to send WoL packets. One popular option is the «Wake On Lan» tool by Depicus. Enter the MAC address you noted earlier, your network’s broadcast IP address, and send the packet. Your computer should wake up if everything is set up correctly.
After completing these steps, your computer should wake when it receives a magic packet. This setup is beneficial for accessing your system remotely without needing it to be powered on all the time.
Tips for Sending Wake on LAN Packet in Windows 10
- Make sure your computer is connected via Ethernet, as WoL often doesn’t work over Wi-Fi.
- Ensure your router supports forwarding WoL packets.
- Test the setup while you’re on the same network before trying remote wake-ups.
- Keep your BIOS/UEFI and network adapter drivers up-to-date for reliability.
- Check your firewall settings and ensure WoL packets are allowed through.
Frequently Asked Questions
Can I use Wake-on-LAN over Wi-Fi?
WoL typically works over Ethernet. Some modern Wi-Fi adapters may support it, but it’s less reliable.
Do I need to leave my computer plugged in?
Yes, the computer needs to be plugged in and on a network, even if it’s powered off.
Will my computer wake up from hibernation?
WoL usually works from sleep, not hibernation. Ensure your computer is in the correct state.
Why isn’t my computer waking up?
Double-check your BIOS/UEFI settings, network adapter settings in Windows, and ensure the correct MAC address is used.
Is Wake-on-LAN secure?
WoL is not inherently secure, as it’s designed for convenience. Consider additional security measures like VPNs.
Summary
- Enable Wake-on-LAN in BIOS/UEFI.
- Enable Wake-on-LAN in Device Manager.
- Configure network adapter settings.
- Obtain the MAC address.
- Send the Wake-on-LAN packet.
Conclusion
Setting up Wake-on-LAN on your Windows 10 machine can be a game-changer for managing your computer remotely. Whether you need to access files, run programs, or perform updates while you’re away from home, WoL makes it possible. Following the steps outlined, you should now be able to reliably send a magic packet and wake your computer remotely.
Remember, this setup can be finicky. Always double-check your settings if something isn’t working. And, if you’re planning to use WoL over the internet, make sure your network is configured correctly to forward WoL packets. With a bit of tweaking, you’ll have a seamless remote access solution that’s both convenient and practical.
Kermit Matthews is a freelance writer based in Philadelphia, Pennsylvania with more than a decade of experience writing technology guides. He has a Bachelor’s and Master’s degree in Computer Science and has spent much of his professional career in IT management.
He specializes in writing content about iPhones, Android devices, Microsoft Office, and many other popular applications and devices.
Read his full bio here.
If you want to set up a server at home, you may want to be able to access it remotely. Of course, you can only connect remotely if you leave your PC or server left turned on. You may not want to do this, however, especially if you’re looking to lower your energy bill.
A good way to get around this problem is to switch your PC or server off, and then wake it up remotely only when you’re ready to use it. If you want to remotely wake up your Windows 10 PC, you can do so using existing methods, such as Wake-on-LAN (WOL), or using remote access software like Teamviewer.

Preparing Your Network Router Or Firewall
Before you start using a remote wakeup tool to remotely wake up your Windows 10 PC, you’ll need to make sure that your network router is properly configured to allow you to access your PC, including setting up appropriate firewall rules.
For instance, most residential network routers have built-in support for Wake-on-LAN. You may need to consult your user manual for additional information on how to set this up, including how to forward the magic packet (the special data packet sent to switch your PC on) to your PC’s MAC address.
You can access the residential settings menu for most home routers by typing http://192.168.0.1 or http://192.168.1.1 in your web browser. You’ll need the administration username and password to sign in, which (if you haven’t changed it) should be printed on your router itself, or within the supplied user manual.

Enabling Wake-on-LAN On A Windows 10 PC
If your router is correctly configured, the next step in enabling Wake-on-LAN on a PC running Windows 10 is to enable the feature in your BIOS/UEFI settings.
This setting may be placed in different sections, depending on your motherboard firmware, but you should be able to find it in the Advanced or Power Management menus. Make sure the setting for Wake-on-LAN is set to On or Enabled. If it isn’t, the WOL magic packet (used to switch your PC back on) won’t turn on your PC.
If Wake-on-LAN is enabled in your BIOS, your next step is to enable it as a feature in Windows 10. You’ll have to set your network adapter to respond to the magic packet.
Note: This can only work with ethernet-connected PCs, meaning you can’t typically use Wake-on-LAN over WiFi.
- To enable WOL in Window 10, you’ll need to enable it in the Device Manager settings menu. Right-click the Start menu and click Device Manager to begin.

- In the Device Manager window, open the Network Adapters category. Right-click the network adapter you use to connect to your network, then click the Properties option.

- In the Advanced tab of the Properties window, you can access various specialist settings for your network adapter. Click the Wake on Magic Packet option, then select Enabled from the Value drop-down menu.
- Once the magic packet setting is enabled, switch to the Power Management tab. Windows will need to allow your PC to respond to a WOL magic packet, so make sure the Allow this device to wake up the computer and Only allow a magic packet to wake the computer checkboxes are enabled. Click OK to save your new settings.

Once the settings are saved, your PC should be ready to be woken up with a Wake-on-LAN magic packet from another computer.
Sending a Wake-On-LAN Magic Packet
To remotely wake up your Windows 10 PC, you’ll need software on another PC capable of issuing a WOL magic packet, such as NirSoft WakeMeOnLAN. Despite a somewhat outdated interface, WakeMeOnLan still works as a free and easy solution for using WOL on Windows PCs.
- To use WakeMeOnLan, you’ll need to download the software from the NirSoft website. Once you’ve extracted the ZIP file, launch the WakeMeOnLan.exe file to launch the software. You can begin scanning for WOL-capable PCs on your local network by clicking File > Start Scanning, or add a PC manually by clicking Add New Computer instead.

- Once you have a PC (or PCs) in your saved list, you can power them up using a WOL magic packet by selecting it and pressing the Wake Up Selected Computers icon. Alternatively, right-click and press the Wake Up Selected Computers option, or press F8 on your keyboard instead.

- You’ll need to confirm that you actually wish to remotely wake these PCs. Press OK to confirm.
The WOL magic packet will be sent automatically once you confirm this. If everything is set up correctly, your PC should begin to wake up, allowing you to access it remotely.
Using Remote Access Software
You can also use remote access software like TeamViewer to remotely wake up a Windows 10 PC. TeamViewer uses the same WOL technology to remotely wake up a PC, which would allow you to wake up a PC that isn’t connected to your local network.
You might want to do this if you want to access your work PC from home or if you’re away from home and want to connect to your home PC, for instance.
- You’ll need to enable Wake-on-LAN in your Teamviewer settings first. To do this, open the Teamviewer client and press Extra > Options.
- In the General tab of the TeamViewer Options window, you should see a Network settings section. You can configure your Wake-on-LAN settings by clicking the Configure button next to the Wake-on-LAN setting, where you can set up the TeamViewer IDs that are allowed to connect to your PC. If you don’t see this setting, your network device probably isn’t capable of supporting Wake-on-LAN.

Once WOL is enabled in Teamviewer, you can launch it by clicking the Wake Up button for your PC, listed under the Computers & Contacts menu. Your remote PC will need to have TeamViewer installed and signed in with the same TeamViewer account for this to work.
Managing Your PC Remotely
You may have a remote PC or server you want to access, but you’ll also need a safe way to manage it. Turning your PC on from afar is one way to do this, but you may need to make more significant changes to your PC configuration. You might need to change the registry remotely to help troubleshoot an issue, for instance.
If you’re having trouble with your IP address changing regularly, you may want to set up a free dynamic DNS address to make sure you can always connect. If you’re worried about your data, you could even think about setting up your own personal cloud storage for easy access to your important files from home.
Related Posts
- How to Fix a “This file does not have an app associated with it” Error on Windows
- How to Fix an Update Error 0x800705b4 on Windows
- How to Resolve “A JavaScript error occured in the main process” Error on Windows
- How to Fix the Network Discovery Is Turned Off Error on Windows
- How to Change Folder Icons in Windows