
С помощью функции Wake-on-LAN (WoL) вы можете удаленно разбудить Linux компьютер, отправив по сети Ethernet специальный широковещательный пакет (magic packet) с MAC адресом компьютера, который нужно включить.
Перед включением WoL в Linux, нужно убедиться, что ваша материнская плата поддерживает эту функцию и включить ее в настройка BIOS. Перезагрузите компьютер и откройте настройки BIOS (UEFI). Название параметра WoL может отличаться в зависимости от модели материнской платы и версии прошивки. Эта опция может называться Wake on PCI/PCI-E, Power или Resume on PCI/PCI-E, S5 Wake on LAN. Найдите и включите эту опцию, сохраните настройки BIOS.
Для управления Wake On LAN в Linux обычно используется утилита ethtool. Установите ее:
$ sudo apt install ethtool
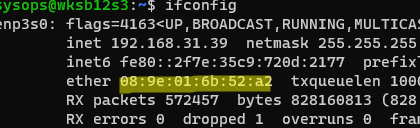
Выведите список сетевых интерфесов:
$ ifconfig
Скопируйте имя вашего LAN интерфейса Ethernet и выполните команду:
$ sudo ethtool enp3s0 | grep "Wake-on"

В данном случае WoL отключена (d — disabled).
Включите Wake on LAN для адаптера:
$ sudo ethtool --change enp3s0 wol g
Статус параметра Wake On Lan должен измениться на g (Wake on MagicPacket).
Ошибка
netlink error: cannot enable unsupported WoL mode (offset 36)
указывает на то, что WoL не поддерживается сетевым адаптером или отключен в BIOS

Теперь вы можете удаленно разбудить ваш хост Linux. Однако параметр WoL сетевого интерфейса сбросится при перезагрузке. Есть несколько способ автоматического включения Wake on LAN для адаптера при загрузке.
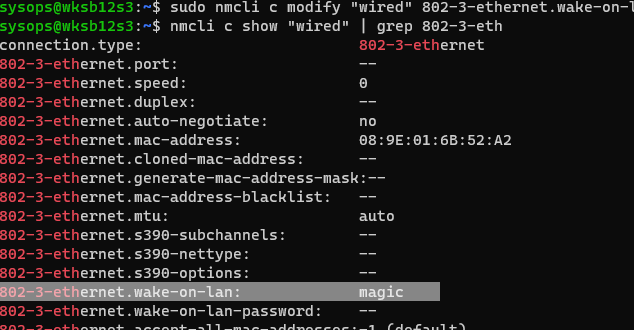
Во многих дистрибутивах Linux (Ubuntu, Rocky, Debian) для управления сетевыми настройками используется NetworkManager. В NetworkManager включить WoL для адаптера можно командами nmcli:
$ nmcli con show
Скопируйте имя Ethernet подключения (wired в этом примере) и включите WoL:
$ sudo nmcli c modify "wired" 802-3-ethernet.wake-on-lan magic
Проверьте, что Wake on LAN включен:
$ nmcli c show "wired" | grep 802-3-eth
В других дистрибутивах Linux можно включить WakeOnLan при загрузке через systemd. Создайте новый юнит systemd:
$ sudo systemctl edit wol.service --full --force
Добавьте следующие строки:
[Unit]
Description=Enable Wake-on-LAN
After=network-online.target
[Service]
Type=oneshot
ExecStart=/sbin/ethtool --change enp3s0 wol g
[Install]
 WantedBy=network-online.target
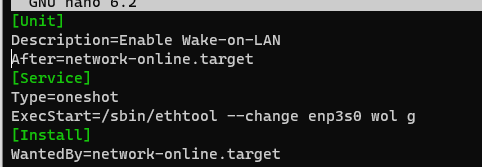
Включите сервис:
$ sudo systemctl daemon-reload
$ sudo systemctl enable wol.service
$ sudo systemctl start wol.service
Проверьте, то сервис запущен:
$ systemctl status wol
Теперь можно протестировать, как будет работать Wake on Lan на этом хосте. Скопируйте MAC адреса сетевого адаптера, для которого вы включили WoL.
Проверьте, включен ли в Linux спящий режим:
$ sudo systemctl status sleep.target suspend.target hibernate.target hybrid-sleep.target
Отправьте компьютер с Linux в спящий режим:
$ sudo systemctl suspend
В Linux для отправки magic packet можно использовать утилиту
wakeonlan
или
etherwake
:
$ sudo apt-get install wakeonlan etherwake
Чтобы удаленно разбудить компьютер, укажите его MAC адрес (компьютеры находится в одной LAN, т.к. WoL пакет не маршрутизируется):
$ wakeonlan <MAC-address>
Или
$ etherwake <MAC-address>
Компьютер должен включиться после получения магического пакета. Обратите внимание, что для работы WoL не нужно открывать порт в файерволе Linux. Широковещательный UDP пакет WoL принимается и обрабатывается непосредсвенно сетевой картой без использования сетевого стека Linux.
Wake-on-LAN (WoL) is a feature that lets you turn on computers remotely. This can be done by sending a special network message called a «magic packet.» This packet contains the MAC address of the target computer’s network card.
When the network card receives this packet, it triggers the computer to power on. WoL is perfect for scenarios where you need to access files, run updates, or manage your network without being physically present. This guide will show you how to set up and use WoL on Linux, Windows, and various network devices.
Configuring your computer for WoL is essential for several reasons. Firstly, it allows you to turn on your computer remotely, enabling access to files and applications without physical presence. Secondly, keeping your computer off and turning it on only when needed reduces energy consumption.
1. Network Topology
Figure 1 depicts a network environment with two computers, central server and a router. A «magic packet», is emitted from the server or the gateway towards specific computers. These computers receive the magic packet through their network interfaces, causing them to power on remotely.»

Figure 1 — Sending Wake-on-LAN packets from Server and Router to PC1 and PC2
2. Configuring Host for Wake-on-LAN Support
To enable WoL, you need to configure computer’s BIOS/UEFI settings. Proper configuration ensures your PC can receive and respond to the magic packet.
- Enter BIOS/UEFI Setup: Restart your computer and press the key (usually F2, F10, F12, or Delete) to enter the BIOS/UEFI setup.
- Navigate to Power Management Settings: Look for settings related to power management or advanced power management.
- Enable Wake-on-LAN: Find the Wake-on-LAN setting and enable it. This might be listed under different names such as «Wake on LAN,» «WOL,» or «Power on by LAN.»
- Save and Exit: Save your changes and exit the BIOS/UEFI setup.
Dell OptiPlex Setup for Wake on LAN:
- Enter Setup: Press F12 during boot to enter the setup.
- Navigate to Power Management: Go to Settings -> Power Management -> Wake on LAN/WLAN and select «LAN only.»
3. Linux
Linux systems support Wake-on-LAN (WoL), which simplifies remote management of servers and desktops. This section covers how to install and use the various WoL tools in Debian Linux.
3.1 Perl
Debian 11 and other Debian-based distributions provide a Perl script for WoL in their repositories. This script simplifies sending WoL packets.
The wakeonlan utility is a simple Perl script that can be installed directly from the repository, making the setup process straightforward. This script is stored in /usr/bin directory.
$ sudo apt install wakeonlan
Use the wakeonlan command followed by the MAC addresses of the computers you want to wake up.
$ /usr/bin/wakeonlan 14:1f:14:18:11:16 18:10:16:17:19:18
3.2 Python
Python offers another way to send Wake-on-LAN packets using the wakeonlan package. Python’s flexibility and widespread use make it a good choice for scripting tasks.
The pip3 command is a package installer for Python. It is used to install and manage software packages written in Python. Here, it installs the wakeonlan package, which contains functions to send WoL packets.
$ sudo pip3 install wakeonlan
Utilize wakeonlan module to send magic packets to multiple computers:
$ python3 /usr/local/bin/wakeonlan 14:1f:14:18:11:16 18:10:16:17:19:18
3.3 Etherwake
Etherwake is a command-line utility specifically designed to send Wake-on-LAN packets. It requires specifying the network interface (-i) through which the magic packet should be sent.
Download and install etherwake from Debian repository:
$ sudo apt install etherwake
Replace eth0 with your actual network interface name (ifconfig or ip addr to find it) and specify MAC addresses:
$ sudo etherwake -i eth0 18:10:16:17:19:18
$ sudo etherwake -i eth0 14:1f:14:18:11:16
Use a loop to send WoL packets to multiple MAC addresses efficiently.
$ for mac in «18:10:16:17:19:18» «14:1f:14:18:11:16»; do sudo etherwake -i eth0 $mac; done
4. Windows
Windows systems support Wake-on-LAN (WoL), enhancing remote server and desktop management. This section covers the installation and usage of WoL tools on Windows to wake computers on the network
4.1 Wake on LAN with PowerShell
For Windows users, PowerShell provides a script-based approach to send WoL packets. Obtain the script from GitHub and configure PowerShell for execution.
Copy the script Invoke-WakeOnLan.ps1 to the computer With Windows. Navigate to the directory when script has been copied, e.g.:
> cd /Users/admin/Desktop
Press Win-R key combination and type powershell command. Press CTRL-Shift and Enter to start powershell as administrator. Check execution policy for Windows computer with the command:
> Get-ExecutionPolicy
If it’s «Restricted,» change it to «RemoteSigned» with Set-ExecutionPolicy RemoteSigned. This will allow running unsigned scripts that you write on your local computer and signed scripts from Internet.
> Set-ExecutionPolicy RemoteSigned
Execution the script as following:
> .\Invoke-WakeOnLan.ps1 -MacAddress 14:1f:14:18:11:16, 18:10:16:17:19:18
4.2 Wake on LAN with GUI Utility
In addition to command-line tools, there are GUI-based applications for Wake-on-LAN on Windows. One of them is «Wake on Lan» tool from The Aquila Technology. Download the WakeOnLAN app from GitHub and install it on your Windows computer.
Press Ctrl+N to add a new host. Navigate to Wake Up tab. Enter the MAC address of the target computer. If the IP address is unknown, you can enter 255.255.255.255. See Figure 2 for reference on adding a new host to the host list.

Figure 2 — Adding New Host to Management
After adding both hosts, initiate the wake-up process. Select both hosts with your mouse to highlight them in blue. Click the «Wake Up» option as shown in Figure 3.

Figure 3 — Powering On Hosts in LAN Network
5. Network Devices
Network devices often offer centralized Wake-on-LAN (WoL) capabilities similar to those found in desktop Linux systems. This section explores how to leverage these built-in features to remotely manage and wake computers on your network.
3.1 Mikrotik
MikroTik routers support Wake-on-LAN functionality through the tool/wol command in the RouterOS CLI. By default, the magic packet is sent as an IP broadcast out the default gateway interface. However, you can specify a particular interface if needed.
> tool/ wol mac=14:1F:14:18:11:16 interface=bridge
> tool/ wol 18:10:16:17:19:18 interface=bridge
To efficiently send WoL packets to multiple devices, you can use a foreach loop:
> :foreach mac in={«14:1F:14:18:11:16»; «18:10:16:17:19:18»} do={/tool wol mac=$mac interface=bridge}
3.2 VyOS
VyOS, a Linux-based network operating system, also supports Wake-on-LAN using the wake-on-lan command. You can specify the interface (interface) and the host’s MAC address (host) to wake up the target device.
$ wake-on-lan interface eth0 host 14:1f:14:18:11:16
$ wake-on-lan interface eth0 host 18:10:16:17:19:18
For batch wake-up of multiple devices, use a loop:
$ for mac in «14:1f:14:18:11:16» «18:10:16:17:19:18»; do wake-on-lan interface eth0 host $mac; done
These commands allow VyOS users to wake up computers across their network infrastructure efficiently and manage devices remotely.
Conclusion
Wake-on-LAN is a powerful tool for remotely managing and maintaining systems. Whether you are using Linux, Windows, or network devices, the ability to wake up computers remotely can save time and decrease power consumption. By following the steps outlined in this guide, you can easily set up and use WoL across different platforms.
published on Wednesday, October 10, 2018
Setting up Wake-on-LAN for your PC may require configuring both your BIOS/UEFI as
well as your operating system. If multi-booting more than one OS, it’s necessary
to set all of them up, since only the last running OS before shutdown determines
whether the PC will be listening for magic packets.
I will give a short and comprehensive write-up of all the steps it took for me
to make Wake-on-LAN work on a dual-boot system with archlinux and windows 10.
While there are already many guides, it is sometimes hard to find all the
relevant information in one place.
- Linux
- Windows
- UEFI
- Check packet reception
Linux
On linux, the ethtool program can be used as follows to enable WOL on your
network interface for the next shutdown only:
ethtool -s INTERFACE wol g
where INTERFACE is the name of your ethernet adapter as displayed by ip
l or found via ls /sys/class/net | grep en, e.g. enp0s25.
However, this setting will be lost after the next reboot! To make it
persistent it must be executed again on every reboot. This can be achieved
using cronjob, udev rules, systemd units or third-party packages.
Quite unsurprisingly, the archwiki has a great Wake-on-LAN article that
explains several alternatives to enable WOL. I will mirror some of the
information here, in case the wiki is modified:
- cronjob
- wol-systemd
- NetworkManager
cronjob
Use the following cronjob to enable WOL on every reboot:
@reboot /usr/bin/ethtool -s INTERFACE wol g
wol-systemd
The wol-systemd AUR package provides a simple systemd unit for running
ethtool. Install the package, then enable and start the unit:
yaourt -S wol-systemd
systemctl enable wol@INTERFACE
systemctl start wol@INTERFACE
NetworkManager
If you’re using NetworkManager, you can use enable WOL via nmcli. First,
determine the name of your ethernet connection by typing:
then enable magic packets as follows:
nmcli con modify "NAME" 802-3-ethernet.wake-on-lan magic
Windows
On windows, I ended up consulting several guides and modifying multiple
settings before WOL started working. Summary of steps:
Right click the windows icon and open the Device Manager. Navigate to
Network Adapters and double-click your ethernet adapter. Then go to the
following tabs:
- Power Management:
- [x] Allow this device to wake the computer
- [x] Only allow a magic packet to wake the computer (to prevent
waking up from other events)- Driver: Update Driver and let windows Search automatically for
updated driver software. Afterwards reboot. This step may not be
needed.- Advanced: Search the list for an Wake on Magic Packet entry and
set it to enabled. If no such entry exists, update the driver and
restart first.
Furthermore, you may have to disable the fast startup option in windows
(don’t worry it will probably not noticably impact startup times):
- Press Win + X and open Power Options
- Click Additional power settings on the right (under related settings)
- Click Choose what the power buttons do on the left menu
- Click Change settings that are currently unavailable
- Scroll to Shutdown settings
- Uncheck Turn on fast startup (recommended)
Of course, they’re changing the names and location of these settings on
seemingly every update, so good luck to you and future me;)
UEFI
Besides OS settings, it is usually necessary to enable WOL in UEFI as well.
The following settings are those that were necessary for me to touch to make
WOL finally work. Naturally, these options may be named differently, reside in
different sections, or may not even exist in your UEFI.
- Enable Boot -> Boot From Onboard LAN
- Disable Boot -> Fast Boot
- Enable Advanced -> ACPI Configuration -> PCIE Devices Power On
Check packet reception
If WOL just doesn’t want to start working, you can check whether the
the target machine receives the magic packet with gnu-netcat:
nc --udp --listen --local-port=40000 --hexdump
In this case, also make sure use the same port while sending the packet (wol
-p PORT option). If you choose a protected port such as 9 you will need root
permissions for the netcat command above.
Alternatively, with wireshark once you’ve been added to the wireshark
group (and logged out and in again), you can listen in as a user on all WOL
packets arriving on arbitrary ports:
tshark -i INTERFACE -Y wol
This entry was tagged
config,
dual-boot,
linux,
windows and
wol
Wake on Lan with Linux and Windows
Motivation
I have 3 computers. My laptop a Thinkpad X30, another Thinkpad which acts as server and a desktop computer. I have all my main data on my server and use the files on my laptop and desktop by sshfs and NFS.
The only files I don’t store on my server is media files, such as movies and music – these are stored on my desktop. This was the problem – if I was out I couldn’t access my files since my desktop was turned off when I am not home. I need something to turn on my desktop when I wasn’t home.

Wake on Lan
Wake on Lan (WOL) is a technology to turn on a computer by sending it a specific network package. When a WOL-enabled computer is turned off the network port will stay active and listen for a certain packages and in if it receives such a package it will boot the computer.
Two things are needed:
- Enable WOL on my Desktop.
- Installing a program to send the magical network package on my server.
BIOS
Somewhere in the BIOS there will hopefully be some setting to enable WOL. I didn’t find it in the BIOS of my ASUS PW5 DH motherboard, but it works fine. A good indicator is to check whether the lights around the network cable is turned on or not on the back of the computer when the computer has been shutdown.
Enabling WOL in Windows
It always takes more screenshots to explain anything in Windows, but there is not really any way around it. In Windows I need to go to the network setting and choose my network adapter. After selecting “configure” as in the screenshot:
I selected the fan called “advanced” where I found to settings I need to turn on:
Wake from shutdown:

Wake up capabilities:

That’s it. 🙂
Enabling WOL in Linux
To enable WOL from Linux the option has to be set before shutting Linux down. First I see what is supported by network driver:
root@bohr:/home/tjansson# ethtool eth1
Settings for eth1:
        ...
        Supports Wake-on: pg
        Wake-on: d
        ...
So it supports pg which means (from man ethtool):
<code>
p  Wake on phy activity
g  Wake on MagicPacket(tm)
The g option is the interesting part. So I set the option on the my network driver:
root@bohr:~# ethtool -s eth1 wol g
but I don’t want to do this every time I shut down the computer, so I will make a script in /etc/init.d/ named wol.sh containg the lines:
#!/bin/bash
ethtool -s eth1 wol g
and make it executable:
root@bohr:/etc/init.d# chmod +x wol.sh
and finally tell Linux to execute the script on every runlevel, which I quite a overkill, but it doesn’t really mater – it works:
root@bohr:/etc/init.d# update-rc.d -f wol.sh defaults
Now WOL is enabled under Linux as well.
Sending the magical package from Linux
The last thing I need to do is to wake the computer after it has been shut down. I do this from my Linux server on the same local network. The only information needed is the hardware adress of network interface on the desktop machine. I can find this by running ifconfig under Linux or some networkgui on Windows on the desktop machine:
tjansson@bohr:~$ /sbin/ifconfig
...
eth1      Link encap:Ethernet  HWaddr 00:18:F3:CD:78:A0
...
Now I can start the desktop computer by running wakeonlan from my server:
root@nobel:/home/tjansson# wakeonlan 00:18:F3:CD:78:A0
Sending magic packet to 255.255.255.255:9 with 00:18:F3:CD:78:A0
Waking the computer from other OS’s
In the bottom of the wikipediaentry on WOL there is a long list of other programs to send the magical network package but I haven’t tried any of these my self.
Related
What is Wake on LAN and why is it so hard?
After releasing my video on the PiKVM I realized that there was so much confusion about Wake on LAN, and rightfully so, that I decided to put together this guide on how to configure Wake on LAN on any machine. Wake on LAN (WoL) is a networking standard that allows a computer to be turned on by sending a network packet. The client sends a special packet (sometimes referred to as a “magic packet”) and the remote machine will wake up either from a cold power state or from sleep.This is where it starts to get complicated because different hardware manufactures have implemented different controls in BIOS to enable or disable this, and to make even more complex operating systems like Windows, macOS, and Linux have also implemented their own way to wake the machine up when it’s sleeping or in a low powered state.I am just going to throw this out there, Wake on LAN is hard.Since there are many different combinations I will try to cover how to configure your machines wake up successfully regardless of hardware, operating system, and power state.
Preparing your hardware for Wake on LAN
In order to wake your machine up, we have to be sure that WoL features are turned on in the BIOS and that other features are disabled.Since I cannot test every single BIOS out there, I am going to use my machine as an example for the types of options you will need to enable or disable.Most of the options should be named similarly however where it is located in your BIOS will depend on your manufacturer.
First, you’ll need to get into the BIOS of the machine, this is typically done by pressing a key at book like f2 or del but varies by machine.
Once you’re in you’re in we’ll start changing some settings.
Power settings
You’ll want to look around for something similar to power settings.If you do not see these options in your power settings, it could be in advanced, networking, or onboard devices.
Power settings menu for Intel NUC.This will look different for your machine but the idea is still the same
Here are some things to look for:
-
Deep S4/S5 Sleep — You’ll want to disable this, otherwise only the power button will wake the machine which will disable Wake on LAN
-
Wake on LAN from S4/S5 — You’ll want to enable this setting and if it has an option choose Power on — Normal Boot
-
Wake System from S5 — You’ll want to disable this.This is basically an alarm clock for your machine.There’s no need to enable this unless you want set a time for it to turn on every day.I’ve used this in the past as a contingency plan for some of my servers in case they were powered off accidentally. I would set an alarm for 12 AM.
-
USB S4/S5 Power — I typically disable this if it’s a server since nothing should be plugged in but if it’s a desktop with USB devices you want powered you can turn it on safely.
-
Wake on LAN — enable this might sound obvious but some older systems have an option that says exactly that however newer systems have options for waking in all of the different sleep states.
-
What to do when AC Power is restored — This is optional but I usually set it to Stay Off if it’s a desktop, Power On if it’s a server that should always be on, and Last power state if it’s something like a machine that I wake seldomly.There is one exception, which is if you have a way to toggle the power remotely too.I have a USP PDU Pro from UniFi that I can toggle all of my servers on and off.If you are able to toggle them on and off, the best setting is Power On, that way you have a way to power them on, even if they were gracefully shut down previously.
Another quick check you can do is power down the machine and check to be sure the network light is lit up on your NIC.If it’s not, this means Wake on LAN is not enabled on your machine and you’ll have to find the option in your BIOS to make it work.
If you don’t have an operating system on your machine yet, you should be able to wake up the machine over the network now.If you do have an operating system on your machine, another way you can test a bare metal / cold boot wake is by pulling the power on the machine and then plugging it back in.The reason this should work is because modern operating systems might not fully shut down (they go into a sort of sleep) or might disable WoL on the NIC when shutting down.We’ll fix this in the next section.
Waking up a Windows machine
After you enabled Wake on LAN in the BIOS, and verified you see the light on your NIC blinking when you power off your machine, we can now enable Wake on LAN at the operating system level for Windows.This will work on all modern versions of Windows (Windows 10 and Windows 11).
Device manager
First we’ll want to open the Device Manager.You can do this from the UI or from a command prompt
Be sure to select the network card that you use to connect to your network.
- Once open you’ll want to expand Network adapters and find your network adapter, then right click and choose Properties
- Then choose the Power Management tab and be sure that all of these options are enabled
- Allow the computer to turn off this device to save power
- Allow this device to wake the computer
- Only allow a magic packet to wake the computer.
Power Management options for your network adapter.
Then we’ll need to verify a few more settings.These settings may or may not exist and depend on your network adapter manufacturer.
- Click on the Advanced Tab for your Network Adapter
- Find Wake on Magic Packet and set it to Enabled
- Find WOL & Shutdown Link Speed and set it to 10 Mbps You’ll want to be sure that your switch supports this speed, otherwise Auto should be fine
- Click OK
You should check to see if Wake on LAN works before proceeding to the next step since this might not be necessary with your machine.
Fast Startup
Another Windows Feature that can prevent a machine from shutting down properly to allow Wake on LAN is Fast Startup.This disables hibernation.I recommend testing to see if Wake on LAN works before disabling this.
First, we’ll need to open the Power Control Panel.You can do this from the UI or from a command prompt
Then we’ll need to change some settings
- Click Choose what the power buttons do from the left menu
- Click Change settings that are currently unavailable
- Uncheck Turn on fast startup (recommended)
- Click Save changes
You should now check to see if Wake on LAN works for your machine.
Waking up a Linux machine
After you enable Wake on LAN in the BIOS, and verified you see the light on your NIC blinking when you power off your machine, we can now enable Wake on LAN at the operating system level for Linux.This sounds odd but I have found that machines (especially Linux) need WoL turned on for each NIC.
Install ethtool if you don’t have it already
1 2 |
sudo apt update sudo apt install ethtool |
First check to see if WoL is supported by your NIC
1 2 |
ip a # this will list all of your NICs sudo ethtool eno1 # replace with one of the NICs you want to check |
This should output something similar to
Settings for eno1:
        Supported ports: [ TP ]
        Supported link modes:   10baseT/Half 10baseT/Full
                                100baseT/Half 100baseT/Full
                                1000baseT/Full
        Supported pause frame use: No
        Supports auto-negotiation: Yes
        Supported FEC modes: Not reported
        Advertised link modes:  10baseT/Half 10baseT/Full
                                100baseT/Half 100baseT/Full
                                1000baseT/Full
        Advertised pause frame use: No
        Advertised auto-negotiation: Yes
        Advertised FEC modes: Not reported
        Speed: 1000Mb/s
        Duplex: Full
        Auto-negotiation: on
        Port: Twisted Pair
        PHYAD: 1
        Transceiver: internal
        MDI-X: on (auto)
        Supports Wake-on: pumbg
        Wake-on: g
        Current message level: 0x00000007 (7)
                               drv probe link
        Link detected: yes
You’re looking for Supports Wake-on: pumbg with at least the letter g in the string.This means that the NIC does support WoL for a magic packet, which is a good thing.If you don’t see this here, don’t worry we’ll fix it in netplan
Using Netplan
There are lots of outdated commands you’ll find on the internet that won’t work or will partially work so I advise that you only do this with netplan.If you don’t have netplan installed (Debian, etc…) skip to the next section.
To edit your netplan
1 |
sudo nano /etc/netplan/01-netcfg.yaml # replace with your netplan yaml |
Once here, you’ll see your network settings.You’ll want to turn on wakeonlan in this yaml for each NIC.For example if you have 2 NICs, eno1 and enp2s0 you would add it in both places under that key.
1 2 3 4 5 6 7 8 9 10 11 12 |
# This file describes the network interfaces available on your system # For more information, see netplan(5). network: version: 2 renderer: networkd ethernets: eno1: dhcp4: yes wakeonlan: true enp2s0: dhcp4: yes wakeonlan: true |
Once this is set, you’ll want to apply your netplan.
Then we’ll want to shutdown
Now we should be able to wake up the machine using WoL from a remote machine.
Without Netplan (Debian, etc…)
Since you don’t have netplan we’ll have to create a service and enable it.Do not do this step if you configure it with netplan.
Find the path to ethtool
In my case it’s at /usr/sbin/ethtool but your may vary.
Nest we’ll create a file at /etc/systemd/system/wol.service
1 |
nano /etc/systemd/system/wol.service |
In this file add the following
1 2 3 4 5 6 7 8 9 |
[Unit] Description=Enable Wake On LAN [Service] Type=oneshot ExecStart = /usr/sbin/ethtool --change eno1 wol g [Install] WantedBy=basic.target |
You’ll want to be sure to change your path for ethtool as well eno1 to the name of your NIC
Then we’ll need to enable the service
1 2 |
sudo systemctl daemon-reload sudo systemctl enable wol.service |
Then we can check to be sure out service is started
Then we’ll want to shutdown
Now we should be able to wake up the machine using WoL from a remote machine.
Waking up a Mac
Waking up a Mac is pretty easy, the easiest of them all.The most challenging part is finding the option in System Preferences.
For a Macbook:
- Open System Preferences and search for power
- Click on Power Nap in Battery
- You’ll see Wake for network access here you can choose whether you want to wake up Always or Only on Power Adapter.Either of these options should be fine.
For all other Macs you’ll want to search System Preferences for another option.
- Search for “Energy Saver”
- Here you’ll see an option to Wake for network access.Be sure this is check
This option might appear different in different versions of macOS and it also varies by form factor, but you’ll want to be sure that the “Wake for network access” option is turned on
Installing a Wake on LAN client
In order to wake up a remote machine machine up, you will need a tool that can send a wake on LAN packet to the remote machine.
Windows Wake On LAN CLient
I am a fan of doing this in a terminal however a decent Windows utility with a GUI is WakeOnLAN.It’s also open source and hosted on GitHub.After installing it and configuring a machine to wake you should be able to wake your machine if it is on the same network and you’ve followed the other steps that are outlined in this guide.
WakeOnLAN is an open source Windows utility that has a nice GUI
Linux Wake on LAN client
I usually prefer installing a command line tool to wake machines up over the network from a Linux machine and I typically using wakeonlan an open source utility that’s simple to use.
To install it on a Debian-like system:
1 2 |
sudo apt update sudo apt install wakeonlan |
Once it’s installed you can now wake machines on the same network by using the command:
1 |
sudo wakeonlan 00:11:22:33:44:55
|
If your machine is on another network and you can reach the broadcast IP, you can supply it in your command
1 |
sudo wakeonlan -i 192.168.2.255 00:11:22:33:44:55 |
Be sure to replace the mac address and broadcast IP above with the mac address of the remote machine and set the broadcast IP if on a different network.
macOS Wake on LAN client
To instal a client for macOS it’s very simple using brew
Once it’s installed you can now wake machines on the same network by using the command:
1 |
wakeonlan 00:11:22:33:44:55 |
If your machine is on another network and you can reach the broadcast IP, you can supply it in your command
1 |
wakeonlan -i 192.168.2.255 00:11:22:33:44:55
|
Be sure to replace the mac address and broadcast IP above with the mac address of the remote machine and set the broadcast IP if on a different network.
Wrapping up
At this point you should be able to power on any machine from any machine on your network. One piece of advice is if you are using VLANs you’ll want to b sure you are sending the WoL packet from the same network, otherwise you’ll have to be sure that you can reach and target the right broadcast IP from the network you are on.As I mentioned in the beginning of this post, Wake on LAN is hard however if you follow these steps for each machine type you should be able to enjoy reliably waking up your machine remotely over the network.
Join the conversation
— Techno Tim (@TechnoTimLive) February 19, 2023
Links
🛍️ Check out the new Merch Shop at https://l.technotim.live/shop
⚙️ See all the hardware I recommend at https://l.technotim.live/gear
🚀 Don’t forget to check out the 🚀Launchpad repo with all of the quick start source files