
Содержание
Подготовка к автоматизации
Основы работы с командной строкой через Python
Автоматизация простых команд
Более сложная автоматизация
Использование планировщика задач для автоматизации на регулярной основе
Советы по улучшению производительности и безопасности
Заключение
Вопрос-Ответ
Комментарии
Дата публикации
10.01.2025
Обновлено
22.01.2025
Источник фото freepik/freepik
В современной разработке и администрировании системы важнейшими навыками становятся умение автоматизировать процессы и оптимизировать рабочие процессы. Одним из мощных инструментов для этого является Python. В этой статье мы рассмотрим, как с помощью Python автоматизировать командную строку (CMD), используя стандартные библиотеки и различные подходы для повышения эффективности работы.
В этой статье мы научим вас использовать Python для автоматизации повседневных задач через командную строку.
Эксперты рекомендуют
Подготовка к автоматизации
Установка Python
Перед тем как начать автоматизацию, убедитесь, что у вас установлен Python. Для этого: скачайте последнюю версию Python с официального сайта. Установите Python, следуя инструкциям на экране. Во время установки убедитесь, что поставили галочку напротив «Add Python to PATH», чтобы иметь возможность использовать Python из командной строки.
Основные библиотеки для работы с CMD
Для взаимодействия с командной строкой Python предоставляет несколько мощных библиотек:
- subprocess. Это основная библиотека для выполнения команд в командной строке. Она позволяет запускать внешние программы и получать их вывод.
- os. Эта библиотека используется для взаимодействия с операционной системой, например, для работы с файлами и директориями.
- shutil. Библиотека для работы с файлами и каталогами (перемещение, копирование, удаление).
- pathlib. Библиотека для работы с путями к файлам и каталогам. Она позволяет удобно работать с путями и создавать платформонезависимые скрипты.
- subprocess.run. Современный способ взаимодействия с командной строкой, позволяющий запускать команды и получать их вывод, ошибки и коды завершения. Это более мощная альтернатива старому методу subprocess.call
В этой статье мы подробно рассмотрим использование библиотеки subprocess.
Основы работы с командной строкой через Python
Для выполнения команд в командной строке мы используем библиотеку subprocess. Рассмотрим простой пример выполнения команды через Python.
import subprocess
# Выполняем команду и выводим результат
result = subprocess.run([‘echo’, ‘Hello, World!’], capture_output=True, text=True)
print(result.stdout)
Этот код выполнит команду echo в CMD, которая выведет «Hello, World!». Обратите внимание на параметры capture_output=True и text=True, которые позволяют захватить и вывести результат выполнения команды.
Как получить результат и обрабатывать ошибки?
Библиотека subprocess позволяет нам получать не только стандартный вывод, но и ошибку, если она возникла.
Например:
import subprocess
result = subprocess.run([‘ls’, ‘non_existent_directory’], capture_output=True, text=True)
if result.returncode != 0:
print(f»Ошибка: {result.stderr}»)
else:
print(result.stdout)
Здесь мы пытаемся выполнить команду ls для несуществующего каталога. Если команда не выполняется, Python выводит ошибку.
Автоматизация простых команд
Для автоматизации задач вы можете создавать скрипты, которые будут запускать повторяющиеся команды. Например, создание бекапов или запуск проверок состояния системы.
Пример скрипта для проверки доступности сайта с использованием команды ping:
import subprocess
def check_website_status(url):
result = subprocess.run([‘ping’, url], capture_output=True, text=True)
if ‘Request timed out’ in result.stdout:
print(f»Сайт {url} не доступен.»)
else:
print(f»Сайт {url} доступен.»)
check_website_status(‘google.com’)
Этот скрипт автоматически проверяет доступность сайта через команду ping.
Более сложная автоматизация
Теперь давайте рассмотрим более сложные задачи. Например, можно автоматизировать обработку файлов, создание директорий или выполнение нескольких команд подряд.
Пример автоматизации с перемещением файлов:
import shutil
import os
# Создание директории, если её нет
if not os.path.exists(‘backup’):
os.makedirs(‘backup’)
# Перемещение файла в директорию
shutil.move(‘important_file.txt’, ‘backup/important_file.txt’)
Этот код создает директорию backup, если её нет, и перемещает файл в эту папку.
Использование планировщика задач для автоматизации на регулярной основе
Один из эффективных способов автоматизации – это использование планировщика задач. Для Windows это Task Scheduler, а для Linux или macOS – cron.
Windows (Task Scheduler)
Настройка автоматического запуска скрипта через Task Scheduler:
- Откройте Task Scheduler.
- Выберите «Create Basic Task» и следуйте инструкциям.
- В поле «Action» выберите «Start a Program» и укажите путь к вашему Python-скрипту.
- Выберите триггер: выберите, когда скрипт должен запускаться (ежедневно, еженедельно, по событию и т. д.). Нажмите «Далее».
- Выберите действие: в поле «Действие» выберите «Запустить программу». Это позволяет запускать программу, в данном случае – ваш Python-скрипт.
- Укажите путь к Python-скрипту: в поле «Программа/скрипт» укажите путь к интерпретатору Python (например, C:\Python39\python.exe). В поле «Добавить аргументы (необязательно)» укажите путь к вашему Python-скрипту (например, C:\scripts\myscript.py).
- Завершение настройки: нажмите «Далее» и «Готово». Теперь ваш скрипт будет автоматически запускаться по установленному расписанию.
Linux/macOS (cron)
Для настройки автоматического запуска на Linux или macOS откройте терминал и введите команду.
crontab-e
Добавьте строку, которая будет запускать скрипт в заданное время. Например, чтобы запускать скрипт каждый день в 12:00:
0 12 * * * /usr/bin/python3 /path/to/your_script.py
Советы по улучшению производительности и безопасности
Обработка ошибок
Каждая команда в командной строке может завершиться ошибкой, поэтому важно предусмотреть обработку ошибок.
try:
result = subprocess.run([‘some_command’], check=True)
except subprocess.CalledProcessError as e:
print(f»Ошибка: {e}»)
Логирование
Логирование помогает отслеживать результаты выполнения автоматических задач. Например, можно записывать вывод в файл.
with open(‘log.txt’, ‘a’) as log_file:
log_file.write(result.stdout)
Переменные среды
Не храните чувствительную информацию, такую как пароли, в скриптах. Вместо этого используйте переменные среды.
import os
api_key = os.getenv(‘API_KEY’)
Заключение
Автоматизация командной строки с помощью Python – это мощный способ повысить свою продуктивность и упростить работу с системными задачами. В этой статье мы рассмотрели основы работы с командной строкой через Python, автоматизацию простых и сложных задач, а также использование планировщиков задач для регулярных запусков.
Используйте Python для автоматизации своих процессов, и вы сможете сэкономить время и усилия при выполнении рутинных операций.
|
Инструмент/Библиотека |
Описание |
Пример использования |
| subprocess | Основная библиотека для выполнения внешних команд в командной строке. | subprocess.run([‘echo’, ‘Hello, World!’]) |
| os | Библиотека для работы с операционной системой, включая управление файлами и директориями. | os.system(‘dir’) |
| shutil | Библиотека для работы с файлами и каталогами (копирование, перемещение, удаление). | shutil.move(‘file.txt’, ‘new_folder/file.txt’) |
| Task Scheduler | Инструмент Windows для автоматического выполнения задач в заданное время или при наступлении определённых событий. | Настройка для запуска Python-скрипта по расписанию (например, ежедневно). |
| .bat (батники) | Текстовые файлы, содержащие команды для CMD, используемые для автоматизации задач. | Создание .bat файла для запуска Python-скрипта с помощью команд python myscript.py. |
Contents
- Introduction
- Understanding Python’s ctypes Library
- Accessing System Libraries with ctypes
- Creating and Using C Structs with ctypes
- Building a Complete System Monitor Application
- Summary
Introduction
This comprehensive tutorial will guide you through using Python’s ctypes library to interact with the Windows API. You’ll learn how to access Windows system functionality, manage processes, and leverage Windows-specific features directly from Python. By the end of this lab, you’ll understand how to build applications that can seamlessly integrate with the Windows operating system and perform powerful system-level operations.
Skills Graph
%%%%{init: {‘theme’:’neutral’}}%%%%
flowchart RL
python((«Python»)) -.-> python/BasicConceptsGroup([«Basic Concepts»])
python((«Python»)) -.-> python/ControlFlowGroup([«Control Flow»])
python((«Python»)) -.-> python/ModulesandPackagesGroup([«Modules and Packages»])
python((«Python»)) -.-> python/ObjectOrientedProgrammingGroup([«Object-Oriented Programming»])
python((«Python»)) -.-> python/FileHandlingGroup([«File Handling»])
python/BasicConceptsGroup -.-> python/variables_data_types(«Variables and Data Types»)
python/BasicConceptsGroup -.-> python/type_conversion(«Type Conversion»)
python/ControlFlowGroup -.-> python/conditional_statements(«Conditional Statements»)
python/ModulesandPackagesGroup -.-> python/standard_libraries(«Common Standard Libraries»)
python/ObjectOrientedProgrammingGroup -.-> python/classes_objects(«Classes and Objects»)
python/FileHandlingGroup -.-> python/file_operations(«File Operations»)
subgraph Lab Skills
python/variables_data_types -.-> lab-391548{{«How to Interact with Windows API in Python»}}
python/type_conversion -.-> lab-391548{{«How to Interact with Windows API in Python»}}
python/conditional_statements -.-> lab-391548{{«How to Interact with Windows API in Python»}}
python/standard_libraries -.-> lab-391548{{«How to Interact with Windows API in Python»}}
python/classes_objects -.-> lab-391548{{«How to Interact with Windows API in Python»}}
python/file_operations -.-> lab-391548{{«How to Interact with Windows API in Python»}}
end
Understanding Python’s ctypes Library
In this step, we’ll explore the basics of Python’s ctypes library, which serves as the foundation for interacting with the Windows API. The ctypes library acts as a bridge between Python and native C libraries, allowing us to call functions directly from DLLs (Dynamic Link Libraries).
What is ctypes?
ctypes is a foreign function library for Python that provides C compatible data types and allows calling functions in DLLs or shared libraries. It’s particularly useful for:
- Accessing low-level system functions
- Interacting with hardware
- Calling functions from platform-specific libraries
Installing Required Packages
Before we start writing code, let’s install the necessary packages. Open a terminal in the WebIDE and run:
pip install pywin32-ctypesThis will install a compatible library that works with our environment.
Basic Usage of ctypes
Let’s create a simple Python script to understand how ctypes works. In the WebIDE, create a new file named ctypes_basics.py in the /home/labex/project directory with the following content:
import ctypes

## Load a standard C library
libc = ctypes.CDLL('libc.so.6')

## Call a simple C function
print("Random number from C library:", libc.rand())

## Find out the size of int type on this machine
print("Size of int:", ctypes.sizeof(ctypes.c_int), "bytes")

## Create and use a C-compatible string
message = ctypes.create_string_buffer(b"Hello from ctypes!")
print("C-compatible string:", message.value.decode())
print("String buffer size:", ctypes.sizeof(message), "bytes")
Run the script using:
python3 ctypes_basics.pyYou should see output similar to this:
Random number from C library: 1804289383
Size of int: 4 bytes
C-compatible string: Hello from ctypes!
String buffer size: 19 bytes
Understanding C Data Types in Python
ctypes provides Python-compatible wrappers for C data types. Here’s a reference table of common C data types and their ctypes equivalents:
| C Type | ctypes Type | Python Type |
|---|---|---|
| char | c_char | 1-character bytes object |
| int | c_int | int |
| unsigned int | c_uint | int |
| long | c_long | int |
| void * | c_void_p | int or None |
| char * | c_char_p | bytes or None |
| wchar_t * | c_wchar_p | str or None |
Let’s explore these data types with another example. Create a file named ctypes_types.py:
import ctypes

## Integer types
i = ctypes.c_int(42)
ui = ctypes.c_uint(123)
print(f"Integer: {i.value}, Unsigned Integer: {ui.value}")

## Floating point types
f = ctypes.c_float(3.14)
d = ctypes.c_double(2.71828)
print(f"Float: {f.value}, Double: {d.value}")

## Character and string types
c = ctypes.c_char(b'A')
s = ctypes.c_char_p(b"Hello, World!")
print(f"Character: {c.value.decode()}, String: {s.value.decode()}")

## Create an array of integers
int_array = (ctypes.c_int * 5)(1, 2, 3, 4, 5)
print("Array elements:", [int_array[i] for i in range(5)])
Run the script:
python3 ctypes_types.pyExpected output:
Integer: 42, Unsigned Integer: 123
Float: 3.140000104904175, Double: 2.71828
Character: A, String: Hello, World!
Array elements: [1, 2, 3, 4, 5]
This fundamental understanding of ctypes will help us as we move forward to interact with more complex system libraries and the Windows API specifically.
Accessing System Libraries with ctypes
In this step, we’ll learn how to access system libraries and call their functions using ctypes. Since we’re working in a Linux environment, we’ll focus on Linux system libraries while explaining the principles that apply to Windows API access as well.
Loading Dynamic Libraries
In Python, we can load dynamic libraries using several methods provided by ctypes:
CDLL— for loading standard C librariesWinDLL— for loading Windows DLLs (when on Windows)OleDLL— for loading COM libraries (when on Windows)
Let’s create a file named system_info.py to explore system information using standard libraries:
import ctypes
import os
import platform

print(f"Python Platform: {platform.platform()}")
print(f"System: {platform.system()}")
print(f"Machine: {platform.machine()}")
print(f"Processor: {platform.processor()}")

## Load the C standard library
libc = ctypes.CDLL('libc.so.6')

## Get system information
print("\n--- System Information ---")

## Get hostname
hostname_buffer = ctypes.create_string_buffer(1024)
if libc.gethostname(hostname_buffer, ctypes.sizeof(hostname_buffer)) == 0:
    print(f"Hostname: {hostname_buffer.value.decode()}")
else:
    print("Failed to get hostname")

## Get user information
uid = os.getuid()
pwd = libc.getpwuid(uid)
if pwd:
    print(f"Current user ID: {uid}")
else:
    print(f"Current user ID: {uid} (failed to get user info)")

## Memory page size
page_size = libc.getpagesize()
print(f"Memory page size: {page_size} bytes")

## Get system uptime (if available)
try:
    class timespec(ctypes.Structure):
        _fields_ = [
            ('tv_sec', ctypes.c_long),
            ('tv_nsec', ctypes.c_long)
        ]

    time_buf = timespec()
    CLOCK_BOOTTIME = 7  ## Linux specific
    if hasattr(libc, 'clock_gettime') and libc.clock_gettime(CLOCK_BOOTTIME, ctypes.byref(time_buf)) == 0:
        uptime_seconds = time_buf.tv_sec
        days, remainder = divmod(uptime_seconds, 86400)
        hours, remainder = divmod(remainder, 3600)
        minutes, seconds = divmod(remainder, 60)
        print(f"System uptime: {days} days, {hours} hours, {minutes} minutes, {seconds} seconds")
    else:
        print("Could not get system uptime")
except Exception as e:
    print(f"Error getting uptime: {e}")
Run the script:
python3 system_info.pyYou should see detailed information about your system, similar to this:
Python Platform: Linux-5.15.0-1031-aws-x86_64-with-glibc2.35
System: Linux
Machine: x86_64
Processor: x86_64

--- System Information ---
Hostname: labex-container
Current user ID: 1000
Memory page size: 4096 bytes
System uptime: 0 days, 1 hours, 23 minutes, 45 seconds
Creating a Process Monitor
Now, let’s create a more practical application: a simple process monitor that will list running processes. Create a file named process_monitor.py:
import ctypes
import os
import time
from datetime import datetime

def list_processes():
    """List all running processes using /proc filesystem"""
    processes = []

    ## On Linux, process information is available in the /proc filesystem
    for pid in os.listdir('/proc'):
        if pid.isdigit():
            try:
                ## Read process name from /proc/[pid]/comm
                with open(f'/proc/{pid}/comm', 'r') as f:
                    name = f.read().strip()

                ## Get process status
                with open(f'/proc/{pid}/status', 'r') as f:
                    status_lines = f.readlines()
                    status = {}
                    for line in status_lines:
                        if ':' in line:
                            key, value = line.split(':', 1)
                            status[key.strip()] = value.strip()

                ## Get memory usage (VmRSS is physical memory used)
                memory_kb = int(status.get('VmRSS', '0 kB').split()[0]) if 'VmRSS' in status else 0

                processes.append({
                    'pid': int(pid),
                    'name': name,
                    'state': status.get('State', 'Unknown'),
                    'memory_kb': memory_kb
                })
            except (IOError, FileNotFoundError, ProcessLookupError):
                ## Process might have terminated while we were reading
                continue

    return processes

def display_processes(processes, top_n=10):
    """Display processes sorted by memory usage"""
    ## Sort processes by memory usage (highest first)
    sorted_processes = sorted(processes, key=lambda p: p['memory_kb'], reverse=True)

    ## Display only top N processes
    print(f"\nTop {top_n} processes by memory usage at {datetime.now().strftime('%H:%M:%S')}:")
    print(f"{'PID':<7} {'NAME':<20} {'STATE':<10} {'MEMORY (KB)':<12}")
    print("-" * 50)

    for proc in sorted_processes[:top_n]:
        print(f"{proc['pid']:<7} {proc['name'][:19]:<20} {proc['state']:<10} {proc['memory_kb']:<12}")

## Monitor processes continuously
print("Simple Process Monitor")
print("Press Ctrl+C to exit")

try:
    while True:
        processes = list_processes()
        display_processes(processes)
        time.sleep(3)  ## Update every 3 seconds
except KeyboardInterrupt:
    print("\nProcess monitoring stopped")
Run the process monitor:
python3 process_monitor.pyYou should see output similar to this, which will refresh every 3 seconds:
Simple Process Monitor
Press Ctrl+C to exit

Top 10 processes by memory usage at 14:30:25:
PID     NAME                 STATE      MEMORY (KB)
-------------------------------------------------------
1234    python3              S (sleeping) 56789
2345    node                 S (sleeping) 34567
3456    code                 S (sleeping) 23456
...
Let the process monitor run for about 10 seconds, then press Ctrl+C to stop it.
In these examples, we’ve learned how to:
- Load and use system libraries with
ctypes - Access system information
- Create a practical process monitoring tool
These principles are the same ones you would use to interact with Windows API through ctypes, just with different library names and function calls.
Creating and Using C Structs with ctypes
In this step, we’ll learn how to define and use C structures in Python. Structs are essential when working with system APIs as they’re commonly used to exchange data between Python and system libraries.
Understanding C Structures in Python
C structures can be represented in Python using the ctypes.Structure class. This allows us to create complex data structures that match the memory layout expected by C functions.
Let’s create a file named struct_example.py to explore how to work with structures:
import ctypes

## Define a simple C structure
class Point(ctypes.Structure):
    _fields_ = [
        ("x", ctypes.c_int),
        ("y", ctypes.c_int)
    ]

## Create an instance of the Point structure
p = Point(10, 20)
print(f"Point coordinates: ({p.x}, {p.y})")

## Modify structure fields
p.x = 100
p.y = 200
print(f"Updated coordinates: ({p.x}, {p.y})")

## Create a Point from a dictionary
values = {"x": 30, "y": 40}
p2 = Point(**values)
print(f"Point from dictionary: ({p2.x}, {p2.y})")

## Get the raw memory view (pointer) of the structure
p_ptr = ctypes.pointer(p)
print(f"Memory address of p: {ctypes.addressof(p)}")
print(f"Access via pointer: ({p_ptr.contents.x}, {p_ptr.contents.y})")

## Define a nested structure
class Rectangle(ctypes.Structure):
    _fields_ = [
        ("top_left", Point),
        ("bottom_right", Point),
        ("color", ctypes.c_int)
    ]

## Create a rectangle with two points
rect = Rectangle(Point(0, 0), Point(100, 100), 0xFF0000)
print(f"Rectangle: Top-Left: ({rect.top_left.x}, {rect.top_left.y}), "
      f"Bottom-Right: ({rect.bottom_right.x}, {rect.bottom_right.y}), "
      f"Color: {hex(rect.color)}")

## Calculate the area (demonstrating structure manipulation)
width = rect.bottom_right.x - rect.top_left.x
height = rect.bottom_right.y - rect.top_left.y
print(f"Rectangle area: {width * height}")
Run the script:
python3 struct_example.pyYou should see output similar to this:
Point coordinates: (10, 20)
Updated coordinates: (100, 200)
Point from dictionary: (30, 40)
Memory address of p: 140737345462208
Access via pointer: (100, 200)
Rectangle: Top-Left: (0, 0), Bottom-Right: (100, 100), Color: 0xff0000
Rectangle area: 10000
Creating a System Time Utility
Now, let’s create a practical application that uses C structures to interact with the system time functions. Create a file named time_utility.py:
import ctypes
import time
from datetime import datetime

## Define the timespec structure (used in Linux for high-resolution time)
class timespec(ctypes.Structure):
    _fields_ = [
        ("tv_sec", ctypes.c_long),
        ("tv_nsec", ctypes.c_long)
    ]

## Define the tm structure (used for calendar time representation)
class tm(ctypes.Structure):
    _fields_ = [
        ("tm_sec", ctypes.c_int),     ## seconds (0 - 60)
        ("tm_min", ctypes.c_int),     ## minutes (0 - 59)
        ("tm_hour", ctypes.c_int),    ## hours (0 - 23)
        ("tm_mday", ctypes.c_int),    ## day of month (1 - 31)
        ("tm_mon", ctypes.c_int),     ## month of year (0 - 11)
        ("tm_year", ctypes.c_int),    ## year - 1900
        ("tm_wday", ctypes.c_int),    ## day of week (0 - 6, Sunday = 0)
        ("tm_yday", ctypes.c_int),    ## day of year (0 - 365)
        ("tm_isdst", ctypes.c_int)    ## is daylight saving time in effect
    ]

## Load the C library
libc = ctypes.CDLL("libc.so.6")

def get_system_time():
    """Get the current system time using C functions"""
    ## Get current time as seconds since epoch
    time_t_ptr = ctypes.pointer(ctypes.c_long())
    libc.time(time_t_ptr)  ## time() function gets current time

    ## Convert to printable time string
    time_val = time_t_ptr.contents.value
    time_str = ctypes.string_at(libc.ctime(time_t_ptr))

    return {
        "timestamp": time_val,
        "formatted_time": time_str.decode().strip()
    }

def get_high_resolution_time():
    """Get high resolution time using clock_gettime"""
    ts = timespec()

    ## CLOCK_REALTIME is usually 0
    CLOCK_REALTIME = 0

    ## Call clock_gettime to fill the timespec structure
    if libc.clock_gettime(CLOCK_REALTIME, ctypes.byref(ts)) != 0:
        raise OSError("Failed to get time")

    return {
        "seconds": ts.tv_sec,
        "nanoseconds": ts.tv_nsec,
        "precise_time": ts.tv_sec + (ts.tv_nsec / 1_000_000_000)
    }

def time_breakdown():
    """Break down the current time into its components using localtime"""
    ## Get current time
    time_t_ptr = ctypes.pointer(ctypes.c_long())
    libc.time(time_t_ptr)

    ## Get local time
    tm_ptr = libc.localtime(time_t_ptr)
    tm_struct = ctypes.cast(tm_ptr, ctypes.POINTER(tm)).contents

    ## Return time components
    return {
        "year": 1900 + tm_struct.tm_year,
        "month": 1 + tm_struct.tm_mon,  ## tm_mon is 0-11, we adjust to 1-12
        "day": tm_struct.tm_mday,
        "hour": tm_struct.tm_hour,
        "minute": tm_struct.tm_min,
        "second": tm_struct.tm_sec,
        "weekday": tm_struct.tm_wday,  ## 0 is Sunday
        "yearday": tm_struct.tm_yday + 1  ## tm_yday is 0-365, we adjust to 1-366
    }

## Main program
print("Time Utility using C Structures")
print("-" * 40)

## Get and display system time
sys_time = get_system_time()
print(f"System time: {sys_time['formatted_time']}")
print(f"Timestamp (seconds since epoch): {sys_time['timestamp']}")

## Get and display high-resolution time
hi_res = get_high_resolution_time()
print(f"\nHigh resolution time:")
print(f"Seconds: {hi_res['seconds']}")
print(f"Nanoseconds: {hi_res['nanoseconds']}")
print(f"Precise time: {hi_res['precise_time']}")

## Get and display time breakdown
components = time_breakdown()
print(f"\nTime breakdown:")
print(f"Date: {components['year']}-{components['month']:02d}-{components['day']:02d}")
print(f"Time: {components['hour']:02d}:{components['minute']:02d}:{components['second']:02d}")
print(f"Day of week: {components['weekday']} (0=Sunday)")
print(f"Day of year: {components['yearday']}")

## Compare with Python's datetime
now = datetime.now()
print(f"\nPython datetime: {now}")
print(f"Python timestamp: {time.time()}")
Run the time utility:
python3 time_utility.pyYou should see output similar to this:
Time Utility using C Structures
----------------------------------------
System time: Wed Jun 14 15:22:36 2023
Timestamp (seconds since epoch): 1686756156

High resolution time:
Seconds: 1686756156
Nanoseconds: 923456789
Precise time: 1686756156.923457

Time breakdown:
Date: 2023-06-14
Time: 15:22:36
Day of week: 3 (0=Sunday)
Day of year: 165

Python datetime: 2023-06-14 15:22:36.923499
Python timestamp: 1686756156.9234989
Understanding Memory Management with ctypes
When working with ctypes and C structures, it’s important to understand memory management. Let’s create one more example, memory_management.py, to demonstrate this:
import ctypes
import gc  ## Garbage collector module

## Define a simple structure
class MyStruct(ctypes.Structure):
    _fields_ = [
        ("id", ctypes.c_int),
        ("value", ctypes.c_double),
        ("name", ctypes.c_char * 32)  ## Fixed-size character array
    ]

def demonstrate_memory_management():
    print("Memory Management with ctypes")
    print("-" * 40)

    ## Create a structure instance
    my_data = MyStruct(
        id=1,
        value=3.14159,
        name=b"Example"
    )

    print(f"Structure size: {ctypes.sizeof(my_data)} bytes")
    print(f"Memory address: {hex(ctypes.addressof(my_data))}")

    ## Create a pointer to the structure
    data_ptr = ctypes.pointer(my_data)
    print(f"Pointer value: {hex(ctypes.cast(data_ptr, ctypes.c_void_p).value)}")

    ## Access through pointer
    print(f"Access via pointer: id={data_ptr.contents.id}, value={data_ptr.contents.value}")

    ## Allocate memory for a new structure
    new_struct_ptr = ctypes.POINTER(MyStruct)()
    new_struct_ptr = ctypes.cast(
        ctypes.create_string_buffer(ctypes.sizeof(MyStruct)),
        ctypes.POINTER(MyStruct)
    )

    ## Initialize the allocated memory
    new_struct = new_struct_ptr.contents
    new_struct.id = 2
    new_struct.value = 2.71828
    new_struct.name = b"Allocated"

    print(f"\nAllocated structure memory address: {hex(ctypes.addressof(new_struct))}")
    print(f"Allocated structure content: id={new_struct.id}, value={new_struct.value}, name={new_struct.name.decode()}")

    ## Create an array of structures
    StructArray = MyStruct * 3
    struct_array = StructArray(
        MyStruct(10, 1.1, b"First"),
        MyStruct(20, 2.2, b"Second"),
        MyStruct(30, 3.3, b"Third")
    )

    print("\nArray of structures:")
    for i, item in enumerate(struct_array):
        print(f"  [{i}] id={item.id}, value={item.value}, name={item.name.decode()}")

    ## Force garbage collection
    print("\nForcing garbage collection...")
    gc.collect()

    ## Memory is automatically managed by Python

## Run the demonstration
demonstrate_memory_management()
Run the memory management script:
python3 memory_management.pyYou should see output similar to this:
Memory Management with ctypes
----------------------------------------
Structure size: 48 bytes
Memory address: 0x7f3c2e32b040
Pointer value: 0x7f3c2e32b040
Access via pointer: id=1, value=3.14159

Allocated structure memory address: 0x7f3c2e32b0a0
Allocated structure content: id=2, value=2.71828, name=Allocated

Array of structures:
  [0] id=10, value=1.1, name=First
  [1] id=20, value=2.2, name=Second
  [2] id=30, value=3.3, name=Third

Forcing garbage collection...
In these examples, we’ve learned how to:
- Define and use C structures in Python with
ctypes - Create pointers to structures and access their contents
- Create nested structures and arrays of structures
- Build practical applications using system time functions
- Manage memory when working with
ctypes
These skills are essential when working with Windows API functions, which frequently require complex data structures for passing information back and forth.
Building a Complete System Monitor Application
In this final step, we’ll put all our knowledge together to build a comprehensive system monitor application. This application will use ctypes to gather system information, display real-time metrics, and demonstrate how to structure a larger Python application that interacts with system libraries.
Creating the System Monitor
Create a new file named system_monitor.py with the following content:
import ctypes
import os
import time
import platform
from datetime import datetime

class SystemMonitor:
    """System monitoring application using ctypes"""

    def __init__(self):
        """Initialize the system monitor"""
        self.libc = ctypes.CDLL("libc.so.6")
        self.running = False

        ## Define a timespec structure for time-related functions
        class timespec(ctypes.Structure):
            _fields_ = [
                ("tv_sec", ctypes.c_long),
                ("tv_nsec", ctypes.c_long)
            ]
        self.timespec = timespec

        ## Print basic system information
        print(f"System Monitor for {platform.system()} {platform.release()}")
        print(f"Python Version: {platform.python_version()}")
        print(f"Machine: {platform.machine()}")
        print("-" * 50)

    def get_uptime(self):
        """Get system uptime information"""
        try:
            CLOCK_BOOTTIME = 7  ## Linux specific
            time_buf = self.timespec()

            if hasattr(self.libc, 'clock_gettime') and self.libc.clock_gettime(CLOCK_BOOTTIME, ctypes.byref(time_buf)) == 0:
                uptime_seconds = time_buf.tv_sec
                days, remainder = divmod(uptime_seconds, 86400)
                hours, remainder = divmod(remainder, 3600)
                minutes, seconds = divmod(remainder, 60)
                return {
                    "total_seconds": uptime_seconds,
                    "days": days,
                    "hours": hours,
                    "minutes": minutes,
                    "seconds": seconds
                }
            return None
        except Exception as e:
            print(f"Error getting uptime: {e}")
            return None

    def get_memory_info(self):
        """Get memory usage information using /proc/meminfo"""
        memory_info = {}
        try:
            with open('/proc/meminfo', 'r') as f:
                for line in f:
                    if ':' in line:
                        key, value = line.split(':', 1)
                        ## Remove 'kB' and convert to integer
                        value = value.strip()
                        if 'kB' in value:
                            value = int(value.split()[0]) * 1024  ## Convert to bytes
                        memory_info[key.strip()] = value

            ## Calculate memory usage percentage
            if 'MemTotal' in memory_info and 'MemAvailable' in memory_info:
                total = int(memory_info['MemTotal'])
                available = int(memory_info['MemAvailable'])
                used = total - available
                memory_info['UsedPercentage'] = (used / total) * 100

            return memory_info
        except Exception as e:
            print(f"Error getting memory info: {e}")
            return {}

    def get_cpu_info(self):
        """Get CPU information using /proc/stat"""
        cpu_info = {'cpu_percent': 0}
        try:
            ## We need two readings to calculate CPU usage
            def get_cpu_sample():
                with open('/proc/stat', 'r') as f:
                    line = f.readline()
                cpu_values = [int(x) for x in line.split()[1:8]]
                return sum(cpu_values), cpu_values[3]  ## Return total and idle

            ## First sample
            total1, idle1 = get_cpu_sample()
            time.sleep(0.5)  ## Wait for 0.5 second

            ## Second sample
            total2, idle2 = get_cpu_sample()

            ## Calculate CPU usage
            total_delta = total2 - total1
            idle_delta = idle2 - idle1

            if total_delta > 0:
                cpu_info['cpu_percent'] = 100 * (1 - idle_delta / total_delta)

            return cpu_info
        except Exception as e:
            print(f"Error getting CPU info: {e}")
            return cpu_info

    def get_disk_info(self):
        """Get disk usage information"""
        try:
            ## Get disk usage for the root filesystem
            stat = os.statvfs('/')

            ## Calculate total, free, and used space
            total = stat.f_blocks * stat.f_frsize
            free = stat.f_bfree * stat.f_frsize
            used = total - free

            return {
                'total_bytes': total,
                'free_bytes': free,
                'used_bytes': used,
                'used_percent': (used / total) * 100 if total > 0 else 0
            }
        except Exception as e:
            print(f"Error getting disk info: {e}")
            return {}

    def get_process_count(self):
        """Count running processes"""
        try:
            return len([p for p in os.listdir('/proc') if p.isdigit()])
        except Exception as e:
            print(f"Error counting processes: {e}")
            return 0

    def format_bytes(self, bytes_value):
        """Format bytes into a human-readable format"""
        for unit in ['B', 'KB', 'MB', 'GB', 'TB']:
            if bytes_value < 1024 or unit == 'TB':
                return f"{bytes_value:.2f} {unit}"
            bytes_value /= 1024

    def display_dashboard(self):
        """Display the system monitoring dashboard"""
        ## Clear the screen (works in most terminals)
        print("\033c", end="")

        ## Display header
        current_time = datetime.now().strftime("%Y-%m-%d %H:%M:%S")
        print(f"System Monitor - {current_time}")
        print("-" * 50)

        ## Display uptime
        uptime = self.get_uptime()
        if uptime:
            print(f"Uptime: {uptime['days']} days, {uptime['hours']} hours, "
                  f"{uptime['minutes']} minutes, {uptime['seconds']} seconds")

        ## Display CPU usage
        cpu_info = self.get_cpu_info()
        print(f"CPU Usage: {cpu_info['cpu_percent']:.1f}%")

        ## Display memory information
        memory_info = self.get_memory_info()
        if memory_info and 'MemTotal' in memory_info:
            print("\nMemory Information:")
            total = int(memory_info['MemTotal'])
            available = int(memory_info.get('MemAvailable', 0))
            used = total - available
            print(f"  Total: {self.format_bytes(total)}")
            print(f"  Used: {self.format_bytes(used)} ({memory_info.get('UsedPercentage', 0):.1f}%)")
            print(f"  Available: {self.format_bytes(available)}")
            if 'SwapTotal' in memory_info:
                swap_total = int(memory_info['SwapTotal'])
                swap_free = int(memory_info.get('SwapFree', 0))
                swap_used = swap_total - swap_free
                if swap_total > 0:
                    print(f"  Swap Used: {self.format_bytes(swap_used)} "
                          f"({(swap_used / swap_total) * 100:.1f}%)")

        ## Display disk information
        disk_info = self.get_disk_info()
        if disk_info:
            print("\nDisk Information (/):")
            print(f"  Total: {self.format_bytes(disk_info['total_bytes'])}")
            print(f"  Used: {self.format_bytes(disk_info['used_bytes'])} "
                  f"({disk_info['used_percent']:.1f}%)")
            print(f"  Free: {self.format_bytes(disk_info['free_bytes'])}")

        ## Display process count
        process_count = self.get_process_count()
        print(f"\nRunning Processes: {process_count}")

        print("\nPress Ctrl+C to exit")

    def start_monitoring(self, interval=2):
        """Start the system monitoring with the specified refresh interval"""
        self.running = True
        try:
            while self.running:
                self.display_dashboard()
                time.sleep(interval)
        except KeyboardInterrupt:
            print("\nMonitoring stopped.")
            self.running = False

## Create and start the system monitor
if __name__ == "__main__":
    monitor = SystemMonitor()
    monitor.start_monitoring()
Run the system monitor:
python3 system_monitor.pyThe system monitor will display real-time information about your system, updating every 2 seconds. You should see a dashboard with:
- System uptime
- CPU usage
- Memory information (total, used, available)
- Disk usage
- Process count
Let the monitor run for a few moments to observe how the metrics change, then press Ctrl+C to exit.
Understanding the System Monitor Structure
Let’s break down the key components of our system monitor:
- Class Structure: Using object-oriented programming to organize our code
- Method Organization: Separating functionality into distinct methods
- Error Handling: Using try-except blocks to handle potential errors
- Data Formatting: Converting raw data into human-readable formats
- Real-time Updates: Using a loop with time.sleep() for periodic updates
Adding Documentation
Now, let’s add a documentation file for our system monitor. Create a file named README.md:
Python System Monitor
A comprehensive system monitoring application built with Python using ctypes for system interactions.
Features
- Real-time CPU usage monitoring
- Memory usage tracking
- Disk space analysis
- Process count
- System uptime display
Requirements
- Python 3.6 or higher
- Linux operating system
How to Run
Simply execute the main script:
python system_monitor.py### How It Works
This application uses Python's `ctypes` library to interface with system libraries and access low-level system information. It also uses the `/proc` filesystem to gather additional metrics about the system state.
The monitoring happens in real-time with updates every 2 seconds (configurable).
### Architecture
The application follows an object-oriented approach with these key components:
1. **SystemMonitor class**: Main class that orchestrates the monitoring
2. **Data Collection Methods**: Methods for gathering different system metrics
3. **Display Methods**: Methods for formatting and displaying the collected data
### Extending the Monitor
To add new monitoring capabilities:
1. Create a new method in the `SystemMonitor` class to collect the desired data
2. Update the `display_dashboard` method to show the new information
3. Ensure proper error handling for robustness
### Learning Resources
- [Python ctypes Documentation](https://docs.python.org/3/library/ctypes.html)
- [Linux Proc Filesystem Documentation](https://man7.org/linux/man-pages/man5/proc.5.html)
### Review and Summary
Let's review what we've accomplished in this lab:
1. We learned how to use Python's `ctypes` library to interact with system libraries
2. We explored C data types and structures in Python
3. We created several practical applications:
- Basic system information retrieval
- Process monitoring
- Time utilities
- Memory management demonstration
- Comprehensive system monitor
4. We learned how to:
- Load dynamic libraries
- Call C functions from Python
- Define and manipulate C structures
- Work with pointers and memory addresses
- Handle system-level errors
These skills form the foundation for working with the Windows API when developing on Windows systems. The principles remain the same - you'll load Windows-specific libraries (like kernel32.dll, user32.dll, etc.) instead of libc, but the approach to defining structures, calling functions, and handling the data remains consistent.Summary
In this lab, you’ve learned how to use Python’s ctypes library to interact with system libraries and perform system-level operations. While the lab was conducted in a Linux environment, the principles and techniques you’ve learned apply directly to Windows API programming as well.
Key takeaways from this lab:
-
Understanding ctypes Fundamentals: You’ve learned how to load dynamic libraries, define C data types, and call system functions from Python.
-
Working with C Structures: You’ve mastered creating and manipulating C structures in Python, essential for exchanging complex data with system libraries.
-
Memory Management: You’ve gained insights into memory allocation, pointers, and memory management when working with system libraries.
-
Building Practical Applications: You’ve applied your knowledge to create useful applications, culminating in a comprehensive system monitor.
-
System Integration: You’ve seen how Python can be integrated with low-level system functionality through the
ctypesbridge.
These skills provide a solid foundation for developing applications that need to interact with the operating system at a low level, whether on Linux or Windows. When working on Windows systems, you would use the same approach but with Windows-specific libraries and API functions.
Further learning could involve exploring Windows-specific APIs for window management, graphical interfaces, system services, or networking capabilities using the techniques you’ve learned in this lab.

PythonForWindows
PythonForWindows (PFW) is a base of code aimed to make interaction with Windows (on X86/X64) easier (for both 32 and 64 bits Python).
Its goal is to offer abstractions around some of the OS features in a (I hope) pythonic way.
It also tries to make the barrier between python and native execution thinner in both ways.
There is no external dependencies but it relies heavily on the ctypes module.
Let’s say that the codebase evolves with my needs, my researches and my curiosity.
Complete online documentation is available here
You can find some examples of code in the samples directory or online.
PythonForWindows is principally known for:
- its ALPC-RPC Client (see samples)
- its generated ctypes definitions.
If you have any issue, question or suggestion do not hesitate to create an issue or reach me out.
I am always glad to have feedbacks from people using this project.
Installation
PythonForWindows is available on Pypi an this can be installed with
python -m pip install PythonForWindows
You can also install PythonForWindows by cloning it and using the setup.py script:
python setup.py install
Encoding & unicode
PythonForWindows support python2.7 & python3 and is currently tested for Python2.7, 3.6 & 3.11 via Github Workflow
Since 1.0.0, the code uses «wide APIs» whenever possible and accept/returns python3 str (py2.7 unicode type) almost everywhere. Any functions/APIs not accepting unicode string can be considered a bug if its not stated explicitly in the documentation.
Python2
PythonForWindows continues to support python2.7 as its the only way to have it running on Windows XP & Windows Server 2003 which are sadly still seen in production.
Encoding errors at print time might be awkward for unicode string on python2, see the PythonForWindows encoding guide in the documentation.
Overview
Processes / Threads
PythonForWindows offers objects around processes and allows you to:
- Retrieve basic process informations (pid, name, ppid, bitness, …)
- Perform basic interprocess operation (allocation, create thread, read/write memory)
- Explore the PEB (Process Environment Block)
- Execute
nativeandPythoncode in the context of a process.
I try my best to make those features available for every cross-bitness processes (32 <-> 64 in both ways).
This involves relying on non-documented Windows functions/behaviours and also injecting code in the 64bits world of a Syswow64 process.
All those operations are also available for the current_process.
You can also make some operation on threads (suspend/resume/wait/get(or set) context/ kill)
>>> import windows
>>> windows.current_process.bitness
32
>>> windows.current_process.token.integrity
SECURITY_MANDATORY_MEDIUM_RID(0x2000)
>>> proc = [p for p in windows.system.processes if p.name == "notepad.exe"][0]
>>> proc
<WinProcess "notepad.exe" pid 16520 at 0x544e410>
>>> proc.bitness
64
>>> proc.peb.modules[:3]
[<RemoteLoadedModule64 "notepad.exe" at 0x3671e90>, <RemoteLoadedModule64 "ntdll.dll" at 0x3671030>, <RemoteLoadedModule64 "kernel32.dll" at 0x3671080>]
>>> k32 = proc.peb.modules[2]
>>> hex(k32.pe.exports["CreateFileW"])
'0x7ffee6761550L'
>>> proc.threads[0]
<WinThread 17688 owner "notepad.exe" at 0x53b47f0>
>>> hex(proc.threads[0].context.Rip)
'0x7ffee68b54b0L'
>>> proc.execute_python("import os")
True
>>> proc.execute_python("exit(os.getpid() + 1)")
# execute_python raise if process died
Traceback (most recent call last):
...
WindowsError: <WinProcess "notepad.exe" pid 16520 (DEAD) at 0x579f610> died during execution of python command
>>> calc
<WinProcess "notepad.exe" pid 16520 (DEAD) at 0x579f610>
>>> calc.exit_code
16521L
System information
Information about the Windows computer running the script are available through the windows.system object.
>>> windows.system
<windows.winobject.system.System object at 0x03FEED10>
>>> windows.system.bitness
64
>>> windows.system.computer_name
'DESKTOP-VKUGISR'
>>> windows.system.product_type
VER_NT_WORKSTATION(0x1)
>>> windows.system.version
(10, 0)
>>> windows.system.version_name
'Windows 10'
>>> windows.system.build_number
'10.0.15063.608'

# windows.system also contains dynamic lists about processes / threads / handles / ...
>>> windows.system.handles[-2:]
[<Handle value=<0x5cc> in process pid=14360>, <Handle value=<0x28e4> in process pid=14360>]
>>> windows.system.processes[:2]
[<WinProcess "[System Process]" pid 0 at 0x433f7d0>, <WinProcess "System" pid 4 at 0x433fd30>]
>>> windows.system.logicaldrives[0]
<LogicalDrive "C:\" (DRIVE_FIXED)>
>>> windows.system.services[23]
<ServiceA "Appinfo" SERVICE_RUNNING(0x4)>
IAT Hook
This codebase is born from my need to have IAT hooks implemented in Python.
So the features is present (See online documentation about IAT hooks).
Winproxy
A wrapper around some Windows functions. Arguments name and order are the same,
but some have default values and the functions raise exception on call error (I don’t like if around all my call).
>>> import windows
>>> help(windows.winproxy.VirtualAlloc)
# Help on function VirtualAlloc in module windows.winproxy:
# VirtualAlloc(lpAddress=0, dwSize=NeededParameter, flAllocationType=MEM_COMMIT(0x1000L), flProtect=PAGE_EXECUTE_READWRITE(0x40L))
#     Errcheck:
#     raise WinproxyError if result is 0

# Positional arguments
>>> windows.winproxy.VirtualAlloc(0, 0x1000)
34537472

# Keyword arguments
>>> windows.winproxy.VirtualAlloc(dwSize=0x1000)
34603008

# NeededParameter must be provided
>>> windows.winproxy.VirtualAlloc()
"""
Traceback (most recent call last):
File "<stdin>", line 1, in <module>
File "windows\winproxy.py", line 264, in VirtualAlloc
    return VirtualAlloc.ctypes_function(lpAddress, dwSize, flAllocationType, flProtect)
File "windows\winproxy.py", line 130, in perform_call
    raise TypeError("{0}: Missing Mandatory parameter <{1}>".format(self.func_name, param_name))
TypeError: VirtualAlloc: Missing Mandatory parameter <dwSize>
"""

# Error raises exception
>>> windows.winproxy.VirtualAlloc(dwSize=0xffffffff)
"""
Traceback (most recent call last):
File "<stdin>", line 1, in <module>
File "windows\winproxy.py", line 264, in VirtualAlloc
    return VirtualAlloc.ctypes_function(lpAddress, dwSize, flAllocationType, flProtect)
File "windows\winproxy.py", line 133, in perform_call
    return self._cprototyped(*args)
File "windows\winproxy.py", line 59, in kernel32_error_check
    raise WinproxyError(func_name)
windows.winproxy.error.WinproxyError: VirtualAlloc: [Error 87] The parameter is incorrect.
"""
Native execution
To make the barrier between native and Python code thinner,
PythonForWindows allows you to create native function callable from Python (thanks to ctypes) and also embed
a simple x86/x64 assembler.
>>> import windows.native_exec.simple_x86 as x86
>>> code = x86.MultipleInstr()
>>> code += x86.Mov("EAX", 41)
>>> code += x86.Inc("EAX")
>>> code += x86.Ret()
>>> code.get_code()
'\xc7\xc0)\x00\x00\x00@\xc3'
# Create a function that takes no parameters and return an uint
>>> f = windows.native_exec.create_function(code.get_code(), [ctypes.c_uint])
>>> f()
42L
# Assemblers can also be used in a more standard way
>>> x86.assemble("cmp edi, 0; jnz :end; mov eax, 1; label :end; ret")
'\x81\xff\x00\x00\x00\x00u\x06\xc7\xc0\x01\x00\x00\x00\xc3'
Token / Security Descriptor
Objects easing access to some information about Token and SecurityDescriptor are also available.
>>> import windows.security
>>> import windows.generated_def as gdef
>>> tok = windows.current_process.token
>>> tok
<Token TokenId=0x6a2b4550 Type=TokenPrimary(0x1)>
>>> tok.username
u'hakril'
>>> tok.type
tagTOKEN_TYPE.TokenPrimary(0x1)
>>> tok.integrity
SECURITY_MANDATORY_MEDIUM_RID(0x2000)
>>> tok.duplicate(type=gdef.TokenImpersonation, impersonation_level=gdef.SecurityIdentification)
<Token TokenId=0x6a3532ce Type=TokenImpersonation(0x2) ImpersonationLevel=SecurityIdentification(0x1)>

# Security Descriptor
>>> sd = windows.security.SecurityDescriptor.from_filename("c:\windows\system32\kernel32.dll")
>>> sd
<SecurityDescriptor object at 0x054E3DF0>
>>> windows.utils.lookup_sid(sd.owner)
(u'NT SERVICE', u'TrustedInstaller')
>>> sd.dacl
<Acl count=6>
>>> list(sd.dacl)
[<AccessAllowedACE mask=2032127>, <AccessAllowedACE mask=1179817>, <AccessAllowedACE mask=1179817>, <AccessAllowedACE mask=1179817>, <AccessAllowedACE mask=1179817>, <AccessAllowedACE mask=1179817>]
>>> sd.dacl[1].sid
<PSID "S-1-5-32-544">
Wintrust
To easily script some signature check script, PythonForWindows implements some wrapper functions around wintrust.dll
>>> import windows.wintrust
>>> windows.wintrust.is_signed(r"C:\Windows\system32\ntdll.dll")
True
>>> windows.wintrust.is_signed(r"C:\Windows\system32\python27.dll")
False
>>> windows.wintrust.full_signature_information(r"C:\Windows\system32\ntdll.dll")
SignatureData(signed=True,
    catalog=u'C:\\Windows\\system32\\CatRoot\\{F750E6C3-38EE-11D1-85E5-00C04FC295EE}\\Package_35_for_KB3128650~31bf3856ad364e35~amd64~~6.3.1.2.cat',
    catalogsigned=True, additionalinfo=0L)
>>> windows.wintrust.full_signature_information(r"C:\Windows\system32\python27.dll")
SignatureData(signed=False, catalog=None, catalogsigned=False, additionalinfo=TRUST_E_NOSIGNATURE(0x800b0100))
WMI
To extract/play with even more information about the system, PythonForWindows is able to perform WMI request.
>>> import windows
>>> windows.system.wmi.select
<bound method WmiNamespace.select of <WmiNamespace "root\cimv2">>
>>> windows.system.wmi.select("Win32_Process")[:3]
[<WmiObject instance of "Win32_Process">, <WmiObject instance of "Win32_Process">, <WmiObject instance of "Win32_Process">]# Get WMI data for current process
>>> windows.system.wmi.select("Win32_Process")[42]["Name"]
u'svchost.exe'
>>> wmi_cp = [p for p in windows.system.wmi.select("Win32_Process") if int(p["Handle"]) == windows.current_process.pid][0]
>>> wmi_cp["CommandLine"], wmi_cp["HandleCount"]
(u'"C:\\Python27\\python.exe"', 227)
Registry
The project also contains some wrapping classes around _winreg for simpler use.
>>> import windows
>>> from windows.generated_def import KEY_WRITE, KEY_READ, REG_QWORD
>>> registry = windows.system.registry
>>> cuuser_software = registry(r'HKEY_CURRENT_USER\Software')
>>> cuuser_software
<PyHKey "HKEY_CURRENT_USER\Software">
>>> cuuser_software.sam
KEY_READ(0x20019)
# Explore subkeys
>>> cuuser_software.subkeys[:3]
[<PyHKey "HKEY_CURRENT_USER\Software\7-Zip">, <PyHKey "HKEY_CURRENT_USER\Software\AppDataLow">, <PyHKey "HKEY_CURRENT_USER\Software\Audacity">]
>>> tstkey = registry('HKEY_CURRENT_USER\TestKey',  KEY_WRITE | KEY_READ)
# Get / Set individual value
>>> tstkey["VALUE"] = 'a_value_for_my_key'
>>> tstkey["VALUE"]
KeyValue(name='VALUE', value=u'a_value_for_my_key', type=1)
>>> tstkey["MYQWORD"] = (123456789987654321, REG_QWORD)  # Default is REG_DWORD for int/long
>>> tstkey["MYQWORD"]
KeyValue(name='MYQWORD', value=123456789987654321L, type=11)
# Explore Values
>>> tstkey.values
[KeyValue(name='MYQWORD', value=123456789987654321L, type=11), KeyValue(name='VALUE', value=u'a_value_for_my_key', type=1)]
Object manager
PythonForWindows uses the native Windows NT API to display some information about the object in the Object Manager’s name space.
Just like the well-known tools winobj.exe
>>> windows.system.object_manager.root
<KernelObject "\" (type="Directory")>
# The objects of type "Directory" can be acceded just like a dict
>>> list(windows.system.object_manager.root)[:3]
[u'PendingRenameMutex', u'ObjectTypes', u'storqosfltport']
# Find an object by its path
>>> windows.system.object_manager["KnownDLLs\\kernel32.dll"]
<KernelObject "\KnownDLLs\kernel32.dll" (type="Section")>
>>> k32 = windows.system.object_manager["KnownDLLs\\kernel32.dll"]
>>> k32.name, k32.fullname, k32.type
('kernel32.dll', '\\KnownDLLs\\kernel32.dll', u'Section')
# Follow SymbolicLink object
>>> windows.system.object_manager["\\KnownDLLs\\KnownDLLPath"]
<KernelObject "\KnownDLLs\KnownDLLPath" (type="SymbolicLink")>
>>> windows.system.object_manager["\\KnownDLLs\\KnownDLLPath"].target
u'C:\\WINDOWS\\System32'
Scheduled Task
The windows.system.task_scheduler object allows to query and create scheduled task.
This part is still in developpement and the API may evolve
>>> windows.system.task_scheduler
<TaskService at 0x4774670>
>>> windows.system.task_scheduler.root
<TaskFolder "\" at 0x4774710>
>>> task = windows.system.task_scheduler.root.tasks[2]
>>> task
<Task "DemoTask" at 0x47748f0>
>>> task.name
u'DemoTask'
# Explore task actions
>>> task.definition.actions[1]
<ExecAction at 0x4774800>
>>> task.definition.actions[1].path
u'c:\\windows\\python\\python.exe'
>>> task.definition.actions[1].arguments
u'yolo.py --test'
Event logs
The windows.system.event_log object allows to query event logs.
This part is still in developpement and the API may evolve
>>> windows.system.event_log
<windows.winobject.event_log.EvtlogManager object at 0x04A78270>
# Find a channel by its name
>>> chan = windows.system.event_log["Microsoft-Windows-Windows Firewall With Advanced Security/Firewall"]
>>> chan
<EvtChannel "Microsoft-Windows-Windows Firewall With Advanced Security/Firewall">
# Open .evtx files
>>> windows.system.event_log["test.evtx"]
<EvtFile "test.evtx">
# Query a channel for all events
>>> chan.query().all()[:2]
[<EvtEvent id="2004" time="2018-07-12 07:44:08.081504">, <EvtEvent id="2006" time="2018-07-12 07:57:59.806938">]
# Query a channel for some ids
>>> chan.query(ids=2004).all()[:2]
[<EvtEvent id="2004" time="2018-07-12 07:44:08.081504">, <EvtEvent id="2004" time="2018-07-12 07:57:59.815156">]
# Query a channel via XPATH
>>> evt = chan.query("Event/EventData[Data='Netflix']").all()[0]
# Explore event information
>>> evt
<EvtEvent id="2006" time="2018-07-17 10:32:39.160423">
>>> evt.data
{u'ModifyingUser': 69828304, u'RuleName': u'Netflix', u'ModifyingApplication': ...}
ALPC-RPC
ALPC
Classes around Advanced Local Procedure Call (ALPC) syscalls allows to simply
write client and server able to send ALPC messages.
>>> import windows.alpc
# Test server juste reply to each message with "REQUEST '{msg_data}' RECEIVED"
>>> client = windows.alpc.AlpcClient(r"\RPC Control\PythonForWindowsTESTPORT")
>>> response = client.send_receive("Hello world !")
>>> response
<windows.alpc.AlpcMessage object at 0x04C0D5D0>
>>> response.data
"REQUEST 'Hello world !' RECEIVED"
Full client/server code for this example is available is the ALPC samples along with a more complex example.
RPC
An RPC-Client based using ALPC communication is also integred
# Server (port ALPC '\RPC Control\HelloRpc') offers:
# Interface '41414141-4242-4343-4444-45464748494a' version 1.0
#   Method 1 -> int Add(int a, int b) -> return a + b
# This Test server is a real RPC Server using rpcrt4.dll and compiled with VS2015.

>>> import windows.rpc
>>> from windows.rpc import ndr
>>> client = windows.rpc.RPCClient(r"\RPC Control\HelloRpc")
>>> client
<windows.rpc.client.RPCClient object at 0x0411E130>
>>> iid = client.bind("41414141-4242-4343-4444-45464748494a")
>>> ndr_params = ndr.make_parameters([ndr.NdrLong] * 2)
# NDR pack + Make RPC call to method 1.
>>> resp = client.call(iid, 1, ndr_params.pack([41414141, 1010101]))
# Unpack the NDR response
>>> result = ndr.NdrLong.unpack(ndr.NdrStream(resp))
>>> result
42424242
A sample with the User Account Control (UAC) and one with lsasrv.dll are available in the RPC samples.
Debugger
PythonForWindows provides a standard debugger to debug other processes.
import windows
import windows.debug
import windows.test
import windows.native_exec.simple_x86 as x86
import windows.generated_def as gdef

from windows.test import pop_proc_32

class MyDebugger(windows.debug.Debugger):
    def on_exception(self, exception):
        code = exception.ExceptionRecord.ExceptionCode
        addr = exception.ExceptionRecord.ExceptionAddress
        print("Got exception {0} at 0x{1:x}".format(code, addr))
        if code == gdef.EXCEPTION_ACCESS_VIOLATION:
            print("Access Violation: kill target process")
            self.current_process.exit()

calc = windows.test.pop_proc_32(dwCreationFlags=gdef.DEBUG_PROCESS)
d = MyDebugger(calc)
calc.execute(x86.assemble("int3; mov [0x42424242], EAX; ret"))
d.loop()

## Ouput ##
Got exception EXCEPTION_BREAKPOINT(0x80000003) at 0x77e13c7d
Got exception EXCEPTION_BREAKPOINT(0x80000003) at 0x230000
Got exception EXCEPTION_ACCESS_VIOLATION(0xc0000005) at 0x230001
Access Violation: kill target process
The debugger handles
- Standard breakpoint
int3 - Hardware Execution breakpoint
DrX - Memory breakpoint
virtual protect
LocalDebugger
You can also debug your own process (or debug a process by injection) via the LocalDebugger.
The LocalDebugger is an abstraction around Vectored Exception Handler (VEH)
import windows
from windows.generated_def.winstructs import *
import windows.native_exec.simple_x86 as x86

class SingleSteppingDebugger(windows.debug.LocalDebugger):
    SINGLE_STEP_COUNT = 4
    def on_exception(self, exc):
        code = self.get_exception_code()
        context = self.get_exception_context()
        print("EXCEPTION !!!! Got a {0} at 0x{1:x}".format(code, context.pc))
        self.SINGLE_STEP_COUNT -= 1
        if self.SINGLE_STEP_COUNT:
            return self.single_step()
        return EXCEPTION_CONTINUE_EXECUTION

class RewriteBreakpoint(windows.debug.HXBreakpoint):
    def trigger(self, dbg, exc):
        context = dbg.get_exception_context()
        print("GOT AN HXBP at 0x{0:x}".format(context.pc))
        # Rewrite the infinite loop with 2 nop
        windows.current_process.write_memory(self.addr, "\x90\x90")
        # Ask for a single stepping
        return dbg.single_step()


d = SingleSteppingDebugger()
# Infinite loop + nop + ret
code = x86.assemble("label :begin; jmp :begin; nop; ret")
func = windows.native_exec.create_function(code, [PVOID])
print("Code addr = 0x{0:x}".format(func.code_addr))
# Create a thread that will infinite loop
t = windows.current_process.create_thread(func.code_addr, 0)
# Add a breakpoint on the infinite loop
d.add_bp(RewriteBreakpoint(func.code_addr))
t.wait()
print("Done!")

## Output ##

Code addr = 0x6a0002
GOT AN HXBP at 0x6a0002
EXCEPTION !!!! Got a EXCEPTION_SINGLE_STEP(0x80000004) at 0x6a0003
EXCEPTION !!!! Got a EXCEPTION_SINGLE_STEP(0x80000004) at 0x6a0004
EXCEPTION !!!! Got a EXCEPTION_SINGLE_STEP(0x80000004) at 0x6a0005
EXCEPTION !!!! Got a EXCEPTION_SINGLE_STEP(0x80000004) at 0x770c7c04
Done!
The local debugger handles
- Standard breakpoint
int3 - Hardware Execution breakpoint
DrX
Symbols
Classes around the Symbols APIs of dbghelp.dll are also implemented and can be used independently of the Debugger.
The path of dbghelp.dll can also be given via the PFW_DBGHELP_PATH environment variable.
# Python3

>>> from windows.debug import symbols
>>> # symbols.set_dbghelp_path(MY_DBGHELP_PATH)
>>> symbols.engine.options = 0 # Disable defered load
>>> sh = symbols.VirtualSymbolHandler()
>>> ntmod = sh.load_file(r"c:\windows\system32\ntdll.dll", addr=0x420000)
>>> ntmod
<SymbolModule name="ntdll" type=SymPdb pdb="ntdll.pdb" addr=0x420000>
>>> ntmod.name
'ntdll'
>>> ntmod.path
'c:\\windows\\system32\\ntdll.dll'
>>> ntmod.pdb
'c:\\Symbols\\ntdll.pdb\\8D5D5ED5D5B8AA609A82600C14E3004D1\\ntdll.pdb'
>>> sym = sh["ntdll!LdrLoadDll"]
>>> sym
<SymbolInfoW name="LdrLoadDll" start=0x44a160 tag=SymTagFunction>
>>> sym.fullname
'ntdll!LdrLoadDll'
>>> hex(sym.addr)
'0x44a160'
>>> sh.search("ntdll!*CreateFile")
[<SymbolInfoW name="EtwpCreateFile" start=0x47d9ec tag=SymTagFunction>, <SymbolInfoW name="EtwpCreateFile" start=0x47d9ec tag=SymTagPublicSymbol>, <SymbolInfoW name="NtCreateFile" start=0x4c03e0 tag=SymTagPublicSymbol>, <SymbolInfoW name="ZwCreateFile" start=0x4c03e0 tag=SymTagPublicSymbol>, <SymbolInfoW name="__imp_NtCreateFile" start=0x55cb70 tag=SymTagPublicSymbol>]
# Some types exploration
>>> peb = sh.get_type("ntdll!_PEB")
>>> peb
<SymbolType name="_PEB" tag=_SymTagEnum.SymTagUDT(0xb)>
>>> peb.size
2000
>>> peb.children[:3]
[<SymbolType name="InheritedAddressSpace" tag=_SymTagEnum.SymTagData(0x7)>, <SymbolType name="ReadImageFileExecOptions" tag=_SymTagEnum.SymTagData(0x7)>, <SymbolType name="BeingDebugged" tag=_SymTagEnum.SymTagData(0x7)>]
>>> peb.children[2].offset
2
Other stuff (see doc / samples)
- Network
- COM
Acknowledgments
- clmntb for his initial work on
windows.security

Здравствуйте! Сегодня мы увидим, как создать Python-приложение, которое открывает системные приложения, такие как терминал Windows или блокнот, с помощью голосовых команд. Это отличный способ автоматизировать повседневные задачи и развить навыки программирования.
Что нам потребуется?
Для реализации этого проекта понадобятся:
- speech_recognition — для распознавания речи.
- os — для выполнения системных команд.
- PyAudio — для работы с микрофоном.
Установите зависимости с помощью следующих команд:
pip install SpeechRecognition

pip install pyaudio
Пример кода
Вот пример кода, который распознаёт голосовые команды и выполняет действия, такие как открытие терминала или блокнота:
import os

import speech_recognition as sr
def recognize_command():
"""
Распознаёт голосовую команду и возвращает текст.
"""
recognizer = sr.Recognizer()
with sr.Microphone() as source:
print("Говорите вашу команду...")
recognizer.adjust_for_ambient_noise(source)
try:
audio = recognizer.listen(source, timeout=5)
command = recognizer.recognize_google(audio, language="ru-RU")
print(f"Вы сказали: {command}")
return command.lower()
except sr.UnknownValueError:
print("Не удалось распознать речь.")
except sr.RequestError as e:
print(f"Ошибка сервиса распознавания речи: {e}")
return None
def execute_command(command):
"""
Выполняет действия на основе распознанной команды.
"""
if "открой терминал" in command or "запусти командную строку" in command:
print("Открываю терминал...")
os.system("start cmd")
elif "открой блокнот" in command or "запусти нотпад" in command:
print("Открываю блокнот...")
os.system("start notepad")
else:
print("Команда не распознана. Попробуйте ещё раз.")
def main():
print("Добро пожаловать! Говорите команды, такие как 'открой терминал' или 'открой блокнот'.")
while True:
command = recognize_command()
if command:
if "выход" in command or "завершить" in command:
print("Завершаю работу. До свидания!")
break
execute_command(command)
if __name__ == "__main__":
main()
Как это работает?
- Распознавание речи:
-
С помощью speech_recognition мы записываем звук с микрофона и преобразуем его в текст.
-
Выполнение команд:
-
Через os.system запускаются системные приложения, такие как терминал или блокнот.
-
Цикл выполнения:
- Программа ждёт голосовых команд до тех пор, пока вы не скажете «выход» или «завершить».
Как запустить?
-
Сохраните код в файл, например,
voice_control.py. -
Запустите приложение:
python voice_control.py
- Скажите команды, например: «открой терминал» или «открой блокнот».
Итоги
Мы создали приложение, которое выполняет голосовые команды, открывая системные приложения. Это отличный пример практичного использования Python для автоматизации.
Больше лайфхаков можно найти в видеокурсе Написание лайфхаков на Python.
-
Создано 09.01.2025 11:40:34
-
Михаил Русаков
Копирование материалов разрешается только с указанием автора (Михаил Русаков) и индексируемой прямой ссылкой на сайт (http://myrusakov.ru)!
Добавляйтесь ко мне в друзья ВКонтакте: http://vk.com/myrusakov.
Если Вы хотите дать оценку мне и моей работе, то напишите её в моей группе: http://vk.com/rusakovmy.
Если Вы не хотите пропустить новые материалы на сайте,
то Вы можете подписаться на обновления: Подписаться на обновления
Если у Вас остались какие-либо вопросы, либо у Вас есть желание высказаться по поводу этой статьи, то Вы можете оставить свой комментарий внизу страницы.
Если Вам понравился сайт, то разместите ссылку на него (у себя на сайте, на форуме, в контакте):
-
Кнопка:
Она выглядит вот так:
-
Текстовая ссылка:
Она выглядит вот так: Как создать свой сайт
- BB-код ссылки для форумов (например, можете поставить её в подписи):
Last Updated :
11 Mar, 2025
Using the Command Prompt (CMD) is an effective way to interact with Python on your Windows 10 machine. Whether you’re writing scripts, testing code, or running programs, mastering CMD for Python in Windows 10 is crucial.
This article will guide you on how to run Python in CMD, execute scripts, and troubleshoot common issues. By mastering these CMD commands, you’ll improve your coding efficiency and streamline your development process.
Detailed Steps to Use CMD for Python in Windows 10
By the end of this tutorial, you’ll be proficient in using CMD for your Python projects, enhancing your development efficiency and control.
Step 1: Check Python Installation
- For setting up Python on CMD, we must check whether Python is installed on your machine or not. For doing this, go to the Windows search bar and search for Python. If you find Python in the result, then you are good to go.
You can see Python3 is installed on my computer
Note: If Python is not installed on your computer, then it can be installed with How to Install Python on Windows
Step 2: Check Python Setup
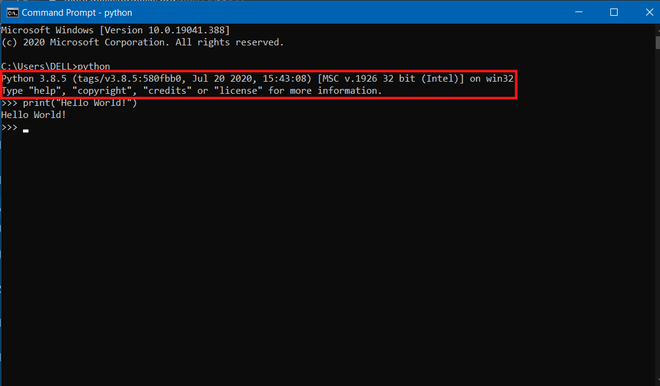
- Now check whether Python is already set up in Command Prompt or not. For doing this just open cmd and type python. If you see any Python version then it is already setup.

You can see after typing Python nothing happened. So, python is not set up on cmd yet.
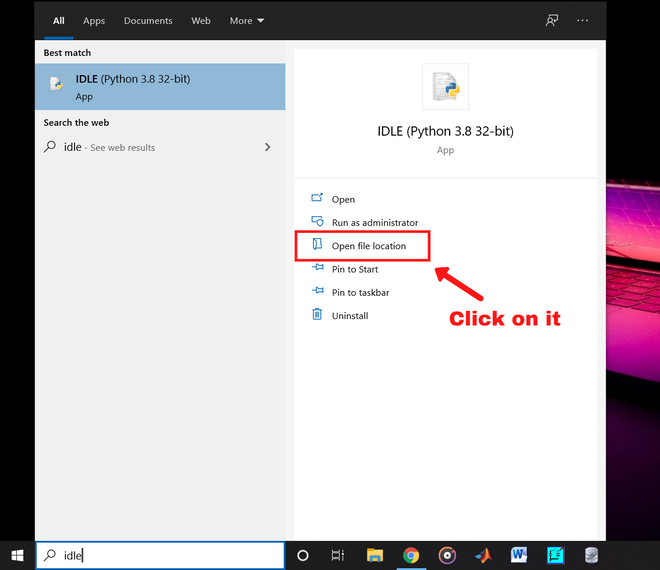
Step 3: Open IDLE Python File Location
- Now open the Windows search bar and search for “idle”. Without opening the app click on “Open file location”. If you didn’t get the option right click on the app and you will get it.
Now a file location will be opened on Windows Explorer.
Step 4: Open IDLE File Location
- Now right-click on “IDLE” and click on “open file location”
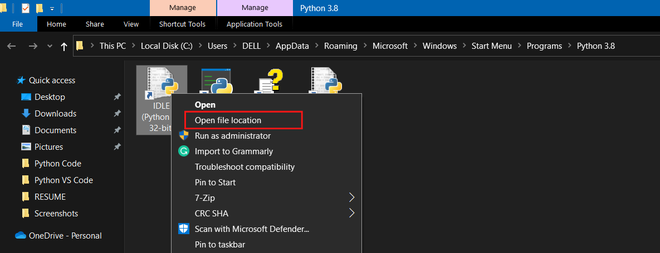
Click on “Open file location”
- After opening the file location copy the path.
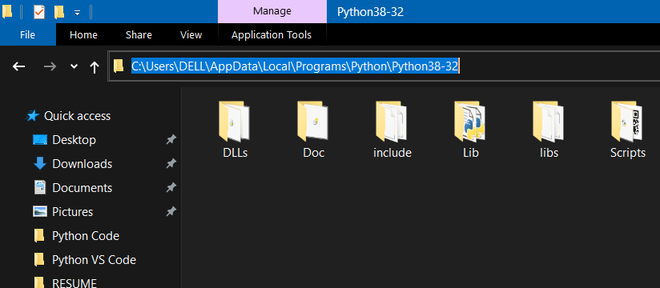
Copy the location
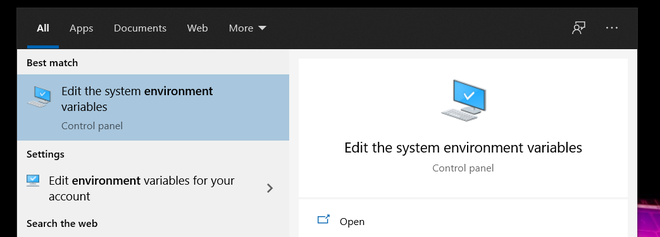
Step 5: Search Environment variables
- Now go to the Windows search bar and search for “Environment variables” and open it.
Open this
- After opening the menu click on “Environment Variables”
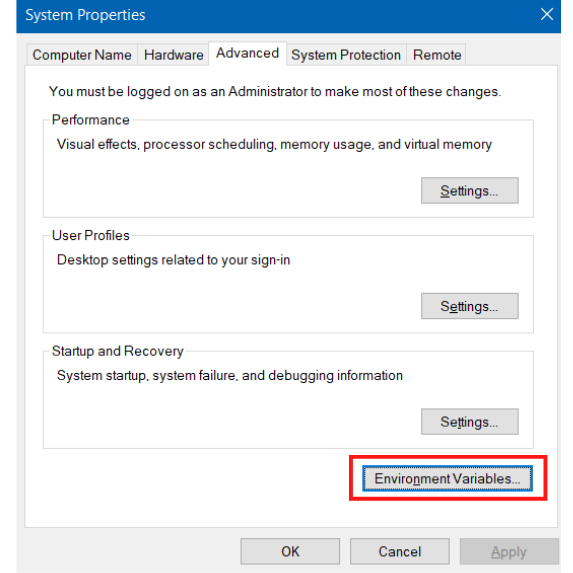
Click on the “Environment Variables”
- Now double-click on the “path” in the “System Variables”
- In the “Edit System Variable” menu click on “new”, then paste the file location you copied and click ok.
- Now close the Environment menus by clicking ok and congratulations, we have set up the Command Prompt for Python.
Step 6: Open CMD
- Now check whether it works. Open Command Prompt and type “python” and hit enter. You will see a python version and now you can run your program there.
Conclusion
Learning how to use CMD for Python in Windows 10 is a valuable skill that allows you to run and test your Python code quickly and efficiently. By understanding how to set up and navigate the Python command line in Windows 10, you can streamline your workflow and focus more on writing code rather than dealing with setup issues. Whether you’re a beginner or an experienced developer, these skills will make your Python development process smoother and more effective.