
Обновлено:
Опубликовано:
Из соображений безопасности и удобства, по умолчанию, после установки Windows система скрывает некоторые объекты — системные и критически важные файлы/папки, а также данные, используемые редко. При необходимости получить доступ к данным объектам, можно настроить показ скрытых файлов и папок. Для этого существуют различные способы.
Графический интерфейс
Реестр Windows
Командная строка
Файловые менеджеры
Снять атрибут, скрывающий папку или файл
Способ 1. Графический интерфейс
Шаг 1. Открыть параметры папок.
В Windows 7 и младше открываем проводник и нажимаем клавишу Alt. Появится верхнее меню — переходим в разделы Сервис — Свойства папки.
В Windows 8, 10 или 11 открываем проводник и разворачиваем ленту настроек:
Теперь переходим в раздел Вид и нажимаем по Параметры.
Шаг 2. Настроить отображение скрытых файлов и папок.
В открывшемся окне переходим на вкладку Вид, затем снимаем галочку Скрывать защищенные системные файлы и переключаем на Показывать скрытые файлы, папки и диски.
Нажимаем OK.
Способ 2. Реестр Windows
Настройка выполняется в ветке HKCU\Software\Microsoft\Windows\CurrentVersion\Explorer\Advanced. Необходимо создать или отредактировать ключ Hidden (тип REG_DWORD): значение 1 — показать скрытые файлы, 2 — скрыть.
В командной строке можно выполнить следующее.
Отобразить скрытые элементы:
reg add «HKCU\Software\Microsoft\Windows\CurrentVersion\Explorer\Advanced» /v Hidden /t REG_DWORD /d 1 /f
Скрыть:
reg add «HKCU\Software\Microsoft\Windows\CurrentVersion\Explorer\Advanced» /v Hidden /t REG_DWORD /d 2 /f
Способ 3. Командная строка
Рассмотрим команды просмотра скрытых файлов для обычной командной строки и Powershell.
cmd
Команда dir показывает только не скрытые папки и файлы. Для отображения всех элементов вводим команду с ключом ah, например:
dir /ah c:\
Powershell
Get-ChildItem -Force c:\
Способ 4. Файловые менеджеры
Также для просмотра скрытого содержимого можно использовать файловые менеджеры. Например, в Far Manager они отображаются по умолчанию, а в Total Commander необходимо зайти в Конфигурация — Настройка и убедиться, что стоит галочка в пункте Показать скрытые/системные файлы:

Ранее мы рассмотрели способы посмотреть скрытое содержимое. Но нам также может понадобиться сделать объект видимым. Для этого кликаем по файлу или папке правой кнопкой мыши и переходим в свойства:

В атрибутах объекта снимаем галочку Скрытый:
Нажимаем OK.
on September 2, 2010
In Windows, files/folders have a special attribute called hidden attribute. By setting this attribute, we can hide files from being displayed in explorer or command prompt. This article explains how to list this hidden files in windows command line and it also discusses how to delete the hidden files.
To get the list of hidden files from a directory you can run the below command.
dir directory_path /A:H /B
Example:
Get the list of hidden files from C:\Windows\system32 folder.
C:\>dir c:\WINDOWS\system32 /A:H /B
cdplayer.exe.manifest
dllcache
GroupPolicy
logonui.exe.manifest
ncpa.cpl.manifest
nwc.cpl.manifest
sapi.cpl.manifest
WindowsLogon.manifest
wuaucpl.cpl.manifest
To get the list of hidden files from all sub directories we need to add /S switch to the command.
dir directory_path /A:H /S /B
Example:
To get the list of hidden files from the folder c:\windows\system32 and from all its subfolders we need to run the below command.
dir c:\WINDOWS\system32 /A:H /B /S
List all hidden folders:
If you want to get the list of all hidden subfolders in a folder, you can run the below command.
dir /s /b /A:DH
Hidden files deletion
To delete hidden files from command prompt we can use Del command. For example to delete a hidden file named example.doc we need to run the below command.
del /A:H example.doc
Note that /A:H is necessary otherwise you will get ‘file not found’ error like below.
C:\>del example.doc
Could Not Find C:\example.doc
To delete all hidden files from a given directory we can run the below command.
del directory_path /A:H
Alternatively you can cd to that directory and then run the below command.
del * /A:H
To delete hidden files from subfolders also you can do that by adding /S switch
del * /A:H /S
Last Updated :
21 Apr, 2025
Hidden Files and Folders are generally system-protected features in Windows OS. This feature is generally used to hide files or folders to avoid any accidental usage. However, you can undo this setting to view hidden files and folders in Windows 10 by using a few simple steps. Here are different approaches to show hidden files and folders for Windows 10 users.
Table of Content
- 1. Using File Explorer
- 2. Using Control Panel
- 3. Using Command Prompt
- 3. Using Registry Editor
- View Hidden Files and Folders using Third-party File Managers
1. Using File Explorer
This is an in-built, straight forward and a simple method to view any hidden files or folders in Windows 10. Here’s how you can do it:
- Go to the Start menu and type «File Explorer» and hit the enter button. Alternatively, you can press Win + E to open File Explorer directly.
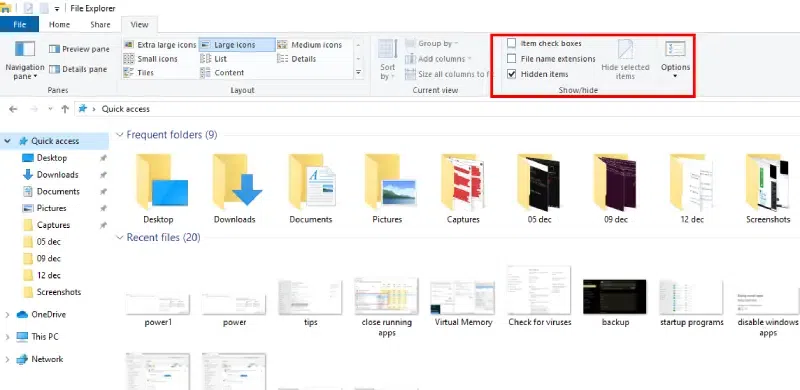
- You will find 4 options on the top of the screen i.e. File, Home, Share and View. Navigate to the «View» option
- You will now see different options to view files in different segments (Extra large icons, Small icons, Tiles, etc.) Navigate to the option «Show/Hide» with an arrow downwards, click on it and select «Hidden Items»
- Now will now notice that files and folders with hidden attributes will be displayed with a slight transparency.
2. Using Control Panel
If you face any difficulty from the above method, you may use Control Panel settings to access Hidden Files and Folders. Here’s how you can do it:
- You can access Control Panel using keyboard shortcut i.e. Win + R, open Run dialog and type «Control panel» and hit the enter button. Alternatively, click the Start Menu and type Control Panel in the search box and hit the enter button
- Go to «Appearance and Personalization» and then click on «Show hidden files and folders» under File Explorer option.
- A pop-up will come up. Look at «Hidden files and folders», click the radio button on «Show hidden files, folders, or drives»
- Click Apply to make the desired changes. Now, you will be able to view all the hidden files or folders in Windows 10.

3. Using Command Prompt
if you’re a geek, you might give this method a chance to hide any files or folders in you Windows 10 computer. This method is suitable to unhide and hide files and folders in your computer. Here’s how to execute:
- Click on the Start Menu and type «CMD» or Control Panel and select «Run as Administrator» or press Win + X and select «Command Prompt (Admin)».
- Now, navigate to the folder where you’ve stored the hidden files using the ‘cd’ command
- Enter the following command to view all the hidden files from that directory:
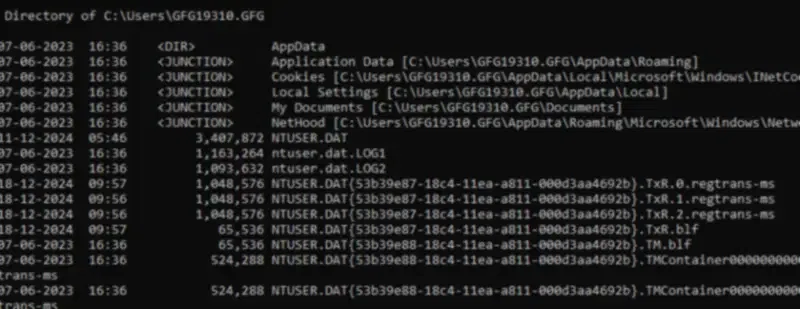
dir /a:h
3. Using Registry Editor
You can also use this alternate advanced method to view all the hidden files and folders of your Windows PC. However, this is not considered as a first-response method to perform but it can be suitable for those who’re looking for alternatives while trying to access hidden files and folders in Windows 10 PC. Here’s how you can access:
- Open the Run dialog box by pressing Win + R or press Win + X and select «Run» and type «Registry Editor» or «regedit». Alternatively, you can click on the start menu and type «Registry Editor» and click to open it.
- Now, navigate to the following directory:
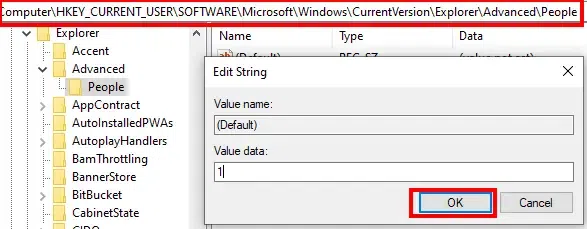
HKEY_CURRENT_USER\Software\Microsoft\Windows\CurrentVersion\Explorer\Advanced\User
- Make a double-click on the Hidden key and set the value to 1 and press OK.
- Restart your PC or the File Explorer so that the changes can take immediate effect.
If you have any specific requirement in managing files and folders including viewing hidden files/folders or making any certain modifications, then you might opt for any trusted third-party File Managers such as:
- Total Commander: Offers file management, archive handling, built-in FTP, and much more.
- EYplorer: Starting from $14.95/month, once of the best file management tool.
- FreeCommander: This tool offers 25+ features including file duplicacy search, automation view, Desktop snapshots, etc.
Points to Remember:
- Make sure to hide your files back once your work is done. Reason being, crucial system files are hidden by default to prevent from any accidental deletion.
- Structure your files and folders to view them at once in any drive.
- Always carry a backup if you choose to modify the hidden file or folder.
Conclusion
In Windows 10, viewing hidden files and folders is a simple procedure that might improve your file management using Control Panel, Command Prompt, Registry Editor, or Third-Party tools. You can quickly retrieve any hidden objects you might require for organizing, debugging, or retrieving crucial data by following these methods.
In this tutorial, you can learn how to show hidden files and folders in Windows 10 with CMD and other 4 ways. Also check how to show hidden files in Windows 10 with File Explorer, Control Panel, Registry or Folder Options. MiniTool software also offers a top data recovery program to help you recover any deleted/lost file in Windows 10.
Windows hide some files and folders related to the OS by default, to avoid accidental deletion or altering from users which may cause the malfunction of system. However, if you are a tech fanatic, and want to make the hidden files visible, you can try the solutions below to show hidden files Windows 10.
You can open Command Prompt in Windows 10 to show hidden files with attrib command. Detailed steps are as follows.
Step 1. Press Windows + R, type cmd, and press Ctrl + Shift + Enter to open elevated Command Prompt in your Windows 10 computer.
Step 2. Then you can type this command line: attrib -h -r -s /s /d E:\*.*, and hit Enter to unhide the files and folders in drive E. You should replace the drive letter with the exact drive letter of your computer. You can open This PC to check the drive letters of your computer hard drive partitions.

To help you better understand this attrib command, below is the explanation of each part of the command line.
- –h: It clears the Hidden file attribute to show hidden files.
- –r: It clears the Read-only file attribute to allow you modify the file after it shows.
- –s: It clears the System file attribute.
- /s: It applies attrib and any command-line options to matching files in the current directory and all of its subdirectories.
- /d: It applies attrib and any command-line options to directories.
You can also show hidden files in Windows 10 with File Explorer. Check how to do it.
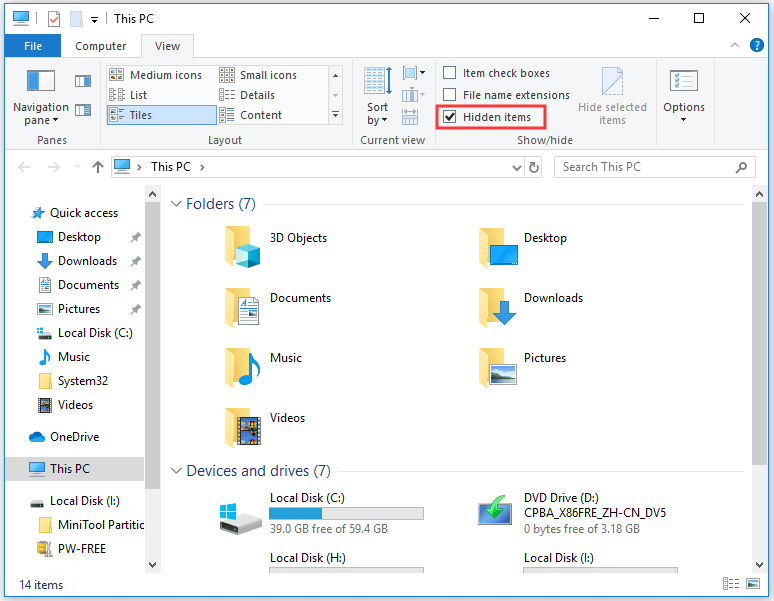
Step 1. You can click This PC to open File Explorer on Windows 10. You should expand the menu bar in File Explorer. If you don’t see the menu bar, you can click the ^ icon at the upper-right corner of File Explorer window.
Step 2. Next you can click View tab, and tick Hidden items box in Show/Hide section. This will let you view the hidden files and folders in Windows 10.
If you need to modify more file viewing options, you can click Options.
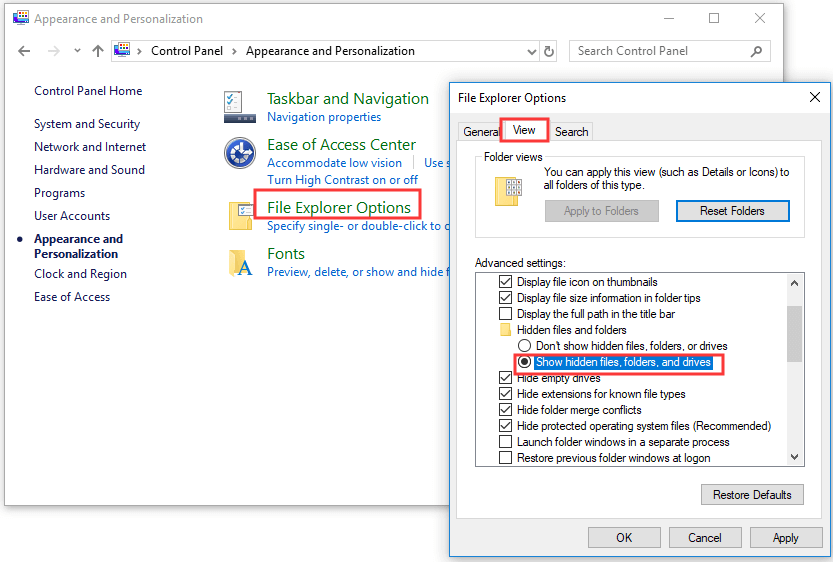
Another way to show hidden files in Windows 10 is through Control Panel.
Step 1. To open Control Panel Windows 10, you can click the Control Panel desktop shortcut icon, or click Start, type control panel, and select Control Panel to open it.
Step 2. Next you can click Appearance and Personalization, and click File Explorer Options.
Step 3. Then you can click View tab in File Explorer Options window. Find Show hidden files, folders, and drives option under Advanced settings, tick this option and click Apply and OK to reveal hidden files and folders.
If you also want to see the hidden operating system files, you can uncheck the Hide protected operating system files (Recommended) option.
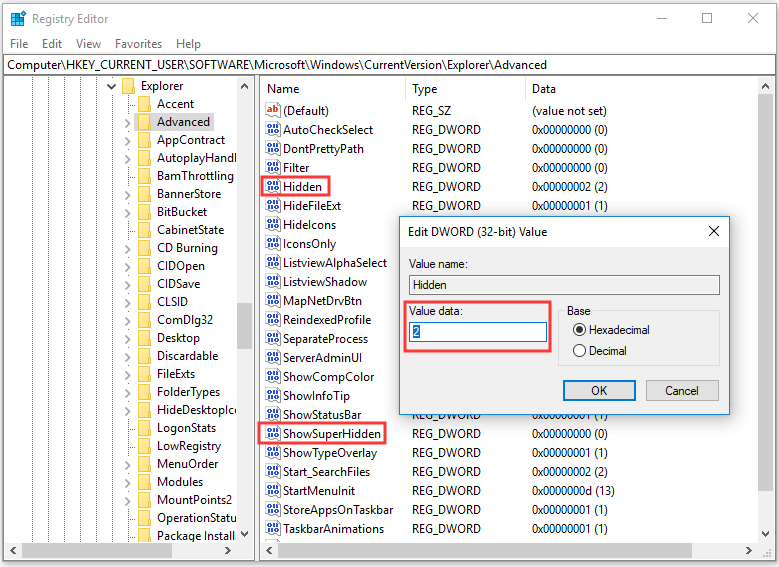
Another way to view the hidden files in Windows 10 is to use Windows Registry Editor.
Step 1. You can press Windows + R, type regedit, and hit Enter to open Registry Editor in Windows 10.
Step 2. Next click as follows to find the target registry key: HKEY_CURRENT_USER\Software\Microsoft\Windows\CurrentVersion\Explorer\Advanced, and click Advanced key.
Step 3. Then you can find the Hidden REG_DWORD in the right window, double-click it, and set its data value as 1 to show hidden files, folders, and drives in Windows 10. If you don’t want to show hidden files, folders, and drives in future, you can follow the same operation to change its data value to the default 2.
You can also find the ShowSuperHidden REG_DWORD, double click it and change its data value to 1 to show protected operating system files in Windows 10. The default data value is 2 which will not show protected OS files.
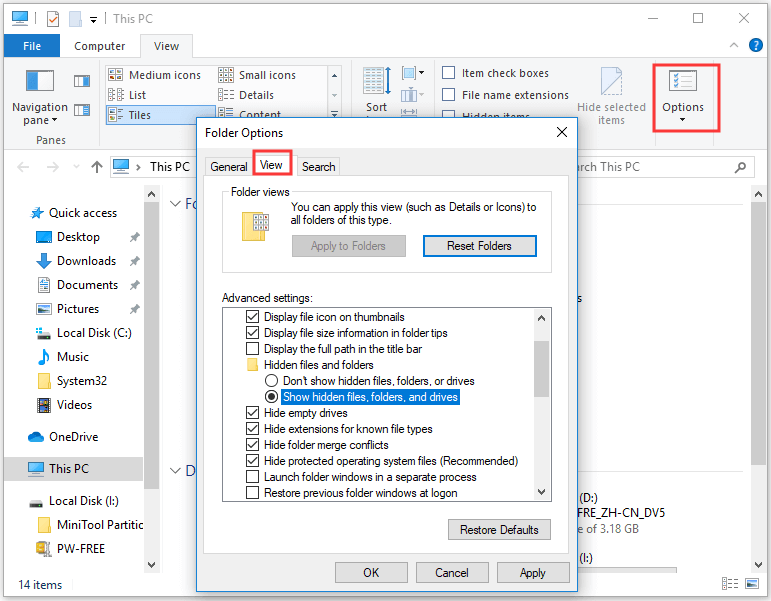
You can also follow the same instruction in Way 1 to open File Explorer and expand its menu bar, and click View -> Options.
Then you can click View tab in Folder Options window, and navigate Show hidden files, folders, and drives option under Advanced settings. Tick this option and click Apply and OK to show hidden files and folders in your Windows 10 computer.
>> Quick Video Guide:
Bottom Line
This post introduces 5 ways to provide a full Windows 10 show hidden files guide to you. You can try any of them to show hidden files and folders in Windows 10.
As for recovering deleted/lost files and data from your Windows 10 computer and other storage devices, you can try MiniTool Power Data Recovery, a 100% clean and free data recovery program.
MiniTool Power Data Recovery FreeClick to Download100%Clean & Safe