
Для работы проектов iXBT.com нужны файлы cookie и сервисы аналитики.
Продолжая посещать сайты проектов вы соглашаетесь с нашей
Политикой в отношении файлов cookie
Если вы увлекались киберспортом или оптимизацией Windows, то наверняка слышали о влияние высокоточного системного таймера HPET на общую производительность ПК. Но знаете ли вы, что, начиная с Windows 10 22H2 и Windows 11, компания Microsoft изменила классическую логику работы системного таймера, и прошлые команды, которые ранее позволяли существенно повысить производительность, более не работают. В этом небольшом материале вы узнаете, как исправить эту проблему и вернуть привычное поведение системного таймера HPET/TSC в новых версиях Windows, существенно ускорив работу своего компьютера.

Чтобы не нагружать вас лишней технической информацией, достаточно будет сказать, что ранее отключение или изменение значений системного таймера HPET глобально влияло на все процессы в Windows, существенно повышая отклик и плавность работы приложений и игр. Теперь же частота прерывания системного таймера HPET/TSC не функционирует на глобальном уровне ОС и не зависит от других процессов. Короче говоря, таймер теперь работает лишь для запущенных на переднем фоне приложений и не может опускаться ниже принудительно заданных значений, что существенно ломает многие старые игры и не позволяет пользователю добиться былой производительности. Подробнее почитать про всё это вы можете, перейдя по ссылке.
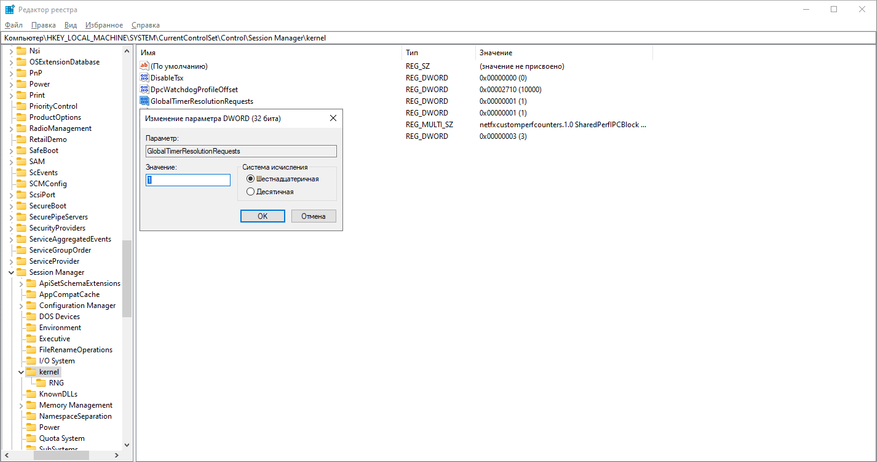
1. Нажимаем Win+R и вводим команду regedit. В появившемся окне переходим в раздел kernel и создаём новый параметр Dword32 с именем GlobalTimerResolutionRequests и значением 1 в шестнадцатеричной системе счисления. Или воспользуйтесь заранее уже готовым файлом с нужными настройками.
2. Нажимаем правым кликом мыши на «Пуск» и выбираем «Диспетчер устройств». Для отключения HPET и активации таймера TSC мы должны в разделе «Системные устройства» отключить «Высокоточный таймер событий» иногда он подписан как High Precision Even Timer. Правый клик мыши>>»Отключить устройство».

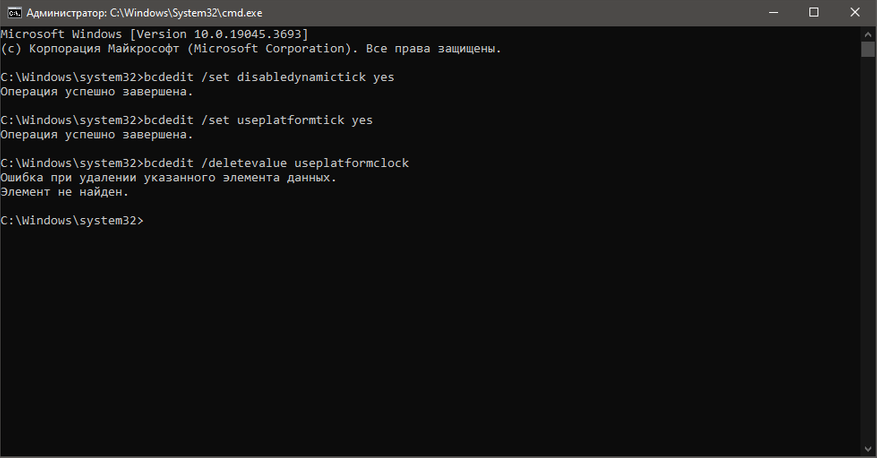
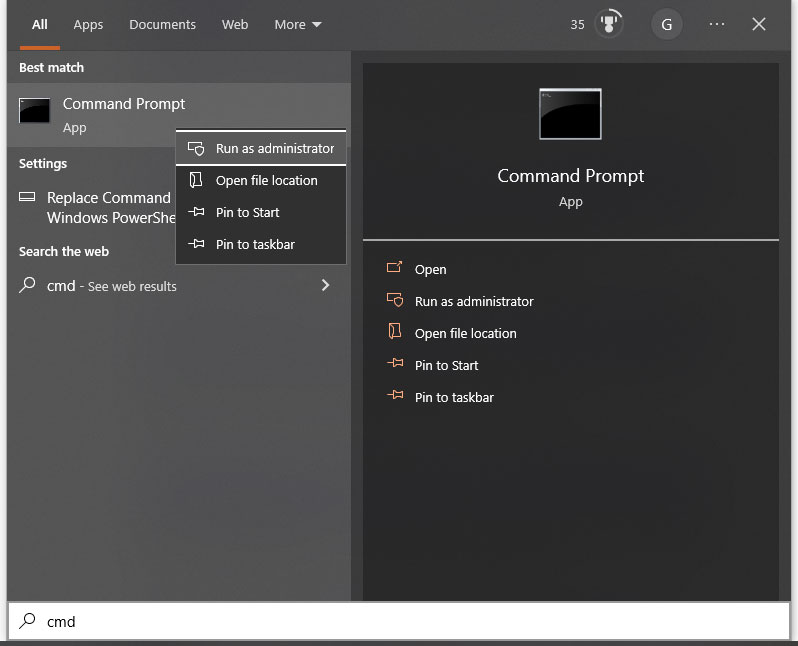
3. Теперь нам осталось только ввести команды для отключения встроенного программного таймера Windows и технологии экономии электроэнергии для ноутбуков. Вновь нажимаем Win+R и вводим команду CMD.
В появившемся окне вводим команды:
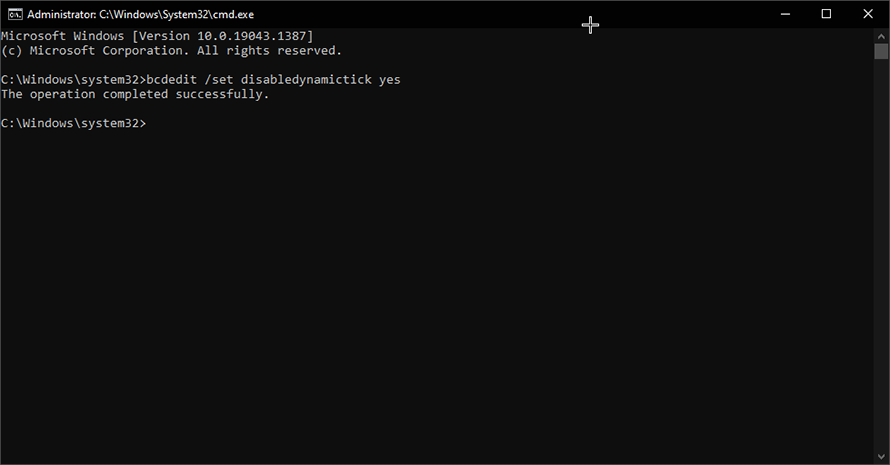
bcdedit /set disabledynamictick yes
bcdedit /set useplatformtick yes
bcdedit /set useplatformclock false
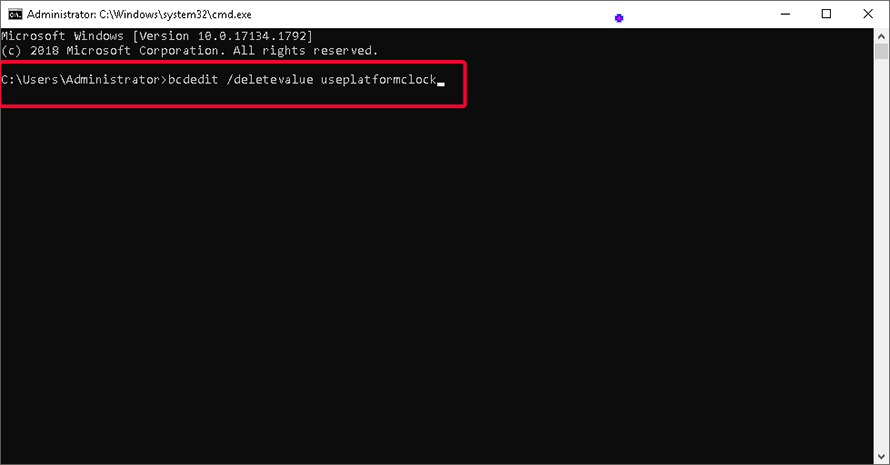
bcdedit /deletevalue useplatformclock
После перезагрузки ПК вы сразу почувствуете разницу в отклике Windows и плавности работы мыши. Однако, чтобы ещё сильнее ускорить работу компьютера, необходимо принудительно зафиксировать значения системного таймера TSC на минимальных значениях.
4. Выполним установку системной службы Windows, отвечающей за минимальное значение системного таймера.
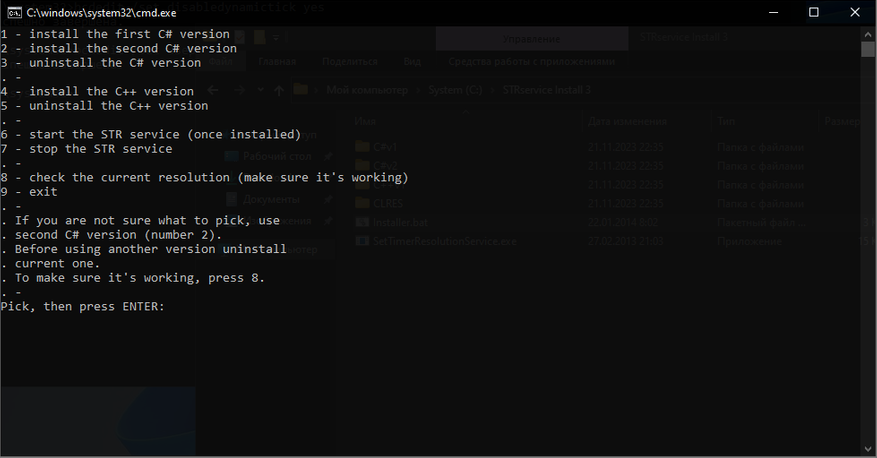
- Скачиваем и извлекаем папку архива в корень любого диска.
- Переходим в папку установщика и запускаем не от имени администратора файл Installer.bat.
- В появившемся окне выбираем желаемый таймер. Я советую 2 или 4.
- Дожидаемся окончания установки. (После установки не удалять папку установщика).
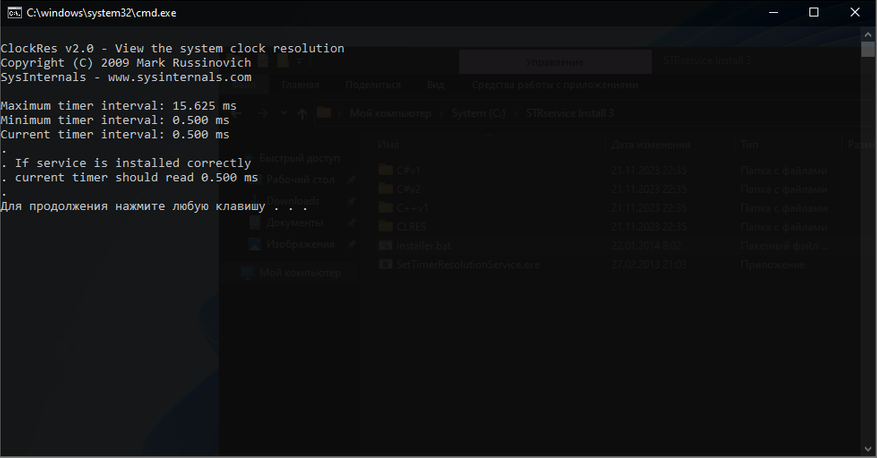
- Проверяем значение таймера, нажав 8.
- Если всё прошло успешно, то значение системного таймера будет равняться 0.5 мс.
Если вы заметили отрицательный эффект от отключения системного таймера HPET, то удалите в реестре Windows запись GlobalTimerResolutionRequest и вновь включите «Высокоточный таймер событий» в «Диспетчере устройств». Не забыв удалить системную службу таймера и ввести в cmd следующие команды:
bcdedit /deletevalue disabledynamictick
bcdedit /deletevalue useplatformtick
Вот, собственно, и всё! Всего за пару не хитрых шагов мы исправили оплошность корпорации Microsoft, вернув себе классическое поведение системного таймера Windows, существенно ускорив работу приложений и игр. Не говоря уже о самой ОС. Уважайте свободу, используйте только проверенное ПО и ни в коем случае не позволяйте компаниям диктовать вам свои условия. С вами был Павел. Ещё увидимся!
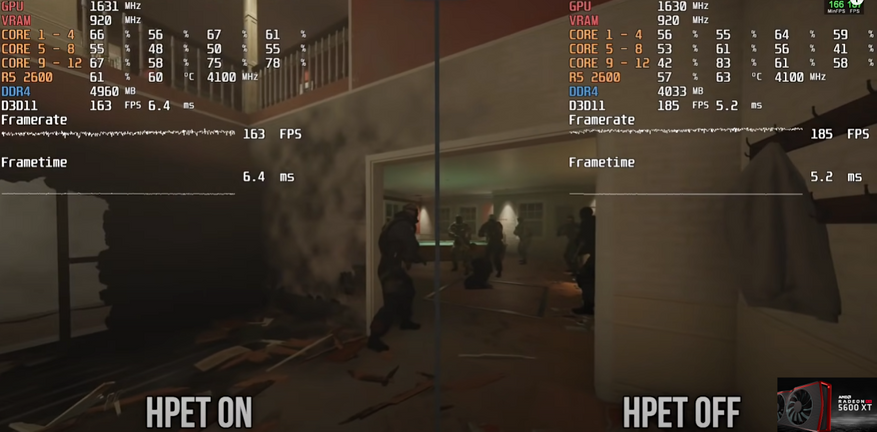
Я провёл дополнительное тестирование в новых играх, используя Windows 10 версии 22H2 (1945.3636). И могу с уверенностью утверждать, что принудительное отключение высокоточного системного таймера HPET позволяет добиться лучшей производительности не только в старых, но и в новых играх. Например, дважды прогоняя встроенный бенчмарк Cyberpunk 2077, отчётливо видна разница в минимальном и среднем FPS. Не говоря уже про отсутствие эффекта «Желе». Миф подтверждён: HPET следует принудительно отключать для максимальной плавности в играх и рабочем ПО!
Сейчас на главной
Новости
Публикации

7 правд о Haval M6, которые менеджеры автосалонов скрывают от покупателей. Почему владельцы Haval M6 не рекомендуют его друзьям?Китайский автопром стремительно меняется — и Haval M6 тому…

Коммерческая авиация прошла долгий путь с тех пор, как братья Райт впервые поднялись в воздух со скоростью около 55 км/ч. То, что начиналось как смелый и рискованный эксперимент в управляемых…

Вьетнам, страна, чья береговая линия тянется более чем на 3000 километров, манит путешественников своими великолепными пляжами. Здесь есть все: от оживленных курортов с бурной ночной жизнью до…

Идея автоматических пылесосов состоит в том, чтобы полностью заменить человека при уборке помещения и предоставить ему дополнительное время для отдыха или других более важных занятий….

Физика стоит на пороге великих открытий, но одна загадка десятилетиями не дает покоя ученым: как помирить две величайшие теории, описывающие нашу Вселенную? С одной стороны — общая…

В нашу эпоху появилось множество технологических чудес, которые поражают размахом возможного, и круизный лайнер (не путать с океанским) — по праву считается одним из самых грандиозных…
-
Home
-
News
- How to Disable HPET to Improve Game Performance in Windows 10/11?
How to Disable HPET to Improve Game Performance in Windows 10/11?
By Aurelie | Follow |
Last Updated
HPET is an inbuilt tool in Windows which can be used to synchronize multimedia and provide smoother playback for your computer. However, if you turn it on when gaming, this tool will take away the precious calculation power of CPUs and severely hurt game performance. Therefore, you’d better disable it. In this article on MiniTool Website, you’ll know two ways to disable it.
What Is HPET on Windows 10 and Windows 11?
HPET is short for High Precision Event Timer which is often used for synchronizing multimedia streams, reducing the need to use other timestamp calculations, and smoothing the playback.
However, although HPET can increase the performance of your PC, it triggers FPS loss and latency & freezes in games. If you encounter low FPS or stuttering when gaming, you can try to disable HPET to get better game performance. Some of you might ask, “Is it safe to disable HPET on Windows 10 and 11?” The answer is absolutely yes. In this post, we’ll show you two ways to disable HPET. Without further ado, let’s dive right in.
Tip: Most Windows 10/11 builds disable HPET by default so if you receive a error message after trying the two methods below, don’t worry. It just means that the HPET utility on your PC was already turned off.
How to Disable HPET Windows 10/11?
# Way 1: Disable HPET via CMD
You can disable HEPT to reduce game stuttering by using the CMD command. Here’s how to disable HPET Windows 10/11:
Step 1. Press Win + S at the same time to evoke the search bar.
Step 2. Type cmd to locate Command Prompt and do a right-click on it to choose Run as administrator.
Step 3. Copy & paste the following command and tap on Enter to disable DPET.
bcdedit /deletevalue useplatformclock
bcdedit /set disabledynamictick yes
Step 4. Reboot your computer to make this change effective.
Tip: If your Command Prompt stops working, you can see help from this guide – [Fixed] Command Prompt (CMD) Not Working/Opening Windows 10.
# Way 2: Disable HPET via Device Manager
Another easy way to disable High Precision Event Timer is using Device Manager Settings. To disable HPET Windows 11/10 in this way:
Step 1. Do a right-click on the Windows icon and choose Device Manager in the drop-down menu.
Step 2. Expand System devices, locate High precision event timer and right-click on it.
Step 3. In the drop-down menu, choose Disable device.
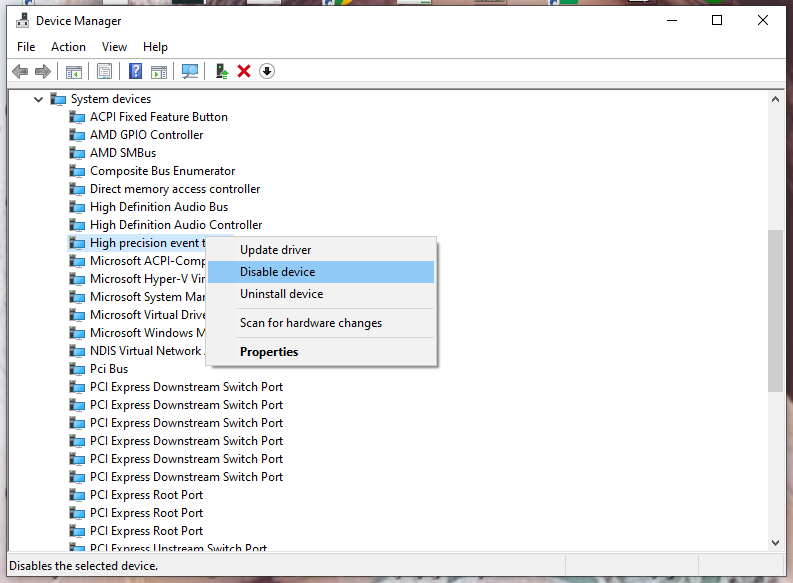
Step 4. Press Yes in the warning message to confirm this action.
Other related articles you might be interested in:
# Here Are 10 Tips to Optimize Windows 10 for Gaming
# Two Gaming Features – How to Optimize Windows 11 for Gaming
Final Words
By now, you must get a full picture of what HPET is and how to disable HPET. Try them to see whether the methods mentioned above work properly for you or not. If you have problems or come up with other creative ideas, please feel free to leave a comment below.
About The Author
Position: Columnist
Aurelie is a passionate soul who always enjoys researching & writing articles and solutions to help others. Her posts mainly cover topics related to games, data backup & recovery, file sync and so on. Apart from writing, her primary interests include reading novels and poems, travelling and listening to country music.
The High Precision Event Timer (HPET) is a hardware timer available in modern x86-compatible personal computers. Compared to older types of timers available in the x86 architecture, HPET allows more efficient processing of highly timing-sensitive applications, such as multimedia playback and OS task switching. It was developed jointly by Intel and Microsoft and has been incorporated in PC chipsets since 2005. Formerly referred to by Intel as a Multimedia Timer,[1] the term HPET was selected to avoid confusion with the software multimedia timers introduced in the MultiMedia Extensions to Windows 3.0.[2]
Older operating systems that do not support a hardware HPET device can only use older timing facilities, such as the programmable interval timer (PIT) or the real-time clock (RTC). Windows XP, when fitted with the latest hardware abstraction layer (HAL), can also use the processor’s Time Stamp Counter (TSC), or ACPI Power Management Timer (ACPI PMTIMER), together with the RTC to provide operating system features that would, in later Windows versions, be provided by the HPET hardware. Confusingly, such Windows XP systems quote «HPET» connectivity in the device driver manager even though the Intel HPET device is not being used.
An HPET chip consists of a 64-bit up-counter (main counter) counting at a frequency of at least 10 MHz, and a set of (at least three, up to 256) comparators. These comparators are 32- or 64-bit-wide. The HPET is programmed via a memory mapped I/O window that is discoverable via ACPI. The HPET circuit in modern PCs is integrated into the southbridge chip.[a]
Each comparator can generate an interrupt when the least significant bits are equal to the corresponding bits[clarification needed] of the 64-bit main counter value. The comparators can be put into one-shot mode or periodic mode, with at least one comparator supporting periodic mode and all of them supporting one-shot mode. In one-shot mode the comparator fires an interrupt once when the main counter reaches the value stored in the comparator’s register, while in the periodic mode the interrupts are generated at specified intervals.
Comparators can be driven by the operating system, e.g. to provide one timer per CPU for scheduling, or by applications.
The HPET can produce periodic interrupts at a much higher resolution than the RTC and is often used to synchronize multimedia streams, providing smooth playback and reducing the need to use other timestamp calculations such as an x86-based CPU’s RDTSC instruction. This provides improved efficiency, since the CPU does not need to waste cycles to make up for the low resolution of timers, and enables more aggressive use of sleep states, reducing power consumption. In addition to the application-level demand for high-precision clock, there are OS-level benefits in the scheduler and through the availability of a stable clock base for multi-processor systems.[3]
Comparison to predecessors
edit
This section needs expansion with: compare with LAPIC timer, ACPI PM etc.. You can help by adding to it. (February 2014)
HPET is meant to supplement and replace the 8254 programmable interval timer and the RTC’s periodic interrupt function. Compared to these older timer circuits, the HPET has higher frequency and wider 64-bit counters (although they can be driven in 32-bit mode).[1]
The HPET specification does not define the timer frequency, only requiring a minimum of 10 MHz; the actual frequency is provided to the operating system by a hardware register giving the number of femtoseconds per period (with an upper bound of 100000000 fs). A popular value is 14.318 MHz, 12 times the standard 8254 frequency of 1.19318 MHz.
While 8254 and RTC can be put into an HPET-like one-shot mode, the set-up process is so slow that their one-shot mode is not used in practice for tasks requiring precise scheduling.[4] Instead, 8254 and RTC are typically used in periodic mode with a very small time interval. For example, if an application needs to perform several short (some milliseconds, perhaps) waits, it is better to have a periodic timer running constantly with a 1 ms period because of the high setup cost of an 8254 or RTC one-shot timer. This causes an interrupt at every millisecond even if the application needs to do actual work less frequently. With HPET, the extra interrupts can be avoided, because the set-up cost of a HPET one-shot timer is considerably smaller.
Use and compatibility
edit
Operating systems designed before HPET existed cannot use HPET, so they use other timer facilities. Newer operating systems tend to be able to use either. Some hardware has both. Indeed, most current southbridge chips have legacy-supporting instances of PIT, PIC, Advanced Programmable Interrupt Controller (APIC) and RTC devices incorporated into their silicon whether or not they are used by the operating system, which helps very modern PCs run older operating systems.
The following operating systems are known not to be able to use HPET:
Windows XP SP1,[b] and earlier Windows versions, Linux kernels prior to 2.6.[c]
The following operating systems are known to be able to use HPET:
Windows XP SP3,[d] Windows Server 2003 SP2, Windows Server 2008, Windows Server 2008 R2, Windows Vista, Windows 7, x86 based versions of OS X, Linux operating systems using the 2.6 kernel (or later), FreeBSD[5] and OpenSolaris.[citation needed]
The Linux kernel can also use HPET as its clock source. The documentation of Red Hat MRG version 2 states that TSC is the preferred clock source due to its much lower overhead, but it uses HPET as a fallback. A benchmark in that environment for 10 million event counts found that TSC took about 0.6 seconds, HPET took slightly over 12 seconds, and ACPI Power Management Timer took around 24 seconds.[6]
In 2019 it was decided to blacklist HPET in newer Linux kernels when running on some Intel CPUs (Coffee Lake) because of its instability.[7]
HPET is a continuously running timer that counts upward, not a one-shot device that counts down to zero, causes one interrupt and then stops. Since HPET compares the actual timer value and the programmed target value on equality rather than «greater or equal», interrupts can be missed if the target time has already passed when the comparator value is written into the chip’s register.[8] In such a case, not only is the intended interrupt missed, but actually set far into the future (about 232 or 264 counts).[9] In the presence of non-maskable interrupts (such as a System Management Interrupt (SMI)) that do not have a hard upper bound on their execution time, this race condition requires time-consuming re-checks of the timer after setup and is hard to avoid completely. The difficulties are exacerbated if the comparator value is not synchronized with the timer immediately, but delayed by one or two ticks, as some chipsets do.[8]
Besides mentioning the race condition discussed above, a VMware document also lists some other drawbacks: «The specification does not require the timer to be particularly fine grained, to have low drift, or to be fast to read. Some typical implementations run the counter at about 18 MHz and require about the same amount of time (1–2 μs) to read the HPET as with the ACPI timer. Implementations have been observed in which the period register is off by 800 parts per million or more.»[9]
- ^ On these highly integrated dies the BIOS often sets up the HPET incorrectly in the ACPI, initializing it correctly only in Intel 8253 mode. If the ACPI is not set up correctly the OS cannot list the HPET. And the BIOS and OS developers don’t see the need to get Real Time support. So the HPET is only there to satisfy the system’s high speed needs. If the HPET is set up correctly in the ACPI from BIOS then the ACPI MMIO page of the first HPET chip should be at 0xFED00000 and the second HPET at page 0xFED80000 (see the discussion for further information).
- ^ Windows XP, SP2 knows the HPET timer (as a device with ACPI\PNP0103 identifier). When detected (for example, on Intel DQ45CB motherboard), Device Manager (Start / Settings / Control Panel / System / Device Manager) shows «High Precision Event Timer» device in «System devices» branch. But this device is not used at all.
- ^ With a Linux kernel, you need the newer RTC-CMOS hardware clock device driver rather than the original RTC driver.
- ^ XP SP3 «emulates» most of the HPET specification as drafted in 2002 in anticipation of a device that made its eventual appearance in PCs designed for Windows Vista by 2005.
The term «High Precision Event Timer» is then used within the driver manager to describe TSC (Time-Stamp-Counter) or ACPI Power Management Timer (PMTimer) timing subsystems even when the 15 MHz Intel HPET device is not being used.
While it is true to say that only Windows Vista and later Windows use the physical Intel 15 MHz HPET, the operating system features intended to be fulfilled by the HPET already largely existed in Windows XP, albeit to a different specification (that of 2002 rather than 2005) and hence with a reduced capability.
In terms of physical embodiment in Windows XP SP3, the IRQ0 and IRQ8 are typically mapped to a «High Precision Event Timer» when using the ACPI HAL (version 5.1.2600.5512), albeit that the QueryPerformanceFrequency API call returns a value related to the rated processor clock speed (for example, 2.6 GHz) or PMTIMER (3.579545 MHz) rather than the Intel HPET spec’d value of 15 MHz that you would get using Windows Vista. This anomaly muddies the water about what is meant by «HPET» on such systems, but it is clearly not the 15 MHz Intel device in those cases. Note that this «HPET»-quoting IRQ mapping and non-HPET clock relationship can be found both on Intel systems and AMD systems whether or not they are using the /USEPMTIMER boot override.
Since the original specification for HPET (in 2002) calls for a high resolution counter, which is then exposed by the QueryPerformanceFrequency and QueryPerformanceCounter API calls (already available since Windows 2000), it is the QueryPerformanceFrequency that can shed light on how this «high precision» counter is actually being provided.
A high value (in the 1 GHz to 4 GHz range) implicates the Time Stamp Counter (TSC) of the CPU as being the source. The early multi-core CPUs from AMD exposed a problem with TSC-derived QueryPerformanceCounter readings, as they would be affected by spread-spectrum and power management speed variations. While this was eventually solved in later processor designs by making the TSC clock independent of the CPU clock, the PM Timer on ACPI systems became the counter source of choice, requiring a /USEPMTIMER override in the Windows BOOT.INI file to enforce its use.
On both Intel and AMD machines using the ACPI HAL together with the /USEPMTIMER boot switch, the IRQs 0 & 8 will still report a HPET, but now the QueryPerformanceFrequency will report 3.579545 MHz, which is the frequency of the PMTIMER. This has the express advantage of being independent of the CPU frequency and still provides a very reasonable sub-microsecond resolution and accuracy.
Ironically the very high count rates obtained in TSC mechanisms (as compared with PMTIMER or the Intel HPET device) can cause a problem that the measurable time intervals are too short: there is an upper limit to the usefulness of a counter that overflows early. It can also be a nuisance that the ever-increasing processor speeds of newer processor designs make this usable time span shorter still. It is thus not surprising that PMTIMER and Intel HPET systems use a clearly specified fixed rate that is deliberately targeted at producing resolutions in the sub-microsecond range, allowing them to measure for longer periods than is possible with TSC.
With or without the /PMTIMER switch, the «event» part of the HPET specification can only be emulated by using yet another timing source, since neither an underlying TSC nor PMTIMER solution includes implicit hardware for aperiodic event triggering as described by the specification, and yet this is available via the timer API in Windows XP (to a best possible resolution of 0.9766 ms when the timeBeginPeriod — timeEndPeriod API calls are used). This part of the specification is still fulfilled by the RTC device with the help of software, despite the fact that the device manager is quoting HPET in the IRQ0 and IRQ8 positions.
- ^ a b Intel Corporation (October 2004), IA-PC HPET (High Precision Event Timers) Specification (revision 1.0a) (PDF), retrieved 2012-06-15
- ^ «Multimedia Timers». Microsoft. 10 December 2007. Retrieved 2010-10-20.
- ^ «IA-PC HPET (High Precision Event Timers) Specification» (PDF). Intel. October 2004. Retrieved 30 August 2022.
- ^ Guidelines For Providing Multimedia Timer Support, 2002-09-20, retrieved 2009-11-10
- ^ «FreeBSD Man Pages: hpet(4)». www.freebsd.org.
- ^ «Chapter 15. Timestamping». Access.redhat.com. Archived from the original on 2016-05-07. Retrieved 2014-02-14.
- ^ «The Linux Kernel Disabling HPET For Intel Coffee Lake». Phoronix.
- ^ a b Thomas Gleixner, x86: hpet: Work around hardware stupidity Archived 2012-07-09 at archive.today, commit merged for Linux kernel 2.6.36-rc5
- ^ a b Timekeeping in VMware Virtual Machines (for VMware vSphere 5.0, Workstation 8.0, Fusion 4.0), page 9
Why Disable HPET?
While HPET is an extremely precise timer (14.32MHz) which in theory would mean that it would perform the best, in practice when tuning your system for gaming it seems that HPET is too precise bogging down your machine.
Gaming seems to benefit from comparatively less precise but more stable and consistent timers and ticks (TSC 3.32MHz) that have a beneficial impact on your percentiles and low FPS. In short, the level of precision HPET offers is not needed when gaming and will result in worse performance overall.
How to Disable HPET?
To get rid of HPET you need to open CMD with administrator privileges and type – bcdedit /deletevalue useplatformclock and then restart your machine. This will disable HPET on your machine, and to test that the changes took effect you can either use the bcdedit/enum command (no value for useplatformclock) or use TimerBench (pictured above) which gives you a more beginner-friendly interface.
As explained in this clarification post you do not need to disable HPET in the BIOS or Device Manager because those changes either do nothing or cause issues by enabling outdated system timers.
Once off, your system will use a TSC clock and you will need to then select between running RTC or TSC ticks, TSC sync policy, etc.
Most custom Windows 10/11 builds already have HPET off so if you get an error message after putting in the command it simply means that HPET was already disabled.
Choosing Between TSC & RTC Ticks
Your system clock has already been put in place (TSC) which means the next important component is to figure out the system tick. You can find more information about the system ticks in the clarification post but the short answer is that you will need to test both ticks (TSC+RTC vs TSC+TSC) to see which one runs better on your system.
RTC is an outdated tick that is not dynamic and has no optimizations which might decrease your system performance and conflict with high polling rate mice. RTC is recommended for unoptimized systems or people who just want the process to be as short as possible without further testing.
Most tuned systems should run TSC+TSC since it is a higher precision timer resolution compared to RTC which was intended for legacy applications (still lower precision than HPET clock).
How to Disable Dynamic Tick
Dynamic tick is a power-saving feature enabled on laptops that helps them preserve battery life. If you are aiming for the best possible performance and inputs such a feature being enabled is counterproductive.
To disable dynamic tick open CMD with administrator privileges and use the command – bcdedit /set disabledynamictick yes. Restart your machine afterward and you should be set (check with bcdedit /enum).
Adjusting Your Windows Timer Resolution
To take full advantage of the bcdedits you have done you need to manually adjust your system’s timer resolution. To do so you can use a simple utility like Memory Cleaner set to your desired timer resolution.
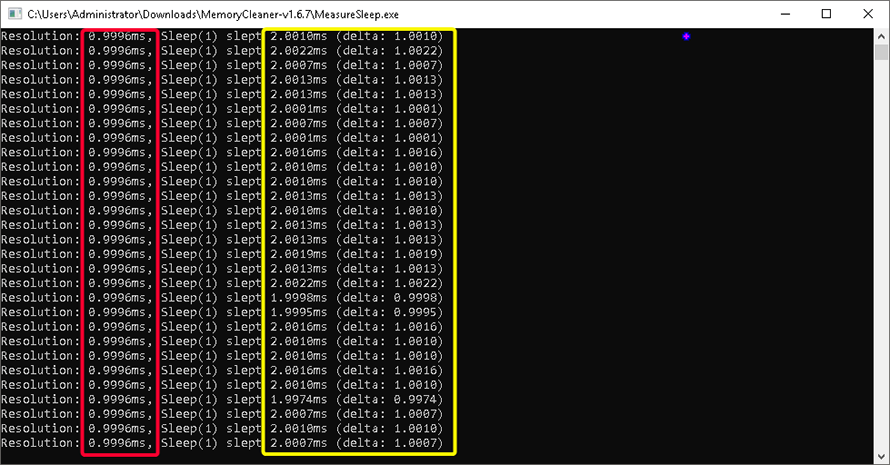
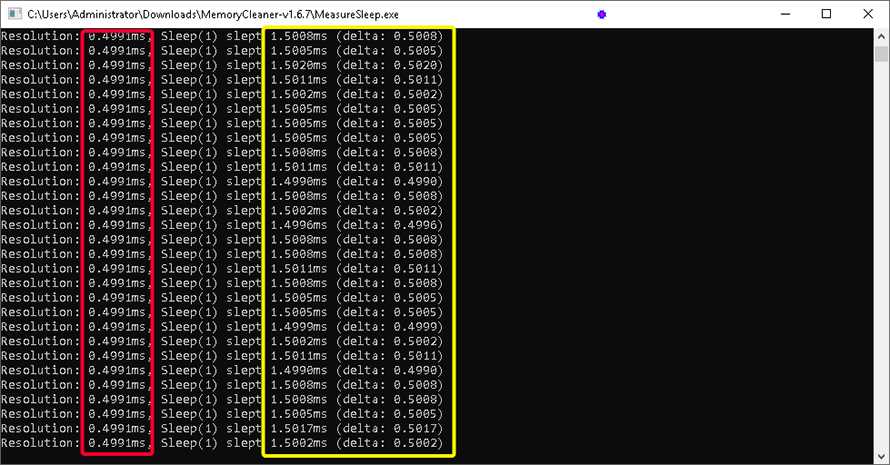
The reason you would do this is because Windows by default runs 15ms on idle and 1ms when you need higher precision for timer resolution values. You can achieve higher precision by using a manual micro-adjusted timer resolution as explained here and test the values using the MeasureSleep utility.
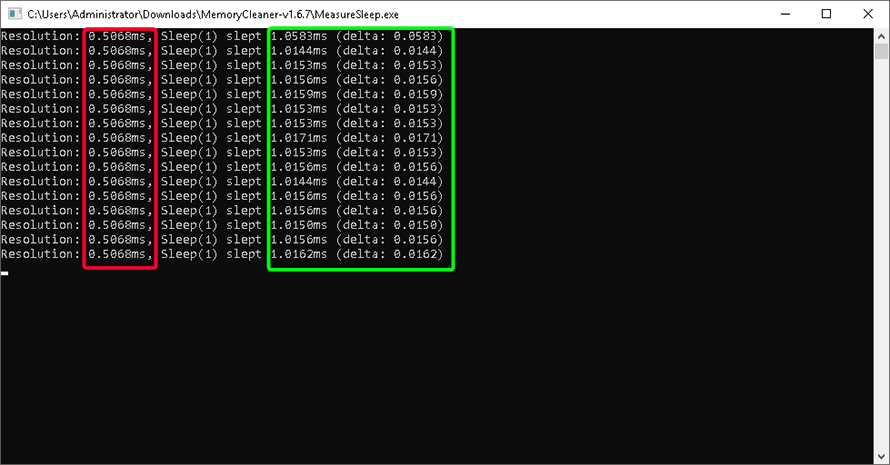
Values used: 5070 – 10000 – 5000
Your Windows timer resolution will behave differently depending on what tick you have chosen to use (RTC/TSC) therefore the values you will settle on will be different. If your system is set up correctly you should be able to achieve 1ms sleep delays with low deltas.