
-
Home
-
News
- Windows 11 24H2 Installer Crashing with a Ventoy USB? [Solved]
By Ariel | Follow |
Last Updated
Are you installing Windows 11 24H2 with Ventoy? If so, you may encounter the Windows 11 24H2 installer crashing with a Ventoy USB. This post from Partition Magic provides several methods to fix the problem.
Ventoy is a free and open-source tool used to burn ISO files to a USB flash drive for creating a bootable drive and clean installing OS. The tool can be used to bypass Windows 11 system requirements. So, a lot of users install Windows 11 with Ventoy on an unsupported PC.
However, they encounter various issues, such as Windows 11 24H2 setup error 0x80070001 – 0x4002f Ventoy, Ventoy not booting from USB, ISO not found in Ventoy partition, and the one discussed here.
Windows 11 24H2 installer crashing from a Ventoy USB. I have been dealing with Windows 11 24H2 since Sunday. Is it possible that something about the 24H2 and Ventoy are not getting along?https://forums.ventoy.net/
How to fix the Win11 24H2 not installing from a Ventoy USB? We summarize 5 solutions as follows. Let’s try them in order until the problem gets solved.
Solution 1. Use a Different USB
According to user reports, the Windows 11 24H2 Ventoy USB crashing issue is related to the USB itself. If you are using an aged or untrusted USB, you may fail to install Windows 11 24H2. So, you can try using a different USB, disabling Secure Boot, and using the MBR partition on the Ventoy USB.
Solution 2. Reformat the USB
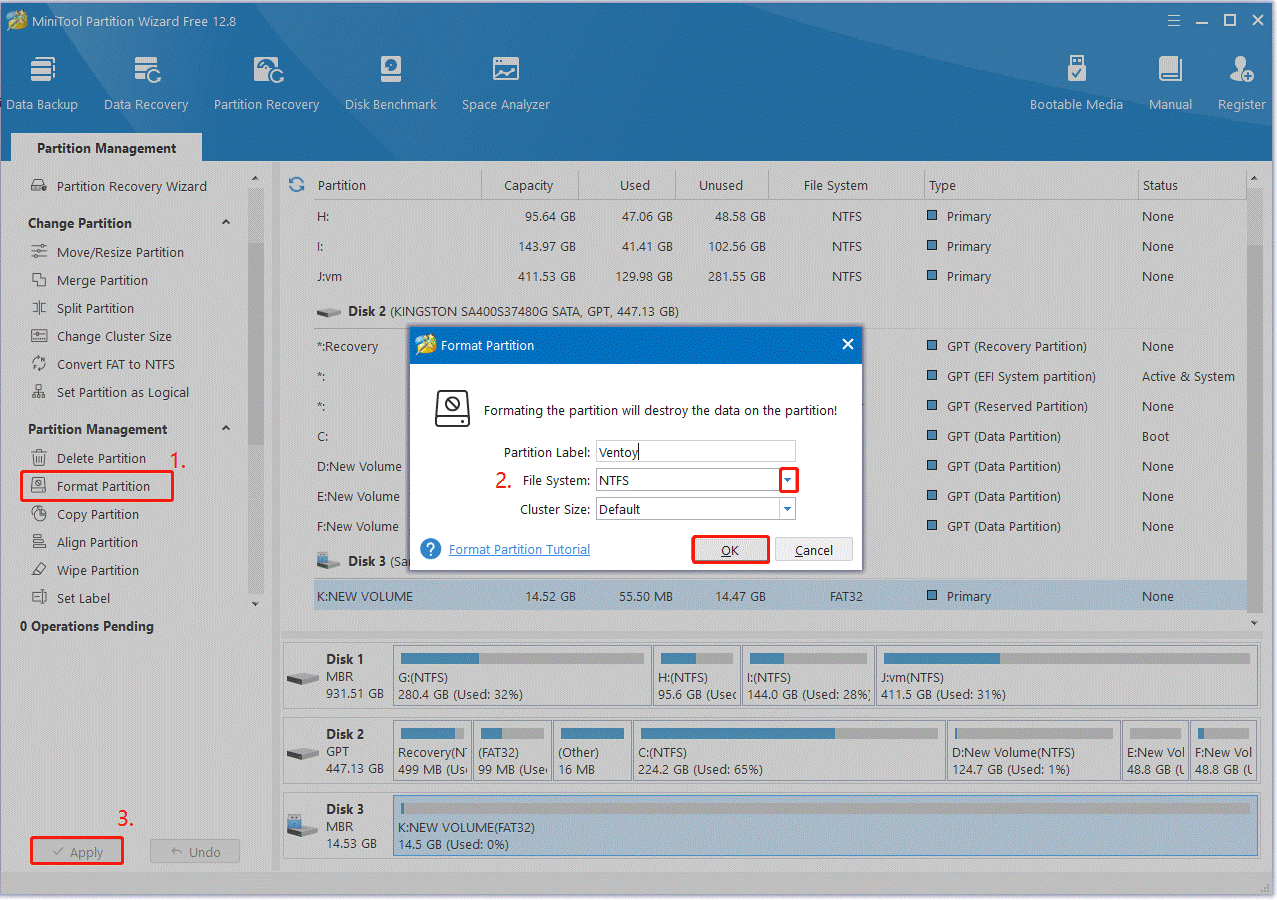
Some users found that the Windows 11 24H2 installer crashing with a Ventoy USB can be solved by reformatting the USB to NTFS. How to do that? MiniTool Partition Wizard is a free USB formatter that can format a drive not only to NTFS but also convert FAT32 to NTFS without data loss. Let’s try.
MiniTool Partition Wizard FreeClick to Download100%Clean & Safe
Step 1. Plug the Ventoy USB into your computer and launch MiniTool Partition Wizard
Step 2. Select the USB drive from the disk map and click Format Partition from the left panel.
Step 3. Select NTFS from the File System drop-down menu and you can change cluster size or partition label. Then click OK > Apply to execute the change.
After that, you can reinstall and check if the Win11 24H2 not installing from a Ventoy USB issue is gone.
Solution 3. Create an Unattended Win11 24H2 Installation
Some users from the Ventoy forum reported that the “Win11 24H2 installer not working with a Ventoy USB” issue can be solved by creating an unattended installation. It is an ongoing installation way without prompting you for information. If you don’t know how to do that, refer to this guide – How to Create an Unattended Windows 11 Installation? [Tutorial]
Solution 4. Use an Alternative to Ventoy
If the “Windows 11 24H2 installer crashing from a Ventoy USB” issue persists, you can use an alternative to Ventoy for installing Win11 24H2. It’s recommended that you use Rufus because the tool can bypass the Secure Boot and TMP 2.0 requirements while installing Windows 11.
However, if you have a standard computer that meets the system requirements, we recommend you create a bootable USB using the latest version of Windows Media Creation Tool.
Solution 5. Check Your Disk Errors
A faulty hard disk is also responsible for the Windows 11 24H2 installer crashing with a Ventoy USB. If the USB drive and Windows 11 24H2 ISO are not the blamed factor, you may have to check the disk errors. Here you can use CHKDSK.
Step 1. Type cmd in the search bar, and then right-click the Command Prompt app and select Run as administrator from the context menu. Then click on Yes in the UAC window to confirm it.
Step 2. In the elevated Command Prompt window, type the chkdsk /f /r command, type Y and press Enter to restart your PC. Then Windows will automatically check and repair errors on the disk.

Bottom Line
This post shows you how to fix Windows 11 24H2 Ventoy USB crashing. It provides 5 feasible solutions to the problem, such as reformatting the USB to NTFS, using an alternative, checking disk errors, creating unattended Windows 11 installation, etc.
About The Author
Position: Columnist
Ariel has been working as a highly professional computer-relevant technology editor at MiniTool for many years. She has a strong passion for researching all knowledge related to the computer’s disk, partition, and Windows OS. Up till now, she has finished thousands of articles covering a broad range of topics and helped lots of users fix various problems. She focuses on the fields of disk management, OS backup, and PDF editing and provides her readers with insightful and informative content.
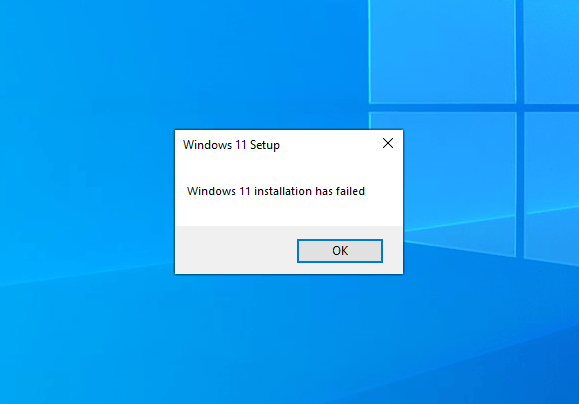
Ready to update to Windows 11 but you’re getting the “Windows 11 installation has failed” error? Many users have reported the exact problem, and luckily it’s not a difficult one to solve. If you’re in the same boat, read on to find out how to fix the error and update to Windows 11.
Try these fixes…
1: Remove external hardware
2: Run Windows Update
3: Update your device drivers
4: Enable TPM 2.0 and Secure Boot
5: Bypass TPM and Secure Boot check
Windows 11 system requirements
Before we dive into anything advanced and try the fixes, you need to make sure that your PC is eligible to update to Windows 11. You can either refer to the table below, or download the PC Health Check app from Microsoft to check compatibility.
| Processor | 1 gigahertz (GHz) or faster with 2 or more cores on a compatible 64-bit processor or System on a Chip (SoC) |
| RAM | 4 GB |
| Storage | At least 64 GB |
| System firmware | UEFI, Secure Boot capable |
| TPM | Trusted Platform Module (TPM) version 2.0 |
| Graphics card | Compatible with DirectX 12 or later with WDDM 2.0 driver |
| Display | High definition (720p) display that is greater than 9” diagonally, 8 bits per color channel. |
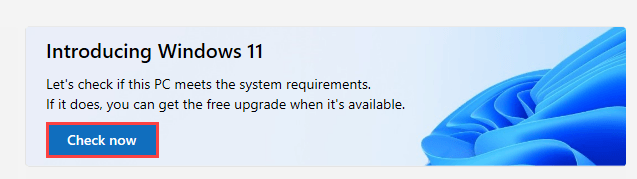
If you’re using the PC Health Check app, simply follow these steps:
- Download and install the PC Health Check app.
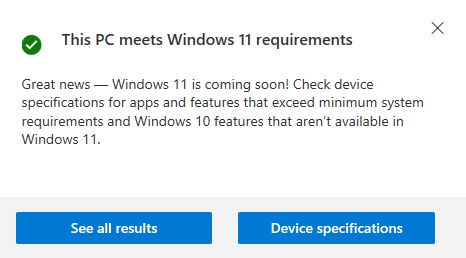
- Run the app, and click Check now.

- The app will show you if your PC is eligible for Windows 11 upgrade or not.

Fix 1: Remove external hardware
A quick troubleshooting tip that’s often overlooked by many is to remove any external devices connected to your PC/laptop. Here we want to keep only the basic functionality of your PC for the Windows 11 upgrade. For example, you can remove any USB hub, speaker, printer, headphone, scanner, etc.
After you rule out any possible interference from these devices, try to install Windows 11 again. If this doesn’t help, try the next fix.
Fix 2: Run Windows Update
Microsoft suggests that you need to make sure all the available Windows updates are installed before you attempt to upgrade to Windows 11. Here’s how to check for Windows updates and install the available ones:
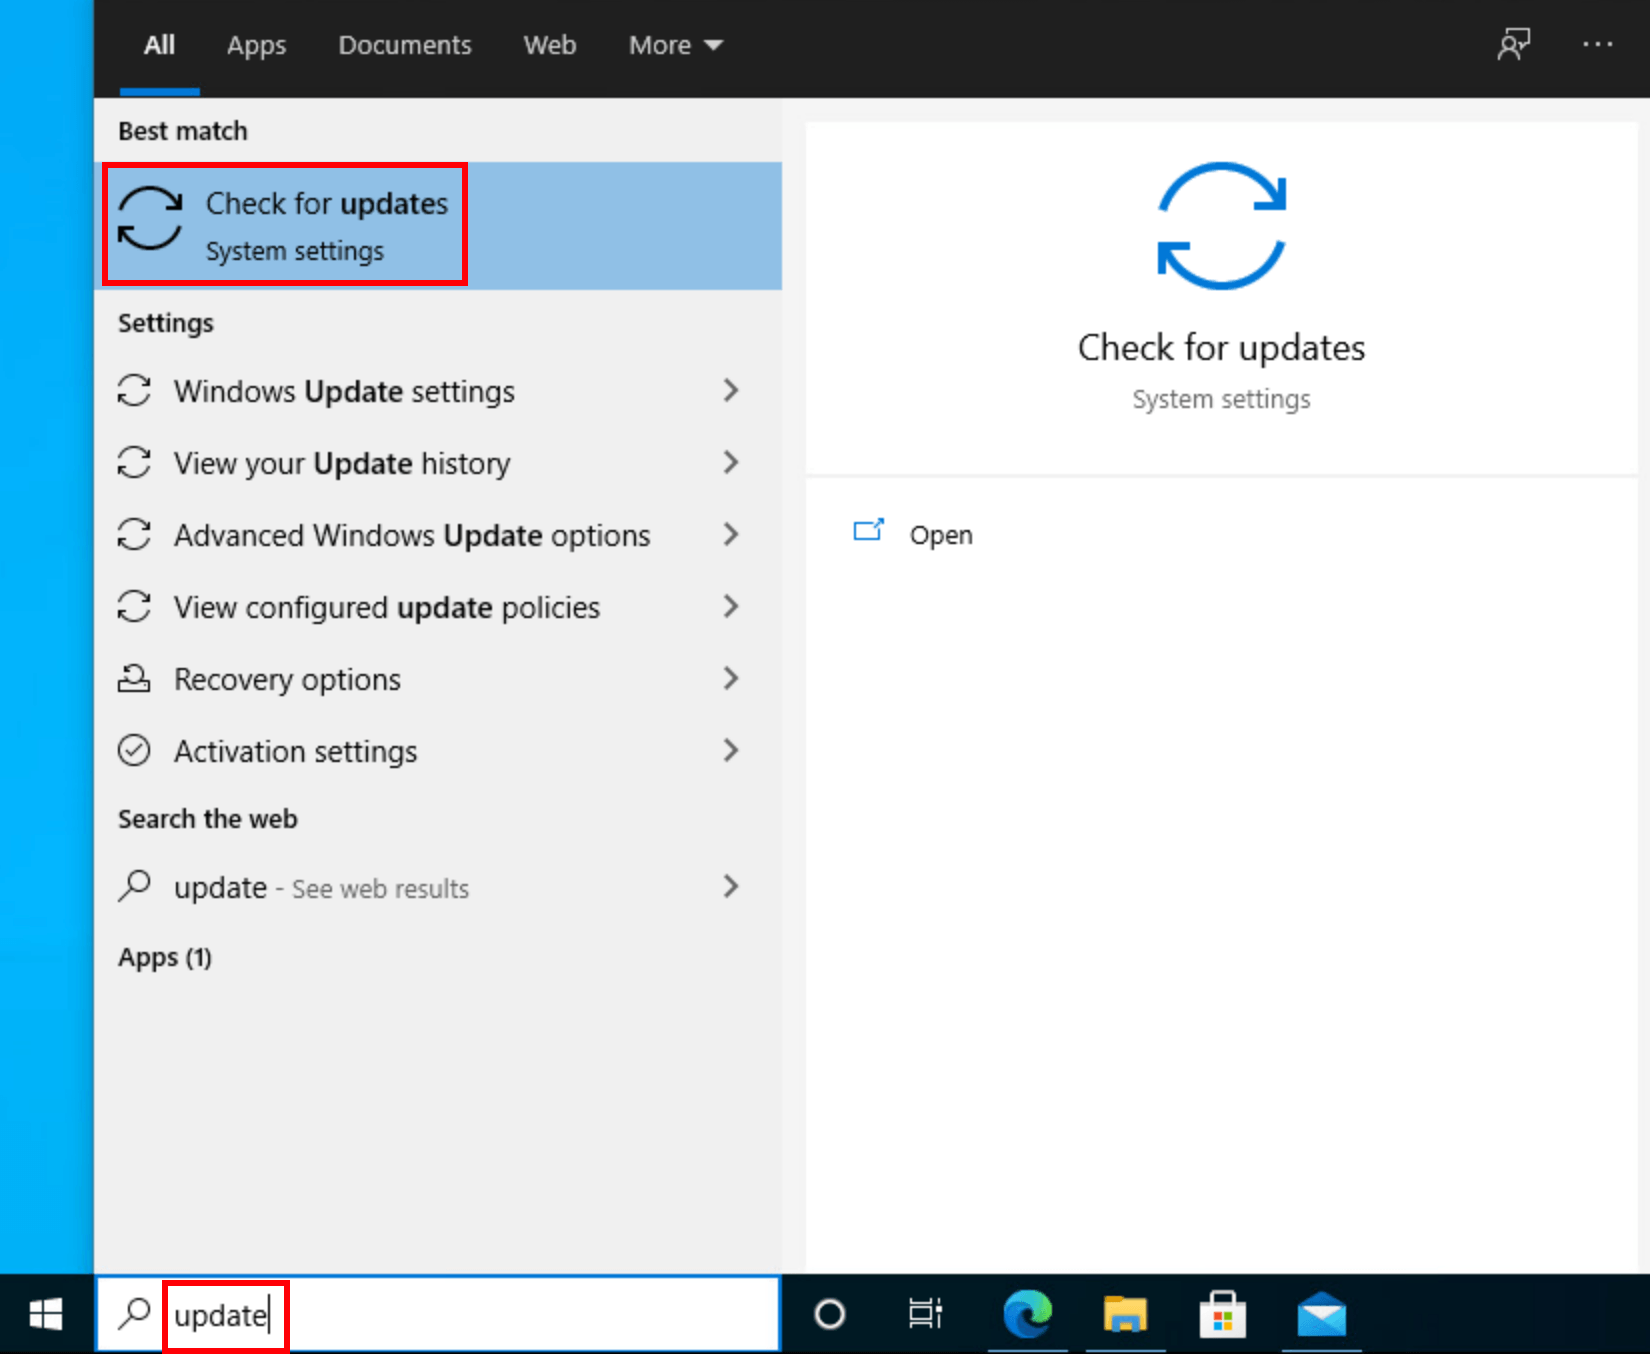
- In the search bar next to your Start button, type update, then click Check for updates.

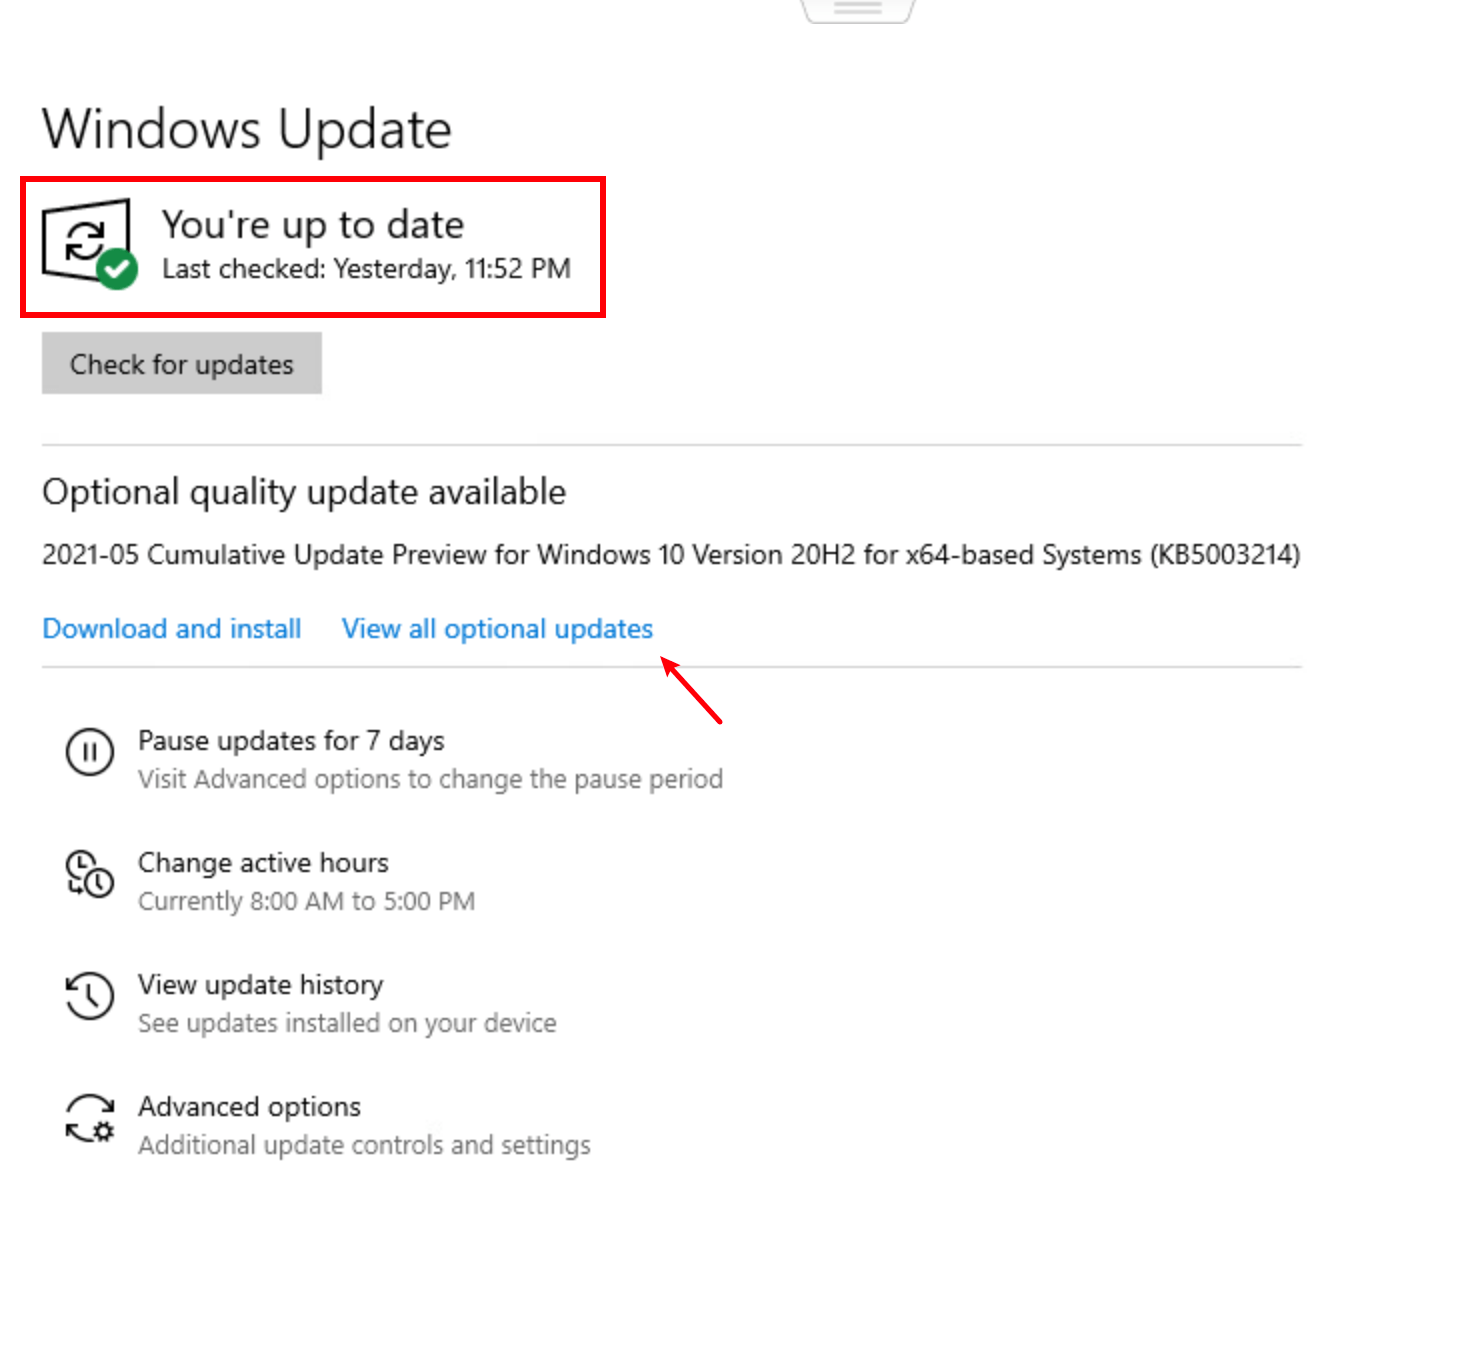
- Windows will scan for available updates. If there are no available updates, you’ll get a You’re up to date sign. You could also click View all optional updates and install them if needed.

- If there are available updates, Windows will automatically download them for you. Follow instructions to complete the installation if needed.

- You may be prompted to restart your PC. Make sure you save important files in advance.
If you still get the “Windows 11 installation has failed” error, try the next fix.
Fix 3: Update your device drivers
Similar to the above, it’s important to make sure all the hardware drivers are up-to-date before you upgrade to Windows 11. There are two ways you can get the right drivers on your PC: manually or automatically.
Manual driver update – To manually update your drivers, you can update the drivers via Device Manager. Note that Device Manager doesn’t always detect the latest available update for you. You can also search on the manufacturer’s website, for example, for your graphics card. Make sure you download the driver that’s compatible with your Windows version.
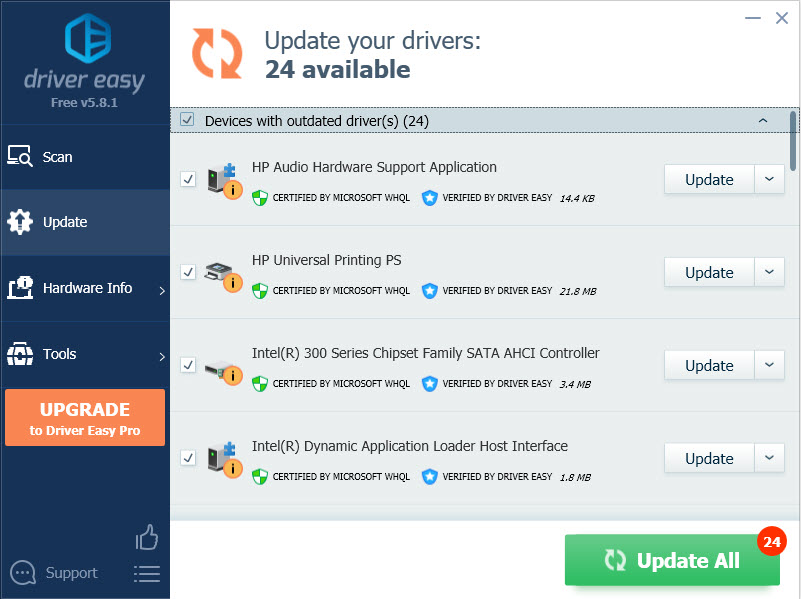
Automatic driver update – If you don’t have the time, patience, or computer skills to update your drivers manually, you can, instead, do it automatically with Driver Easy. Driver Easy will automatically recognize your system and find the correct drivers for you, then it will download and install them correctly:
- Download and install Driver Easy.
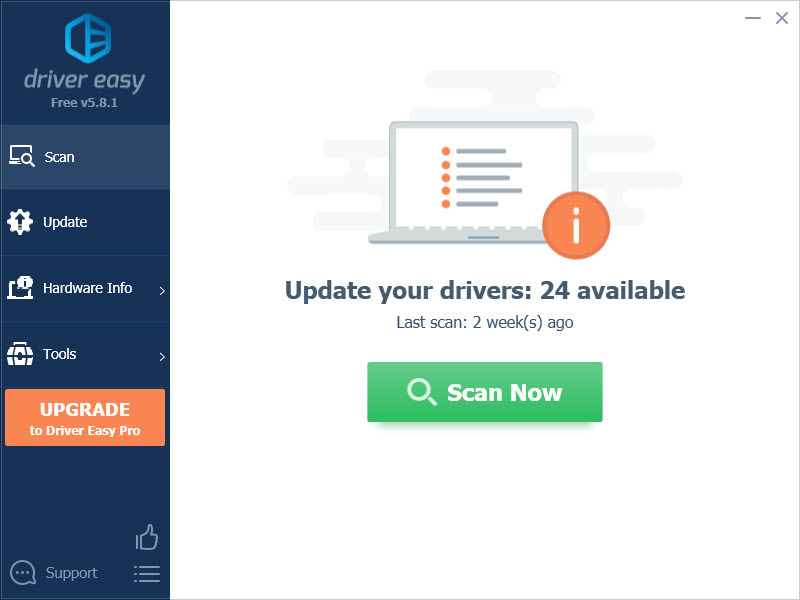
- Run Driver Easy and click the Scan Now button. Driver Easy will then scan your computer and detect any problem drivers.

- Click the Update button next to the flagged drivers to automatically download the correct version of the drivers, then you can manually install them (you can do this with the FREE version).
Or click Update All to automatically download and install the correct version of all the drivers that are missing or out of date on your system. (This requires the Pro version which comes with full support and a 30-day money-back guarantee. You’ll be prompted to upgrade when you click Update All.)

If you need assistance, please contact Driver Easy’s support team at support@drivereasy.com.
Restart your PC then try to install Windows 11 again. If the error persists, try the next fix.
Fix 4: Enable TPM 2.0 and Secure Boot
According to the system requirement for Windows 11, TPM 2.0 and the Secure Boot option need to be enabled on your PC. Below are the steps to check the TPM on your PC and enable TPM 2.0 and Secure Boot from BIOS:
Check if your PC has a TPM 2.0 chip
- Press the Windows key and R to invoke the Run box.
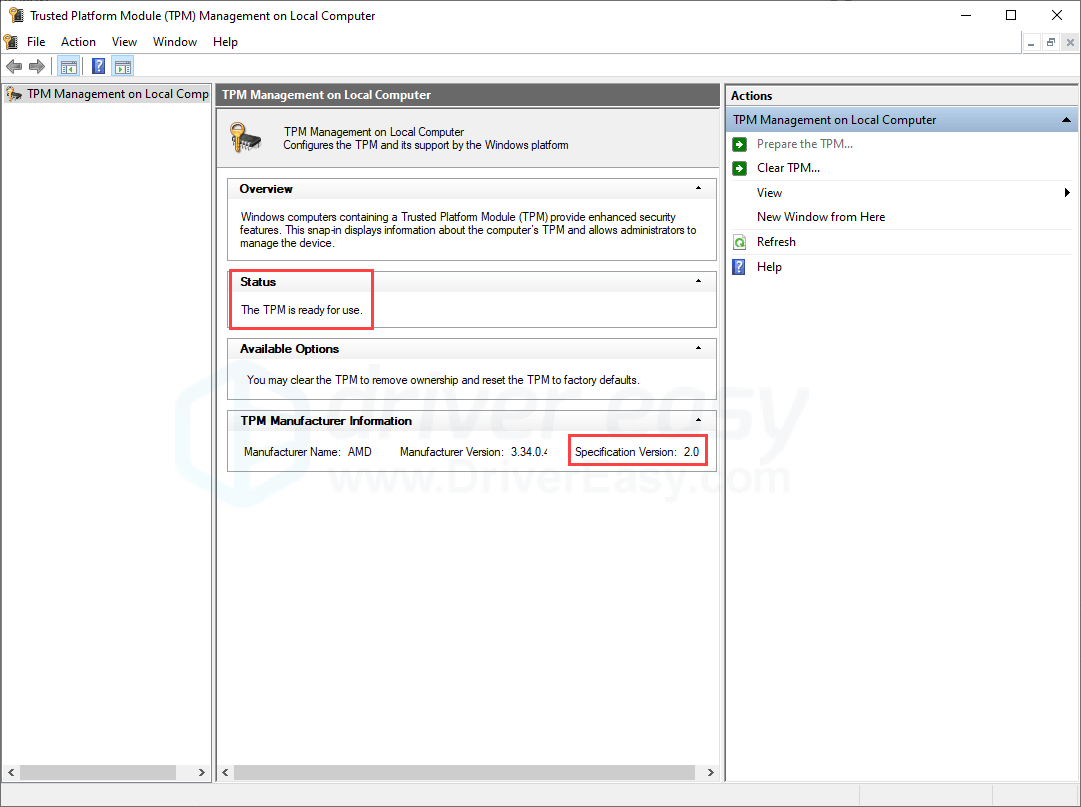
- Type in tpm.msc, then click OK.
- If the TPM 2.0 is already enabled on your PC, you should see the following results with ” The TPM is ready for use” and “Specification Version: 2.0“.

If your PC doesn’t have a compatible TPM chip, the result may show “Compatible TPM cannot be found”. You can jump to Fix 5 to bypass TPM and Secure Boot check.
Enter BIOS
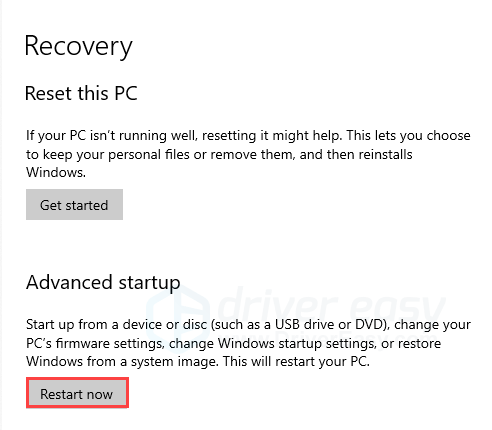
- Press the Windows key to open the search menu, type recovery, then click Recovery options.
- Under Advanced Startup, click Restart now.

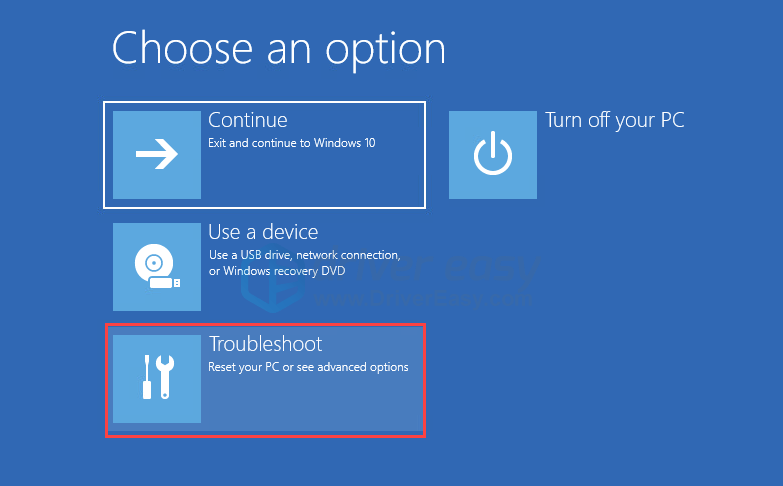
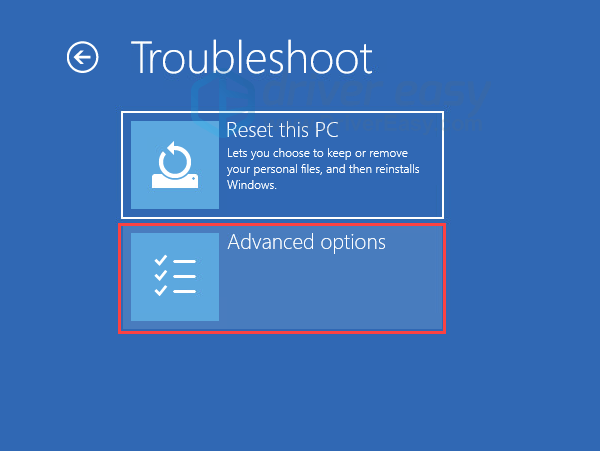
- Click Troubleshoot.
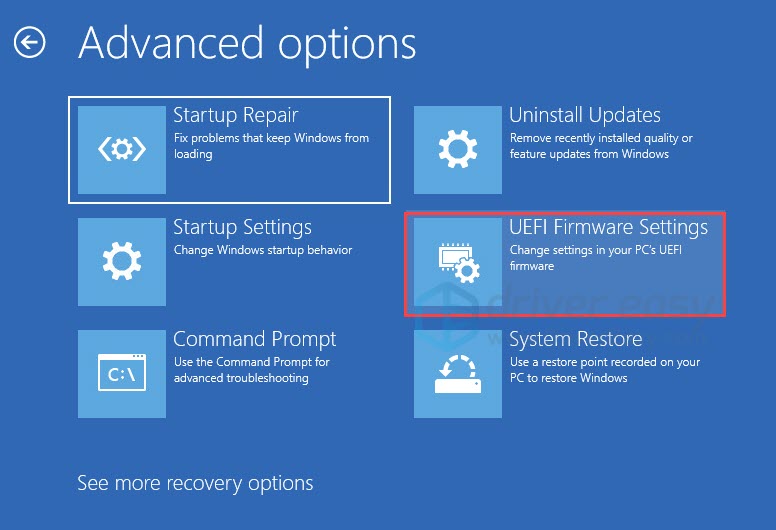
- Select Advanced options.
- Click UEFI Firmware Settings.
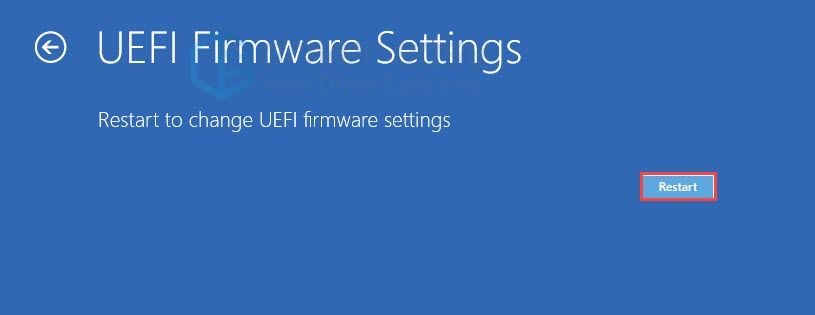
- Click Restart.
After you enter the BIOS screen, follow the steps below to enable TPM 2.0 and Secure Boot.
Enable TPM 2.0
- Go to the Security or Advanced tab.
- You may see different terms, such as TPM Configuration, TPM 2.0 Security, TPM Support, TPM Device Selection, Intel Platform Trust Technology (PTT), or AMD fTPM Switch.
- Once you find it, set it to enabled.
Enable Secure Boot
- Go to the Boot or Security tab.
- Find Secure Boot and enable it.
- Save the changes and exit to boot your PC.
Fix 5: Bypass TPM and Secure Boot check
If your device doesn’t have a TPM 2.0 chip, then it doesn’t meet the requirement for Windows 11. But it doesn’t mean you can’t upgrade to Windows 11. One trick that makes it possible is to bypass the system check of TPM,and the Secure Boot option when upgrading. Here’s how:
Although this method allows you to install Windows 11 on an unsupported device, it’s not recommended by Microsoft. Your device won’t be entitled to receive future updates on Windows 11, and there could be compatibility issues.
It can be risky to make changes to the registry, so before you proceed, make sure you backup your registry.
- Press the Windows key and R to open the Run box.
- Type in regedit, then click OK. If prompted for permission, click Yes.
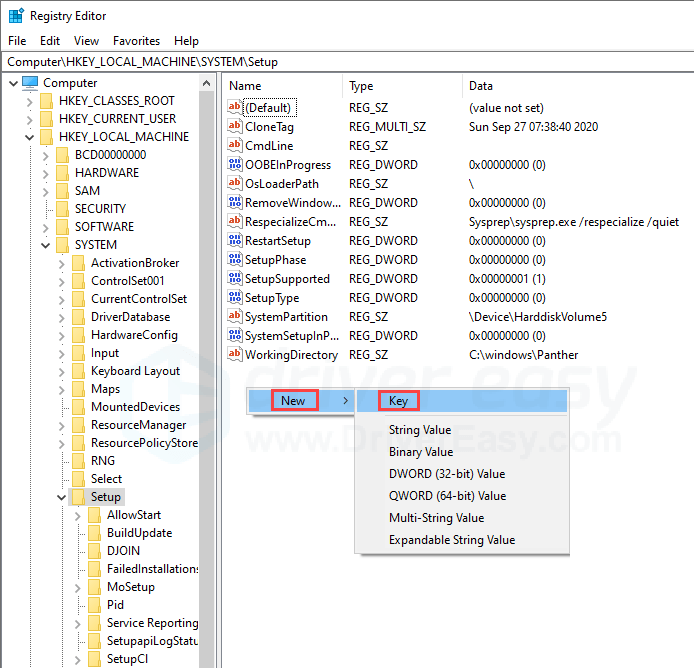
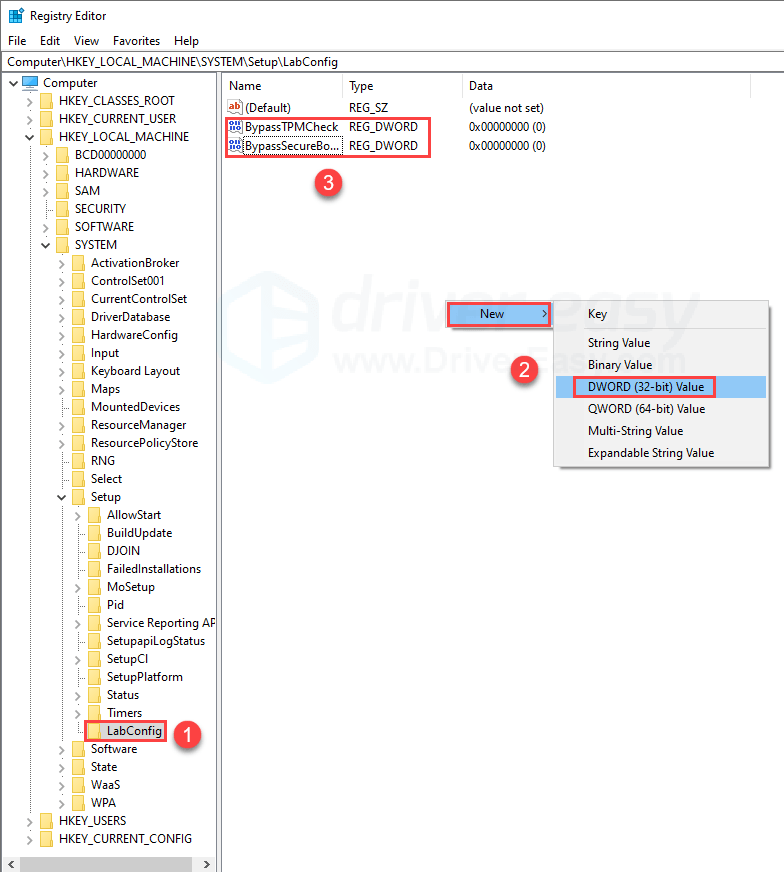
- Copy Computer\HKEY_LOCAL_MACHINE\SYSTEM\Setup and paste it to the address bar, then press Enter.
- Right-click anywhere empty on the right, select New and click Key. Name it as LabConfig.

- Select LabConfig, then right-click an empty area on the right and create two DWORD Value options. Name them as BypassTPMCheck and BypassSecureBootCheck respectively.

- Double-click BypassTPMCheck, change the value data to 1, select Decimal, and click OK.
- Repeat the same for BypassSecureBootCheck option. Change the value data to 1, select Decimal, and click OK.
- Exit the Registry editor, and reboot your PC.
- You should now be able to install Windows 11.
Hopefully this article is helpful! Please feel free to leave a comment if you have any questions or suggestions.
5
5 people found this helpful
Some Windows 11 users attempting to utilize the Windows 11 Installation Assistant are reporting that the program closes after a second or so. This problem seems to be prevalent with insider builds of Windows 11 (particularly with Dev insider builds)
Of course, this problem won’t affect a lot of Windows 11 users, since few of them will have much use with running the Windows 11 Installation assistant tool if they’re already on Windows 11.
Note: You can expect to face this issue if you’re looking to move away from an Insider Development build of Windows 11 to the official release version.
If this scenario is applicable and you find that the Windows 11 Installation assistant closes as soon as you open it, there is one potential workaround that you can use to make sure the window stays open.
Other affected users have discovered that you can ‘force’ the window to stay open by forcing the executable to run in compatibility mode with Windows 7. This method is confirmed to work by a lot of affected users.
How to Prevent the Windows 11 Installation Assistant window from Automatically closing
This method should work for you if you are currently using an insider dev build, but we couldn’t verify its effectiveness for stable releases of Windows 11.
It involves forcing the Windows 11 Installation Assistant window to remain open by forcing the main executable to run in Compatibility Mode with Windows 7:
Here’s what you need to do
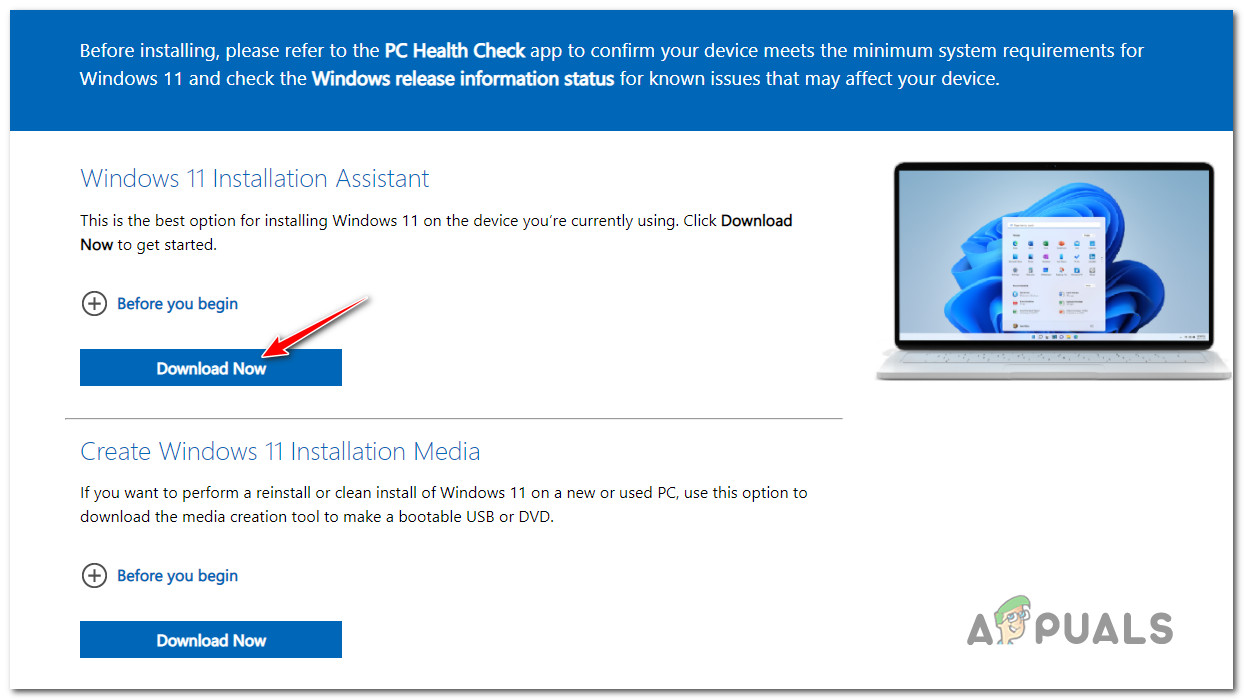
- To make sure you’re using the latest version available for Windows 11 Installation Assistant, open your default browser and visit the official download page for Windows 11.
- Once you’re inside, click on the Download Button directly under Windows 11 Installation Assistant.

Downloading the Windows 11 Installation Assistant - Wait until the installer is downloaded locally, then navigate manually where the download is located. Most likely, you’ll find it inside the download folder.
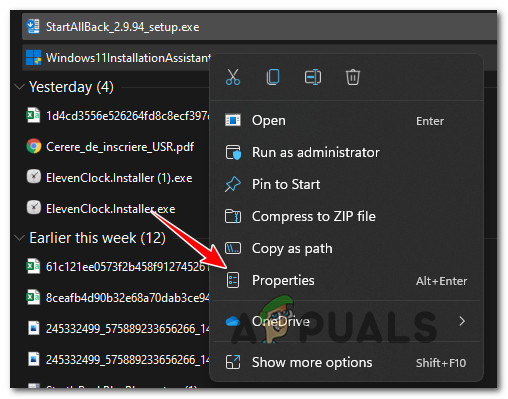
- Next, once you manage to discover the executable, right-click on it and choose Properties from the context menu.

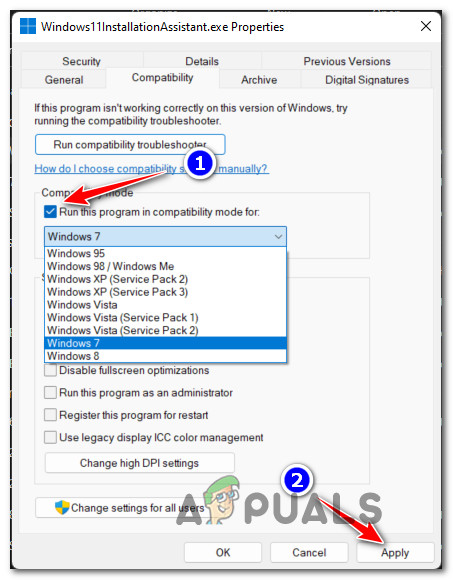
Accessing the Properties screen - Once you’re inside the Properties screen of Windows11 Installation Assistant Properties screen, select the Compatibility tab from the ribbon menu at the top.
- Next, check the box associated with Run this program in compatibility mode for, then select Windows 7 from the drop-down menu below.

Configuring the executable to launch in Compatibility mode with Windows 7 - Hit Apply to save the changes, then run the executable normally and see if the window nor remains open long enough for you to perform your tasks.
Unfortunately for those of you that found this method to be ineffective, the only way is to go for a clean install or repair install procedure:
- Clean install Windows 11
- Repair install Windows 11
Note: In case you are looking to move away from an insider dev build, the only way really is to go for a clean install.
Kamil Anwar
Kamil is a certified MCITP, CCNA (W), CCNA (S) and a former British Computer Society Member with over 9 years of experience Configuring, Deploying and Managing Switches, Firewalls and Domain Controllers also an old-school still active on FreeNode.
While trying to install the Windows update, are you encountering Windows 11 installation has failed error? If so, you are not alone; several other users have reported facing a similar problem. Luckily, the problem is fixable, and you can do it on your own by following the steps mentioned below.
However, before we learn how to troubleshoot the error, let us narrow down the reasons that cause the installation of Windows 11 to fail.
Reasons for Windows 11 Installation Failed
The error can be caused due to multiple reasons. Here we list down the most common ones that will help you understand the reason behind the blocked Windows 11 installation task.
- The external hard drive is attached to the PC.
- Outdated or corrupt device drivers.
- Either the PC is incompatible with Windows 11 or does not meet system requirements.
- Faulty Windows 11 ISO file downloaded or the Insider preview build has problems.
- Issues with disk, UEFI, secure boot, or MBR.
- Insufficient disk space.
- Interference caused by the antivirus or third-party application.
- Copying Windows installation files twice.
- Corrupt Boot Manager.
- Incorrect File extension.
Common Windows 11 Installation Problems
- Installation fails without an error code due to antivirus software.
- Windows 11 installation has failed ISO.
- The setup installation has failed.
- Cannot install Windows 11 – Error 0xc1900101.
- Installation Failed in Safe_OS Phase.
- The setup has failed to validate the product key.
- Windows Installer error.
- This PC can’t run Windows 11.
Whatever the error message or reason is, we will help fix it. Follow the fixes explained individually in the correct order to find the perfect solution for you.
Read Also: Exploring Windows 11: 5 Common Problems & Fixes
What Does the Meaning of This Error
The error means that the installation process was unable to complete successfully due to various system-related issues. This error can occur during an upgrade from Windows 10 or a fresh installation of Windows 11.
Best Ways To Fix Windows 11 Installation Failed Error
To troubleshoot the Windows 11 installation stuck, here are some basic fixes, followed by the complex ones. Before going with the technical ones, follow the quick tips below:
Basic Tips to Fix Windows 11 Upgrade and Installation Errors
Fix 1 – Disconnect all connected external hard drives.
Fix 2 – Check the copy of Windows 11 you are using. It must be genuine.
Fix 3 – Scan the PC for malware infection. For this, you can use the antivirus program you are using or can use the T9 antivirus.
Fix 4 – Update your device drivers
After performing the above fixes one last thing you need to try before getting into technicalities is to update the hardware drivers. You can update them either manually or automatically.
Manually Update Driver –
To update drivers manually you can use Device Manager, Windows built-in utility to keep drivers updated. Press Windows + X select Device Manager and update the hardware drivers.
However, it is not easy to update drivers manually, as you will have to update each driver individually. Also, there is no guarantee that you will get the latest available update. To deal with this you can visit the manufacturer’s website, and download the driver. But for that, you need to have system and device details, which again is not easy and requires a lot of time and effort.
If you want to avoid this, then the best thing you can do is update drivers automatically.
Automatically Update Drivers –
Advanced Driver Updater is one of the best driver updating tools for Windows. Using it you can scan the system for outdated drivers and update them without any hassle. The tool shows the latest and compatible driver updates and even takes backups of drivers and allows scheduling driver scanning. To use it, follow these steps:
Features, User Reviews, Pros & Cons, And More about the tool
1. Download, install, and run Advanced Driver Updater.
2. To scan the PC click Start Scan Now and wait for the process to finish.

3. Click on Update driver next to the driver you want to update. However, if you want to update all drivers at once you can do it by switching to the paid version which comes with a 60-day money-back guarantee and technical support. You can contact the support team for technical support at support@systweak.com.

4. Restart the PC and try to install Windows 11. The error should be fixed. If it persists we’ve other fixes, try them.
After performing these basic steps, restart steps restart your computer and try reinstalling Windows 11. Suppose this helps; there is no need to move further. You can enjoy working on Windows 11. However, if this does not help, continue reading to implement the fixes explained below:
Technical Troubleshooting To Fix Windows 11 Installation Stuck, Error
Method 1 – Check the PC for compatibility
Most PC users do not know that to install Windows 11; their PC should meet the following system requirements.
- Processor: 1 gigahertz (GHz) or faster with 2 or more cores on a compatible 64-bit processor or System on a Chip (SoC)
- RAM: 4 gigabytes (GB)
- Storage: 64 GB or larger storage device
- System firmware: UEFI, Secure Boot capable
- TPM: Trusted Platform Module (TPM) version 2.0
- Graphics card: Compatible with DirectX 12 or later with WDDM 2.0 driver
- Display: High definition (720p) display that is greater than 9” diagonally, 8 bits per color channel
- Internet connection and Microsoft accounts: Windows 11 Home edition requires internet connectivity and a Microsoft account to complete device setup on first use.

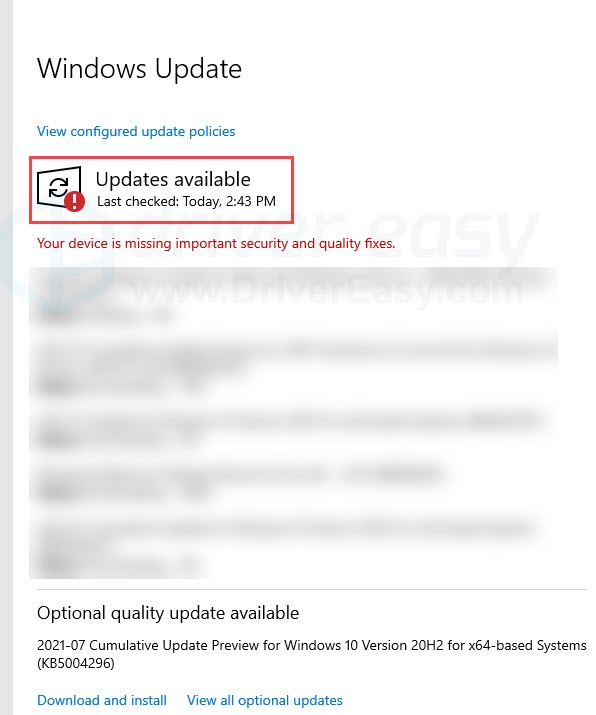
If your PC fails to meet them, you will face Windows 11 install failure and other errors, as shown in the screenshot below.

To check if your computer meets the requirements
Note : Microsoft provides a step-by-step guide for you to open the PC Health Checkup app on its official webpage
1. Install the PC Health Checkup app if not already installed.
2. Press Windows key + S and search for PC Health Check. Select the best search result.
3. Click Check Now.

4. The app will show whether your PC is compatible with Windows 11 or not.

If it is compatible and you are still struggling with Windows 11 and can’t install an update, it seems TPM2.0 and Secure Boot are missing from the BIOS.
What is TPM 2.0?
TPM is a computer chip that offers hardware-based security. When the BIOS/UEFI and CPU do not fall under Micrpspft’s permitted range, you cannot install Windows 11. Following the list of supported AMD and Intel CPU
- 8th Generation Intel Core Processors and Newer Products
- AMD Ryzen Processor
- Ryzen 3000 Series and Newer Products
Steps to check TPM 2.0 on your PC
1. Press Windows + R to open the Run window.
2. Type tpm.msc and press the Enter key.
3. This will open the TPM management window. Here, under the Status tab, if you can read The TPM is ready for use it means TPM is enabled. Verify the TPM version from under the TPM Manufacturer Information.

4. If TPM is compatible but disabled, you will get a message ‘Compatible TPM can’t be found’. This means you must log in to the BIOS to enable it.

To do so, follow these steps.
Enabling TPM 2.0 Via BIOS
1. Press the Shift key while clicking the Restart option.
2. This will help you access the boot page. Here, select Troubleshoot.

3. Click Advanced options.

4. Click UEFI Firmware Settings and press Restart to enter the BIOS.

5. If you cannot find TPM look for PTT as the name may differ depending on the motherboard. However, remember both function the same. Click Settings > Security > TPM 20. Security and enable TPM.
Note : On certain systems, you may find terms like TPM Configuration, TPM Support, TPM Device Selection, Intel Platform Trust Technology (PTT), or AMD fTPM Switch. Select either to enable TPM.

Enable Secure Boot
1. Click the Boot or Security tab.
2. Look for Secure Boot and enable it.
3. Save the change and exit to restart the PC.
Method 2 – Perform a Clean Boot
Most of the time, third-party applications interact with your Windows installation. To ensure these programs do not interfere with Windows installation, perform a clean boot. To do so, follow these steps:
1. Press Windows + R to open the Run window.
2. Type msconfig and press the Enter key.

3. Click on the Boot tab. Uncheck Safe boot > click Apply.

4. Click the General tab and select the Selective Startup option.
5. Uncheck the Load startup items option. Click Apply.

6. Click the Services tab > select the box next to Hide All Microsoft Services > and click Disable All.

7. Click the Startup tab > select Open Task Manager.

8. Now select the items one by one and Disable them.
9. Next, enable each item individually and Restart the PC after enabling each item.

This will help fix Windows 11 installation failure with no error code issue and help narrow down the program that is creating issues.
Method 3 – Update Windows
Before you try to upgrade to Windows 11, ensure you have all the Windows updates installed. To check if you have them all, follow these steps:
1. Press Windows + I to open Windows Settings.
2. Double click Update & Security.
3. Windows Updates > Check for updates.

4. Windows now scan for available updates. If you have all the updates installed you will get You’re up to date message. However, it is best that you click View all optional updates and install them too. However, if any updates are missing Windows will install them automatically. Follow these steps until you get You’re up to date prompt.

5. Restart the PC to save changes. Now try to update Windows, you should not get the “Windows 11 installation has failed” error. However, if the error persists, trypersists try the next fix.
Method 4 – Uninstall the Language Pack
Some experts have discovered that there are certain language packs installed on Windows 10 that are not supported by Windows 11. Hence, it is suggested that you uninstall the language pack before attempting to install Windows 11. Here are the steps –
1. Press Windows + S to open the search box and type “change display language”. Click on the same option in the search results.

2. Next, choose English (US).

3. Now, type “Uninstall display language” in the search box and a new box will open. Click on the Install/Uninstall languages button.

4. Now locate the alternative language and delete it from your PC.
5. Restart the Computer.
Method 5 – Create Installation Media and Setup
Another method to fix the error is to create a new installation media. Here is what you need to do –
1. Register for the Windows 10/11 upgrade and choose the free version.
2. Ensure that you have ample free space on your hard drive.
3. Visit the Microsoft official website and download the Media Creation Tool. Remember to choose 32-bit or 64-bit depending on your PC’s architecture.
4. Double-click on the file downloaded and choose “Create installation media for another PC”.
5. Click on Next and follow the onscreen instructions to create the installation media.
Method 6 – Uninstall GPU to fix error 0xc1900101
There have been a few users who have received the “The installation failed in the SAFE_OS phase 0xc1900101” error while installing Windows 11. This is a rare error and the exact cause of this error is not yet determined. However, we have a few steps that have helped others with the same error.
1. Remove all the external devices attached to your PC (except Mouse & Keyboard).
2. Uninstall The GPU Driver by pressing Win + X to open the Power menu and select Device Manager.
3. Click on Display Adapters, to extend and reveal your graphics card.
4. Right-click on the Intel Graphics card and choose Uninstall Device from the context menu.

5. Next, reboot your computer and enter the BIOS by pressing the F9/F10/F11 key.
6. Locate Active Core Settings under the Processor section and modify the Active Processor Core to 1. Remember to save and exit the BIOS settings.

7. Reboot your PC.
Method 7 – Upgrade System Disk
Upgrading your hard drive involves replacing your current disk with a newer one. This will help improve storage, speed, and performance. Here is what you need to do to upgrade the system disk.
1. Select a hard disk that is better than your current hard disk.
2. Backup your important data on cloud storage or external disk.
3. Next, clone the existing hard disk to the new one by choosing the option (Keep Everything).
Note : You can use any third-party disk cloning software. (EaseUS Todo Backup, AOMEI Backupper)
4. If cloning is not possible then you can clean-install Windows 11 by creating a new disk as explained in Method 5.
Note : You will have to physically replace the hard disk. If you are not too confident then we recommend you get a hardware technician to do it for you.
Method 8 – Reinstall Windows 11
Reinstalling Windows 11 is very easy if you follow the steps and do not miss even a single one. Here are the steps –
Reboot your PC and enter the BIOS.
You need to set the Boot Priority to either USB or DVD depending on the Windows installation media you possess.
1. Exit the BIOS and insert the installation media.
2. The PC will boot from the new option you have selected.
3. In the new screen, choose Language, Time, and Currency format, Keyboard, and then click on the Next button.

4. Click on Install Now and then select “I don’t have a product key”.

5. Choose the Windows 11 edition and then click on Next.

6. Accept the Microsoft license agreement and click on Next.
7. Choose the “Install Windows Only” option.

8. Select the hard disk partition and click on Next.

9. The Windows installation process will now begin. Wait for the entire process to complete which will include a reboot of your PC. Remember to unplug the installation media when your PC reboots.
Method 9 – Bypass TPM and Secure Boot Check
If you found that your device doesn’t have TPM 2.0 chip you must be thinking that you can’t use Windows 11, right? Luckily that is not the case. You can update to Windows 11 using a trick that helps bypass system checks for TPM and Secure Boot.
Note : This step will help upgrade to Windows 11 but you will not be able to receive Windows 11 updates.
Before we proceed we suggest taking a backup of the registry as we will make some changes to the Windows registry. To backup the Windows registry press Windows + S and type regedit and press the Enter key. This will open Registry Editor. Click Computer > Right-click Export. This will back up all the keys and subkeys.
1. Once the keys are exported, copy and paste the following command in the address bar Computer\HKEY_LOCAL_MACHINE\SYSTEM\Setup and press the Enter key.

2. Right-click on the blank space > select New > key > Name it as LabConfig.

3. Select LabConfig, right-click on the blank space on the right, and create two DWORD (32-bit) Value options. Name them as BypassTPMCheck and BypassSecureBootCheck.

4. Double-click BypassTPMCheck, change the value data to 1 and select Decimal > OK.

5. Do the same for BypassSecureBootCheck option. Change the value data to 1, select Decimal > click OK.
6. Close Registry Editor and then try to install Windows 11. This should work and you should no longer see the side-by-side configuration is incorrect in Windows 11.
Fixed Windows 11 Installation has Failed to Start
We hope the above solution helps to fix the Windows 11 installation failure or upgrade failed error. If this doesn’t help we suggest optimizing the PC and running a system file checker to fix corrupt system files.
Please let us know which fix worked for you in the comments.
Recommended:
Fixed – “We Couldn’t Find Any Drives During Windows 11 Installation
9+ Ways To Fix Windows Stuck on “Checking for Updates”
Performing a Windows 11 update is essential for enhancing the security and stability of your system. The update and installation process is smooth most of the time. However, it’s possible to encounter a «Windows 11 24H2 failed to install» problem. This tutorial from EaseUS will outline the main causes of the «Windows 11 24H2 update won’t install» error and discuss eight fixes you can apply to address Windows 11 24H2 not installing on PC or stuck error.
How to Fix Windows 11 24H2 Update Failure on PC
An update failing to install may affect your computer’s ability to run normally. We will describe how you can apply each fix to address the «Windows 11 not updating to 24H2» problem. This section will discuss 8 fixes to the Windows 11 24H2 update problem as follows:
- Fix 1. Free Up Space on C Drive
- Fix 2. Restart Your Computer
- Fix 3. Run Windows Update Troubleshooter
- Fix 4. Remove External Devices
- Fix 5. Run SFC and DISM Commands
- Fix 6. Fix Driver Errors in Device Manager
- Fix 7. Reset Windows Update Components
- Fix 8. Update from USB Drive
Fix 1. Free Up Space on C Drive
The leading cause of Windows 11 update failure is insufficient disk space. You can easily fix this by deleting some files on your C drive using Disk Cleanup. Check the following steps:
Step 1. Open Disk Cleanup.
Step 2. Select your C drive and click «OK.»
Step 3. Select the components to delete under the «Files to delete» section. Click «OK.»
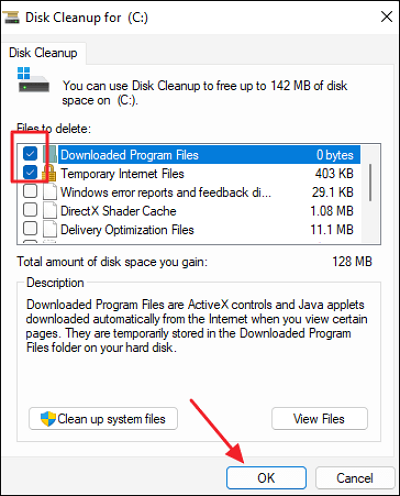
Step 4. You’ll now have some extra disk space that accommodates the updates.
Fix 2. Restart Your Computer
Minor errors may also prevent your update from installing. You can fix this by easily restarting your device as follows:
Step 1. Click on the Start Menu.
Step 2. Click the Power icon. Choose the «Restart» option.
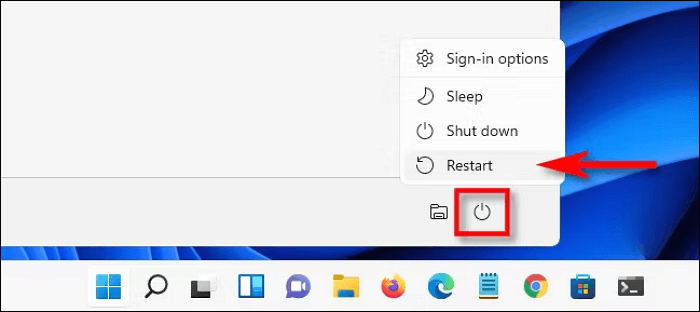
Step 3. You can then save your work and proceed with the restart. The system will then resume installing your updates.
Fix 3. Run Windows Update Troubleshooter
The Windows Update Troubleshooter lets you find and solve common errors affecting your update. You can run it via the following steps:
Step 1. Open your Windows 11 Settings.
Step 2. Click on «System.» Select «Troubleshoot» and then «Other troubleshooters.»
Step 3. Click the «Run» button under «Windows Update.» This will start the Windows Update troubleshooter service. It will scan for possible issues affecting the update process and fix them.
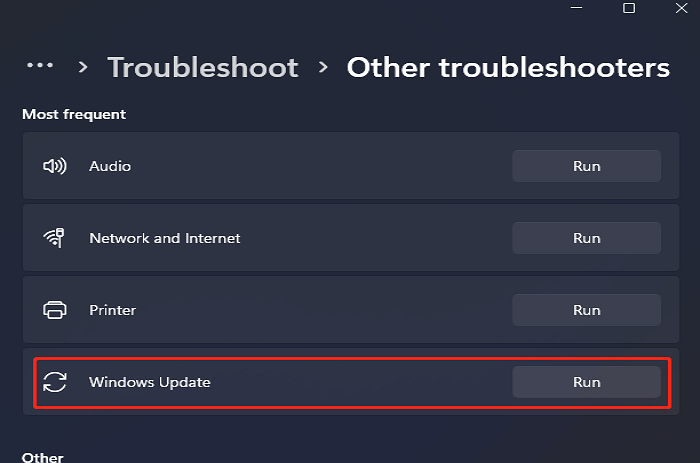
Step 4. Once the troubleshooter has finished running, you can restart your PC and check whether you can now install the update.
Fix 4. Remove External Devices
You may also experience the «Windows 11 version 24H2 not downloading» problem because of the interference from connected external devices. You can disconnect these devices temporarily until you finish updating your operating system. They include printers, USB drives, external HDDs, etc.
You can leave critical components like the mouse and keyboard intact. The Bluetooth service may also interfere with the update. Please turn it off until the process finishes.
Fix 5. Run SFC and DISM Commands
The SFC scan helps to identify corrupted system files affecting the Windows 11 24H2 update. The DISM command helps to fix the identified and corrupted system files. You can run the two scans simultaneously as follows:
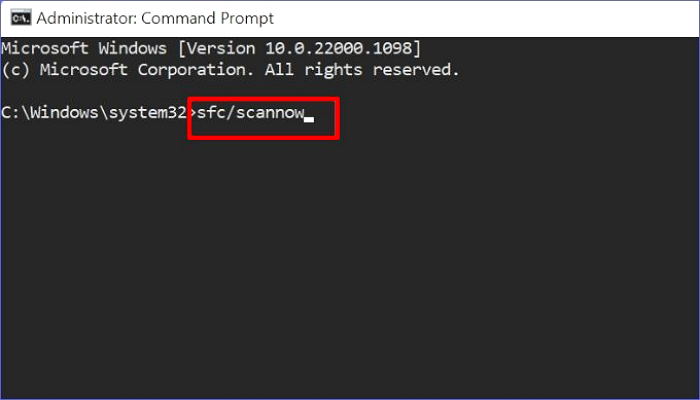
Step 1. Launch Command Prompt. Ensure you’ve selected the «Run as administrator» option.
Step 2. Run the SFC scan using the following command:
- sfc /scannow
Step 3. You can then run the DISM scan as follows. Hit Enter after writing each command.
- DISM /Online /Cleanup-Image /CheckHealth
- DISM /Online /Cleanup-Image /ScanHealth
- DISM /Online /Cleanup-Image /RestoreHealth
Step 4. You can restart your device once the above scan finishes running. You can then check whether the update error has disappeared.
Fix 6. Fix Driver Errors in Device Manager
A problem with your system drivers may also lead to Windows 11 version 24H2 not downloading. You can fix such errors as follows:
Step 1. Open Device Manager.
Step 2. Check those with a yellow exclamation mark to identify devices with drive errors.
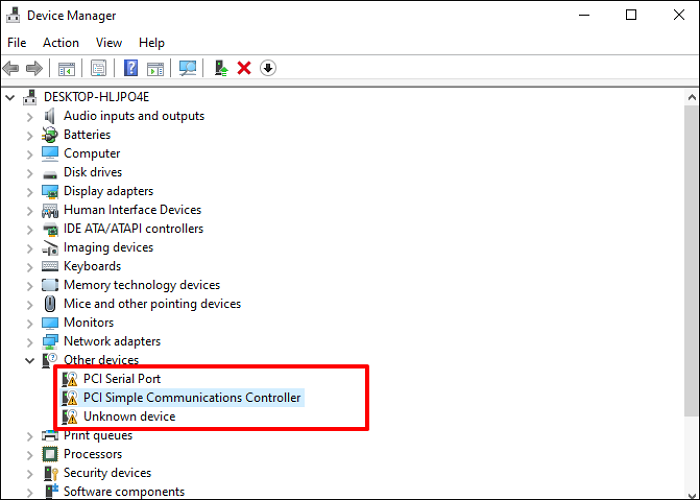
Step 3. Double-click on each device and select the «Update driver» option.
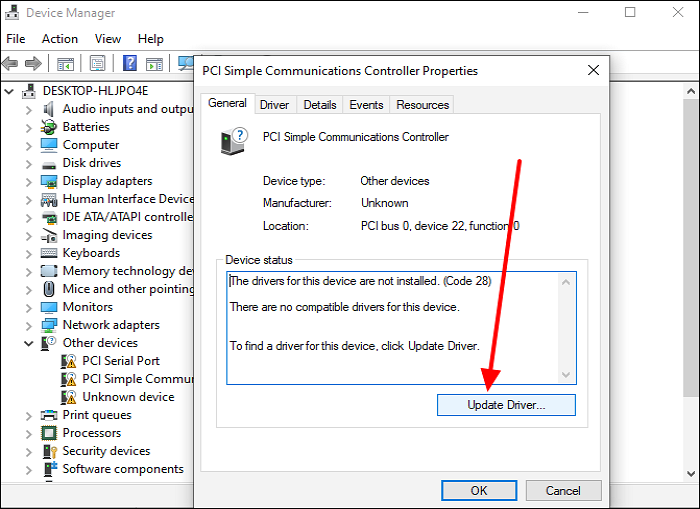
Step 4. The system will then scan and install the latest drivers for the selected devices. You can restart your device once you’ve updated all the devices. You can then proceed with installing your Windows updates.
Fix 7. Reset Windows Update Components
A Windows 11 update may fail to install if you have corrupted components. You can fix the issue by stopping and then restarting the Windows update components. Check the following steps:
Step 1. Open CMD as an admin.
Step 2. Type the following commands and press Enter after each to stop the listed update components:
- net stop bits
- net stop wuauserv
- net stop appidsvc
- net stop cryptsvc
Step 3. The next step is to rename the SoftwareDistribution and catroot folders. You can do that by pasting the following commands and pressing Enter after each:
- ren %systemroot%\softwaredistribution softwaredistribution.old
- ren %systemroot%\system32\catroot2 catroot2.old
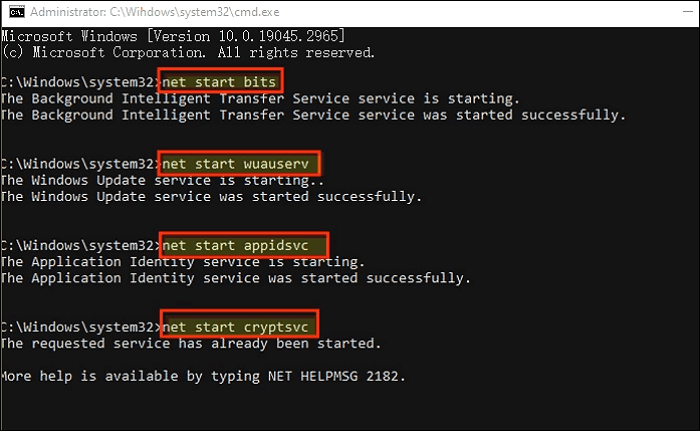
Step 4. You can then restart the services using the following commands:
- net start bits
- net start wuauserv
- net start appidsvc
- net start cryptsvc
Step 5. Restart your PC to check if the update error has disappeared.
Fix 8. Update from USB Drive
You can apply this method if all the other fixes have failed to address the update problem. This fix entails creating a bootable USB drive. You can then use it to install your OS. The first step is to download the Windows 11 24H2 ISO file. Next, follow these steps:
The following article will describe creating a Windows 11 24H2 bootable USB for clean installing Windows 11 24H2 or update.
How to Create Windows 11 24H2 Bootable USB for Free
You’re in the right place if you’re wondering how to create Windows 11 24H2 bootable USB. This tutorial will outline 4 methods you can apply to seamlessly create a bootable USB drive for your PC. Read more >>
After creating a bootable USB, you can use it to install or update your Windows:
Step 1. Connect the bootable USB drive to your computer and press the applicable keys to enter BIOS. Choose your USB drive as the bootable device. You can then exit BIOS.
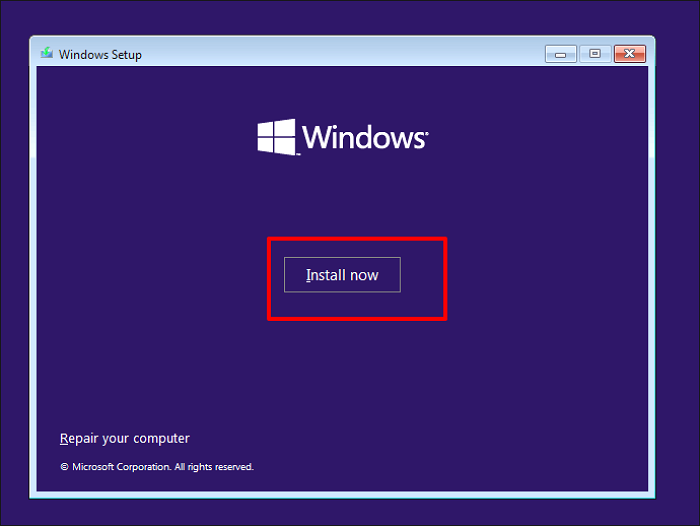
Step 2. The Windows Setup will load once your computer reboots. Select your language and click Next.
Step 3. Click «Install now» and follow the onscreen guide to install your OS.
Backup Your PC Before Updating to Windows 11 24H2
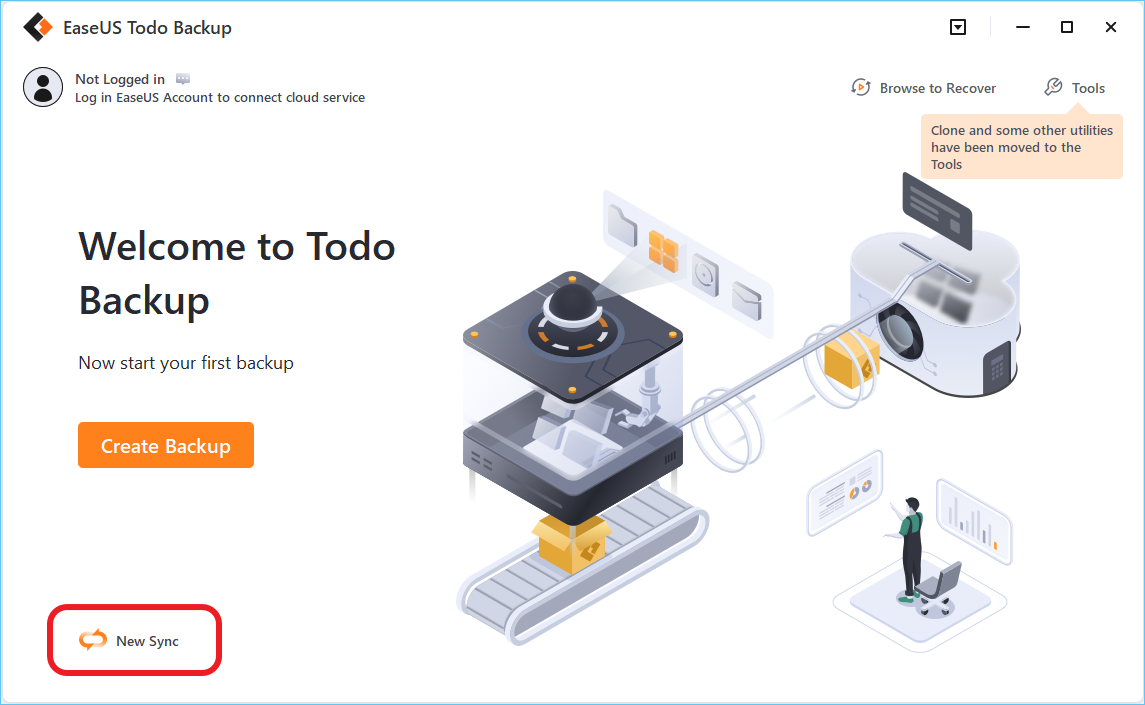
Data is a crucial component of your computer. It’s important to protect it against any loss or damage. Performing a Windows update could be unpredictable. For this reason, it’s important to create a backup. Try EaseUS Todo Backup to achieve this seamlessly. This backup solution lets you save your files in multiple locations.
You can copy your data to the cloud or an external hard drive. You can also move them to a shared network or NAS. It guarantees the safety of your files since you’ll protect them using a password. You can access your backup data anytime you wish to retrieve them.
Todo Backup allows you to restore them to their original location or a new one. What more? This amazing backup tool also supports incremental and differential backup strategies.
Do you want to back up your Windows 11 data today? Download this tool now to get started. You can achieve this in very simple steps.
Share this article on your social media to help others fix the Windows 11 24H2 not installing error!
Why Is Windows 11 Version 24H2 Failed to Install
Windows 11 24H2 is the latest release of the Windows 11 updates. It comes with many improved functions compared to the previous updates. It includes Copilot + PC features like Cocreator in Paint, Recall, and Windows Studio effects. What more? This 2024 Windows 11 update also has Microsoft Copilot/arm and emulsion features.
Updating to Windows 11 version 24H2 should always be a seamless process. However, it’s possible to encounter the «Windows 11 24H2 not installing» problem. This could happen due to the following reasons:
- Insufficient disk space. There should be enough space to store the update file. Windows 11 24H2 may fail to install if that isn’t the case. Check the Windows 11 24h2 system requirements first.
- Interference from external hardware. The hardware connected to your PC during the update process may sometimes prevent a successful installation.
- Corrupted temporary files. These files are essential for the update. The installation files are missing or damaged. You can resolve this by deleting the temporary files and redownloading the feature update.
- Disabled Windows update service. Your 2024 Windows 11 update may fail to install if this service is blocked/disabled.
- Missing update components. Your update may also fail to install if some components are corrupted/missing.
- Issues with the Windows Registry. Windows 11 version 24H2 may also fail to install if the key/value for the Windows update service is missing in the registry.
- Unstable Internet. Check Your Internet Connection to ensure you have a stable Internet connection, as unstable connections can lead to failed updates.
To Wrap Things Up
The «Windows 11 24H2 failed to install» error could arise due to multiple causes. You could be running out of disk space or have corrupted system files. The issue may also occur due to interference from external hardware or missing update components. This tutorial has discussed eight fixes that you can apply.
It’s important to back up all your files before updating to Windows 11 version 24H2. Try EaseUS Todo Backup now to save all your data. This tool lets you move files to multiple locations for their accessibility. Download it now and check how it works.
FAQs on Unable to Install Windows 11 24H2 Updates
The common FAQs on Windows 11 version 24H2 not installing on PC include:
1. Why Does My Windows Installation Keep Failing?
This could happen due to:
- Insufficient disk space.
- Interference from external hardware.
- Corrupted installation files.
- Disabled Windows update service.
- Missing update components.
- Unstable Internet connection.
Try fixing these issues.
2. How to Install Win 11 24H2?
Follow these steps to perform an in-place-upgrade using the latest ISO.
- Step 1. Open Settings and select Windows Update.
- Step 2. Click Check for updates. The system will scan for available Windows updates.
- Step 3. Click the Download and Install button if a Windows 11 24H2 update is available.
- Step 4. You can then stay patient for the update to download and install on your PC. You may need to restart your device afterward.
3. What Are the Requirements for Windows 24H2?
Your PC should have the following:
- A RAM of at least 4GB.
- Free disk space of at least 64GB.
- TPM 2.0.
- Secure Boot.
- UEFI/BIOS support.
4. Why I Cannot Upgrade to Windows 24H2 Update from 23H2?
This may happen if you don’t meet all the system requirements. Ensure you have sufficient RAM and disk storage. Your computer must also support Secure Boot and TPM 2.0.