
Kiosk mode on Windows is implemented to attain a highly secure, purpose-built device for focused working.
There are multiple ways to configure Windows 10 kiosk mode, and each method has its own features and support, so users can choose the method based on their specific business needs. Similarly, the exit strategies for each method are different.
Let’s discuss how to exit kiosk mode Windows 10 to run a restriction-free device with access to all device features.
- 1 :Sign out of assigned access
- Method 1. Shortcut Key
- Method 2. Task Manager
- Method 3. Command Prompt
- Method 4. Sign out from «Settings»
- Method 5. Turn off assigned access via Group Policy
- Method 6. PowerShell
- 2 :Remove Windows Kiosk Provisioning Package
- 3 :Exit Kiosk Mode in MDM(Mobile Device Management)
1 Sign out of assigned access
Note : Assigned access is a widely used method to ensure restricted and focused device usage by blocking access to the start menu and other device features. It works on Windows 10 Pro, Enterprise, and Education.
Users need to exit assigned access to access all the device functions freely, and there are multiple ways to exit assigned access:
Method 1. Shortcut Key
Press Ctrl+ Alt+ Delete keys collectively. Sign out of your current account and log in with another account. It lets you exit the assigned access mode from the device.


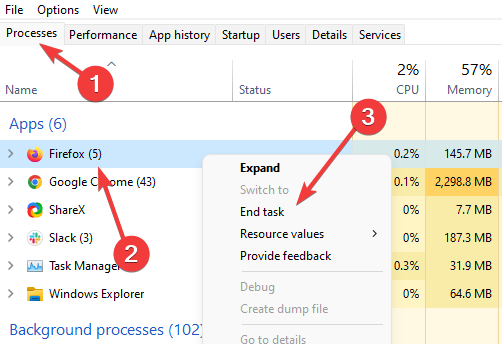
Method 2. Task Manager
Use the shortcut key Ctrl + Shift + Esc to open the task manager. Once it is opened, choose the kiosk app from the list of opened tabs and applications. After selecting it, click the ‘End Task’ button, and the kiosk mode will exit as the app closes.

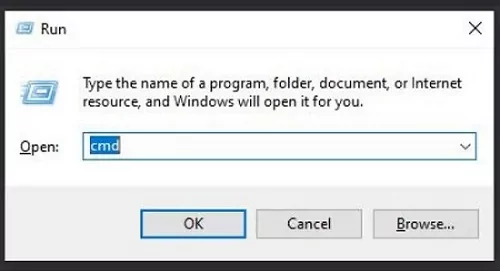
Method 3. Command Prompt
- Step 1. Open the Command Prompt by typing cmd in the Run program
- Step 2. Type shutdown/r, and it will initiate the device restart process. You can also type shutdown/l to log off. It will exit the specific account that was logged in.
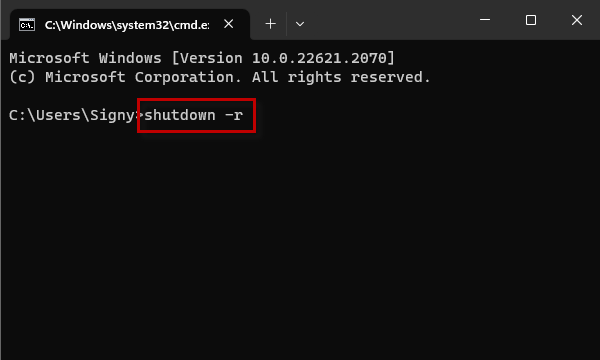
Note : In both cases, assigned access will exit, and you can sign in with another account to enjoy normal device usage without the kiosk mode or assigned access.
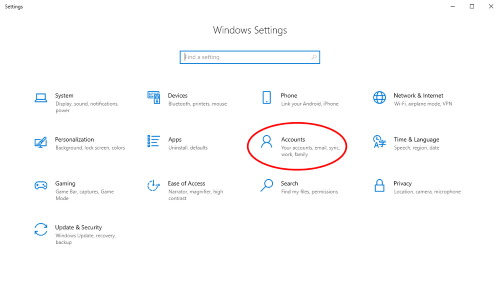
Method 4. Sign out from «Settings»
Follow these steps to learn how to exit kiosk mode in Windows 10 which set up with assigned access from Settings:
- Step 1. Press the shortcut key Windows key + I to open the Settings app on your Windows PC.

- Step 2. Select the ‘Accounts’ tab and click ‘Family and other people.’ Select the ‘Set up assigned access’ below the ‘Other people’ tab.
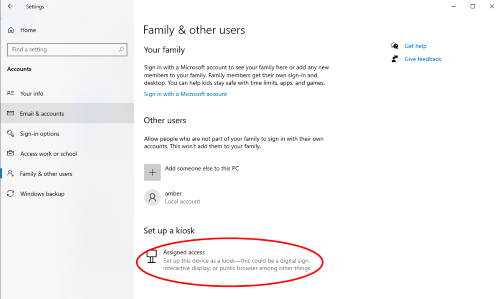
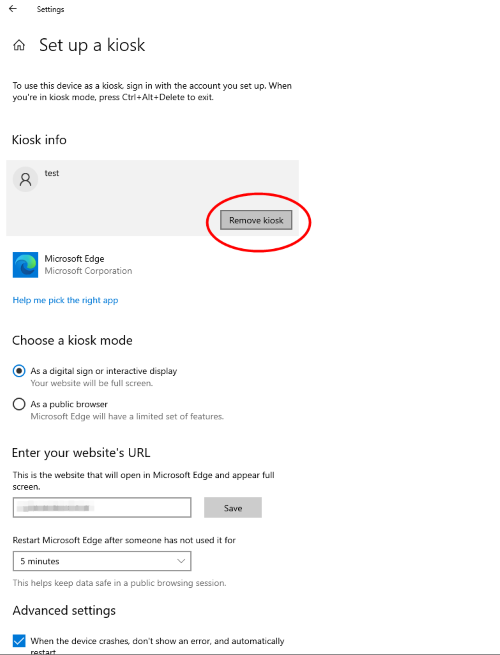
- Step 3. Select the current kiosk account and choose ‘Remove Kiosk.’ It will take the device from assigned access and run as a standard account.
Method 5. Turn off Assigned Access via Group Policy
- Step 1. Open the run program from the Windows menu or press the Windows + R keys.
- Step 2. Type ‘gpedit.msc’ and press the enter key. It will take you to the group policy editor.
- Step 3. Move to the assigned access policy > navigate to the Computer Configurations tab > Select Administrative Templates > System > Assigned Access.
- Step 4. Now restrict assigned access by double-clicking the ‘turn off Assigned Access'(or a similarly named setting) option.
- Step 6. After disabling it, click the ‘Apply’ button and then ‘OK’ to save changes. Restart the computer, and it will turn on automatically in normal mode.
Method 6. PowerShell
To disable the Windows 10 kiosk mode that was set up using PowerShell, you will use the Clear-AssignedAccess command in the PowerShell, and it will remove all the configured settings associated with assigned access and restore the device to its default settings.
Open PowerShell as an Administratoron your Windows 10. Use ‘Get-AssignedAccess’ to check if any account is configured with Assigned Access.

If an account is configured with assigned access, you can clear it by using this command:Clear-AssignedAccess
2 Remove Windows Kiosk Provisioning Package
A provisioning package contains specific configuration settings that are enforced on devices where it is enabled. IT administrators use it to configure employee devices without physically touching them. It provides a streamlined process for managing device settings when enrolled in the business network.
Follow the below guidelines to remove the kiosk mode by disabling the provisioning package from Windows 10:
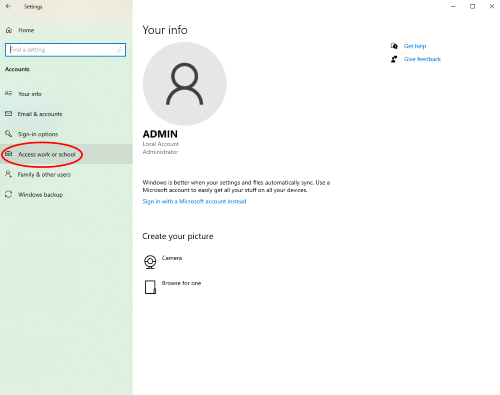
- Step 1. Open device settings and select the ‘Access work or School’ tab. It is on the left-side menu.
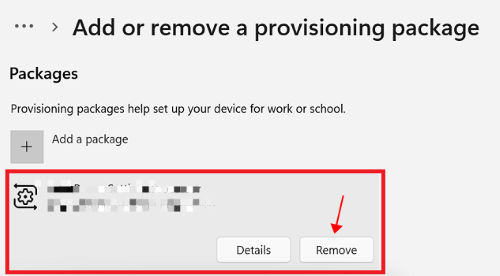
- Step 2. Now observe the right-side menu and select the ‘Add or remove provisioning package’ option.
- Step 3. A list of provisioning packages will appear. Choose the one with set kiosk mode and press the ‘Remove’ button. The installed provisioning package will be removed from the device, and kiosk mode will ultimately exit.
3 Exit Kiosk Mode in MDM(Mobile Device Management)
The scenario for exiting kiosk mode through MDM solutions is different. MDM is the safest and most effective way to implement kiosk mode because end-users cannot exit it without admin permission.
Different MDM solutions have different steps to exit kiosk mode, but the basic principle is almost the same: They require admin permission to enter the MDM dashboard and exit it.
Demo — How to Exit Windows 10 Kiosk Mode of AirDroid Business
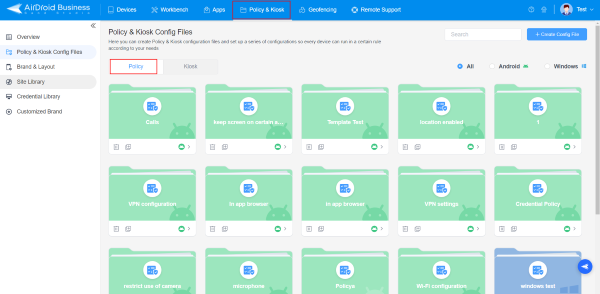
- Step 1: Sign in to the AirDroid Business admin console.
- Step 2: After successful login, navigate to the ‘Policy & Kiosk’ tab and click on it to open the menu. Find the ‘Policy’ option.
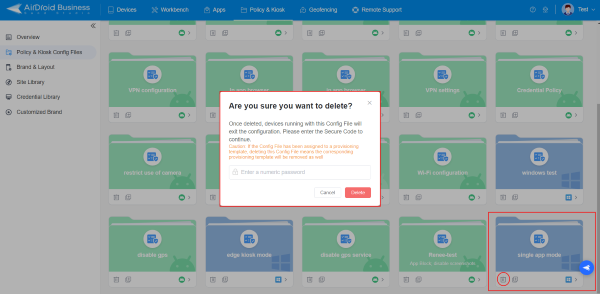
- Step 3: Find and choose the profile that has set your Windows device into kiosk mode. Edit or delete the profile to exit kiosk mode.
- Step 4: It is important to sync your Windows device into AirDroid Business so the current changes are applied to it. Usually, the devices are automatically synced, but if not, you need to do it to apply changes manually. Restart the device to exit it from kiosk mode and run as a standard Windows device.
If you’re stuck in Kiosk mode on Windows 10 and need to get out, don’t worry. In just a few steps, you can exit this mode and regain full access to your desktop. We’ll walk you through the process, so by the time you finish reading this guide, you’ll know exactly how to exit Kiosk Mode.
In this section, we’ll guide you through the essential steps to exit Kiosk Mode. We’ll explain each step clearly so you can follow along and resolve the issue easily.
Step 1: Press Ctrl + Alt + Delete
Press Ctrl + Alt + Delete on your keyboard simultaneously.
When you press Ctrl + Alt + Delete, you’ll bring up the security options screen. This is a fundamental way to access different functions when you’re in a restricted mode, like Kiosk Mode.
Step 2: Select Task Manager
From the security options screen, click on Task Manager.
Task Manager allows you to see all running applications and processes. By accessing Task Manager, you can end the Kiosk application that is currently running.
Step 3: End the Kiosk Application
In Task Manager, find the application that is running in Kiosk Mode, right-click on it, and select End Task.
Ending the task will stop the Kiosk application, effectively taking you out of Kiosk Mode and returning you to the regular desktop environment.
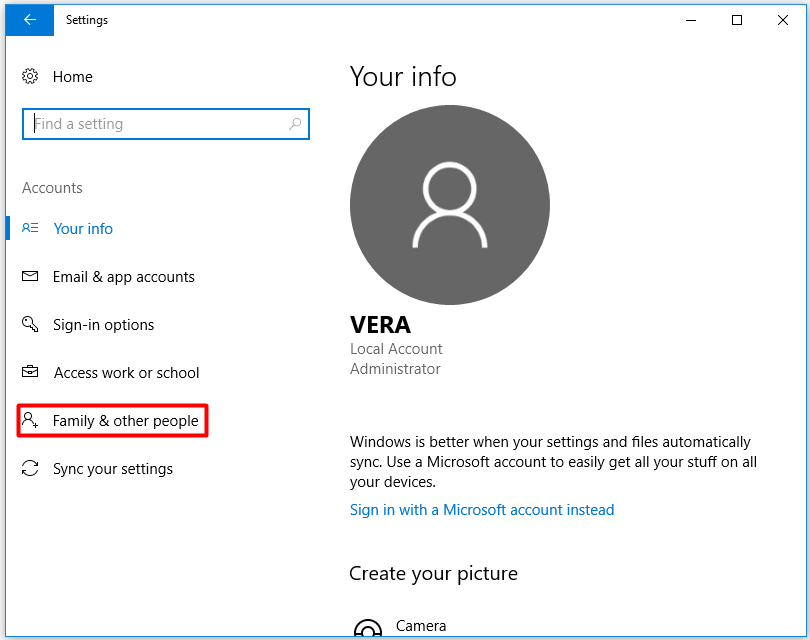
Step 4: Access Settings
Once back on the desktop, click the Start button and go to Settings > Accounts > Family & other users.
By accessing the Settings menu, you can make changes to user accounts and manage Kiosk Mode settings.
Step 5: Remove Assigned Access
Under the ‘Set up a kiosk’ section, click on the name of the kiosk and select Remove kiosk.
Removing the assigned access completely disables Kiosk Mode, ensuring it won’t automatically start the next time you log in.
After completing these steps, your computer will exit Kiosk Mode, and you’ll have full access to all the regular features of Windows 10.
Tips for Exiting Kiosk Mode in Windows 10
- Make sure you have administrative privileges. You need these permissions to access Task Manager and the Settings menu.
- If you are unable to access Task Manager, restarting your computer might help. Sometimes a fresh start can resolve unexpected glitches.
- Make a note of any changes you make. In case you need to re-enable Kiosk Mode later, having notes will make the process easier.
- Regularly update your Windows system. Keeping your system up to date may help you avoid issues with modes like Kiosk.
- Consider using a different user account. If Kiosk Mode is set up on one account, switching to another user might bypass it.
Frequently Asked Questions
What is Kiosk Mode?
Kiosk Mode is a feature in Windows 10 that allows a device to run a single app in full-screen mode. It’s commonly used in public areas like museums or information kiosks.
Can I exit Kiosk Mode without administrative privileges?
No, you generally need administrative privileges to exit Kiosk Mode because you need access to Task Manager and Settings.
What if I can’t access Task Manager?
If you can’t access Task Manager, try restarting your computer. If the issue persists, you may need to use a different method, such as accessing Safe Mode.
How do I re-enable Kiosk Mode?
To re-enable Kiosk Mode, go to Settings > Accounts > Family & other users > Set up a kiosk and follow the prompts to assign access again.
Is there a shortcut to disable Kiosk Mode quickly?
Unfortunately, there isn’t a universal shortcut to disable Kiosk Mode. You’ll need to follow the steps outlined above to disable it properly.
Summary
- Press Ctrl + Alt + Delete – Bring up the security options screen.
- Select Task Manager – Access running applications.
- End the Kiosk Application – Stop the Kiosk app.
- Access Settings – Navigate to the user accounts.
- Remove Assigned Access – Disable Kiosk Mode setup.
Conclusion
Exiting Kiosk Mode in Windows 10 doesn’t have to be a head-scratcher. By following these straightforward steps, you can quickly regain full control of your desktop. Just remember, pressing Ctrl + Alt + Delete is your first step to freedom. From there, Task Manager and the Settings menu will be your best friends. If you encounter issues, a simple restart or ensuring you have the right permissions can often solve the problem.
If you’re frequently toggling between Kiosk and regular modes, it might be helpful to jot down these steps or bookmark this guide for future reference. For more detailed instructions, Microsoft’s official support page is always a good place to check.
Feel like a Windows 10 pro now? Great! Dive into the settings, make the changes you need, and say goodbye to any frustrations with Kiosk Mode. Happy computing!
Matt Jacobs has been working as an IT consultant for small businesses since receiving his Master’s degree in 2003. While he still does some consulting work, his primary focus now is on creating technology support content for SupportYourTech.com.
His work can be found on many websites and focuses on topics such as Microsoft Office, Apple devices, Android devices, Photoshop, and more.
Assigned Access (or kiosk mode) on Windows 10 is a feature that enables administrators to restrict the usage of a specific machine to only a select few purposes by converting it into a kiosk device. Typically, you’ll see such as the kiosks at the airports or PCs that are used to display digital signage.
Windows 10 isn’t the first Microsoft OS that has the kiosk mode. However, Microsoft redesigned the feature in 2018 to make configuring it a lot more user-friendly. Here’s how to use it.
Lay the Groundwork for Kiosk Mode
Once you’ve configured kiosk mode on your Windows 10 PC, it will always sign in automatically into a user account with restricted access and run only one app at a time. Nobody that has access to the device will be able to view the desktop, multitask, or modify anything on it. You’ll be able to restrict a guest user’s access to one or more Universal Windows Provisioning (UWP) apps and gate their access to anything else on the machine.
Before you begin to set up kiosk mode on your PC, you should see if your PC meets the pre-requisites for setting up kiosk mode. If it does, make sure you’ve got the required settings in order so you don’t run into a problem while you configure kiosk mode on Windows 10.
1. Find Out Which Version of Windows You Have
Windows kiosk mode isn’t available on Windows 10 Home edition. To set up kiosk mode, your computer must be running Windows 10 Pro (v1709 or later), Enterprise, or Education, so check which version of Windows 10 you’re running beforehand.
2. Creating a User Account for Kiosk Mode
You can’t set up kiosk mode on an administrator account. If you don’t have one already, you’ll need to create a new standard user account so you can configure kiosk mode for that account. Make sure you’re able to create a standard user account before you start configuring kiosk mode.
3. Checking If Your Chosen Apps Can Run in Kiosk Mode
You’ll need to determine the app(s) that you want to provision under the kiosk mode. You can only allow UWP apps (aka metro-style apps).
How to Enable and Configure Kiosk Mode
The process to configure kiosk mode isn’t complex. All you need to do is set up a standard user account, choose the app(s), and add relevant settings for them.
1. Create a User Account
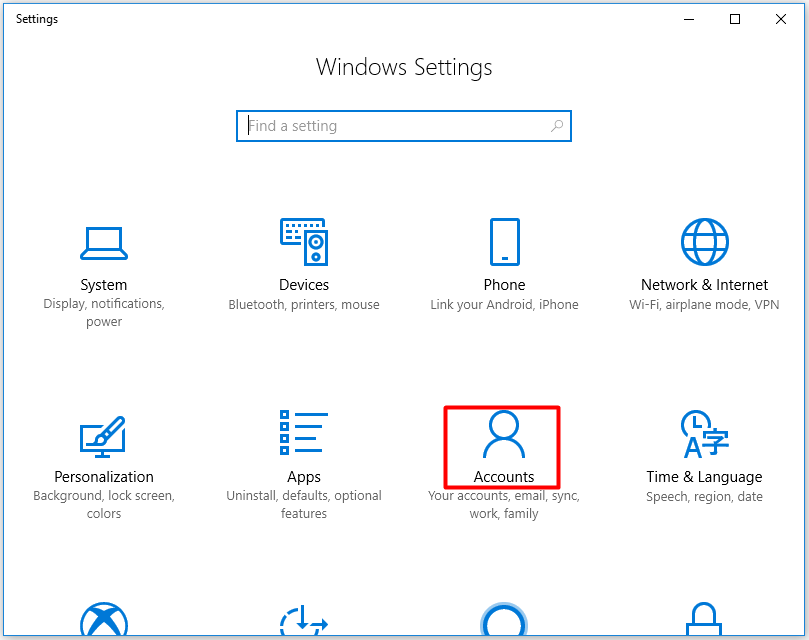
Start by pressing Ctrl + I to launch the Settings app and go to Accounts > Family & other users. From the right pane, click on Add someone else to this PC.

When you’re asked for an email or phone of the person so they can sign in, just click on I don’t have this person’s sign-in information and click Next. You’ll now need to create a local user account for your PC. Just give it a name and a password (or leave the password blank if you want them to sign in automatically).
2. Set up Kiosk Mode
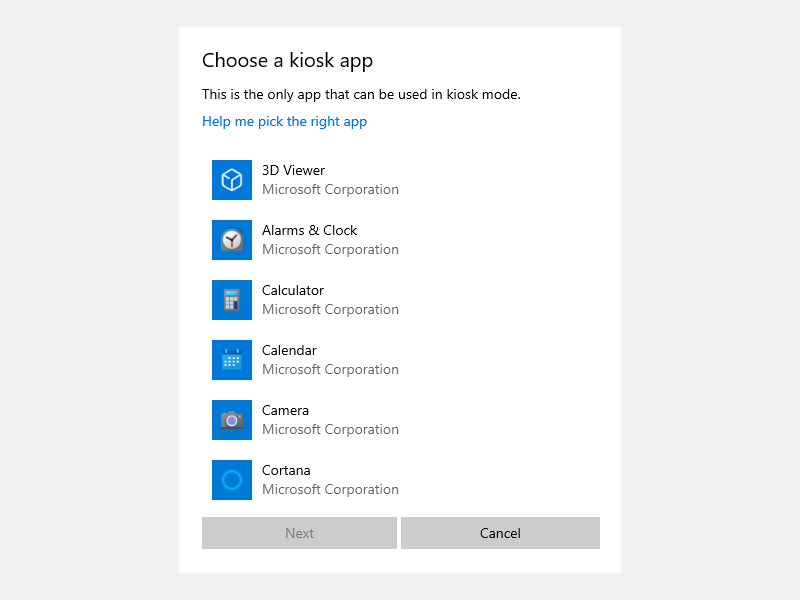
Once you’ve created the account, go back to Settings > Accounts > Family & other users. Now, click on Assigned access to configure kiosk mode on your PC. You’ll now need to select a user account (select the one you just created).
You’ll see a list of apps from which you can choose your kiosk app. Just select the app you want and click Next.
Depending on the app you choose, you may need to enter a few more details. Just fill in the details that you see along the way. Once you’re done, restart the PC and select the guest user account you created earlier to log in.
How to Disable Kiosk Mode in Windows 10
To disable kiosk mode, go back to the Settings app and navigate to Accounts > Family & other users. Click on Assigned access. On the next screen, select the kiosk you set up under the Kiosk info section and click on the Remove kiosk button.
Alternatively, you could just delete the user account for which you enabled the kiosk mode. To delete that account, you’ll need to use two commands.
Press Win + R, type cmd, and press Ctrl + Shift + Enter to launch an elevated Command Prompt. First, run the following command:
net user
This will give you a list of all the user accounts on your system. Identify the one you created for enabling kiosk mode. Next, run the following command:
net user "username" /delete
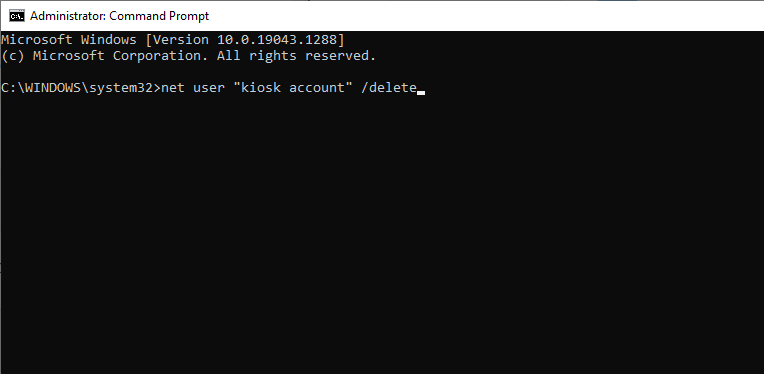
Of course, replace the word username with the actual user account name. This command will delete the user from your system.
Potential Problems With Kiosk Mode
While Kiosk Mode is a handy way to set up a one-app machine for public use, it can sometimes encounter problems.
1. Freezing
You’re still using a PC with Windows 10 that’s prone to the occasional freezing. When you’re in the kiosk mode and your screen freezes, just press Ctrl + Alt + Del and log out of the standard user account. Log back in and see if it fixes the issue. If not, restart your PC.
2. Unauthorized Actions
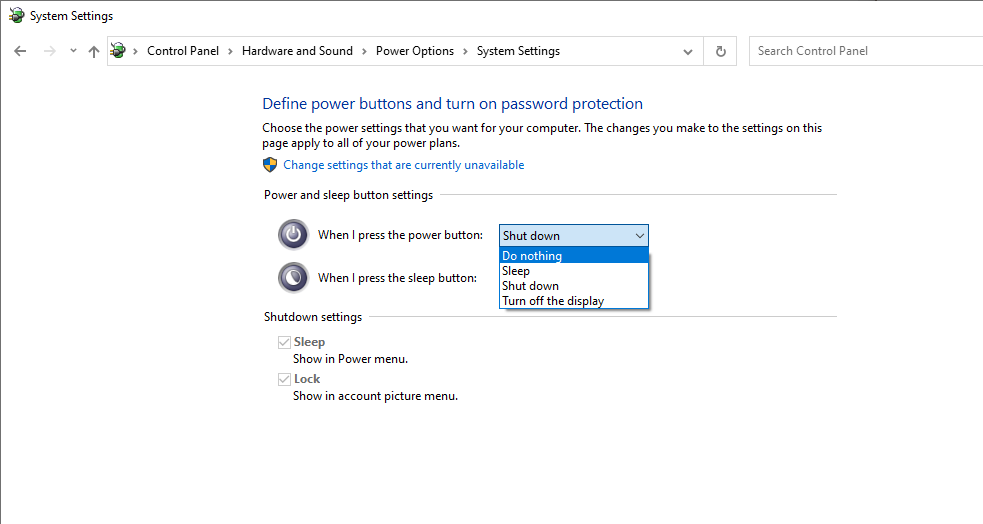
If your kiosk is in a public place, someone could just shut the PC down unless you stand guard for the full duration that the kiosk remains on. However, you could get around this issue by tweaking your power settings.
Go to Control Panel and navigate to Hardware and Sound > Power Options. Click on the Choose what the power buttons do option from the left pane and select Do nothing for the When I press the power button option.
3. Kiosk User Account Not Visible
If you don’t see your kiosk user account in the Settings app from where you created it, don’t be alarmed. It’s usually still there even if it’s not visible. You can, of course, verify its existence using the Command Prompt. Just use the net user command to get a list of the user accounts on the PC and you should find the standard user account you created for the kiosk mode in the list.
Enjoy Singularity on Your PC
Kiosk mode is a great way to turn an old laptop into a jukebox or something of more value for others without allowing them access to your personal files. However, if you’re trying to just restrict access for other users rather than limiting them to one or a couple of apps, there’s a better way to go about it.
While most organizations should manage their kiosks through a mobile device management (MDM) platform, it’s still important to know how to exit kiosk mode manually.
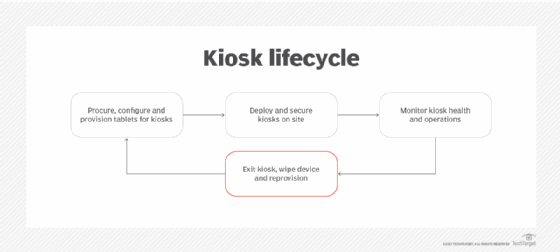
Going through the steps to exit kiosk mode is crucial when the time comes to wipe and rebuild a kiosk for maintenance or device reuse. Additionally, organizations should include employees in the discussion of kiosk management to ensure the right users understand their responsibility and have appropriate privileges to access kiosks.
Here’s an overview of how to exit kiosk mode on any OS:
How to exit kiosk mode on an iPad
Kiosk mode for iPad uses Guided Access, which enables IT admins to set up a single-app or multi-app kiosk. Exiting Guided Access returns the iPad to its default state, where users can interact with any app.
Follow these steps to exit kiosk mode on an iPad:
- Press the Home button three times in quick succession.
- Enter the Guided Access passcode.
- Tap End.
- Double-click Home if you turned on Touch ID or Face ID for Guided Access.
How to exit kiosk mode on Windows 10
Exiting Windows kiosk mode requires another account to log into, which an employee such as a retail worker may not have at the ready. It’s also possible for a Windows administrator to lock down the task manager from end users.
Follow these steps to exit kiosk mode on Windows 10:
- Press Control+Alt+Delete to exit the assigned kiosk app.
- Sign in using another Windows account, which should cause the kiosk app to log out automatically. The kiosk may relaunch if you don’t log into another account or wait for the screen to time out.
How to exit kiosk mode on Windows 11
Exiting kiosk mode on Windows 11 is similar to exiting kiosk mode on Windows 10.
Follow these steps to exit kiosk mode on Windows 11:
- Open the kiosk’s task manager.
- Locate the kiosk mode app process and click on it.
- Click End Task to close the app and exit kiosk mode.
How to exit kiosk mode on Android
Exiting Android kiosk mode varies depending on the specific kiosk app. A best practice is to make the user documentation for the chosen kiosk app available as part of the service desk knowledge base.
How to exit kiosk mode on a Chromebook
Exiting Chromebook kiosk mode depends on the organization’s chosen kiosk app and the installed version of ChromeOS. Like Android kiosk apps, saving the kiosk app documentation in the service desk’s knowledge base is wise. However, a typical method to exit kiosk mode on a Chromebook includes the following steps:
- Turn off the Chromebook and then turn it back on.
- While the device is booting, press Ctrl+Alt+S.
- Enter the password for the kiosk mode user account.
Exiting kiosks using an MDM platform
While it’s important to know how to exit kiosk mode manually, most organizations would be better off using an MDM tool like Hexnode or Jamf Pro. MDM provides several benefits for an organization, and the only difference from managing other mobile devices is the kiosk lifecycle, which varies slightly from other user devices.
Here’s an overview of how some popular MDM solutions handle exiting kiosk mode:
How to exit kiosk mode with Jamf Pro
Managing kiosks centrally with Jamf Pro enables the IT department to govern the kiosks throughout their lifecycle, including being able to exit kiosks and perform a remote wipe, if necessary.
Follow these high-level steps to exit kiosk mode via Jamf Pro.
- Log in to the Jamf Pro console.
- Select the device that you want to exit kiosk mode on.
- Select the Management tab.
- Select Configuration Profiles in the left-hand menu.
- Select the kiosk mode profile currently applied to the device.
- Click the Edit button.
- In the kiosk mode profile, change the Mode setting from Single App Mode or Multi App Mode to Disabled.
- Save the changes to the kiosk mode profile.
- On the device, restart the kiosk app or reboot the device.
How to exit kiosk mode with Esper
Esper enables end users to manage Android kiosks throughout their entire lifecycle. Following is a high-level overview of shutting down kiosks remotely with Esper:
- Open the Esper console.
- Select the device that you want to exit kiosk mode on.
- Click Actions in the top right corner of the screen.
- Select Exit Kiosk from the drop-down menu.
- Confirm the action by clicking OK in the pop-up window.
How to exit kiosk mode using Microsoft Enterprise Mobility + Security
Microsoft Enterprise Mobility + Security (EMS) enables IT admins to manage kiosks throughout their lifecycle, including leaving kiosk mode and wiping devices.
To exit Windows kiosk mode via Microsoft EMS:
- Log in to the Azure portal.
- Navigate to the Intune blade.
- Click on the Devices option in the left-hand menu.
- Select the device that you want to exit kiosk mode on.
- Click on the Kiosk option in the device features menu.
- Select the kiosk mode profile currently applied to the device.
- In the kiosk mode profile, change the setting from multi-app to single-app.
- Save the changes to the kiosk mode profile.
- On the device, restart the kiosk app or reboot the device back to full functionality.
Like many tasks in managing mobile devices, centralized management is critical to saving IT and frontline workers from yet another manual task. Exiting kiosk mode should be part of the kiosk lifecycle strategy, including documentation as part of IT’s standard operating procedures.
-
Home
-
Knowledge Base
- Windows 10 Kiosk Mode (Definition, Setup, Opening and Closure)
By Amy | Follow |
Last Updated
This post will discuss Windows 10 kiosk mode, including its definition, creation, opening and closure. If you would like to use it, this post is very suitable for you.
What Is Kiosk Mode
Kiosk mode, a Windows operating system feature, only allows one program to run. It is often used to lock down a Windows device that is used for a specific task or used in public-setting. MiniTool will illustrate this through some examples.
For instance, you can utilize the Windows 10 kiosk mode to lock down a point-of-sale app to stop consumer and bored employees from tabbing out of the application and going through other apps, shutting down important tools.
Windows kiosk mode can be used to offer consumers access to a demonstration application and lock down other apps at the same time in a computer store. Even though you use Windows XP, Windows Vista, Windows 7 or Windows 8 operating systems, kiosk mode is still available for you.
Tip: You need to aware that the kiosk mode is called assigned access since Windows 8.1.
However, these old operating systems require you modify Windows Registry if you want to enable the kiosk mode. You can change the Windows Registry via tools such as regedit.exe and regedt32.exe.
What’s more, you should define the application to be enabled and any startup string. To make Registry changes, some expertise has to set up the kiosk computer with the administrator privileges. Since any improper registry edits can cause your computer unbootable, you should be cautious when operating.
If you are a Windows 8.1 user, you can invoke the kiosk mode by establishing the assigned access while managing user accounts. This operation is easier and more secure than making registry changes.
Additionally, you can log into the assigned access mode automatically. If so, the kiosk mode will automatically restart when the system reboots.
How to Set up Kiosk Mode in Windows 10
If you use kiosk mode on Windows, the PC will sign in automatically and only the Microsoft Store app runs inside a limited local user account (located above the Lock screen). And this will stop anyone from accessing the desktop, close apps, or change settings.
So, how to set up and manage kiosk mode to run a single program in full screen? Here are steps for that.
Step 1: Open Windows Settings by pressing Win and I keys.
Step 2: Click the Accounts option on the next page.
Step 3: Under the Accounts tab, click on Family & other people.
Step 4: Navigate to the right side of the page, click on Assigned access button under the Set up a kiosk tab.
Step 5: In the next page, click Get started button.
Step 6: After entering a short but descriptive name for your kiosk account, click on Next.
Step 7: Choose a Microsoft Store application from the given list, and then click Next. After that, follow the on-screen instruction to finish the operation.
How to Open and Close Kiosk Mode
You can open the kiosk mode by rebooting your computer after setting up the mode with the above steps. If you want to close kiosk mode or don’t need the mode, you can follow the steps below.
Step 1: Find Assigned access by following Step 1 to Step 4 in setting up kiosk mode section, and then click it.
Step 2: Double click the account under the Kiosk mode tab, and then click on Remove kiosk button.
Step 3: After that, follow the given instruction to complete the operation.
After closing the Windows 10 kiosk mode, the account and any data related to the mode will be erased from your PC.
If you want to make any changes to the Windows 10 kiosk mode, you also need to repeat Step 1 to Step 4 of setting up mode part and click Assigned access. In the kiosk settings page, you are able to change the settings based on your need.
Final Words
In conclusion, this post shares the definition, establishment, opening and closing of Windows 10 kiosk mode. You can get a comprehensive and clear understanding of kiosk mode Windows 10 after reading the post. Now, the post comes to an end.
About The Author
Position: Columnist
Having writing articles about computer tech for a long time, I am rather experienced especially on the aspect of computer optimization, PC enhancement, as well as tech terms explanation. The habit of looking through tech forums makes me a great computer issues collector. And then, many articles related to these issues are released, which benefit plenty of users. Professional, effective, and innovative are always the pursuit of an editing worker.