
How to Make an Account an Administrator Using PowerShell in Windows 11
Windows 11 provides several ways to manage user accounts and their permissions. One powerful tool for managing user accounts is PowerShell, a command-line shell and scripting language. In this guide, we will walk you through the steps to make an account an administrator using PowerShell in Windows 11.
Before we begin, it’s important to note that making an account an administrator gives that user full control over the system, including the ability to install software, modify system settings, and access sensitive data. Therefore, it is crucial to exercise caution when granting administrator privileges to an account.
To make an account an administrator using PowerShell, follow these steps:
- Open PowerShell with administrative privileges. You can do this by right-clicking on the Start button and selecting “Windows PowerShell (Admin)” from the context menu.
- Once PowerShell is open, you need to identify the user account that you want to make an administrator. You can do this by running the following command:
Get-LocalUser -Name "username"
Replace “username” with the actual username of the account you want to promote to administrator. This command will display information about the specified user account.
- After identifying the user account, you can proceed to make it an administrator by running the following command:
Add-LocalGroupMember -Group "Administrators" -Member "username"
Replace “username” with the actual username of the account you want to make an administrator. This command adds the specified user account to the “Administrators” group, granting it administrator privileges.
Once you have executed the command, PowerShell will display a confirmation message indicating that the user account has been added to the “Administrators” group. You can verify the changes by running the following command:
Get-LocalGroupMember -Group "Administrators"
This command will list all the members of the “Administrators” group, including the newly added user account.
It’s important to note that you need to have administrative privileges yourself to make changes to user accounts using PowerShell. If you are not already logged in as an administrator, you may be prompted to enter the administrator password or provide confirmation.
Remember, granting administrator privileges to an account should be done with caution. It is recommended to only give administrator access to trusted users who require it for specific tasks. Regular user accounts should be used for everyday tasks to minimize the risk of accidental system modifications or unauthorized access to sensitive data.
By following the steps outlined in this guide, you can easily make an account an administrator using PowerShell in Windows 11. This method provides a convenient and efficient way to manage user accounts and their permissions, giving you control over who has administrative access to your system.
Step 1: Open PowerShell
The first step is to open PowerShell. There are a few different ways to do this:
- Press the Windows key, type “PowerShell,” and click on the “Windows PowerShell” app that appears in the search results.
- Right-click on the Start button, select “Windows PowerShell” from the menu.
- Press the Windows key + X, then select “Windows PowerShell” from the menu.
Once you have opened PowerShell, you will see a command line interface where you can input commands and execute them. PowerShell is a powerful tool that allows you to automate tasks, manage system configurations, and perform various administrative tasks on your Windows computer. It is based on the .NET framework and offers a wide range of features and functionalities.
PowerShell uses a scripting language that is similar to other programming languages, such as C# and VB.NET. It supports variables, loops, conditional statements, and other programming constructs, making it a versatile tool for both simple and complex tasks. With PowerShell, you can interact with various components of the operating system, such as the file system, registry, services, and more.
One of the key advantages of PowerShell is its ability to work with objects. Unlike traditional command-line interfaces, which typically output text, PowerShell outputs objects that can be manipulated and processed. This object-oriented approach allows for more flexible and powerful scripting, as you can easily filter, sort, and format the output to suit your needs.
In addition to its core functionality, PowerShell also supports the use of modules, which are collections of cmdlets (pronounced “command-lets”) that extend the capabilities of the shell. These modules can be used to perform specific tasks, such as managing Active Directory, working with databases, or interacting with cloud services.
Overall, PowerShell is a versatile and powerful tool that can greatly enhance your productivity as a Windows user or administrator. Whether you are a beginner or an experienced user, learning PowerShell can open up new possibilities and help you automate repetitive tasks, troubleshoot issues, and manage your system more efficiently.
Step 2: Run PowerShell as Administrator
Once you have opened PowerShell, you need to run it as an administrator to have the necessary permissions to make changes to user accounts. To do this:
- Right-click on the “Windows PowerShell” app in the taskbar or Start menu.
- Select “Run as administrator” from the context menu.
Running PowerShell as an administrator is crucial when performing tasks that require elevated privileges. By running PowerShell with administrative rights, you gain access to system-level settings and can make changes that affect all users on the computer.
When you run PowerShell as an administrator, you are essentially executing commands with full control over the system. This allows you to modify user accounts, install software, configure system settings, and perform other administrative tasks that are otherwise restricted to standard user accounts.
Running PowerShell as an administrator is a straightforward process. Once you have located the “Windows PowerShell” app either in the taskbar or the Start menu, simply right-click on it. This action will open a context menu with various options. From the context menu, select “Run as administrator.”
Upon selecting this option, a User Account Control (UAC) prompt may appear, asking you to confirm your action. The UAC prompt is a security feature designed to prevent unauthorized changes to the system. To proceed, click “Yes” on the UAC prompt.
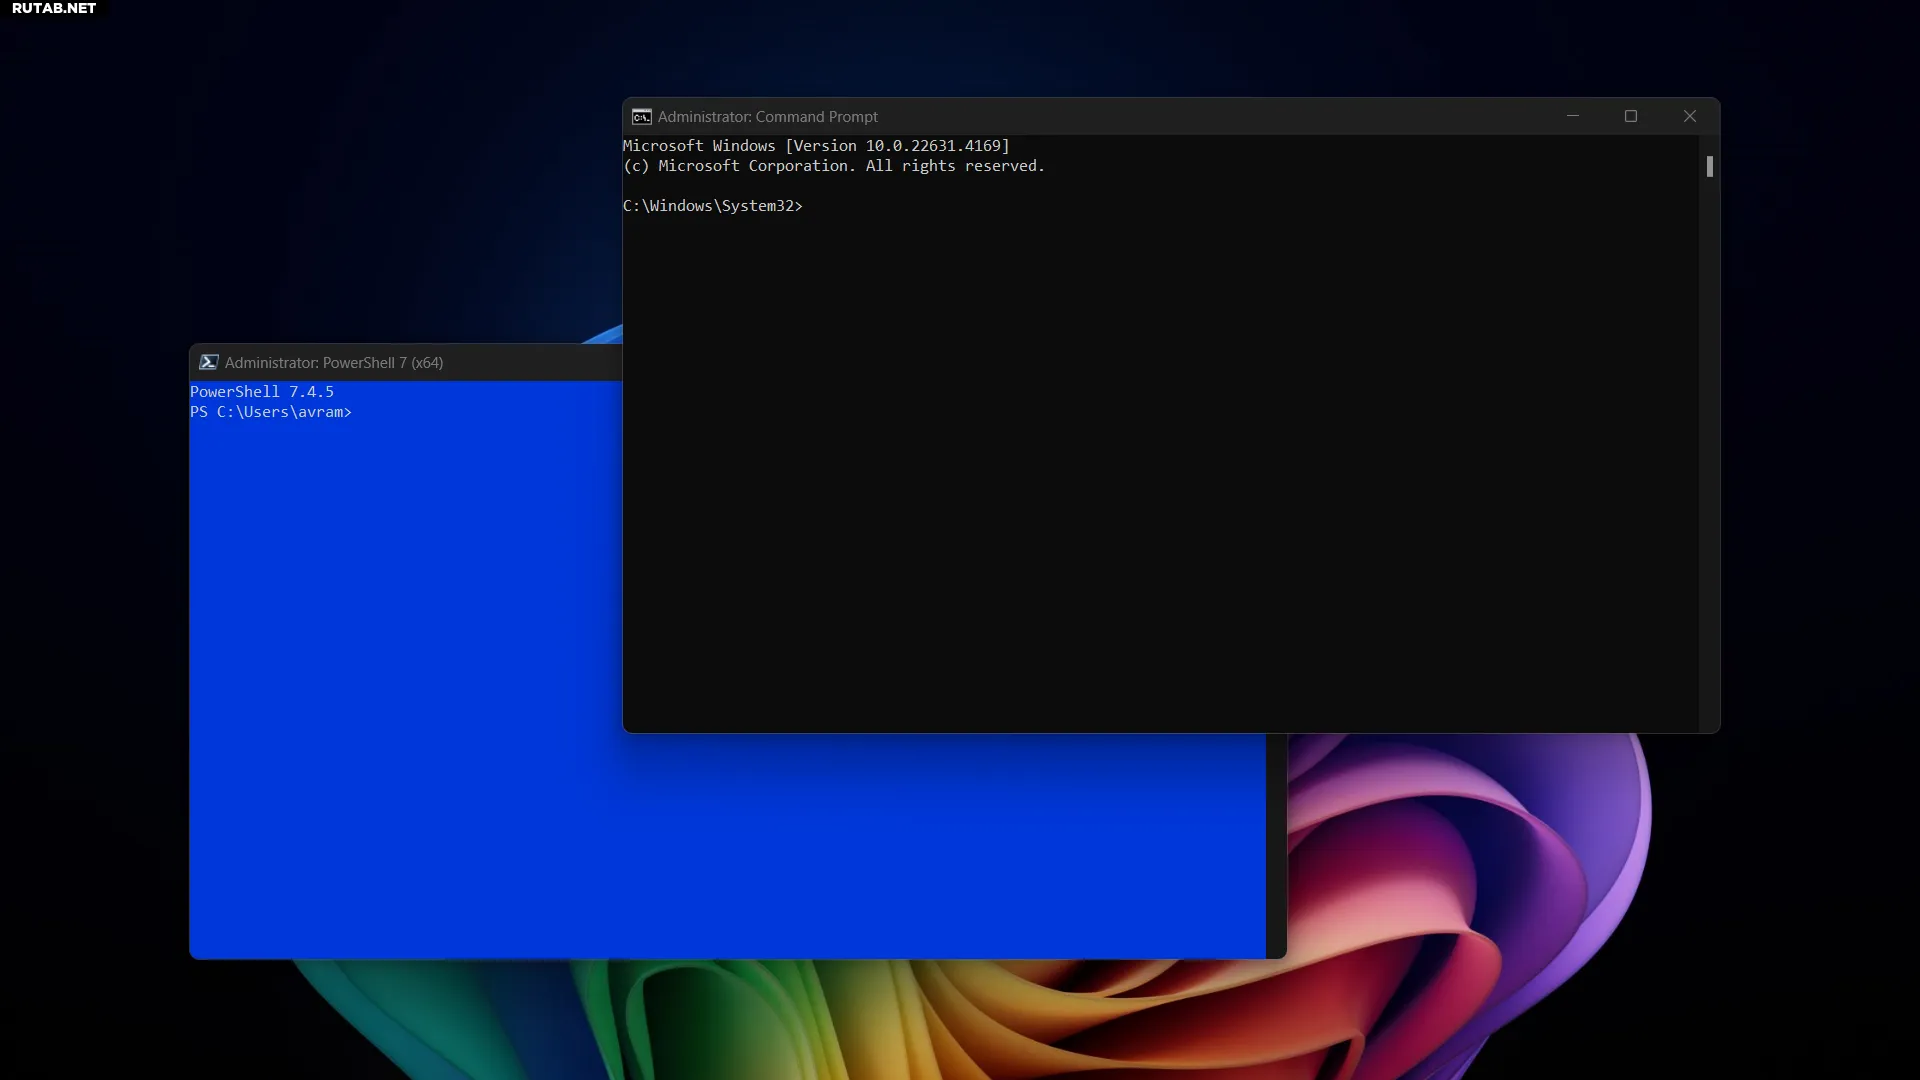
After successfully running PowerShell as an administrator, you will notice a change in the PowerShell window’s title bar. The title bar will now display “Administrator: Windows PowerShell” to indicate that you have elevated privileges.
It is important to note that running PowerShell as an administrator should be done with caution. With great power comes great responsibility, and executing commands with administrative rights can have significant consequences if not used properly. Always double-check your commands and ensure that you understand the potential impact before proceeding.
In summary, running PowerShell as an administrator grants you elevated privileges and allows you to perform administrative tasks on your computer. By following the simple steps outlined above, you can easily run PowerShell with administrative rights and take control of your system’s settings and user accounts.
Once you have executed the PowerShell command Get-LocalUser and obtained the list of local user accounts on your Windows 11 system, it’s time to identify the specific user account that you want to elevate to administrator status.
Take a close look at the list of usernames displayed in the PowerShell output. Each username represents a distinct user account on your system. It is essential to choose the correct account to ensure that you grant administrator privileges to the intended user.
To identify the user account, you can refer to various attributes associated with each username. These attributes may include the account’s full name, description, and account type. By examining these details, you can ensure that you are selecting the correct account for elevation.
Additionally, it is worth noting that the PowerShell command Get-LocalUser provides valuable information about each user account, such as the account’s SID (Security Identifier), status (enabled or disabled), and whether it requires a password. These details can further assist you in identifying the desired user account.
Once you have identified the username of the account you wish to make an administrator, make sure to note it down accurately. This username will be crucial in the subsequent steps of granting administrator privileges to the user account.
Step 4: Make the Account an Administrator
Now that you have identified the username of the account you want to make an administrator, you can use the following PowerShell command to grant it administrator privileges:
Add-LocalGroupMember -Group "Administrators" -Member "username"Replace “username” with the actual username of the account you want to make an administrator. For example, if the username is “JohnDoe,” the command would be:
Add-LocalGroupMember -Group "Administrators" -Member "JohnDoe"After running the command, PowerShell will add the specified user account to the “Administrators” group, granting it administrator privileges.
Granting administrator privileges to a user account is an important step in managing the security and access control of a computer system. By making an account an administrator, you are giving it elevated privileges that allow it to perform tasks that are typically restricted to regular users. This can include installing software, modifying system settings, and accessing sensitive files and folders.
However, it is important to exercise caution when granting administrator privileges, as it can also pose security risks if not managed properly. With great power comes great responsibility, and administrators should be aware of the potential consequences of their actions. It is recommended to only grant administrator privileges to trusted users who require it for their job responsibilities.
By using the PowerShell command mentioned above, you can easily add a user account to the “Administrators” group, which is a built-in group in Windows that has full control over the system. This group is typically reserved for system administrators who need unrestricted access to perform their duties.
Once the user account is added to the “Administrators” group, the user will have the ability to perform administrative tasks on the computer. This includes installing and uninstalling software, managing user accounts, modifying system settings, and accessing restricted files and folders.
It is worth noting that granting administrator privileges should be done with caution and only when necessary. Giving unrestricted access to a user account can increase the risk of security breaches and unauthorized system changes. It is important to regularly review the list of users with administrator privileges and remove any accounts that no longer require such access.
Additionally, it is recommended to use strong and unique passwords for all administrator accounts to prevent unauthorized access. Regularly changing passwords and implementing multi-factor authentication can further enhance the security of administrator accounts.
In conclusion, making an account an administrator is a powerful action that should be taken with care. By following the steps outlined above and being mindful of the potential risks, you can effectively manage user privileges and maintain the security of your computer system.
Step 5: Verify the Account’s Administrator Status
To verify that the account has been successfully made an administrator, you can use the following PowerShell command:
Get-LocalGroupMember -Group "Administrators"This command will list all the members of the “Administrators” group, including the account you just added. Make sure that the account you wanted to make an administrator is listed.
Once you have executed the command, you will see a list of all the members of the “Administrators” group. This includes both local and domain accounts that have been granted administrative privileges on the system. It is important to ensure that the account you just added is present in this list, as it confirms that the account has been successfully added as an administrator.
If you do not see the account listed, double-check the steps you followed in the previous sections. Ensure that you entered the correct username and domain (if applicable) when adding the account. Additionally, make sure that you have the necessary permissions to modify the group membership.
Verifying the account’s administrator status is an essential step to ensure that the account has the necessary privileges to perform administrative tasks on the system. Without the appropriate administrative rights, the account may encounter restrictions and limitations when attempting to perform certain actions or access specific resources.
By confirming the account’s presence in the “Administrators” group, you can be confident that the account has the necessary permissions to effectively carry out administrative tasks and manage the system as required.
Hope you find it helpful.
Whether you’re just starting out with PowerShell or you already know how to run commands, there are times when you must use PowerShell to ‘run as administrator’ Why? Because sometimes, any activity you do inside of PowerShell will require elevated privileges.
In this tutorial, you’re going to learn just about every way possible to run PowerShell as administrator from the perspective of an end-user, a command-line junkie, or an IT admin!
This tutorial has many sections each showcasing how to run PowerShell as administrator. Feel free to click on whichever method you prefer in the Table of Contents.
Prerequisites
This article will be a hands-on tutorial. If you’d like to follow along, please be sure you have:
- A Windows 10 PC – Although Windows 10 was used as an example for this article, most of the methods provided will work with Windows 7+.
- An account with administrator privileges. If you don’t already have one, learn how to create one here.
- PowerShell – Most of these methods will work with Windows PowerShell 5.1 or PowerShell 7.
Running PowerShell as Administrator with a Right-Click
One of the simplest ways to run PowerShell as administrator is with a right-click. There are a few different areas where you can right click on PowerShell and run it. Let’s run through them.
Using the Search Bar
The Search Bar is practically one of the easiest ways to run most of the programs installed on your computer. It’s also an easy way to run any program as administrator, including PowerShell.
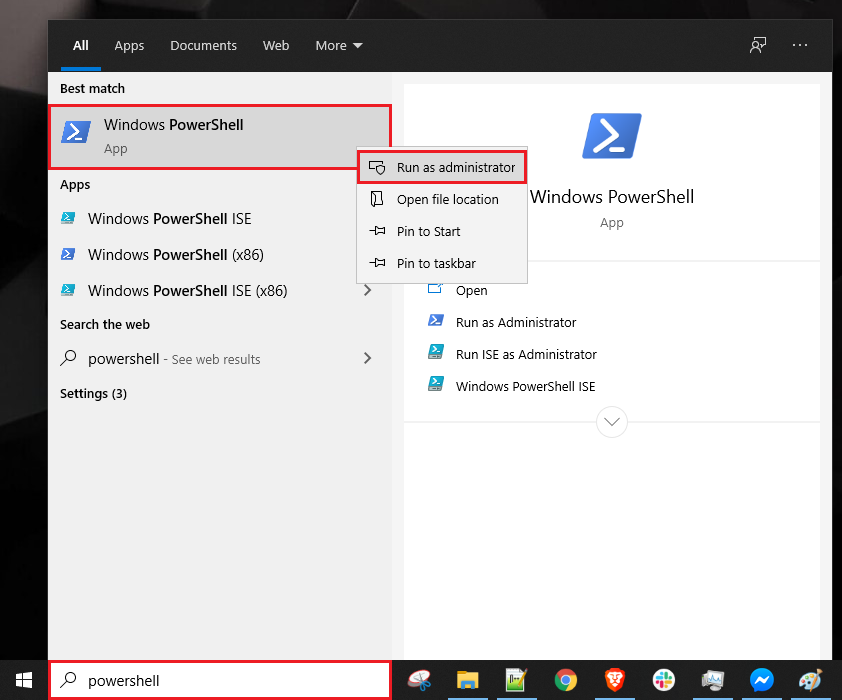
To run PowerShell, specifically, as administrator from the search bar:
- Click on the search box at the taskbar and type powershell. This action will bring up the PowerShell edition of your preference.
- Look for Windows PowerShell or just PowerShell, if using PowerShell Core, from the search result.
- Right-click on the menu item and select Run as administrator.
You can see these steps demonstrated in the screenshot below.
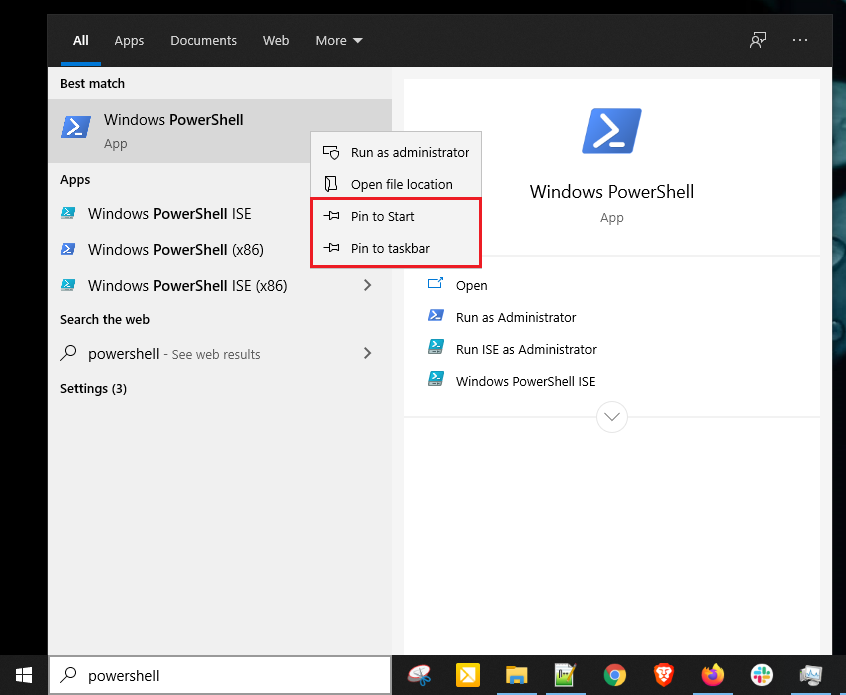
If you pin a program to the start menu or taskbar, you can also right-click on the menu item there as well. With this method, Windows 10 creates a shortcut for PowerShell that is more accessible to you at the start menu or the taskbar.
To run PowerShell as administrator on a pinned item:
- Find the PowerShell icon in the search box again.
- Right-click on the PowerShell icon and select Pin to Start or Pin to Taskbar.
- Click on the Start button
- Look for Windows PowerShell (or PowerShell Core) on the right side of the Start Menu.
- Right-click on the menu item and choose Run as administrator.

Running PowerShell as Administrator Using File Explorer
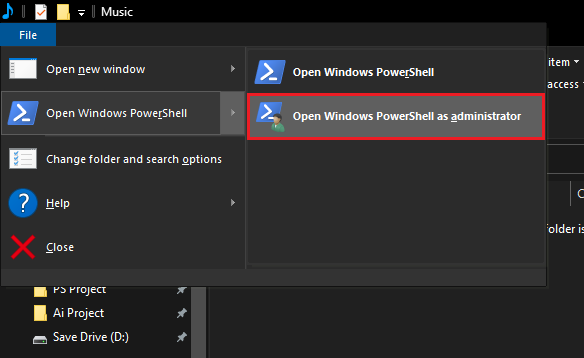
Are you in Windows’ File Explorer, you can fire up PowerShell as administrator there too!
- Open up File Explorer by using Win Key + E shortcut keys or by simply clicking the icon at the taskbar as you can see on the screenshot below.
2. Once in File Explorer, click on File → Open Windows PowerShell → Open Windows PowerShell as administrator as shown below.
Using the PowerShell Executable
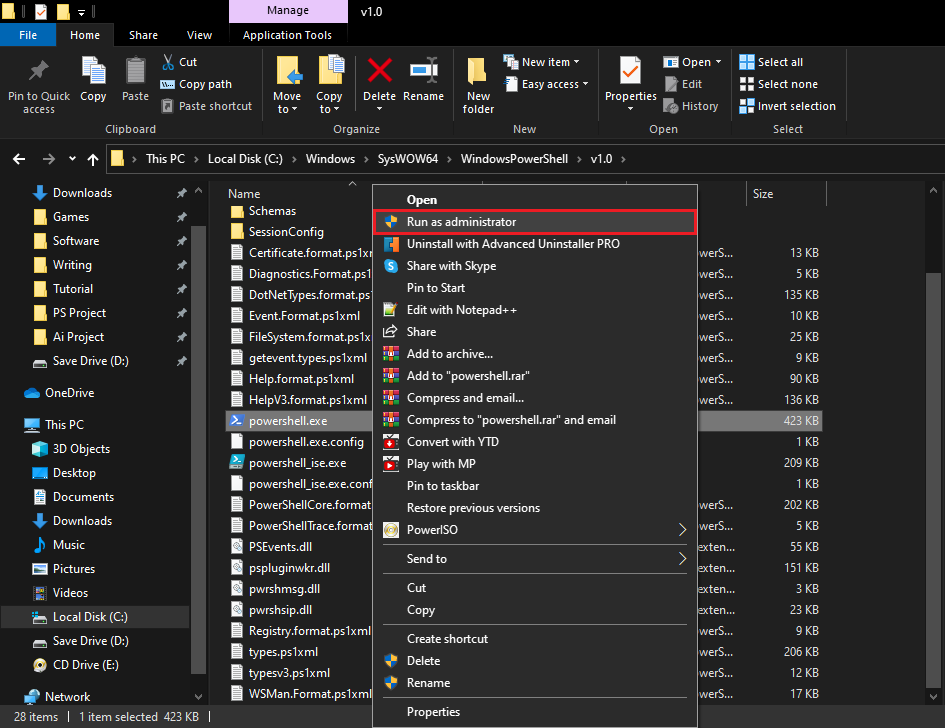
Whether you’re using a 32-bit or 64-bit operating system, you can run PowerShell as administrator from its respective location.
- In File Explorer, navigate to one of the folders below.
- For 32-bit OS: C:\Windows\System32\WindowsPowerShell\v1.0
- For 64-bit OS: C:\Windows\SysWOW64\WindowsPowerShell\v1.0
- Find the powershell.exe file.
- Right-click on powershel.exe and select Run as Adminstrator.
Creating a Shortcut for PowerShell on the Desktop
If you’d like an easy way to invoke PowerShell, you can also create a Windows shortcut for it.
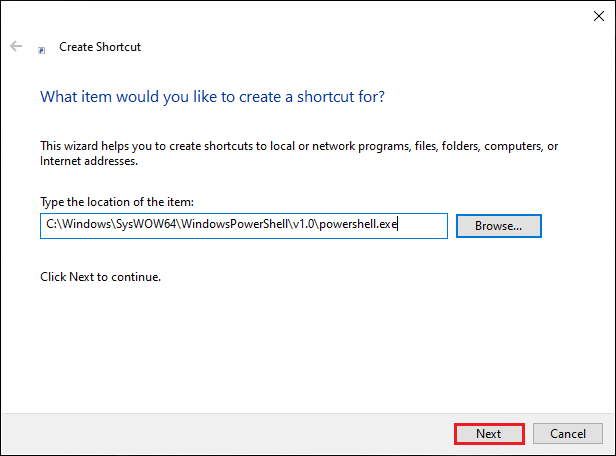
- Once you’ve got the Create Shortcut process started, provide the path to the PowerShell executable. For Windows PowerShell, that path is:
- For 32-bit OS: C:\Windows\SysWOW64\WindowsPowerShell\v1.0\powershell.exe
- For 64-bit OS: C:\Windows\System32\WindowsPowerShell\v1.0\powershell.exe
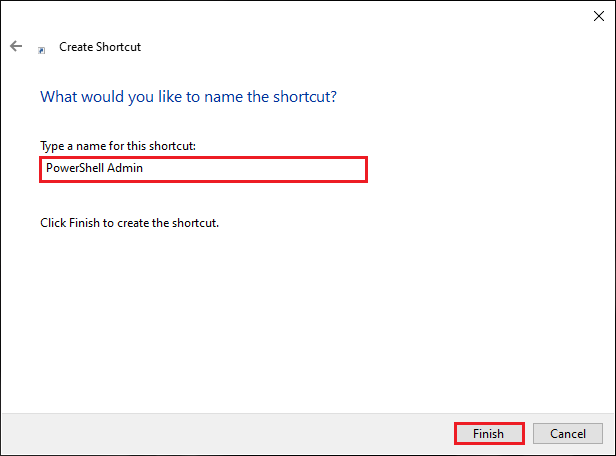
2. Provide the shortcut a handy name (PowerShell Admin for example).
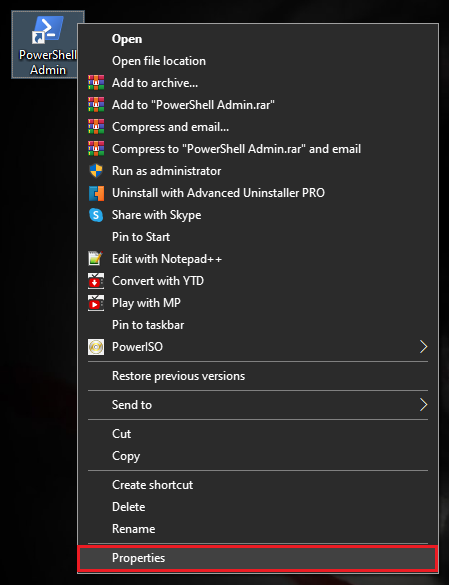
3. Find the shortcut you just created and right-click on it and choose Properties as shown below.
4. Click on Shortcut tab and then on the Advanced button and the Advanced Properties window will pop-up.
5. In the Advanced Properties window, select the Run as administrator checkbox and click OK.
6. Back to the Shortcut Properties, click OK to apply the changes and you’re all set.
Another way to easily access PowerShell is via the Win-X menu as shown in the following screenshot. This menu was never given an official name but was widely referred to as Win-X (or power user menu) as the shortcut to access it is Win Key + X.
Once the menu is up, simply click on Windows PowerShell (Admin) and you’re off to th races.

Using the Run Command Window
The Run Command Window is a powerful tool that lets you run programs without searching for them using the SearchBar, Start Menu or File Explorer. To run PowerShell as administrator via the Run command window:
- Press Win Key + R. A a small window will pop up as shown in the screenshot below.
- Type in powershell and press Ctrl+Shift+Enter or press and hold Ctrl+Shift.
- Click OK to make PowerShell run as administrator.
You’re now running PowerShell as administrator.
Using Task Manager
Task Manager is a tool that lets you monitor or end a process of the programs and services that are currently running on your computer. You can also use it to execute a task such as running PowerShell as administrator manually.
To run PowerShell as administrator via the task manager:
- Open the Task Manager by pressing Ctrl+Shift+Esc keys on your keyboard or as you see in the screenshot below
You can alternatively right-click on the Task Bar and select Task Manager to bring up Task Manager.
2. Once Task Manager opens, go up to File and click on Run new task as shown below.
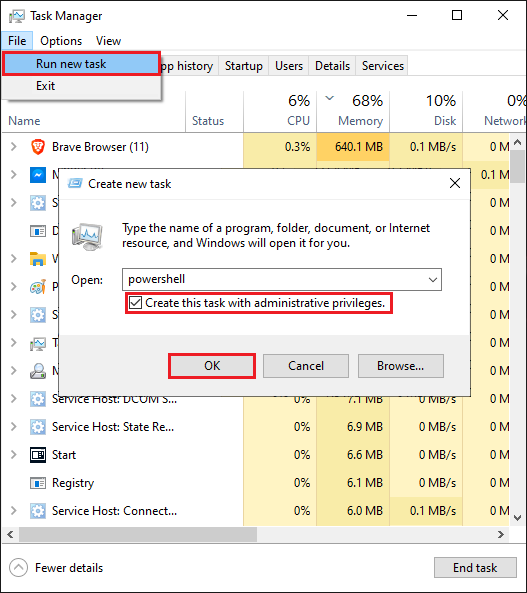
3. You should then see a window pop up that looks similar to the Run window described earlier.
4. Type in powershell ensuring you also check the Create this task with administrative privileges checkbox and click OK to make PowerShell run as administrator.
Running PowerShell as Administrator with the Command Line
If you regularly find yourself on the command line, don’t fret, you can run PowerShell as administrator there too!
If you already have cmd. exe open running as adminstrator using the same techniques described in this article, you can simply run start powershell and it will be running as adminstrator.
If you’re running a command prompt not as administrator yet, that’s not a problem. Invoke the Start-Process cmdlet with PowerShell from cmd. exe using the -Verb runas parameter.
powershell Start-Process powershell -Verb runAsIf you’re already in a PowerShell window, you can run Start-Process powershell -Verb runas directly to open a new PowerShell instance running as administrator
Creating a Batch File to Run PowerShell as Administrator
So you now know how to invoke PowerShell as administrator from a command prompt. If you already know how to do that, you can create a batch file to automate it!
Open up your favorite text editor, paste in the following line and save the file as PowerShell as admin.bat anywhere you’d like.
Powershell.exe -Command "& {Start-Process Powershell.exe -Verb RunAs}"Run the batch file and you’ll notice up comes a PowerShell window running as administrator!
Creating a Scheduled Task to Run PowerShell as Administrator
Task Scheduler is a built-in app on Windows 10 that lets you virtually run automated tasks. Hence, you can also use it to create a task that runs PowerShell as administrator each time you logon to your computer, for example.
Start up the Create Taskbox and specify the file to run as one of the below:
- For 32-bit OS: C:\Windows\System32\WindowsPowerShell\v1.0\powershell.exe
- For 64-bit OS: C:\Windows\SysWOW64\WindowsPowerShell\v1.0\powershell.exe
In the Create Task windows, provide the values to all of the menu items shown below ensuring the Run with highest privileges checkbox is checked.

Now when the scheduled task is invoked, it will execute PowerShell as administrator!
Further Reading
- PowerShell Objects, Properties and Methods
- How to Set Up and Manage Scheduled Tasks with PowerShell
Nowadays, most users are aware of the Command Prompt that is present in all versions of Windows. Undoubtedly this is one of the most dominant tools on the Windows Operating System. However, Windows supports another powerful application, PowerShell, to perform a wide range of operations. Just sign in as an Administrator and you may run PowerShell to handle configuration and carry out task automation.
PowerShell is a task-based mechanization and a fully developed scripting tool that can accelerate the admin job. It instructs users to manage the device from the command line. In other words, you can say that PowerShell is an advanced form of CMD. Therefore in the coming days, it is quite possible that this tool can take the place of a command prompt. So here are the five easy methods by following you can Open PowerShell as an administrator in Windows 10.
6 Ways to open PowerShell as Admin on Windows 10
Here is how to open Windows PowerShell with admin rights on your computer –
1. Using Cortana or the Search bar
You can open this tool using the Search (Win + S) bar available on the Taskbar. Here’s what you need to do –
- Click on Cortana and type PowerShell.
- Look for the option “Run as Administrator” on the right pane and click on it.

- The User Account Control window will prompt next, hit Yes to authorize opening it.
- When Windows PowerShell starts, you may run whichever command you want to execute on your PC.
2. Using Run Command
- Press the Win + R hotkey to open the Run dialog box.
- Type PowerShell and click OK.
Note: Windows PowerShell will open in normal mode.
- Type the command Start-Process Powershell -verb runAs and press the Enter key.
- Its interface will switch to administrator mode.

- There will be a confirmation line regarding this request.
- Type Y and hit Enter to confirm this action.
3. By using the Command Prompt
- Press Win + S, and type Command Prompt.
- Right-click on the result and select Run as administrator.
- Provide permission on the UAC window by clicking Yes.
- On the running Window, type PowerShell and hit Enter.

- Well, the default structure on CMD will now change to the PowerShell way. You may see the Snapshot above.
4. By using the Power menu
This method will only work if you haven’t changed Windows PowerShell to Command Prompt sometime back on your PC. Let’s see how to open PowerShell using the Power Menu (Win + X) –
- Right-click on the Start button.
- Click on Windows PowerShell (Admin).
5. By using Task Manager
- Initially open the Task Manager by pressing ctrl + shift + Esc.
- Click on File, available in the top-left corner of the wizard.
- Hit the Run new task option.
- Now, type PowerShell in the void box and tick the checkbox below the void space.

6. By using the Start Menu
- Click on the start button; scroll down the menu list.
- Explore the drop-down menu in the Windows PowerShell folder.
- Now select this folder and it will expand.
- Right-click on the Windows PowerShell option and select Run as Administrator.

I hope you find this guide useful and all six methods also work on your computer. Let us know in the comment section if any method doesn’t work.
That would be all!
Для некоторых важных задач в Windows вам нужно открыть командную строку и запустить ее как администратор. Например, если вы хотите запустить Diskpart, который позволяет вам просматривать, создавать или удалять разделы в командной строке, вам нужно открыть CMD (также известное как приложение командной строки) как администратор. Для некоторых задач вы можете предпочесть PowerShell, который имеет все функции командной строки, но добавляет расширенные возможности сценариев / командлеты.
Когда вы запускаете CMD как администратор, это называется запуском командной строки с повышенными правами, потому что ваши привилегии повышены. Если вы являетесь администратором своего ПК — скорее всего, так и было, если вы купили или собрали свой собственный компьютер — ваш основной пользователь, вероятно, имеет права администратора (если вам выдали корпоративный компьютер на работе или в школе, возможно, нет). Вам просто нужно воспользоваться этими правами, потому что по умолчанию ни командная строка
Интерфейс командной строки (англ. Command line interface, CLI) — способ взаимодействия между человеком и компьютером путём отправки компьютеру команд, представляющих собой последовательность символов. Команды интерпретируются с помощью специального интерпретатора, называемого оболочкой. Интерфейс командной строки противопоставляется системам управления программой на основе меню, а также различным реализациям графического интерфейса. Википедия
, ни PowerShell не запускаются от имени администратора.
Как запустить Cmd от имени администратора с помощью правой кнопки мыши
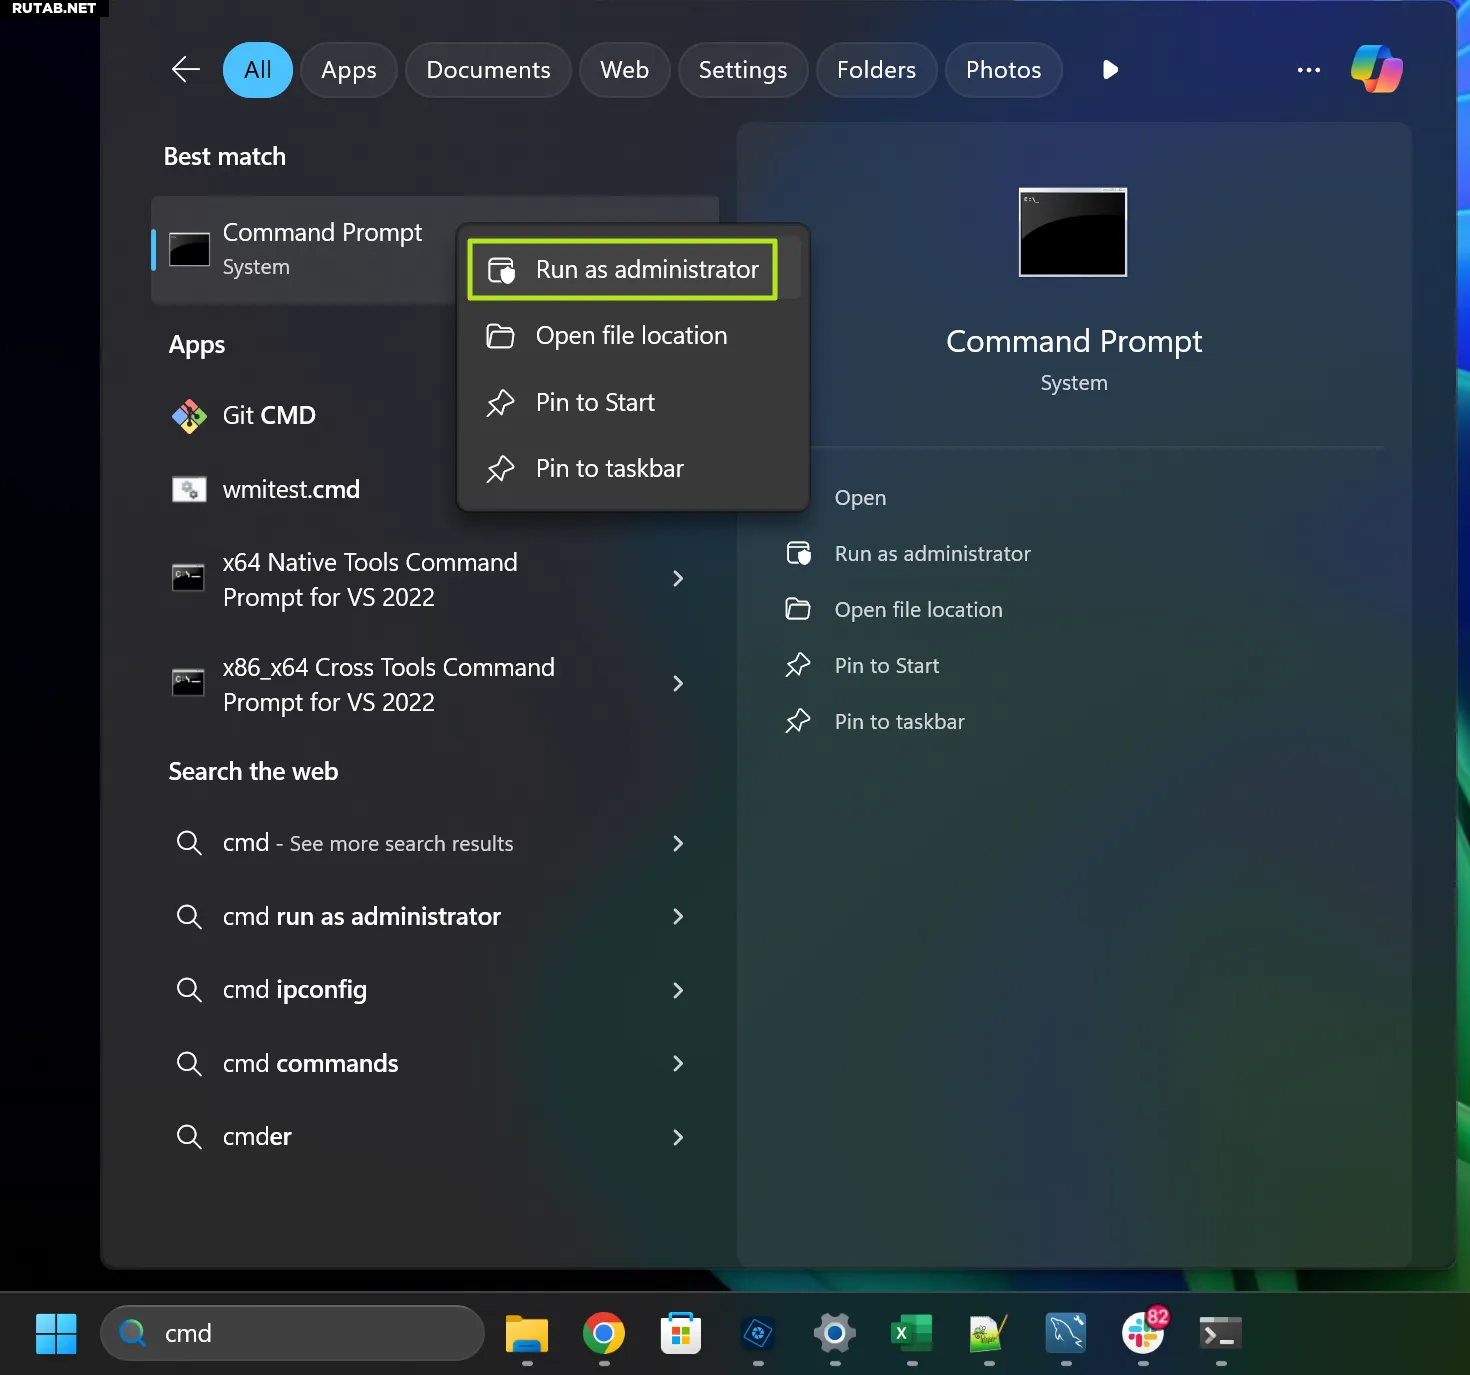
Самый простой способ запустить любую программу, включая CMD, с правами администратора в Windows 11 или 10 — это найти ее в поиске Windows, затем щелкнуть правой кнопкой мыши по значку и выбрать «Запуск от имени администратора».
Изображение: Tom’s Hardware
Само собой разумеется, что если вы не отключили контроль учетных записей пользователей, Windows выведет диалоговое окно
Диало́говое окно́ (англ. dialog box) в графическом пользовательском интерфейсе — специальный элемент интерфейса, окно, предназначенное для вывода информации и (или) получения ответа от пользователя. Получил своё название потому, что осуществляет двустороннее взаимодействие компьютер-пользователь («диалог»): сообщая пользователю что-то и ожидая от него ответа.
Диалоговые окна подразделяются на модальные и немодальные, в зависимости от того, блокируют ли они возможность взаимодействия пользователя с приложением (или системой в целом) до тех пор, пока не получат от него ответ. Википедия
с вопросом, уверены ли вы, что хотите запустить CMD от имени администратора.
Этот же метод работает для PowerShell или любой другой программы, которую вы хотите. Однако я ненавижу использовать этот метод, потому что он добавляет шаг щелчка правой кнопкой мыши и выбора элемента из контекстного меню. На ноутбуке с жестким или скользким тачпадом вам, возможно, придется несколько раз попытаться щелкнуть правой кнопкой мыши и выбрать Запуск от имени администратора.
Как настроить Cmd для постоянного запуска от имени администратора
Я не могу вспомнить момент, когда я хотел бы запустить командную строку или PowerShell и не запускать их в режиме администратора. К счастью, есть способ сделать так, чтобы каждая программа (или любая программа) запускалась по умолчанию от имени администратора, как только вы нажимаете на ее ярлык. Вот как это сделать для командной строки, но те же шаги сработают и для PowerShell.
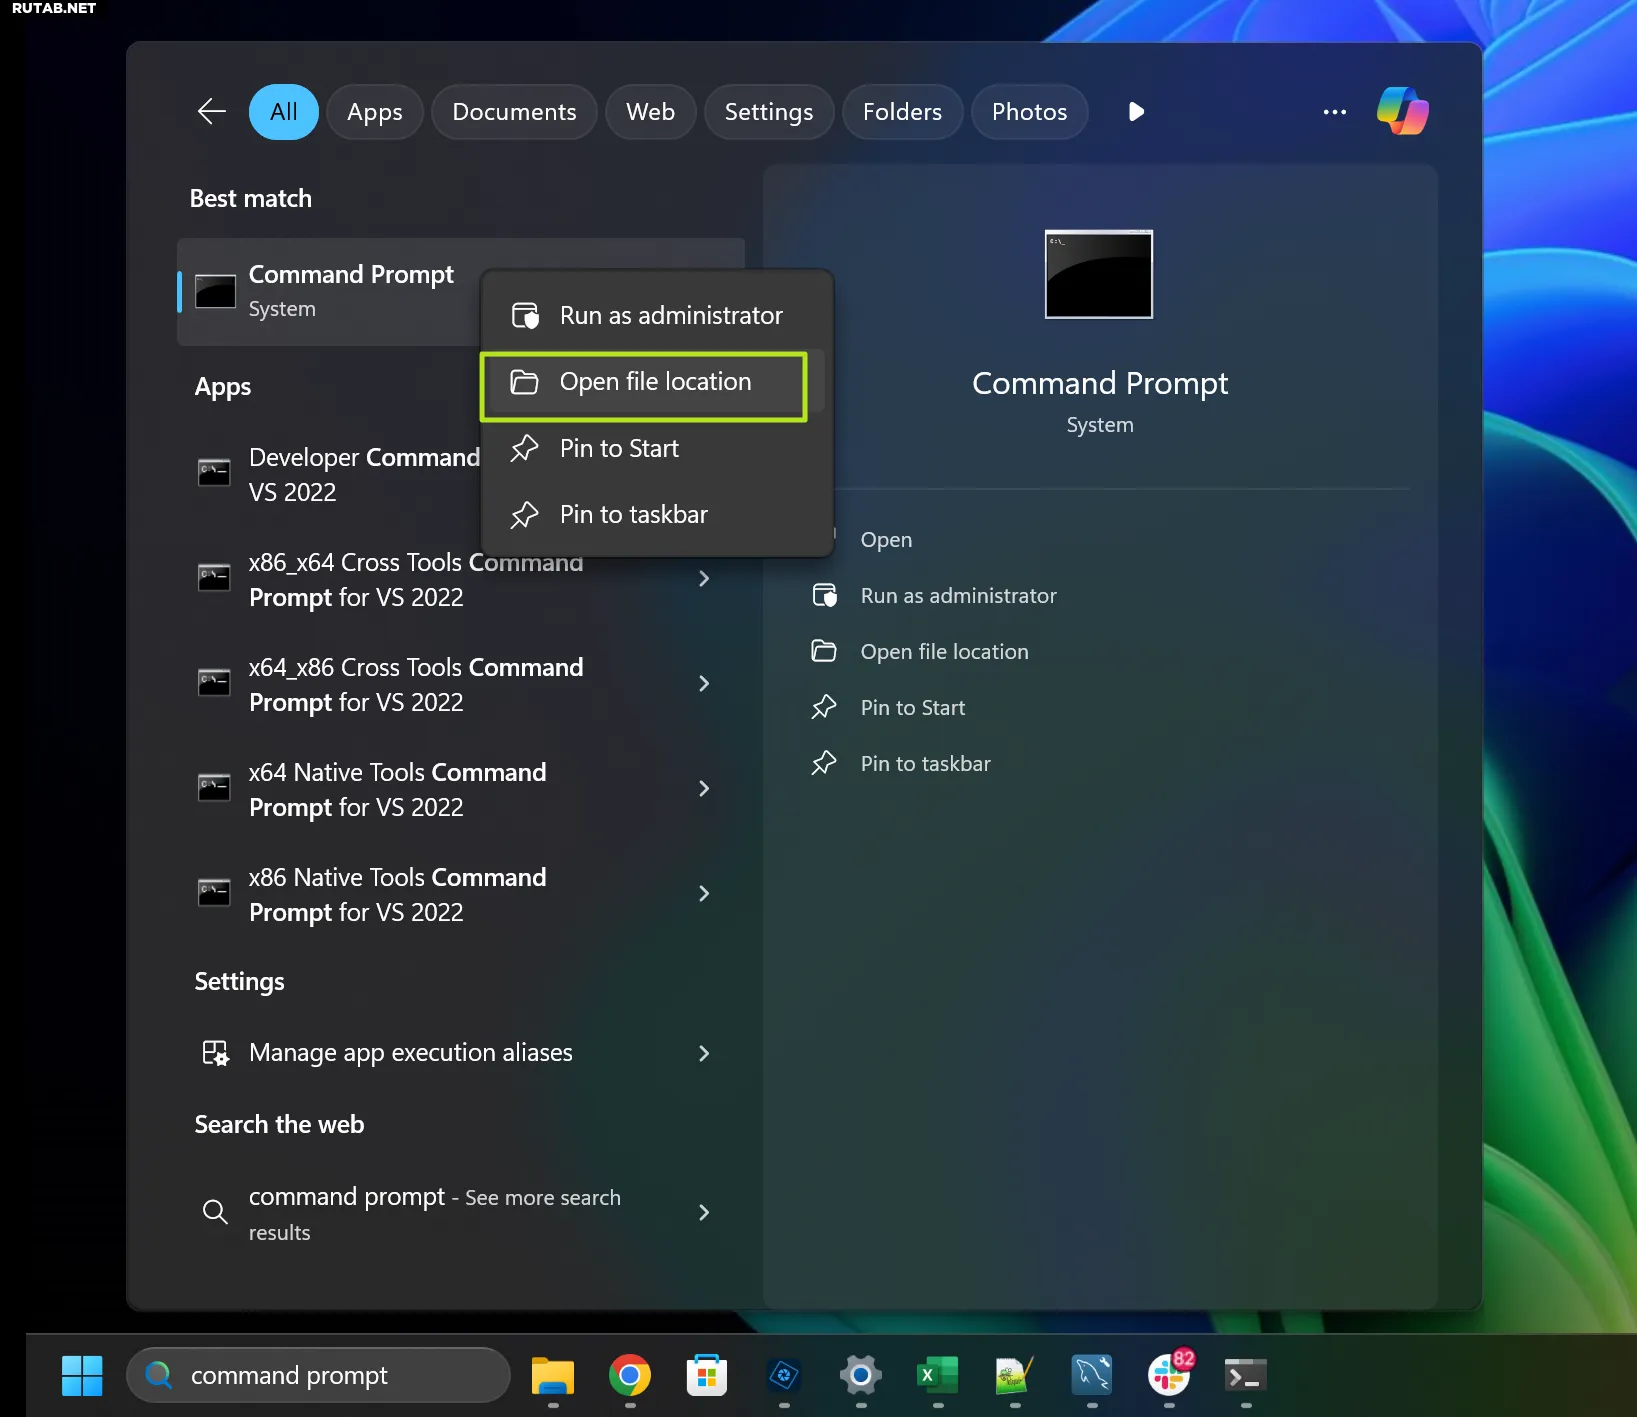
1. Найдите «командную строку» или «CMD» в поиске Windows.
2. Щелкните правой кнопкой мыши по верхнему результату и выберите «Открыть расположение файла».
Изображение: Tom’s Hardware
Расположение ярлыка командной строки откроется в проводнике Windows.
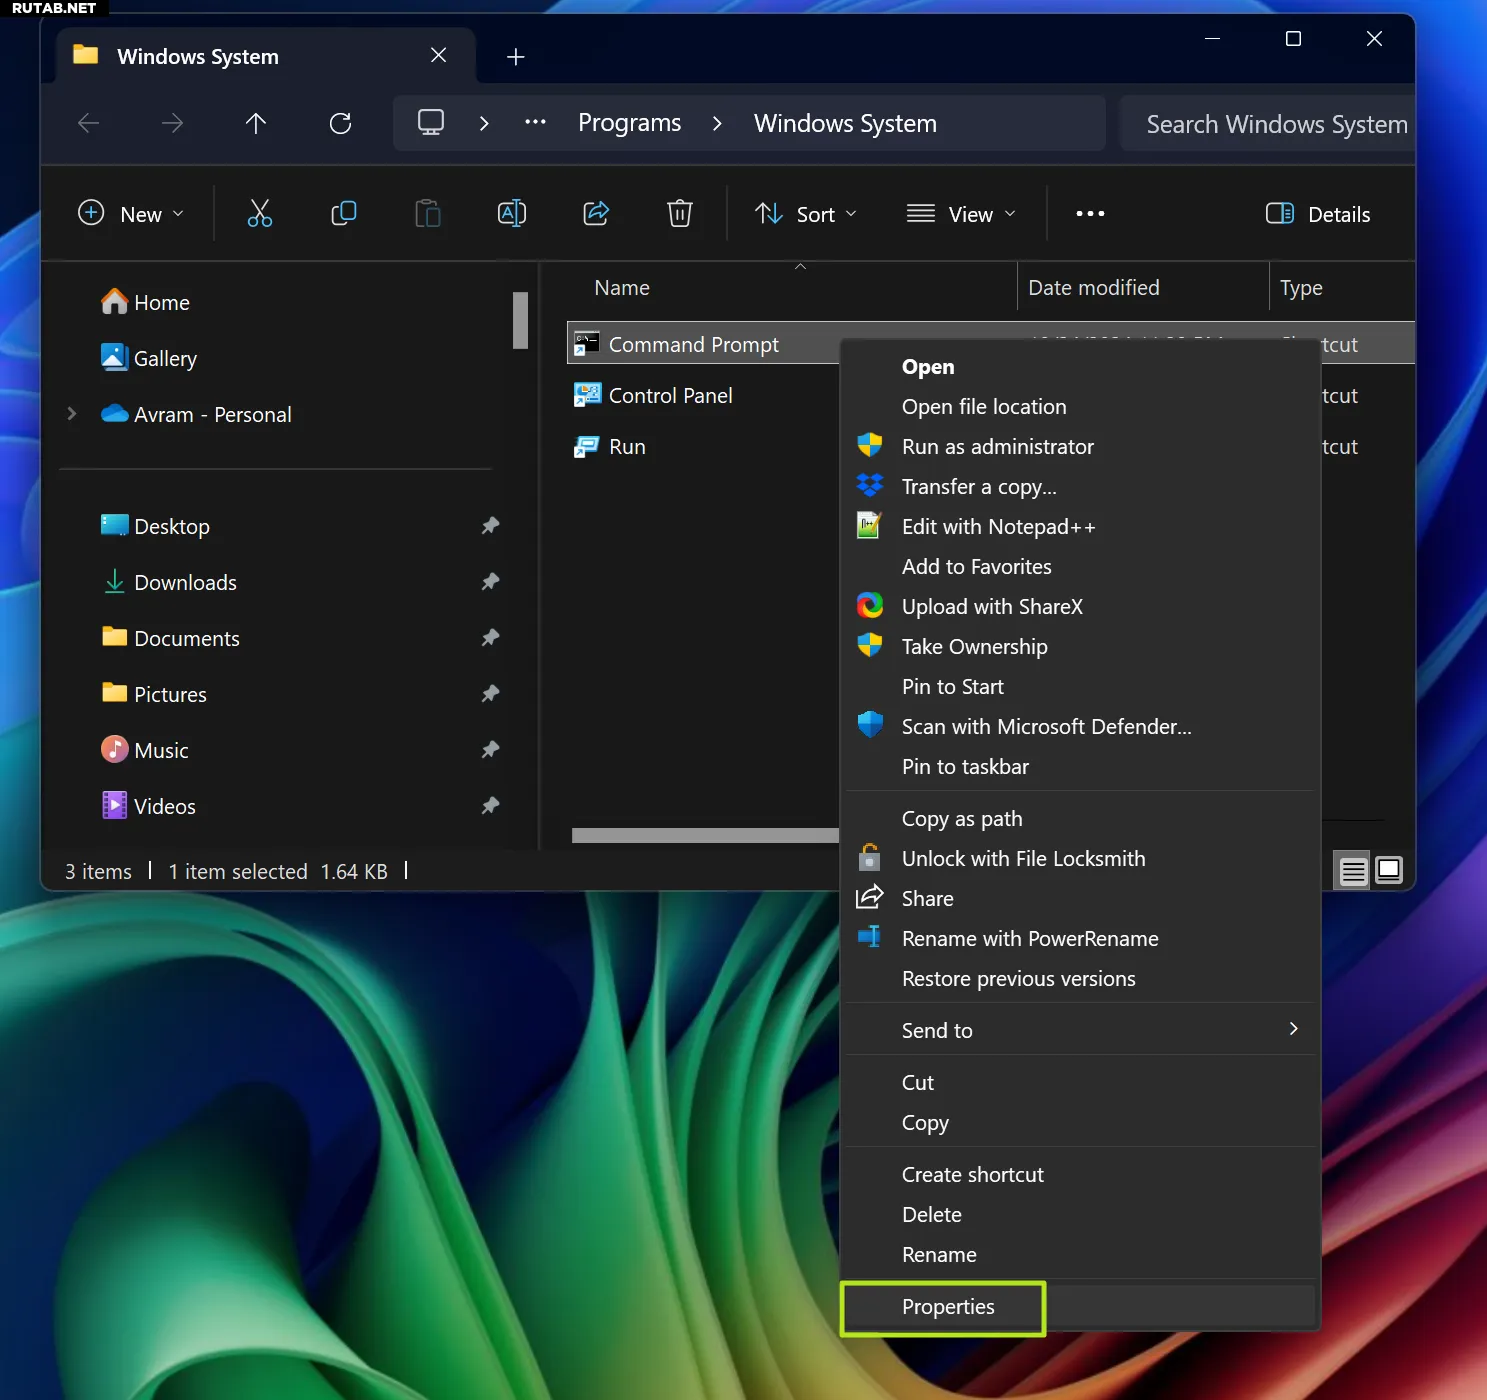
3. Щелкните правой кнопкой мыши значок ярлыка командной строки и выберите Свойства.
Изображение: Tom’s Hardware
4. Click Advanced.
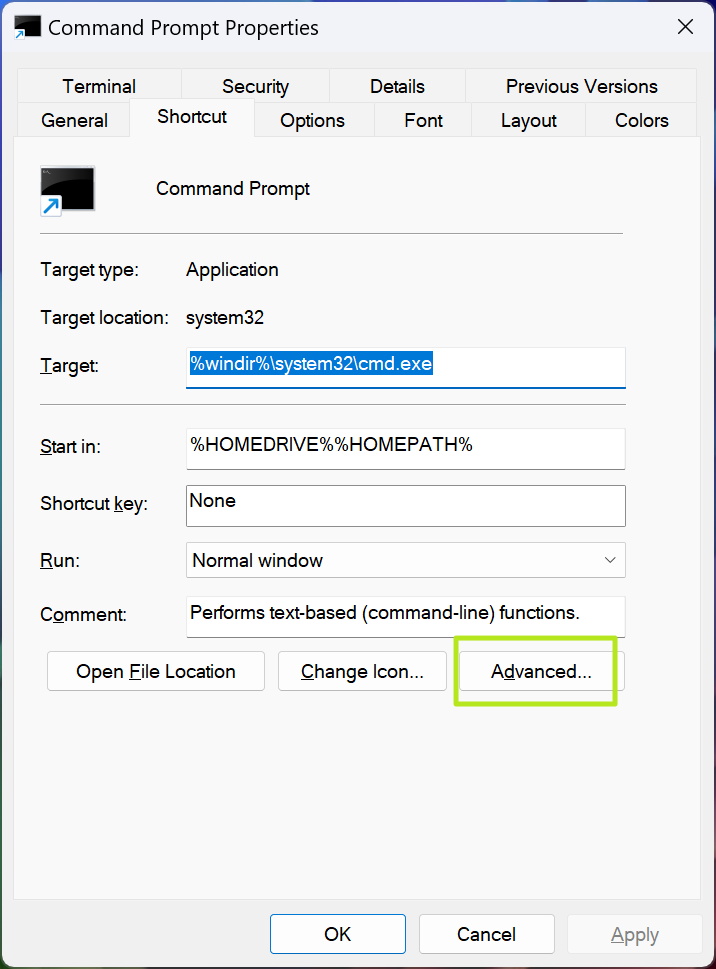
Изображение: Tom’s Hardware
5. Установите переключатель «Запуск от имени администратора» в положение «Вкл.» и нажмите «ОК».
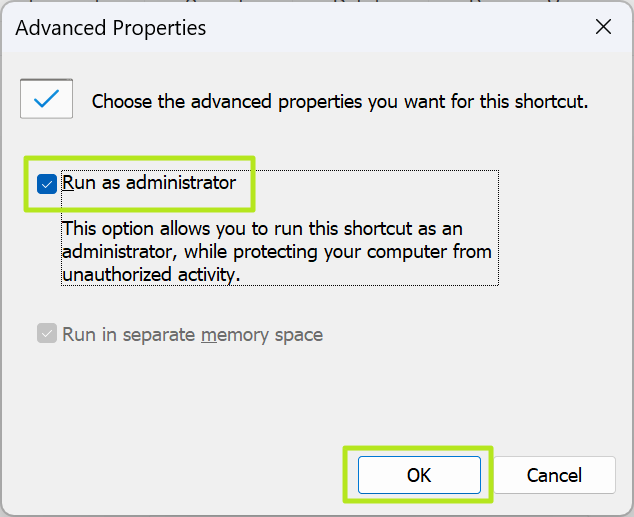
Изображение: Tom’s Hardware
6. Нажмите «ОК» в окне свойств командной строки, чтобы закрыть его.
В следующий раз, когда вы выполните поиск по запросу «CMD» или «командная строка» и нажмете на верхний результат, вы получите административную командную строку.
Обратите внимание, что командная строка с повышенными правами, в качестве меры безопасности, всегда будет запускаться в C:\Windows\System32 — поле «Запустить в» ярлыка игнорируется. Если вы хотите запустить командную строку с повышенными правами в другой папке, например C:\Users, вы можете обойти ограничение, передав в командную строку команду смены каталога (или pushd) с помощью параметра /k. Для этого измените Target, включив в него дополнительные параметры, например:
%windir%\system32\cmd.exe /k «pushd C:\Users»
Используйте CTRL + Shift Enter для запуска Cmd от имени администратора.
Допустим, вы хотите запустить командную строку с повышенными правами, но не хотите менять сочетание клавиш
Сочетание клавиш (синонимы: горячая клавиша, шорткат [англ. shortcut], клавиша быстрого доступа, клавиша быстрого вызова, клавиатурный ускоритель; англ. keyboard shortcut, quick key, access key, hot key) (для программного обеспечения) — разновидность интерфейса взаимодействия с вычислительным устройством (компьютером, калькулятором), представляющая собой нажатие кнопки/клавиши (или сочетания клавиш) на клавиатуре, которому назначено (запрограммировано) некое действие — команды (операции), исполняемые данной системой. Как правило, частично дублирует интерфейс меню или кнопок и служит для значительного ускорения работы, также — увеличения количества возможных действий, выполняемых с помощью клавиатуры. Википедия
командной строки, чтобы это происходило каждый раз. Нет проблем. Вы можете использовать сочетание клавиш Ctrl + Shift + Enter, когда выбираете значок командной строки в меню «Пуск» или даже когда запускаете CMD из диалогового окна «Выполнить».
Чтобы использовать диалоговое окно «Выполнить» для запуска cmd от имени администратора:
1. Нажмите сочетание клавиш Windows + R, чтобы открыть диалоговое окно «Выполнить».
2. Введите cmd в диалоговое окно «Выполнить».
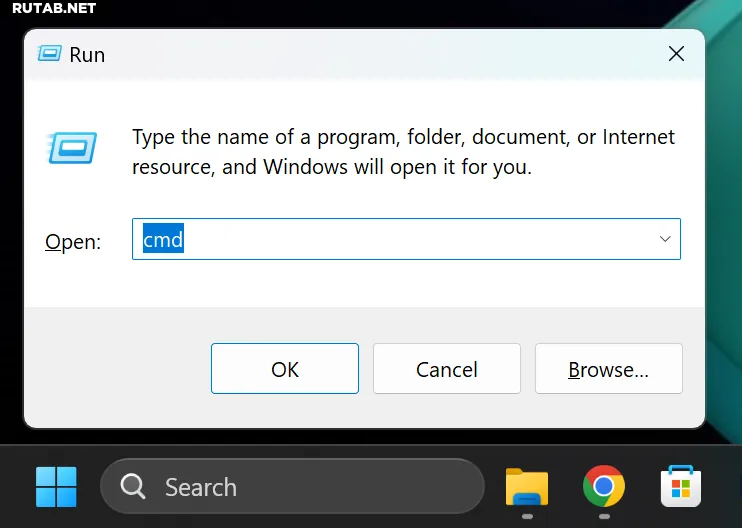
Изображение: Tom’s Hardware
3. Нажмите Ctrl + Shift + Enter.
Используйте контекстное меню Windows + X для запуска PowerShell от имени администратора
Этот метод работает только для PowerShell, но, как мы уже говорили, PowerShell может делать все то же, что и CMD, и даже больше.
1. Нажмите клавиши Windows + X. На рабочем столе появится длинное контекстное меню.
2. Выберите Терминал (администратор)
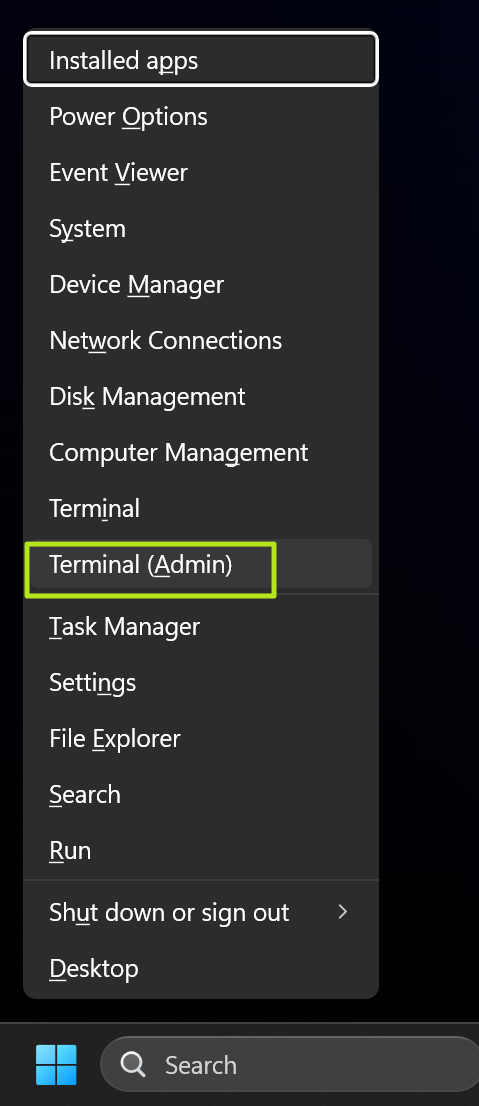
Изображение: Tom’s Hardware
Откроется окно PowerShell с правами администратора.
Источник: Tomshardware.com
Товарищи, добрый день. Так как у меня появились несколько идей для написания будущих статей, я решил немного подготовить сайт. В будущем, нам скорее всего понадобится инструмент PowerShell, который уже сейчас превосходит по возможностям стандартную командную строку, но все равно развивается параллельно ей. Подробнее лучше прочитать на википедии, а у нас практические знания, поэтому переходим к инструкции. И снова у нас несколько способов:
- Через меню «Пуск»
- Через командную строку
- Через проводник
- Заменой командной строки в контекстном меню «Пуск» (только современные операционные системы)
Самый популярный способ у нас будет первым, для Windows 10: открываем меню «Пуск» → «Все программы» → ищем каталог «Windows PowerShell» и выбираем файл нужной разрядности. На 32 битных системах будет только 32 битный исполняющий файл.
Если необходим PowerShell с правами администратора, то кликаем правой клавишей мыши по файлу, выбираем «Дополнительно» и жмем «Запуск от имени администратора».
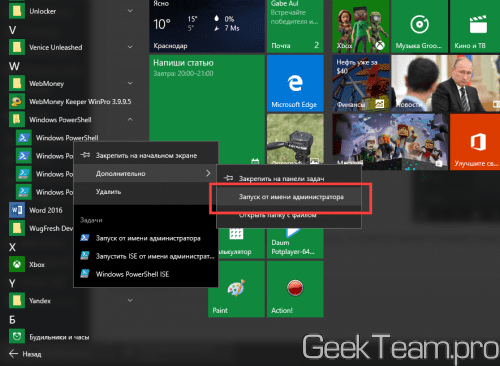
Для Windows 8.x и старше: Открываем меню «Пуск» → открываем раздел «Все программы» → листаем до раздела служебные и открываем Windows PowerShell этот сриншот сделан на 32 битной системе и здесь уже видно, что файл будет только один.

Запуск от имени администратора по тому же сценарию, правой клавишей по файлу и выбираем «Запустить от имени администратора»

2. Запуск PowerShell через командную строку
Да, для любителей нестандартных путей, тоже способ есть)) Много способов запуска командной строки описаны здесь. Здесь же я опишу способ, который подходит для современных операционных систем. Нажимаем правой клавишей мыши по углу пуск или жмем Win+X, а в открывшемся меню выбираем подходящую командную строку. Если вам необходим PowerShell с правами администратора, то выбираем и командную строку с правами администратора.
В открывшееся окно вводим powershell и жмём Enter. После этого командная строка будет работать полностью как Windows PowerShell.

3. Запуск Windows PowerShell через окно проводника Windows.
Открываем проводник и переходим в одну из папок:
a) 64bit PowerShell если стоит 64 битная система или 32bit PowerShell, если стоит 32 битная система
C:\Windows\System32\WindowsPowerShell\v1.0
b) 32bit PowerShell на 64 битных системах находится в папке:
C:\Windows\syswow64\Windowspowershell\v1.0
Можно просто вставить ссылку в адресную строку.
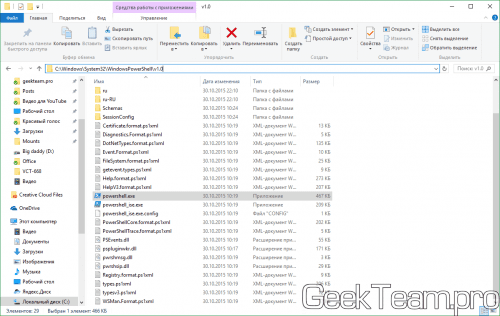
Если вам нужен PowerShell с обычными правами, просто запускаем выделенный файл. Если же с правами администратора, жмём правой клавишей мыши и выбираем «Запуск от имени администратора».

4. Замена командной строки на PowerShell в контекстном меню «Пуск».
Вот во втором способе, мы использовали контекстное меню «Пуска» и там по-умолчанию добавлена командная строка. Это можно исправить. Скажем для системных администраторов, все чаще нужен PowerShell, вместо командной строки и вместе с добавлением контекстного меню, Microsoft добавили возможность замены командной строки на Windows PowerShell. Для этого, необходимо кликнуть правой клавишей мыши по пустому месту на «Панели задач». И выбрать её «Свойства».
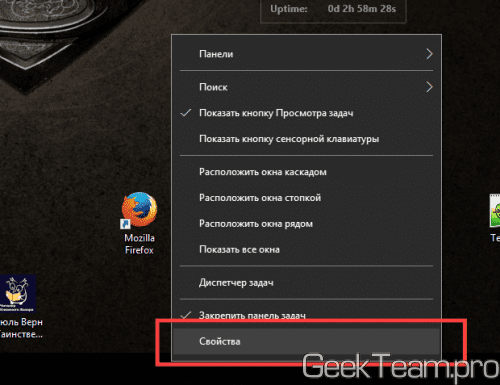
На вкладке «Навигация» ставим галочку на «Заменить командную строку оболочкой Windows PowerShell…» и жмём ОК.
Теперь в контекстном меню можно сразу же запускать Windows PowerShell.
Вроде всё. Надеюсь эта статья оказалась вам полезной, нажмите одну из кнопок ниже, чтобы рассказать о ней друзьям. Также подпишитесь на обновления сайта, введя свой e-mail в поле справа или подписавшись на группу во Вконтакте и канал YouTube.
Спасибо за внимание
Материал сайта geekteam.pro