
В этой статье мы рассмотрим, как ввести компьютер с Windows 10/11 или Windows Server 2022/2019/2016 в домен Active Directory.
Содержание:
- Предварительные требования для присоединения Windows к домену
- Вводим компьютер Windows в домен через классический интерфейс System Properties
- Добавление Windows в домен через панель Settings
- Добавить Windows в домен с помощью PowerShell
- Предварительное создание учетной записи компьютера в домене
Предварительные требования для присоединения Windows к домену
Рассмотрим основные требования и подготовительные шаги, которые нужно выполнить на вашем компьютере для подключения его к домену Active Directory:
- В домен можно добавить только следующие редакции Windows 10/11: Pro, Education, Pro for Workstations и Enterprise. Редакции Home не поддерживают работу в домене Active Directory;
- Вы должны подключить ваш компьютер к локальной сети, из которой доступен хотя бы один контроллер домена AD. Предположим, что на вашем компьютере уже настроен IP адрес из локальной подсети, а в настройках DNS северов указаны IP адреса ближайших котроллеров домена (вы можете настроить параметры сетевого адаптера вручную или получить от DHCP сервера);
- Проверьте, что ваш компьютер может отрезолвить имя домена и с него доступны контроллеры домена:
ping contoso.com - Время на компьютере не должно сильно расходится со временем на контроллере домена (плюс-минус пять минут). Корректное время нужно для выполнения Kerberos аутентификации;
- Задайте имя вашего компьютера (hostname), под которым он будет добавлен в домен. По умолчанию Windows генерирует имя компьютера при установке, но лучше изменить его на что-то более осмысленное. Вы можете изменить имя компьютера
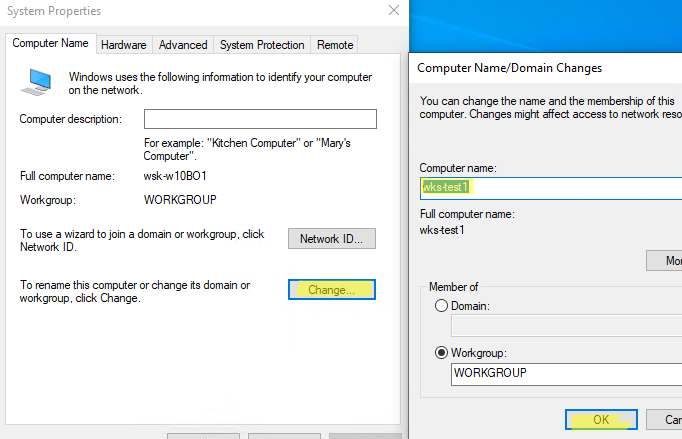
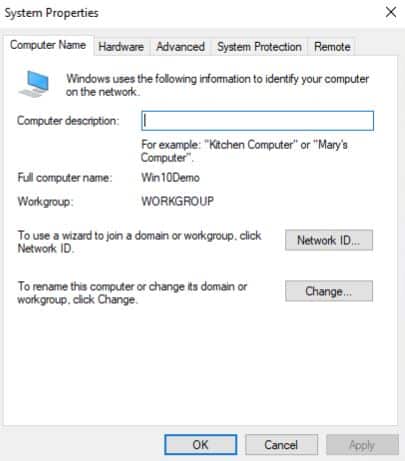
Через классическую панель
sysdm.cpl
. Нажмите кнопку Change, укажите новое имя компьютера и нажмите OK (как вы видите, сейчас компьютера находится в рабочей группе Workgroup);
Также Можно изменить имя компьютера с помощью PowerShell команды:
Rename-Computer -NewName "wks-test1"

После смены
hostname
нужно перезагрузить Windows.
Вводим компьютер Windows в домен через классический интерфейс System Properties
Вы можете добавить ваш компьютер в домен из классической панели управления Windows.
- Выполните команду
sysdm.cpl
и нажмите кнопку Change; - В поле Member of переключите опцию на Domain и укажите имя вашего домена;
- Появится запрос имени и пароля пользователя, которому делегированы административные права на добавление компьютеров в домен. Это может быть обычный пользователь AD (по умолчанию любой пользователь домена может присоединить до 10 устройств) или учетная запись с правами Domain Admins;
- После этого должна появится надпись Welcome to the contoso.com domain;
- Перезагрузите компьютер.

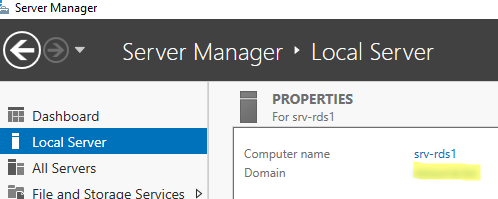
В Windows Server 2022/2019/2019 диалог System Properties для присоединения к домену AD можно открыть из Server Manager -> Local Server -> Domain.
После перезагрузки к компьютеру загрузить и применит доменные групповые политики, а вы может выполнить аутентификацию на компьютере с помощью учетной записи пользователя домена.
Добавление Windows в домен через панель Settings
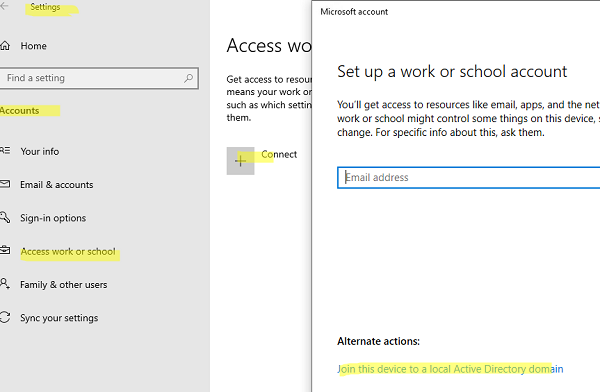
В современных версиях Windows 10 и Windows 11 вы можете присоединить ваш компьютер в домен AD через панель Settings.
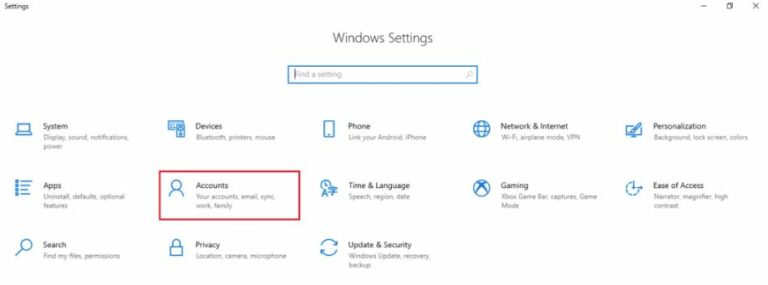
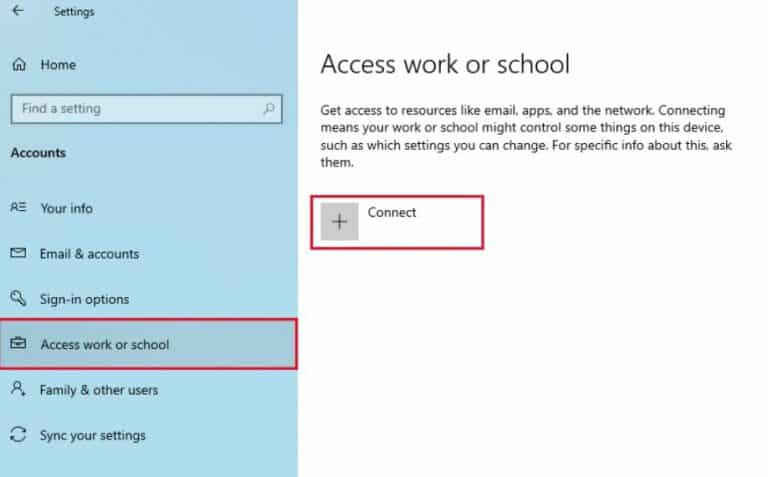
- Перейдите в раздел Settings -> Accounts -> Access work or school -> нажмите Connect (для быстрого перехода в этот раздел Setting можно использовать команду быстрого доступа: ms-settings:workplace);
- В открывшейся форме нажмите на ссылку Alternate actions: Join this device to a local Active Directory domain;
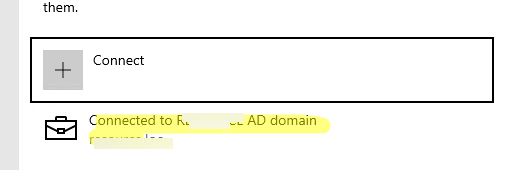
Если ваш компьютер уже добавлен в домен, здесь будет надпись Connected to CONTOSO AD domain.
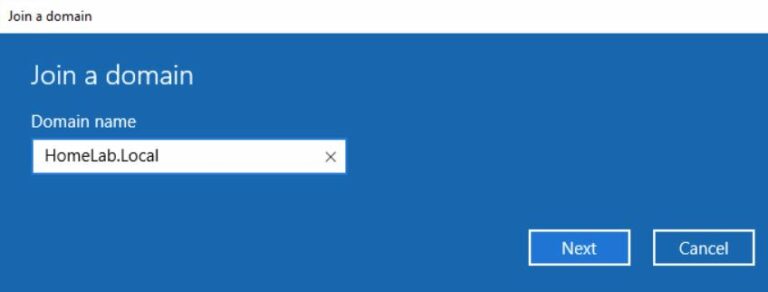
- Укажите имя домена в форме Join a domain;
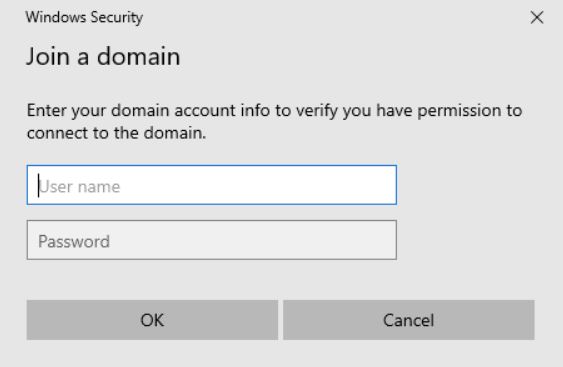
- Затем укажите имя доменного пользователя и пароль.
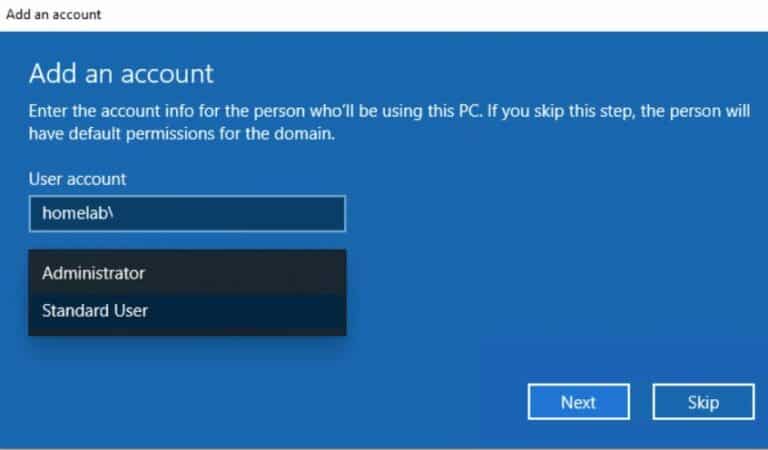
- Пропустите следующий шаг с добавлением пользователя в администраторы (вы можете добавить пользователя в локальные админы с помощью GPO);
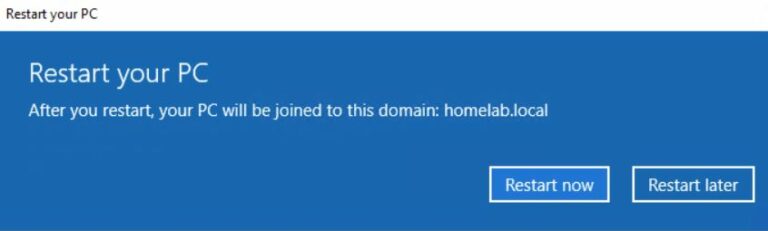
- Осталось перезагрузить компьютер, чтобы завершить добавление в домен.
Добавить Windows в домен с помощью PowerShell
Для присоединения компьютеров к домену Active Directory можно использовать команду Powershell Add-Computer. Командлет позволяет ввести компьютер в домен с новым именем, а также позволяет сразу поместить учетную запись компьютера в определенный OU.
В самом простом случае для добавления в домен достаточно выполнить команду:
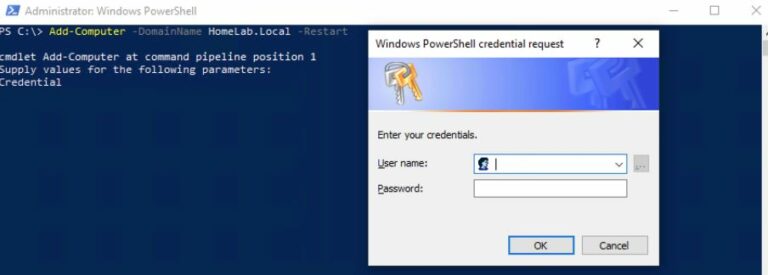
Add-Computer -DomainName contoso.com
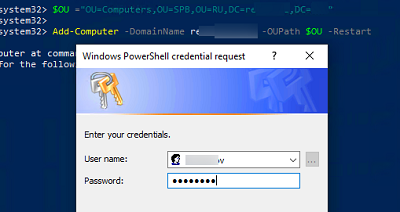
Появится окно, в котором нужно указать свою учетную запись и пароль.
Вы можете сразу поместить ваш компьютер в нужную OU. Для этого имя OU в формате DN (distinguishedName) нужно указать в параметре OUPath:
$OU ="OU=Computers,OU=SPB,OU=RU,DC=contosoc,DC=loc"
Add-Computer -DomainName contoso.loc -OUPath $OU -Restart
Ключ -Restart означает, что вы хотите перезагрузить Windows сразу после завершения команды добавления в домен.
После перезагрузки вы можете проверить, что ваш компьютер теперь является членом домена Windows с помощью команды:
Get-WmiObject Win32_NTDomain
Команда вернули имя домена, сайта AD, IP адрес и имя контроллера домена, через который выполнен вход (Logon server)
Также можно получить имя вашего домена с помощью команды:
systeminfo | findstr /B "Domain"

Вы можете добавить удаленный компьютер в домен. Для этого нужно указать имя компьютера в параметре -ComputerName:
Add-Computer -ComputerName wks-pc22 -DomainName contoso.com -Credential contoso\Administrator -LocalCredential wks-pc22\Admin -Restart –Force
В новых версиях PowerShell Core 6.x и 7.x команда Add-Computer отсутствует в модуле Microsoft.PowerShell.Management.
Add-Computer: The term 'Add-Computer' is not recognized as a name of a cmdlet, function, script file, or executable program.
Check the spelling of the name, or if a path was included, verify that the path is correct and try again.
Suggestion [4,General]: The most similar commands are: Add-Computer, Stop-Computer, Get-ADComputer, New-ADComputer, Set-ADComputer, Add-Content, Rename-Computer, Add-Member.
Поэтому для добавления компьютера в домен, нужно запускать
powershell.exe
, а не pwsh.exe.
Также для добавления Windows в домен можно использовать утилиту netdom, но она требует установки пакета администрирования RSAT на клиентский компьютер и сейчас используется очень редко:
netdom join %computername% /domain:contoso.com /UserD:contoso\admin /PasswordD:pasS1234
Если вам нужно вывести компьютер из домена и вернуть его в рабочую группу, выполните команду PowerShell:
Remove-Computer
After you leave the domain, you will need to know the password of the local Administrator account to log onto this computer. Do you wish to continue?
[Y] Yes [N] No [S] Suspend [?] Help (default is "Y"): y

Предварительное создание учетной записи компьютера в домене
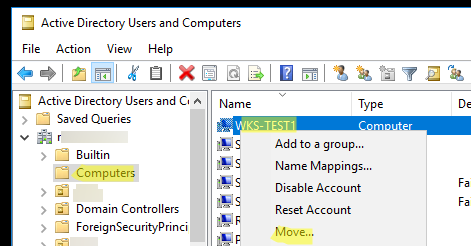
При добавлении в домен новые компьютеры по умолчанию помещаются в стандартный контейнер (Organizational Unit / OU) с именем Computers в корне домена. Вы можете вручную перенести учетную запись компьютера в новую OU с помощью пункта меню Move или простым перетягиванием (drag and drop).
Администратор может предварительно создать учетную запись компьютера в Active Directory с помощью графической консоли Active Directory Users and Computers dsa.msc (New -> Computer) или с помощью командлета New-ADComputer из модуля ActiveDirectory PowerShell:
New-ADComputer -Name "wks-msk022" -SamAccountName "wks-msk022" -Path "OU=Computers,OU=MSK,OU=RU,DC=contoso,DC=loc"
Если вы создаёте учетную запись компьютера вручную, ее имя должно совпадать с именем компьютера (hostname), который вы добавляете в домен AD.
Сначала рекомендуем воспользоваться поиском в AD для поиска компьютеров с таким же именем. Если это имя уже занято, и вы хотите его использовать для другого компьютера, можно его сбросить. Щёлкните правой клавишей по компьютеру в AD и выберите Reset Account.
Также можно сбросить учетную запись компьютера в AD с помощью команды:
Get-ADComputer -Identity "computername" | % {dsmod computer $_.distinguishedName -reset}
Это сбросит пароль компьютера в домене который используется для установки доверительных отношений с AD.
How to Join Computer to Domain using PowerShell. Active Directory (AD) is a technology that thousands of businesses rely on daily. We must join computers to an AD domain to take advantage of AD. However, we need to realize there are many ways to do that, some better than others. This article teaches us how to add a machine to a domain using the Windows Graphical User Interface (GUI) command line with PowerShell.
How to Join Computer to Domain using PowerShell

Prerequisites
If we want to complete all of the steps in this tutorial, we must have the following items:
- An Active Directory domain.
- A Windows workstation or server with access or connectivity to the AD domain.
- An AD user account with permission to add a computer to a domain.
- Ensure that we install the Remote Server Administration Tools (RSAT) package to use the PowerShell commands.
Joining a Computer to a Domain via the GUI
Remember, the GUI is one of the most common methods for adding a computer to an AD domain. This approach is good when we add a single or a few computers simultaneously. However, this method is unsuitable for adding multiple computers simultaneously.
1. Run the sysdm.cpl command. This command launches the System Properties applet in the control panel.
2. Click the Change button on the System Properties screen. The Computer Name/Domain Changes dialog box will appear when you click this button.
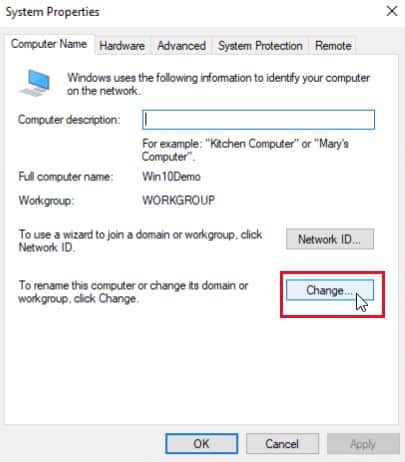
3. This computer, by default, is part of a workgroup called WORKGROUP, as shown below. To add this computer, click the Domain radio button in the Computer Name/Domain Changes dialog box.
4. To add the computer to the Domain box, enter the domain name and click OK. The computer will then try to connect to a domain controller and join the domain.
Suppose our computer cannot contact the domain name we entered immediately. In that case, it will throw the below error:
If the computer cannot reach a domain controller, ensure the computer’s DNS server points to a domain controller.
The computer must locate the DNS SRV record to locate a DC.
5. If the computer can communicate with a domain controller, it will prompt us for a username and password. Click OK after entering a user account that has permission to add this computer to the domain.
6. If everything goes well, we receive the message below welcoming us to the domain. The computer now creates an AD computer object. Select OK.
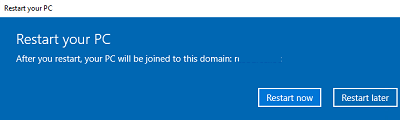
7. Click OK to confirm the need to restart the computer.
8. Return to the System Properties dialog box, but there will be a warning (Changes will take effect after you restart this computer.) Click Close.
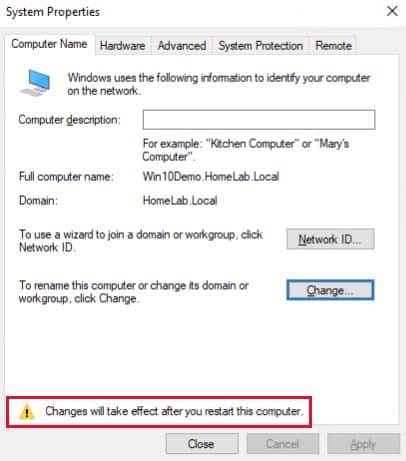
9. When we click Close, Windows will ask us to restart. To restart the computer immediately, click Restart now.
Improve your Active Directory Security & Azure AD
Try us out for Free, Access to all features. – 200+ AD Report templates Available. Easily customise your own AD reports.
Joining a Local Computer to a Domain via the Settings app
Alternatively, we join a computer to a domain via the settings app using the following steps:
1. Right click on the Start menu and click Settings.
2. Under Settings, click on Accounts.
3. On the next page, select Access Work or School and select the connect option to the right.
4. Because we will be joining this machine to the local Active Directory Domain, in the Microsoft account dialog box, select Join this device to local Active Directory Domain and click Next.

5. Enter the domain name and click Next on the next page.
6. If the computer can communicate with a domain controller, it will prompt us for a username and password. Click OK after entering a user account that has permission to add this computer to the domain.
7. On the next page, select the account type that will use this machine.
- If we select Administrator, we will add the user we used to add this machine to the domain to the local administrators’ group on the device.
- Selecting a standard user will not add the user to the local administrator’s group. We can also skip it and continue to the next page.
8. To restart the computer immediately, click Restart now.
9. After restarting the machine, we can log in with an AD user id.
Joining a Local Computer to a Domain via Netdom
Netdom is a command-line tool that allows us to manage trust relationships between computers. It can join a computer to a domain and perform other tasks, such as resetting machine account passwords and creating trust between domains. Follow the instructions below to join the computer using netdom commands:
1. Start cmd.exe as administrator.
2. Use netdom join with the following parameters.
netdom.exe join %COMPUTERNAME% /domain:DOMAIN /UserD:DOMAIN\USERNAME /PasswordD:PASSWORD
Following the join parameter, Netdom requires a computer name. Using this command on another computer, we should always replace the value with the variable %computername% to represent the local computer.

3. Now restart the computer, and the system will join the computer to the domain.
Joining a Local Computer to a Domain via PowerShell
If we have many computers to add to a domain, an onboarding automation process, or prefer the command line, we can use PowerShell. Follow the instructions below to join multiple computers to the domain using PowerShell:
1. Open Windows PowerShell, making sure to run it as administrator.
2. Run the Add-Computer cmdlet from the PowerShell console. This cmdlet does the same thing as adding a computer to a domain through the GUI. First, use the DomainName parameter to specify the domain name to which we will add the computer. Then, optionally set the Restart parameter to restart the computer when the process is complete.
We can also specify the Credential parameter to specify the username and password sooner. If we would like to add a computer to a different Organizational Unit (OU) upon creation, select the OUPath parameter. For more options, run Get-Help Add-Computer -Full.
Add-Computer -DomainName DOMAINNAME -Restart
Join a Local Computer to a Domain via WMI
To ensure that this article covers all possible methods for adding a computer to a domain, let’s move on to a less known way of using Windows Management Instrumentation (WMI). WMI is a common component of Windows that contains a wealth of information about a computer and can perform actions on it.
To add a local machine to a domain using WMI, we must call a WMI method. This method accomplishes the same thing as the Add-Computer PowerShell cmdlet. To accomplish this:
1. Start Windows PowerShell as an administrator.
2. Run the command below:
(Get-WMIObject -NameSpace "Root\Cimv2" -Class "Win32_ComputerSystem").JoinDomainOrWorkgroup("DOMAIN.COM","PASSWORD","DOMAIN\USER",$null,3)
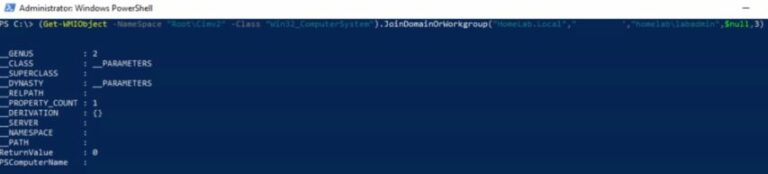
3. When completed, restart the computer.
Adding Computers Remotely to a Domain
To add computers to a domain remotely, we could use the WMI method in PowerShell as described above but use the ComputerName parameter on the Get-WmiObject cmdlet or PSRemoting.
To join remote computers to the domain remotely, invoke the Add-Computer PowerShell cmdlet. But this time, use the ComputerName parameter. To run the Add-Computer cmdlet remotely, we must ensure that we enable PSRemoting on all remote computers.
1. Open PowerShell as administrator on our workstation
2. Execute the following command. We may refer to the command below:
- Adds the remote computer to the domain.
- Authenticating to the remote computer uses the local user on the computer.
- The computer account uses the domain account to authenticate to the domain.
- Restart the computer automatically after completion
Add-Computer -ComputerName COMPUTERNAME -LocalCredential DOMAIN\LOCAL -DomainName DOMAIN -Credential DOMAIN\ADMIN -Restart
When we run the Add-Computer cmdlet, it will prompt us for passwords for the local and domain administrator accounts. When finished, PowerShell will automatically restart the remote computer.
By default, the Add-Computer cmdlet will not restart the remote computer if a logged-in user is in session. To override this, specify the Force switch parameter to restart the remote computer constantly.
Thank you for reading this article blog about How to Join Computer to Domain using PowerShell. We shall conclude.
How to Join Computer to Domain using PowerShell Conclusion
In conclusion, using PowerShell to join a computer to a domain is a quick and efficient way to add a new device to your network. By following the steps outlined in this article, you can quickly join a computer to a domain and begin using it as a fully fledged member of your organization. Whether you are a network administrator or simply looking to add a new device to your home network, PowerShell offers a powerful and convenient way to get the job done.
Try InfraSOS for FREE
Invite your team and explore InfraSOS features for free
- Free 15-Days Trial
- Easy Setup
- Full Access to Enterprise Plan
Несколько способов добавить компьютер с Windows к домену Active Directory
Обновлено:
Опубликовано:
Используемые термины: контроллер домена, Windows, Active Directory.
В инструкции мы рассмотрим несколько способов присоединить компьютер с Windows к службе каталогов Active Directory.
Методы универсальные и подходят для всех версий линейки Windows (7 / 8 / 10 / 11).
Требования к системе
В графическом интерфейсе
В командной строке
С помощью Powershell
Дополнительные материалы
Требования к операционной системе
Не все редакции Windows можно подключать к службе каталогов. Подразумевается, что среда с доменом является корпоративной и применяется в организациях. По этой причине компания Microsoft технически ограничивает возможность присоединить компьютер к домену, если система не предназначена для работы в компаниях. Например, Windows Home (Домашняя) нельзя ввести в домен — в ней не будет соответствующих команд или пунктов меню.
Если наша система не предназначена для работы в домене, то необходимо ее переустановить.
Способ 1 — графический интерфейс
Открываем свойства компьютера. Для этого открываем проводник и кликаем правой кнопкой мыши по Компьютер и выбираем Свойства:
В открывшемся окне в разделе Имя компьютера, имя домена и параметры рабочей группы нажимаем Изменить параметры:

В следующем окне нажимаем Изменить и выставляем переключатель Является членом в положение домена и вводим имя домена:
Нажимаем OK. Система запросит логин и пароль учетной записи с правом на ввод компьютера в домен. Вводим логин и пароль, например администратора, и нажимаем OK. Windows выкинет несколько сообщений о присоединении компьютера к домену и запросит перезагрузку — соглашаемся.
Способ 2 — командная строка
Запускаем командную строку от имени администратора и вводим следующую команду:
> netdom join %computername% /domain:dmosk.local /userd:dmosk\admin /passwordd:pass
* данная команда выполняется в командной строке (cmd). Она добавить компьютер к домену dmosk.local под учетными данными admin с паролем pass.
После отработки команды необходимо перезагрузить компьютер.
Способ 3 — powershell
Запускаем powershell от имени администратора и вводим следующий командлет:
> Add-Computer -DomainName dmosk.local -Credential dmosk\kdo
После нажатия Enter система запросит пароль для учетной записи. Вводим и дожидаемся окончания операции. После перезагружаем компьютер.
Читайте также
Дополнительная информация, которая может оказаться полезной:
1. Ручное удаление контроллера домена.
2. Как посмотреть версию операционной системы Windows.
3. Понижение контроллера домена и удаление роли AD DS.
4. Какие существуют версии операционной системы Windows.
5. Как установить роль контроллера домена на Windows Server.
6. Настройка доверительных отношений между доменами Active Directory.
In this tutorial, you’ll learn how to join a computer to the domain using PowerShell.
I will provide step by step instructions for adding a single computer and multiple computers to the domain.
Also, I’ll show you how to move the computer to an OU once it’s been added to the domain.
Let’s get started.
Important Tip: You may need to run PowerShell as Administrator to avoid access denied errors. To do this just right-click the PowerShell icon and select “Run as Administrator”.
Open Powershell and run the following command. Change YourDomainName to your Active Directory domain name.
add-computer –domainname "YourDomainName" -restart
Example picture below running on my domain ad.activedirectorypro.com

You will get prompted to enter your credentials. This will need to be a Domain Administrator account or a user that has been delegated rights to join computers to the domain.
The computer should automatically restart and be joined to the domain.
Tip: Run help add-computer to see all the command line options (syntax)
Join Multiple Computers to the Domain From a Text File
To Join multiple computers to the domain you just need to create a text file and add the computer names to it.
In this example, I’ve created a text file called computers.txt and added PC2 and PC3 to it.
I’ve saved the text file to c:\it\computers.txt
With the text file setup I’ll run the following commands:
$computers = Get-Content -Path c:\it\computers.txt
Add-Computer -ComputerName $computers -Domain "YourDomainName" -Restart
Example picture below running on my domain ad.activedirectorypro.com

The first line sets up a variable ($computers), which stores the values of the text file. The 2nd line is similar to the previous examples, now I just added the -ComputerName and the $computers variable.
This command will go through every computer listed in the text file and join them to the domain.
Pretty cool right? This will defiantly speed up the process of joining multiple computers to the domain.
Join Computer to Domain and specify OU Path With PowerShell
When you join a computer to the domain it will by default go the computers folder. It is best practice to move the computers from the default folder to a different OU.
Thankfully we can automate this with PowerShell when we join the computers to the domain.
Run this command to join a computer to the domain and specify the OU path.
Add-Computer -DomainName "Domain02" -OUPath "OU=testOU,DC=domain,DC=Domain,DC=com"
In the following example, I’ll be adding computers to the domain that go to the sales department. I have an OU setup called sales so I want the computers to automatically be moved to that OU.
The PowerShell command requires the distinguished name of the OU. The easiest way to get this is by navigating to the OU in Active Directory Users and Computers and opening the properties of the OU. Then click the Attribute Editor and copy the value of distinguishedName.
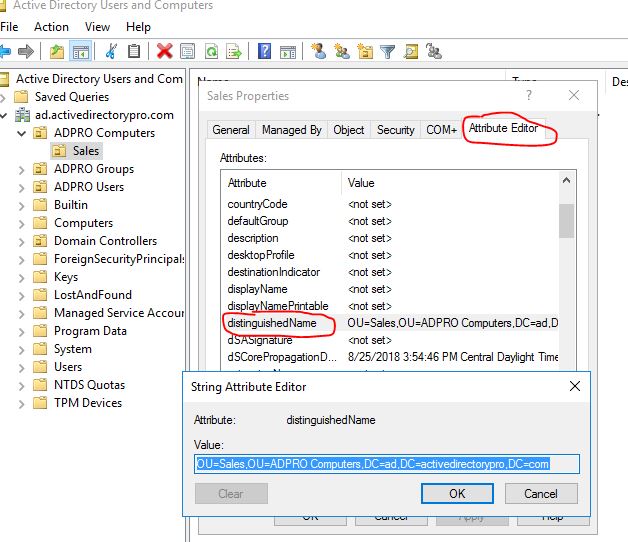
Now add this path to the command, below is the command for my domain. This will add the computer to the Sales OU in my Active Directory.
Add-Computer -DomainName "ad.activedirectorypro.com" -OUPath "OU=Sales,OU=ADPRO Computers,DC=ad,DC=activedirectorypro,DC=com"

I’ve just walked through three examples of using PowerShell to join computers to the domain. Now you can forget about logging into each computer and manually adding them to the domain. With PowerShell you can quickly add single or multiple computers at a time.
Try out these commands and let me know how they work by leaving a comment below.
Related: Huge List of PowerShell Commands for Active Directory
-
Understanding PowerShell Basics
-
Renaming the Computer and Joining the Domain
-
Ensuring Successful Domain Join
-
Troubleshooting Common Issues
-
Conclusion
-
FAQ
Renaming a computer and joining it to a domain can sometimes feel like a daunting task, especially for those who are not well-versed in IT. However, with PowerShell, this process can be simplified into a single command.
In this tutorial, we’ll walk you through the steps to rename your computer and join it to a domain efficiently. Whether you’re managing multiple machines or just one, knowing how to do this with PowerShell can save you time and effort. Let’s dive into the details and get your computer set up just the way you want it!
Understanding PowerShell Basics
Before we get into the command itself, it’s important to understand what PowerShell is and how it works. PowerShell is a task automation framework that consists of a command-line shell and an associated scripting language. It allows users to automate tasks and manage configurations across various systems. By using PowerShell, you can easily rename your computer and join it to a domain in a streamlined manner.
To perform these tasks, you’ll need to run PowerShell with administrative privileges. This ensures that you have the necessary permissions to make changes to the system settings.
Renaming the Computer and Joining the Domain
Now, let’s get into the meat of the matter. The command you’ll use to rename your computer and join it to a domain is quite straightforward. Here’s how you can do it:
Rename-Computer -NewName "NewComputerName" -DomainName "YourDomainName" -Credential "Domain\User" -Restart
Output:
Renaming computer to "NewComputerName"...
Joining domain "YourDomainName"...
Restarting computer...
In this command, you need to replace "NewComputerName" with the desired name for your computer, and "YourDomainName" with the name of the domain you want to join. The -Credential parameter is where you will specify the domain user account that has permission to join the computer to the domain. The -Restart flag ensures that your computer restarts automatically after the changes are made.
When you execute this command, PowerShell will first rename the computer. After a successful renaming, it will attempt to join the specified domain. If everything goes well, your computer will restart, and upon reboot, it will be part of the domain with the new name.
Ensuring Successful Domain Join
After running the command, it’s crucial to verify that the computer has successfully joined the domain. You can do this by using the following command:
Get-ComputerInfo | Select-Object -Property CsName, Domain
Output:
CsName         Domain
-------        -------
NewComputerName YourDomainName
This command retrieves the computer’s information, showing the current name and the domain it’s joined to. If the output reflects your new computer name and the correct domain, you’ve successfully completed the task!
In cases where the domain join fails, check your network connection and ensure that the domain controller is reachable. Additionally, confirm that the credentials provided have the necessary permissions to add computers to the domain.
Troubleshooting Common Issues
While the process is generally straightforward, you might encounter some issues along the way. Here are a few common problems and their solutions:
- Invalid Credentials: Ensure that the username and password provided in the
-Credentialparameter are correct and have the necessary permissions. - Network Issues: If the computer cannot reach the domain controller, check your network settings and ensure that the computer is connected to the correct network.
- Firewall Settings: Sometimes, firewall settings can block communication with the domain controller. Ensure that the necessary ports are open for domain communication.
By keeping these troubleshooting tips in mind, you can quickly resolve any issues that may arise during the renaming and domain-joining process.
Conclusion
Renaming a computer and joining it to a domain using PowerShell is not only efficient but also a great way to manage your systems effectively. With just a few commands, you can streamline your workflow and ensure that your machines are properly configured. Whether you’re managing a single computer or a fleet of devices, mastering PowerShell can significantly enhance your productivity. Remember to verify your changes and troubleshoot any potential issues to ensure a smooth transition. Happy computing!
FAQ
-
How do I open PowerShell with administrative privileges?
Right-click on the Start menu and select “Windows PowerShell (Admin)” or search for PowerShell in the Start menu, right-click it, and select “Run as administrator.” -
Can I rename the computer without joining a domain?
Yes, you can use theRename-Computercommand without the domain parameters to simply rename your computer. -
What should I do if the domain join fails?
Check your network connection, verify the credentials, and ensure that your firewall settings allow communication with the domain controller. -
Is it necessary to restart the computer after renaming it?
Yes, a restart is required for the changes to take effect. -
Can I run these commands remotely?
Yes, you can use PowerShell remoting to execute these commands on remote computers if you have the necessary permissions.
Enjoying our tutorials? Subscribe to DelftStack on YouTube to support us in creating more high-quality video guides. Subscribe