
How to Fix Mouse Input not Captured on Hyper-V?
If your mouse input is not being captured in Hyper-V, you can try the following solutions to fix the issue:-
Check your Hyper-V settings: Ensure the “Enhanced Session Mode” option is enabled in the Hyper-V settings. To do this, open the Hyper-V Manager, right-click on the virtual machine in question, select “Settings,” click on “Enhanced Session Mode” in the left-hand menu, and ensure that the “Use enhanced session mode” checkbox is selected.
Update your Hyper-V Integration Services: Ensure that the Integration Services are up to date by running Windows Update on the virtual machine.
Restart the Hyper-V Virtual Machine Management service: Open the Services app on your virtual machine, locate the “Hyper-V Virtual Machine Management” service, right-click, and select “Restart.”
Install or update the Virtual Machine Connection application: You can download and install the latest version of the Virtual Machine Connection application from the Microsoft Download Center.
Disable mouse integration: If none of the above solutions work, try disabling mouse integration in the Hyper-V settings. To do this, open the Hyper-V Manager, right-click on the virtual machine, select “Settings,” click on “Integration Services” in the left-hand menu, uncheck “Mouse Services” in the right-hand pane, and click on “OK.”
By trying these solutions, you should be able to fix the issue of mouse input not being captured in Hyper-V. For more details, watch the above video.
If you encounter the issue of “Mouse input not captured” while using a Hyper-V virtual machine, this article can provide you with some helpful solutions. Regardless of which operating system you have installed on the Hyper-V, the solutions are the same.
This error typically appears when you start the virtual machine and hover your mouse over the mouse icon in the bottom-right corner. The problem mainly occurs when you enable Enhanced Session mode, which is linked to RDP and can block users from using the mouse in their virtual environment.
To fix the “Mouse input not captured” issue on Hyper-V in Windows 11/10, you can follow these tips:
1. Disable Enhanced Session Mode
To turn off Enhanced Session mode in Hyper-V,
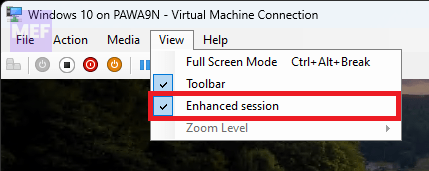
1. Start the virtual machine first, and then click on the “View” option in the top menu bar.
2. Unselect the Enhanced Session option to disable it immediately.
However, if you want to disable Enhanced Session Mode for the selected virtual machine entirely, you need to shut down the virtual machine first.
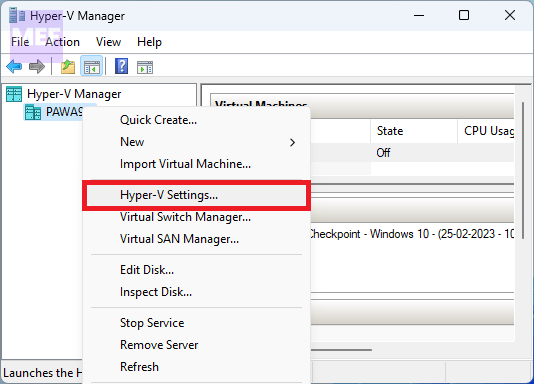
1. Click on the Hyper-V Settings option by right-clicking your Hyper-V server in the left pane.
2. Switch to the Enhanced Session Mode tab under the User section.
3. Untick the Use enhanced session mode checkbox.
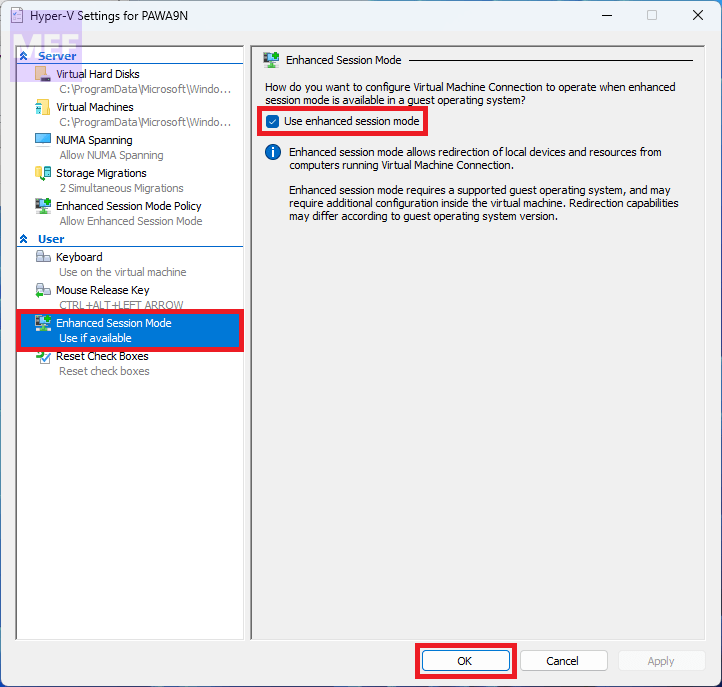
4. Then, click the OK button and restart your virtual machine.
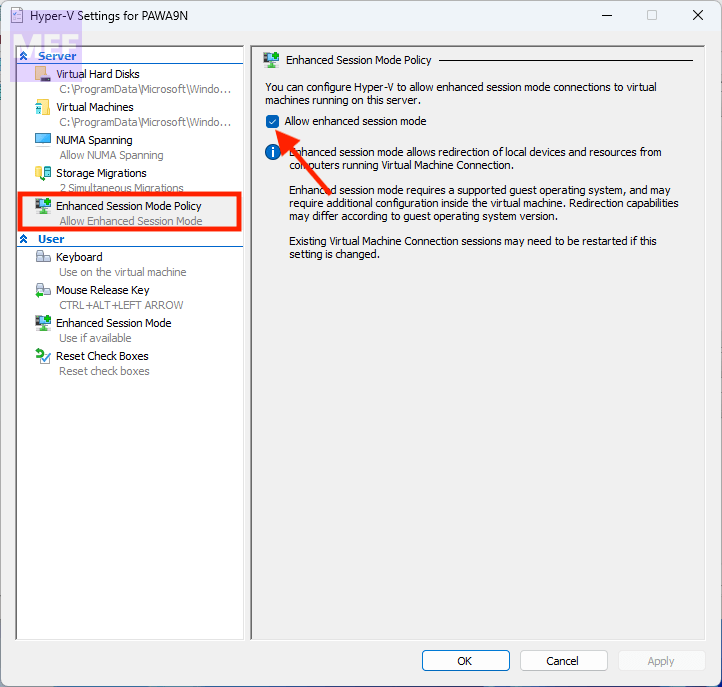
If you want to disable Enhanced Session mode for the server,
5. You need to go to the “Enhanced Session Mode Policy” tab and uncheck the “Allow enhanced session mode” option.
6. Finally, click the “OK” button and restart your virtual machine.
2. Install Virtual PC Integration Components
For old Hyper-V users (Windows XP), the solution is to install Virtual PC Integration Components. To do so,
1. Click on the “Settings” option from the right-click context menu of your virtual machine.
2. Then go to the Management tab and select Integration Services to start the installation process.
Alternatively, you can also find this option at Tools > Integration Services.
To capture mouse input in Hyper-V, turn off the Enhanced Session feature, which could be causing the issue. Open the “View” menu and uncheck the Enhanced Session option.
To enable your mouse on a virtual machine, especially on Hyper-V, turn off the Enhanced Session option as it is linked to RDP or Remote Desktop Protocol, which may cause problems on your computer.
Also Read:
- Fix: Msinfo32 Can’t Collect Information (msinfo32.exe Not Working)
- Fix “No driver was found that can be installed on the current device. Exit Code 8” on Windows
- Fix PxHIpa64.sys Memory Integrity Incompatible Drivers Error
- 5 Ways to Fix Windows 11 Mail App Showing HTML Code
- How to Enable and Use Tabs in Notepad on Windows 11
Learn how to fix the problem of mouse cursor going outside the virtual machine window in Hyper-V and how to enable real mouse input for better gaming experience.
Hyper-V is a virtualization technology that allows you to create and run virtual machines on your Windows 10 computer. However, some users may encounter mouse issues when using Hyper-V, such as the mouse cursor going outside the virtual machine window or the mouse input not being captured correctly by the virtual machine. In this article, we will show you how to fix these mouse issues in Hyper-V virtual machines and how to enable real mouse input for playing games in Hyper-V.
Mouse Cursor Goes Outside the Virtual Machine Window
One of the common mouse issues in Hyper-V is that the mouse cursor goes outside the virtual machine window when you move it. This can be annoying and inconvenient, especially if you want to switch between the host and the guest systems. The reason for this issue is that Hyper-V uses a mouse synchronization driver to pass the mouse movements from the host to the guest system. This driver detects whether the host mouse cursor is moving on the VM’s screen and then moves the guest mouse cursor accordingly. However, this driver does not lock the host mouse cursor inside the VM’s window, so it can still go outside the window.
The solution for this issue is to enable the mouse integration feature in Hyper-V. This feature allows you to use the mouse seamlessly between the host and the guest systems without having to manually grab the window. To enable the mouse integration feature, follow these steps:
- Open Hyper-V Manager and select the virtual machine that you want to connect to.
- Click on Connect to open the VMConnect window.
- Click on View and then select Enhanced Session Mode.
- If you see a message that says “Enhanced session mode is not available”, you need to enable it on the host computer first. To do that, go to Hyper-V Manager, select the host computer name, click on Hyper-V Settings, and then check the box that says “Allow enhanced session mode” under both Server and User sections.
- After enabling the enhanced session mode, you should see a message that says “Enhanced session mode is available” in the VMConnect window. Click on Connect to start the enhanced session mode.
- You should now be able to use the mouse smoothly between the host and the guest systems without the mouse cursor going outside the virtual machine window.
Mouse Input Not Captured Correctly by the Virtual Machine
Another mouse issue in Hyper-V is that the mouse input is not captured correctly by the virtual machine, especially when playing games. For example, you may experience problems such as the mouse cursor spinning around in circles, the mouse sensitivity being too high or too low, or the mouse buttons not working properly. The reason for this issue is that Hyper-V does not capture the real mouse input from the host system, but instead processes it through the virtual machine to make the mouse movement smoother. However, this can cause problems for some games that require precise and accurate mouse input.
The solution for this issue is to enable the USB passthrough feature in Hyper-V. This feature allows you to connect a USB device directly to the virtual machine, bypassing the host system. This way, the virtual machine can capture the real mouse input from the USB device and use it for the games. To enable the USB passthrough feature, follow these steps:
- Open Hyper-V Manager and select the virtual machine that you want to connect to.
- Click on Settings and then select Integration Services from the left pane.
- Uncheck the box that says “Guest services” and then click on OK.
- Click on Connect to open the VMConnect window.
- Click on Action and then select Insert Integration Services Setup Disk. This will mount a virtual CD-ROM drive in the virtual machine that contains the integration services setup files.
- Log in to the virtual machine and open the File Explorer. You should see a CD-ROM drive with the label “Integration Services Setup Disk”.
- Double-click on the CD-ROM drive and then run the setup.exe file. This will install the integration services on the virtual machine. You may need to restart the virtual machine after the installation is complete.
- After restarting the virtual machine, you should see a message that says “Enhanced session mode is available” in the VMConnect window. Click on Connect to start the enhanced session mode.
- You should now be able to use the USB passthrough feature in Hyper-V. To connect a USB device to the virtual machine, click on View and then select Show Options. In the Local Resources tab, click on More and then check the box that corresponds to the USB device that you want to connect. Click on OK and then click on Connect. The USB device should now be available in the virtual machine and you should be able to use it for the games.
Frequently Asked Questions (FAQs)
Question: How do I enable Hyper-V on Windows 10?
Answer: To enable Hyper-V on Windows 10, you need to have a 64-bit processor that supports virtualization and at least 4 GB of RAM. You also need to enable the virtualization feature in your BIOS or UEFI settings. To enable Hyper-V on Windows 10, follow these steps:
- Open the Control Panel and click on Programs.
- Click on Turn Windows features on or off.
- Check the box that says Hyper-V and then click on OK.
- Restart your computer to complete the installation.
Question: How do I create a virtual machine in Hyper-V?
Answer: To create a virtual machine in Hyper-V, follow these steps:
- Open Hyper-V Manager and click on New and then select Virtual Machine.
- Follow the wizard to specify the name, location, generation, memory, network, disk, and operating system of the virtual machine.
- Click on Finish to create the virtual machine.
- To start the virtual machine, select it from the Hyper-V Manager and then click on Start.
- To connect to the virtual machine, select it from the Hyper-V Manager and then click on Connect.
Summary
In this article, we have shown you how to fix the mouse issues in Hyper-V virtual machines and how to enable real mouse input for playing games in Hyper-V. We have explained the causes and the solutions for the mouse cursor going outside the virtual machine window and the mouse input not being captured correctly by the virtual machine. We have also provided the steps to enable the mouse integration and the USB passthrough features in Hyper-V. We hope this article has been helpful and informative for you. If you have any questions or feedback, please feel free to leave a comment below.
Disclaimer: This article is for informational purposes only and does not constitute professional advice. We are not responsible for any damages or losses that may result from following the instructions or using the tools mentioned in this article. Please use them at your own risk and discretion.
When it comes to virtualization platforms, Microsoft’s Hyper-V has been a stalwart choice for professionals and enterprises alike. However, users often encounter various issues while working with Hyper-V, one of which is the frustrating problem of mouse input not being captured in Windows 11 or 10 virtual machines (VMs). This issue can severely hamper productivity, especially for users who rely on the graphical interface for operations.
In this article, we will explore the potential causes of the mouse input capture issue in Hyper-V, troubleshoot the problem, and provide detailed solutions to regain full mouse functionality in your virtual environment.
Understanding Hyper-V and Its Mouse Integration
Hyper-V is a type 1 hypervisor developed by Microsoft that enables multiple operating systems to run concurrently on a host computer. It provides services to manage the guest operating systems, including memory management, process scheduling, and I/O management. One critical aspect of this interaction is the integration of mouse input between the host and the guest OS.
Mouse integration is typically managed through a set of drivers and services designed to allow seamless control of the mouse pointer across the virtual environment. However, issues can arise, resulting in a non-responsive or poorly functioning mouse.
Common Causes of Mouse Input Issues in Hyper-V
Before diving into solutions, let’s review some common reasons why mouse input may not be captured effectively in Hyper-V:
-
Outdated Integration Services: Hyper-V utilizes integration services (or enhancements) that improve the interaction between the host and guest OS. If these services are outdated or not installed, users may face problems with mouse input.
-
VM Configuration Issues: The configuration settings established when creating the VM can impact mouse functionality. For instance, using the default settings may not always work optimally.
-
Graphics Driver Issues: Problems with the graphics drivers on either the host or guest OS can interfere with mouse input capture.
-
Remote Desktop Connection Settings: If you’re accessing the Hyper-V VM via Remote Desktop Protocol (RDP) or using a different remote access method, specific settings might hinder mouse input.
-
Hyper-V Mouse Integration Disabled: Sometimes, the mouse integration feature might be turned off in the VM settings, causing delays or failure in mouse input capture.
-
Resource Limitations: If the host system is overloaded or running low on resources (CPU, RAM), it can affect the performance of the VM, including mouse functionality.
-
Windows Update Issues: Updates to Windows 10 or 11 can impact virtualization performance if the Hyper-V feature or integration services are not appropriately updated afterward.
Troubleshooting Steps for Hyper-V Mouse Input Problems
Now that we understand the potential causes, let’s move on to some actionable steps to troubleshoot and fix the mouse input capture issue in Hyper-V.
Step 1: Check Integration Services
- Open Hyper-V Manager: Start by running the Hyper-V Manager utility from the Windows Start Menu.
- Select Your Virtual Machine: Locate the VM experiencing mouse issues and right-click on it.
- Configuration Options: Select “Settings” to check the configuration window.
- Integration Services: Look for the «Integration Services» section and ensure that the «Mouse integration» option is checked. If it’s not enabled, you will need to enable it and restart the VM.
If the integration services are outdated, you can update them through the Hyper-V Manager.
Step 2: Update Hyper-V and Windows
-
Windows Updates: Ensure your host operating system is up to date by going to Settings > Update & Security > Check for updates. Install any pending updates.
-
Hyper-V Update: Within the Windows update, check if there are any specific updates related to Hyper-V or the Windows Server roles. Install those updates, as they may contain crucial fixes for any known bugs.
Step 3: Reinstall Hyper-V Guest Services
The Hyper-V Guest Services enable the host to communicate with the guest VM effectively.
-
Open the VM Console: Start the VM in question.
-
Install or Repair Integration Services: Navigate to the guest operating system and reinstall or repair the integration services. For Windows 10 or 11, you may need to navigate to the Settings app and look for Update & Security > Windows Update to acquire any additional features available.
-
Force a Reconnection: After the integration services are installed or repaired, disconnect and reconnect the VM.
Step 4: Configure VM Settings
-
Adjust Memory and Resources: Make sure your VM is allocated sufficient memory and CPU resources. An under-resourced VM can lead to freezing or unresponsive input.
-
Check VM Display Settings: Within the VM settings in Hyper-V Manager, ensure that you have the video memory set to an optimal level and that the correct adapter is chosen when using monitors.
-
Enable Enhanced Session Mode: Enhanced Session Mode enhances integration and can improve mouse input handling. Enable it by:
- Opening Hyper-V Manager and clicking on “Hyper-V Settings” (found on the right pane)
- Enable «Enhanced Session Mode» in both the server and user settings
Step 5: Remote Access Considerations
If you’re using RDP to access your VM, ensure the following:
- RDP Settings: When setting up a remote session with your Hyper-V VM, configure the remote settings to ensure that the mouse is passed through properly.
- Use «mstsc» Commands: When connecting via Remote Desktop, use the «mstsc» command and click on Options before connecting. Make sure that the local resources tab has the settings configured to allow mouse usage.
Step 6: Restart Virtual Services
Sometimes, simply restarting the virtual machine services can resolve temporary glitches:
- Open the Services Manager: Type «services.msc» into the Run dialog (Win + R).
- Find Hyper-V Services: Look for Hyper-V services such as “Hyper-V Virtual Machine Management” and “Hyper-V Host Compute Service.”
- Restart Services: Right-click on the relevant service and choose to restart it.
Step 7: Verify Host Environment
Ensure that your hardware environment meets the specifications required to run Hyper-V properly:
- Check CPU Compatibility: Ensure that your CPU supports virtualization (VT-x for Intel, AMD-V for AMD).
- Verify BIOS/UEFI Settings: Access your BIOS and ensure that virtualization support is enabled.
- Review Other Software Conflicts: Sometimes other virtualization software (like VMware or VirtualBox) may interfere with Hyper-V. Try disabling or uninstalling these applications if they coexist with Hyper-V.
Conclusion
Dealing with mouse input capture issues in Hyper-V on Windows 10 or 11 can be a source of frustration for many users. However, with a systematic approach to troubleshooting, you can resolve such challenges effectively. By ensuring that integration services are up to date, configuring the VM settings correctly, and taking care of remote access considerations, users can restore smooth mouse functionality in their virtual machines.
If the problem persists even after trying the above suggestions, it may be necessary to research more specific logs or errors within Hyper-V, or consult Microsoft’s support channels for further assistance.
Every problem has a solution, and with patience and the right steps, you can turn to your Hyper-V VMs without the nuisance of input capture issues once and for all.
I installed a Windows 2003 SP1 Virtual Machine on Microsoft Hyper-V 2008 R2 and faced Mouse Input not captured error. Meanwhile, after doing some research, I concluded that I need to install Integration Services from the following path on my newly built Windows Virtual Machine (VM). Moreover, Mouse Input not captured on Hyper-V required below integration service installed.
Click Action > Insert Integration Services Setup Disk.
Subsequently, after the message in bottom or a popup, reboot your system. Then you will be able to use mouse inside the VM properly.
Integration Services & Service Pack
Equally Important: Mouse Input not captured on Hyper-V can be resolved with integration services installed on your operating system. Hence, Windows Server 2003 required Service Pack 2 for the installation of integration services.
Solution: Mouse Input not captured
For Network Access, you need to shut down your VM and have to add “Legacy Network Adaptor“.
- Once you click on add, you will notice that a “Legacy Network Adapter” is appears in your side panel.
- By Default in Network selection menu, it shows “Not Connected“. You need to select a network card here.
- You can boot your VM, and you will be able to access network, if there is a DHCP to assign IP Address. Otherwise, you need to manually assign IP address to your NIC.
- Now, you are free to access your Network. After Installation of Services Pack and restart of your VM, You can go for installation of “Integration Services“.
Meanwhile, Mouse Input not captured on Hyper-V error will be resolved and on guest VM, mouse will start working. You may notice that there are two Network Cards are available now. You may un-install your “Legacy Network Adaptor” but that need to shut down your VM. After, finishing above setup, You have a normal running VM. Hope this article will be helpful for you.