
Пароль не отвечает требованиям политики — как исправить?
При изменении пароля в Windows 11, Windows 10 или других версиях системы вы можете столкнуться с сообщением: «Введенный пароль не отвечает требованиям политики паролей. Проверьте минимальную длину пароля, его сложность, отличие от ранее использованных паролей». Текст сообщения может варьироваться, в зависимости от того, какой именно способ вы будете использовать для изменения пароля Windows.
В этой инструкции подробно о том, как отключить требования к паролям в Windows путем настройки соответствующих политик безопасности. Способы приведены для компьютера с личной учетной записью, а не для учетной записи домена, впрочем, логика остается той же и для этого сценария. На близкую тему: Способы изменить пароль Windows 11 и Windows 10.
О каких политиках паролей и требованиях идет речь

Сообщение «Введенный пароль не отвечает требованиям политики» появляется в ситуации, когда в политиках безопасности заданы какие-либо ограничения для паролей, а именно:
- Минимальная длина пароля
- Требования к сложности пароля, которые включают в себя:
- Пароль не должен содержать имя или часть имени пользователя.
- Пароль должен содержать не менее 6 символов
- Пароль должен содержать символы по меньшей мере трёх из следующих видов: прописные латинские буквы, строчные латинские буквы, цифры, символы (не являющиеся буквами или цифрами).
В большинстве случаев оказывается включенным вторая из двух политик. Есть и другие политики паролей, например, задающие максимальный срок их действия, но появляющееся сообщение в этом случае будет другим: Пароль просрочен и должен быть заменен.
Если у вас нет задачи отключать требования к паролям или речь идёт о компьютере организации, просто установите пароль, соответствующий указанным требованиям (об определении заданной минимальной длины пароля — далее в инструкции).
В ситуации, когда это ваш личный компьютер, вы можете отключить требования к паролям несколькими способами.
Как отключить требования политики безопасности к паролям
Есть несколько способов отключения требований политики безопасности, относящихся к паролям. Основной — использование оснастки «Локальная политика безопасности». Шаги будут следующими:
- Нажмите клавиши Win+R на клавиатуре (или нажмите правой кнопкой мыши по кнопке «Пуск» и выберите пункт «Выполнить»), введите secpol.msc и нажмите Enter.
- Перейдите в раздел «Политики учетных записей» — «Политика паролей». По умолчанию, без настроенных ограничений все значения должны выглядеть как на изображении ниже.

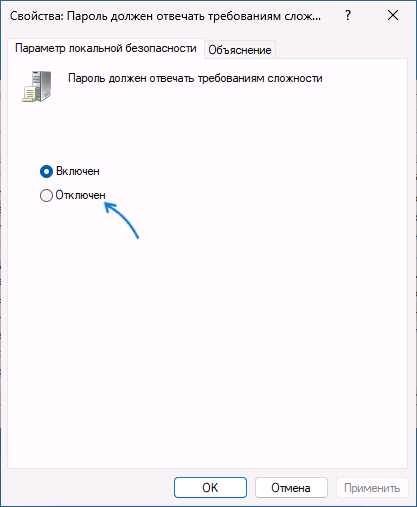
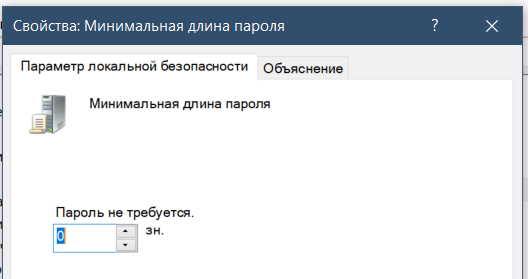
- Если вы видите, что настроена минимальная длина пароля (значение отличается от 0) или включена политика «Пароль должен отвечать требованиям сложности», дважды нажмите по такой политике и измените значение на 0 или «Отключен» соответственно.

- Примените сделанные настройки.

Вторая возможность — использование Windows PowerShell. Отключить требования к минимальной длине пароля можно следующим образом:
- Запустите PowerShell или Терминал Windows от имени Администратора. Сделать это можно через меню по правому клику на кнопке Пуск.
- Введите команду net accounts и проверьте, установлена ли минимальная длина пароля.
- Если значение задано, используйте команду
net accounts /minpwlen:0
чтобы отключить требования к длине пароля.


Настроить требования политики к сложности пароля с помощью net accounts не получится, но можно использовать следующий набор команд:
secedit /export /cfg c:\edit.cfg
((get-content c:\edit.cfg) -replace ('PasswordComplexity = 1', 'PasswordComplexity = 0')) | Out-File c:\edit.cfg
secedit /configure /db $env:windir\security\edit.sdb /cfg c:\edit.cfg /areas SECURITYPOLICY
rm c:\edit.cfg

Также на эту тему может быть полезным: Как сбросить локальные групповые политики и политики безопасности в Windows.
Салимжанов Р.Д
Настройка парольной политики в Windows 10 важна для обеспечения безопасности вашего устройства и данных. Включение и соблюдение парольных политик помогают защитить ваш компьютер от несанкционированного доступа и предотвратить утечку конфиденциальных данных.
Для настройки парольной политики в Windows 10, можно использовать инструменты локальной групповой политики или через Windows PowerShell.
Чтобы настроить парольную политику через локальную групповую политику, выполните следующие шаги:
Нажмите Win + R, чтобы открыть окно «Выполнить», введите gpedit.msc и нажмите Enter.
В локальной групповой политике перейдите в «Конфигурация компьютера», «Настройки Windows», «Параметры безопасности», «Политика паролей».
В этом разделе мы можем настроить различные параметры парольной политики, такие как минимальная длина пароля, требования к сложности пароля, максимальный период действия пароля и другие.
Давайте немного поиграемся и выставим параметры.
Минимальная длина пароля:
Число уникальных паролей:
Сложность пароля:
Если вдруг, кто-либо не понимает какой-либо из параметров window прекрасным образом предоставил кнопочку “Объяснение”, где о каждом из них можно прочитать.
Запускаем PowerShell Windows от имени Администратора.
Далее прописываем команду net accounts, она используется для просмотра и конфигурирования политик учетных записей в домене. С помощью этой команды можно просмотреть текущие настройк�� политик учетных записей, такие как минимальная и максимальная длина пароля, время протухания пароля и другие параметры.
А далее пользуемся командами для настройки парольной политике:
— minpwlen: Этот параметр определяет минимальную длину пароля, которая должна быть установлена для пользователей. Например, net accounts /minpwlen:8 устанавливает минимальную длину пароля равной 8 символам.
— maxpwage: Этот параметр определяет максимальный возраст пароля, после которого пользователь должен его изменить. Например, net accounts /maxpwage:90 устанавливает максимальный возраст пароля в 90 дней.
— minpwage: Этот параметр определяет минимальный возраст пароля, после которого пользователь может его изменить. Например, net accounts /minpwage:1 устанавливает минимальный возраст пароля в 1 день.
— uniquepw: Этот параметр определяет, можно ли использовать предыдущие пароли при изменении пароля. Значение yes означает, что предыдущие пароли запрещены, а no — что позволяется использовать предыдущие пароли. Например, net accounts /uniquepw:yes запрещает использование предыдущих паролей.
Пример роботы net accounts /minpwlen:8
Ну вроде все, здесь все очень легко. Точно также можно настроить политику паролей на сервере Windows 19.
В целом, настройка парольной политики в Windows способствует обеспечению безопасности вашего устройства и данных и является важным элементом защиты в мире цифровых технологий.
1) Пароль не отвечает требованиям политики — как исправить? // [электронный ресурс]. URL: https://remontka.pro/password-doesnt-meet-requirements/ (дата обращения 24.07.2024).
3) Настройка AD GP: Тонкая настройка политики паролей в домене Active Directory // [электронный ресурс]. URL: https://www.youtube.com/watch?v=zQeliHLUdQI (дата обращения 24.07.2024).
При попытке поменять пароль в Windows 10 или Windows 11 может возникать проблема, из-за которой возникают сложности. При этом неудачная попытка смены пароля сопровождается сообщением о том, что введенный пароль не соответствует требованиям политики паролей.
Политика паролей
В названных выше операционных системах была введена функция, призванная улучшить безопасность своих пользователей. Суть её заключается в том, что существует набор правил, которым пользователь должен следовать при создании пароля. Компьютер не позволяет создать пароль в том случае, если он не соответствует данной политике.
Список правил следующий:
- Пароль не должен содержать имя пользователя или его часть. При этом если пароль короче трех символов, то проверка пропускается.
- Пароль должен содержать цифры, специальные символы, буквы разных регистров.
- Пароль не должен совпадать с предыдущими.
Такая мера безопасности принуждает пользователей создавать надежные пароли, что повышает уровень безопасности.
Как отключить политику паролей?
Если вы решите отключить политику паролей, вам нужно сделать следующее:
1. Нажмите Win + R, введите secpol.msc и нажмите Enter.

2. Перейдите в раздел Политика учетных записей – политика паролей. Здесь можно увидеть все настройки политики паролей и изменить их.

3. Нажмите дважды левой кнопки мыши на Минимальная длина пароля и в открывшемся окне введите в поле 0, а после нажмите ОК.
4. Аналогично сделайте с разделом Пароль должен отвечать требованиям сложности, выбрав Отключен.

После этого можно не беспокоиться о соблюдении политики паролей.
Заключение
Политика паролей – это мера защиты пользователей. Она вынуждает создавать надежный пароль, который будет сложно взломать, а сообщение о несоответствии пароля этой политике – лишь предупреждение пользователя. Её можно отключить, однако тогда становится возможным создание ненадежного пароля, поэтому стоит дважды подумать перед тем, как это сделать.
- Updated on May 19, 2024
- Microsoft 365
The users want to change their password in their Microsoft 365 account settings. After they enter a new password, an error appears: Your password does not meet policy requirements. Enter a different password. Why is this happening, and what is the solution to this error? In this article, you will learn how to fix the Password Reset error.
Table of contents
- Your password does not meet policy requirements
- Solution to Your password does not meet policy requirements error
- Test password change
- Conclusion
The users are synced from on-premises to Microsoft 365. When they go to aka.ms/mysecurity and change their password, it sometimes works, and sometimes they get an error:
Your password does not meet policy requirements. Enter a different password.

Why is this happening, and what is the solution to this error?
Solution to Your password does not meet policy requirements error
Password policies in the on-premises AD DS environment may prevent password resets from being correctly processed. Go to the on-premises Password Policy in Group Policy Management and check the settings.
In our case, the users successfully changed their password in Microsoft online account settings. However, they want to change the password again within 24 hours. They get the error because the password policy is, by default, set to 1 day.
If you did follow the article Enable Microsoft Entra Self-Service Password Reset (SSPR), this error would not appear because the last step shows to configure the minimum password age policy.
- Sign in to the Domain Controller
- Start Group Policy Management Console (gpmc.msc)

- Browse to Computer Configuration > Policies > Windows Settings > Security Settings > Account Policies > Password Policy
- Double-click on the policy Minimum password age

- Set it it 0 days
Note: The group policy for Minimum password age must be set to 0 days for password writeback to work most efficiently.

- Verify that the Minimum password age policy is set to 0 days

- Run Command Prompt as administrator and use the gpupdate /force command
gpupdate /forceTest password change
Go to aka.ms/mysecurity and change the password. Once done, the message Success, password changed appears.

That’s it!
Read more: Configure Microsoft Entra Password Protection for on-premises »
Conclusion
You learned how to fix your password does not meet policy requirements error. Check your on-premises group policies and ensure the minimum password age policy setting is set to 0 days. If you have set different policy settings that will not let users change their passwords, you might want to adjust them or let the user know why it’s happening. After that, users can change their passwords without getting the error.
Did you enjoy this article? You may also like Get MFA status in Microsoft Entra and PowerShell. Don’t forget to follow us and share this article.
ALI TAJRAN is a passionate IT Architect, IT Consultant, and Microsoft MVP. He started Information Technology at a very young age, and his goal is to teach and inspire others. Read more »
Unable to change Windows password and keep getting the error “The password you typed does not meet the password policy requirements“? How to make the system lock your account when a hacker tries to guess your password continuously? In this guide we’ll show you how to change the account lockout and password complexity requirement policy from Command Prompt, Local Security Policy Editor, or by exporting / importing your policy. These methods work on Windows 10, 8, 7, Vista and XP.
- Part 1: Local Security Policy
- Part 2: Change Password Complexity Requirement Policy
- Part 3: Change Account Lockout Policy
- Part 4: Change Local Security Policy by Exporting and Importing
Local Security Policy
Local Security Policy allows enforcing many system-wide, user and security-related settings, such as password policy, account lockout policy, audit policy and user rights.
When you want change a security setting this is how you launch the Local Security Policy Editor:
- Press the Windows key + R to bring up the Run box.
- Type secpol.msc and hit Enter.
When the Local Security Policy Editor opens, you can navigate to the security policy you’re interested.
Note that the Local Security Policy Editor is not available on the Home edition of Windows. So if you’re running Windows 10/8/7/Vista/XP Home, you have to change the local security policy from Command Prompt.
Change Password Complexity Requirement Policy
In the left pane of Local Security Policy Editor, expand Account Policies and then click Password Policy. In the right pane you see a list of password policy settings. Double-click on the policy you want to modify, it will open the Properties box and you can change the setting to desired value.
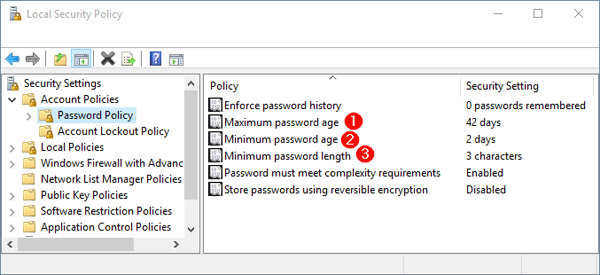
- Maximum password age
Set the maximum number of days that a password is valid. After this number of days, the password is expired and Windows will force you to change the password at the next logon. You can set the Maximum password age between 1 and 999, or set it to 0 so your password will never expire. - Minimum password age
This security setting determines the period of time (in days) that a password must be used before the user can change it. You can set a value between 1 and 998 days, or set it to 0 for allowing to change password anytime. This policy allows you to limit how frequently a user may change the password.
Note: The Minimum password age must be less than the Maximum password age, unless the Maximum password age is set to 0. - Minimum password length
Specify the least number of characters a password can have. You can set a value of between 1 and 14 characters, or set to 0 if you allow blank password. This policy can reject a user to set a short password that does not meet a minimum password length. For security reasons you’ll generally want passwords of at least six characters because long passwords are usually harder to crack than short ones. - Password must meet complexity requirements
If this policy is enabled, passwords must meet the following minimum requirements:- Be at least six characters long
- Contain a combination of at least three of the following characters: uppercase letters, lowercase letters, numbers, symbols (punctuation marks)
- Don’t contain the user’s user name or screen name
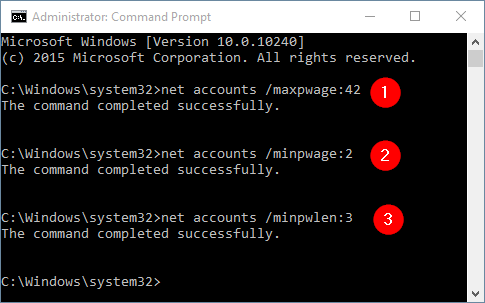
You can also change the password policy from an elevated Command Prompt. This is especially useful if you’re running Windows Home edition.
For example, if you want to change Maximum password age to 42 days, type the command:
net accounts /maxpwage:42
Set Minimum password age to 2 days, type:
net accounts /minpwage:2
Set Minimum password length to 3 characters, type:
net accounts /minpwlen:3
Change Account Lockout Policy
In the left pane of Local Security Policy Editor, expand Account Policies and then click Account Lockout Policy. In the right pane you see three policy settings. Double-click on the policy and you can change the setting to desired value.
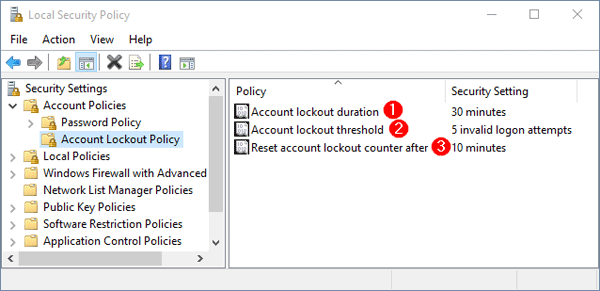
- Account lockout duration
Specify the number of minutes that a locked account remains inaccessible before it automatically becomes unlocked. You can set the account lockout duration between 1 and 99,999 minutes. If you set it to 0, then a locked out account will remain locked until an administrator manually unlocks that account. This policy has to set along with Account lockout threshold policy. - Account lockout threshold
Set the number of invalid logon attempts that are allowed before an account becomes locked out. The lockout threshold can be set to any value from 0 to 999. If the lockout threshold is set to zero, accounts will never be locked out due to invalid logon attempts. - Reset account lockout counter after
Specify the time (in minutes) that must elapse after a failed logon attempt before logon attempt counter is reset to 0. The available range is 1 minute to 99,999 minutes.Note: The Account lockout duration must be greater than or equal to the Reset account lockout counter after time.
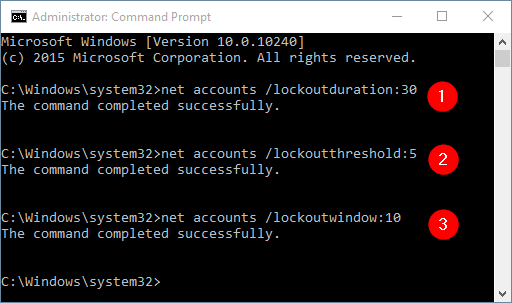
Here is how you can change the account lockout policy from an elevated Command Prompt.
For example, if you want to set Account lockout duration to 30 minutes, type:
net accounts /lockoutduration:30
Set Account lockout threshold to 5 bad logon attempts, type:
net accounts /lockoutthreshold:5
Set Reset account lockout counter after to 10 minutes, type:
net accounts /lockoutwindow:10
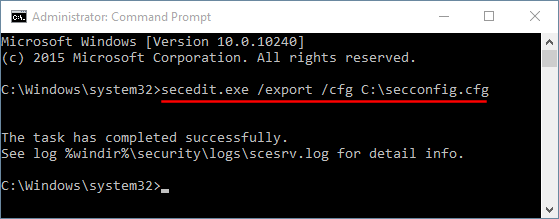
Change Local Security Policy by Exporting and Importing
How to copy local group policy objects from one machine to another? Is it possible to disable the “Password must meet complexity requirements” policy using Command Prompt? All these can be achieved by exporting & importing the local security policy. Here’s how:
- Open an elevated Command Prompt.
- Type the following command and press Enter. This will export all the settings of local security policy to a text file.
secedit.exe /export /cfg C:\secconfig.cfg
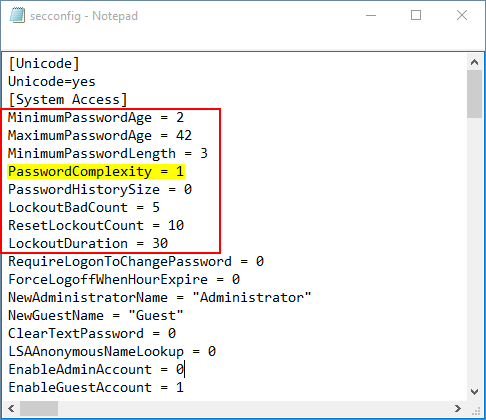
- Open the C:\secconfig.cfg file with NotePad and you can view and modify the policy for your own purpose. For example, if you want to disable the password complexity requirements policy, just set the value PasswordComplexity to 0 and save your changes.

- Type the following command to import the local security policy from the file C:\secconfig.cfg. Of course, you can move the secconfig.cfg file to another computer and then import the policy.
secedit.exe /configure /db %windir%\securitynew.sdb /cfg C:\secconfig.cfg /areas SECURITYPOLICY - Restart your computer and the imported security policy will take effect.
- Previous Post: How to Turn on / off Adaptive Brightness in Windows 10 / 8
- Next Post: How to Restore Local Security Policy to Default in Windows 10, 8, 7, Vista and XP