
Quick Start
Try Vue Online
-
To quickly get a taste of Vue, you can try it directly in our Playground.
-
If you prefer a plain HTML setup without any build steps, you can use this JSFiddle as your starting point.
-
If you are already familiar with Node.js and the concept of build tools, you can also try a complete build setup right within your browser on StackBlitz.
Creating a Vue Application
Prerequisites
- Familiarity with the command line
- Install Node.js version 18.3 or higher
In this section we will introduce how to scaffold a Vue Single Page Application on your local machine. The created project will be using a build setup based on Vite and allow us to use Vue Single-File Components (SFCs).
Make sure you have an up-to-date version of Node.js installed and your current working directory is the one where you intend to create a project. Run the following command in your command line (without the $ sign):
sh
$ npm create vue@latestThis command will install and execute create-vue, the official Vue project scaffolding tool. You will be presented with prompts for several optional features such as TypeScript and testing support:
✔ Project name: … <your-project-name>
✔ Add TypeScript? … No / Yes
✔ Add JSX Support? … No / Yes
✔ Add Vue Router for Single Page Application development? … No / Yes
✔ Add Pinia for state management? … No / Yes
✔ Add Vitest for Unit testing? … No / Yes
✔ Add an End-to-End Testing Solution? … No / Cypress / Nightwatch / Playwright
✔ Add ESLint for code quality? … No / Yes
✔ Add Prettier for code formatting? … No / Yes
✔ Add Vue DevTools 7 extension for debugging? (experimental) … No / Yes

Scaffolding project in ./<your-project-name>...
Done.
If you are unsure about an option, simply choose No by hitting enter for now. Once the project is created, follow the instructions to install dependencies and start the dev server:
sh
$ cd <your-project-name>
$ npm install
$ npm run dev
You should now have your first Vue project running! Note that the example components in the generated project are written using the Composition API and <script setup>, rather than the Options API. Here are some additional tips:
- The recommended IDE setup is Visual Studio Code + Vue — Official extension. If you use other editors, check out the IDE support section.
- More tooling details, including integration with backend frameworks, are discussed in the Tooling Guide.
- To learn more about the underlying build tool Vite, check out the Vite docs.
- If you choose to use TypeScript, check out the TypeScript Usage Guide.
When you are ready to ship your app to production, run the following:
This will create a production-ready build of your app in the project’s ./dist directory. Check out the Production Deployment Guide to learn more about shipping your app to production.
Next Steps >
Using Vue from CDN
You can use Vue directly from a CDN via a script tag:
html
<script src="https://unpkg.com/vue@3/dist/vue.global.js"></script>Here we are using unpkg, but you can also use any CDN that serves npm packages, for example jsdelivr or cdnjs. Of course, you can also download this file and serve it yourself.
When using Vue from a CDN, there is no «build step» involved. This makes the setup a lot simpler, and is suitable for enhancing static HTML or integrating with a backend framework. However, you won’t be able to use the Single-File Component (SFC) syntax.
Using the Global Build
The above link loads the global build of Vue, where all top-level APIs are exposed as properties on the global Vue object. Here is a full example using the global build:
html
<script src="https://unpkg.com/vue@3/dist/vue.global.js"></script>

<div id="app">{{ message }}</div>

<script>
  const { createApp } = Vue

  createApp({
    data() {
      return {
        message: 'Hello Vue!'
      }
    }
  }).mount('#app')
</script>
CodePen Demo >
html
<script src="https://unpkg.com/vue@3/dist/vue.global.js"></script>

<div id="app">{{ message }}</div>

<script>
  const { createApp, ref } = Vue

  createApp({
    setup() {
      const message = ref('Hello vue!')
      return {
        message
      }
    }
  }).mount('#app')
</script>
CodePen Demo >
TIP
Many of the examples for Composition API throughout the guide will be using the <script setup> syntax, which requires build tools. If you intend to use Composition API without a build step, consult the usage of the setup() option.
Using the ES Module Build
Throughout the rest of the documentation, we will be primarily using ES modules syntax. Most modern browsers now support ES modules natively, so we can use Vue from a CDN via native ES modules like this:
html
<div id="app">{{ message }}</div>

<script type="module">
  import { createApp } from 'https://unpkg.com/vue@3/dist/vue.esm-browser.js'

  createApp({
    data() {
      return {
        message: 'Hello Vue!'
      }
    }
  }).mount('#app')
</script>
html
<div id="app">{{ message }}</div>

<script type="module">
  import { createApp, ref } from 'https://unpkg.com/vue@3/dist/vue.esm-browser.js'

  createApp({
    setup() {
      const message = ref('Hello Vue!')
      return {
        message
      }
    }
  }).mount('#app')
</script>
Notice that we are using <script type="module">, and the imported CDN URL is pointing to the ES modules build of Vue instead.
Enabling Import maps
In the above example, we are importing from the full CDN URL, but in the rest of the documentation you will see code like this:
js
import { createApp } from 'vue'We can teach the browser where to locate the vue import by using Import Maps:
html
<script type="importmap">
  {
    "imports": {
      "vue": "https://unpkg.com/vue@3/dist/vue.esm-browser.js"
    }
  }
</script>

<div id="app">{{ message }}</div>

<script type="module">
  import { createApp } from 'vue'

  createApp({
    data() {
      return {
        message: 'Hello Vue!'
      }
    }
  }).mount('#app')
</script>
CodePen Demo >
html
<script type="importmap">
  {
    "imports": {
      "vue": "https://unpkg.com/vue@3/dist/vue.esm-browser.js"
    }
  }
</script>

<div id="app">{{ message }}</div>

<script type="module">
  import { createApp, ref } from 'vue'

  createApp({
    setup() {
      const message = ref('Hello Vue!')
      return {
        message
      }
    }
  }).mount('#app')
</script>
CodePen Demo >
You can also add entries for other dependencies to the import map — but make sure they point to the ES modules version of the library you intend to use.
Import Maps Browser Support
Import Maps is a relatively new browser feature. Make sure to use a browser within its support range. In particular, it is only supported in Safari 16.4+.
Notes on Production Use
The examples so far are using the development build of Vue — if you intend to use Vue from a CDN in production, make sure to check out the Production Deployment Guide.
While it is possible to use Vue without a build system, an alternative approach to consider is using vuejs/petite-vue that could better suit the context where jquery/jquery (in the past) or alpinejs/alpine (in the present) might be used instead.
Splitting Up the Modules
As we dive deeper into the guide, we may need to split our code into separate JavaScript files so that they are easier to manage. For example:
html
<!-- index.html -->
<div id="app"></div>

<script type="module">
  import { createApp } from 'vue'
  import MyComponent from './my-component.js'

  createApp(MyComponent).mount('#app')
</script>
js
// my-component.js
export default {
  data() {
    return { count: 0 }
  },
  template: `<div>Count is: {{ count }}</div>`
}
js
// my-component.js
import { ref } from 'vue'
export default {
  setup() {
    const count = ref(0)
    return { count }
  },
  template: `<div>Count is: {{ count }}</div>`
}
If you directly open the above index.html in your browser, you will find that it throws an error because ES modules cannot work over the file:// protocol, which is the protocol the browser uses when you open a local file.
Due to security reasons, ES modules can only work over the http:// protocol, which is what the browsers use when opening pages on the web. In order for ES modules to work on our local machine, we need to serve the index.html over the http:// protocol, with a local HTTP server.
To start a local HTTP server, first make sure you have Node.js installed, then run npx serve from the command line in the same directory where your HTML file is. You can also use any other HTTP server that can serve static files with the correct MIME types.
You may have noticed that the imported component’s template is inlined as a JavaScript string. If you are using VS Code, you can install the es6-string-html extension and prefix the strings with a /*html*/ comment to get syntax highlighting for them.
Next Steps
If you skipped the Introduction, we strongly recommend reading it before moving on to the rest of the documentation.
Provide feedback
Saved searches
Use saved searches to filter your results more quickly
Sign up
Appearance settings
Vue.js предоставляет несколько способов для установки и создания приложения и быстрого запуска приложения.
Для этого должен быть установлен Node.js. Вы можете загрузить его с официального сайта https://nodejs.org/en/.
Теперь откроем терминал и выполним команду:
npm init vue@latest
По окончанию установки переходим в папку Vue.js приложения, устанавливаем зависимости и запускаем сборку в режиме разработки.
cd <your-project-name>
npm install
npm run dev
Если вы хотите быстро загрузить фреймворк CDN и начать пользоваться, или узнать детали установки, подробную и свежую информацию можно найти на официальном сайте vuejs.org
Vue.js is built by design to be incrementally adoptable. This means that it can be integrated into a project multiple ways depending on the requirements.
There are four primary ways of adding Vue.js to a project:
- Import it as a CDN package on the page
- Download the JavaScript files and host them yourself
- Install it using npm
- Use the official CLI to scaffold a project, which provides batteries-included build setups for a modern frontend workflow (e.g., hot-reload, lint-on-save, and much more)
Release Notes
Latest version:
Detailed release notes for each version are available on GitHub (opens new window).
Currently in Beta — Vuex and Router integration is still WIP
When using Vue, we recommend also installing the Vue Devtools (opens new window) in your browser, allowing you to inspect and debug your Vue applications in a more user-friendly interface.
Get the Chrome Extension (opens new window)
Get the Firefox Addon (opens new window)
Get the standalone Electron app (opens new window)
CDN
For prototyping or learning purposes, you can use the latest version with:
<script src="https://unpkg.com/vue@next"></script>
For production, we recommend linking to a specific version number and build to avoid unexpected breakage from newer versions.
Download and Self Host
If you want to avoid using build tools but can’t use a CDN in production then you can download the relevant .js file and host it using your own web server. You can then include it using a <script> tag, just like with the CDN approach.
The files can be browsed and downloaded from a CDN such as unpkg (opens new window) or jsDelivr (opens new window). The various different files are explained later but you would typically want to download both a development build and a production build.
npm
npm is the recommended installation method when building large scale applications with Vue. It pairs nicely with module bundlers such as webpack (opens new window) or Rollup (opens new window).
# latest stable
$ npm install vue@next
Vue also provides accompanying tools for authoring Single File Components (SFCs). If you want to use SFCs then you’ll also need to install @vue/compiler-sfc:
$ npm install -D @vue/compiler-sfc
If you’re coming from Vue 2 then note that @vue/compiler-sfc replaces vue-template-compiler.
In addition to @vue/compiler-sfc, you’ll also need a suitable SFC loader or plugin for your chosen bundler. See the SFC documentation for more information.
In most cases, the preferred way to create a webpack build with minimal configuration is to use Vue CLI.
CLI
Vue provides an official CLI (opens new window) for quickly scaffolding ambitious Single Page Applications. It provides batteries-included build setups for a modern frontend workflow. It takes only a few minutes to get up and running with hot-reload, lint-on-save, and production-ready builds.
TIP
The CLI assumes prior knowledge of Node.js and the associated build tools. If you are new to Vue or front-end build tools, we strongly suggest going through the guide without any build tools before using the CLI.
For Vue 3, you should use Vue CLI v4.5 available on npm as @vue/cli. To upgrade, you need to reinstall the latest version of @vue/cli globally:
yarn global add @vue/cli
# OR
npm install -g @vue/cli
Then in the Vue projects, run
Vite
Vite (opens new window) is a web development build tool that allows for lightning fast serving of code due to its native ES Module import approach.
Vue projects can quickly be set up with Vite by running the following commands in your terminal.
With npm:
# npm 6.x
$ npm init vite@latest <project-name> --template vue

# npm 7+, extra double-dash is needed:
$ npm init vite@latest <project-name> -- --template vue

$ cd <project-name>
$ npm install
$ npm run dev
Or with Yarn:
$ yarn create vite <project-name> --template vue
$ cd <project-name>
$ yarn
$ yarn dev
Or with pnpm:
$ pnpm create vite <project-name> -- --template vue
$ cd <project-name>
$ pnpm install
$ pnpm dev
Explanation of Different Builds
In the dist/ directory of the npm package (opens new window) you will find many different builds of Vue.js. Here is an overview of which dist file should be used depending on the use-case.
From CDN or without a Bundler
vue(.runtime).global(.prod).js:
- For direct use via
<script src="...">in the browser, exposes the Vue global. - In-browser template compilation:
-
vue.global.jsis the «full» build that includes both the compiler and the runtime so it supports compiling templates on the fly. -
vue.runtime.global.jscontains only the runtime and requires templates to be pre-compiled during a build step.
-
- Inlines all Vue core internal packages — i.e. it’s a single file with no dependencies on other files. This means you must import everything from this file and this file only to ensure you are getting the same instance of code.
- Contains hard-coded prod/dev branches, and the prod build is pre-minified. Use the
*.prod.jsfiles for production.
vue(.runtime).esm-browser(.prod).js:
- For usage via native ES modules imports (in browser via
<script type="module">). - Shares the same runtime compilation, dependency inlining and hard-coded prod/dev behavior with the global build.
With a Bundler
vue(.runtime).esm-bundler.js:
- For use with bundlers like
webpack,rollupandparcel. - Leaves prod/dev branches with
process.env.NODE_ENV guards(must be replaced by bundler) - Does not ship minified builds (to be done together with the rest of the code after bundling)
- Imports dependencies (e.g.
@vue/runtime-core,@vue/runtime-compiler)- Imported dependencies are also esm-bundler builds and will in turn import their dependencies (e.g. @vue/runtime-core imports @vue/reactivity)
- This means you can install/import these deps individually without ending up with different instances of these dependencies, but you must make sure they all resolve to the same version.
- In-browser template compilation:
-
vue.runtime.esm-bundler.js(default) is runtime only, and requires all templates to be pre-compiled. This is the default entry for bundlers (via module field inpackage.json) because when using a bundler templates are typically pre-compiled (e.g. in*.vuefiles). -
vue.esm-bundler.js: includes the runtime compiler. Use this if you are using a bundler but still want runtime template compilation (e.g. in-DOM templates or templates via inline JavaScript strings). You will need to configure your bundler to alias vue to this file.
-
For Server-Side Rendering
vue.cjs(.prod).js:
- For use in Node.js server-side rendering via
require(). - If you bundle your app with webpack with
target: 'node'and properly externalizevue, this is the build that will be loaded. - The dev/prod files are pre-built, but the appropriate file is automatically required based on
process.env.NODE_ENV.
Runtime + Compiler vs. Runtime-only
If you need to compile templates on the client (e.g. passing a string to the template option, or mounting to an element using its in-DOM HTML as the template), you will need the compiler and thus the full build:
// this requires the compiler
Vue.createApp({
  template: '<div>{{ hi }}</div>'
})

// this does not
Vue.createApp({
  render() {
    return Vue.h('div', {}, this.hi)
  }
})
When using vue-loader, templates inside *.vue files are pre-compiled into JavaScript at build time. You don’t really need the compiler in the final bundle, and can therefore use the runtime-only build.
Перед вами — вторая часть серии материалов, которая посвящена созданию веб-приложения Budget Manager с использованием Node.js, Vue.js и MongoDB. В первой части мы занимались сервером, а именно — подготовили основные методы RESTful API и наладили JWT-аутентификацию. Сегодня приступим к работе над клиентской частью приложения, создадим каркас фронтенда, средства для регистрации в системе и входа в неё, поговорим о маршрутах и об их защите.

Установка Vue.js и использование vue-cli
Установить Vue.js довольно просто. Мы планируем использовать vue-cli с шаблоном webpack. Обратившись к руководству по Vue, можно выяснить, что для установки vue-cli и подготовки рабочей среды используются такие команды:
# установка vue-cli
$ npm install --global vue-cli
# создание нового проекта с использованием шаблона "webpack"
$ vue init webpack my-project
# установка зависимостей
$ cd my-project
$ npm install
$ npm run dev
Продолжим работу над проектом, создав папку application в его корневой директории. Этот шаг можно и пропустить, создав папку в процессе работы с vue-cli. Если вы решите не создавать папку, тогда вам нужно дать проекту имя, выполнив команду такого вида:
vue init webpack name-of-your-project
Вот как выглядит проект после создания папки application:
Теперь перейдём в только что созданную папку с помощью интерпретатора командной строки, и, если vue-cli ещё не установлен, выполним следующую команду:
npm i --g vue-cli
Эта команда позволяет установить vue-cli глобально, поэтому неважно, в какой именно папке мы будем находиться, выполнив её.
Теперь вызовем следующую команду:
vue init webpack
Обратите внимание на то, что тут не указано имя проекта, так как подразумевается, что команда выполняется в папке application, уже созданной для размещения в ней приложения.
После выполнения вышеприведённой команды и загрузки шаблона вам будет задан ряд вопросов:
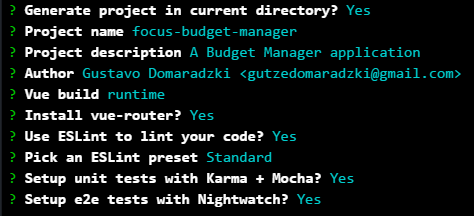
Если хотите, на данном этапе может поменять название проекта, описание, сведения об авторе. Для того, чтобы не отклоняться от этого материала, оставьте всё остальное таким, как показано на рисунке.
Далее, всё ещё оставаясь в папке application, устанавливаем зависимости и запускаем проект.
npm i
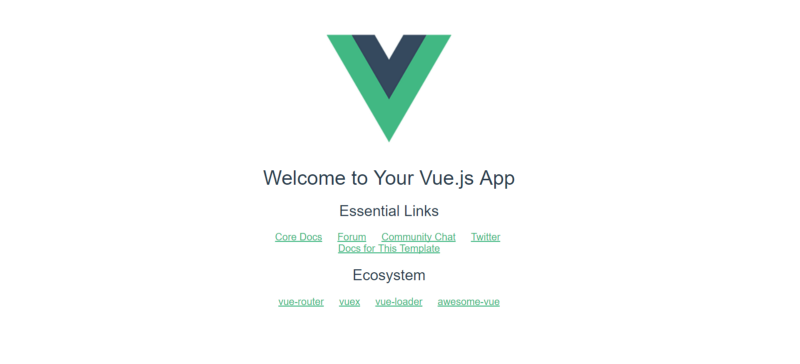
npm run devТеперь можно полюбоваться на стандартную страницу Vue.
Очистка приложения Vue
Уберём из приложения некоторые ненужные нам стандартные элементы. Для этого надо перейти в папку application/src/assets и удалить logo.png, так как этим файлом мы пользоваться не будем. Далее, откроем файл корневого компонента App.vue из папки application/src и приведём его к виду, представленному следующим фрагментом кода:
<template>
  <div id="app">
    <v-container>
      <router-view/>
    </v-container>
  </div>
</template>
<script>
  export default {
    name: 'app'
  }
</script>
Теперь надо очистить маршруты. Для этого откроем файл index.js в папке router и приведём его к такому виду:
import Vue from 'vue'
import Router from 'vue-router'
Vue.use(Router)
export default new Router({
  routes: [
    {}
  ]
})
Обратите внимание на то, что существует множество способов структурирования маршрутов, но, для того, чтобы не усложнять проект, мы просто импортируем компоненты и зададим маршруты в этом файле.
Теперь, на последнем этапе очистки стандартного приложения, удалим файл HelloWorld.vue из папки components.
Установка зависимостей
Прежде чем заняться разработкой фронтенда приложения, нужно установить ещё несколько зависимостей. Перед выполнением следующей команды проверьте, находитесь ли вы в папке application:
npm i --save axios vuetify vue-cookieТеперь установим зависимости разработки:
npm i --save-dev sass-loader node-sass
Мы будем использовать axios для обработки HTTP-запросов. В vuetify нас интересуют визуальные компоненты и возможность пользоваться компоновкой элементов на основе сетки. Библиотеку vue-cookie будем применять для работы с куки-файлами. Пакеты sass-loader и node-sass позволят нам пользоваться SCSS.
Начало работы над фронтендом приложения
Теперь, когда все подготовительные мероприятия завершены, займёмся разработкой. Перейдём к папке components и создадим в ней папку pages, в которой создадим папку Authentication. В этой папке надо создать файл Authentication.vue, представляющий компонент, которым будем пользоваться для аутентификации. Вот что должно в итоге получиться:
В файле Authentication.vue разместим следующий код:
<template>
  <h1>Auth!</h1>
</template>
<script>
  export default {}
</script>
Расширением этого компонента займёмся позже, а пока перейдём в папку router и поработаем с маршрутами.
Для начала импортируем компонент Authentication и настроим маршрут для его использования:
import Vue from 'vue'
import Router from 'vue-router'
// Pages
import Authentication from '@/components/pages/Authentication/Authentication'
Vue.use(Router)
export default new Router({
  routes: [
    {
      path: '/login',
      name: 'Authentication',
      component: Authentication
    }
  ]
})
После этого, если перейти по адресу http://localhost:8080/#/login, можно увидеть пустую страницу с надписью «Auth!». Это говорит о том, что маршрут аутентификации работает.
Теперь откроем файл main.js из папки src и импортируем vuetify и vue-cookie:
import VueCookie from 'vue-cookie'
import Vuetify from 'vuetify'
import('../node_modules/vuetify/dist/vuetify.min.css')
Vue.use(VueCookie)
Vue.use(Vuetify)
Vue.config.productionTip = false
Перейдём к компоненту App.vue из папки src и займёмся стилями. Сначала нужно подготовить тег style. Разместим его сразу после закрытия тега script:
<style lang="scss">
</style>
Теперь переходим в папку src/assets и создаём в ней файл styles.scss и папку partials. В этой папке создадим два частичных шаблона, представленных файлами _variables.scss и _animations.scss. В результате должна получиться такая структура:
В файле _variables.scss зададим такие параметры:
// Colors
$background-tint: #1734C1;
$background-color: rgba(0, 0, 0, .5);
В файл _animations.css добавим описания анимаций bounceIn и slideInFromLeft:
@keyframes bounceIn {
  to {
      animation-timing-function: cubic-bezier(.215, .61, .355, 1)
  }
  0% {
      opacity: 0;
      transform: scale3d(.3, .3, .3)
  }
  20% {
      transform: scale3d(1.1, 1.1, 1.1)
  }
  40% {
      transform: scale3d(.9, .9, .9)
  }
  60% {
      opacity: 1;
      transform: scale3d(1.03, 1.03, 1.03)
  }
  80% {
      transform: scale3d(.97, .97, .97)
  }
  to {
      opacity: 1;
      transform: scaleX(1)
  }
}
@keyframes slideInFromLeft {
  from {
    transform: translateX(-2500px);
    opacity: 0
  }
  50% {
    transform: translateX(0);
    opacity: 1;
  }
  70% {
    transform: translateX(-20px);
  }
  90% {
    transform: translateX(10px);
  }
  to {
    transform: translateX(0);
  }
}
Импортируем частичные шаблоны в styles.scss:
@import "./partials/variables";
@import "./partials/animations";
Теперь, в папке assets, создадим папку images. Сюда можно поместить любое изображение, которое будет использоваться в качестве фона. Здесь, в репозитории, можно найти изображение, которое применяется в этом материале.
Настроим внешний вид приложения, приведя к следующему виду блок стилизации в файле App.vue:
<style lang="scss">
  @import "./assets/styles";
  body {
    background: url('./assets/images/background.jpg') no-repeat center center fixed;
    &:after {
      content: '';
      position: fixed;
      width: 100%;
      height: 100%;
      top: 0;
      left: 0;
      background-color: $background-tint;
      opacity: .3;
      z-index: -1;
    }
  }
</style>
Тут мы импортируем ранее подготовленные стили scss и задаём использование фиксированного фонового изображения для приложения. Мы стремимся к тому, чтобы на любом устройстве экран приложения выглядел примерно одинаково.
В псевдоэлементе body :after мы задаём параметр background-color, записывая в него значение переменной $background-tint. Это позволит применить к фоновому изображению пурпурный цветной фильтр. Вот как выглядят разные варианты фонового изображения.

Обратите внимание на то, что всё, что касается стилизации и работы с фоном, на функционал приложения не влияет, поэтому вы вполне можете пропустить эти шаги или украсить приложение так, как вам захочется.
Масштабирование области просмотра и загрузка иконок
Благодаря этому шагу мы обеспечим правильное отображение приложения на мобильных устройствах. Кроме того, на данном этапе работы мы загрузим иконки в стиле Material Design. Для того, чтобы всё это сделать, перейдём к файлу index.html, который расположен в папке application и добавим следующее в тег head:
<meta name="viewport" content="initial-scale=1">
<link href='https://fonts.googleapis.com/css?family=Roboto:300,400,500,700|Material+Icons' rel="stylesheet">
Разработка компонента Authentication
Теперь, когда мы немного украсили приложение, избавившись, по крайней мере, от скучных белых страниц, продолжим работу над компонентом Authentication. Создадим в папке Authentication файл index.js.
Импортируем в него то, что нам понадобится и объявим константу, в которую запишем путь к API:
import Axios from 'axios'
import router from '@/router'
const BudgetManagerAPI = `http://${window.location.hostname}:3001`
Теперь создадим объект Authentication, который будет содержать нужные нам методы:
export default {
  user: { authenticated: false }
}
Мы начинаем работу над этим компонентом, объявляя объект с именем user, который хранит сведения о том, аутентифицирован ли пользователь.
Теперь напишем методы:
import Axios from 'axios'
import router from '@/router'

const BudgetManagerAPI = `http://${window.location.hostname}:3001`

export default {
  user: { authenticated: false },

  authenticate (context, credentials, redirect) {
    Axios.post(`${BudgetManagerAPI}/api/v1/auth`, credentials)
        .then(({data: {token}}) => {
          context.$cookie.set('token', token, '1D')
          context.validLogin = true
          this.user.authenticated = true

          if (redirect) router.push(redirect)
        }).catch(({response: {data}}) => {
          context.snackbar = true
          context.message = data.message
        })
  },

  signup (context, credentials, redirect) {
    Axios.post(`${BudgetManagerAPI}/api/v1/signup`, credentials)
        .then(({data: {token}}) => {
          context.$cookie.set('token', token, '1D')
          context.validSignUp = true
          this.user.authenticated = true

          if (redirect) router.push(redirect)
        }).catch(({response: {data}}) => {
          context.snackbar = true
          context.message = data.message
        })
  },

  checkAuthentication () {
    const token = document.cookie

    if (token) this.user.authenticated = true
    else this.user.authenticated = false
  },

  getAuthenticationHeader (context) {
    return `Bearer ${context.$cookie.get('token')}`
  }
}
В первом методе используются три аргумента:
context: это — компонент Vue.credentials: тут будут имя пользователя (username) и пароль (password).redirect: здесь будет путь, по которому мы собираемся перенаправить пользователя.
Axios используется здесь для выполнения POST-запроса к API с передачей аргумента credentials. Затем мы деструктурируем ответ, data, так как нас здесь интересует лишь значение token, сохраняем это значение в куки-файле и задаём срок жизни этих данных, равный одному дню. Также мы устанавливаем в true переменную validLogin и значение authenticated объекта user, и, наконец, перенаправляем пользователя по пути из аргумента redirect.
В противном случае мы устанавливаем поле snackbar объекта context в true и записываем в message сообщение об ошибке.
Второй метод очень похож на первый, его мы используем для создания новой учётной записи. Разница между ним и первым методом заключается в конечной точке, с которой мы работаем.
Третий метод используется для проверки того, аутентифицирован пользователь или нет.
Последний метод позволяет возвратить заголовок Authorization.
Теперь продолжим работу над компонентом, открыв файл Authentication.vue. Тут мы будем пользоваться средствами Vuetify:
<template>
  <div class="l-auth-container">
    <div class="l-auth">
      <v-form v-model="validLogin">
        <v-text-field label="Username"
                      v-model="credentials.username"
                      prepend-icon="account_box"
                      :rules="rules"
                      required
                      color="light-blue lighten-1">
        </v-text-field>

        <v-text-field label="Password"
                      v-model="credentials.password"
                      prepend-icon="lock"
                      :rules="rules"
                      :append-icon="loginPasswordVisible ? 'visibility' : 'visibility_off'"
                      :append-icon-cb="() => (loginPasswordVisible = !loginPasswordVisible)"
                      :type="loginPasswordVisible ? 'text' : 'password'"
                      color="light-blue lighten-1"
                      required>
        </v-text-field>

        <v-btn flat color="light-blue lighten-1" @click.native="signUpVisible = true">Create account</v-btn>
        <v-btn color="light-blue lighten-1" @click.native="submitAuthentication()">Login</v-btn>
      </v-form>
    </div>

    <div class="l-signup" v-if="signUpVisible">
      <v-form v-model="validSignUp">
        <v-text-field label="Username"
                      v-model="newUser.username"
                      prepend-icon="account_box"
                      :rules="rules"
                      required
                      color="light-blue lighten-1">
        </v-text-field>

        <v-text-field label="Password"
                      v-model="newUser.password"
                      prepend-icon="lock"
                      :rules="rules"
                      :append-icon="signUpPasswordVisible ? 'visibility' : 'visibility_off'"
                      :append-icon-cb="() => (signUpPasswordVisible = !signUpPasswordVisible)"
                      :type="signUpPasswordVisible ? 'text' : 'password'"
                      color="light-blue lighten-1"
                      required>
        </v-text-field>

        <v-btn block color="light-blue lighten-1" @click.native="submitSignUp()">Sign Up</v-btn>
      </v-form>
    </div>

    <v-snackbar timeout="6000"
                bottom="bottom"
                color="red lighten-1"
                v-model="snackbar">
      {{ message }}
    </v-snackbar>
  </div>
</template>
Здесь имеется элемент div с классом l-auth-container, который выполняет роль контейнера. Следом идёт ещё один div с классом l-auth, который содержит структуру элементов для организации формы ввода, в частности, это элемент v-form, привязанный к данным переменной validLogin.
Внутри него находится пара подписанных полей ввода v-text-field, которые привязаны к данным из credentials (мы займёмся этими данными ниже). Поля снабжены иконками, взятыми из https://material.io/icons/, с ними также связаны правила по проверке ввода (и там и там — одни и те же правила, не будем усложнять проект), кроме того, оба эти поля являются обязательными.
Второе поле ввода предназначено для пароля, оно снабжено иконкой, которая указывает на то, может ли пользователь видеть вводимый пароль. У этой иконки есть коллбэк, являющийся стрелочной функцией, который позволяет переключать значение переменной loginPasswordVisible с true на false и наоборот. Если эта переменная установлена в true, то параметр type поля ввода устанавливается в text, иначе это password.
И, наконец, тут присутствуют описания кнопок, которые мы используем для создания новой учётной записи или для отправки формы с целью входа в систему.
Следующий фрагмент кода описывает структуру формы регистрации в системе, которая видна лишь в том случае, если переменная signUpVisible установлена в true. Устройство этой формы похоже на устройство формы входа в систему, тут изменены лишь несколько строк. В частности, здесь используется переменная signUpPasswordVisible вместо loginPasswordVisible и другой метод обработки щелчка по кнопке.
Далее, тут имеется панель v-snackbar, которая, в ходе аутентификации, используется для вывода сообщений.
Теперь, в том же файле Authentication.vue, опишем скрипт компонента:
<script>
  import Authentication from '@/components/pages/Authentication'
  export default {
    data () {
      return {
        snackbar: false,
        validLogin: false,
        validSignUp: false,
        signUpVisible: false,
        loginPasswordVisible: false,
        signUpPasswordVisible: false,
        rules: [ (value) => !!value || 'This field is required' ],
        credentials: {
          username: '',
          password: ''
        },
        newUser: {
          username: '',
          password: ''
        },
        message: ''
      }
    },
    methods: {
      submitAuthentication () {
        Authentication.authenticate(this, this.credentials, '/')
      },

      submitSignUp () {
        Authentication.signup(this, this.newUser, '/')
      }
    }
  }
</script>
Тут всё начинается с импорта файла index.js из папки Authentication, так как нам нужен метод authenticate, определённый внутри этого файла.
Взглянем теперь на переменные, хранящие данные компонента:
snackbar: используется для панели сообщений.validLogin: используется для проверки формы входа в систему.validSignUp: используется для проверки формы регистрации.signUpVisible: используется для вывода формы регистрации (при установке вtrue).loginPasswordVisible: указывает на то, может ли пользователь видеть пароль, вводимый в форме входа в систему.signUpPasswordVisible: указывает на то, можно ли видеть пароль, вводимый в форме регистрации.rules: правила проверки данных, введённых в поля форм.credentials: объект, привязанный к полям ввода формы входа в систему, используемый для аутентификации пользователя.newUser: объект, привязанный к полям ввода формы регистрации в системе.message: используется для вывода сообщений в ходе аутентификации.
В этом компоненте есть пара методов. В методе submitAuthentication осуществляется вызов метода authenticate из файла Authentication, с передачей контекста, учётных данных и пути для перенаправления. Метод submitSignUp используется для вызова метода signup.
И, наконец, вот код стилизации компонента, который надо разместить в том же файле Authentication.vue (тут вы можете дать волю фантазии и сделать всё таким, как вам хочется):
<style lang="scss">
@import "./../../../assets/styles";
.l-auth {
background-color: $background-color;
padding: 15px;
margin: 45px auto;
min-width: 272px;
max-width: 320px;
animation: bounceIn 1s forwards ease;
}
.l-signup {
background-color: $background-color;
padding: 15px;
margin: 45px auto;
min-width: 272px;
max-width: 320px;
animation: slideInFromLeft 1s forwards ease;
}
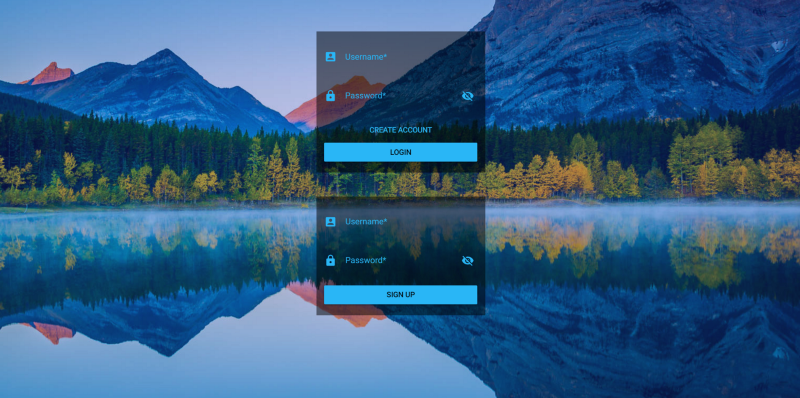
</style>Вот как выглядят компоненты для входа в систему и регистрации нового пользователя.
Разработка компонента Home
Перейдём в папку pages и создадим файл компонента Home.vue:
На данный момент в шаблоне этого компонента, код которого представлен ниже, будут лишь несколько текстовых сообщений:
<template>
  <div>
    <h3>Hi! this is our App's Home</h3>
    <ul>
      <li v-if="users != null" v-for="user in users">
        {{ user.username }}
      </li>
    </ul>
  </div>
</template>
<script>
  import Axios from 'axios'
  import Authentication from '@/components/pages/Authentication'
const BudgetManagerAPI = `http://${window.location.hostname}:3001`
export default {
    data () {
      return {
        users: []
      }
    },
    mounted () {
      this.getAllUsers()
    },
    methods: {
      getAllUsers (context) {
        Axios.get(`${BudgetManagerAPI}/api/v1/users`, {
          headers: {
            'Authorization': Authentication.getAuthenticationHeader(this)
          }
        }).then(({data}) => (this.users = data))
      }
    }
  }
</script>
Этот компонент является основой для домашней страницы, которой мы займёмся в следующей части этой серии. А пока выполним GET-запрос к API для получения всех зарегистрированных пользователей, используя отладочный метод API и передавая токен в заголовке запроса. Вот как это будет выглядеть:

Защита системы навигации
Откроем файл index.js из папки router. Вот к какому виду его нужно привести:
import Vue from 'vue'
import Router from 'vue-router'
import * as Auth from '@/components/pages/Authentication'
// Pages
import Home from '@/components/pages/Home'
import Authentication from '@/components/pages/Authentication/Authentication'
Vue.use(Router)
const router = new Router({
  routes: [
    {
      path: '/',
      name: 'Home',
      component: Home,
      meta: {
        requiredAuth: true
      }
    },
    {
      path: '/login',
      name: 'Authentication',
      component: Authentication
    }
  ]
})
router.beforeEach((to, from, next) => {
  if (to.meta.requiredAuth) {
    if (Auth.default.user.authenticated) {
      next()
    } else {
      router.push('/login')
    }
  } else {
    next()
  }
})
export default router
Рассмотрим этот код.
import * as Auth from '@/components/pages/Authentication'
В этой строке мы импортируем файл Authentication, называя его Auth, так как компонент Authentication также был импортирован.
const router = new Router({
  routes: [
    {
      path: '/',
      name: 'Home',
      component: Home,
      meta: {
        requiredAuth: true
      }
    },
    {
      path: '/login',
      name: 'Authentication',
      component: Authentication
    }
  ]
})
Тут мы даём имя объекту Router для того, чтобы позже создать защиту системы навигации. Также мы добавляем путь к компоненту Home. В параметре meta.requiredAuth будет записано true. Это означает, что если к этому компоненту попытается получить доступ неаутентифицированный пользователь, он будет перенаправлен на страницу входа в систему.
router.beforeEach((to, from, next) => {
  if (to.meta.requiredAuth) {
    if (Auth.default.user.authenticated) {
      next()
    } else {
      router.push('/login')
    }
  } else {
    next()
  }
})
Здесь мы защищаем систему навигации. А именно, регистрируем глобальный сторожевой хук, пользуясь которым перед переходом по каждому маршруту проверяем, установлен ли его параметр meta.requiredAuth в true. Если это так, мы проверяем объект пользователя из Authentication. Если пользователь не аутентифицирован, мы перенаправляем его на страницу входа в систему.
export default routerЭтой командой экспортируем маршрутизатор.
Теперь откройте файл main.js в папке application. Тут мы собираемся импортировать файл Authentication и вызвать метод checkAuthentication:
import Vuetify from 'vuetify'
import Authentication from '@/components/pages/Authentication'
import('../node_modules/vuetify/dist/vuetify.min.css')
Vue.use(VueCookie)
Vue.use(Vuetify)
Vue.config.productionTip = false
Authentication.checkAuthentication()
Без этого, если пользователь перезагрузит страницу или закроет её, а потом снова откроет, он будет перенаправлен на страницу входа в систему.
Итоги
Сегодня мы рассказали о том, как создать приложение Vue.js, как разрабатывать компоненты Vue, рассмотрели выполнение HTTP-запросов и защиту маршрутов приложения. В следующей части займёмся доработкой компонента Home и продолжим развитие клиентской и серверной частей приложения.
Уважаемые читатели! Если вы хорошо разбираетесь в Vue.js, просим рассказать о том, для каких проектов вы его использовали, и довольны ли вы тем, что получилось.