В Windows 10 и Windows Server 2019 появился встроенный SSH клиент, который вы можете использовать для подключения к *Nix серверам, ESXi хостам и другим устройствам по защищенному протоколу, вместо Putty, MTPuTTY или других сторонних SSH клиентов. Встроенный SSH клиент Windows основан на порте OpenSSH и предустановлен в ОС, начиная с Windows 10 1809.
Содержание:
- Установка клиента OpenSSH в Windows 10
- Как использовать SSH клиенте в Windows 10?
- SCP: копирование файлов из/в Windows через SSH
Установка клиента OpenSSH в Windows 10
Клиент OpenSSH входит в состав Features on Demand Windows 10 (как и RSAT). Клиент SSH установлен по умолчанию в Windows Server 2019 и Windows 10 1809 и более новых билдах.
Проверьте, что SSH клиент установлен:
Get-WindowsCapability -Online | ? Name -like 'OpenSSH.Client*'

В нашем примере клиент OpenSSH установлен (статус: State: Installed).
Если SSH клиент отсутствует (State: Not Present), его можно установить:
- С помощью команды PowerShell:
Add-WindowsCapability -Online -Name OpenSSH.Client* - С помощью DISM:
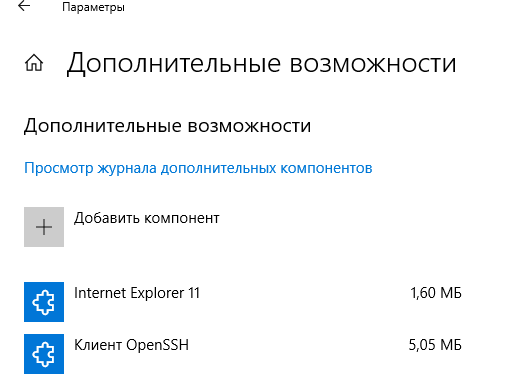
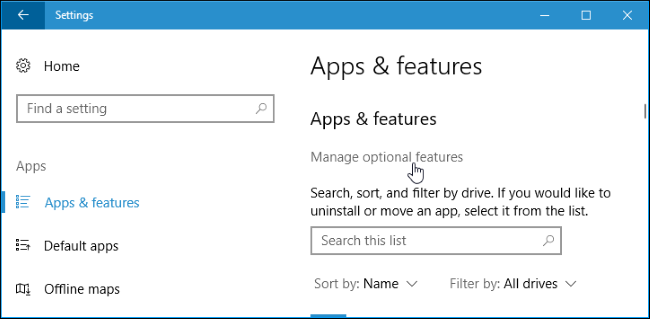
dism /Online /Add-Capability /CapabilityName:OpenSSH.Client~~~~0.0.1.0 - Через Параметры -> Приложения -> Дополнительные возможности -> Добавить компонент. Найдите в списке Клиент OpenSSH и нажмите кнопку Установить.
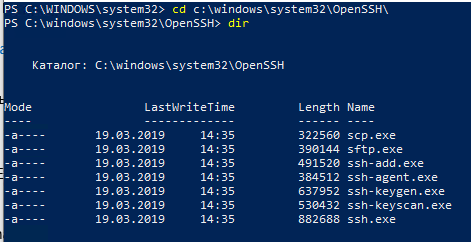
]Бинарные файлы OpenSSH находятся в каталоге c:\windows\system32\OpenSSH\.
- ssh.exe – это исполняемый файл клиента SSH;
- scp.exe – утилита для копирования файлов в SSH сессии;
- ssh-keygen.exe – утилита для генерации ключей аутентификации;
- ssh-agent.exe – используется для управления ключами;
- ssh-add.exe – добавление ключа в базу ssh-агента.
Вы можете установить OpenSSH и в предыдущих версиях Windows – просто скачайте и установите Win32-OpenSSH с GitHub (есть пример в статье “Настройка SSH FTP в Windows”).
Как использовать SSH клиенте в Windows 10?
Чтобы запустить SSH клиент, запустите командную строку
PowerShell
или
cmd.exe
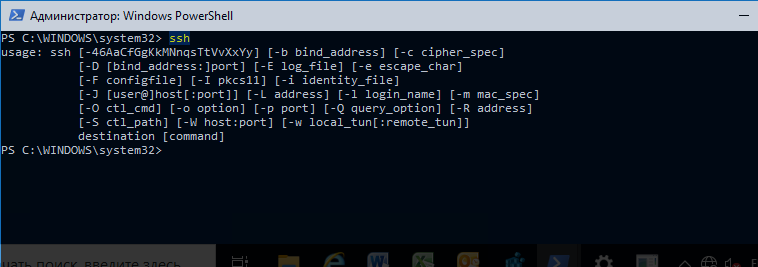
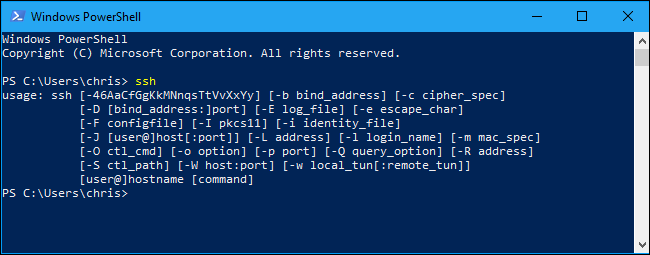
. Выведите доступные параметры и синтаксис утилиты ssh.exe, набрав команду:
ssh
usage: ssh [-46AaCfGgKkMNnqsTtVvXxYy] [-b bind_address] [-c cipher_spec]
[-D [bind_address:]port] [-E log_file] [-e escape_char]
[-F configfile] [-I pkcs11] [-i identity_file]
[-J [user@]host[:port]] [-L address] [-l login_name] [-m mac_spec]
[-O ctl_cmd] [-o option] [-p port] [-Q query_option] [-R address]
[-S ctl_path] [-W host:port] [-w local_tun[:remote_tun]]
destination [command]
Для подключения к удаленному серверу по SSH используется команда:
ssh username@host
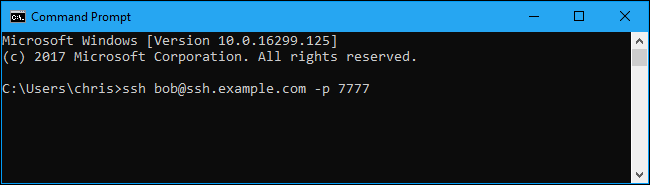
Если SSH сервер запущен на нестандартном порту, отличном от TCP/22, можно указать номер порта:
ssh username@host -p port
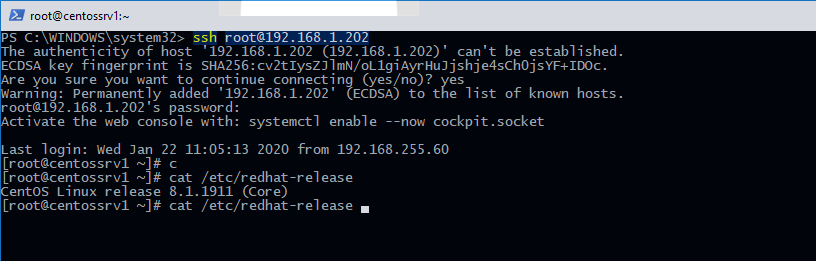
Например, чтобы подключиться к Linux хосту с IP адресом 192.168.1.202 под root, выполните:
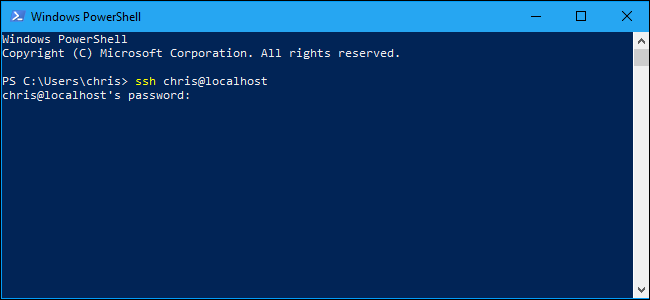
ssh [email protected]
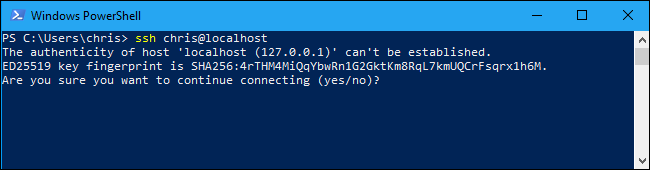
При первом подключении появится запрос на добавление ключа хоста в доверенные, наберите yes -> Enter (при этом отпечаток ключа хоста добавляется в файл C:\Users\username\.ssh\known_hosts).
Затем появится запрос пароля указанной учетной записи, укажите пароль root, после чего должна открытся консоль удаленного Linux сервера (в моем примере на удаленном сервере установлен CentOS 8).
С помощью SSH вы можете подключаться не только к *Nix подобным ОС, но и к Windows. В одной из предыдущих статей мы показали, как настроить OpenSSH сервер на Windows 10 и подключиться к нему с другого компьютера Windows с помощью SSH клиента.
Если вы используете SSH аутентификацию по RSA ключам (см. пример с настройкой SSH аутентификации по ключам в Windows), вы можете указать путь к файлу с закрытым ключом в клиенте SSH так:
ssh [email protected] -i "C:\Users\username\.ssh\id_rsa"
Также вы можете добавить ваш закрытый ключ в SSH-Agent. Сначала нужно включить службу ssh-agent и настроить ее автозапуск:
set-service ssh-agent StartupType ‘Automatic’
Start-Service ssh-agent
Добавим ваш закрытый ключ в базу ssh-agent:
ssh-add "C:\Users\username\.ssh\id_rsa"
Теперь вы можете подключиться к серверу по SSH без указания пути к RSA ключу, он будет использоваться автоматически. Пароль для подключения не запрашивается (если только вы не защитили ваш RSA ключ отдельным паролем):
ssh [email protected]
Еще несколько полезных аргументов SSH:
-
-C
– сжимать трафик между клиентом и сервером (полезно на медленных и нестабильных подключениях); -
-v
– вывод подробной информации обо всех действия клиента ssh; -
-R
/
-L
– можно использовать для проброса портов через SSH туннель.
SCP: копирование файлов из/в Windows через SSH
С помощью утилиты scp.exe, которая входит в состав пакета клиента SSH, вы можете скопировать файл с вашего компьютера на SSH сервер:
scp.exe "E:\ISO\CentOS-8.1.1911-x86_64.iso" [email protected]:/home

Можно рекурсивно скопировать все содержимое каталога:
scp -r E:\ISO\ [email protected]:/home
И наоборот, вы можете скопировать файл с удаленного сервера на ваш компьютер:
scp.exe [email protected]:/home/CentOS-8.1.1911-x86_64.iso e:\tmp
Если вы настроите аутентификацию по RSA ключам, то при копировании файлов не будет появляться запрос на ввод пароля для подключения к SSH серверу. Это удобно, когда вам нужно настроить автоматическое копирование файлов по расписанию.
Итак, теперь вы можете прямо из Windows 10 подключаться к SSH серверам, копировать файлы с помощью scp без установки сторонних приложений и утилит.
Уровень сложностиПростой
Время на прочтение5 мин
Количество просмотров308K

Программистов, сисадминов, devops’ов, тестировщиков часто объединяет использование некоторых общих технологий. Например, возможность иметь удалённый доступ к серверу пригодилось бы любому из указанной выше анекдотичной компании. Поэтому в этой статье мы рассмотрим основы работы с протоколом SSH на базовом уровня (без генерации ключей, подписей, мам, пап и кредитов). «Продвинутое» использование посмотрим уже отдельно, в следующий раз. Материал подготовил Макс, автор YouTube-канала PyLounge. Поехали!
Введение
SSH (Secure SHell — защищенная оболочка) — сетевой протокол прикладного уровня, предназначенный для безопасного удаленного доступа к различным системам (Linux, Windows, Mac).
Данный протокол шифрует всю передаваемую информацию по сети. По умолчанию, используется 22-й порт. В основном он нужен для удаленного управления данными пользователя на сервере, запуска служебных команд, работы в консольном режиме с базами данных.
Эта служба была создана в качестве замены не зашифрованному Telnet и использует криптографические техники, чтобы обеспечить, что всё сообщение между сервером и пользователем было зашифровано.
Чтобы установить SSH-соединение, необходимы два компонента: SSH-сервер и SSH-клиент. Сервер прослушивает определенный порт (по умолчанию это порт 22) и при успешной аутентификации дает доступ пользователю. Все команды, которые используются на SSH-клиенте, отправляются через защищенный канал связи на SSH-сервер, на котором они выполняются и откуда отправляют результат работы обратно клиенту.
SSH-сервер
Устанавливается на управляемой операционной системе и принимает входящие подключения от клиентских машин, проверяя соединение одним из способов:
-
по IP-адресу клиента, что не слишком безопасно из-за риска подмены;
-
по публичному ключу клиента и имени пользователя. Нужно создать приватный (закрытый) и публичный (открытый) ключ. Зашифровав информацию одним ключом, можно расшифровать ее только другим;
-
по паролю клиента, который передается в зашифрованном виде. Это один из наиболее распространенных вариантов. Вводить его нужно при каждом подключении.
Платные и бесплатные SSH-серверы есть для всех распространенных ОС:
-
BSD — OpenSSH;
-
Linux — dropbear, lsh-server, openssh-server;
-
Windows — freeSSHd, copssh, WinSSHD, OpenSSH и т. д.
SSH-клиент
Используется для входа на удаленный сервер и выполнения команд. Через клиент выполняется управление удаленным компьютером.
SSH-клиенты разработаны для всех ОС. Имеют платные и бесплатные версии:
-
Linux/BSD — openssh-client, putty, ssh, Vinagre;
-
Windows — PuTTY, SecureCRT, ShellGuard;
-
Android — connectBot.
Встроенный SSH-клиент Windows, основанный на OpenSSH, предустановлен в ОС, начиная с Windows 10 1809.
Установка OpenSSH на Ubuntu
Установка с помощью менеджера пакетов apt-get:
sudo apt-get install openssh-serverПроверка SELinux
Security Enhanced Linux, или SELinux – это усовершенствованный механизм контроля доступа, встроенный в большинство современных дистрибутивов Linux. Первоначально он был разработан Агентством национальной безопасности США для защиты компьютерных систем от вторжения злоумышленников и взлома. SELinux также может помешать работе с ssh. Поэтому необходимо убедиться, что он отключен, либо отключить его.
Устанавливаем доп. инструменты для работы с сетью и настройками безопасности:
sudo apt-get install policycoreutils
sudo apt-get install net-tools
Проверяем статус SELinux. Состояние должно быть disable.
sestatusПодключение к виртуальной машине с типом подключения NAT
Если виртуальная машина использует тип сетевого подключения NAT, то первоначально необходимо настроить проброс портов. Пробросим порт хоста 2222 (или любой свободный) на гостевой порт виртуальной машины номер 22 (порт ssh по умолчанию).
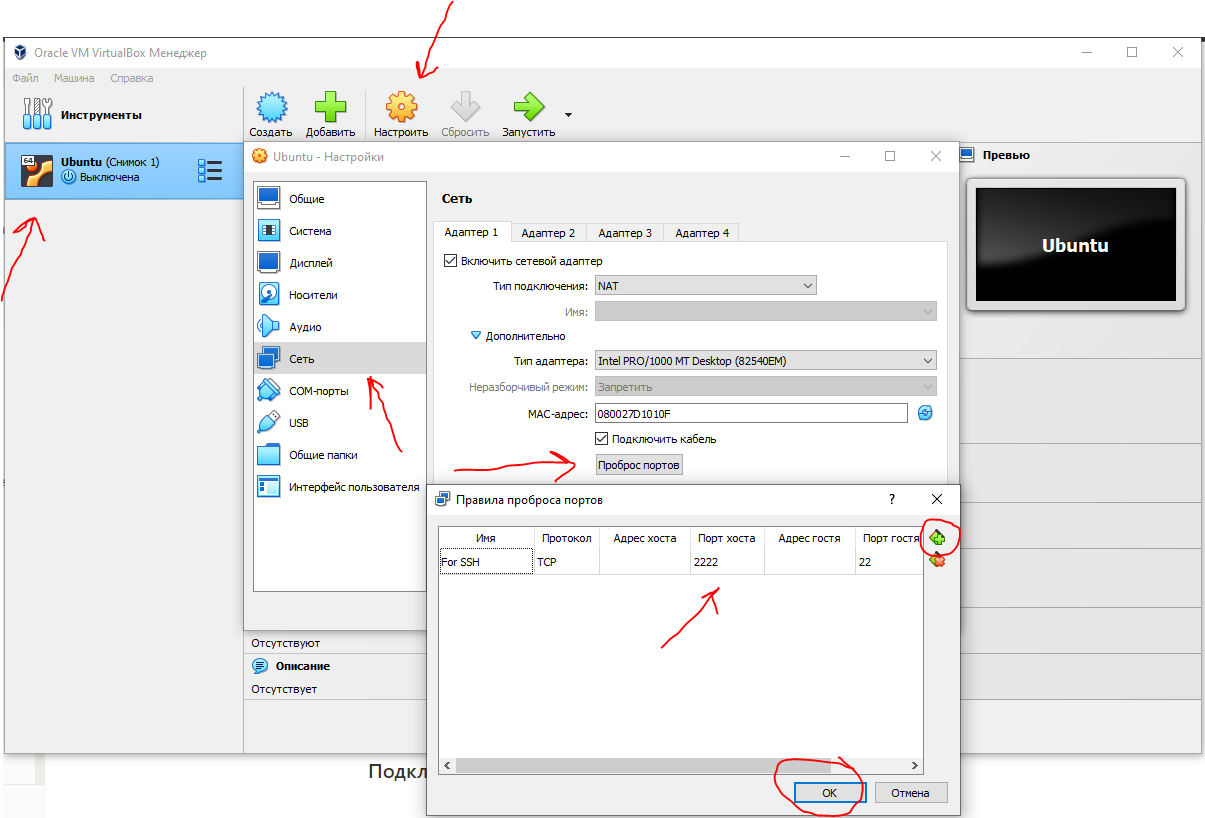
После этого мы можем подключиться из Windows к нашей виртуальной машине.
Подключение по ssh через PuTTY
Т.к. в качестве сетевого подключения у виртуальной машины используется NAT, при подключении мы будем указывать петлевой адрес localhost (127.0.0.1) c портом, на который был назначен проброс.

После этого вводим имя пользователя (пользователь должен существовать в linux!!!) и пароль от этого пользователя.
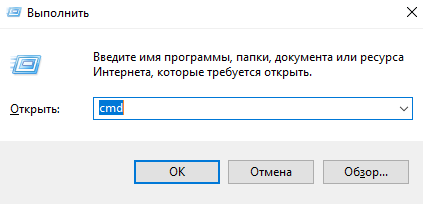
Подключение по ssh через Командную строку Windows (cmd)
Запускаем командную строку сочетанием клавиш Win + R . В открывшемся окне указываем cmd. Нажимаем OK.
В общем видео подключение по ssh имеет вид:
ssh имя_пользователя@ip_адрес_компьютера_к_которому_подключаемся -p портЕсли для подключения используется стандартный порт ssh — 22, то порт можно не указывать.
В открывшемся окне вводим команду:
ssh student@127.0.0.1 -p 2222Вводим пароль пользователя. Всё. Вы великолепны!
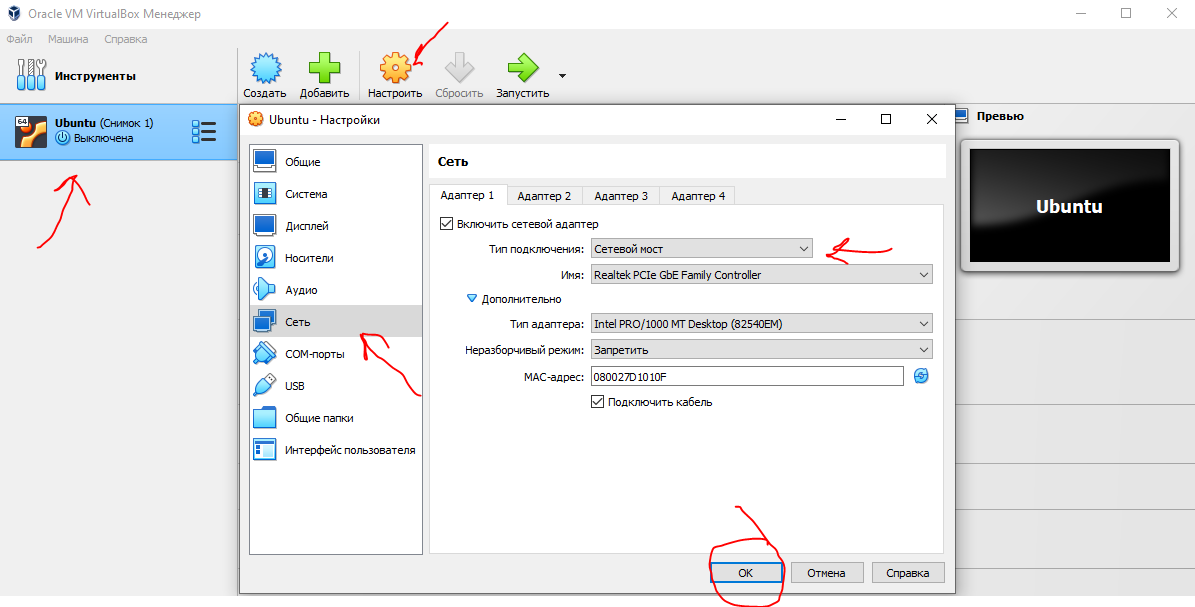
Подключение к виртуальной машине с типом подключение Сетевой мост
С типом подключения Сетевой мост необходимо выдать статический ip для Linux системы. Дальнейшее подключение будет уже по этому, выданному ip, а не через localhost.
Установка статического ip
Начиная с выпуска Ubuntu 17.10 NetPlan теперь это инструмент настройки сети по умолчанию для управления настройками сети, заменяющий файл конфигурации /etc/network/interfaces, который использовался в предыдущих версиях.
Файлы конфигурации для Netplan находятся в каталоге /etc/netplan и написаны на языке YAML. В этом каталоге вы найдете файлы конфигурации YAML.
Откроем конфигурационный файл:
sudo nano /etc/netplan/*.yamlОтредактируем конфигурационный файл:
network:
  version: 2
  renderer: NetworkManager
  ethernets:
      enp0s3:
          dhcp4: false
          addresses: [10.40.0.224/24]
          gateway4: 10.40.0.1
          nameservers:
              addresses: [10.2.0.8, 10.2.0.3]
Здесь:
-
ethernets — указывает на проводное Ethernet подключение;
-
enp0s3 — имя сетевого интерфейса (можно узнать командой ifconfig);
-
dhcp4 — автоматическая выдача ipv4-адреса с помощью службы dhcp (для ipv6 указывать dhcp6);
-
addresses — ip-адрес и маска сети, которые назначаются компьютеру;
-
gateway4 — шлюз по умолчанию;
-
nameservers — список dns-серверов.
Посмотреть настройки можно с хостовой машины на Windows с помощью команды ipconfig /all.
Чтобы применить изменения и перезагрузить сеть, вводим команду:
sudo netplan applyПодключение по ssh
Запускаем командную строку сочетанием клавиш Win + R . В открывшемся окне указываем cmd. Нажимаем OK.
В открывшемся окне вводим команду:
ssh student@10.40.0.224Вводим пароль пользователя. Всё. Вы великолепны (2)!
Заключение
Несмотря на высокую защиту протокола, использование стандартного порта значительно повышает риск взлома сервера. Например, это можно сделать при помощи brute-force (атака полным перебором). Порт 22 — открытый, поэтому злоумышленнику нужно только подобрать логин и пароль к серверу. Это сложно, но возможно. Чтобы максимально ограничить доступ к серверу для злоумышленников (настроить брандмауэр, iptables), можно сменить SSH-порты.
Ресурсы, которые использовал
-
Как включить SSH в Ubuntu 20.04 (Routerus):https://routerus.com/how-to-enable-ssh-on-ubuntu-20-04/
-
Коротко об SSH / Хабр: https://habr.com/ru/sandbox/166705/
-
Что такое SSH (блог REG.RU): https://help.reg.ru/support/hosting/dostupy-i-podklyucheniye-panel-upravleniya-ftp-ssh/chto-takoye-ssh
Step-by-Step Guide to Installing OpenSSH Client on Windows 11
Published
7 min read
How To Install OpenSSH Client On Windows 11 [Tutorial]
OpenSSH is a suite of tools that offers secure communication over a network, primarily utilized for remote login over the SSH protocol. With its growing importance in modern computing environments, particularly for developers, system administrators, and security professionals, knowing how to install and configure OpenSSH Client on Windows 11 is crucial.
In this comprehensive tutorial, we will guide you through every step necessary to install the OpenSSH Client on Windows 11, explaining various aspects along the way. By the end of this article, you will have a clear understanding of the installation process and how to start using OpenSSH.
Understanding OpenSSH
Before diving into the installation process, let’s discuss what OpenSSH is and why it is essential.
OpenSSH provides the ability to secure remote shell access and file transfers through authentication, encryption, and integrity checks. It is widely used in various operating systems, including Unix-based systems, and has been incorporated natively into Windows 10 and Windows 11.
The OpenSSH suite includes:
- ssh: A secure shell client for connecting to remote servers.
- scp: For secure copy over SSH.
- sftp: An interactive file transfer program that uses the SSH protocol.
- ssh-keygen: A tool for generating SSH keys, which enhances the security of SSH connections.
Windows 11, like its predecessor Windows 10, comes with built-in options for installing OpenSSH. The native client is streamlined, easy to use, and integrates well with the Windows operating system. Let’s get started with the installation process.
Checking for OpenSSH Client in Windows 11
Before installing OpenSSH, check if it is already installed on your Windows 11 system. Here’s how to do so:
-
Open the Settings App: Press
Windows + Ito open the Settings app. -
Navigate to Apps: In the Settings window, select the “Apps” section from the left sidebar.
-
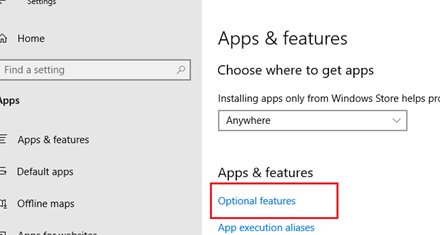
Optional Features: Click on “Optional features.” This is where Windows allows users to add various features, including OpenSSH.
-
Look for OpenSSH Client: Scroll through the list of installed features. If you see «OpenSSH Client» listed, then it is already installed, and you do not need to install it again.
If you don’t see the OpenSSH Client on your system, follow the steps below to install it.
Installing OpenSSH Client on Windows 11
Method 1: Using Settings
-
Open the Settings App: Press
Windows + Ito access the Settings menu. -
Navigate to Apps: In the left sidebar, click on “Apps.”
-
Optional Features: Under the Apps section, you will see “Optional features.” Click on it.
-
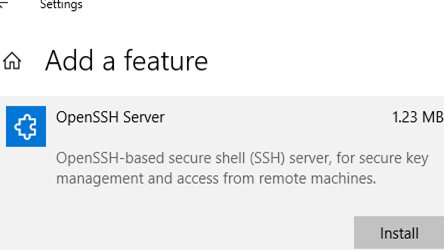
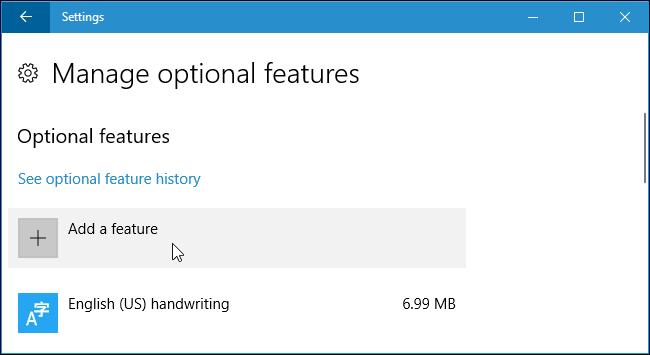
Add a Feature: At the top of the Optional Features window, click on the “Add a feature” button.
-
Search for OpenSSH Client: In the search box, type “OpenSSH Client.” This will filter the features.
-
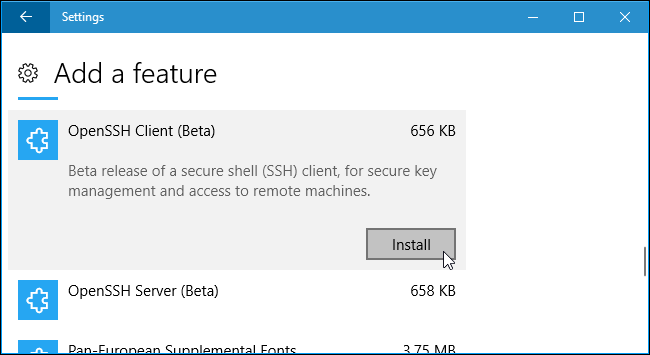
Install OpenSSH Client: Once you find “OpenSSH Client,” click the checkbox next to it and then click the “Install” button.
-
Installation Confirmation: Installation will begin, and once it is complete, you will receive a notification indicating that “OpenSSH Client” has been installed successfully.
Method 2: Using Windows PowerShell
If you prefer command-line tools or are more comfortable with PowerShell, you can install the OpenSSH Client using PowerShell:
-
Open PowerShell as Administrator: Right-click on the Start menu (Windows icon) and select “Windows Terminal (Admin)” to open PowerShell with administrative privileges.
-
Check for OpenSSH Client: Before proceeding, check if the OpenSSH Client is already installed using the command:
Get-WindowsCapability -Online | Where-Object Name -like 'OpenSSH.Client*' -
Install OpenSSH Client: If it is not installed, you can proceed with the installation command:
Add-WindowsCapability -Online -Name OpenSSH.Client~~~~0.0.1.0 -
Wait for Installation: After you enter the command, the PowerShell will begin the installation process. Wait until the process completes.
-
Verify Installation:
To confirm that the installation was successful, you can check again with:Get-WindowsCapability -Online | Where-Object Name -like 'OpenSSH.Client*'
Method 3: Using Windows Command Prompt
Alternatively, you can use the Command Prompt to install OpenSSH Client:
-
Open Command Prompt as Administrator: Right-click on the Start menu and select “Windows Terminal (Admin)” or “Command Prompt (Admin).”
-
Use DISM to Install:
Enter the following command to install:DISM /Online /Add-Capability /CapabilityName:OpenSSH.Client~~~~0.0.1.0 -
Wait for Installation: The installation may take a few moments.
-
Check Installation:
You can verify the installation by executing the same command used in PowerShell:Get-WindowsCapability -Online | Where-Object Name -like 'OpenSSH.Client*'
Configuring OpenSSH Client on Windows 11
After the installation is successful, there are a few configurations you might consider and understand how to use OpenSSH effectively.
Generating SSH Keys
Using SSH keys for authentication is more secure than traditional passwords. To generate SSH keys in Windows 11:
-
Open PowerShell or Command Prompt: Right-click on the Start menu and launch ‘Windows Terminal’ or ‘Command Prompt.’
-
Generate SSH Keys: Enter the following command:
ssh-keygen -
Follow Prompts: You will be prompted to specify a file to save the key. By default, it saves to
C:Users\.sshid_rsa. You can press Enter to accept the default path. -
Set a Passphrase (Optional): You may also set a passphrase for an extra layer of security. If you don’t want to set one, just press Enter.
-
Complete the Process: Your keys will be generated, and you will see output indicating where your public and private keys are stored.
Copying SSH Key to Remote Server
To use your SSH keys for remote connections, you must copy the public key to the remote server:
-
Use SCP to Copy Public Key: Use the following command to transfer your public key to the remote server. Replace
andwith your appropriate remote server credentials.type $env:USERPROFILE.sshid_rsa.pub | ssh @ "mkdir -p ~/.ssh && cat >> ~/.ssh/authorized_keys" -
Verify: Log into your remote server to ensure that you can authenticate using your SSH key without requiring a password.
Using OpenSSH Client
Now that the OpenSSH Client is installed and configured, you can use it to connect to remote servers:
Connecting to a Remote Server
To establish a connection to a remote server using OpenSSH:
-
Open Command Prompt/PowerShell: Launch Windows Terminal or PowerShell.
-
Use SSH Command: Use the following format:
ssh @For example, if your username is “user” and the remote host is “example.com,” the command would be:
ssh [email protected] -
Accept Host Key: The first time you connect, you will receive a prompt to accept the server’s host key. Type “yes” and press Enter.
-
Enter Password (If Needed): If you haven’t set up SSH key authentication, you’ll be prompted to enter your password.
-
You’re In!: If the credentials are correct, you will be connected to the remote server, and you can start executing commands remotely.
Transferring Files
You can also securely transfer files to and from the remote server using scp:
-
Copying from Local to Remote:
scp @: -
Copying from Remote to Local:
scp @:
Troubleshooting Common Issues
While the installation and configuration process is straightforward, you may encounter some common issues. Here are solutions to a few:
-
SSH Command Not Found: If you receive a message indicating that the
sshcommand is not recognized, it means that the OpenSSH Client is not installed correctly. Verify the installation using the methods discussed. -
Connection Timeout: If you’re unable to connect to the remote server, confirm that you are using the correct IP address or hostname. Ensure that the server is running and is accessible through your network. Network configurations, such as firewalls, may block the connection.
-
Authentication Failures: If authentication fails, ensure that you are using the correct username and password. If you’re using SSH keys, confirm that the public key has been copied to the
~/.ssh/authorized_keysfile on the server. -
Permission Denied Errors: If you see permission denied errors when trying to access directories or files, ensure that the user account you’re using has the necessary permissions on the remote server.
Conclusion
Installing and configuring the OpenSSH Client on Windows 11 is a vital step for enhancing security and enabling remote connectivity in various applications. In this tutorial, we have covered the installation methods, key generation, and usage of the OpenSSH Client, as well as troubleshooting common issues.
As remote work and secure communications continue to gain importance, mastering OpenSSH will equip professionals with the tools necessary to operate more effectively across diverse environments. Whether you are a developer, IT professional, or someone interested in improving security practices, OpenSSH serves as a fundamental skill in your toolkit.
Take the knowledge you have gained and start using OpenSSH on your Windows 11 system. Happy connecting!
В последних билдах Windows 10 появился встроенный SSH сервер и клиент на базе OpenSSH. Это значит, что теперь вы можете удаленно подключаться к компьютеру Windows 10/11 (Windows Server 2019/2022) с помощью любого SSH клиента, как к Linux. В этой статье мы покажем, как настроить OpenSSH в Windows 10 и подключится к нему с помощью putty или любого другого SSH клиента.
Убедитесь, что ваша версия Windows 10 1809 или выше. Проще всего это сделать, выполнив команду:
winver
Совет. Если у вас более старая версия Windows 10 вы можете обновить ее через Windows Update или с помощью ISO образа с более новой версией Windows 10 (можно создать его с помощью Media Creation Tool). Если вы не хотите обновлять Windows 10, вы можете вручную установить порт OpenSSH для Windows с GitHub — Win32-OpenSSH (https://github.com/PowerShell/Win32-OpenSSH).
Вы можете включить OpenSSH сервера в Windows 10 через панель Параметры:
- Перейдите в Settings -> Apps -> Optional features;

- Нажмите Add a feature, выберите OpenSSH Server и нажмите Install;

Также вы можете установить sshd сервер в Windows с помощью PowerShell:
Add-WindowsCapability -Online -Name OpenSSH.Server*

Или с помощью DISM:
dism /Online /Add-Capability /CapabilityName:OpenSSH.Server~~~~0.0.1.0
Если вы хотите убедитесь, что OpenSSH сервер установлен, выполните следующую команду:
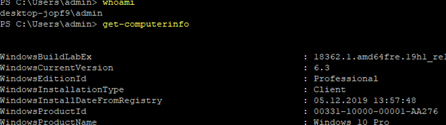
Get-WindowsCapability -Online | ? Name -like 'OpenSSH.Server*'
Name : OpenSSH.Server~~~~0.0.1.0
State : Installed

Проверьте статус служб ssh-agent и sshd с помощью командлета Get-Service:
Get-Service -Name *ssh*

Как вы видите, обе службы находятся в состоянии Stopped и не добавлены в автозагрузку. Чтобы запустить службы и настроить для них автозапуск, выполните команды:
Start-Service sshd
Set-Service -Name sshd -StartupType 'Automatic'
Start-Service ‘ssh-agent’
Set-Service -Name ‘ssh-agent’ -StartupType 'Automatic'

Также нужно разрешить входящие подключения на порт TCP 22 в Windows Defender Firewall:
netsh advfirewall firewall add rule name="SSHD service" dir=in action=allow protocol=TCP localport=22
Теперь вы можете подключиться к Windows 10 с помощью любого SSH клиента. Для подключения из Linux используете команду:
ssh -p 22 admin@192.168.1.90
где, admin – имя локального пользователя Windows, под которым вы хотите подключиться
192.168.1.90 – ip адрес вашего компьютера с Windows 10
После этого откроется окно командной строки Windows.
Совет. Чтобы вместо оболочки cmd.exe при подключении к Windows 10 через SSH запускалась консоль PoweShell, нужно выполнить команду:
New-ItemProperty -Path "HKLM:\SOFTWARE\OpenSSH" -Name DefaultShell -Value "C:\Windows\System32\WindowsPowerShell\v1.0\powershell.exe" -PropertyType String –Force
Так вы измените оболочку, которая стартует через OpenSSH. Теперь при подключении к Windows по SSH у вас будет сразу открываться консоль PowerShell вместо командной строки cmd.exe.
Если вы хотите использовать key-based ssh authentification вместо парольной аутентификации, нужно на вашем клиенте сгенерировать ключ с помощью ssh-keygen.exe.
Затем содержимое файла id_rsa.pub нужно скопировать в файл c:\users\admin\.ssh\authorized_keys в Windows 10.
После этого вы сможете подключаться с вашего Linux клиента к Windows 10 без пароля. Используйте команду:
ssh -l admin@192.168.1.90
Вы можете настроить различные параметры OpenSSH сервера в Windows с помощью конфигурационного файла %programdata%\ssh\sshd_config
Например, вы можете отключить аутентификацию по паролю и разрешить вход только по ключу:
PubkeyAuthentication yes
PasswordAuthentication no
Sign in to your How-To Geek account
Quick Links
-
How to Install Windows 10’s SSH Client
-
How to Use Windows 10’s SSH Client
Microsoft announced it was bringing an integrated OpenSSH client to Windows in 2015. They’ve finally done it, and an SSH client is hidden in Windows 10’s Fall Creators Update. You can now connect to an Secure Shell server from Windows without installing PuTTY or any other third-party software.
Update: The built-in SSH client is now enabled by default in Windows 10’s April 2018 Update. Here’s how to get the update if you don’t already have it on your PC.
PuTTY may still have more features. According to the project’s bug tracker on GitHub, the integrated SSH client only supports ed25519 keys at the moment.
How to Install Windows 10’s SSH Client
The SSH client is a part of Windows 10, but it’s an «optional feature» that isn’t installed by default.
To install it, head to Settings > Apps and click «Manage optional features» under Apps & features.
Click «Add a feature» at the top of the list of installed features. If you already have the SSH client installed, it will appear in the list here.
Scroll down, click the «OpenSSH Client (Beta)» option, and click «Install».
Windows 10 also offers an OpenSSH server, which you can install if you want to run an SSH server on your PC. You should only install this if you actually want to run a server on your PC and not just connect to a server running on another system.
How to Use Windows 10’s SSH Client
You can now use the SSH client by running the ssh command. This works in either a PowerShell window or a Command Prompt window, so use whichever you prefer.
To quickly open a PowerShell window, right-click the Start button or press Windows+X and choose «Windows PowerShell» from the menu.
To view the syntax of the ssh command, just run it:
ssh
If you see an error message saying the command isn’t found, you will need to sign out and sign in again. Rebooting your PC will also work. This shouldn’t be necessary, but this is a beta feature.
This command works the same as connecting to an SSH server via the ssh command on other operating systems like macOS or Linux. Its syntax, or command line options, are the same. You can even create an SSH config file to store server definitions and proxies.
For example, to connect to an SSH server at ssh.example.com with the username «bob», you’d run:
ssh bob@ssh.example.com
By default, the command attempts to connect to an SSH server running on port 22, which is the default. However, you may need to connect to a server running on a different port. You do this by specifying a port with the -p switch. For example, if the server accepts connections on port 7777, you’d run:
ssh bob@ssh.example.com -p 7777
As with other SSH clients, you’ll be prompted to accept the host’s key the first time you connect. You’ll then get a command-line environment you can use to run commands on the remote system.