
Все способы:
- Способ 1: Средства операционной системы
- Шаг 1: Включение службы FTP
- Шаг 2: Создание сайта FTP
- Шаг 3: Настройка доступа
- Шаг 4: Создание группы пользователей
- Шаг 5: Изменение параметров безопасности целевой директории
- Шаг 6: Добавление правил авторизации
- Шаг 7: Подключение к FTP-серверу с другого компьютера
- Способ 2: FileZilla Server
- Вопросы и ответы: 4
Способ 1: Средства операционной системы
Включить сервер FTP в Windows 10 можно посредством инструментов операционной системы. Для этого сначала необходимо активировать соответствующий компонент в специальном меню «Панели управления», затем создать сайт, а потом добавить пользователей в группу доверенных учетных записей.
Шаг 1: Включение службы FTP
По умолчанию служба, отвечающая за работу сервера FTP, в Windows 10 отключена, поэтому первостепенно ее необходимо включить. Делается это следующем образом:
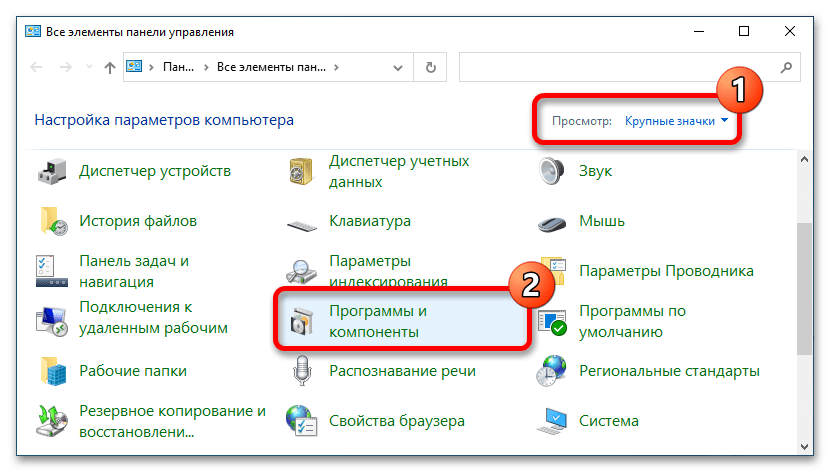
- Откройте «Панель управления» через системный поиск или другим привычным для вас образом.
- В открывшемся окне измените режим отображения элементов меню, выбрав в верхнем правом углу интерфейса значение «Крупные значки» или «Мелкие значки». После этого в списке найдите пункт «Программы и компоненты» и нажмите по нему мышкой.
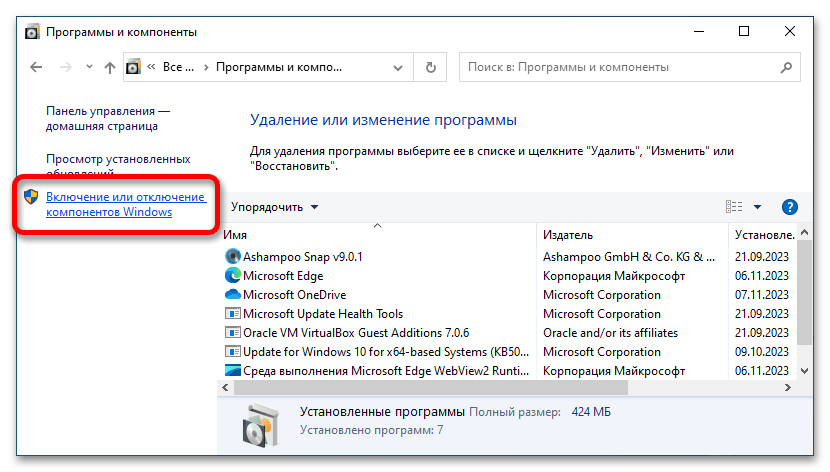
- На боковой панели слева щелкните по ссылке «Включение или отключение компонентов Windows».
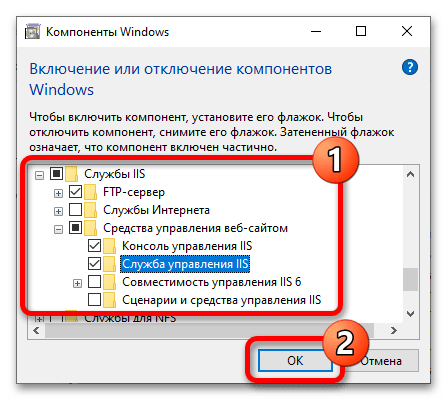
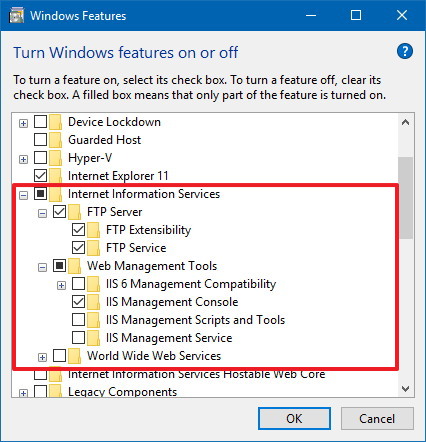
- В появившемся окне найдите в списке папку под названием «Службы IIS» и откройте ее. Установите напротив компонента «FTP-сервер» галочку, после чего раскройте подпапку «Средства управления веб-сайтом» и в ней отметьте компоненты «Консоль управления IIS» и «Служба управления IIS». Кликните по кнопке «ОК», чтобы запустить процесс установки выбранных элементов.
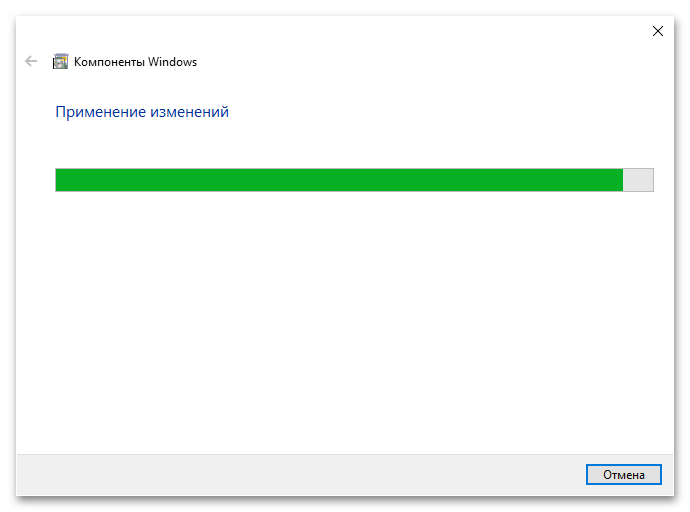
- Дождитесь завершения процедуры инсталляции компонентов. Следить за этим процессом можно непосредственно в диалоговом окне.
- Когда на экране появится сообщение «Windows применила требуемые изменения», закройте все открытые окна и переходите к следующему шагу этой инструкции.


Шаг 2: Создание сайта FTP
После того как служба, отвечающая за работу сервера FTP, была запущена, можно переходить непосредственно к созданию сайта, на который другие пользователи будут заходить, тем самым подключаясь к локальной файловой системе компьютера. Делается это следующим образом:
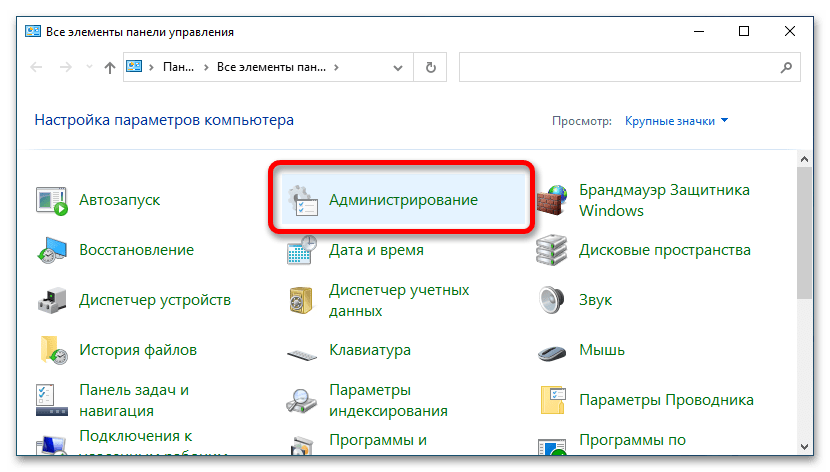
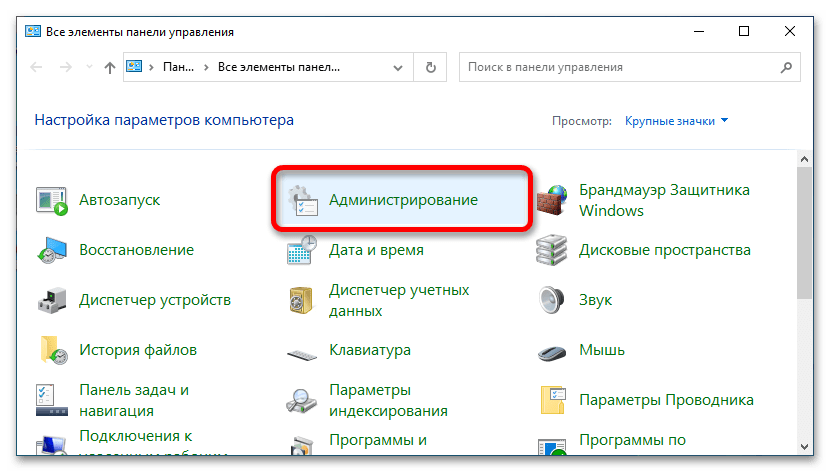
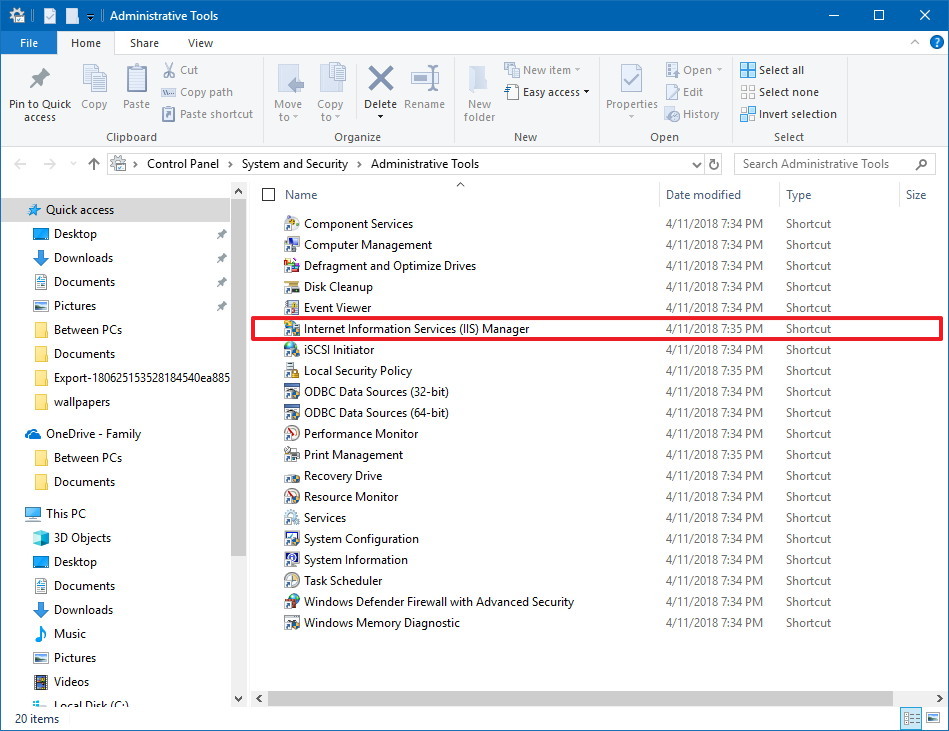
- Запустите окно «Панели управления», как это было уже описано в предыдущем шаге, выберите режим просмотра как значки, после чего перейдите в «Администрирование».
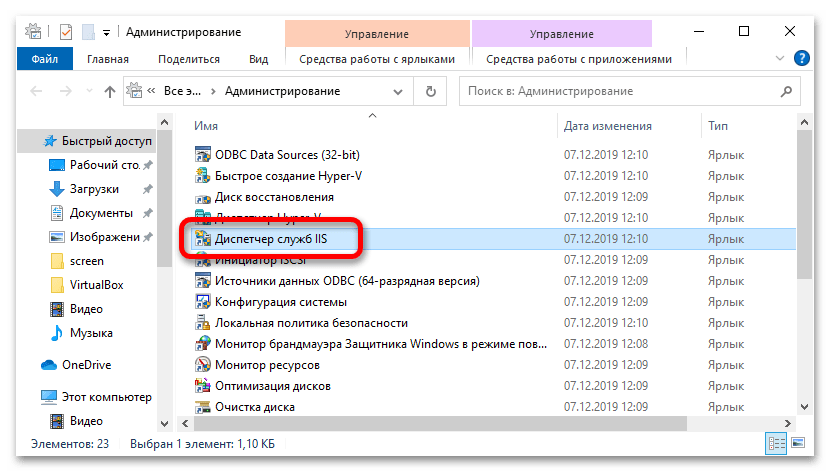
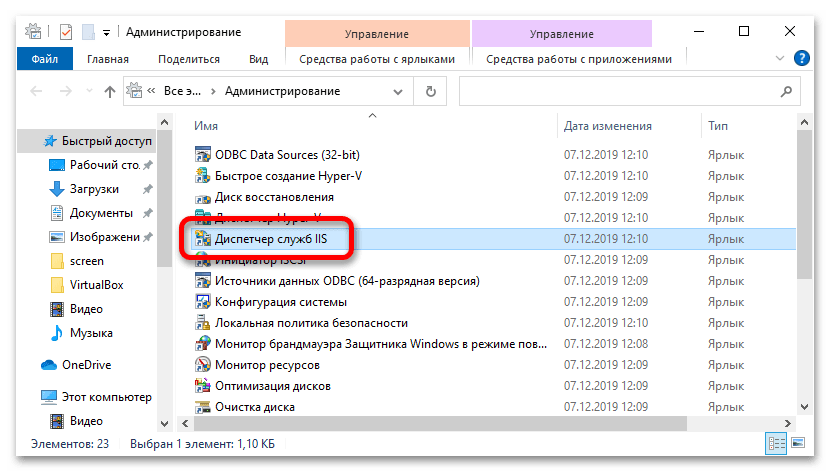
- Найдите и запустите утилиту под названием «Диспетчер служб IIS».
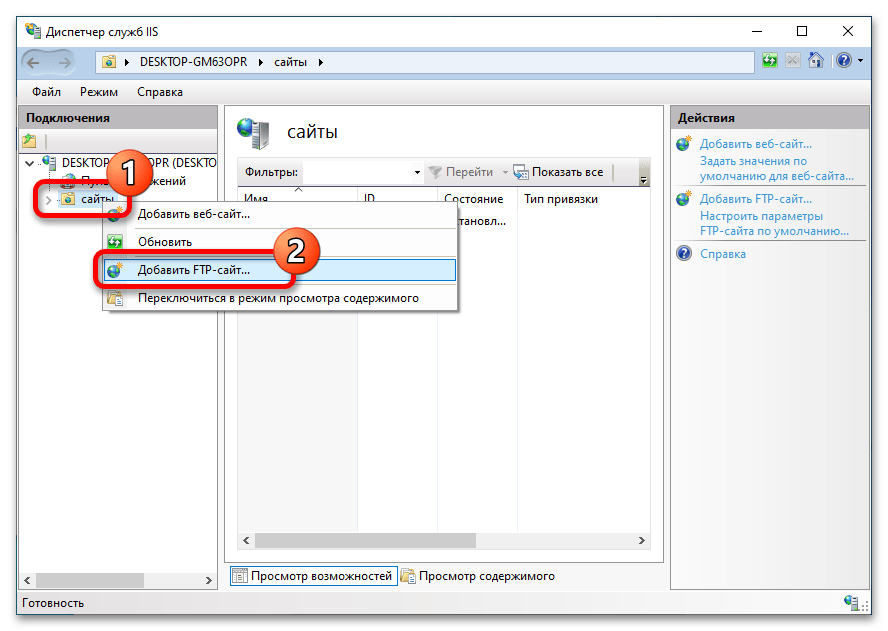
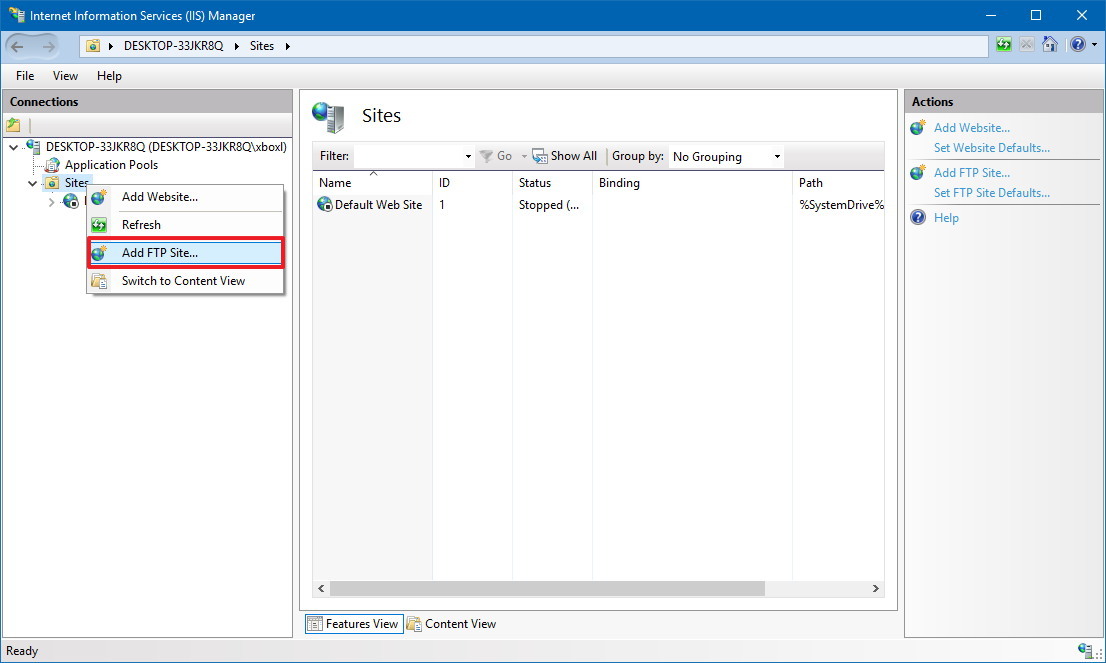
- В открывшемся окне кликните правой кнопкой мыши по папке «сайты», расположенной на боковой панели слева, и выберите из контекстного меню пункт «Добавить FTP-сайт».
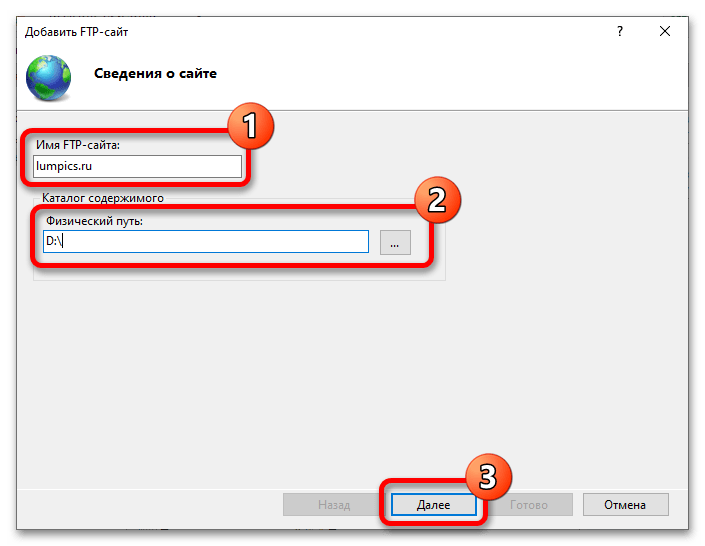
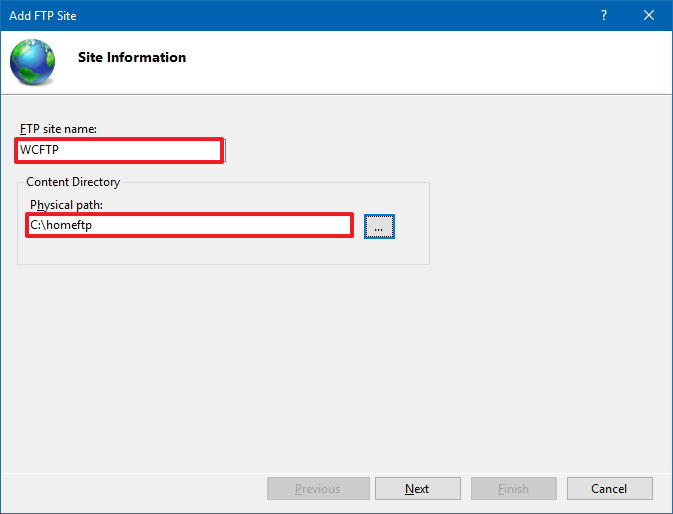
- Введите любое имя сайта, а затем укажите физический путь к каталогу, к которому впоследствии другие люди будут иметь доступ. Вы также можете указать диск компьютера, как это продемонстрировано на изображении ниже. После этого кликните по кнопке «Далее».
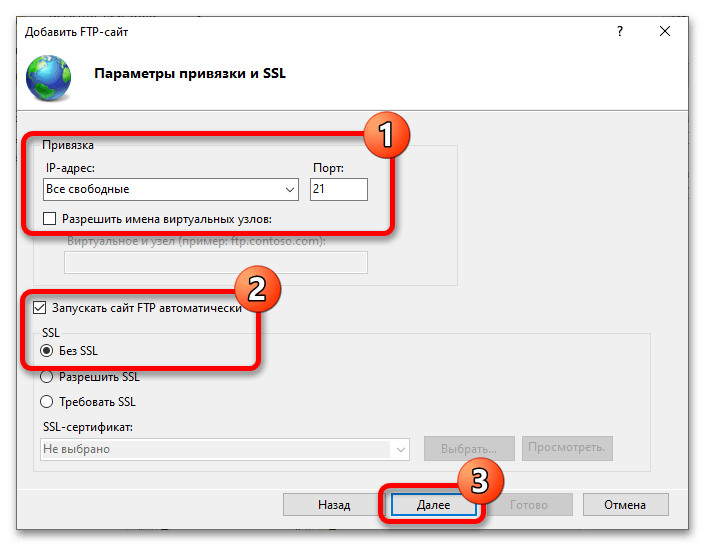
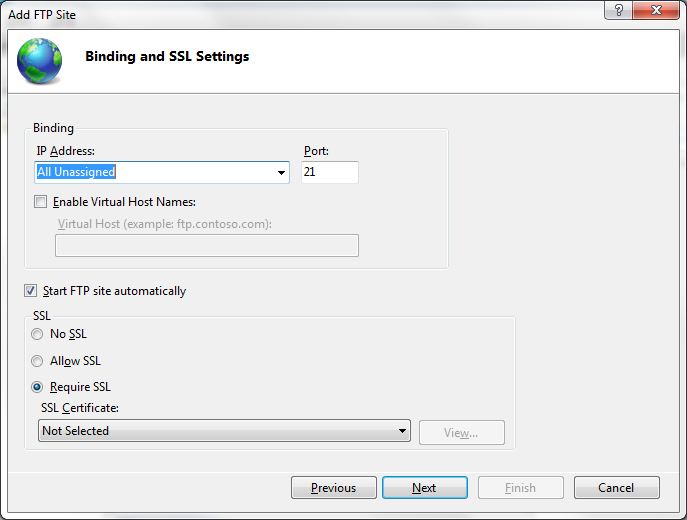
- Укажите параметры привязки и SSL. Рекомендуется из выпадающего списка «IP-адрес» оставить значение «Все свободные» и указать порт «21» (без кавычек). Опцию «Разрешить имена виртуальных узлов» оставьте неактивной, после чего активируйте параметр «Запускать сайт FTP автоматически», поставив отметку у соответствующего пункта. Установите переключатель в блоке «SSL» в положение «Без SSL» и нажмите по кнопке «Далее».
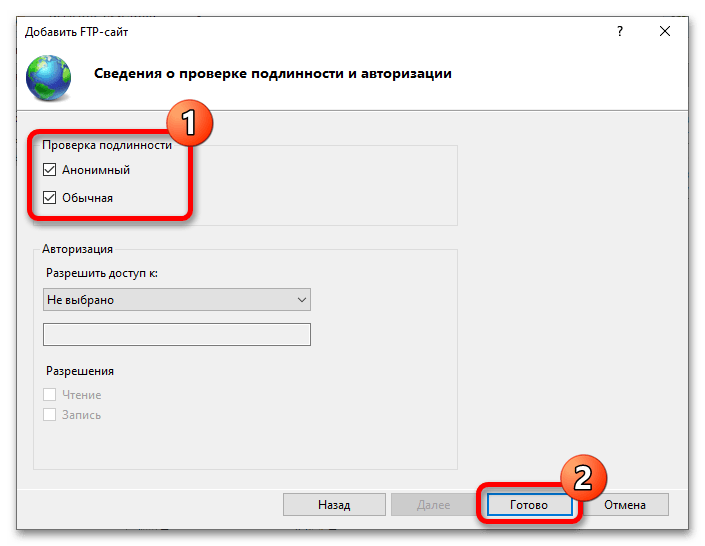
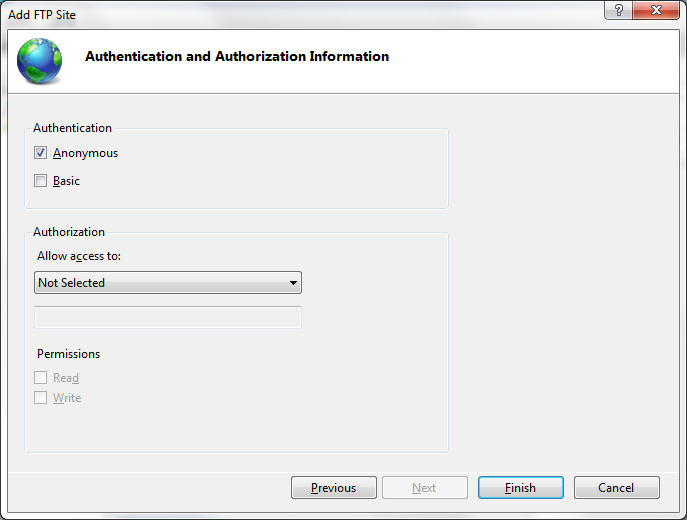
- Задайте параметры проверки подлинности и авторизации. На этом этапе вы выбираете, какому типу аккаунтов будет разрешено подключаться к вашему серверу. Если вы хотите дать доступ всем юзерам, тогда установите галочку напротив пункта «Анонимный». Отметив пункт «Обычная», все пользователи при авторизации должны будут указывать логин и пароль. Остальные параметры на этой странице оставьте нетронутыми, после чего нажмите по «Готово».

Примечание! Также вы можете отметить два этих пункта одновременно, но в будущем задать дополнительные правила, ограничив анонимным пользователям возможность вносить изменения в файлы на сервере.
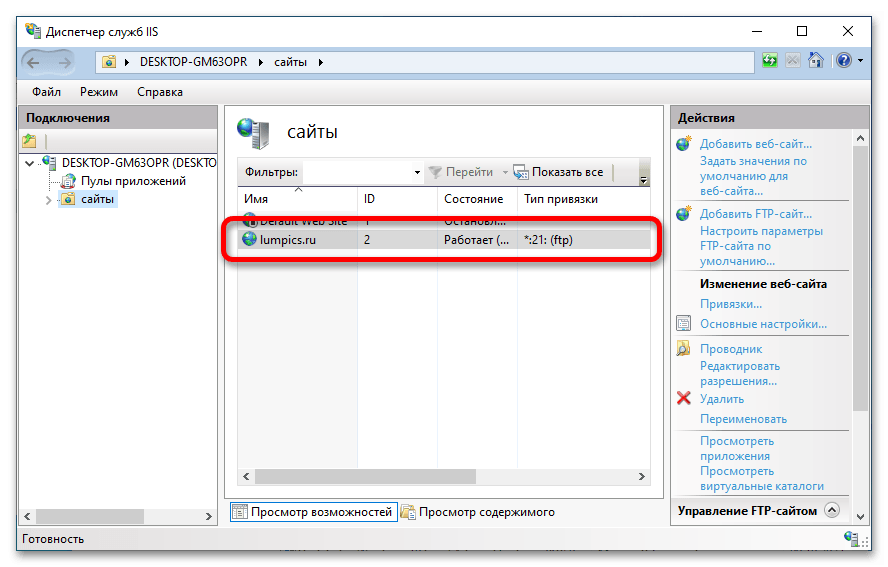
- В результате сервер FTP будет создан, в чем вы можете убедиться на странице со списком всех сайтов.
Шаг 3: Настройка доступа
Несмотря на то что все необходимые компоненты для работы сервера FTP установлены в системе и создан сайт, подключиться другим юзерам к вашему компьютеру не получится из-за отсутствия соответствующих правил в брандмауэре. Поэтому их необходимо задать, и делается это следующим образом:
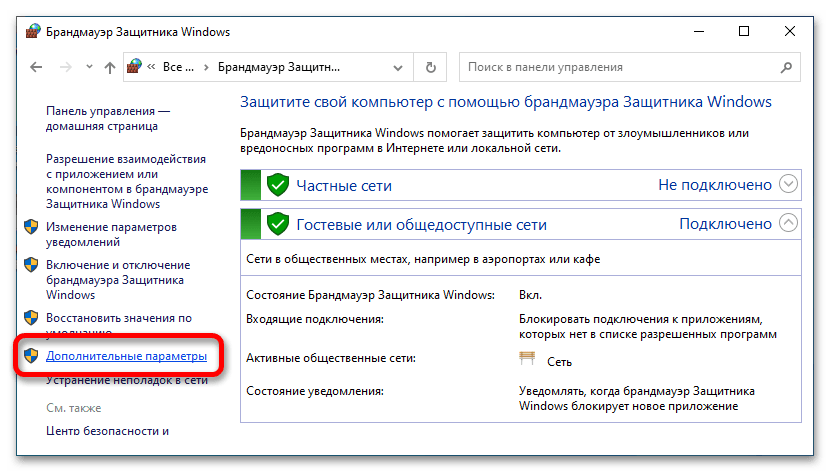
- Запустите «Панель управления» и найдите в списке пункт «Брандмауэр Защитника Windows», после чего нажмите по нему дважды кнопкой мыши.
- На боковой панели слева кликните по ссылке «Дополнительные параметры».
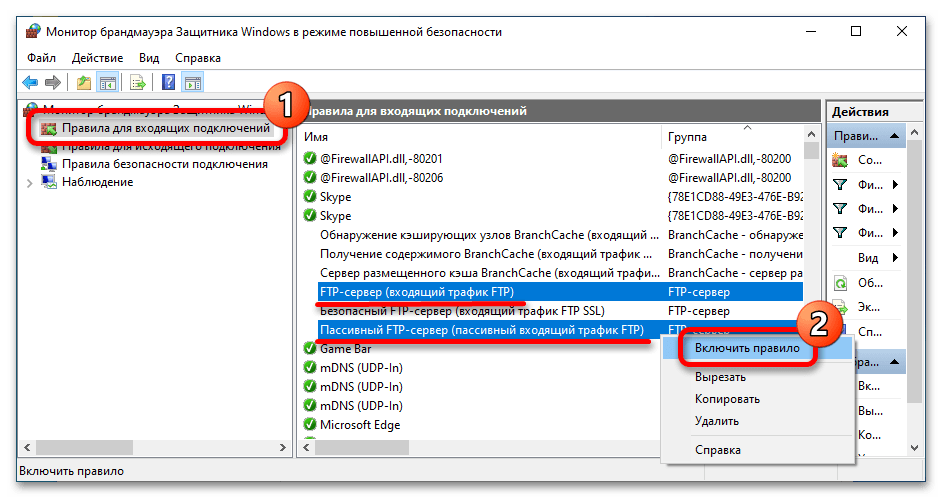
- В отобразившемся меню воспользуйтесь навигационной панелью слева, чтобы перейти в раздел «Правила для входящих подключений». Затем в основном блоке интерфейса найдите в списке пункт «FTP-сервер (входящий трафик FTP)» и нажмите по нему правой кнопкой мыши, после чего в появившемся контекстном меню кликните по строке «Включить правило». Повторите то же самое с правилом «Пассивный FTP-сервер (пассивный входящий трафик FTP)».
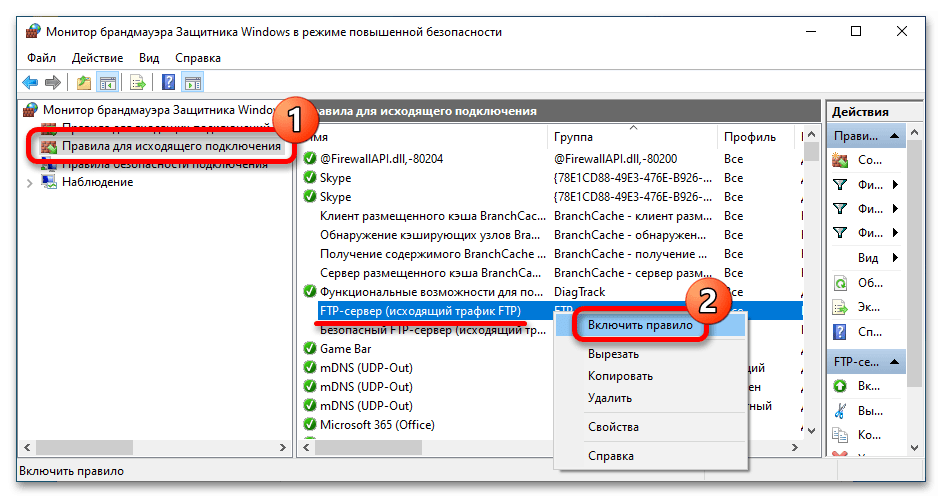
- Снова воспользуйтесь навигационной панелью слева, чтобы перейти в раздел «Правила для исходящего подключения». В нем найдите правило с названием «FTP-сервер (исходящий трафик FTP)» и включите его через контекстное меню, как это было описано ранее. Можете закрыть окно брандмауэра и переходить к следующему шагу текущей инструкции.

Шаг 4: Создание группы пользователей
Важно! Этот шаг можно пропустить, если на предыдущем вы предоставляли доступ только анонимным пользователям.
Чтобы пользователи смогли авторизоваться при подключении к серверу FTP, необходимо создать соответствующую группу доверенных аккаунтов. Делается это следующим образом:
- Перейдите в «Панель управления» и откройте раздел «Администрирование».
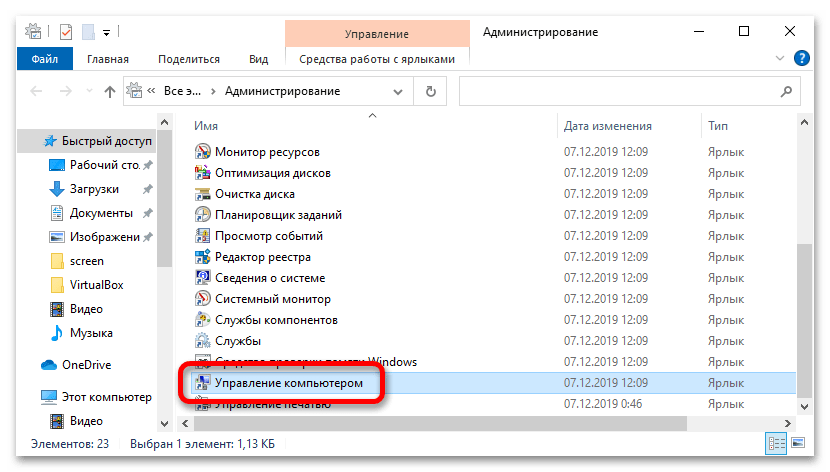
- В списке доступных системных утилит найдите «Управление компьютером» и откройте ее двойным нажатием мыши.
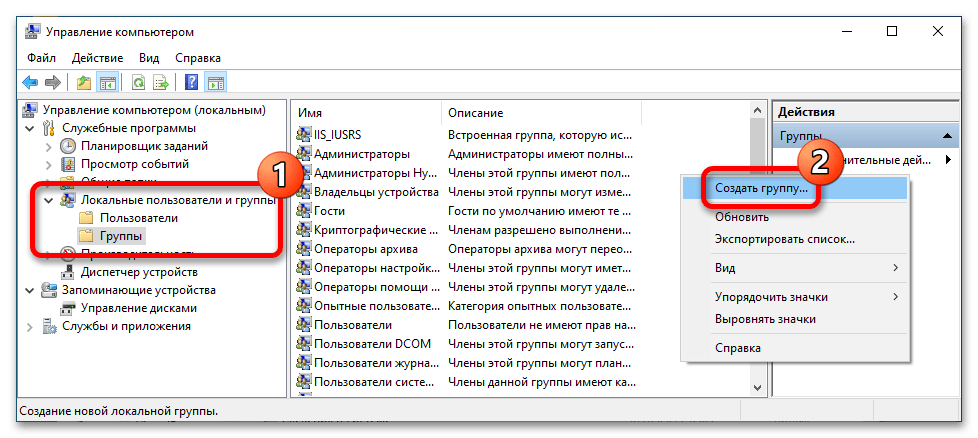
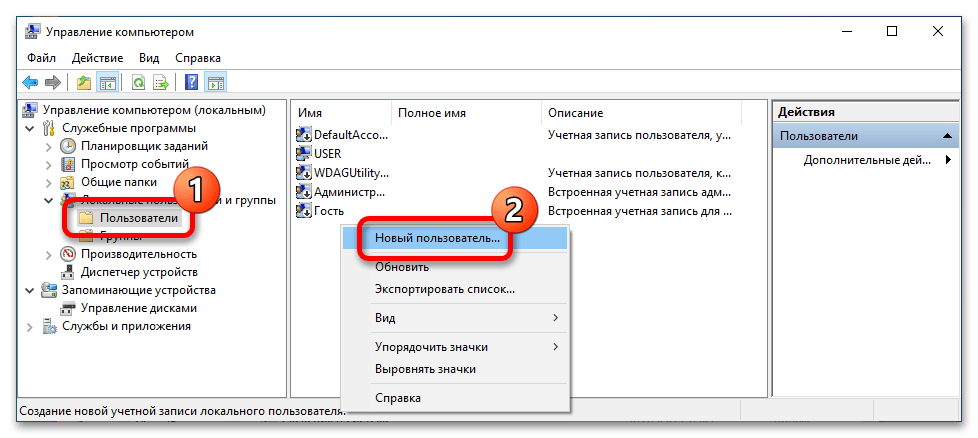
- Воспользуйтесь навигационной панелью слева, чтобы перейти в раздел «Локальные пользователи или группы», а затем откройте папку «Группы». В основном меню кликните правой кнопкой мыши по пустому месту и выберите из контекстного меню пункт «Создать группу».
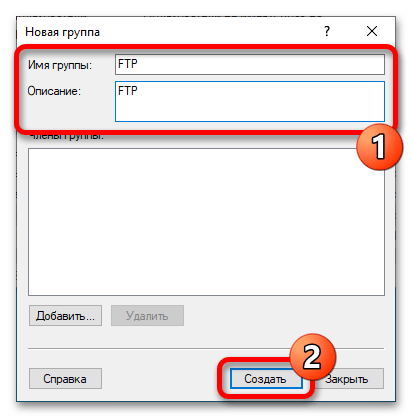
- В открывшейся форме введите значение «FTP» в поле «Имя группы». То же самое укажите в графе «Описание». Кликните по кнопке «Создать».
- Вернитесь в окно «Управление компьютером» и проследуйте через боковую панель в директорию «Пользователи». В списке всех аккаунтов щелкните по пустому месту правой кнопкой мыши и из контекстного меню выберите пункт «Новый пользователь».
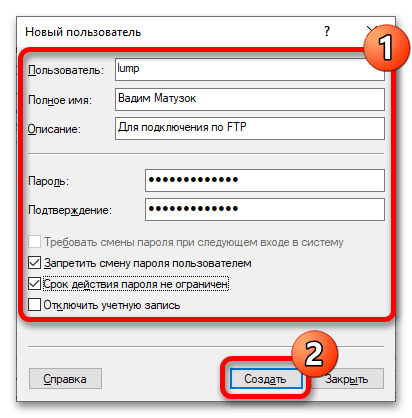
- В форме создания новой учетной записи в строке «Пользователь» укажите ее название — оно может быть любым. Аналогичным образом заполните поля «Полное имя» и «Описание», придумайте пароль и продублируйте его в поле «Подтверждение». Снимите отметку с опции «Требовать смены пароля при следующем входе в систему» и установите галочки напротив пунктов «Запретить смену пароля пользователем» и «Срок действия пароля не ограничен», чтобы его не приходилось систематически изменять вручную. В завершение кликните по «Создать».
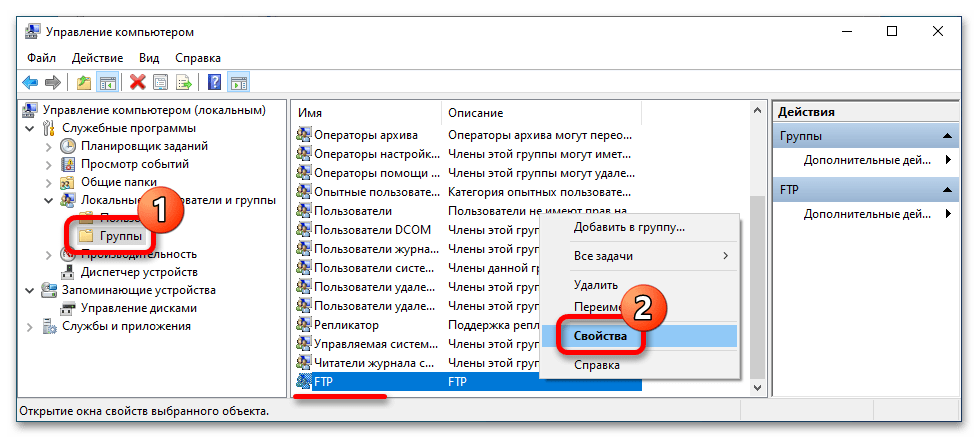
- Вернитесь в папку «Группы» и откройте свойства ранее созданной группы «FTP». Для этого щелкните по ее названию правой кнопкой мыши, а затем по пункту «Свойство».
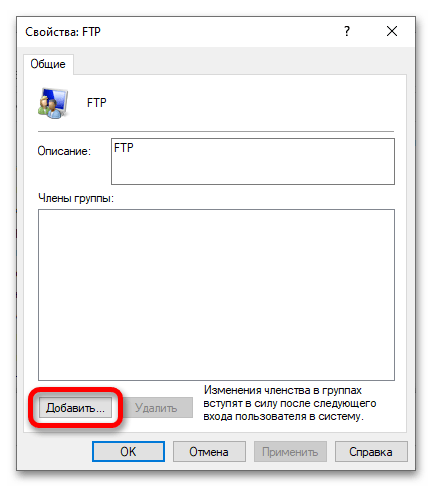
- В открывшейся форме вам необходимо добавить только что созданного пользователя. Для этого сначала кликните по кнопке «Добавить».

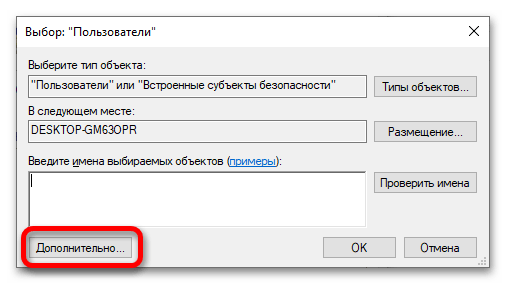
В новом окне введите имя пользователя в соответствующее поле. Чтобы не делать это вручную, его можно выбрать из списка, перейдя в раздел «Дополнительно».

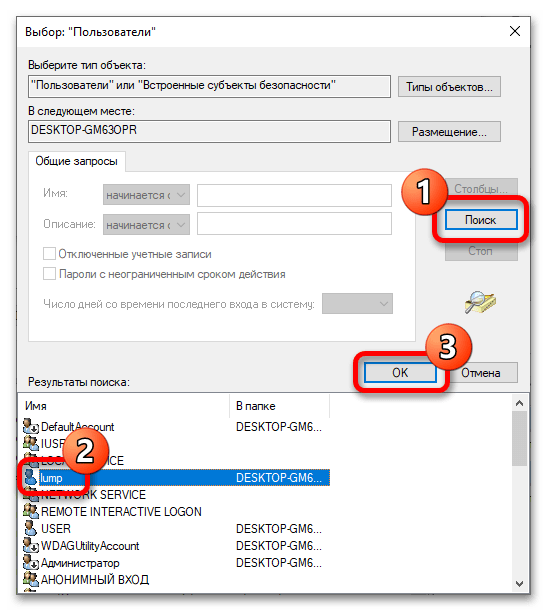
Щелкните по кнопке «Поиск», чтобы отобразить перечень доступных учетных записей и групп, найдите и выделите в списке нужный аккаунт и кликните на «ОК».

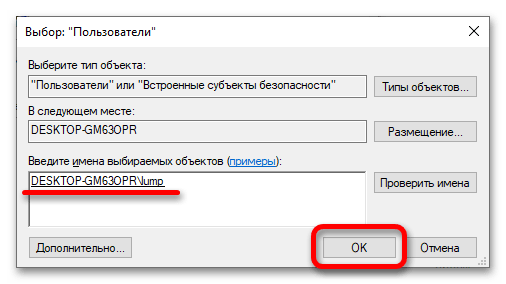
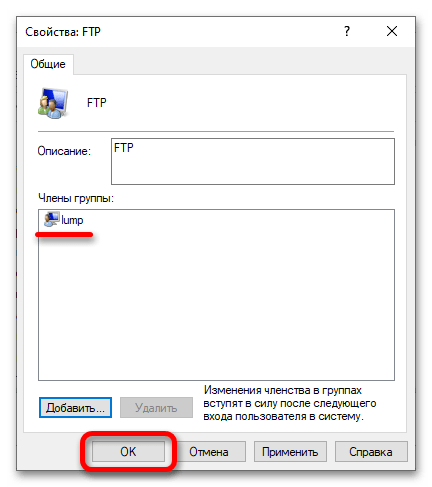
Убедитесь, что новый пользователь отображается в указанном на изображении ниже поле, после чего щелкните по кнопке «ОК».
Если вы все сделали верно, тогда в свойствах группы «FTP» будет отображаться выбранный пользователь. При успешном выполнении поставленной задачи сохраните внесенные изменения, используя «ОК».

Примечание! При необходимости аналогичным образом вы можете создать и добавить в группу других пользователей. Вследствие этого к вашему серверу смогут подключиться сразу несколько авторизованных устройств.
Шаг 5: Изменение параметров безопасности целевой директории
На втором шаге текущей инструкции вы выбирали директорию, к которой у других людей будет доступ. Но они все равно не смогут ее открыть, пока не будут заданы соответствующие параметры безопасности. Делается это следующим образом:
- Откройте файловый менеджер «Проводник» и перейдите в раздел «Этот компьютер». Если нужно, перейдите к выбранной на втором шаге директории и кликните по ней правой кнопкой мыши, чтобы вызвать окно «Свойства».
- В новом окне проследуйте на вкладку «Безопасность» и нажмите «Изменить».
- После этого в похожем меню кликните по кнопке «Добавить», чтобы открыть интерфейс добавления новых пользователей и групп.
- Добавьте группу «FTP», чтобы в дальнейшем предоставить всем ее пользователям доступ к файлам выбранной директории. Делается это таким же способом, как было описано в последнем пункте инструкции на предыдущем шаге. Вам необходимо выбрать из списка нужный пункт, а после подтвердить это действие.
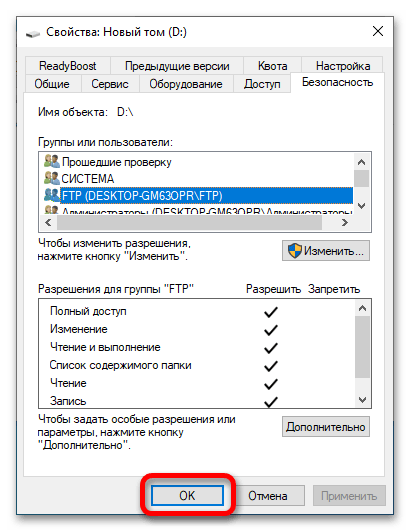
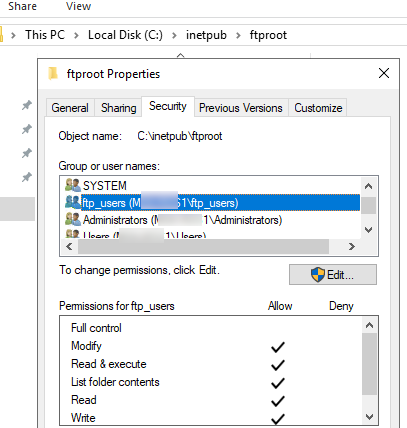
- Вернувшись в окно свойств безопасности, выделите в списке «Группы или пользователи» строку «FTP», после чего поставьте в блоке «Разрешения для группы «FTP»» отметку на пересечении столбца «Разрешить» и строки «Полный доступ». Как только вы это сделаете, автоматически проставятся все оставшиеся отметки в столбце «Разрешить». Закончив, щелкните по «ОК».
- В окне «Свойств» директории тоже кликните по «ОК», чтобы его закрыть. Сразу после этого можно переходить к следующему шагу этой инструкции.


Шаг 6: Добавление правил авторизации
Сейчас будут задаваться права пользователям на взаимодействие с файлами при входе на сервер FTP. Отметим, что вы можете их устанавливать отдельно для авторизованных аккаунтов и анонимных:
- Вызовите окно «Панели управления», а затем перейдите в раздел «Администрирование».
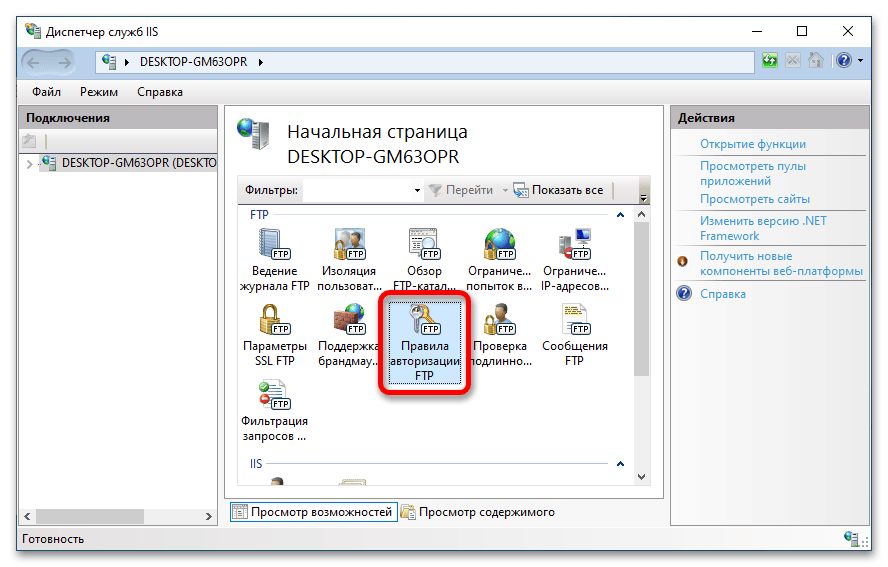
- В списке всех утилит найдите и запустите «Диспетчер служб IIS».
- В открывшемся окне найдите в блоке «FTP» пункт «Правила авторизации FTP» и кликните по нему дважды кнопкой мыши.
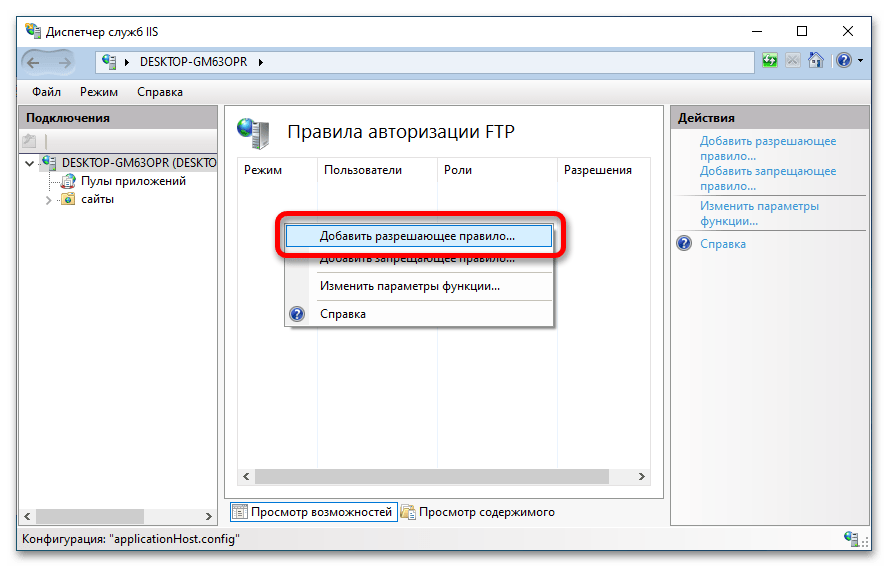
- В новом меню нажмите правой кнопкой мыши по пустому месту, а после этого выберите из появившегося списка опций «Добавить разрешающее правило».
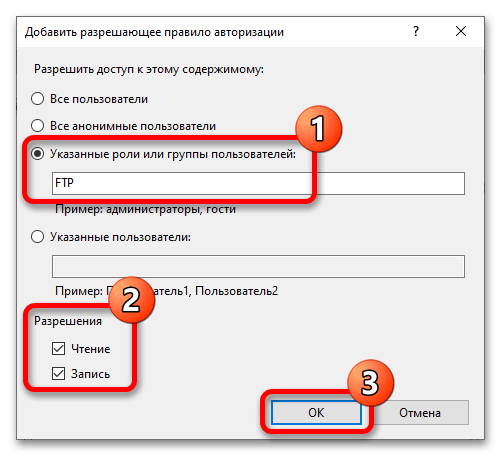
- В отобразившейся форме, если вы хотите задать права доступа для авторизованных пользователей, установите переключатель в положение «Указанные роли или группы пользователей» и в активированном поле введите «FTP» (без кавычек). В блоке «Разрешения» поставьте галочки напротив желаемых прав доступа. Для авторизованных юзеров рекомендуется выдавать полные права на запись и чтение. В завершение кликните по кнопке «ОК».

Вы также можете задать разрешения для анонимных пользователей: создайте новое правило и установите переключатель в положение «Все анонимные пользователи», а затем выберите разрешения, отметив нужные галочкой. Анонимным юзерам рекомендуется предоставлять доступ только для чтения, чтобы те не могли вносить изменения в файлы на сервере. В конце не забудьте нажать по «ОК», сохраняя тем самым внесенные правки.

Шаг 7: Подключение к FTP-серверу с другого компьютера
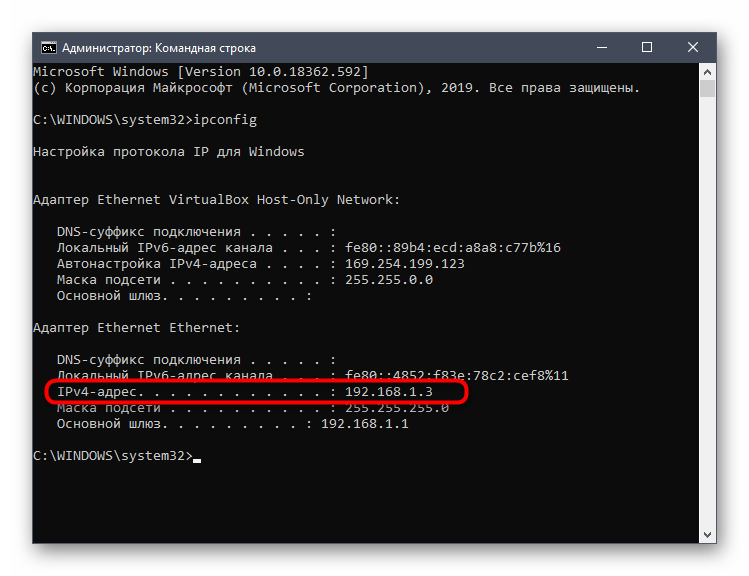
После того как сервер FTP будет создан и полностью настроен, к нему можно подключиться с другого устройства. Для этого необходимо знать IP компьютера, на котором он был запущен. Узнать его можно через «Командную строку» путем ввода всего одной команды. Но есть и другие способы достижения поставленной задачи. Все они подробно описываются в другой статье на нашем сайте. Ознакомиться с ней можно посредством представленной ниже ссылки.
Подробнее: Определение IP-адреса компьютера в Windows 10
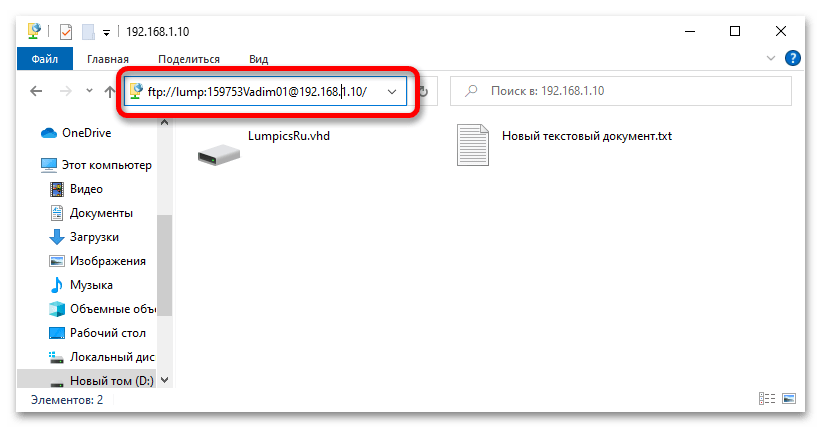
Зная IP целевого компьютера, к нему можно подключиться с другого устройства непосредственно из окна «Проводника». Запустите его и вставьте в адресную строку команду следующего формата:
ftp://<ip-адрес>/
Вместо <ip-адрес> необходимо указать сетевой адрес компьютера, на котором запущен сервер FTP. Пример выполнения такой команды можно видеть на изображении ниже. Таким образом на сервере может авторизоваться аноним.

Если вы хотите войти на сервер FTP с помощью логина и пароля, тогда в адресной строке необходимо ввести команду следующего синтаксиса:
ftp://<логин>:<пароль>@<ip-адрес>/
Заполните указанные данные и нажмите Enter — сразу после этого перед вами отобразится сетевая папка и вы будете иметь полный доступ ко всем находящимся там файлам. Явный пример ввода команды можно видеть непосредственно на изображении ниже.
Обратите внимание! Войти на сервер FTP можно не только через стандартный файловый менеджер операционной системы, но и через любой доступный браузер. На эту тему у нас написана отдельная статья, с которой вы можете ознакомиться, перейдя по ссылке ниже.
Подробнее: Как войти на FTP-сервер через браузер

Способ 2: FileZilla Server
Настроить сервер FTP можно как средствами операционной системы, так и с помощью стороннего программного обеспечения под названием FileZilla Server. Сначала потребуется выполнить настройку этого приложения, а делать это следует на компьютере, к которому будут подключаться, то есть на сервере. Подробная инструкция по этой теме размещена в другой публикации на нашем сайте — ознакомьтесь с ней, перейдя по ссылке ниже.
Подробнее: Настройка программы FileZilla Server

Как только сервер FTP будет настроен, к нему можно подключиться. Сделать это можно стандартным способом, как это было описано ранее в статье, или воспользоваться непосредственно программой FileZilla. На эту тему у нас тоже есть материал.
Подробнее: Настройка FTP-клиента FileZilla

Наша группа в TelegramПолезные советы и помощь
В этой пошаговой инструкции мы рассмотрим, как установить и настроить FTP сервер для простого обмена файлов на Windows Server. Во всех версий Windows Server (а также десктопных редакциях Windows 10/11) доступна встроенная роль сервера FTP, которая реализована на базе веб сервера IIS.
Содержание:
- Установка FTP сервера в Windows, создание FTP сайта
- Настройка прав доступа на FTP сервере в Windows
- Настройка изоляции FTP пользователей в Windows
- Быстрая установка и настройка FTP-сервера в Windows с помощью PowerShell
Установка FTP сервера в Windows, создание FTP сайта
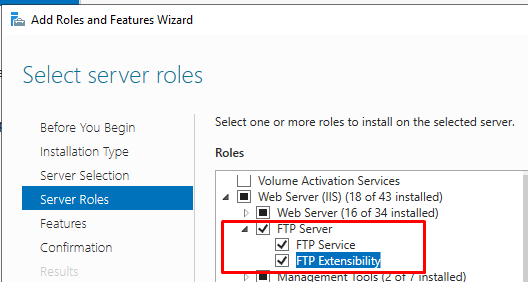
Чтобы установить роль FTP сервера в Windows Server, нужно открыть консоль Server Manager, запустите мастер Add Roles and Features, разверните роль Web Server (IIS) -> FTP Server и отметьте опции FTP Service и FTP Extensibility.
В Windows 10 и 11 установить компоненты FTP сервера можно через консоль Turn Windows features on or off (команда
optionalfeatures
). Разверните компонент Internet Information Services и выберите для установки службы FTP.
После установки роли вы можете создать FTP сайт. Для управления FTP сервером в Windows используется консоль управления IIS (inetmgr).
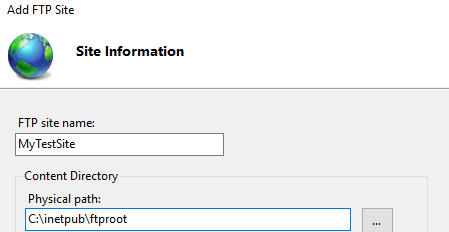
Создайте новый FTP сайт (Sites -> Add FTP Site).
- Имя FTP сайта: MyTestSite
- Корневой каталог FTP сайта: C:\inetpub\ftproot
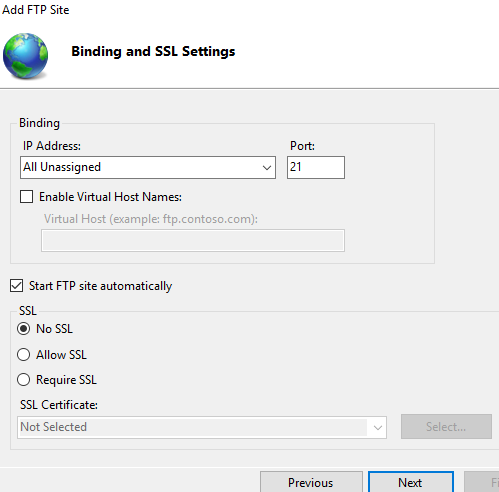
На следующем этапе можно выбрать сертификат для шифрования и защиты FTP трафика, которые рекомендуется использовать при передаче FTP данных через открытые сети. (подробнее о настройке FTP over SSL (FTPS) в Windows). В данном случае мы не используем шифрование (опция No SSL).
На этапе Authentication and Authorization оставьте настройки по умолчанию (мы настроим права доступа позже).
Настройка прав доступа на FTP сервере в Windows
FTP сервер на Windows поддерживает два типа аутентификации пользователей:
- Anonymous Authentication – к FTP серверу может подключиться кто угодно (в качестве имени указывается anonymous или guest, а в качестве пароля — произвольный email-адрес);
- Basic Authentication – для подключения к FTP серверу пользователь должен аутентифицироваться с помощью своей учетной записи (доменной или локальной).
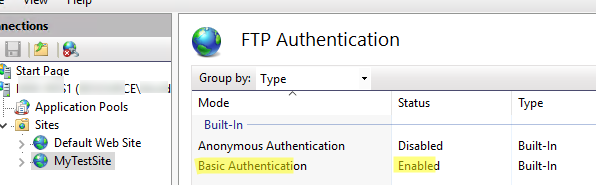
В нашем случае мы разрешим только
Basic Authentication
(разверните секцию FTP Authentication в настройках сайта и включите только этот режим).
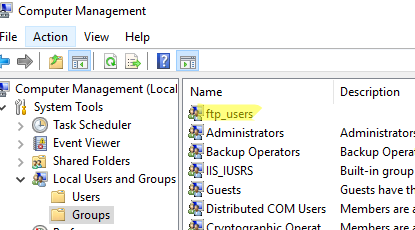
Для удобства предоставления доступа к FTP сайту, создайте локальную группу ftp_users.
Создадим локального пользователя ftp_user1 и добавим его в группу:
net user ftp_user1 /add *
net localgroup ftp_users ftp_user1 /add
Затем в эту же группу добавим доменного пользователя:
net localgroup ftp_users winitpro\kbuldogov /add
Предоставьте созданной группе ftp_users права RW на каталог C:\inetpub\ftproot.
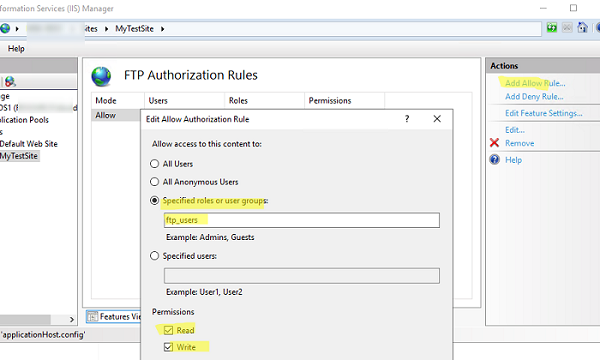
Затем нужно разрешить доступ к сайту в консоли управления FTP. Выберите раздел FTP Authorization Rules -> Add allow Rule. Создайте правило:
- Specified roles or user groups: ftp_users (разрешить доступ к сайту для указанной группы)
- Permissions: Read + Write (разрешить и чтение и запись в FTP каталог)
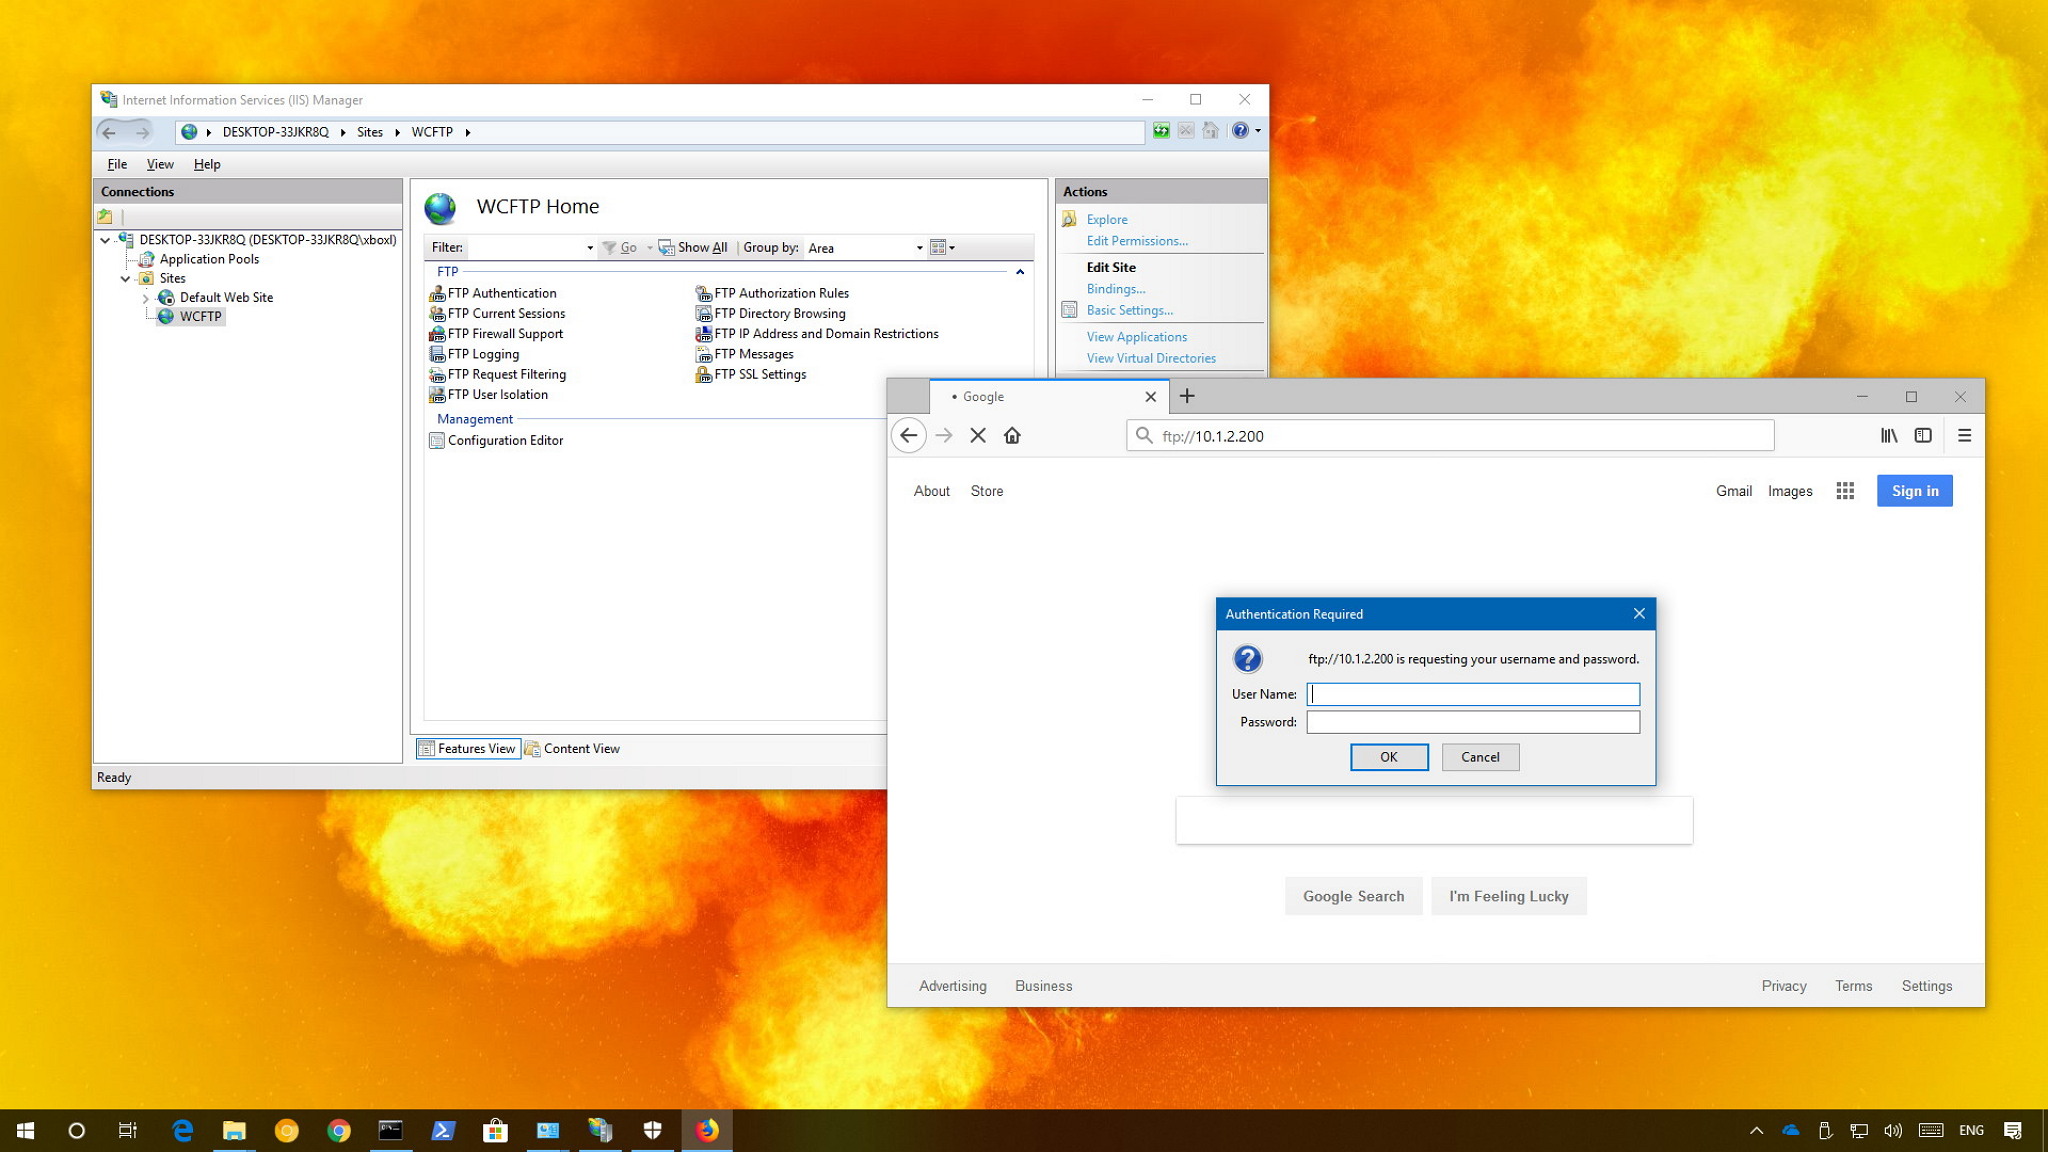
Теперь пользовали могут подключиться к FTP серверу. Для подключения можно использовать любой сторонний FTP клиент, или открыть FTP прямо из проводника Windows.
Укажите в адресной строке проводника Windows адрес FTP сервера в формате
ftp://192.168.13.221/
, укажите учетную запись пользователя и пароль.
Пользователь должен увидеть список файлов и папок на FTP сервере.
В данном случае все пользователи подключаются к корню FTP сайта и видят все файлы. FTP сервер в Windows поддерживает режим изоляции, при котором для каждого пользователя создается персональный каталог.
Настройка изоляции FTP пользователей в Windows
Если вам нужно ограничить доступ FTP пользователей только к своим папкам (домашним каталогам), нужно включить режим изоляции. Откройте пункт FTP User Isolation в настройка сервера.
Первые две не предполагают изоляции пользователей:
- FTP root directory – пользователь подключается в корневой каталога ftp-сайта;
- User name directory – пользователь подключается в каталог с именем пользователя. Если каталог отсутствует, сессия начинается с корневого каталога ftp-сайта.
Следующие 3 опции представляют различные режимы работы изоляции пользователей:
- User name directory (disable global virtualdirectories) – ftp-сессия пользователя изолирована каталогом имя которого соответствует имени пользователя ftp. Пользователи видят только собственный каталог (для них он является корневым) и не могут выйти за его рамки (в вышестоящий каталог дерева FTP). Любые глобальные виртуальные каталоги игнорируются;
- User name physical directory (enable global virtual directories) – FTP-сессия пользователя ограничена (изолирована) физическим каталогом с именем учетной записи пользователя FTP. Пользователь не может перейти выше своего каталога по структуре FTP. Однако пользователю доступны все созданные глобальные виртуальные каталоги;
- FTP home directory configured in Active Directory – FTP-пользователь изолируется в рамках своего домашнего каталога, заданного в настройках его учетной записи Active Directory (свойства FTPRoot и FTPDir).
Выберите нужный режим изоляции (в этом примере я использую второй вариант изоляции ftp пользователей).
Теперь внутри каталога C:\inetpub\ftproot нужно создать персональные директории для пользователей. В зависимости от типа учетной записи, путь к домашнему каталогу будет отличаться.
| Тип учетной записи | Синтаксис именования домашних каталогов |
| Анонимные пользователи |
%FtpRoot%\LocalUser\Public
|
| Локальная учетная запись Windows |
%FtpRoot%\LocalUser\%UserName%
|
| Доменная учетная запись Windows |
%FtpRoot%\%UserDomain%\%UserName%
|
| Специальные учетки IIS Manager или ASP.NET |
%FtpRoot%\LocalUser\%UserName%
|
В данном примере у меня есть два пользователя, для которых я создам следующие каталог
- Локальный пользователь ftp_user1 (
C:\inetpub\ftproot\LocalUser\ftpuser1
) - Доменный пользователь resource\kbuldogov (
C:\inetpub\ftproot\resource\kbuldogov
)
Теперь при подключении FTP пользователи будут видеть файлы только в своих персональных каталогах.
Быстрая установка и настройка FTP-сервера в Windows с помощью PowerShell
Для быстрого развертывания FTP сервера на Windows можно использовать PowerShell скрипт.
Установить роль FTP сервера в Windows Server:
Install-WindowsFeature Web-FTP-Server -IncludeAllSubFeature -IncludeManagementTools
Установка компонентов FTP в Windows 10 и 11:
Enable-WindowsOptionalFeature -Online -FeatureName IIS-FTPServer
Enable-WindowsOptionalFeature -Online -FeatureName IIS-FTPSvc
Enable-WindowsOptionalFeature -Online -FeatureName IIS-FTPExtensibility
Создать локального пользователя и группу с помощью PowerShell:
$pass = ConvertTo-SecureString "P@ssw0rd!" -AsPlainText -Force
New-LocalUser -Name ftp_user1 -Password $pass
New-LocalGroup -Name ftp_users
Add-LocalGroupMember -Group ftp_users -Member ftp_user1
Создать каталог для FTP сайта, предоставить NTFS права доступа для группы ftp_group:
$ftproot='C:\inetpub\ftproot\MyFTP'
mkdir $ftproot
New-WebFtpSite -Name MyFTP -IPAddress "*" -PhysicalPath $ftproot -Port 21
icacls $ftproot /grant "ftp_group:(OI)(CI)(F)"
Разрешить подключение без SSL:
$FtpSite="IIS:\Sites\MyFTP"
Set-ItemProperty $FtpSite -Name ftpServer.security.ssl.controlChannelPolicy -Value "SslAllow"
Set-ItemProperty $FtpSite -Name ftpServer.security.ssl.dataChannelPolicy -Value "SslAllow"
Включить basic аутентификацию:
Set-ItemProperty $FtpSite -Name ftpServer.security.authentication.basicAuthentication.enabled -Value $true
Разрешить доступ к сайту для указанной группы:
Add-WebConfiguration "/system.ftpServer/security/authorization" -Location MyFTP -PSPath IIS:\ -Value @{accessType="Allow";roles="ftp_users";permissions="Read,Write"}
Если нужно ограничить к FTP сайту доступ по IP:
Set-ItemProperty $FtpSite -Name ftpServer.firewallSupport.externalIp4Address -Value "192.168.10.101"
Создайте правило в Windows Defender Firewall, которое разрешает доступ к FTP серверу:
New-NetFirewallRule -Name "FTP 21" -DisplayName "FTP 21" -Profile All -Direction Inbound -Action Allow -Protocol TCP -LocalPort 21 -Program "%windir%\system32\svchost.exe"
Перезапустить FTP сайт:
Restart-WebItem -PSPath $FtpSite
Проверьте доступность FTP сервера с помощью командлета Test-NetConnection:
Test-NetConnection -ComputerName yourftpservername -Port 21
To set up a Microsoft Windows 7 system as an
FTP server
using software provided by Microsoft, you can take the following steps while
logged into an administrator account:
-
Click on the Windows
Start button
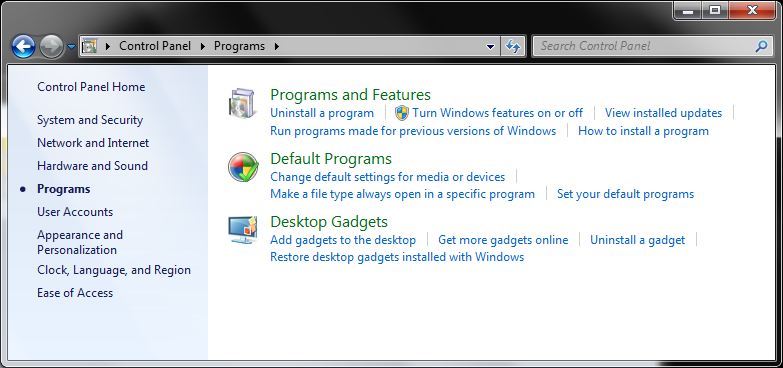
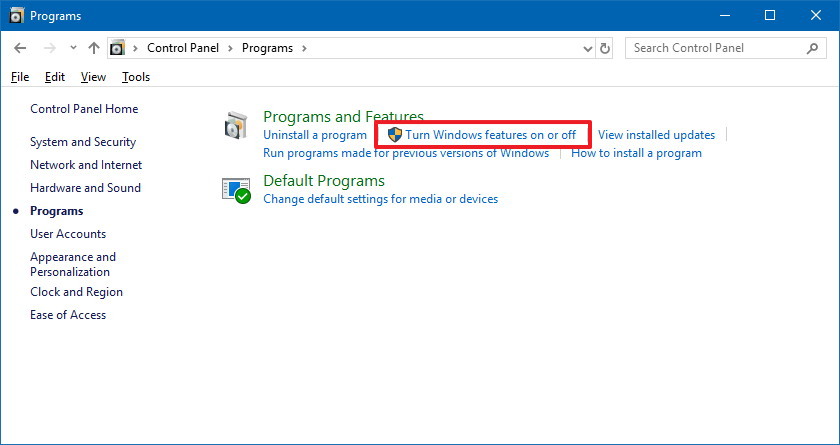
and select Control Panel. - Click on Programs.
-
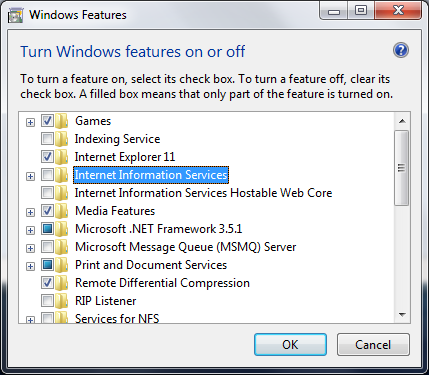
Under Programs and Features, click on Turn Windows Features
on or off.
-
From the Windows Features window, click on the plus sign to the
left of Internet Information Services to expose the options beneath
it.
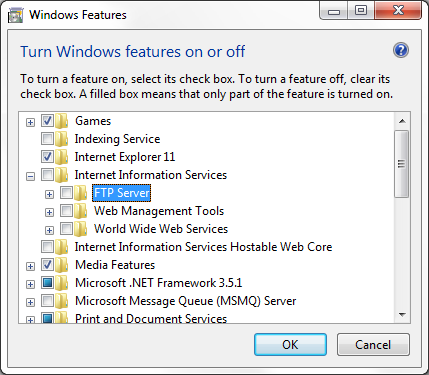
-
Click on the plus sign next to FTP Server to expose the
entries within it.
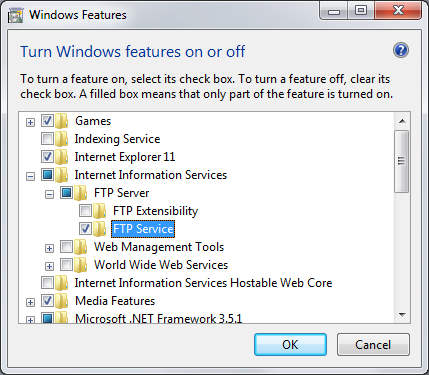
-
Select FTP Service by clicking on it, which will put a check mark in
the box next to it.
- Click on OK.
At this point, though you’ve completed the steps to be taken through
the Windows Features interface for the FTP Service, you
still won’t be able to access the system via FTP to transfer files. If you
tried connecting to the system from itself using
localhost or
127.0.0.1 from a command prompt, you would see the following:
C:\Users\Administrator>ftp
ftp> open localhost
ftp> dir
Not connected.
ftp>
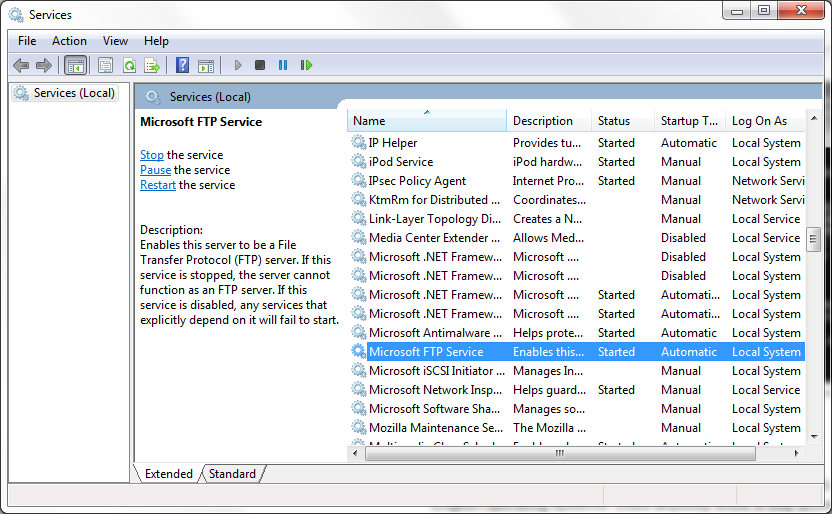
Though if you look at the services on the system by clicking
on the Windows Start button and typing services in the
«Search programs and files» field and hit Enter, you will
see Microsoft FTP Service with a status of «Started».
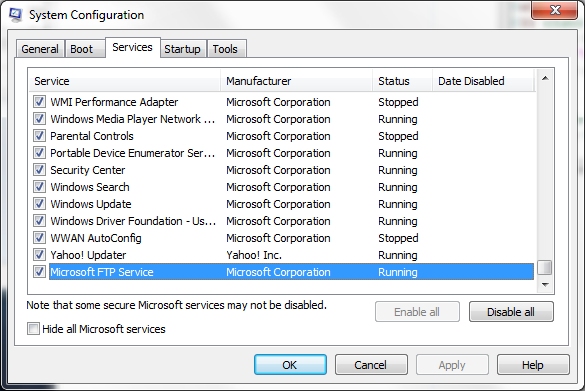
You will also see it listed with a status of «Running» if you check
the system configuration by selecting System Configuration from
Administrative Tools.
There will also be a C:\inetpub\ftproot directory, which
can serve as the root directory for the FTP server.
C:\Users\Administrator>dir c:\inetpub
 Volume in drive C has no label.
 Volume Serial Number is 9420-A68C

 Directory of c:\inetpub

12/23/2015  03:52 PM    <DIR>          .
12/23/2015  03:52 PM    <DIR>          ..
12/23/2015  03:52 PM    <DIR>          ftproot
               0 File(s)              0 bytes
               3 Dir(s)  59,508,944,896 bytes free

C:\Users\Administrator>dir c:\inetpub\ftproot
 Volume in drive C has no label.
 Volume Serial Number is 9420-A68C

 Directory of c:\inetpub\ftproot

12/23/2015  03:52 PM    <DIR>          .
12/23/2015  03:52 PM    <DIR>          ..
               0 File(s)              0 bytes
	       2 Dir(s)  59,508,944,896 bytes free
To be able to configure the FTP service, so you can actually use it,
you also need to add the IIS Management Console from the
Windows Features window you used to add the FTP Server
service to the system. So from the Windows Features window,
click on the plus sign to the left of Web Management Tools, which
appears below FTP Server within Internet Information Services.
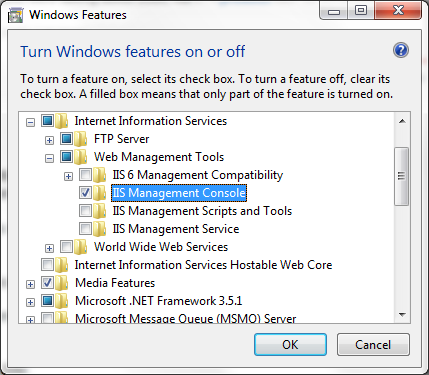
After you’ve selected IIS Management Console so that it has a
check mark in the box next to it, click on OK.
Now you can configure the FTP server service by taking the following
steps:
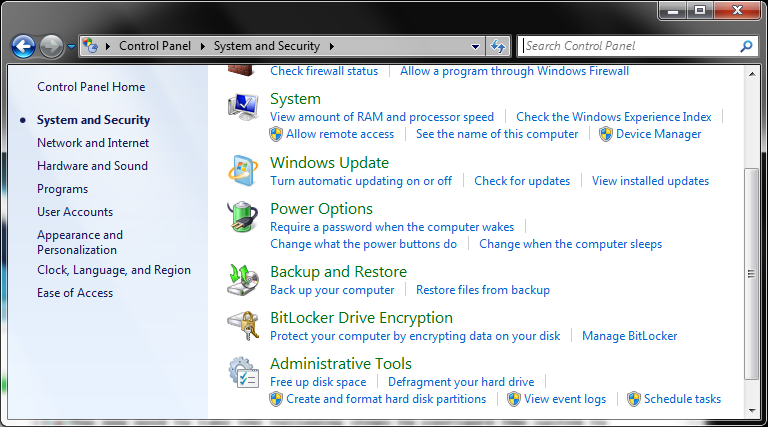
-
Click on the Windows
Start button
and select Control Panel. - Click on System and Security.
-
Click on Administrative Tools.

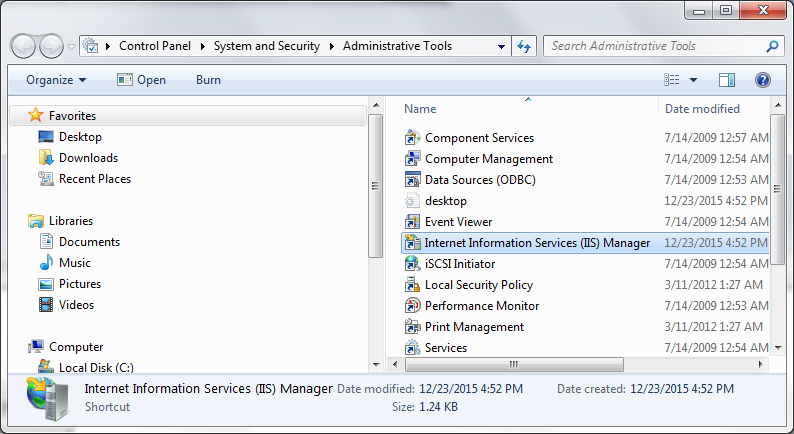
-
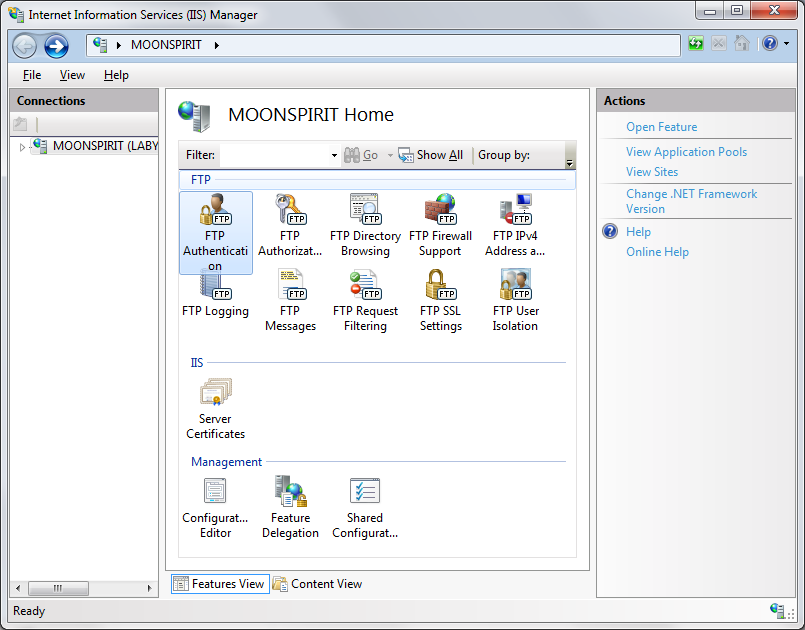
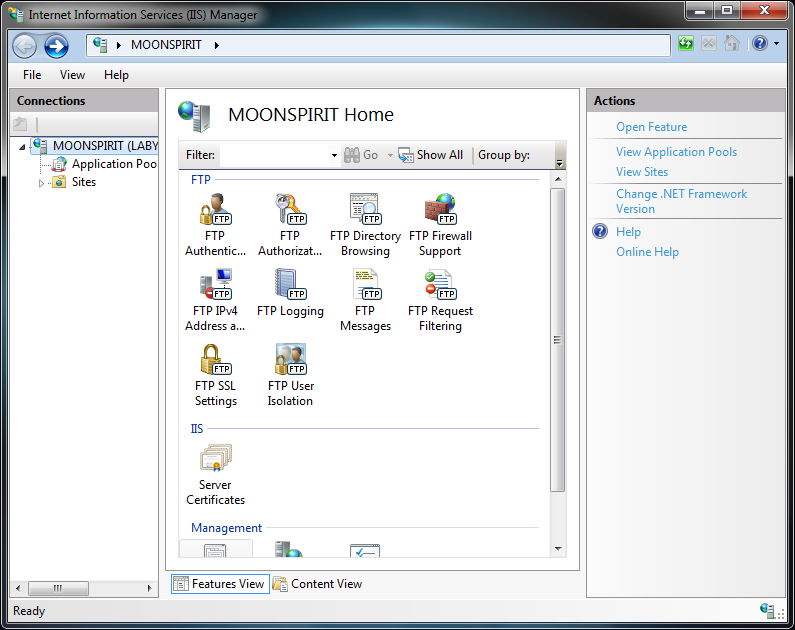
Double-click on Internet Information Services (IIS) Manager.

-
Now you need to create a FTP site for the system by clicking on
the rightward pointing triangle to the left of the system name under
Connections in the left pane of the Internet Information
Services (IIS) Manager window.
You will then see Application Pools and Sites.

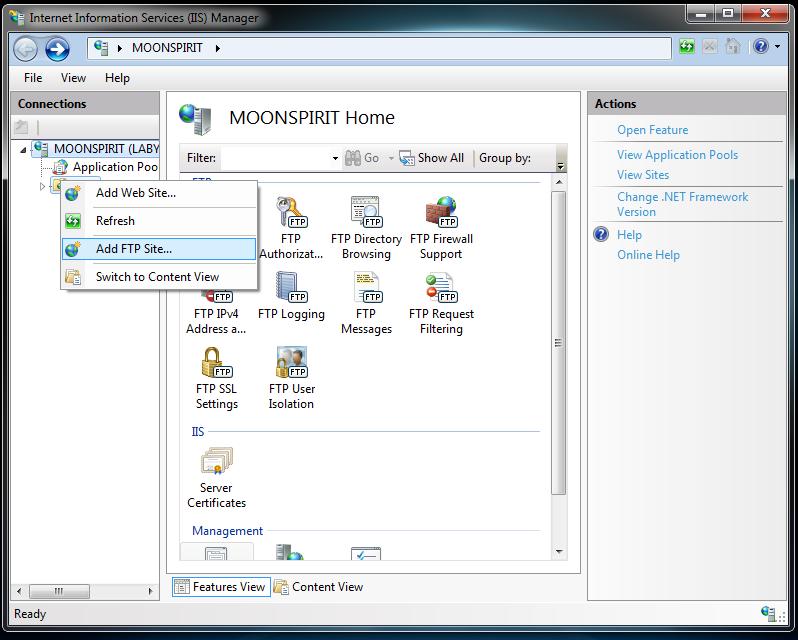
-
Right-click on Sites and select Add FTP Site.

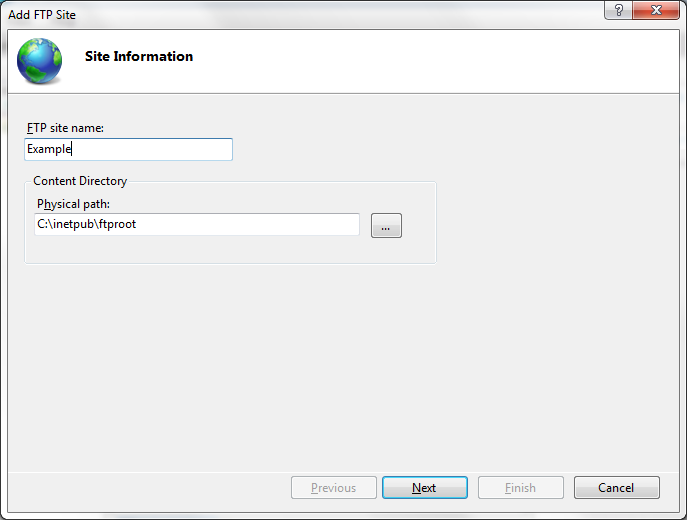
-
Give the site whatever name you like and then specify the directory that
will be the root directory for the site, e.g.,C:\inetpub\ftproot,
if you want to use the directory created when the service was installed.
You can click on the button with the three dots on it next to the
«Physical path» field to browse to a directory, if you prefer. -
Click on Next to create the site.
-
The next window will show Binding and SSL Settings. You can
make any changes you wish, e.g., you can opt not to require SSL, and
then click on Next.
If you leave the setting at «Require SSL» rather than change it to
«Allow SSL», when you connect from an FTP client, if the authorization
credentials aren’t encrypted via SSL, you will see the following when you
connect to the server:ftp> open localhost Connected to ftp.example.com. 220 Microsoft FTP Service User (ftp.example.com:(none)): anonymous 534-Policy requires SSL. Win32 error: Access is denied. Error details: SSL policy requires SSL for control channel. 534 End Login failed. ftp>
The control channel is what FTP uses for sending the username and
password.You can change the setting later, if needed, by selecting «Allow SSL
conections» from FTP SSL Settings within the Internet
Information Services (IIS) Manager. -
At the Authentication and Authorization Information window,
you will need to select an FTP Authentication method.
-
You have to enable an authentication method if you want to allow FTP users to
access your content. You will need to select at least one of the following
two authentication modes:- Anonymous Authentication
- Basic Authentication
Anonymous authentication is a built-in authentication method that allows any
user to access any public content by providing an anonymous user name and
password. I.e., when prompted for a userid, the FTP client user can enter
anonymousand when prompted for a password the user can type
anything he chooses or just hit Enter. You would allow
Anonymous authentication when you want to allow all clients who visit your FTP
site to be able to view its content without knowing a user name and password
for an account on the system.Basic authentication is a built-in authentication method that requires users to
provide a valid Windows user name and password to gain access to content. The
user account can be local to the FTP server or a domain account.
Basic authentication may transmit unencrypted passwords across the network. You
should use Basic authentication only when you know that the connection between
the client and the server is secured using
SSL.Though, if the FTP server and the only systems having access to it are
all on your Local
Area Network (LAN), e.g., your home network, where you control all of the
systems and network equipment, then you may not need to ensure that
the authentication information is encrypted with SSL, but if you are allowing
people to log into the system from the Internet with userids and passwords
rather than via anonymous FTP access, it is best to ensure that usernames and
passwords are encrypted so that no one along the network path between the
client and server can use a
packet sniffer to
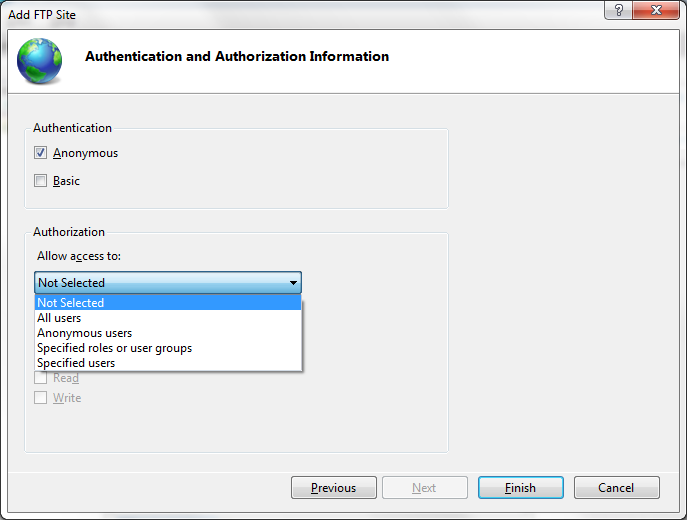
view the username and password used by FTP clients.For «Allow access to», you can select from «All users», «Anonymous users»,
«Specified roles or user groups», or «Specified users».
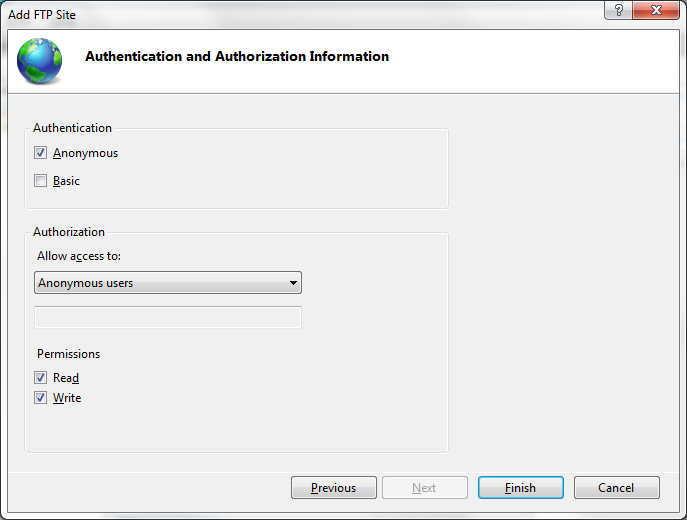
Once you’ve made a choice for «Allow access to», you can then choose to
grant read and/or write access.
- Click on the Finish button to complete the process.

If you selected C:\inetput\ftproot for the root directory
for the site and try to transfer a file there from an FTP client, but
get the error message «File system denied the access», you will need to
change the security permissions for the directory if you wish to allow
anonymous users to transfer files to that directory.
C:\Users\Public\Documents>ftp
ftp> open localhost
Connected to ftp.example.com.
220 Microsoft FTP Service
User (ftp.example.com:(none)): anonymous
331 Anonymous access allowed, send identity (e-mail name) as password.
Password:
230 User logged in.
ftp> put somefile.txt
200 EPRT command successful.
550-Access is denied.
 Win32 error:   Access is denied.
 Error details: File system denied the access.
550 End
ftp>
You can change the permissions by right-clicking on the ftproot directory from the
File Explorer,
selecting Properties and then clicking on the
Security tab. Then click on the Edit button then the
Add button. Put everyone in the Enter the object
names to select field then click on OK. Ensure Write
permission is checked and then click on OK and then OK
again to close the ftproot Properties window.
You then should be able to place files in the directory using an FTP
client.
ftp> open localhost
Connected to ftp.example.com
220 Microsoft FTP Service
User (ftp.example.com:(none)): anonymous
331 Anonymous access allowed, send identity (e-mail name) as password.
Password:
230 User logged in.
ftp> put somefile.txt
200 EPRT command successful.
125 Data connection already open; Transfer starting.
226 Transfer complete.
ftp: 11 bytes sent in 0.00Seconds 11000.00Kbytes/sec.
ftp>
If you try to connect from another system and are unable to do so, e.g.,
you get a «connection timed out» message, you may need to configure the
firewall software on the FTP server system to allow the connectivity. If
you are using the built-in Microsoft Windows firewall software rather than
some third-party firewall software, such as might be included with an
antivirus package, you can use the command netsh advfirewall firewall at a command prompt to
set rule group="FTP Server" new enable="yes"
configure the Microsoft Windows firewall software.
C:\Users\Administrator>netsh advfirewall firewall set rule group="FTP Server" ne
w enable="yes"

Updated 5 rule(s).
Ok.


C:\Users\Administrator>
Note: these steps were taken on a Microsoft Windows 7 Ultimate sysetm.
Created: Wednesday December 23, 2015
Setting up a File Transfer Protocol (FTP) server on Windows 10 is perhaps one of the most convenient solutions to upload and download files from virtually anywhere to your computer without the limitations typically found with cloud storage services.
Using an FTP server, you’re basically creating a private cloud that you have absolute control. You don’t have monthly transfers caps and speeds can be fast (depending on your internet subscription).
Also, there not file type or size restrictions, which means that you can transfer a 1KB text file as well as 1TB backup file, and you can create as many accounts as you want to let family and friends store and share files with each other.
There are plenty third-party solutions to set up a file server of this kind, but even though it may sound complicated, the FTP feature bundled on Windows 10 isn’t difficult to set up.
In this Windows 10 guide, we’ll walk you through the steps to set up and manage an FTP server on your computer to transfer files within your home network or remotely over the internet.
- How to install the FTP server components on Windows 10
- How to configure an FTP server site on Windows 10
- How to set up multiple FTP accounts on Windows 10
- How to connect to an FTP server remotely on Windows 10
How to install the FTP server components on Windows 10
Although Windows 10 includes support to set up an FTP server, you need to add the required components manually.
To install the FTP server components, do the following:
All the latest news, reviews, and guides for Windows and Xbox diehards.
- Open Control Panel.
- Click on Programs.
- Under «Programs and Features,» click the Turn Windows features on or off link.
- Expand the «Internet Information Services» feature, and expand the FTP server option.
- Check the FTP Extensibility and FTP Service options.
- Check the Web Management Tools option with the default selections, but making sure that the IIS Management Console option is checked.
- Click the OK button.
- Click the Close button.
Once you’ve completed the steps, the components to set up an FTP server will be installed on your device.
How to configure an FTP server site on Windows 10
After installing the required components, you can proceed to configure an FTP server on the computer, which involves creating a new FTP site, setting up firewall rules, and allowing external connections.
Setting up an FTP site
To set up an FTP site, do the following:
- Open Control Panel.
- Click on System and Security.
- Click on Administrative Tools.
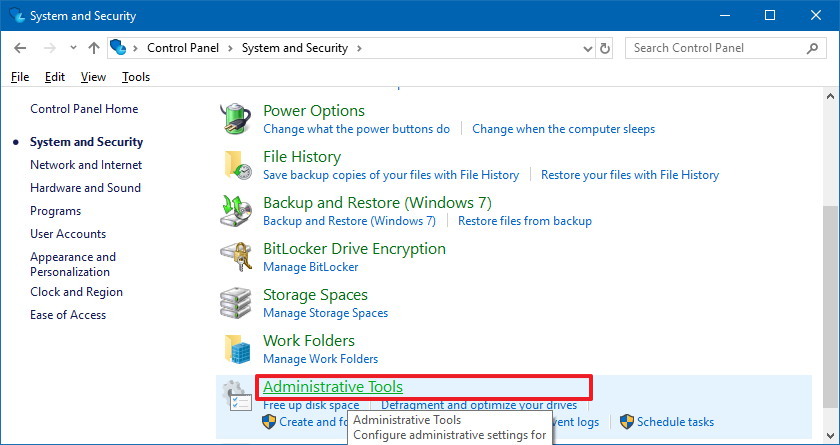
- Double-click the Internet Information Services (IIS) Manager shortcut.
- On the «Connections» pane, right-click Sites, and select the Add FTP Site option.
- In the FTP site name, type a short descriptive name for the server.
- In the «Content Directory» section, under «Physical path,» click the button on the right to locate the folder you want to use to store your FTP files.Quick Tip: It’s recommended to create a folder in the root of the main system drive, or on an entirely different hard drive. Otherwise, if you set the home folder in one of your default folders when adding multiple accounts, users won’t have permission to access the folder. (You can adjust folder permissions, but it’s not recommended.)
- Click the Next button.
- Use the default Binding settings selections.
- Check the Start FTP site automatically option.
- In the «SSL» section, check the No SSL option.Important: In a business environment or on an FTP server that will host sensitive data, it’s best practice to configure the site to require SSL to prevent transmitting data in clear text.
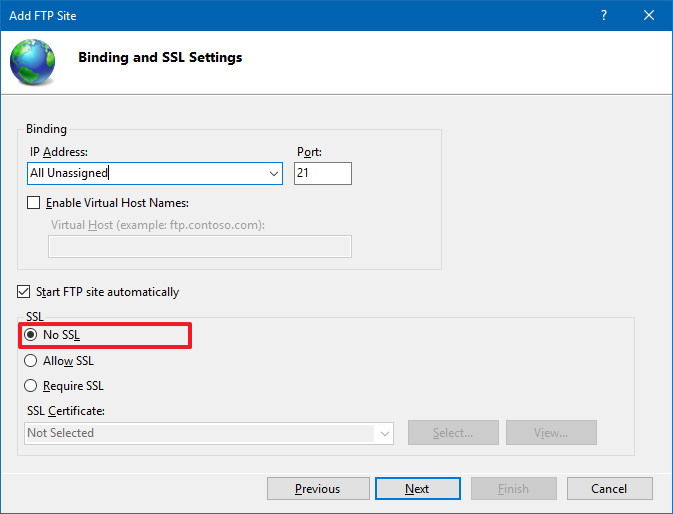
- Click the Next button.
- In the «Authentication» section, check the Basic option.
- In the «Authorization» section, use the drop-down menu, and select Specified users option.
- Type the email address of your Windows 10 account or local account name to allow yourself access to the FTP server.
- Check the Read and Write options.
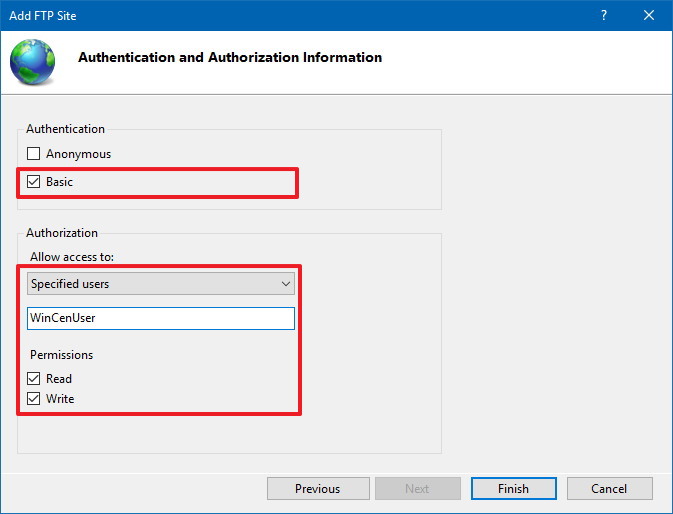
- Click the Finish button.
After completing the steps, the FTP site should now be operational on your computer.
Configuring firewall rules
If you’re running the built-in firewall on Windows 10, connections to the FTP server will be blocked by default until you manually allow the service through, using these steps:
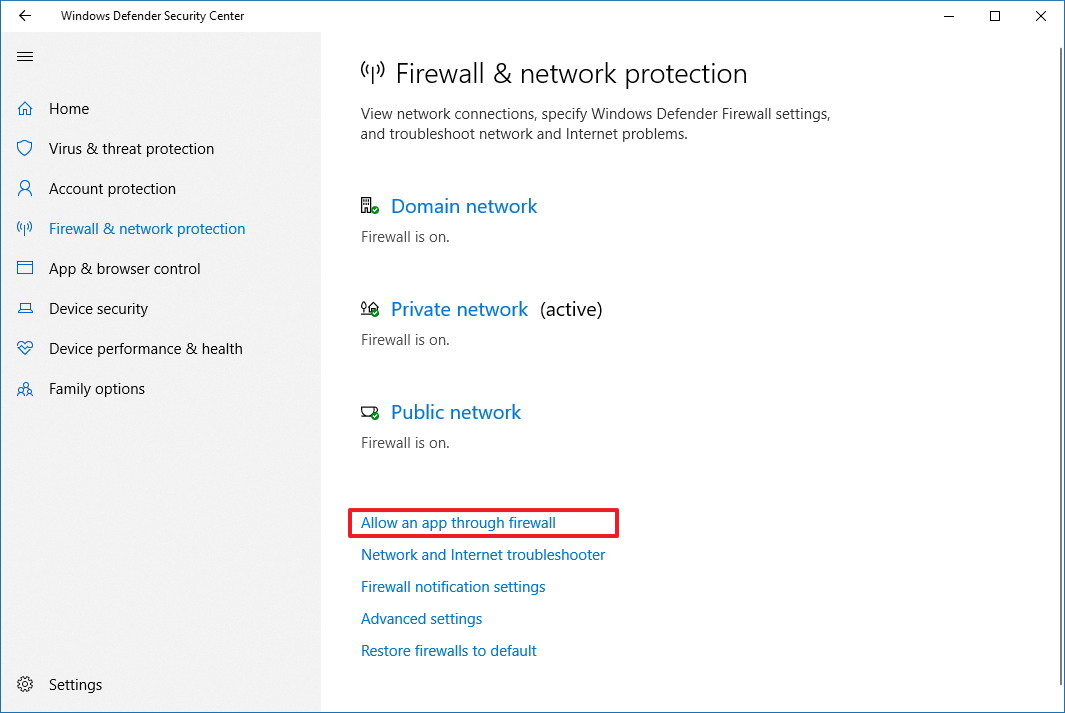
- Open Windows Defender Security Center.
- Click on Firewall & network protection.
- Click the Allow an app through firewall option.
- Click the Change settings button.
- Check the FTP Server option, as well as the options to allow Private and Public access.
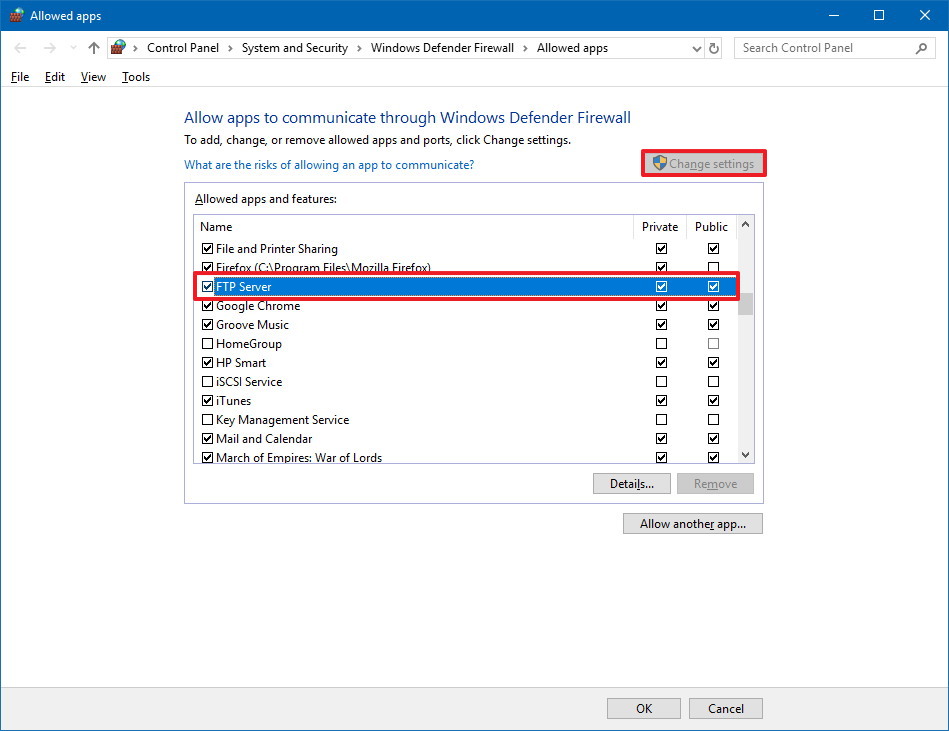
Once you’ve completed the steps, the FTP server should now be accessible from the local network.
In the case that you’re running third-party security software, make sure to check your vendor support website for more specific details on adding firewall rules.
Allowing external connections
To make your FTP server reachable from the internet, you also need to open the Transmission Control Protocol/Internet Protocol (TCP/IP) port number 21 on your router.
The instructions to forward a port will be different depending on the router, and even depending on the firmware version. In the steps below, we’ll outline the general steps, but you may need to consult your manufacturer support website for specific details.
To forward port 21 to allow FTP connections outside of the local network, do the following:
- Open Settings.
- Click on Network & Internet.
- Click on Status.
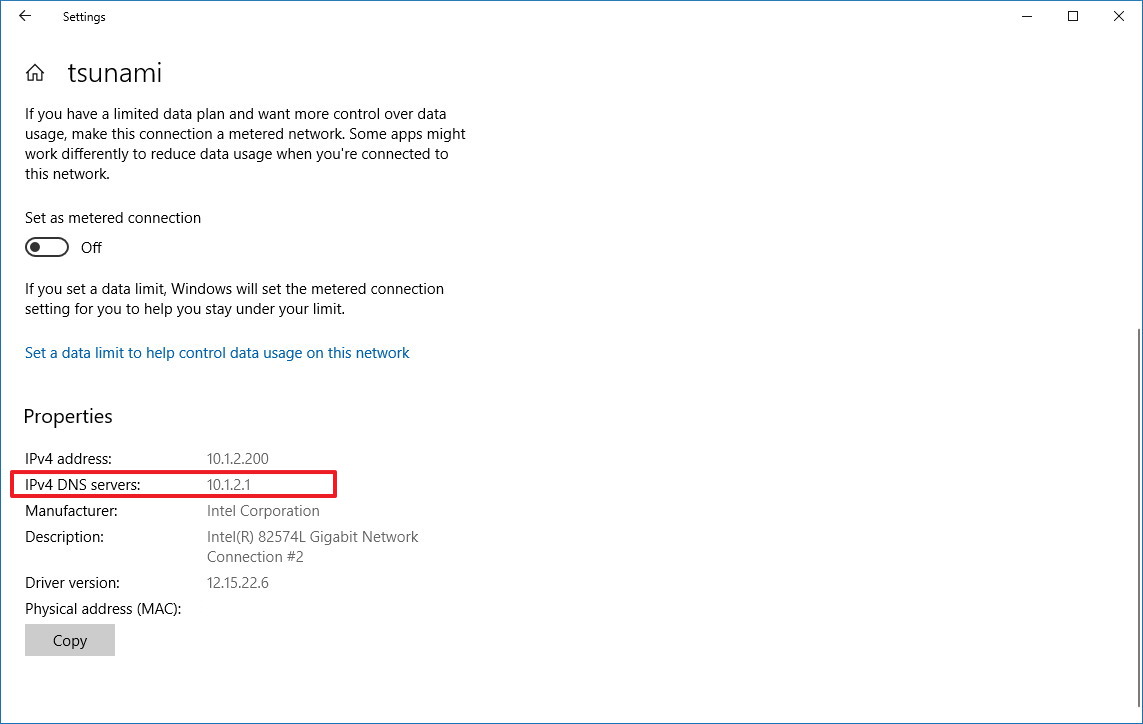
- Click the Change connections properties option.
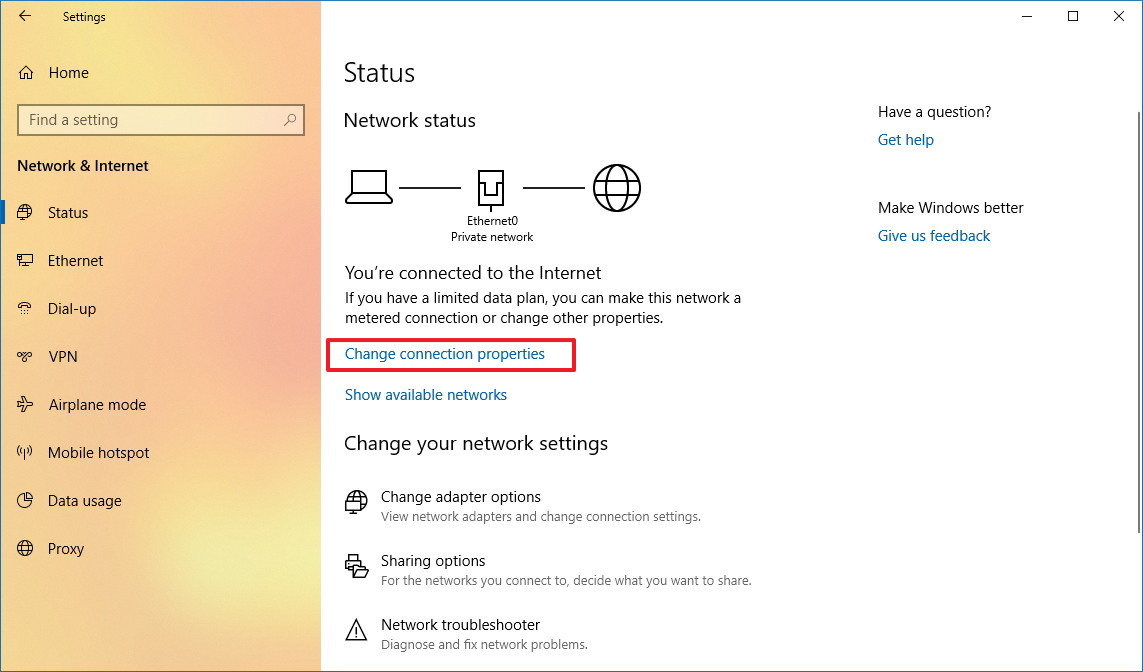
- Make a note of the IPv4 DNS server address, which is the address of your router. Usually, it’s private address in the 192.168.x.x range. For instance, 192.168.1.1 or 192.168.2.1.
- Open your default web browser.
- On the address bar enter the router’s IP address (for example, 192.168.1.1) and press Enter.
- Sign-in with your router credentials.
- Open the Port Forwarding page. (Usually, these settings can be found under the WAN, NAT, or Advanced settings pages.)
- Add a new rule to forward incoming connections to the FTP server from the internet by including this information:
- Service name: Type a descriptive name for the port forwarding rule.
- Port range: 21.
- Local IP: This is the FTP server IP address that the router will forward incoming connections. (This is your IPv4 address. See step No. 5.)
- Local port: 21.
- Protocol: TCP.
- Click the add button.
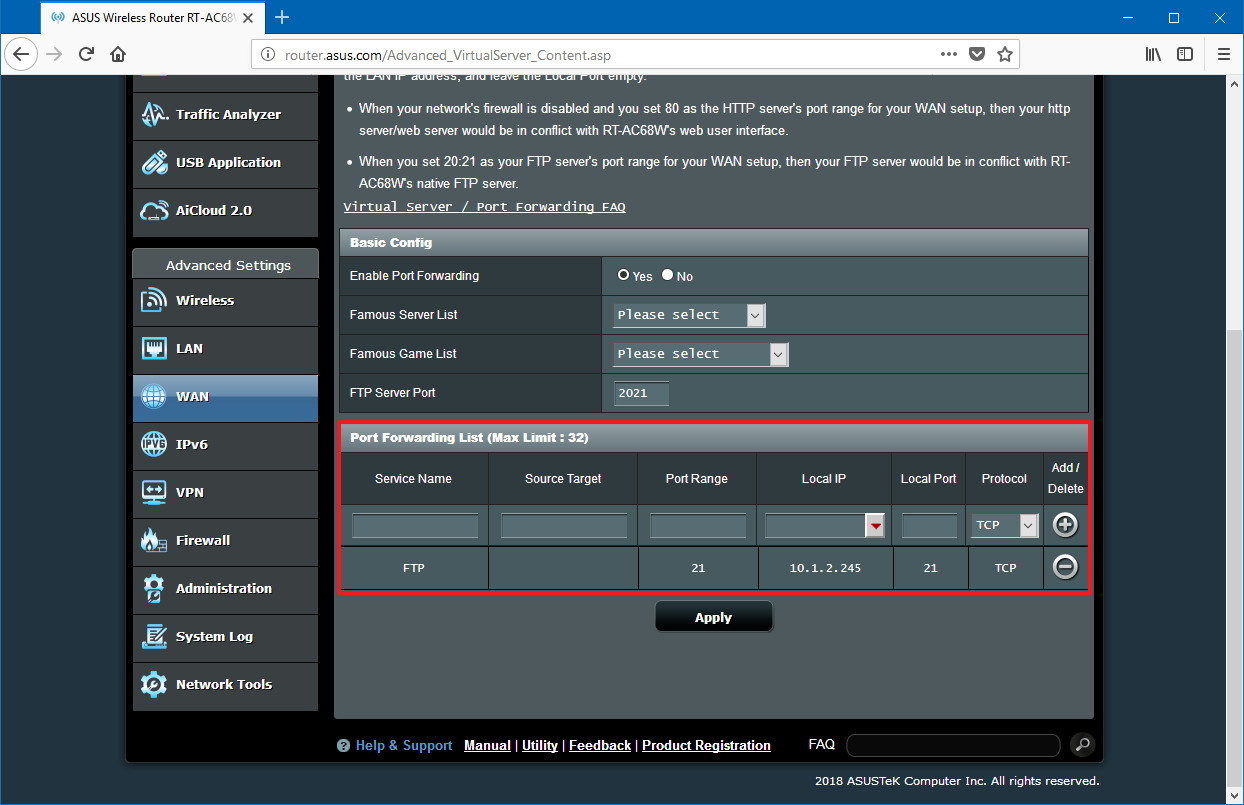
- Click the Apply button to save the changes.
After completing the steps, any incoming connection on port 21 will be forwarded to the FTP server to establish a networking session.
Setting up a static IP address
If you’re planning to transfer files over the internet in the regular basis, then it’s recommended to configure a static IP address to prevent having to reconfigure your router in the future if your device’s IP changes.
- Open Control Panel.
- Click on Network and Internet.
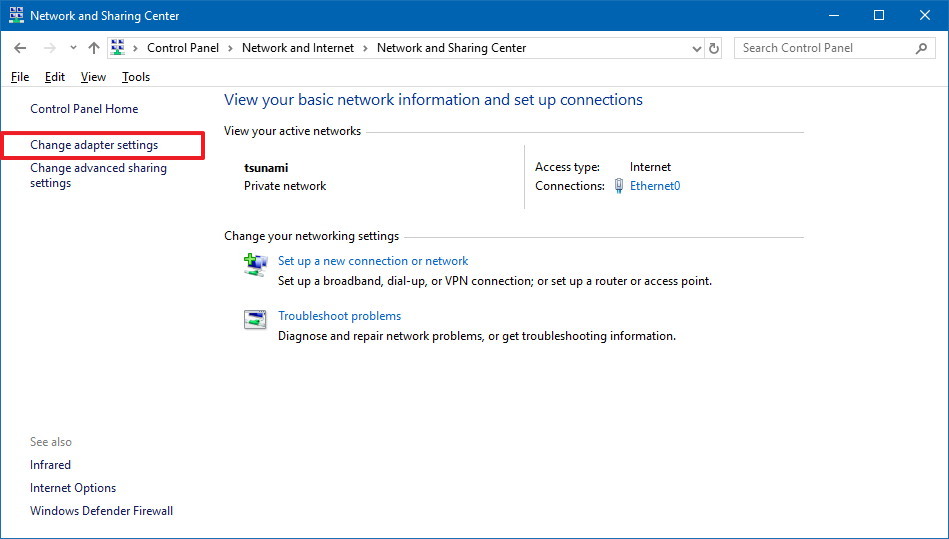
- Click on Network and Sharing Center.
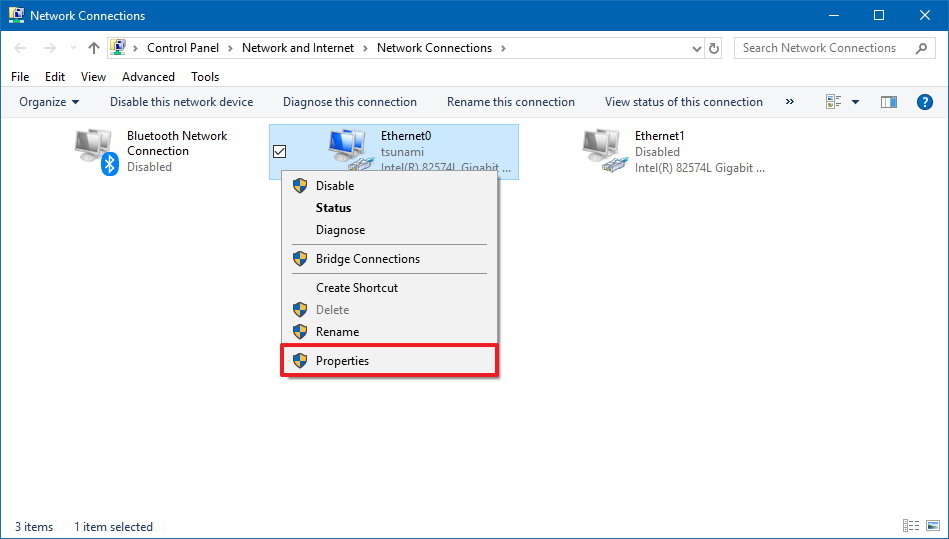
- In the left pane, click the Change adapter settings option.
- Right-click the network adapter, and select the Properties option.
- Select the Internet Protocol Version 4 (TCP/IPv4) option.
- Click the Properties button.
- Select the Use the following IP address option.
- Specify the IP settings:
- IP address: Specify a static network address for the computer. You should use an address outside of the DHCP server scope configured in your router to prevent conflicts. For instance, 192.168.1.200.
- Subnet mask: In a home network, the address usually is 255.255.255.0.
- Default gateway: This is usually the IP address of the router. For example, 192.168.1.1.
- Preferred DNS server: Typically, this is also the IP address of your router.
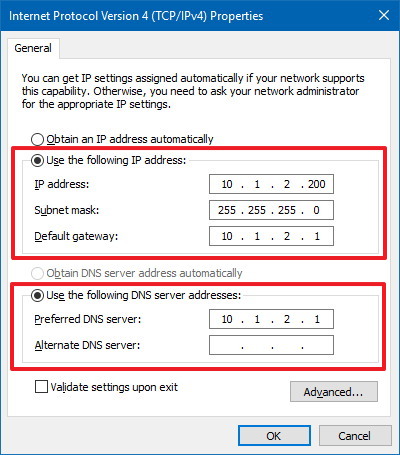
- Click the OK button.
- Click the Close button.
Once you’ve completed the steps, the IP configuration will no longer change, and it’ll prevent potential connection problems in the future.
How to set up multiple FTP accounts on Windows 10
If you want to allow multiple people to download and upload files to the FTP server simultaneously, you need to set up multiple accounts with specific permissions.
This process is done by creating new standard Windows 10 accounts and configuring the correct settings.
Creating new user accounts
To add multiple accounts to an FTP server, do the following:
- Open Settings.
- Click on Accounts.
- Click on Family & other people.
- Click the Add someone else to this PC button.
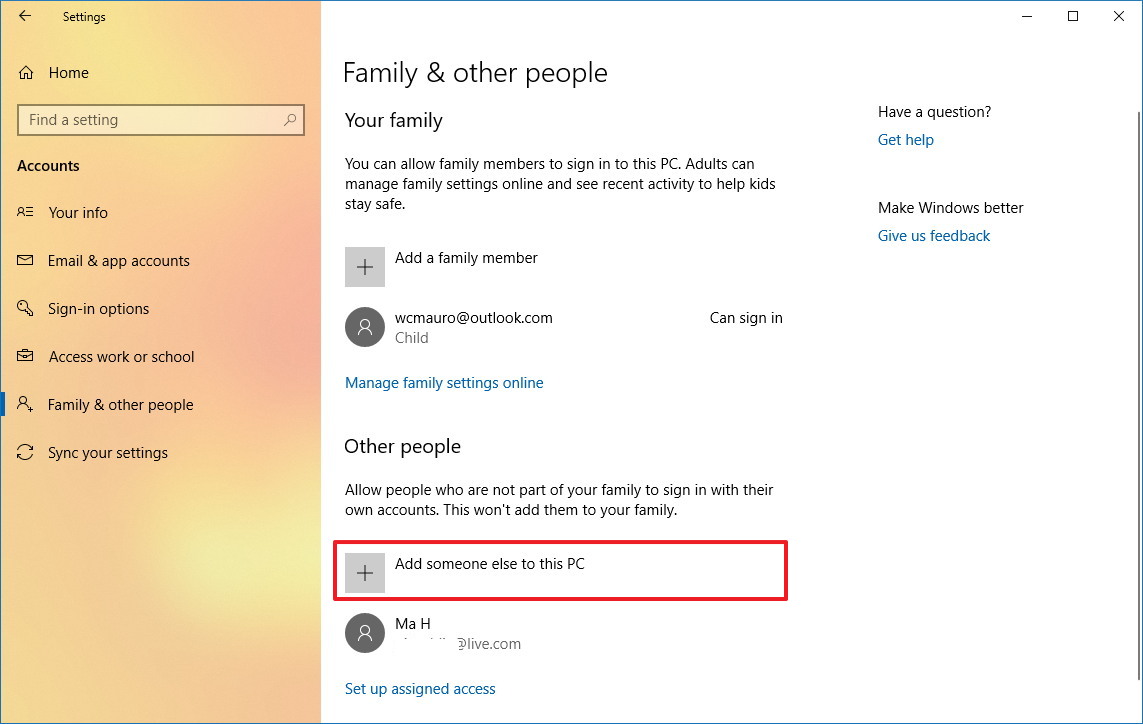
- Type the Microsoft account address for the user you want to allow access to the FTP server.Quick Tip: If you want users to access the server using local accounts, then click the I don’t have this person sign-in information option, click the Add a user without a Microsoft account option, and follow the on-screen direction to create the account.
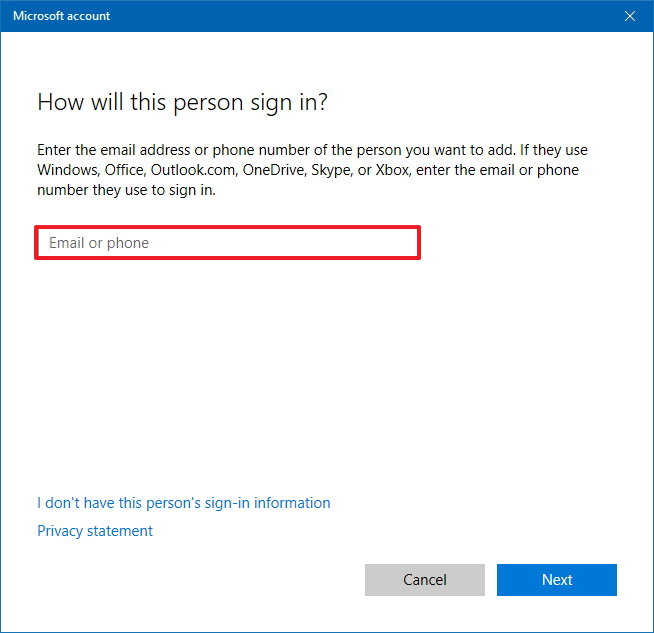
- Click the Next button.
Once you’ve completed the steps, you may need to repeat the steps to create additional accounts.
Configuring user accounts to FTP server
If you want multiple users to access the FTP server at the same time, you need to modify the server settings using these steps:
- Open Control Panel.
- Click on System and Security.
- Click on Administrative Tools.
- Double-click the Internet Information Services (IIS) Manager shortcut.
- On the left pane, expand «Sites,» and select the site you created earlier.
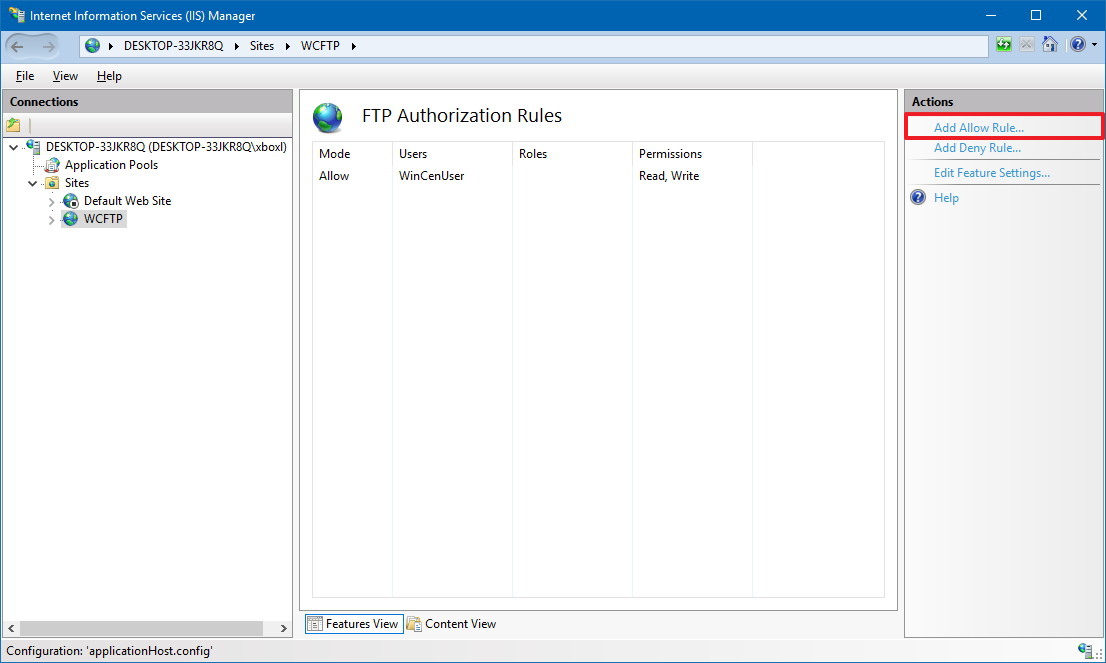
- Double-click the FTP Authorization Rules option.
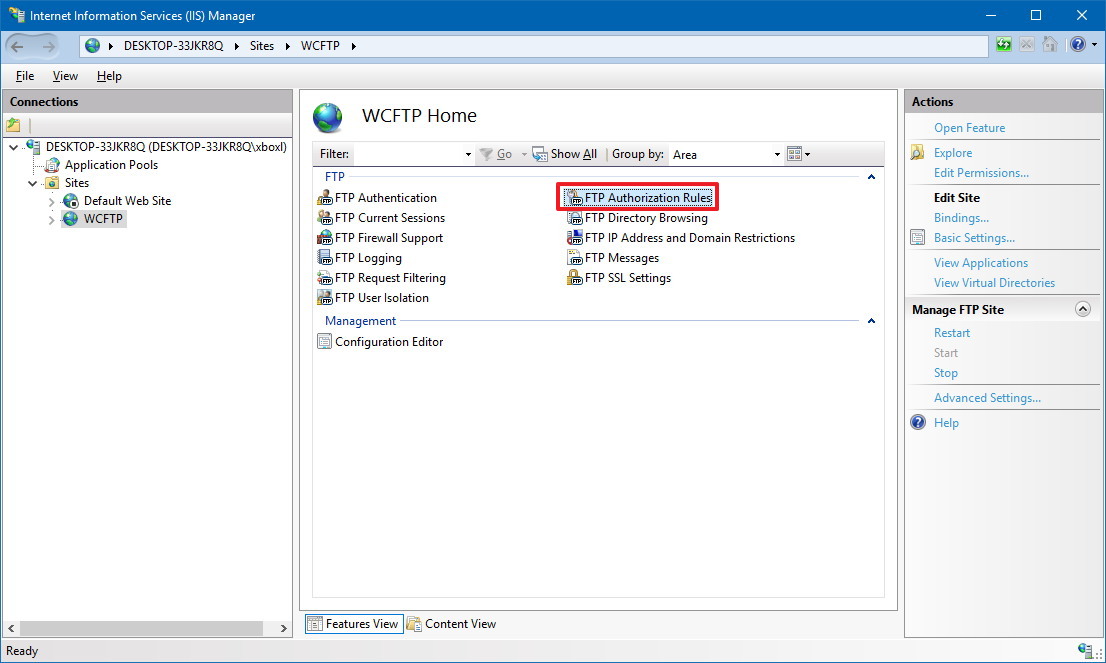
- On the right pane, click the Add Allow Rule option.
- Select one of these two options:
- All Users: Allows every user configured on your Windows 10 device to access the FTP server.
- Specified users: You can use this option to specify all the users you want to access the FTP server. (You must separate each user using a comma.)
- Check the Read and Write options.
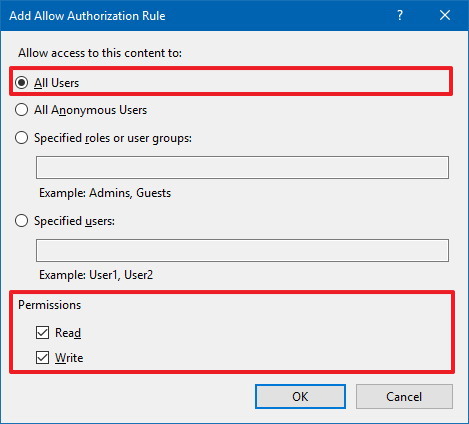
- Click the OK button.
After completing the steps, all the users you specified should now be able to access the FTP server to download and upload files remotely.
How to connect to an FTP server remotely on Windows 10
Once you’ve created and configured your FTP server, there are many ways to view, download, and upload files.
Viewing and downloading files
If you want to browse and download files, you can do this using Internet Explorer, Firefox, or Chrome:
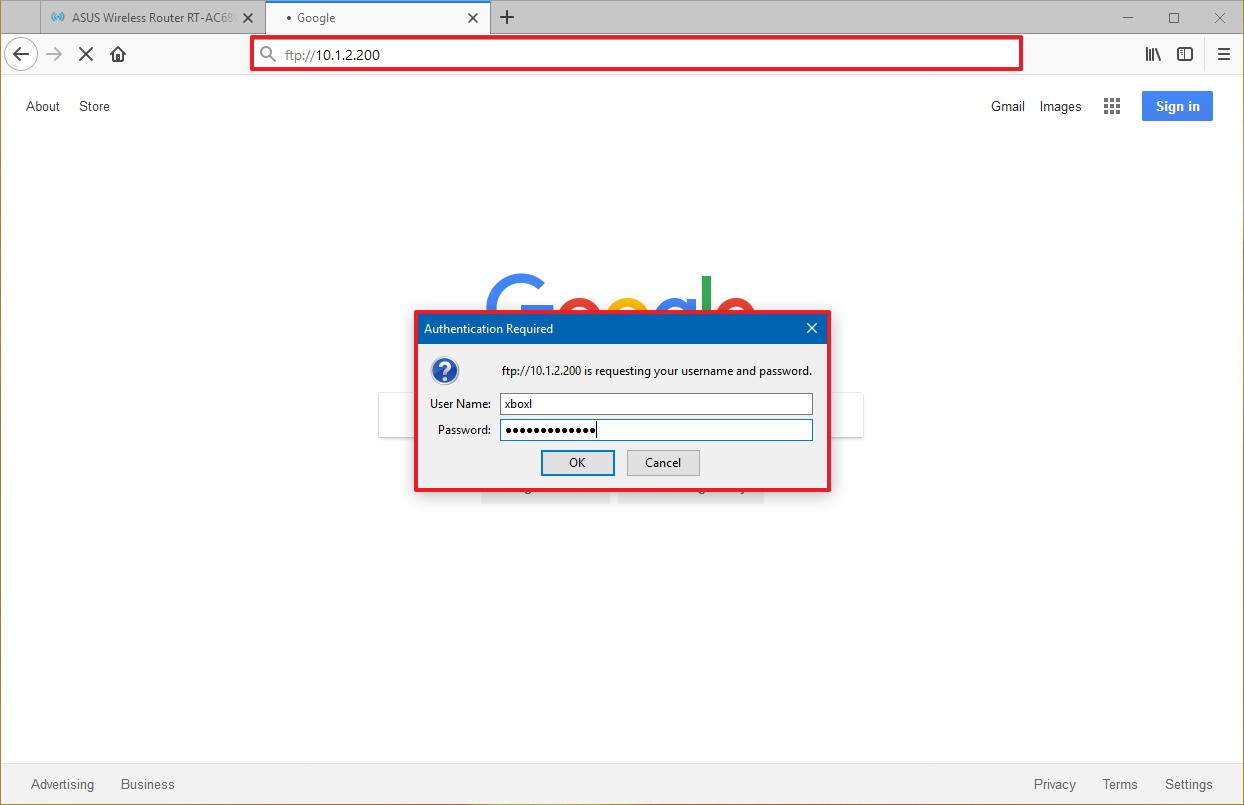
- Open a web browser.
- In the address bar, type the server IP address using ftp://, and press Enter. For example, ftp://192.168.1.100.
- Type your account credentials.
- Click the Log on button.
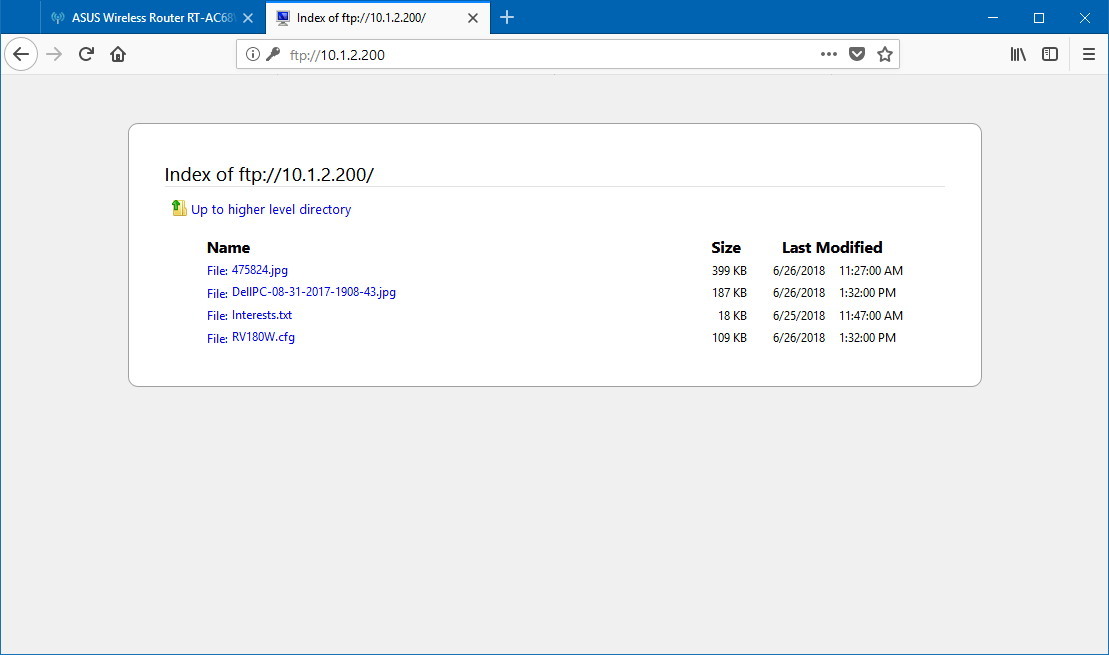
After completing the steps, you should be able to navigate and download files and folders from the server.
In the case that you’re trying to connect from the internet, you have to specify the public (internet) IP address of the network hosting the FTP server.
The easiest way to find out is to search for «What’s my IP» in Google or Bing within the network before trying to connect from a remote connection. Also, unless you have an static IP address from your internet provider, or you’re not using DDNS service, you may need to check your public IP regularly in order to connect, in case it changes.
Viewing, downloading, and uploading files
The easiest way to browse, download and upload files is to use File Explorer with these steps.
- Open File Explorer.
- In the address bar, type the server address using ftp://, and press Enter. For example, ftp://192.168.1.100.
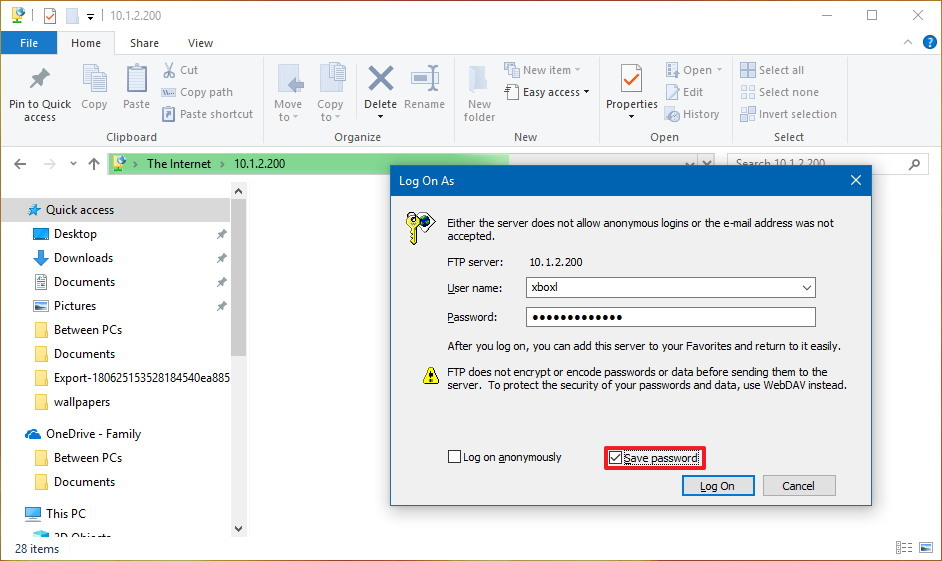
- Type your account credentials.
- Check the Save password option.
- Click the Log on button.
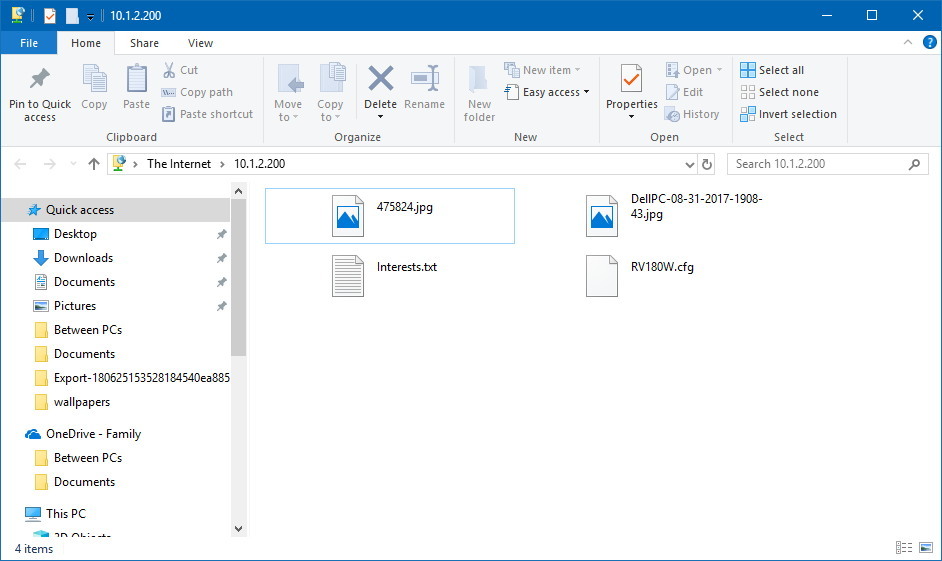
After completing the steps, you’ll be able to browse folders and files, as well as download and upload files as if they’re locally stored on your device.
You can avoid going through the steps to reconnect to the FTP server by right-clicking Quick Access in the left pane, and selecting the Pin current folder to Quick Access option.
Of course, you’re not limited to use File Explorer as there are plenty of FTP clients, such as FileZilla that you can use to transfer files.
Wrapping things up
In this guide, we outlined the steps to get started with the FTP server feature available on Windows 10, and the steps to view, download, and upload files. However, bear in mind that you can only establish a connection as long as the device hosting the service is turned on. You won’t be able to access your files when the computer is asleep or hibernating.
The FTP Server component is available on Windows 10 Pro as well as on Windows 10 Home, and older versions of the OS, including Windows 8.1 and Windows 7.
More Windows 10 resources
For more helpful articles, coverage, and answers to common questions about Windows 10, visit the following resources:
- Windows 10 on Windows Central – All you need to know
- Windows 10 help, tips, and tricks
- Windows 10 forums on Windows Central
Mauro Huculak has been a Windows How-To Expert contributor for WindowsCentral.com for nearly a decade and has over 15 years of experience writing comprehensive guides. He also has an IT background and has achieved different professional certifications from Microsoft, Cisco, VMware, and CompTIA. He has been recognized as a Microsoft MVP for many years.
In this step-by-step guide, we’ll look at how to install and configure an FTP server for easy file transfer on Windows Server. The built-in FTP server is available in all versions of Windows Server (as well as the desktop editions of Windows 10/11) and is based on the IIS web server role.
Contents:
- Install an FTP Server on Windows and Create an FTP Site
- Setup User Access Permission on Windows FTP Server
- Configure FTP User Isolation on Windows
- Install and Configure an FTP Server with PowerShell
Install an FTP Server on Windows and Create an FTP Site
To install the FTP Server role in Windows Server, open the Server Manager console, run the Add Roles and Features wizard, expand Web Server (IIS) -> FTP Server, and check the options FTP Service and FTP Extensibility.
In Windows 10 and 11, you can install FTP server components using the Turn Windows Features on or off dialog (run the optionalfeatures command). Expand the Internet Information Services and select the FTP Server services to install.
Once you have installed the role, you can create an FTP site. Use the IIS management console (inetmgr) to manage an FTP server on Windows.
Create a new FTP site (Sites -> Add FTP Site).
- FTP site name: MyTestSite
- FTP site root directory: C:\inetpub\ftproot
The next step allows you to select a certificate to encrypt and protect FTP traffic (FTP over SSL /FTPS), which is recommended for use when transferring FTP data over public networks. In this case, we don’t use encryption (No SSL option).
Leave the default settings in the Authentication and Authorization step (we will configure FTP user access permissions later).
Setup User Access Permission on Windows FTP Server
There are two types of user authentication supported by the Windows FTP server:
- Anonymous Authentication – Anyone can access the FTP server (anonymous or guest is specified as the name of the user and any e-mail address as a password);
- Basic Authentication – the user must authenticate with their Windows account (local or domain) to connect to the FTP server.
In this case, we will only allow Basic Authentication (in the Site Settings, expand the FTP Authentication section and enable only this mode).
To make it easier to grant access to the FTP site, create a local group called ftp_users.
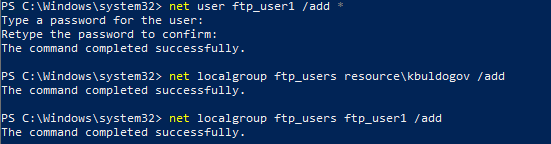
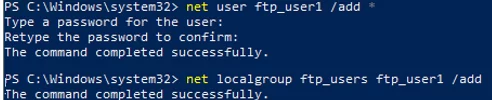
Let’s create a local user ftp_user1 and add it to the group:
net user ftp_user1 /add *
 net localgroup ftp_users ftp_user1 /add
Then add a domain user to that group:
net localgroup ftp_users woshub\m.korman /add
Give the ftp_users group you created NTFS RW permissions on the C:\inetpub\ftproot directory.
Next, allow specified users and groups to access the FTP site. In the IIS console, select FTP Authorization Rules -> Add allow Rule:
- Specified roles or user groups: ftp_users (users in this group can access FTP)
- Permissions: Read + Write (Allow both reading and writing to the FTP directory

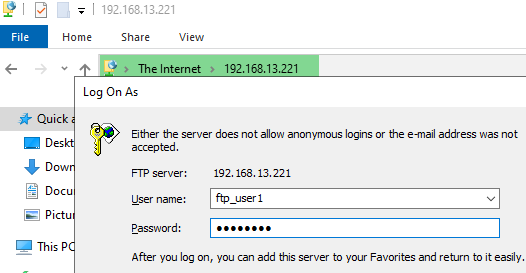
Users can now connect to the FTP server. You can connect to an FTP server with any third-party FTP client, or open FTP directly from Windows Explorer.
In the File Explorer address bar, type the address of the FTP server in the format ftp://192.168.3.21/ and specify the user account and password.
A user should see a list of files and folders on the FTP server.
In this case, all the users will connect to the root of the FTP site and will see all the files. The Windows FTP server supports isolation mode, which allows the creation of a home directory for each user.
Configure FTP User Isolation on Windows
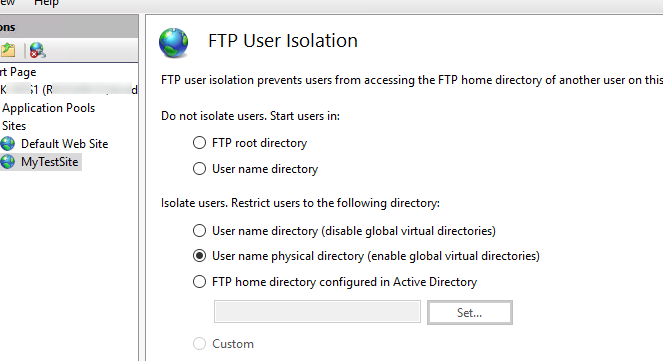
If you need to restrict FTP users’ access to only their folders (home directories), you need to enable the FTP isolation mode. In IIS, open the FTP user isolation in the site setting.
The first two options don’t suggest user isolation:
- FTP root directory – the user connects to the FTP site root;
- User name directory – FTP user session starts with the
%username%directory. The session will start from the ftp site root if this directory doesn’t exist.
Different modes of user isolation are available in the next three options:
-
- User name directory (disable global virtual directories) – the user’s FTP session is isolated by a directory whose name corresponds to the FTP username. Users only see their own directory (it is their root FTP-directory) and cannot go beyond it (to an upper directory in the FTP tree). Any global virtual directories will be ignored;
- User name physical directory (enable global virtual directories) – the user’s FTP session is restricted (isolated) to a physical directory that has the same name as the name of the FTP user account. A user cannot go outside their FTPHome directory. All global virtual directories are available to users;
- FTP home directory configured in Active Directory – The FTP user is isolated within the home directory specified in their Active Directory account settings (FTPRoot and FTPDir user attributes).
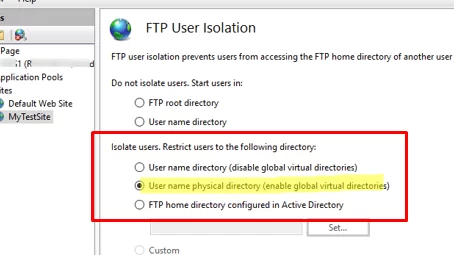
Select the isolation mode you want to use (in this example, I am using the second option to isolate the FTP users).
Now you need to create personal directories for users in C:\inetpub\ftproot. Depending on the type of user account, the path to the FTP home directory will be different.
| Account Type | Syntax of FTP Home Directory Naming |
| Anonymous users | %FtpRoot%\LocalUser\Public |
| Local Windows account | %FtpRoot%\LocalUser\%UserName% |
| Domain Windows account | %FtpRoot%\%UserDomain%\%UserName% |
| Special IIS Manager or ASP.NET accounts | %FtpRoot%\LocalUser\%UserName% |
In this example, I have two users for whom I will create the following directories
- Local user ftp_user1 (
C:\inetpub\ftproot\LocalUser\ftp_user1) - Domain user woshub\m.korman (
C:\inetpub\ftproot\woshub\m.korman)
Users will now only see files in their home directories when connecting to an FTP server.
Install and Configure an FTP Server with PowerShell
You can quickly deploy an FTP server on Windows using the PowerShell script.
Install the FTP server role and management tools on Windows Server:
Install-WindowsFeature Web-FTP-Server -IncludeAllSubFeature -IncludeManagementTools
Installing the FTP server feature on Windows 10 or 11:
Enable-WindowsOptionalFeature -Online -FeatureName IIS-FTPServer
 Enable-WindowsOptionalFeature -Online -FeatureName IIS-FTPSvc
 Enable-WindowsOptionalFeature -Online -FeatureName IIS-FTPExtensibility
Create a local user and group using PowerShell:
$pass = ConvertTo-SecureString "myPassw0rd22!" -AsPlainText -Force
 New-LocalUser -Name ftp_user1 -Password $pass
 New-LocalGroup -Name ftp_users
 Add-LocalGroupMember -Group ftp_users -Member ftp_user1
Create an FTP site directory and grant NTFS access permissions to the ftp_users group:
$ftproot='C:\inetpub\ftproot\MyFTP'
 mkdir $ftproot
 New-WebFtpSite -Name MyFTP -IPAddress "*" -PhysicalPath $ftproot -Port 21
 icacls $ftproot /grant "ftp_group:(OI)(CI)(F)"
Allow to connect without using SSL:
$FtpSite="IIS:\Sites\MyFTP"
 Set-ItemProperty $FtpSite -Name ftpServer.security.ssl.controlChannelPolicy -Value "SslAllow"
 Set-ItemProperty $FtpSite -Name ftpServer.security.ssl.dataChannelPolicy -Value "SslAllow"
Allow basic authentication on the FTP site:
Set-ItemProperty $FtpSite -Name ftpServer.security.authentication.basicAuthentication.enabled -Value $true
Allow the specified group to access the FTP site:
Add-WebConfiguration "/system.ftpServer/security/authorization" -Location MyFTP -PSPath IIS:\ -Value @{accessType="Allow";roles="ftp_users";permissions="Read,Write"}
To restrict access to an FTP site by source IP address:
Set-ItemProperty $FtpSite -Name ftpServer.firewallSupport.externalIp4Address -Value "10.2.1.100"
Create a Windows Defender firewall rule to allow access to the FTP server:
New-NetFirewallRule -Name "FTP 21" -DisplayName "FTP 21" -Profile All -Direction Inbound -Action Allow -Protocol TCP -LocalPort 21 -Program "%windir%\system32\svchost.exe"
Restart the FTP site:
Restart-WebItem -PSPath $FtpSite
Use the Test-NetConnection cmdlet to verify that your FTP server is available:
Test-NetConnection -ComputerName yourftpservername -Port 21