
Visual Studio Code has rich support for debugging various types of applications. VS Code has built-in support for JavaScript, TypeScript, and Node.js debugging. The Visual Studio Marketplace has a wide variety of debugging extensions to add debugging support for other languages and runtimes to VS Code.
This article describes the debugging features of VS Code and how to get started with debugging in VS Code. You also learn how you can use Copilot in VS Code to accelerate setting up your debugging configuration and starting a debugging session.
The following video shows how to get started with debugging in VS Code.
Debugger user interface
The following diagram shows the main components of the debugger user interface:
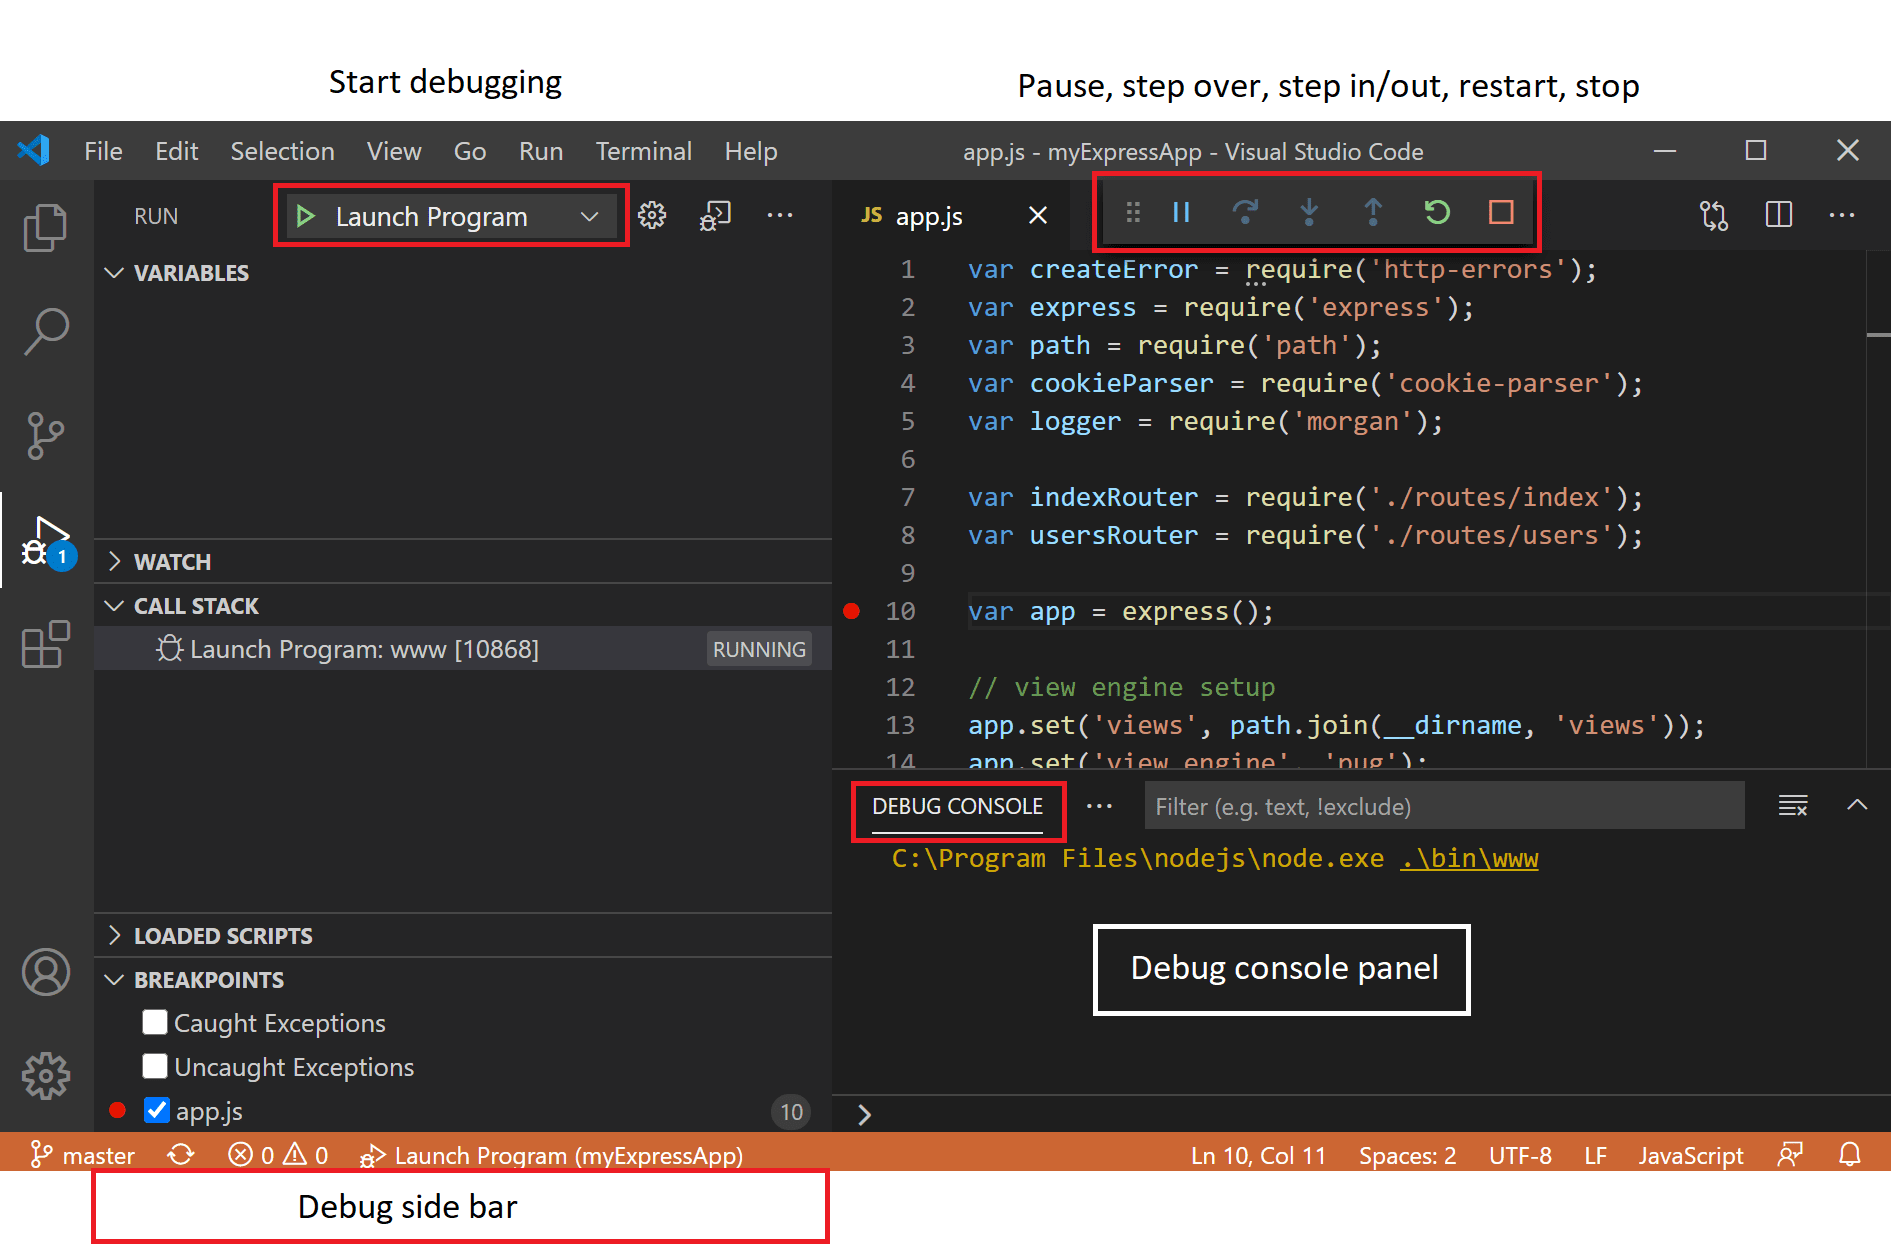
- Run and Debug view: displays all information related to running, debugging, and managing debug configuration settings.
- Debug toolbar: has buttons for the most common debugging actions.
- Debug console: enables viewing and interacting with the output of your code running in the debugger.
- Debug sidebar: during a debug session, lets you interact with the call stack, breakpoints, variables, and watch variables.
- Run menu: has the most common run and debug commands.
Before you start debugging
-
Install a debugging extension from the Visual Studio Marketplace for your language or runtime.
VS Code has built-in support for JavaScript, TypeScript, and Node.js debugging.
-
Define a debugging configuration for your project.
For simple applications, VS Code tries to run and debug the currently active file. For more complex applications or debugging scenarios, you need to create a
launch.jsonfile to specify the debugger configuration. Get more information about creating a debug configuration. -
Set breakpoints in your code.
A breakpoint is a marker that you can set on a line of code to tell the debugger to pause execution when it reaches that line. You can set breakpoints by clicking in the gutter next to the line number in the editor.
For more information about breakpoints, see Working with Breakpoints.
Start a debugging session
To start a debugging session in VS Code, perform the following steps:
-
Open the file that contains the code you want to debug.
-
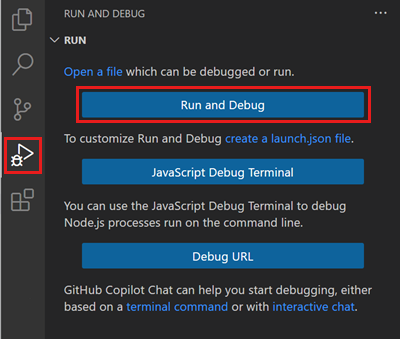
Start a debugging session with the F5 key or select Run and Debug in the Run and Debug view (
workbench.view.debug).
For more complex debugging scenarios like attaching to a running process, you need to create a
launch.jsonfile to specify the debugger configuration. Get more information about debug configurations. -
Choose the debugger you want to use from the list of available debuggers.
VS Code tries to run and debug the currently active file. For Node.js, VS Code checks for a
startscript in thepackage.jsonfile to determine the entry point of the application. -
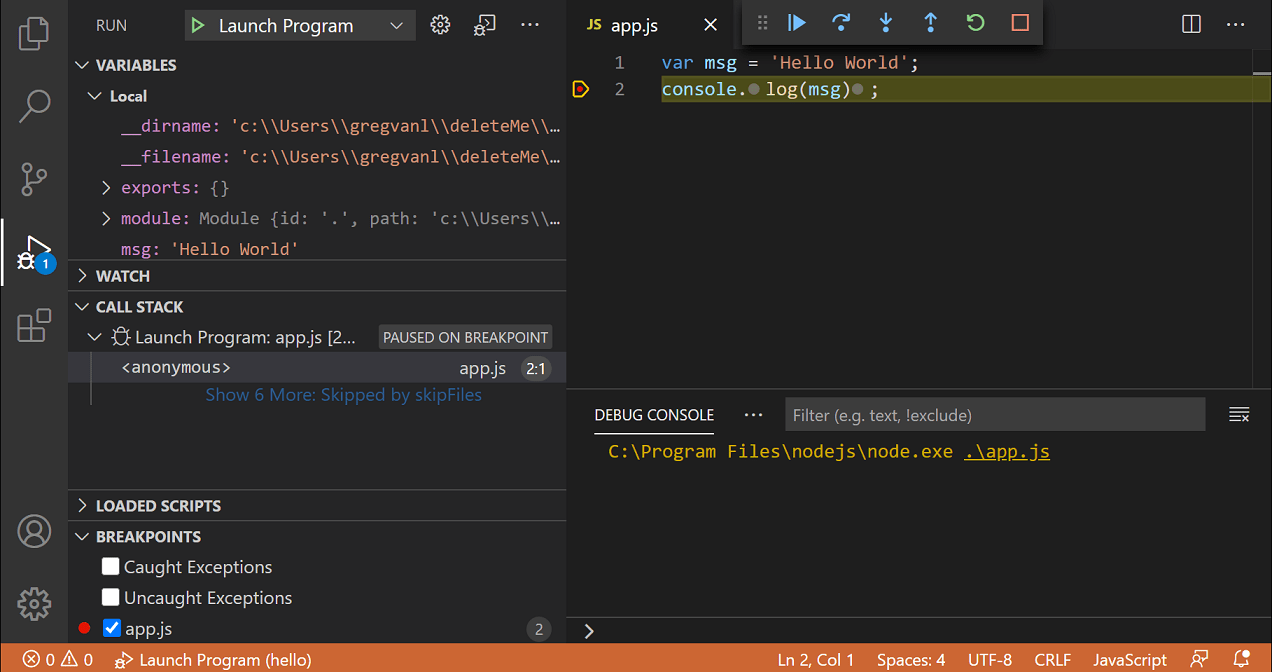
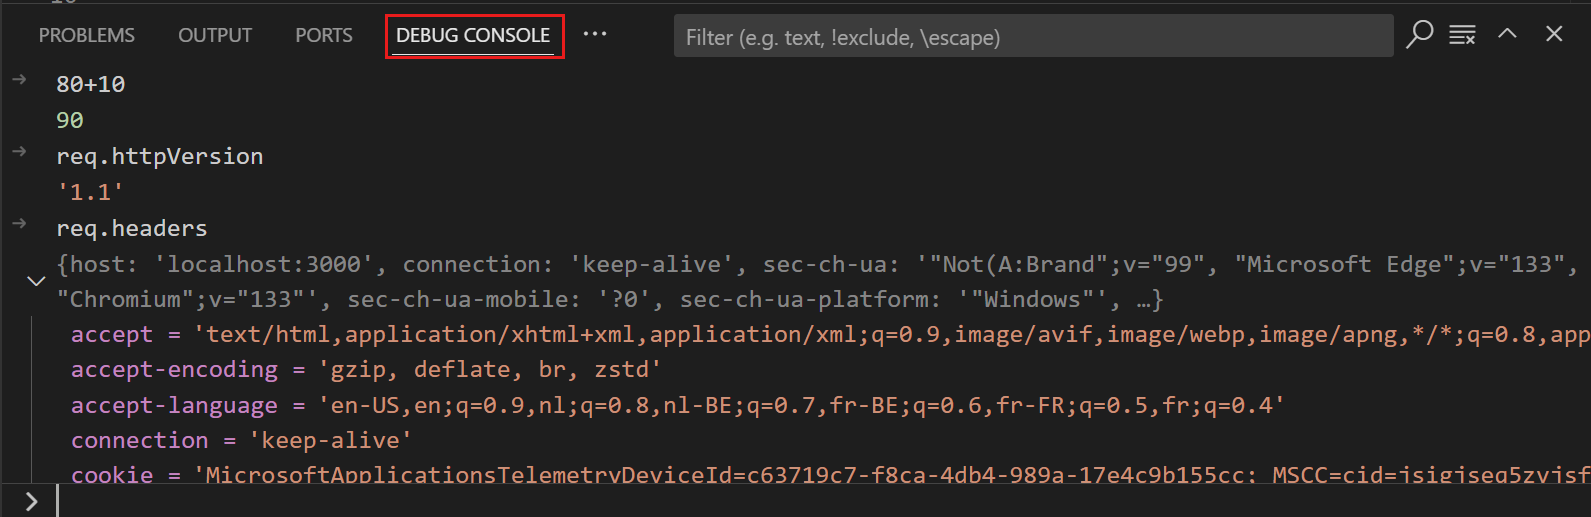
When a debugging session starts, the DEBUG CONSOLE panel is displayed and shows debugging output, and the Status Bar changes color (orange for default color themes).
-
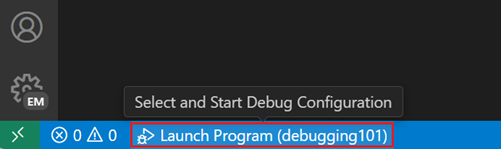
The debug status in the Status Bar shows the active debug configuration. Select the debug status to change the active launch configuration and start debugging without needing to open the Run and Debug view.
Debug actions
Once a debug session starts, the Debug toolbar appears at the top of the window. The toolbar contains actions to control the flow of the debug session, such as stepping through code, pausing execution, and stopping the debug session.
The following table describes the actions available in the debug toolbar:
| Action | Description |
|---|---|
| Continue / Pause F5 |
Continue: Resume normal program/script execution (up to the next breakpoint). Pause: Inspect code executing at the current line and debug line-by-line. |
| Step Over F10 |
Execute the next method as a single command without inspecting or following its component steps. |
| Step Into F11 |
Enter the next method to follow its execution line-by-line. |
| Step Out ⇧F11 (Windows, Linux Shift+F11) |
When inside a method or subroutine, return to the earlier execution context by completing remaining lines of the current method as though it were a single command. |
| Restart ⇧⌘F5 (Windows, Linux Ctrl+Shift+F5) |
Terminate the current program execution and start debugging again using the current run configuration. |
| Stop ⇧F5 (Windows, Linux Shift+F5) |
Terminate the current program execution. |
If your debugging sessions involve multiple targets (for example, a client and a server), the debug toolbar shows the list of sessions and lets you switch between them.
Tip
Use the debug.toolBarLocation setting to control the location of the Debug toolbar. It can be the default floating, docked to the Run and Debug view, or hidden. A floating debug toolbar can be dragged horizontally and also down to the editor area (up to a certain distance from the top edge).
Breakpoints
A breakpoint is a special marker that pauses the execution of your code at a specific point, so you can inspect the state of your application at that point. VS Code supports several types of breakpoints.
Setting breakpoints
To set or unset a breakpoint, click on the editor margin or use F9 on the current line.
- Breakpoints in the editor margin are normally shown as red filled circles.
- Disabled breakpoints have a filled gray circle.
- When a debugging session starts, breakpoints that can’t be registered with the debugger change to a gray hollow circle. The same might happen if the source is edited while a debug session without live-edit support is running.
Optionally, breakpoints can be shown in the editor’s overview ruler by enabling the setting debug.showBreakpointsInOverviewRuler:
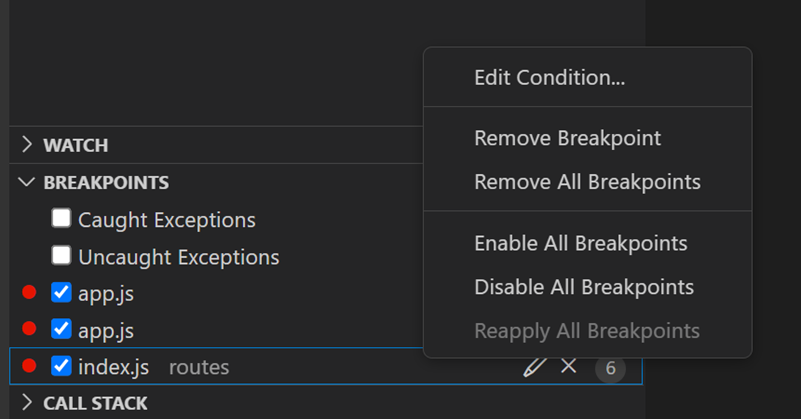
For more control of your breakpoints, use the Run and Debug view’s BREAKPOINTS section. This section lists all breakpoints in your code and provides extra actions to manage them.
Breakpoint types
Conditional breakpoints
A powerful VS Code debugging feature is the ability to set conditions based on expressions, hit counts, or a combination of both.
- Expression condition: The breakpoint is hit whenever the expression evaluates to
true. - Hit count: The hit count controls how many times a breakpoint needs to be hit before it interrupts execution. Whether a hit count is respected, and the exact syntax of the expression, can vary among debugger extensions.
- Wait for breakpoint: The breakpoint is activated when another breakpoint is hit (triggered breakpoint).
To add a conditional breakpoint:
-
Create a conditional breakpoint
- Right-click in the editor margin and select Add Conditional Breakpoint.
- Use the Add Conditional Breakpoint command in the Command Palette (⇧⌘P (Windows, Linux Ctrl+Shift+P)).
-
Choose the type of condition you want to set (expression, hit count, or wait for breakpoint).
To add a condition to an existing breakpoint:
-
Edit an existing breakpoint
- Right-click on the breakpoint in the editor margin and select Edit Breakpoint.
- Select the pencil icon next for an existing breakpoint in the BREAKPOINTS section of the Run and Debug view.
-
Edit the condition (expression, hit count, or wait for breakpoint).
If a debugger does not support conditional breakpoints, the Add Conditional Breakpoint and Edit Condition actions are not available.
Triggered breakpoints
A triggered breakpoint is type of conditional breakpoint that is enabled once another breakpoint is hit. They can be useful when diagnosing failure cases in code that happen only after a certain precondition.
Triggered breakpoints can be set by right-clicking on the glyph margin, selecting Add Triggered Breakpoint, and then choosing which other breakpoint enables the breakpoint.
Inline breakpoints
Inline breakpoints are only hit when the execution reaches the column associated with the inline breakpoint. This is useful when debugging minified code, which contains multiple statements in a single line.
An inline breakpoint can be set using ⇧F9 (Windows, Linux Shift+F9) or through the context menu during a debug session. Inline breakpoints are shown inline in the editor.
Inline breakpoints can also have conditions. Editing multiple breakpoints on a line is possible through the context menu in the editor’s left margin.
Function breakpoints
Instead of placing breakpoints directly in source code, a debugger can support creating breakpoints by specifying a function name. This is useful in situations where source is not available but a function name is known.
To create a function breakpoint, select the + button in the BREAKPOINTS section header and enter the function name. Function breakpoints are shown with a red triangle in the BREAKPOINTS section.
Data breakpoints
If a debugger supports data breakpoints, they can be set from the context menu in the VARIABLES view. The Break on Value Change/Read/Access commands add a data breakpoint that is hit when the value of the underlying variable changes/is read/is accessed. Data breakpoints are shown with a red hexagon in the BREAKPOINTS section.
Logpoints
A logpoint is a variant of a breakpoint that does not interrupt into the debugger, but instead logs a message to the debug console. Logpoints can help you save time by not having to add or remove logging statements in your code.
A logpoint is represented by a diamond-shaped icon. Log messages are plain text but can also include expressions to be evaluated within curly braces (‘{}’).
To add a logpoint, right-click in the editor left margin and select Add Logpoint, or use the Debug: Add Logpoint… command in the Command Palette (⇧⌘P (Windows, Linux Ctrl+Shift+P)). You can also configure the setting debug.gutterMiddleClickAction to toggle a logpoint when pressing the middle mouse button in the editor gutter.
Just like regular breakpoints, logpoints can be enabled or disabled and can also be controlled by a condition and/or hit count.
Note
Debugger extensions can choose to implement logpoints or not.
Data inspection
Run and Debug view
During a debugging session, you can inspect variables and expressions in the VARIABLES section of the Run and Debug view or by hovering over their source in the editor. Variable values and expression evaluation are relative to the selected stack frame in the CALL STACK section.
To change the value of a variable during the debugging session, right-click on the variable in the VARIABLES section and select Set Value (Enter (Windows, Linux F2)).
Additionally, you can use the Copy Value action to copy the variable’s value, or the Copy as Expression action to copy an expression to access the variable. You can then use this expression in the WATCH section.
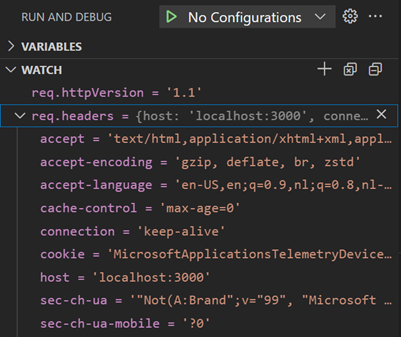
Variables and expressions can also be evaluated and watched in the Run and Debug view’s WATCH section.
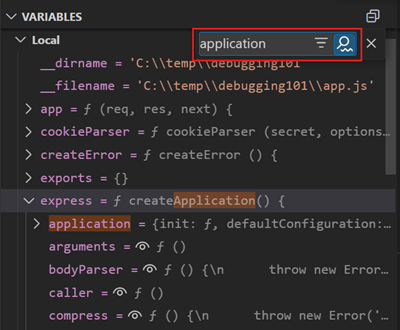
To filter variables by their name or value, use the ⌥⌘F (Windows, Linux Ctrl+Alt+F) keyboard shortcut while the focus is on the VARIABLES section, and type a search term.
Debug console REPL
Expressions can be evaluated with the Debug Console REPL (Read-Eval-Print Loop) feature. To open the Debug Console, use the Debug Console action at the top of the Debug pane or use the View: Debug Console command (⇧⌘Y (Windows, Linux Ctrl+Shift+Y)).
Expressions are evaluated after you press Enter and the Debug Console REPL shows suggestions as you type. If you need to enter multiple lines, use Shift+Enter between the lines and then send all lines for evaluation with Enter.
Debug Console input uses the mode of the active editor, which means that the Debug Console input supports syntax coloring, indentation, auto closing of quotes, and other language features.
Note
You must be in an active debugging session to use the Debug Console REPL.
Multi-target debugging
For complex scenarios that involve more than one process (for example, a client and a server), VS Code supports multi-target debugging. After you’ve started a first debug session, you can launch another debug session. As soon as a second session is up and running, the VS Code UI switches to multi-target mode:
-
The individual sessions now show up as top-level elements in the CALL STACK view.
-
The debug toolbar shows the currently active session (and all other sessions are available in a dropdown menu).
-
Debug actions (for example, all actions in the debug toolbar) are performed on the active session. The active session can be changed either by using the dropdown menu in the debug toolbar or by selecting a different element in the CALL STACK view.
Remote debugging
VS Code does not support built-in remote debugging across all languages. Remote debugging is a feature of the debug extension you are using, and you should consult the extension’s page in the Marketplace for support and details.
There is, however, one exception: the Node.js debugger included in VS Code supports remote debugging. For more information, see Node.js Debugging.
Debugger extensions
VS Code has built-in debugging support for the Node.js runtime and can debug JavaScript, TypeScript, or any other language that gets transpiled to JavaScript.
For debugging other languages and runtimes (including PHP, Ruby, Go, C#, Python, C++, PowerShell and many others), look for Debuggers extensions in the Visual Studio Marketplace, or select Install Additional Debuggers in the top-level Run menu.
These are several popular extensions that include debugging support:
Next steps
To learn about VS Code’s Node.js debugging support, take a look at:
- Node.js — Describes the Node.js debugger, which is included in VS Code.
- TypeScript — The Node.js debugger also supports TypeScript debugging.
To see a tutorial on the basics of debugging, check out this video:
- Getting started with debugging in VS Code — Learn about debugging in VS Code.
To learn more about Copilot and AI-assisted debugging in VS Code:
- Debugging and fixing issues with Copilot
- Copilot cheat sheet for debugging and fixing issues
To learn about debugging support for other programming languages via VS Code extensions:
- C++
- Python
- Java
To learn about VS Code’s task running support, go to:
- Tasks — Describes how to run tasks with Gulp, Grunt, and Jake and how to show errors and warnings.
To write your own debugger extension, visit:
- Debugger Extension — Uses a mock sample to illustrate the steps required to create a VS Code debug extension.
Common questions
What are the supported debugging scenarios?
Debugging of Node.js-based applications is supported on Linux, macOS, and Windows out of the box with VS Code. Many other scenarios are supported by VS Code extensions available in the Marketplace.
05/08/2025
Debugging is a powerful tool that runs the code line-by-line to find the exact point where one may have made a programming mistake. You need to debug the code to ensure it does what you intended without any errors.
One of the most powerful features of Visual Studio Code is its debugger. In this guide, let us look at how you can quickly debug your code in VS Code.
Debug JavaScript, TypeScript, and Node.js in VS Code
Visual Studio Code only has in-built debugging support for JavaScript, Node.js and TypeScript. Therefore, let us look at debugging using a simple JavaScript program. Make sure you have Node.js installed before continuing. Then, follow these steps to debug on VS Code:
- Open the file you want to debug. In our case, we are debugging a JavaScript program. So, I will choose index.js.

Open the file you want to debug in Visual Studio Code. - Select the Run and Debug button from the “Run” icon in the sidebar or press F5. Visual Studio Code will try to run your currently active file.

From the Run view, select the Run and Debug button. - Visual Studio Code will try to detect your debug environment automatically. Our debugger is now attached, and Visual Studio Code has automatically found your program.

This is the debug environment, and the debug result will be outputted in the debug console. - Debugging will begin, and you will have the Debug Console panel on the bottom of the code editor, which shows debugging output.


Debug actions
You will notice a debug toolbar in the top center of the debug mode.
- Continue / Pause allows you to continue or pause debugging during the debugging session.
- Step Over allows you to execute one line of code at a time. We call it Step Over because you might not want to debug a function call. Instead, you might want to step over the line and see the function results.
- Step Into is similar to Step Over, except it allows you to step into a function call and watch that particular function execute line by line.
- Step Out executes all the code in the current function and then pauses at the following statement (if there is one). It allows you to step out of the current function in one jump.
- Restart restarts the debugging session.
- Stop allows you to terminate the current run.
Breakpoints
Breakpoints let you stop or pause debugging at a particular line of code and look at the program’s state at that moment. Breakpoints can be created by left-clicking in the Editor Margin or pressing F9 on the current line. Breakpoints have red-filled circles.

If we run the program after setting a breakpoint, you will notice that it will stop at the breakpoint. If you hover over your Variables, you will be able to note the variable’s value at the time of the breakpoint.
Debugger extensions – debugging other languages
Debugging Python code
If you want to debug languages other than JavaScript or TypeScript, you must install a VS Code extension. Let us say, for instance, we want to debug a Python program. Follow these steps:
- Open your Python program. In our case, I will use prime.py.

Open the Python program you want to debug. - Head over to the top-level “Run” menu and select Install Additional Debuggers.

From the Run menu dropdown, select Install Additional Debuggers. - From here, install the Python extension.

Install Python Extension. - Select the Run and Debug button from the “Run” icon in the sidebar or press F5.
From the Run view, select the Run and Debug button. - You will find several configurations that are specific to Python files. Since we are just debugging a single Python file, we can select Python File from the menu options.

Select Python File from the Debug Configuration menu options. - Debugging console will be activated in the integrated terminal.

Debug output will be displayed in the Python Debug Console.


Debugging HTML code
Debugging an HTML file does not require additional extension as VS Code’s built-in JavaScript Debugger also debugs HTML files. It is a debugger that debugs Node.js, Chrome, Edge, WebView2, VS Code extensions, and more. The process of debugging HTML files is as follows:
- Open the HTML file you want to debug. I am using a file named “web.html.”

Open the HTML source file you want to debug. - Add the breakpoints by left-clicking in the Editor Margin.

Insert a few breakpoints by left-clicking on the editor margins. - From the sidebar, select the Run and Debug icon. It will open the Run and Debug panel.
From the sidebar, select the Run and Debugger icon. - Select the Run and Debug button.
Press the Run and Debug button. - The debugging session will start.

HTML debugging will initiate. - It will also run your HTML code in your preferred browser.

Your HTML file will also run in your browser.


One of the key features of Visual Studio Code is its great debugging support. VS Code’s built-in debugger helps accelerate your edit, compile and debug loop.
VS Code has built-in debugging support for Node.js (JavaScript, TypeScript, and any other language that gets transpiled to JavaScript). For debugging other languages (including C# on Mono), please look for Debuggers extensions in our VS Code Marketplace.
The following documentation is based on the built-in Node.js debugger, but many of the concepts and features are applicable to other debuggers as well.
It is helpful to first create a sample Node.js application before reading about debugging. Follow this guide to do a run-through with Node.js:
- Node.js Applications
Once you are all set up, this page will take you through the debugging scenarios we support.
Debug View
To bring up the Debug view, click on the Debugging icon in the View Bar on the side of VS Code.
The Debug view displays all information related to debugging and has a top bar with debugging commands and configuration settings.
Launch Configurations
To debug your app in VS Code, you’ll first need to set up your launch configuration file — launch.json. Click on the Configure gear icon on the Debug view top bar, choose your debug environment and VS Code will generate a launch.json file under your workspace’s .vscode folder.
Here is the one generated for Node.js debugging:
{
    "version": "0.2.0",
    "configurations": [
        {
            "name": "Launch",
            "type": "node",
            "request": "launch",
            "program": "${workspaceRoot}/app.js",
            "stopOnEntry": false,
            "args": [],
            "cwd": "${workspaceRoot}",
            "preLaunchTask": null,
            "runtimeExecutable": null,
            "runtimeArgs": [
                "--nolazy"
            ],
            "env": {
                "NODE_ENV": "development"
            },
            "externalConsole": false,
            "sourceMaps": false,
            "outDir": null
        },
        {
            "name": "Attach",
            "type": "node",
            "request": "attach",
            "port": 5858,
            "address": "localhost",
            "restart": false,
            "sourceMaps": false,
            "outDir": null,
            "localRoot": "${workspaceRoot}",
            "remoteRoot": null
        }
    ]
}
Please note that the attributes available in these launch configurations vary from debugger to debugger. You can use IntelliSense to find out which attributes exist for a specific debugger. In addition, hover help is available for all attributes. If you see green squigglies in your launch configuration, hover over them to learn what the problem is and try to fix them before launching a debug session.
In VS Code, we support launching your app in debug mode or attaching to an already running app. Depending on the request (attach or launch) different attributes are required and our launch.json validation and suggestions should help with that.
Review the generated values and make sure that they make sense for your project and debugging environment. You can add additional configurations to the launch.json (use hover and IntelliSense to help).
Select the configuration named Launch using the Configuration dropdown in the Debug view. Once you have your launch configuration set, start your debug session with kb(workbench.action.debug.start).
To launch a task before the start of each debug session, set the preLaunchTask to the name of one of the tasks specified in tasks.json (located under the workspace’s .vscode folder).
VS Code supports variable substitution inside strings in launch.json the same way as for tasks.json.
In addition to debugging a program, VS Code supports running the program. The Run action is triggered with kb(workbench.action.debug.run) and uses the currently selected launch configuration. Many of the launch configuration attributes are supported in ‘Run’ mode. VS Code maintains a debug session while the program is running and pressing the Stop button terminates the program.
Please note: The Run action is always available, but a debugger extension has to ‘opt-in’ in order to support ‘Run’. If a debugger extension has not been updated, ‘Run’ will fall back to ‘Debug’ (the built-in Node.js Debug and Mono Debug already support ‘Run’).
Breakpoints
Breakpoints can be toggled by clicking on the editor margin. Finer breakpoint control (enable/disable/reapply) can be done in the Debug view’s BREAKPOINTS section.
- Breakpoints in the editor margin are normally shown as red filled circles.
- Disabled breakpoints have a filled gray circle.
- When a debugging sessions starts, breakpoints that cannot be registered with the debugger change to a gray hollow circle.
The Reapply All Breakpoints command sets all breakpoints again to their original location. This is helpful if your debug environment is «lazy» and «misplaces» breakpoints in source code that has not yet been executed. (For details see below under Node Debugging: Breakpoint Validation)
Data inspection
Variables can be inspected in the VARIABLES section of the Debug view or by hovering over their source in the editor. Variables and expression evaluation is relative to the selected stack frame in the CALL STACK section.
Variables and expressions can also be evaluated and watched in the Debug view WATCH section.
Debug Console
Expressions can be evaluated in the Debug Console. To open the Debug Console, use the Open Console action at the top of the Debug pane or using the Command Palette (kb(workbench.action.showCommands)).

Debug actions
Once a debug session starts, the Debug actions pane will appear on the top of the editor.
- Continue / Pause
kb(workbench.action.debug.continue) - Step Over
kb(workbench.action.debug.stepOver) - Step Into
kb(workbench.action.debug.stepInto) - Step Out
kb(workbench.action.debug.stepOut) - Restart
kb(workbench.action.debug.restart) - Stop
kb(workbench.action.debug.stop)
Node Debugging
The following sections are specific to the Node.js debugger.
Node Console
By default, Node.js debug sessions launch the target in the internal VS Code Debug Console. Since the Debug Console does not support programs that need to read input from the console, you can enable an external, native console by setting the attribute externalConsole to true in your launch configuration.
Breakpoint Validation
For performance reasons, Node.js parses the functions inside JavaScript files lazily on first access. As a consequence, breakpoints don’t work in source code areas that haven’t been seen (parsed) by Node.js.
Since this behavior is not ideal for debugging, VS Code passes the --nolazy option to Node.js automatically. This prevents the delayed parsing and ensures that breakpoints can be validated before running the code (so they no longer «jump»).
Since the --nolazy option might increase the start-up time of the debug target significantly, you can easily opt out by passing a --lazy as a runtimeArgs attribute.
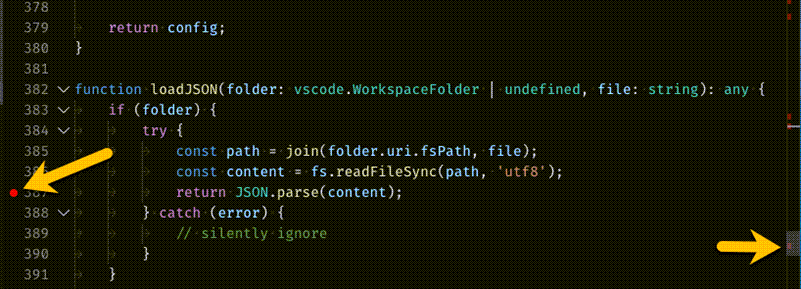
When doing so you will find that some of your breakpoints don’t «stick» to the line requested but instead «jump» for the next possible line in already-parsed code. To avoid confusion, VS Code always shows breakpoints at the location where Node.js thinks the breakpoint is. In the BREAKPOINTS section, these breakpoints are shown with an arrow between requested and actual line number:
This breakpoint validation occurs when a session starts and the breakpoints are registered with Node.js, or when a session is already running and a new breakpoint is set. In this case, the breakpoint may «jump» to a different location. After Node.js has parsed all the code (e.g. by running through it), breakpoints can be easily re-applied to the requested locations with the Reapply button in the BREAKPOINTS section header. This should make the breakpoints «jump back» to the requested location.
Function Breakpoints
Instead of placing breakpoints directly in source code, the Node.js debugger now supports creating breakpoints by specifying a function name. This is useful in situations where source is not available but a function name is known.
A ‘function breakpoint’ is created by pressing the + button in the BREAKPOINTS section header:
Please note: Node.js support for function breakpoints is limited because:
- function breakpoints only work for global, non-native functions and
- function breakpoints can only be created if the function has been defined (seen by Node.js).
JavaScript Source Maps
The Node.js debugger of VS Code supports JavaScript Source Maps which help debugging of transpiled languages, e.g. TypeScript or minified/uglified JavaScript. With source maps, it is possible to single step through or set breakpoints in the original source. If no source map exists for the original source or if the source map is broken and cannot successfully map between the source and the generated JavaScript, the breakpoints are shown as gray hollow circles.
The source map feature is enabled by setting the sourceMaps attribute to true in the launch configuration. With that you can now specify a source file (e.g. app.ts) with the program attribute. If the generated (transpiled) JavaScript files do not live next to their source but in a separate directory, you can help the VS Code debugger locate them by setting the outDir attribute. Whenever you set a breakpoint in the original source, VS Code tries to find the generated source, and the associated source map, in the outDir directory.
Since source maps are not automatically created, you must configure the TypeScript compiler to create them:
tsc --sourceMap --outDir bin app.ts
This is the corresponding launch configuration for a TypeScript program:
{
    "version": "0.2.0",
    "configurations": [
        {
            "name": "Launch TypeScript",
            "type": "node",
            "request": "launch",
            "program": "app.ts",
            "sourceMaps": true,
            "outDir": "bin"
        }
    ]
}
Source maps can be generated with two kinds of inlining:
- Inlined source maps: the generated JavaScript file contains the source map as a data URI at the end (instead of referencing the source map through a file URI).
- Inlined source: the source map contains the original source (instead of referencing the source through a path).
VS Code supports both the inlined source maps and the inlined source.
Attaching VS Code to Node.js
If you want to attach the VS Code debugger to a Node.js program, launch Node.js as follows:
node --debug program.js
node --debug-brk program.js
With the --debug-brk option Node.js stops on the first line of the program.
The corresponding launch configuration looks like this:
{
    "version": "0.2.0",
    "configurations": [
        {
            "name": "Attach to Node",
            "type": "node",
            "request": "attach",
            "address": "localhost",
            "port": 5858,
            "restart": false
        }
    ]
}
The restart attribute controls whether the Node.js debugger automatically restarts after the debug session has ended. This feature is useful if you use nodemon to restart Node.js on file changes. Setting the launch configuration attribute restart to true makes node-debug automatically try to re-attach to Node.js after Node.js has terminated.
On the command line, start your Node.js program server.js with nodemon:
nodemon --debug server.js
In VS Code, set the restart attribute to true in the ‘attach’ launch configuration.
Tip: Pressing the Stop button stops the debug session and disconnects from Node.js, but nodemon (and Node.js) will continue to run. To stop nodemon, you will have to kill it from the command line.
Tip: In case of syntax errors, nodemon will not be able to start Node.js successfully until the error has been fixed. In this case, VS Code will continue trying to attach to Node.js but eventually give up (after 10 seconds). To avoid this, you can increase the timeout by adding a
timeoutattribute with a larger value (in milliseconds).
Remote Debugging Node.js
The Node.js debugger supports remote debugging for recent versions of Node.js (>= 4.x). Specify a remote host via the address attribute.
By default, VS Code will stream the debugged source from the remote Node.js folder to the local VS Code and show it in a read-only editor. You can step through this code, but cannot modify it. If you want VS Code to open the editable source from your workspace instead, you can setup a mapping between the remote and local locations. The attach launch configuration supports a localRoot and a remoteRoot attribute that can be used to map paths between a local VS Code project and a (remote) Node.js folder. This works even locally on the same system or across different operating systems. Whenever a code path needs to be converted from the remote Node.js folder to a local VS Code path, the remoteRoot path is stripped off the path and replaced by localRoot. For the reverse conversion, the localRoot path is replaced by the remoteRoot.
Mono Debugging
On Linux or OS X, the Mono debugging support of VS Code requires Mono version 3.12 or later.
If you intend to build ASP.NET Core applications with Visual Studio Code, we recommend you first follow the steps
Installing ASP.NET Core and DNX in ASP.NET Core Applications which will install a version of Mono
that supports debugging.
If you just want to try VS Code Mono debugging, you can either download the latest Mono version
for Linux or OS X at Mono project or you can use your package manager.
- On OS X:
brew install mono - On Linux:
sudo apt-get install mono-complete
Installing the Mono Debug Extension
VS Code Mono debugging integration comes from the ‘Mono Debug’ extension on the Visual Studio Marketplace.
You can either install the Mono Debug extension with the VS Code Extensions: Install Extension command or if you already have a Mono based project with a mono launch configuration, simply by starting a debug session. VS Code will then prompt you to download and install Mono Debug.
Enable Mono debugging
To enable debugging of Mono based C# (and F#) programs, you have to pass the -debug option to the compiler:
mcs -debug Program.cs
If you want to attach the VS Code debugger to a Mono program, pass these additional arguments to the Mono runtime:
mono --debug --debugger-agent=transport=dt_socket,server=y,address=127.0.0.1:55555 Program.exe
The corresponding launch configuration looks like this:
{
    "version": "0.2.0",
    "configurations": [
        {
            "name": "Attach to Mono",
            "request": "attach",
            "type": "mono",
            "address": "localhost",
            "port": 55555
        }
    ]
}
Debugging Other Languages
Debugging many other languages is supported by VS Code extensions. These include Go, PowerShell, Python, PHP, …
Next Steps
In case you didn’t already read the Node.js section, take a look at:
- Node.js — End to end Node scenario with a sample application
To learn about VS Code’s task running support, go to:
- Tasks — Running tasks with Gulp, Grunt and Jake. Showing Errors and Warnings
To write your own debugger extension, visit:
- Debuggers — Steps to create a VS Code debug extension starting from a mock sample
Common Questions
Q: What are the supported debugging scenarios?
A: Debugging of Node.js based applications is supported on Linux, OS X, and Windows. Debugging of C# applications running on Mono is supported on Linux and OS X. ASP.NET Core applications are compiled using the Roslyn compiler, not the Mono compiler. ASP.NET Core debugging will be available through a VS Code extension. Many other scenarios are supported by VS Code extensions.
Q: I do not see any launch configurations in the debug view drop down, what is wrong?
A: The most common problem is that you did not set up launch.json yet or there is a syntax error in the launch.json file.
Q: What Node.js version is required for Node.js debugging?
A: Version 0.12.x is recommended, though most functionality is supported in 0.10.x as well (except break on unhandled exceptions).
Q: Is Mono debugging supported on Windows?
A: No. Currently Mono debugging is only supported on Mac and Linux.

This article is about using VS Code for Debugging your C/C++ code on Windows(8/9/10). I thought it was a simple task when I was trying to debug my code for one of the problems for an online coding competition on codeforces but I found out a lot of blockers in front of me when I did it the very first time.
The first one of those was setting up a debugger in Windows(Windows 10 in my case) was quite problematic when used for languages like C++. Although I could have used Codeblocks which supports debugging features on Windows platforms in this case, but I am not used to light-theme applications and I don’t quite like the debugging interface it offers. Like a lot of other developers, I am a fan of dark-themes too, and using something like VS Code will give me more options to explore in dark themes. For that reason, I decided to get the debugger for C++ running on my Windows system.
After a lot of googling and reading a lot of articles on the same, I was finally able to debug my C++ code using VS Code on my Windows system but it took a lot of my time to work out the complete solution. So I decided to prepare a compiled step-by-step guide for the complete process so that everything can be found at a single place. Here are the steps:
-
Install Visual Studio Code.
-
Install Windows Subsystems for Linux(WSL) using the instructions from the official documentation here.
-
Install your Linux distribution of choice. Just open the Microsoft Store and select your favorite Linux distribution(Ubuntu in my case).
-
After installation is completed, search for the Linux distribution which you installed in windows search(lets say Ubuntu). Opening it will start the WSL command prompt.
-
Inside the WSL command prompt, first run apt-get update to update the Ubuntu package lists just to avoid any issues because of out-of-date packages:
sudo apt-get update -
Next, install the GNU compiler tools and the GDB debugger by typing:
sudo apt-get install build-essential gdb -
After installing the compiler tools, verify that the GNU C++ Compiler and the debugger is installed by using these commands:
g++ --version
gdb --version
If both these commands do not return the version currently present on WSL and give some error, try updating/installing the GNU compiler tools once again.
-
Now your Linux environment is fully set up to get the things running. Create a folder for your visual studio project(say helloWorld) and open it in Visual Studio Code in the project folder using following commands.
mkdir helloworld cd mkdir code . -
Opening VS Code in WSL command prompt will install a small server(VS Code Server) on the Linux side that the Windows system VS Code will talk to.
-
Once the VS Code is open on WSL, go to View > Extensions(or Ctrl+Shift+X) and install these two extensions:
- Remote — WSL extension : The Remote — WSL extension extension lets you use the Windows Subsystem for Linux (WSL) as your full-time development environment right from VS Code.
-
C/C++: C/C++ extension adds language support for C/C++ to Visual Studio Code, including features such as IntelliSense and debugging.
-
Once these two extensions are installed, you will see the context in which the VS code is running is changed to [WSL: Ubuntu] in the status bar present at the bottom of Visual Studio.
-
Now you are ready to write your code. Add a source code file(say helloWorld.cpp) from VS code and write your code in that file:
// helloWorld.CPP #include<bits/stdc++.h> using namespace std; int lengthOfLIS(vector<int>& a, int n) { if(n==0) return 0; vector<int> dp(n, 0); dp[0] = a[0]; int len = 1; for(int i=1; i<n; i++){ auto it = lower_bound(dp.begin(), dp.begin()+len, a[i]); if(it == dp.begin()+len) dp[len++] = a[i]; else *it = a[i]; } return len; } int main(){ int n; cin>>n; vector<int> v; int x; for(int i=0; i<n; i++){ cin>>x; v.push_back(x); } cout<<lengthOfLIS(v, n); } -
Build the Task: After writing the code, go to
Terminal > Configure Default Build Task. In the dropdown, chooseg++ build active file, which will build the file that is currently displayed(helloWorld.cpp in this case) in the editor. -
This will create a tasks.json file in a .vscode folder and open it in the editor. Your new tasks.json file should look similar to the JSON below:
{ "version": "2.0.0", "tasks": [ { "type": "shell", "label": "g++ build active file", "command": "/usr/bin/g++", "args": [ "-g", "${file}", "-o", "${fileDirname}/${fileBasenameNoExtension}" ], "options": { "cwd": "/usr/bin" }, "problemMatcher": [ "$gcc" ], "group": { "kind": "build", "isDefault": true } } ] } -
Next,
Run > Add Configurationand then chooseC++(GDB/LLDB).
You’ll then see a dropdown for various predefined debugging configurations. Chooseg++ build and debug active file. VS Code creates a launch.json file which should look like this:{ /**************************************************** Use IntelliSense to learn about possible attributes. Hover to view descriptions of existing attributes. For more information, visit: https://go.microsoft.com/fwlink/?linkid=830387 ****************************************************/ "version": "0.2.0", "configurations": [ { "name": "g++ - Build and debug active file", "type": "cppdbg", "request": "launch", "program": "${fileDirname}/${fileBasenameNoExtension}", "args": [], "stopAtEntry": false, "cwd": "${workspaceFolder}", "environment": [], "externalConsole": false, "MIMode": "gdb", "setupCommands": [ { "description": "Enable pretty-printing for gdb", "text": "-enable-pretty-printing", "ignoreFailures": true } ], "preLaunchTask": "g++ build active file", "miDebuggerPath": "/usr/bin/gdb", } ] } -
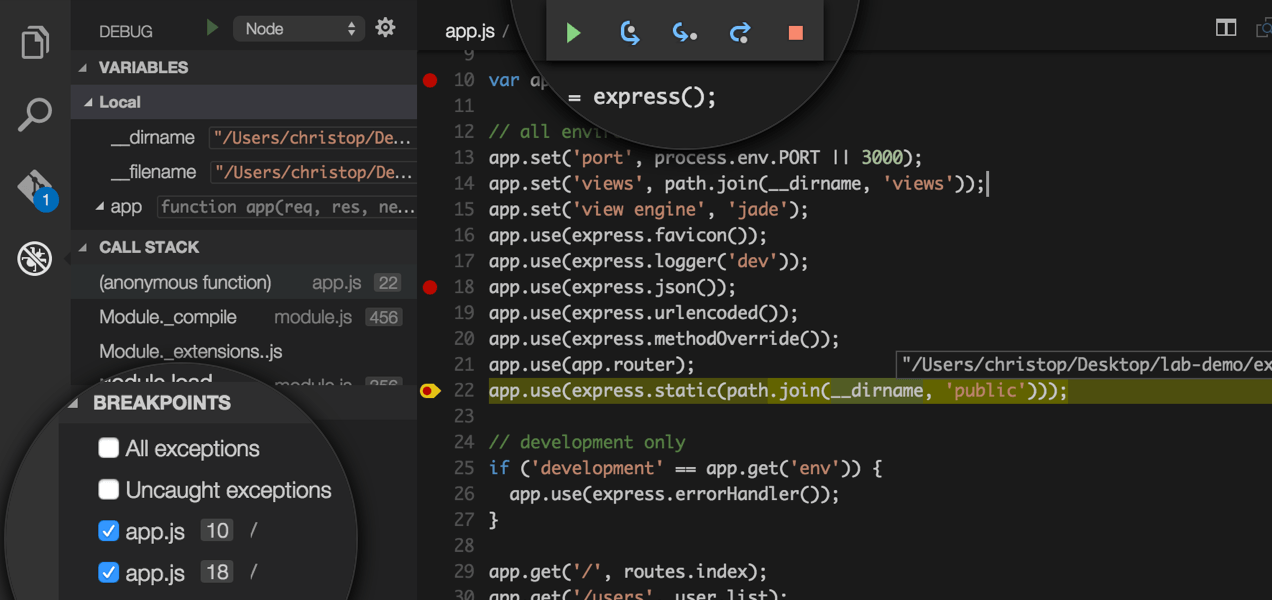
Now you can start the debugging session. Go back to helloworld.cpp so that it is the active file. Press F5 or from the main menu choose
Run > Start Debugging. Do not forget to set the breakpoints(just click on the left of line number) where you want the debugger to stop as shown in the sample image below.


- This way you can set breakpoints and go line by line(https://code.visualstudio.com/docs/cpp/config-mingw#_step-through-the-code) through your code using the debugger options to find where it might be going wrong. Here is some help on how to use a debugger.
So that is it. Hope it helps in debugging the C++ code on Windows OS and making lives easier.
Оригинал статьи на английском:
https://code.visualstudio.com/docs/getstarted/tips-and-tricks
Продолжение перевода:
Отладка
Настройка отладчика
Для одиночного файла настройки отладчика сохраняются в раздел (свойство) «launch» файла «settings.json», в котором хранятся пользовательские настройки. У меня на компьютере редактор «VS Code» хранит этот файл в следующем местоположении:
C:\Users\Илья\AppData\Roaming\Code\User\settings.json
Для рабочей области (папки/папок проекта) настройки отладчика сохраняются в файл «launch.json» в папке «.vscode». Папка «.vscode» должна находиться в папке проекта.
Всё это можно создать и прописать вручную. Но в редакторе «VS Code» для создания настроек (конфигурации) отладчика есть команда, которую можно вызвать с помощью пункта главного меню «Выполнить – Добавить конфигурацию…» (по-английски «Run – Add Configuration…»). В случае одиночного файла эта команда внесет изменения в пользовательски настройки (файл «settings.json»), в случае рабочей области — создаст файл «launch.json».
При создании файла «launch.json» команда пункта главного меню «Выполнить – Добавить конфигурацию…» попросит выбрать отладчик из доступных на данный момент редактору «VS Code», чтобы создать в файле «launch.json» настройки отладчика по умолчанию. Вот как такой запрос выглядит у меня на компьютере:

После выбора отладчика файл «launch.json» будет создан. Поддержка среды выполнения (и соответствующего отладчика) «Node.js» в редакторе «VS Code» встроенная, а для других отладчиков может потребоваться установка соответствующего расширения. Читайте подробнее об этом в статье «Отладка» документации редактора «VS Code».
Если в редакторе «VS Code» открыта рабочая область и в этой рабочей области в соответствующем местоположении есть файл «launch.json», то его можно, естественно, открыть вручную, а можно использовать для этого команду «Открыть «launch.json»» (по-английски «Open ‘launch.json’») из палитры команд («Ctrl+Shift+P»). Если рабочая область не открыта или открыта, но в ней нет файла «launch.json» в правильном местоположении, то эта команда не будет доступна в палитре команд.
[В оригинале пишут про команду «Debug: Open launch.json», но в свежих версиях редактора «VS Code» на сегодня такой команды нет. Поэтому ввод ключа >debug launch в палитре команд не сработает. — Прим. пер.]
Точки останова и пошаговое выполнение программы
Точки останова можно ставить слева от номеров строк программы. Пошаговое выполнение программы можно выполнять с помощью кнопок на виджете (панели) отладки. Вот как это выглядит:

Отслеживание значений переменных и свойств объектов
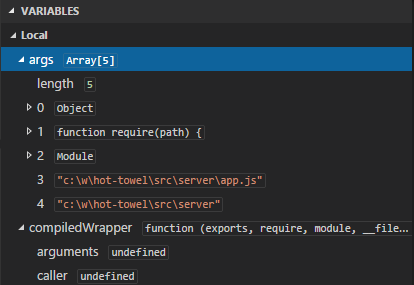
Отслеживайте значения переменных в разделах вкладки «Запуск и отладка» (по-английски «Run and Debug») боковой панели и в консоли отладки:

Точки сообщений отладки
Точки сообщений отладки (по-английски «logpoint») действуют очень похоже на точки останова, но вместо остановки отладчика в местах, где их ставят, они отправляют указанное сообщение в консоль отладки. Точки сообщений отладки особенно полезны для встраивания в приложение выдачи сообщений о работе приложения при отладке приложений, находящихся в эксплуатации на серверах, которые нельзя изменить или приостановить.
Чтобы добавить точку сообщения отладки, можно использовать команду «Добавить точку журнала…» (по-английски «Add Logpoint…») из контекстного меню, вызываемого щелчком правой кнопки мыши по пространству (по-английски «gutter») слева от номеров строк программы. Точка сообщения отладки будет отображена в указанном пространстве красным ромбиком. Сообщения, отправляемые этими точками, являются обычным текстом, но могут включать выражения, которые будут вычислены, обособленные фигурными скобками {}.
Вот как выглядят эти точки сообщений отладки:

Продолжение следует.