
Время непрерывной работы Windows с момента последней перезагрузки (uptime) можно узнать разными способами.
В графическом интерфейсе общее время работы Windows можно найти в диспетчере задач.
- Запустите Task Manager (выполните команды
taskmgr.exe
или нажмите сочетание клавиш
Ctrl+Shift+Esc
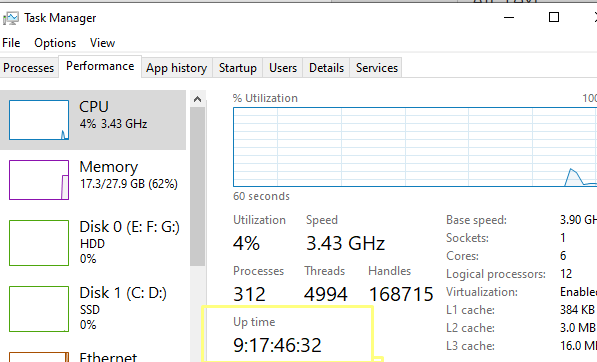
) - Перейдите на вкладку Производительность (Performance) -> вкладка ЦП (CPU)
- Время непрерывной работы компьютера содержится в поле Up time
-

Также можно получить текущий uptime из командной строки. Выполните команду:
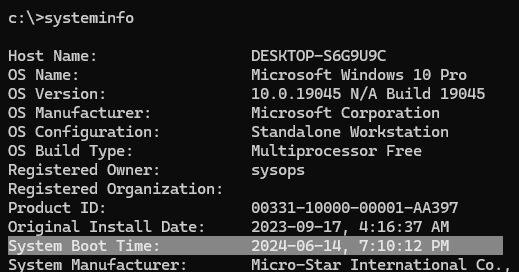
Systeminfo
Время последней загрузки (перезагрузки) Windows указано в значении System Boot Time.
В данном случае в командной строке отобразится только время последней загрузки. Чтобы вычислить значение uptime, как разницу между текущим временем и временем загрузки Windows, воспользуйтесь PowerShell командами:
$boot_time = Get-CimInstance Win32_OperatingSystem | select LastBootUpTime
(Get-Date) - $boot_time.LastBootUpTime | SELECT Days,Hours,Minutes,Seconds
Команда вернет значение аптайма компьютера в днях и часах.
В новых версиях PowerShell Core 6.x и 7.x для получения времени работы системы можно использовать новый командлет Get-Uptime. Это командлет сразу выведет значение uptime в днях, часах, минутах (в формате TimeSpan). Или можно вывести время с последней загрузки компьютера:
Get-Uptime -Since
Можно получить значение аптайм с удаленного хоста:
$remotePC='pcbuh01'
(Get-Date) - (Get-CimInstance Win32_OperatingSystem -ComputerName $remotePC).LastBootupTime
Эту команду можно использовать для удаленного опроса uptime компьютеров в домене AD. Для получения списка компьютеров обычно используется командлет Get-ADComputer.
Обратите внимание, что на десктопных версиях Windows 10 и 11 по умолчанию включена функция гибридной загруки (Быстрый запуск, Fast Boot). В этом режиме, когда пользователь выключает компьютер, Windows фактически не выключается, а выгружает ядро и драйверы в файл гибернации. В этом случае (как и после пробуждения после режима сна и обычной гибернации) аптайм компьютера не сбрасывается при включении.
Посмотреть время работы компьютера после перезагрузки
Обновлено:
Опубликовано:
Иногда хочется (или необходимо) увидеть, сколько компьютер работал времени без перезагрузки. В данной инструкции приведены примеры команд для Windows и Linux.
Для определения возраста компьютера или ноутбука, не стоит полагаться на 100% на данную информацию — система может быть переустановлена, а вместе с этим, сбивается общее время работы системы.
Открываем командную строку.
Для этого нажимаем комбинацию клавиш Win + R и в появившемся окне вводим cmd:

И нажимаем OK. Откроется командная строка.
1. Команда net stats
Введем команду net stats srv
> net stats srv
Среди результатов увидим Статистика после …
Это и будет, так называемый, uptime windows или время работы с момента последнего запуска.
2. Команда systeminfo
Для более детальной информации также можно ввести следующую команду:
> systeminfo
Она покажет детальную информацию, в том числе общее (суммарное) время работы компьютера:

* где дата установки — дата и время, когда система была запущена в первые; время загрузки системы — дата и время, когда система была перезагружена последний раз.
Время выключения Windows
Открываем журнал Windows (команда eventvwr) и находим последнее событие с кодом 6006:


Linux
Любая из приведенных ниже команд позволит посмотреть общее время работы Linux:
1. Uptime
uptime
Пример ответа:
13:28:16 up 27 days, 2:46, 1 user, load average: 0.00, 0.02, 0.05
* где 13:28:16 — текущее время; up 27 days — дней с последней перезагрузки.
2. w
w
* по сути, ответ тот же, что и после ввода команды uptime, с подробными сведениями подключения пользователей.
3. Top
Команда top предназначена для отображения состояния загруженности Linux, но она также показывает, сколько компьютер работал после перезагрузки:
top
Ответ:
top — 13:35:15 up 27 days, 2:53, 1 user, load average: 0.03, 0.03, 0.05
Tasks: 116 total, 1 running, 115 sleeping, 0 stopped, 0 zombie
%Cpu(s): 0.0 us, 0.0 sy, 0.0 ni, 99.8 id, 0.0 wa, 0.0 hi, 0.0 si, 0.2 st
KiB Mem : 1016040 total, 77052 free, 591528 used, 347460 buff/cache
KiB Swap: 524284 total, 231264 free, 293020 used. 237288 avail Mem
* в данном случае, нас интересует верхняя строчка, которая нам напоминает вывод, все той же, uptime.
Все способы:
- Способ 1: «Диспетчер задач»
- Способ 2: «Командная строка»
- Вариант 1: Команда WMIC
- Вариант 2: Утилита «System Information Tool»
- Способ 3: «Windows PowerShell»
- Способ 4: «Панель управления»
- Вопросы и ответы: 0
Способ 1: «Диспетчер задач»
В операционной системе от Microsoft реализовано средство для просмотра сведений о программных и аппаратных компонентах. Используя функции этого инструмента, можно посмотреть, сколько компьютер с Windows 10 работает:
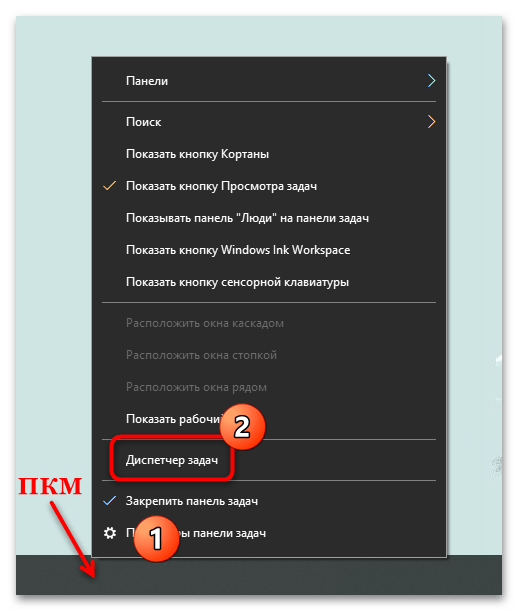
- Запустите «Диспетчер задач», щелкнув правой кнопкой мыши по нижней рабочей панели. Из появившегося списка выберите нужную функцию.
- Перейдите на вкладку «Производительность». Для отображения данных о времени работы вам нужен центральный процессор – вкладка «ЦП». В главном окне можно увидеть данный параметр у строки «Время работы».
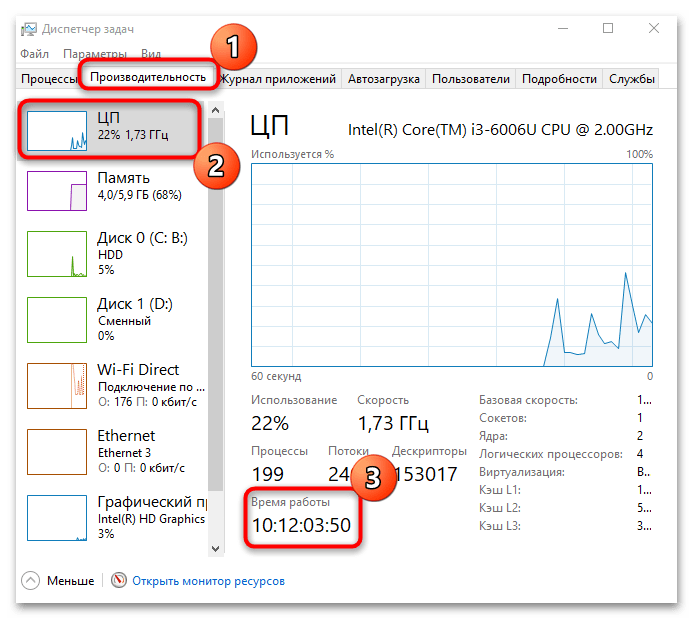
Если «Диспетчер задач» находится в свернутом режиме, предварительно нужно нажать на кнопку «Подробнее», расположенную внизу.
Способ 2: «Командная строка»
Через «Командную строку» Windows можно посмотреть, когда была запущена система, и вычислить время ее работы несложным подсчетом. Для этого нужно воспользоваться специальными командами. Разберем два варианта.
Для просмотра времени работы системы запустите «Командную строку» от имени администратора. Все способы разобраны в нашей отдельной статье.
Подробнее: Запуск «Командной строки» от имени администратора в Windows 10
Вариант 1: Команда WMIC
После того как «Командная строка» запущена с расширенными правами, введите команду wmic path Win32_OperatingSystem get LastBootUpTime, затем нажмите на клавишу «Enter», чтобы применить ее.
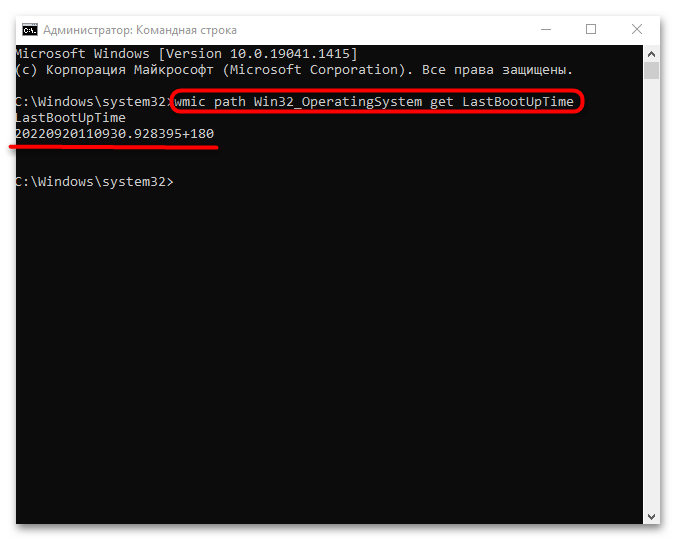
В интерфейсе консоли отобразится набор цифр. На первый взгляд кажется, что ничего не понятно, но на самом деле это несложно расшифровать. Разберем на нашем примере, как это сделать:
- первые четыре цифры в строке – это год, то есть 2022;
- следующие числа – месяц, или 09 – сентябрь;
- затем следует число месяца – 20;
- 11 – в нашем случае это часы;
- 09 – минуты;
- 30 – секунды;
- после точки следует показатель миллисекунд;
- значение «+180» — это часовой пояс в минутах, то есть 3 часа по Гринвичу, или московское время.
Эти данные говорят о том, когда точно была запущена система в последний раз. В нашем примере это 20 сентября 2022 года, в 11:09 утра. Зная информацию, не составит труда подсчитать, сколько всего работает Windows 10.
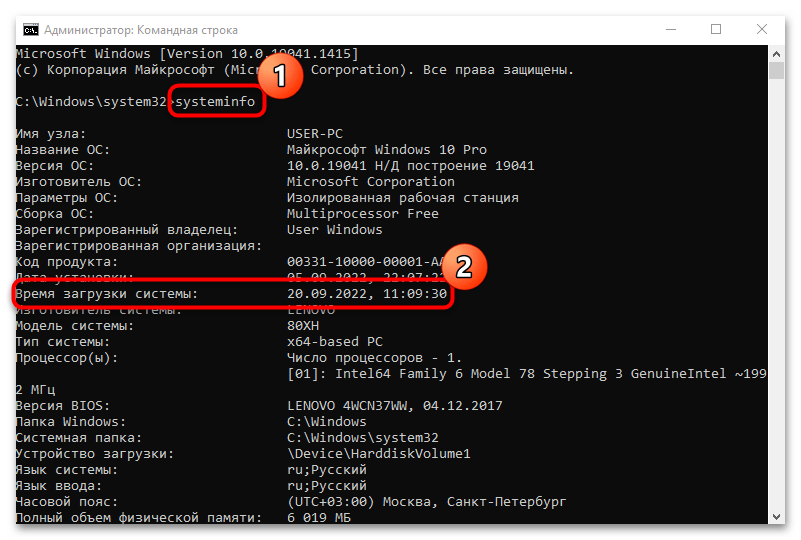
Вариант 2: Утилита «System Information Tool»
Еще одна команда запускает утилиту, отображающую информацию о различных компонентах системы, включая время последнего запуска. В этом случае также можно узнать, когда система была включена, затем подсчитать время.
В окне «Командной строки», запущенной от имени администратора, введите systeminfo и нажмите на клавишу «Enter». Отыщите строку «Время загрузки системы»: здесь отобразится дата и время включения Windows 10.
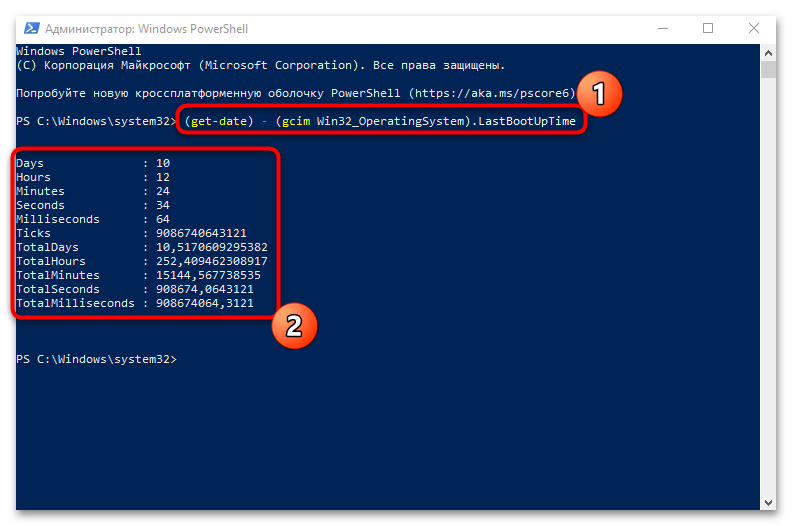
Способ 3: «Windows PowerShell»
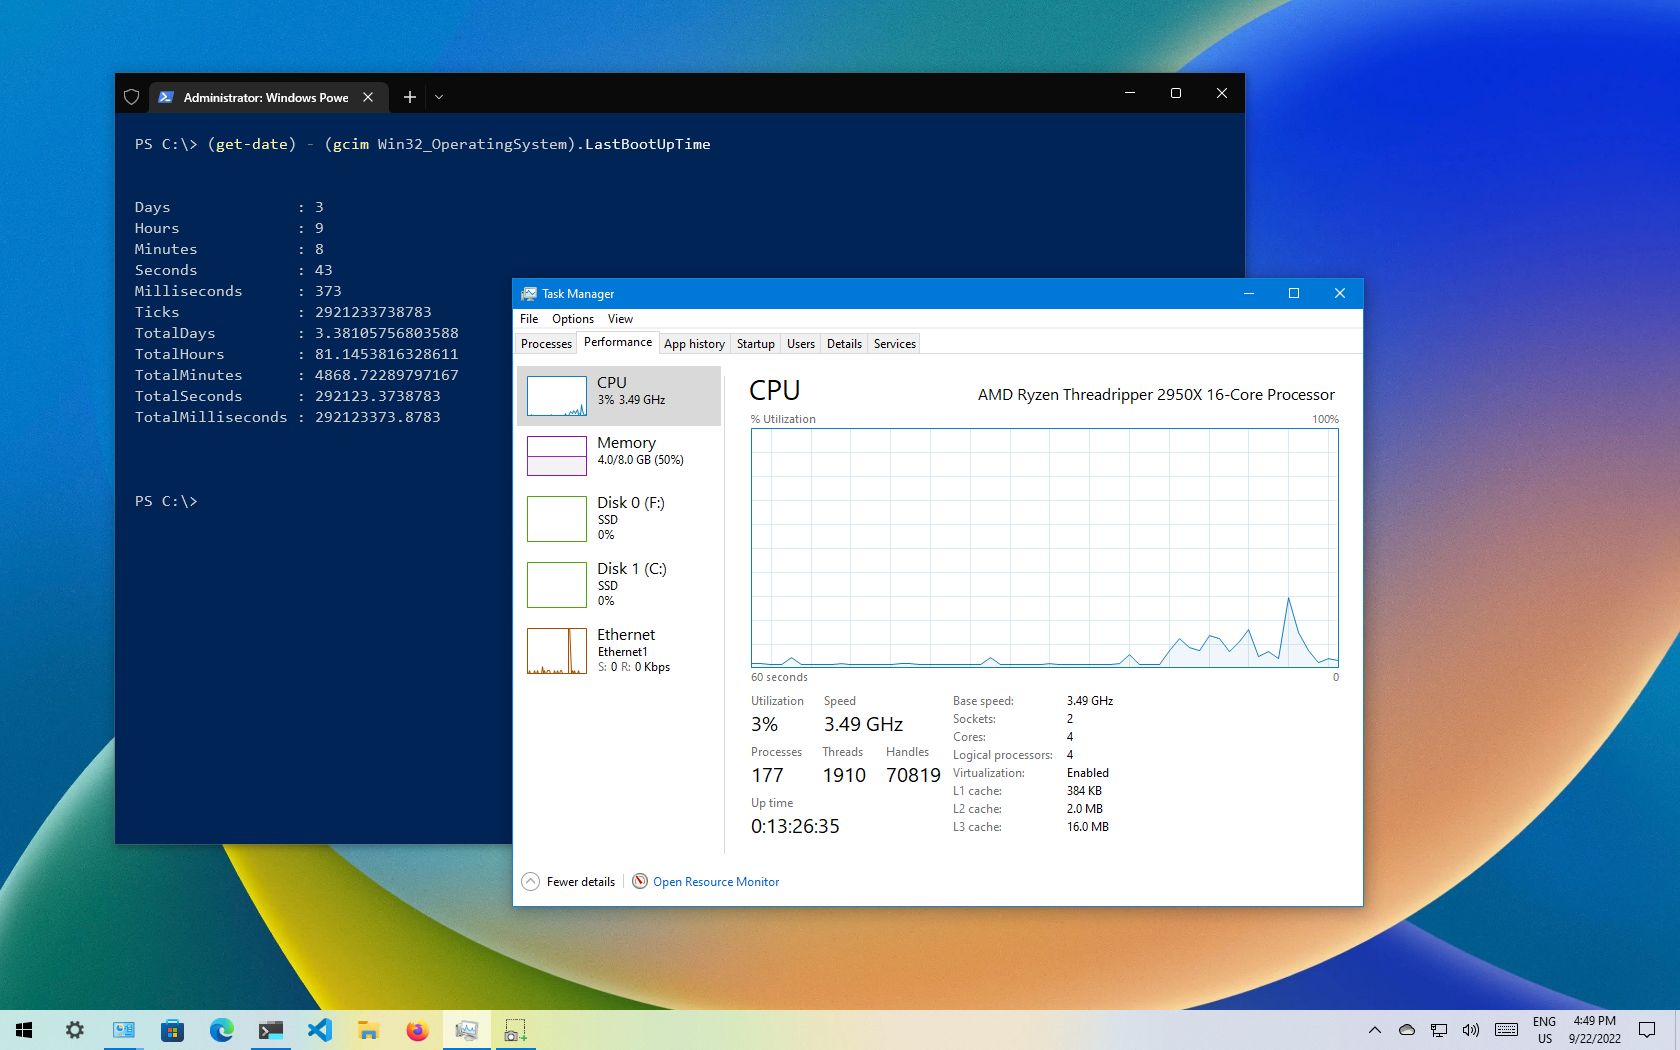
С помощью консоли «Windows PowerShell» можно вплоть до миллисекунд узнать время, в течение которого компьютер работал без перезагрузки:
- Запустите консоль с расширенными правами. Для этого щелкните правой кнопкой мыши по значку Windows и выберите пункт «Windows PowerShell (администратор)».
- Введите команду
(get-date) - (gcim Win32_OperatingSystem).LastBootUpTimeи нажмите на клавишу ввода. В результате в окне отобразится столбец с данными: дни, часы, минуты и даже миллисекунды.
Способ 4: «Панель управления»
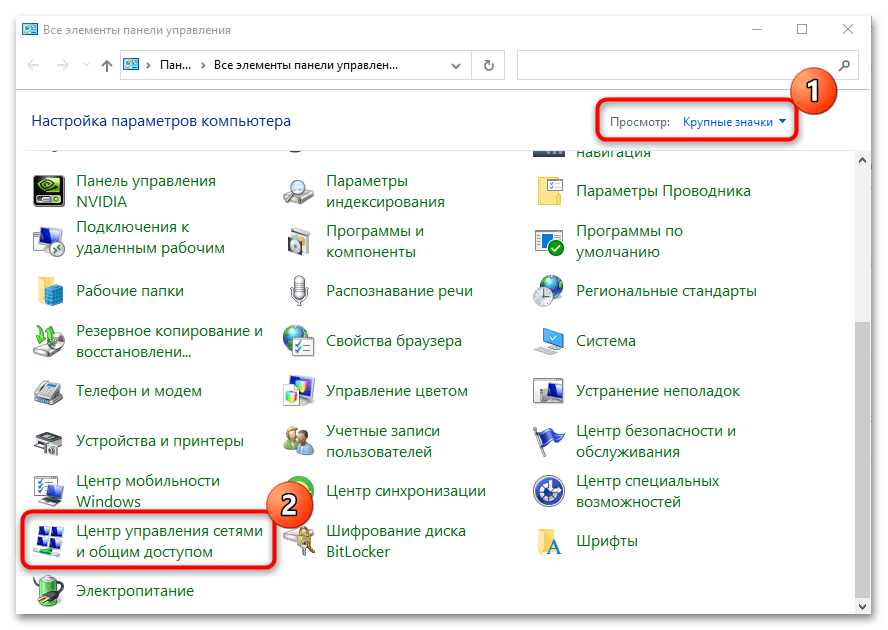
Если компьютер после запуска сразу же подключается к интернету, и во время работы соединение не прерывалось, то посмотреть, сколько работает компьютер с Windows 10, можно через сведения о сетевом адаптере:
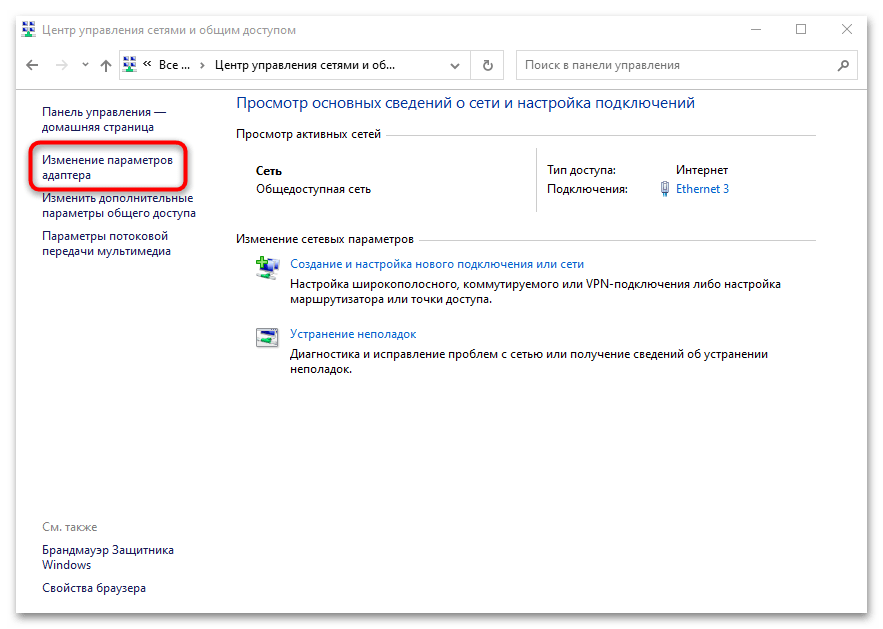
- Запустите «Панель управления». Средство находится в главном меню в папке «Служебные – Windows».
- Для комфортного просмотра разделов задайте их отображение как «Крупные значки» в строке «Просмотр». Выберите раздел «Центр управления сетями и общим доступом».
- На панели слева выберите строку «Изменение параметров адаптера».
- Выберите то подключение, которое используется, и дважды кликните по нему левой кнопкой мыши.
- В окне со свойствами обратите внимание на параметр «Длительность».

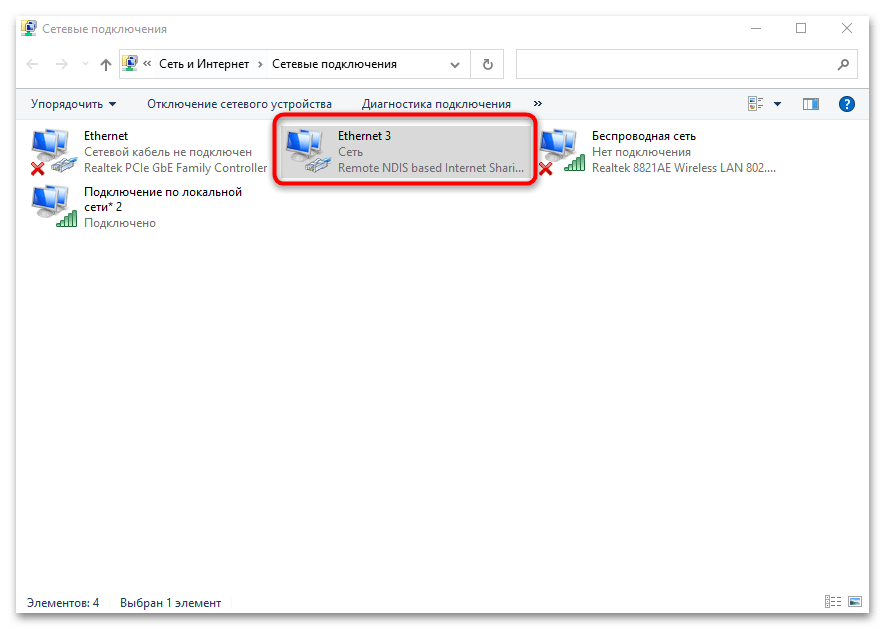
Не важно, какой тип подключения используется — проводной или беспроводной — нужная информация все равно будет доступна для просмотра.
Наша группа в TelegramПолезные советы и помощь
How to Check Your Computer Uptime on Windows 11 and 10
In the fast-paced world of technology, keeping track of your computer’s uptime can be crucial for various reasons—be it for optimizing performance, troubleshooting issues, or simply understanding how long your machine has been operational. Uptime refers to the amount of time that your computer has been running since the last boot. Monitoring this metric can provide insights into your system’s health, help identify potential software bugs, and allow for more efficient resource management. In this article, we will delve into several methods to check your computer uptime on Windows 10 and Windows 11.
Understanding Uptime
Before we dive into checking your uptime, it’s essential to understand what uptime represents. Uptime, in computing terms, is the time period your operating system has been running without interruption. Every time you turn off your computer, its uptime resets to zero the next time you power it on. For users who experience frequent system crashes or restarts, knowing the uptime can be a vital step in diagnosing issues. It can also be useful for network administrators managing servers or workstations, allowing them to audit how long systems have been running.
Why Uptime Matters
-
Performance Monitoring: By regularly checking uptime, you can gauge the performance of your system. If your computer is frequently rebooted due to crashes or hangs, it may indicate underlying problems that need to be addressed.
-
Resource Management: For professionals running resource-heavy applications, such as video editing software or virtual machines, tracking uptime can help manage resources effectively.
-
Preventative Maintenance: Regular monitoring can assist in implementing maintenance schedules. Perhaps you want to reboot your system weekly to clear memory caches or apply software updates.
-
Troubleshooting: If you notice software issues, knowing how long the system has been running can help you determine whether a reboot may resolve the problem.
How Uptime is Calculated
Uptime is typically displayed as a duration, showing how long a system has been online since it was last booted. This duration is often shown in hours, minutes, and seconds. Various tools and command-line utilities can help you retrieve this information.
Methods for Checking Uptime in Windows 10 and 11
There are multiple methods to check your computer’s uptime, and we will explore several ways, including using Task Manager, Command Prompt, PowerShell, and third-party applications.
Method 1: Using Task Manager
Task Manager is an integral part of the Windows operating system that provides various statistics about system performance and running applications. Here’s how to check your uptime using Task Manager:
-
Open Task Manager:
- You can do this by right-clicking on the taskbar and selecting «Task Manager» or by pressing
Ctrl + Shift + Escon your keyboard.
- You can do this by right-clicking on the taskbar and selecting «Task Manager» or by pressing
-
Go to the Performance Tab:
- Once Task Manager opens, click on the «Performance» tab. This tab includes detailed information about your CPU, Memory, Disk, and Network usage.
-
Check System Uptime:
- In the «Performance» section, click on «CPU» on the left sidebar. On the right side, you will see various statistics about your CPU usage. Look towards the bottom right corner where you will find «Uptime» displayed with the duration since the last boot.
This method provides a graphical representation of your system’s performance metrics along with uptime data.
Method 2: Using Command Prompt
If you are more comfortable using command-line interfaces, you can easily check your uptime with the Command Prompt. Here’s how:
-
Open Command Prompt:
- Press
Windows + Rto open the Run dialog. Typecmdand press Enter.
- Press
-
Run the Uptime Command:
- In the Command Prompt window, type the command:
systeminfo | find "System Boot Time" - This command retrieves system information and filters it to display only the system boot time.
- In the Command Prompt window, type the command:
-
Interpret the Output:
- The output will show you the exact date and time your system was last booted. You can then calculate how long the system has been running since this time.
Method 3: Using PowerShell
PowerShell is a powerful scripting environment in Windows that can also be used to check your system uptime. Here are the steps:
-
Open PowerShell:
- Right-click on the Start button and select «Windows Terminal (Admin)» or «Windows PowerShell (Admin).»
-
Run the Uptime Command:
- Type the following command:
(Get-CimInstance -ClassName Win32_OperatingSystem).LastBootUpTime - This retrieves the last boot time of your operating system.
- Type the following command:
-
Convert Boot Time:
- To make it easier to read, you can format the output:
[Management.ManagementDateTimeConverter]::ToDateTime((Get-CimInstance -ClassName Win32_OperatingSystem).LastBootUpTime) - This command converts the last boot time to a standard date format, allowing you to see how long ago your machine was started.
- To make it easier to read, you can format the output:
Method 4: Using System Information Utility
Windows has a built-in utility called System Information that provides detailed information about the system, including uptime. Here’s how to use it:
-
Open the System Information Tool:
- Press
Windows + R, typemsinfo32, and hit Enter. This command opens the System Information window.
- Press
-
Find Uptime:
- In the System Information window, look for “System Summary” on the left sidebar. Scroll down in the main window until you see “System Boot Time,” which shows the exact date and time of the last boot.
Method 5: Using Event Viewer
Event Viewer can be a bit more technical, but it provides an in-depth look at system events, including boot times.
-
Open Event Viewer:
- Right-click on the Start button and select «Event Viewer.»
-
Navigate to System Logs:
- In the Event Viewer, expand «Windows Logs» from the left pane, then click on «System.»
-
Filter Boot Events:
- Click on «Filter Current Log» on the right pane. In the pop-up, set the «Event sources» to “USER32.” Click “OK.”
- You will see a list of events indicating when the system was started. The event ID for a system boot is typically 6005 (Event Log service started) or 6006 (Event Log service stopped).
-
Interpret the Data:
- The timestamps of these events will help you determine when the system was last rebooted.
Method 6: Using Third-Party Software
If you prefer a graphical user interface and additional features, various third-party applications can help you monitor system uptime, among other performance metrics.
-
CPU-Z: A lightweight utility that provides detailed statistics about your CPU, including uptime and other system information.
-
HWMonitor: This tool monitors various system parameters such as voltage, temperature, and uptime.
-
HWiNFO: A comprehensive hardware analysis, monitoring, and reporting tool that can provide uptime statistics along with other metrics.
To use any of these tools, simply download and install the chosen application, and you can find uptime statistics within their respective dashboards.
Tips for Maintaining System Uptime
To enhance and maintain system uptime effectively, consider the following tips:
-
Regular Updates: Keep your system updated with the latest patches and drivers. This ensures stability and reduces the chances of crashes.
-
Perform Routine Maintenance: Regularly perform disk cleanups and defragmentation (for HDDs) to enhance system performance.
-
Monitor Hardware: Ensure all hardware components are functioning correctly. Faulty hardware can lead to unexpected reboots.
-
Be Cautious with Software: Only install trusted software. Malware and buggy applications can cause instability.
-
Use UPS: Employ an Uninterruptible Power Supply (UPS) to prevent sudden shutdowns due to power outages.
-
Backup Regularly: Frequently back up your data to prevent loss in case of crashes, and ensure that you can restore operations quickly.
Conclusion
Monitoring the uptime of your Windows 10 or Windows 11 computer can provide valuable insights into its health and performance. While there are multiple ways to check uptime—including built-in utilities like Task Manager, Command Prompt, and PowerShell—using third-party applications can offer a more user-friendly experience. Regardless of the method you choose, knowing your system’s uptime is an important aspect of effective computer management.
Incorporating regular checks into your maintenance routine can help you identify potential issues before they escalate, allowing you to optimize your system’s performance and longevity. Whether you’re troubleshooting a problem, planning scheduled maintenance, or just curious about how long your computer has been running, understanding and monitoring uptime is crucial for ensuring a smooth computing experience.
(Image credit: Future)
On Windows 10, understanding how long a device has been up and running can be useful information in many scenarios. For example, when troubleshooting problems, you may want to know if a reboot was recently applied or if your computer is acting up while working on an important project, and you suspect a restart is required.
Whatever the reason, Windows 10 doesn’t make it obvious to see your system uptime, but it’s not impossible to find either, as you can deduce this information using Task Manager, Control Panel, Command Prompt, and PowerShell.
This guide will walk you through four simple ways to check your device uptime without scripts or restarting.
How to check PC uptime using Task Manager
The easiest way to check your device uptime is using Task Manager with these steps:
- Open Start.
- Search for Task Manager and click the top result to open the experience.
- Quick tip: You can also open Task Manager using the «Ctrl + Shift + Esc» keyboard shortcut or by right-clicking the taskbar and selecting Task Manager from the menu.
- Click the More details button (if you’re using the compact view).
- Click the Performance tab.
- Select the CPU section.
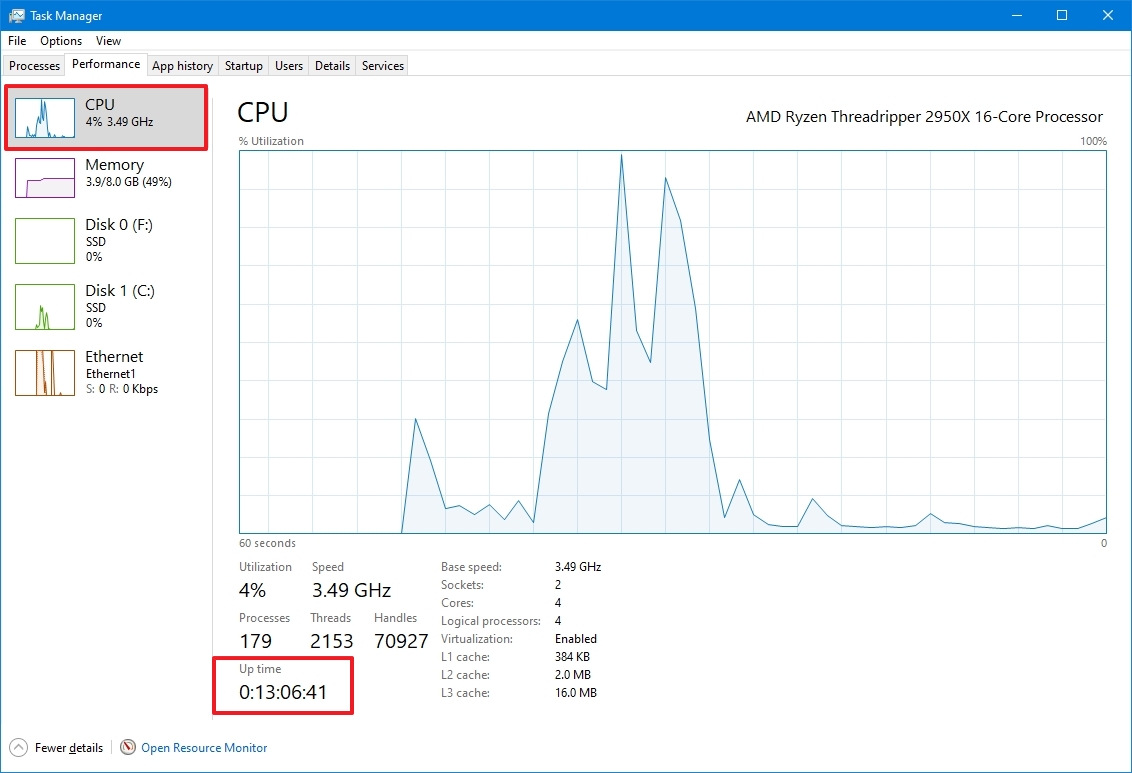
Once you complete the steps, you’ll see your device uptime on the right, at the bottom of the page.
How to check PC uptime using Control Panel
Another easy way to determine your system uptime is to check your network adapter status with these steps:
- Open Start.
- Search for Control Panel and click the top result to open the experience.
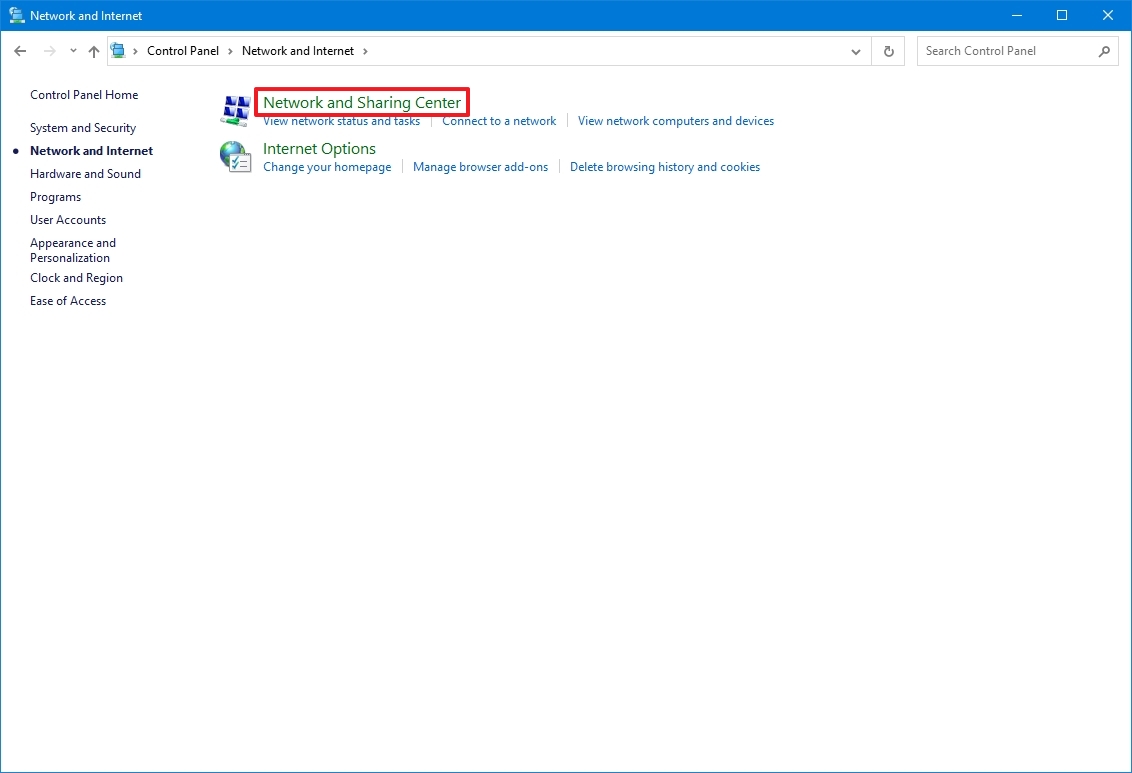
- Click on Network and Internet.
- Click on Network and Sharing Center.
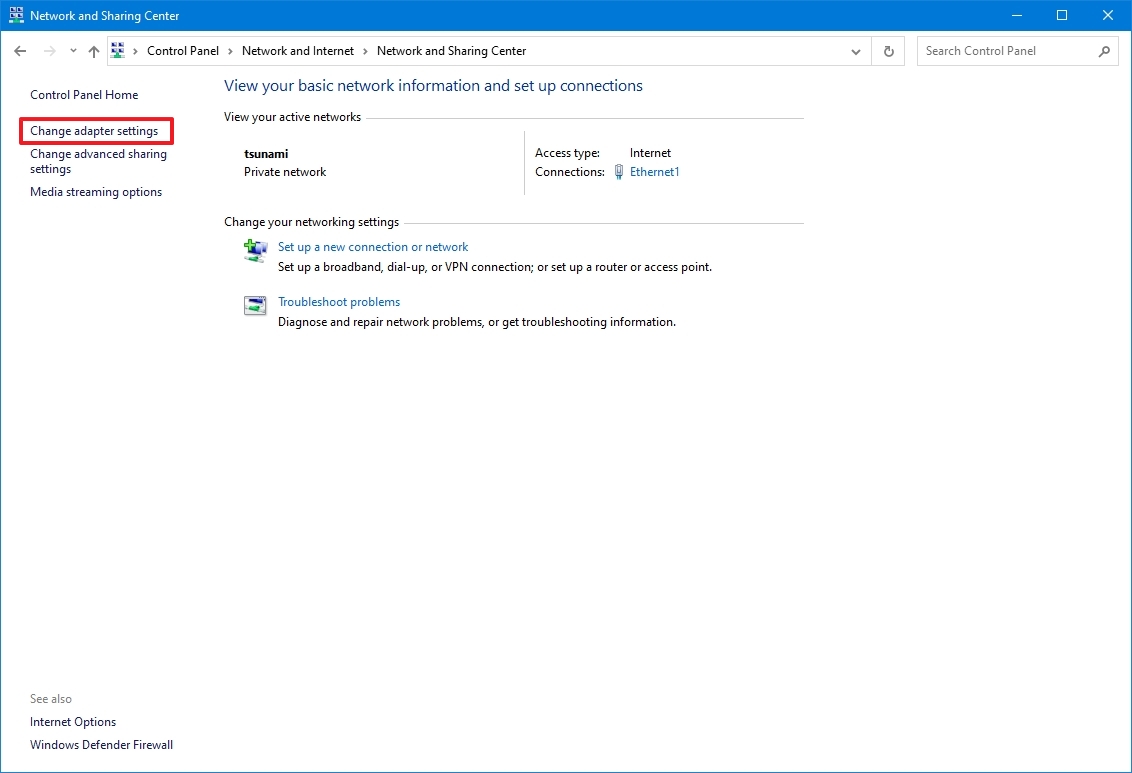
- Click the «Change adapter settings» option in the left pane.
- Double-click the network adapter connected to the internet.
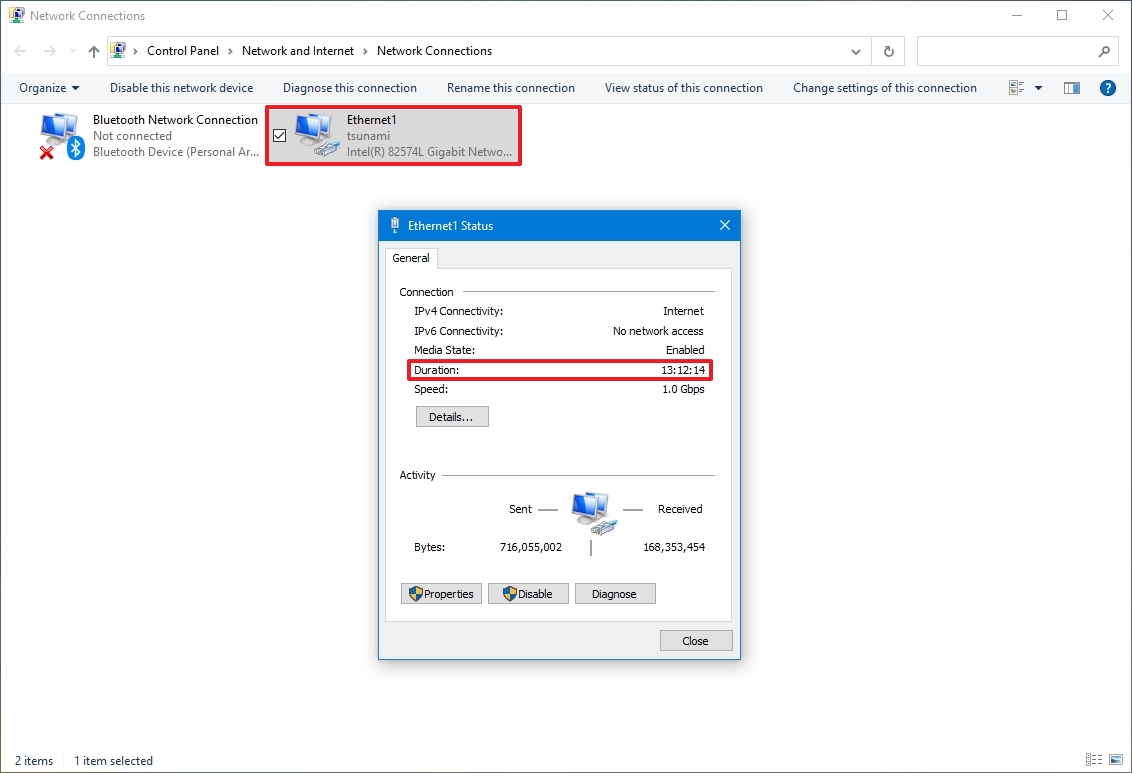
After completing the steps, you can deduce your computer uptime using the «Duration» information, which indicates the uptime from the network connection that resets every time the device starts. However, this method work as long as you didn’t reset your network connection since the last time you booted the device.
All the latest news, reviews, and guides for Windows and Xbox diehards.
How to check PC uptime using Command Prompt
If you want to use Command Prompt to check your device uptime, you have at least two ways to do it.
WMIC method
To check the device uptime with Command Prompt on Windows 10, use these steps:
- Open Start.
- Search for Command Prompt, right-click the top result and click the Run as administrator option.
- Type the following command to query the device’s last boot time and press Enter: wmic path Win32_OperatingSystem get LastBootUpTime
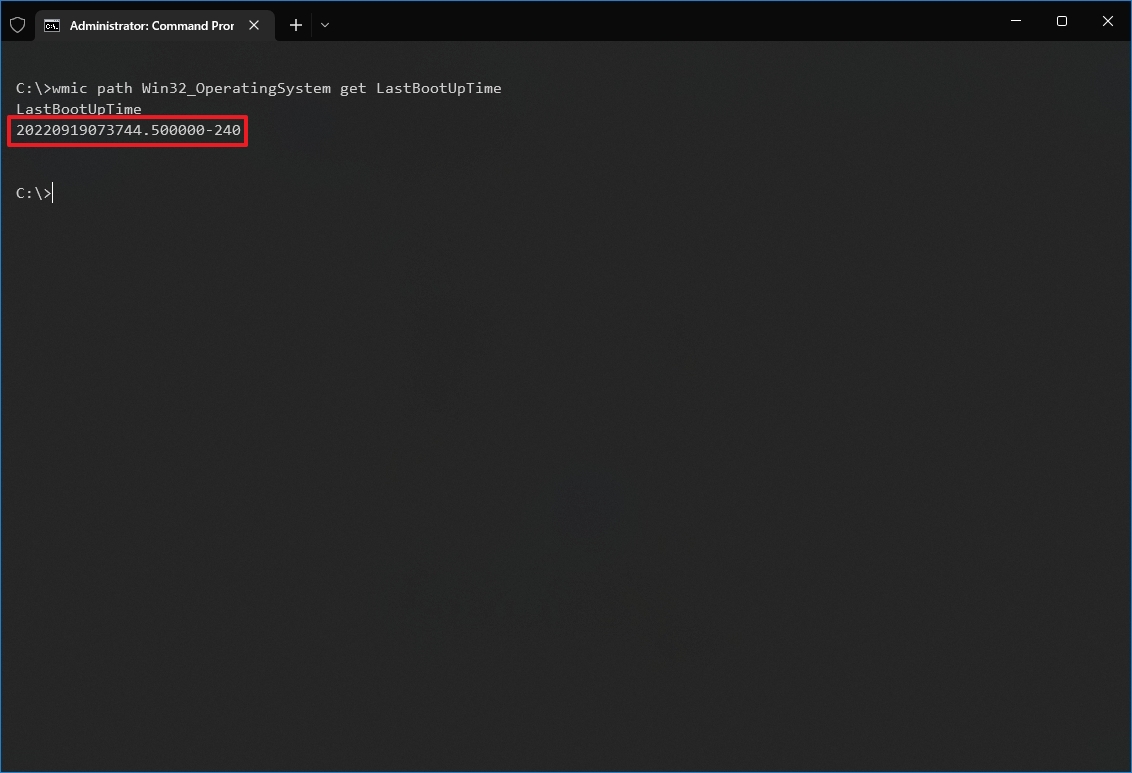
Once you complete the steps, you’ll notice an output may look intimidating, but it’s not difficult to decode so you can understand your device’s uptime.
For example, the LastBootUpTime 20220919073744.500000-240 can be broken down using the info below.
- Year: 2022.
- Month: 09.
- Day: 19.
- Hour: 07.
- Minutes: 37.
- Seconds: 44.
- Milliseconds: 500000.
- GMT: -300 (5 hours ahead of GMT).
This means that the computer has been up and running since September 19, 2022, at 07:37 AM. If you want to be more specific, subtract the last boot time from the current time to deduce the number of days, hours, and minutes the device has been in operation.
System Information method
You can also see your system uptime in a more user-friendly format using the System Information tool with these steps:
- Open Start.
- Search for Command Prompt, right-click the top result and click the Run as administrator option.
- Type the following command to query the device’s last boot time and press Enter: systeminfo | find «System Boot Time»
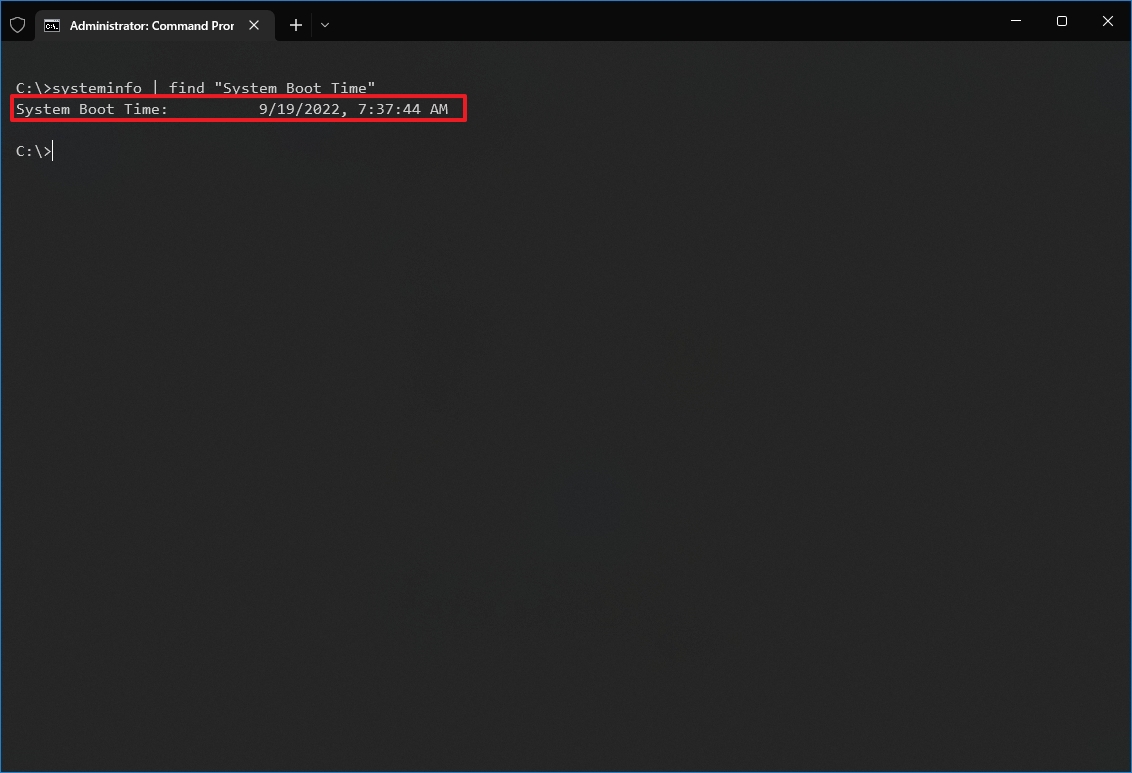
The System Information tool can quickly show the last time your system rebooted in an easy-to-read format. Also, like the wmic command, you can subtract the last boot time from the current time to determine the number of days, hours, and minutes the device has been running.
How to check PC uptime using PowerShell
It’s also possible to check your device uptime using PowerShell with these steps:
- Open Start.
- Search for Command Prompt, right-click the top result and click the Run as administrator option.
- Type the following command to query the device uptime and press Enter: (get-date) — (gcim Win32_OperatingSystem).LastBootUpTime
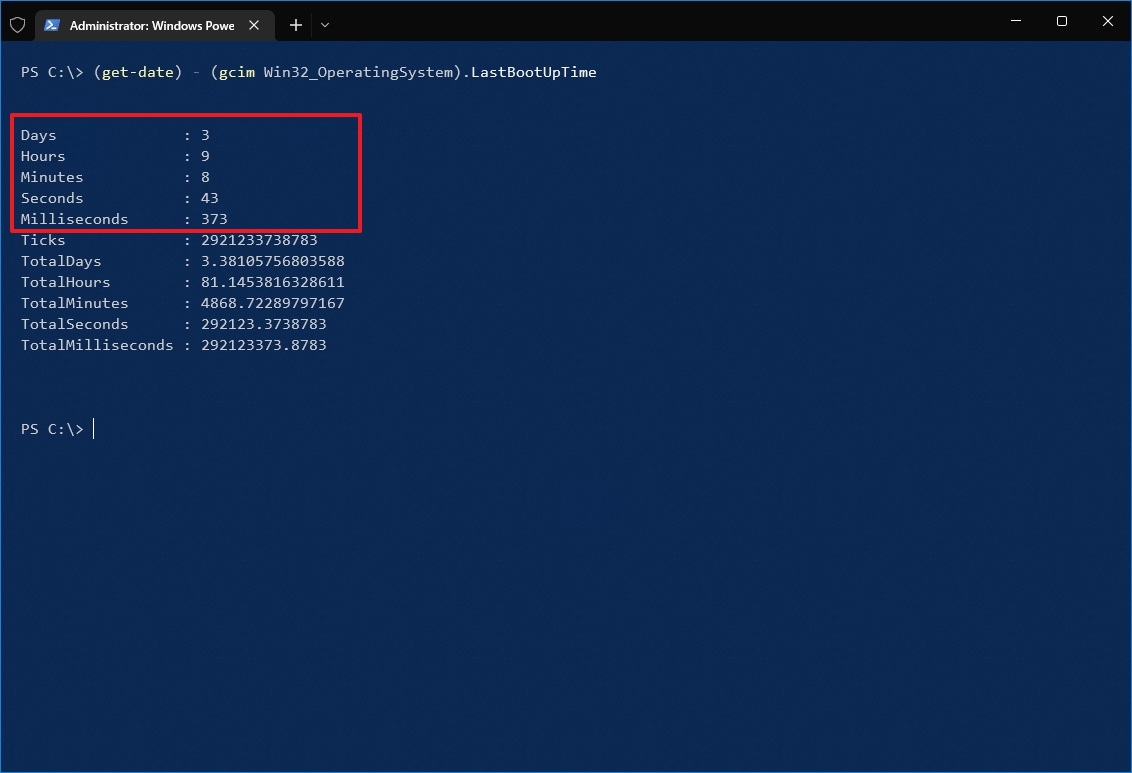
After completing the steps, you’ll get the uptime information in a list format with the days, hours, and minutes.
This guide outlines several ways to check your device uptime, but it’s important to note that there are many other methods to find the same information using Command Prompt and PowerShell scripts. However, these are the most straightforward methods.
In addition, while these instructions are focused on Windows 10, these methods have been around for a long time, which means they’ll also work on Windows 8.1 and 7.
More resources
For more helpful articles, coverage, and answers to common questions about Windows 10 and Windows 11, visit the following resources:
- Windows 11 on Windows Central — All you need to know
- Windows 10 on Windows Central — All you need to know
Mauro Huculak has been a Windows How-To Expert contributor for WindowsCentral.com for nearly a decade and has over 15 years of experience writing comprehensive guides. He also has an IT background and has achieved different professional certifications from Microsoft, Cisco, VMware, and CompTIA. He has been recognized as a Microsoft MVP for many years.