
При нахождении на экране блокировки в Windows 11/10 экран автоматически выключается через 30 секунд или 1 минуту. Если вам требуется изменить это время или сделать так, чтобы экран не выключался, нужного параметры вы не найдёте, но возможность настройки существует.
В этой инструкции подробно о том, как добавить возможность настройки времени выключения экрана на экране блокировки в Windows 11 и Windows 10 в параметры электропитания и настроить этот промежуток времени.
Как добавить настройку времени отключения монитора в параметры схемы электропитания
В Windows 11 и Windows 10 предусмотрен параметр для настройки выключения экрана на экране блокировки, но он скрыт по умолчанию.
Соответственно, первое, что потребуется сделать — добавить опцию настройки времени отключения экрана на при заблокированной Windows в параметры электропитания, для этого придётся прибегнуть к использованию редактора реестра. Шаги будут следующими:
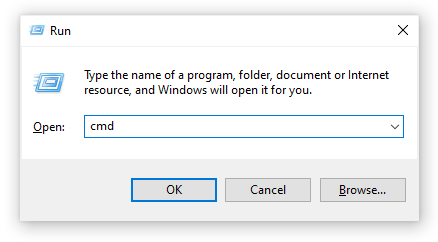
- Запустите редактор реестра. Для этого нажмите клавиши Win+R, либо нажмите правой кнопкой мыши по кнопке «Пуск» и выберите пункт «Выполнить». Введите regedit и нажмите Enter.
- Перейдите к разделу реестра
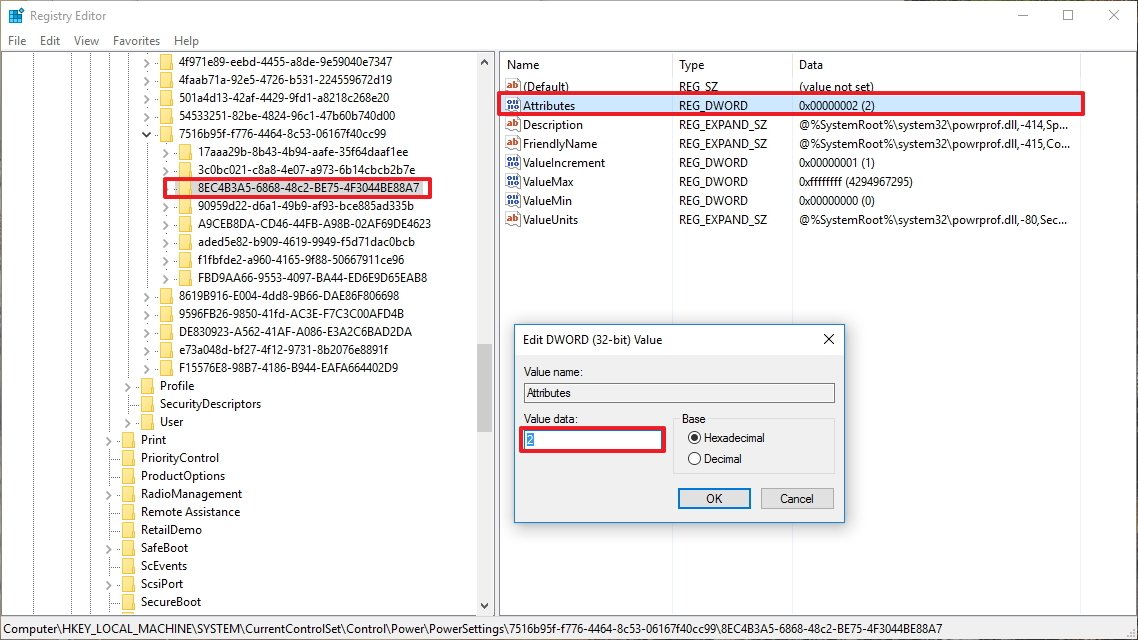
HKEY_LOCAL_MACHINE\SYSTEM\CurrentControlSet\Control\Power\PowerSettings\7516b95f-f776-4464-8c53-06167f40cc99\8EC4B3A5-6868-48c2-BE75-4F3044BE88A7
- В правой панели редактора реестра дважды нажмите по параметру с именем Attributes, замените его значение с 1 на 2 и примените настройки.

- Закройте редактор реестра.

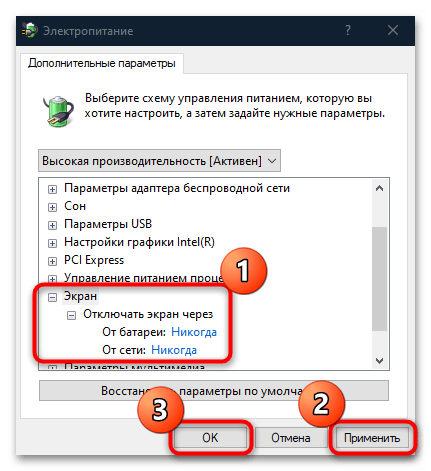
Следующий шаг — настройка времени до выключения экрана на экране блокировки, для этого:
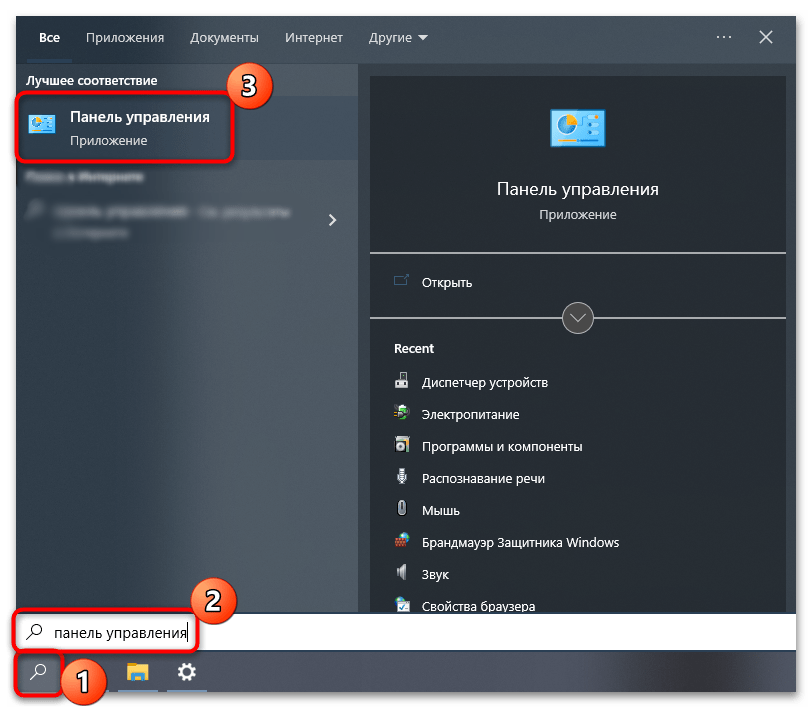
- Зайдите в Панель управления и откройте пункт «Электропитание», либо нажмите клавиши Win+R на клавиатуре, введите powercfg.cpl и нажмите Enter.
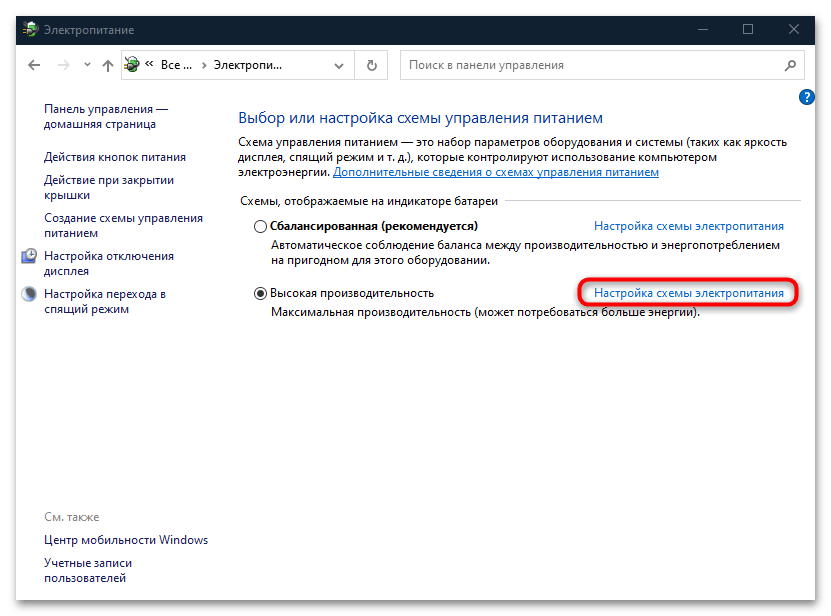
- Нажмите «Настройка схемы электропитания» справа от используемой схемы.

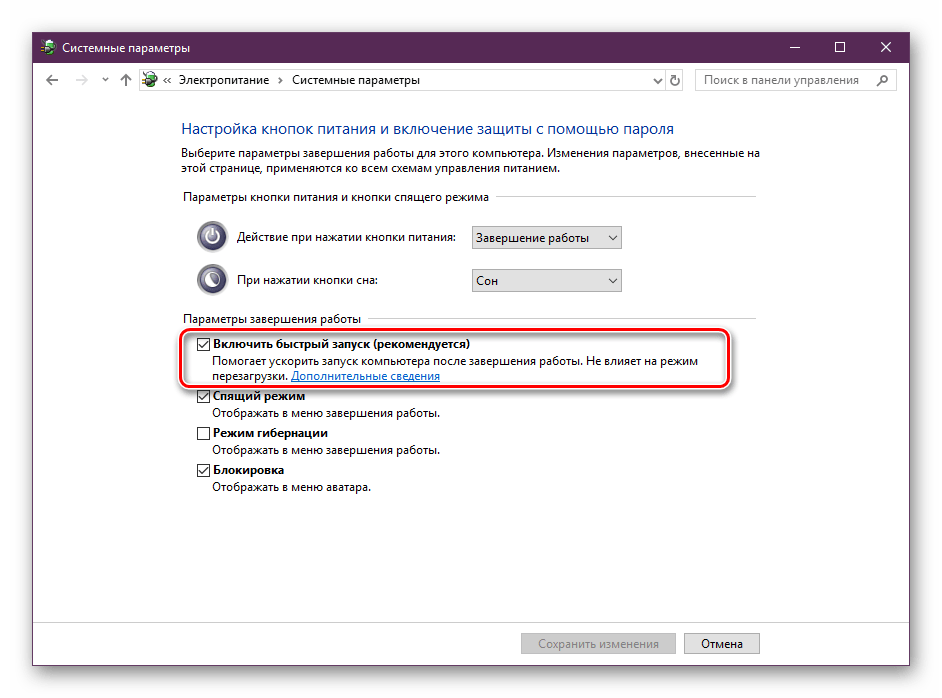
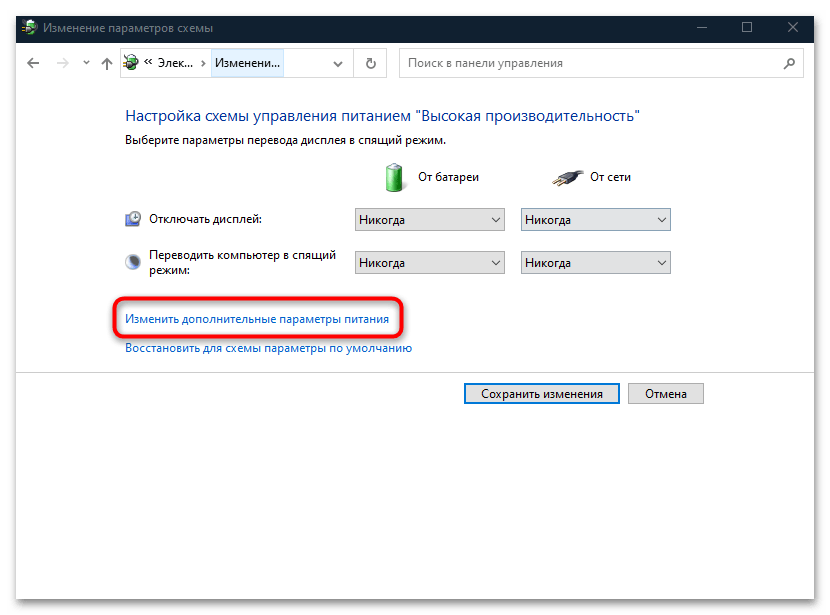
- В следующем окне нажмите «Изменить дополнительные параметры питания».
- Перейдите в раздел «Экран» и настройте нужные параметры в подразделе «Время ожидания до отключения экрана блокировки консоли». Время задается в минутах, если указать 0, выключение экрана выполняться не будет.

- Примените сделанные настройки


Учитывайте, что работать настройка будет только после уже выполненного входа в Windows 11/10 (т.е. когда мы заблокировали систему после входа или она заблокировалась сама), но не, например, после перезагрузки компьютера ещё до входа.
Изменение времени отключения экрана при блокировке Windows 10 с помощью powercfg.exe
Еще один способ изменить это же поведение — использовать утилиту командной строки для установки времени отключения экрана.
В командной строке от имени администратора выполните следующие команды (в зависимости от задачи):
-
powercfg.exe /setacvalueindex SCHEME_CURRENT SUB_VIDEO VIDEOCONLOCK время_в_секундах
(при питании от сети)

-
powercfg.exe /setdcvalueindex SCHEME_CURRENT SUB_VIDEO VIDEOCONLOCK время_в_секундах
(при питании от батареи)

Надеюсь, найдутся читатели, для которых информация из инструкции будет востребована.
В Windows 10 предусмотрено автоматическое выключение экрана, которое активируется в случае, если пользователь не производит на компьютере никаких действий, то есть устройство включено, но находится в режиме бездействия. Эта функция нужна для экономии энергии, в особенности для ноутбуков, работающих на аккумуляторной батарее. Отключение экрана может происходить по нескольким причинам, например, активация заставки или уход компьютера в спящий режим, и в зависимости от этого подбирается алгоритм действий. Мы разберем наиболее распространенные методы.
Способ 1: Экранная заставка
Заставка представляет собой дополнительные элементы, которые отображаются на дисплее, если компьютером не пользуются какое-то время. Часто на это различные фигуры, часы или фотографии. Бывает так, что через несколько минут заставка потухает, и появляется черный экран.
Чтобы выйти из режима показа экранной заставки, достаточно просто пошевелить компьютерной мышью или нажать любую клавишу на клавиатуре.
Чтобы отключить выключение экрана в Windows 10, нужно изменить параметры заставки:
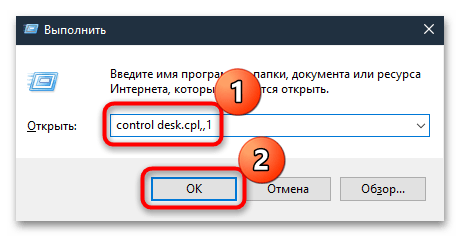
- Одновременно зажмите клавиши «Win + R», в появившемся окне введите команду
control desk.cpl,,1и выполните ее, нажав на кнопку «ОК». - Отобразится системное окно с настройками заставки. Разверните одноименное меню и выберите пункт «(нет)». Сохраните новые настройки.

После внесения изменений экран не будет гаснуть из-за заставки. Если дело в настройках сна или электропитания, то алгоритм действий отличается.
Способ 2: «Параметры»
Когда экран становится черным, компьютер или ноутбук продолжает работать некоторое время, затем уходит в сон. Это позволяет не только экономить электроэнергию и автономность аккумуляторной батареи у лэптопов, но и продлить срок эксплуатации других компонентов, поскольку все процессы и службы, работающие в фоне, также отключаются, а на комплектующие нет почти никакой нагрузки.
Некоторые пользователи отключают режим сна по другим причинам: из-за сложности выхода из этого режима ввиду некорректных настроек, сбоев в работе ОС или неправильной конфигурации BIOS. В итоге приходится перезагружать компьютер, чтобы вернуться к работе, но нередко из-за этого не сохраняются различные данные. Если вы хотите отключить выключение экрана на Windows 10 из-за такой неполадки, то у нас есть материал на сайте, где подробным образом описаны решения проблемы.
Подробнее: Устранение проблем с выводом компьютера на Windows 10 из спящего режима
Для деактивации режима сна на компьютере с Windows 10 в системных «Параметрах» предусмотрен специальный раздел:
- Нажмите на кнопку «Пуск» и выберите «Параметры» в меню.
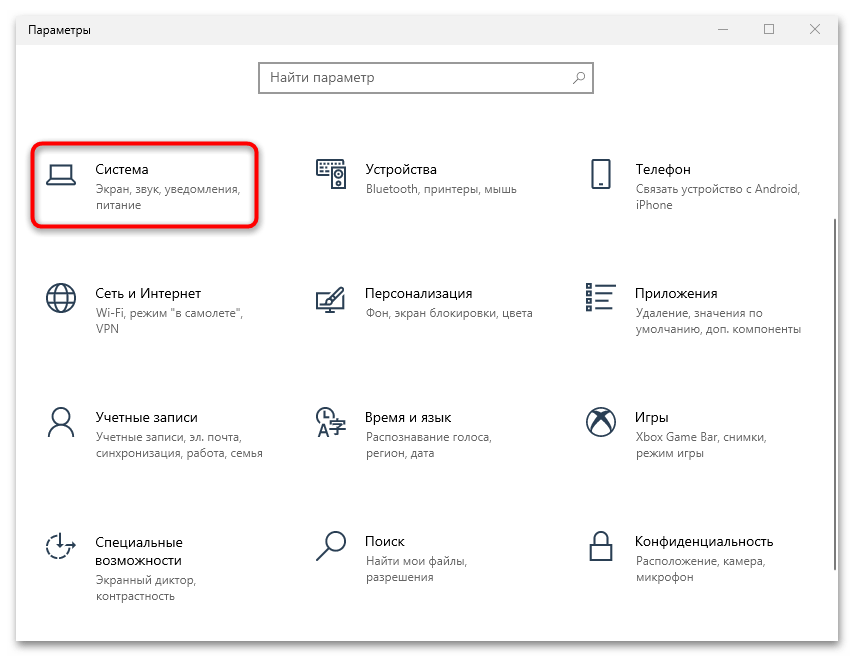
- В открывшемся окне перейдите в раздел «Система».
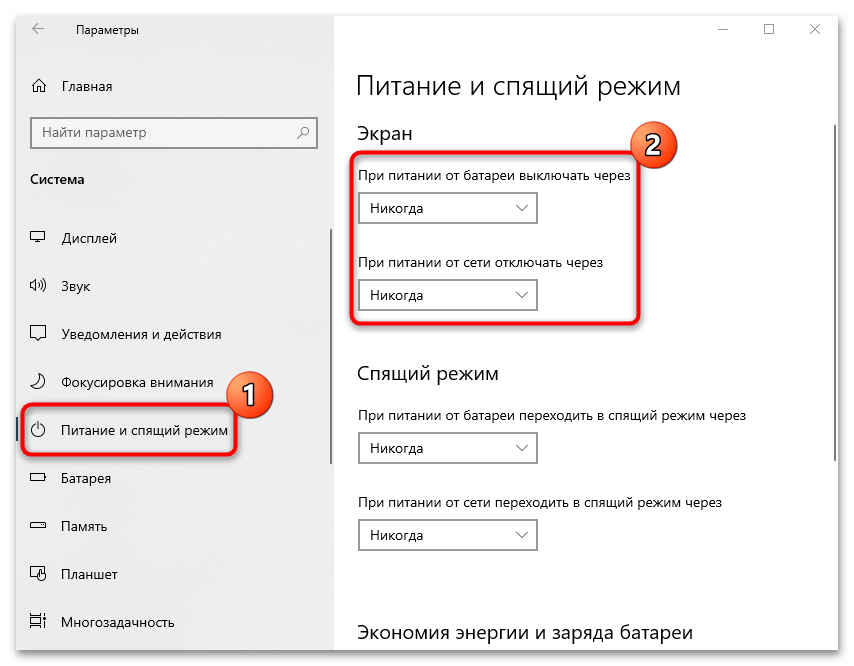
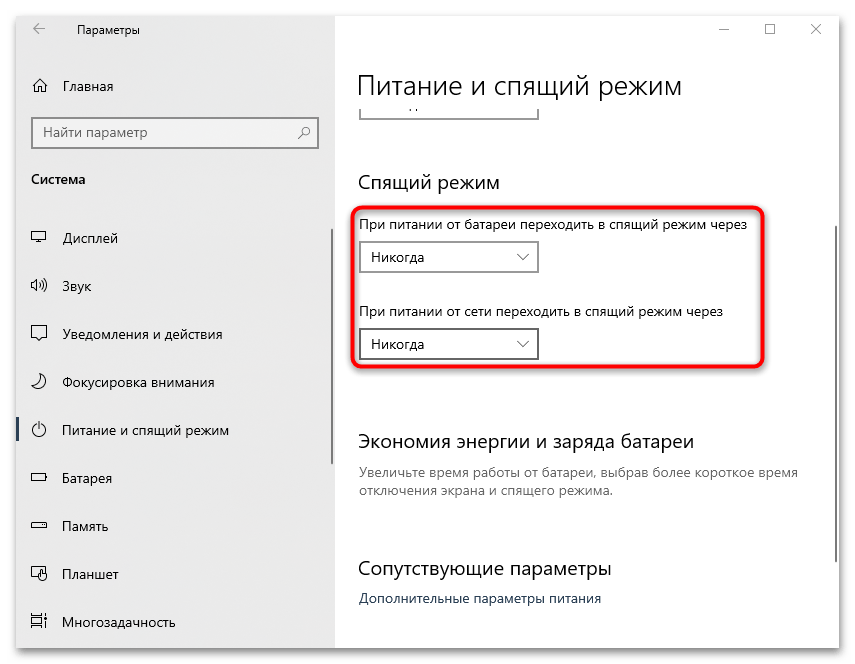
- На панели слева нажмите на пункт «Питание и спящий режим». В основном окне в разделе «Экран» выберите значение «Никогда». Если у вас ноутбук, то будет выбор для питания от сети и от аккумулятора.
- Ниже в разделе «Спящий режим» проделайте то же самое, чтобы отключить уход компьютера или ноутбука в сон.
Также можно выбрать и другие значения, например отключение экрана через несколько часов. Это подойдет, если вы забываете выключать устройство на ночь или ставите на долгое время выполнение различных задач в автоматическом режиме, к примеру конвертирование или скачивание файлов.
Способ 3: Настройки электропитания
Еще один способ отключить выключение экрана – это использовать настройки электропитания. Параметры в этом случае выбираются через «Панель управления», они аналогичны с предыдущим вариантом, но предполагаются более расширенные возможности.
- Через «Пуск» отыщите встроенное средство «Панель управления».
- В качестве просмотра лучше выбрать крупные или мелкие значки. Перейдите в раздел «Электропитание».
- Нажмите на строку «Настройка схемы электропитания» у той схемы, которую вы используете.
- В новом окне также можно настроить время для отключения дисплея или ухода компьютера в спящий режим, а также вовсе отключить эти функции. Для ноутбуков тоже доступно два варианта: «От сети» и «От батареи». После того как вы внесли изменения, нажмите на кнопку сохранения внизу.


Еще в настройках электропитания можно установить параметры для различных компонентов системы. Например, чтобы сделать это для дисплея, нужно проделать следующее:
- В окне с настройкой схемы электропитания кликните по строке «Изменить дополнительные параметры питания».
- В новом окне отыщите в списке «Экран» и разверните меню. В пункте «Отключать экран через» выберите «Никогда». Примените и сохраните настройки.
Если вы используете несколько схем электропитания и активно переключаетесь между ними, то таким образом настроить нужно каждую из них.
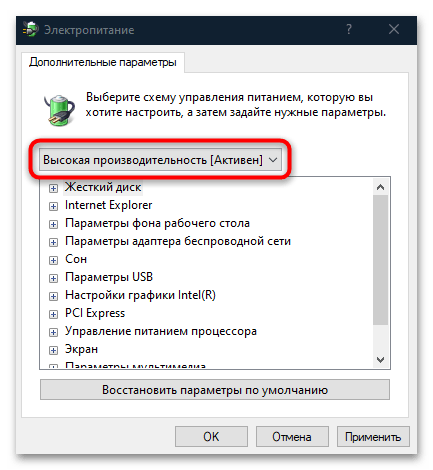
В окне «Дополнительные параметры» электропитания можно еще выбрать параметр «Высокая производительность» или «Максимальная производительность», чтобы отключить все настройки режима экономии энергии для всех компонентов операционной системы.
Наша группа в TelegramПолезные советы и помощь
В данной статье показаны действия, с помощью которых можно изменить время отключения экрана в операционной системе Windows 10.
Практически все современные мониторы имеют энергосберегающие возможности, которые отключают экран после определенного периода бездействия компьютера. Включение этой возможности уменьшает потребление электричества. Энергосберегающие возможности автоматически задействуются операционной системой при её установке, но это зависит от правильного определения монитора операционной системой и установки всех требуемых драйверов.
Также энергосбережение особенно актуально для мобильных устройств (ноутбуки, планшеты). Настроив экран на отключение при бездействии компьютера, можно сэкономить заряд батареи и продлить время работы от батареи.
По умолчанию время бездействия компьютера после которого происходит отключение экрана (дисплея) составляет 10 (5) минут, но при необходимости можно изменить его.
Содержание
- Как изменить время отключения экрана используя «Параметры Windows»
- Как изменить время отключения экрана используя «Панель управления»
- Как изменить время отключения экрана используя дополнительные параметры электропитания
Как изменить время отключения экрана используя «Параметры Windows»
Чтобы изменить время отключения экрана, откройте приложение «Параметры», для этого нажмите на панели задач кнопку Пуск и далее выберите Параметры или нажмите сочетание клавиш + I.

В открывшемся окне «Параметры» выберите Система.

Затем выберите вкладку Питание и спящий режим, и в правой части окна в разделе «Экран», в выпадающем списке При питании от сети отключать через и При питании от батареи выключать через (для ноутбуков и планшетов) выберите через какое время бездействия компьютера отключать экран (минуты, часы или никогда).

Как изменить время отключения экрана используя «Панель управления»
Откройте классическую панель управления, в выпадающем списке Просмотр выберите Мелкие значки и затем выберите Электропитание.

В окне «Электропитание» нажмите на ссылку Настройка отключения дисплея

Затем в окне «Изменение параметров схемы», в выпадающем списке Отключать дисплей: выберите через какое время бездействия компьютера отключать дисплей (минуты, часы или никогда) и нажмите кнопку Сохранить изменения.

Как изменить время отключения экрана используя дополнительные параметры электропитания
Чтобы изменить время отключения экрана данным способом, нажмите сочетание клавиш + R, в открывшемся окне Выполнить введите (скопируйте и вставьте) control powercfg.cpl,,1 и нажмите кнопку OK.

В окне «Электропитание» выберите Экран > Отключать экран через, затем установите необходимое время и нажмите кнопку OK.

Используя рассмотренные выше действия, можно изменить время бездействия компьютера через которое отключится экран (дисплей) на устройстве с Windows 10.
On Windows 10, similar to Windows 8.1, the operating system features a Lock screen before you sign in to your account. The new experience showcases date and time, quick status for apps you choose, and more importantly a background image, which typically, users opt to display personal pictures or those from Windows Spotlight.
While the Lock screen provides useful information and beautiful pictures, you probably noticed that your computer’s display turns off after 60 seconds when you lock your Windows 10 account. This happens even if you change the power options to never turn off the monitor or never put the computer to sleep.
The reason is that by design, the operating system includes a function that detects when the device is locked and waits for 60 seconds. After the time expires, the computer screen goes black. This is a function, which for a mysterious reason, users can’t customize in Control Panel or the Settings app. However, you can modify the Registry to enable a new option in the power settings to change the time to anything you want.
In this Windows 10 guide, we’ll walk you through the steps to tweak the Registry (or Command Prompt) to customize the operating system should way until turning the display off, which will give you more time to see the background, status, and interact with Cortana on the Lock screen.
- How to change the time when the display turns off when your PC is locked
- How to change the Lock screen timeout using Command Prompt
How to change the time when the display turns off when your PC is locked
Important: Before diving into this guide, it’s worth noting that editing the registry can be dangerous, and it can cause irreversible damage to your system if you don’t do it correctly. It’s highly recommended to make a full backup of your PC before proceeding. You’ve been warned!
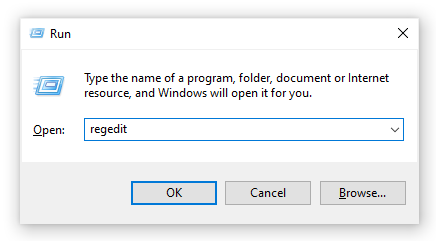
- Use the Windows key + R keyboard shortcut to open the Run command, type regedit, and click OK to open the registry.
- Browse the following path:
HKEYLOCAL_MACHINE\SYSTEM\CurrentControlSet\Control\Power\PowerSettings\7516b95f-f776-4464-8c53-06167f40cc99\8EC4B3A5-6868-48c2-BE75-4F3044BE88A7 - On the right side, double-click the Attributes DWORD.
- Change the value from 1 to 2.
- Click OK.
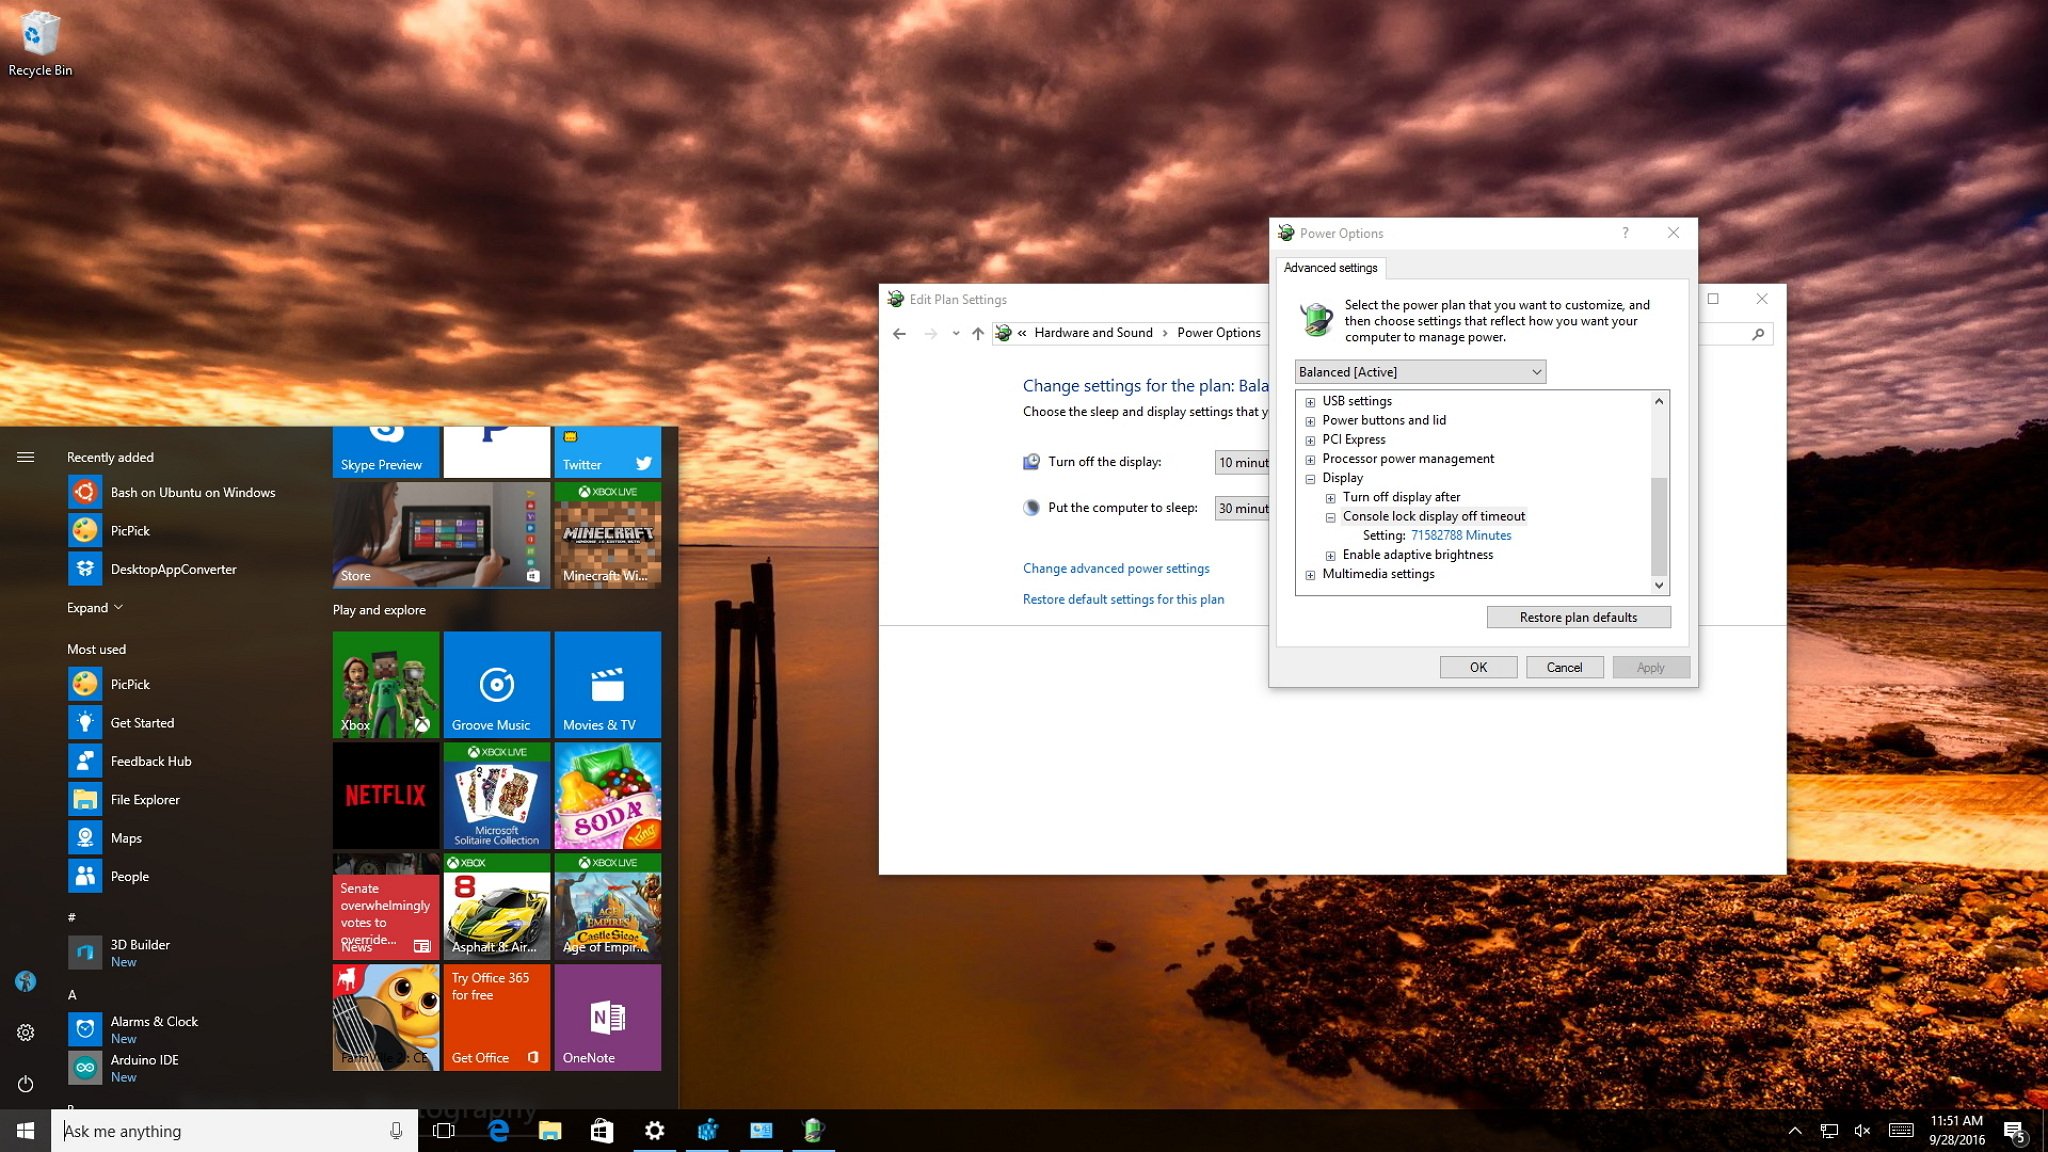
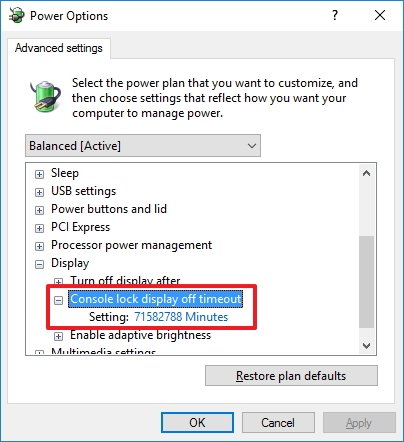
These steps only enabled the option on Windows 10 called «Console lock display off timeout.» Now the only thing left to do is to customize this option to any time you want. To do this, use these instructions:
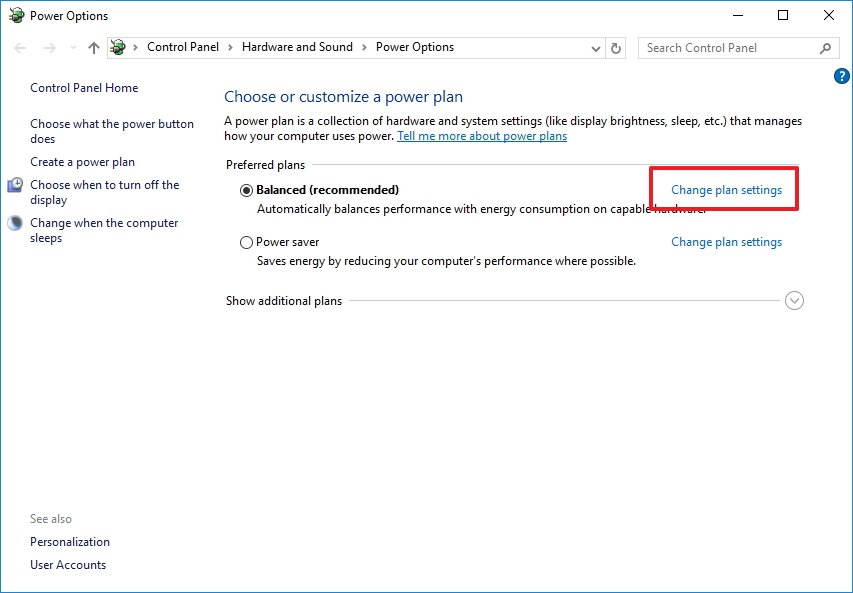
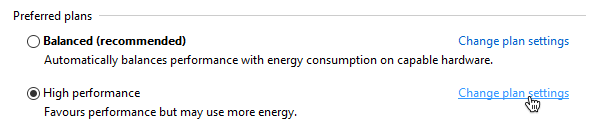
- Use the Windows key + X keyboard shortcut to open the Power User menu and select Power Options.
- Click the Change plan settings link for the selected plan.
- Click the Change advanced power settings link.
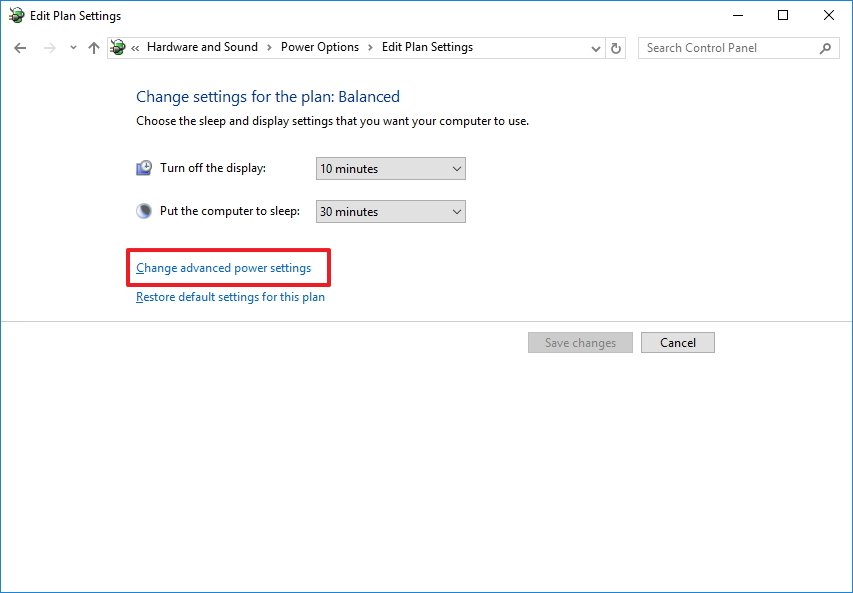
- On Advanced settings, scroll down and expand the Display settings.
- You should now see the Console lock display off timeout option, double-click to expand.
- Change the default time of 1 minute to the time you want, in minutes.
- Click Apply.
- Click OK to complete the task.
Once you complete the steps, you can test the new settings by locking your computer (Windows key + L keyboard shortcut), and now the screen shouldn’t turn off until the time you set expires.
All the latest news, reviews, and guides for Windows and Xbox diehards.
At any time, you can revert the changes by following the previous steps, but this time, on step 4 change the registry value key from 2 to 1.
How to change the Lock screen timeout using Command Prompt
The beauty of Windows is that you can configure the same feature in a number of ways. Alternatively, you can use the PowerCfg.exe utility to change you display timeout setting when your computer is locked. When it’s connected to AC power or when your device is running on battery (DC power).
To change the Lock screen timeout using Command Prompt, do the following:
- Use the Windows key + X keyboard shortcut to open the Power User menu and select Command Prompt (admin).
- Type the following command and press Enter:
powercfg.exe /SETACVALUEINDEX SCHEME_CURRENT SUB_VIDEO VIDEOCONLOCK 60Important: You must change «60» in the command-line with the timeout time you want to use, in seconds. For example, if you want the screen to turned on for 5 minutes, then you need to use 300 at the end of the command. - Type the following command and press Enter:
powercfg.exe /SETACTIVE SCHEME_CURRENT

- Use the Windows key + L keyboard shortcut to lock your PC and see if the new settings work.
The command mentioned in step 2 will work when your computer is using AC power. You must replace /SETACVALUEINDEX for /SETDCVALUEINDEX if you want to change the timeout setting on your laptop or tablet running on battery.
It’s worth noting that while changing the Registry settings is an advanced task, during my test, I have found that sometimes using the command lines may settings may not work as expected, but it’s an alternative.
On the other hand, changing the Registry worked perfectly, and after making the tweak, I can simply go to the Power Options settings in Control Panel and adjust the Lock screen timeout without having to use any commands.
More Windows 10 resources
For more help articles, coverage, and answers on Windows 10, you can visit the following resources:
- Windows 10 on Windows Central – All you need to know
- Windows 10 help, tips, and tricks
- Windows 10 forums on Windows Central
Mauro Huculak has been a Windows How-To Expert contributor for WindowsCentral.com for nearly a decade and has over 15 years of experience writing comprehensive guides. He also has an IT background and has achieved different professional certifications from Microsoft, Cisco, VMware, and CompTIA. He has been recognized as a Microsoft MVP for many years.
Rick Akura
By default, Windows 10 turns off the on-screen display after a minute when the PC is locked. Learn how to disable the lock screen timeout on Windows 10.
By default, Windows 10 lock screen automatically turns off after you’ve been inactive for over a minute. This is called a timeout, and it’s implemented to save power and battery life, however, some users may be looking to spend more or even less time with the lock screen active
This is something that can be changed quite easily and quickly. All you have to do is read our article and follow the steps described below. You’ll be able to modify or disable the lock screen timeout within minutes!

What is the lock screen timeout?
In Windows 10, the lock screen has become quite advanced and a lot more useful as well. It displays the current time and date, all available local users, and even gives you the option to use Cortana and other Windows utilities. You may also choose to restart or shut down your device straight from the lock screen itself.
With more functionality, more people are looking to extend the amount of time the lock screen remains visible even while the computer is inactive. This can be used to have access to Cortana, display the time and date with the beautiful background images, or simply liven up the atmosphere instead of showing a black screen.
To be able to achieve this, you need to configure the lock screen timeout. By doing that, you’re able to give instructions to Windows 10 to not turn your screen off. It’ll stay shown even if the device is on the lock screen and doesn’t receive input for an extended amount of time.
Guide to change or disable the lock screen timeout
There are multiple ways to go about changing or disabling the lock screen timeout in Windows 10. All of these steps are easy to follow, however, some of them require a bit more time than the others. Do what feels good for you — you can always return to our article and try something else in the future.
Tip: All of these methods can be performed by anybody, as our guides are easy to follow and don’t require any previous Windows 10 experience. If you know anyone who’s experiencing issues with their system, don’t forget to recommend us!
Now, let’s start learning about disabling or modifying the lock screen timeout using a Windows 10 operating system.
Method 1: Manually make changes to the Registry and modify the lock screen timeout
The very first thing we recommend trying is making changes to the Registry. Here’s where you can find Windows’ more advanced settings, often not available elsewhere.
While the Registry seems intimidating at first, it’s actually quite simple to navigate. All you have to keep in mind is to not make any un-instructed changes. A poorly configured Registry may lead to errors on your device!
Warning: Before beginning this guide, we recommend creating a backup of your Registry. If you’re not sure how to create and import Registry backups, watch “Registry Backup, Restore, Import And Export” from Windows Ninja.
Let’s get started!
-
Press the Windows + R keys on your keyboard at the same time to bring up the Run application. Here, simply type in “Regedit” and click OK.

- Navigate the Registry Editor using the arrow icons next to each folder name on the left-side panel. Navigate to the following registry key: HKEYLOCAL_MACHINE\SYSTEM\CurrentControlSet\Control\Power\PowerSettings\7516b95f-f776-4464-8c53-06167f40cc99\8EC4B3A5-6868-48c2-BE75-4F3044BE88A7
- Double-click on the “Attributes” key seen in the right side of the window.
-
Change the value data to 2, then click the OK button. Make sure not to make any other changes!
- Now, you should be able to see the lock screen timeout option when making changes to your Power Options (jump to Method 4).
Method 2: Download the automatic Registry changes
Not confident in using the Registry yourself? No problem! You can simply apply a one-click solution to make the modifications automatically without having to worry about messing something up.
- Click here to download the “Lock Screen Timeout Hacks” file from HowTo Geek. This is a .zip file, meaning that you might need to download an application such as WinRAR or 7-Zip to access the contents.
-
Open the file you just downloaded.
-
Locate “Add Lock Screen Timeout Setting to Power Options” and double-click on it to launch it.
- Now, you should be able to see the lock screen timeout option when making changes to your Power Options (jump to Method 4).

Method 3: Enter a command using Command Prompt to change the lock screen timeout
Another powerful tool used to make more advanced changes and personalization to your device is the Command Prompt. It allows you to directly give commands to your computer via a code language. We can use this to make changes to the Power Options, allowing you to modify the lock screen timeout.
-
Press the Windows + R keys on your keyboard to open up the Run utility. Type in “cmd” and press Ctrl + Shift + Enter to launch the Command Prompt with administrative permissions.
- When the Command Prompt launches, input the following command and press Enter: powercfg.exe /SETACVALUEINDEX SCHEME_CURRENT SUB_VIDEO VIDEOCONLOCK 60.
Make sure to change “60” to the amount of time you want your lock screen to stay active for. This time is in seconds, meaning that by leaving it default, you’ll have 60 seconds before the lock screen goes into a timeout.
- Next, input the following command and press Enter once again: powercfg.exe /SETACTIVE SCHEME_CURRENT
- Close the Command Prompt. You should be able to notice that the lock screen timeout has changed.
Method 4: Use the Power Options to change the lock screen timeout
After enabling the setting with either Method 1 or Method 2, you’ll be able to use the Power Options to modify the lock screen timeout. This is what you need to do:
-
Press the Windows + R keys using your keyboard to bring up the Run utility, then type in “control” and click the OK button. This is going to open the Control Panel.
-
Make sure that your view mode is set to Category. This will allow you to see grouped settings, making navigation easier.
-
Next, click on the Hardware and Sound heading.
-
You should see another list of groups full of different settings. What you need to click on is the Power Options menu.
-
Click on the “Change plan settings” link next to whichever plan you’re using. There’s no need to change your actual plan — all we’ll do is simply modify it.
-
Click on the “Change advanced power settings” link at the bottom of the page. A new window should pop up.
- Scroll down until you see Display, then click on the plus icon to expand the section.
-
Change “Console lock display off timeout” to the number of minutes you want before your lock screen goes into a timeout. If you don’t see this setting, make sure to follow the steps in either Method 1 or Method 2.
- Click the Apply button, then close the window by clicking OK.
- You should be able to see that your lock screen timeout has been increased or decreased.

We hope that this article was able to help you learn how you can change the lock screen time out, or disable it entirely. Get more control over your device and enjoy your lock screen active for exactly as much time as you want it to!
Are you interested in learning more about Windows 10? Do you need help fixing any other Windows 10 errors and issues? You can browse our dedicated blog section and find articles about everything related to Microsoft’s groundbreaking operating system. Click here to proceed.