
Yes. Adobe and Creative Cloud fill up the temp folder quickly.
I have a small NVMe drive as C so on a PC I went into SYSTEM Environment / Advanced and moved both temp folders to an «I» drive and named it Ntemp. I also moved the ACR folder to the «I» drive.
Issues created by this — those new Neural Filters won’t download successfully if your temp files aren’t on the C drive.
On my desktop I have a shortcut to the NTemp folder.
Next to it on the desktop is a .bat file I created that deletes the Ntemp folder and the ACR folder, and, in the same .bat file recreates the folders if they were deleted as well. Folders won’t be deleted if there’s stuff in them, i.e. an open file explorer creates a temp file, browser files that are currently open.
To create a .bat file just start a notepad document and type commands. The ones below work nicely. When finished save as delete tmp.bat onto your desktop for regular use.
Remember that when you read the contents of my .bat file — I moved both temp folders to the I drive named Ntemp.
Through Photoshop preferences I moved ACR folder to the I drive as well.
rd /s /q «I:\NTemp\» This line empties the NTemp folder
mkdir I:\NTemp This line makes a new NTemp folder ONLY if the whole thing was deleted
rd /s /q «I:\ACR\» This line empties the ACR folder
mkdir I:\ACR This line makes a new ACR folder ONLY if the whole thing was deleted.
Type only the stuff on the left return after each line. NOT the This line stuff.
Lastly, if you don’t trust or have any questions about this post just create a «test» folder somwhere.
Create a «delete test.bat» file. Adjust the parameters from my .bat file and try it. Just replace the stuff between the » » with the path to your test folder.
Once you get comfortable. Try moving your Google Cache folder to another drive and add it to your bat file to be deleted.
Фотошоп – мощный инструмент для обработки изображений, который активно использует временное хранилище данных. Многие пользователи сталкиваются с ситуацией, когда программа начинает работать медленнее обычного или выдает ошибки, связанные с недостатком места на диске. При этом далеко не все понимают, где именно Photoshop хранит временные файлы и как правильно управлять этим процессом. Интересно, что неправильная настройка параметров кэширования может существенно повлиять на производительность работы с графикой.
Что такое временные файлы Photoshop и зачем они нужны
Временные файлы Photoshop представляют собой специальные данные, которые программа создает в процессе работы для оптимизации производительности. Эти файлы играют роль промежуточного буфера между оперативной памятью компьютера и жестким диском. Когда RAM переполняется, Photoshop автоматически использует место на жестком диске через механизм так называемого «scratch disk» (диска подкачки).
- Кэширование часто используемых элементов
- Хранение истории действий
- Обработка больших файлов
- Работа со слоями и масками
По сути, временные файлы позволяют программе эффективно обрабатывать даже очень большие изображения, не зависая и не тормозя систему. Однако их неконтролируемое накопление может привести к проблемам с дисковым пространством.
Стандартные расположения временных файлов
Photoshop использует несколько основных локаций для хранения временных данных. Знание этих мест помогает контролировать использование дискового пространства и при необходимости очищать ненужные файлы.
| Операционная система | Путь к временным файлам |
|---|---|
| Windows 10/11 | C:Users[Имя пользователя]AppDataLocalTemp |
| macOS | /private/var/folders/ |
| Scratch Disk | Зависит от настроек программы |
Важно отметить, что папка AppData по умолчанию скрыта в Windows. Чтобы получить к ней доступ, нужно включить показ скрытых файлов и папок в настройках проводника.
Как настроить расположение временных файлов
Программа предоставляет возможность гибкой настройки мест хранения временных данных. Это особенно полезно, если основной системный диск заполнен или работает медленно.
Пошаговая инструкция:
- Откройте Photoshop и зайдите в меню Edit (Правка)
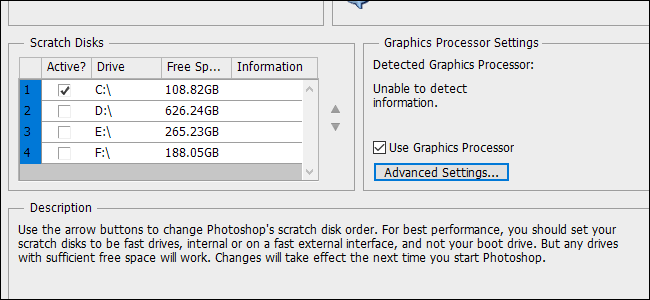
- Выберите Preferences (Установки) → Scratch Disks
- Укажите дополнительные диски для хранения временных файлов
- Перезапустите программу для применения изменений
Эксперты рекомендуют использовать быстрые SSD-накопители в качестве scratch disk для максимальной производительности. Также желательно оставлять на выбранном диске минимум 20% свободного места для корректной работы системы.
Оптимизация работы с временными файлами
Профессиональные фотографы и дизайнеры знают несколько важных правил работы с временными файлами Photoshop:
- Регулярно перезапускайте программу для очистки кэша
- Ограничьте количество шагов в истории действий
- Используйте функцию Purge (Очистка) через меню Edit
- Создавайте расписание для автоматической очистки временных файлов
Практика показывает, что оптимальное количество шагов в истории составляет 20-30, что обеспечивает баланс между удобством работы и потреблением ресурсов. Более высокие значения могут привести к значительному замедлению работы.
Экспертное мнение: рекомендации практика
Александр Петров, сертифицированный Adobe Certified Expert с 15-летним опытом работы в области цифровой обработки изображений, делится профессиональными советами:
«В своей практике я часто сталкиваюсь с ситуациями, когда пользователи забывают о важности правильной настройки временного хранилища. Особенно это критично при работе с RAW-файлами большого разрешения. Рекомендую всегда иметь отдельный SSD-диск объемом не менее 500 ГБ специально для scratch disk. Также советую использовать утилиты для мониторинга использования дискового пространства в реальном времени.»
Частые вопросы и ответы
- Почему Photoshop создает такие большие временные файлы?
Программа сохраняет все этапы обработки изображения, включая историю изменений, слои и маски. При работе с RAW-файлами размер временных данных может достигать нескольких гигабайт.
- Можно ли полностью отключить создание временных файлов?
Нет, это невозможно, так как программа не сможет корректно обрабатывать изображения без использования временного хранилища.
- Как часто нужно очищать временные файлы?
Рекомендуется делать это после каждого завершения работы или использовать автоматические средства очистки системы.
Современные решения проблемы управления временными файлами
С появлением новых технологий хранения данных появились и современные подходы к управлению временными файлами Photoshop:
- Использование NVMe-накопителей для максимальной скорости
- Автоматизация очистки через сторонние утилиты
- Облачные решения для временного хранения данных
- Гибридные системы хранения
Например, облачные сервисы позволяют организовать удаленный scratch disk, что особенно актуально для работы на ноутбуках с ограниченным объемом локального хранилища. Однако стоит учитывать возможные задержки при передаче данных.
Практические советы по управлению временными файлами
Для эффективной работы с Photoshop важно соблюдать несколько ключевых принципов:
- Регулярно проверяйте наличие свободного места на дисках
- Используйте только проверенные антивирусные программы, которые не блокируют работу с временными файлами
- Не размещайте временные файлы на системном диске вместе с операционной системой
- Создавайте резервные копии важных проектов перед очисткой временных данных
При этом важно помнить, что резкое удаление временных файлов во время работы программы может привести к потере несохраненных данных или сбоям в работе.
Заключение
Управление временными файлами Photoshop – важный аспект работы с программой, который напрямую влияет на производительность и стабильность системы. Правильная настройка мест хранения, регулярная очистка и использование современных технологий хранения данных помогают поддерживать оптимальную работу программы даже при обработке самых сложных проектов.
RU DESIGN SHOP — это интернет магазин товаров для дома и ремонта от российских производителей, rudesignshop.ru предлагает большой выбор по доступной цене и является надежным партнером при покупке с быстрой доставкой по всем городам России. RU DESIGN SHOP помогает подобрать товар по вашему проекту, а также есть система лояльности, акции и скидки. RU DESIGN SHOP реализует товары произведенные в России. RU DESIGN SHOP приглашает к сотрудничеству дизайнеров интерьера, архитекторов, строителей и мастеров.
Статьи на сайте RU DESIGN SHOP (https://rudesignshop.ru) в разделе БЛОГ (https://rudesignshop.ru/blog/) носят исключительно ознакомительный характер и не является призывом к совершению каких-либо действий. Автор ИИ не ставит целью оскорбить, оклеветать или нанести ущерб репутации физических или юридических лиц. Информация подготовлена на основе открытых источников, включая официальные сайты государственных органов и публичные заявления представителей профильных организаций. Решения, принятые на основе материалов статьи, осуществляются читателем на свой страх и риск. Автор и редакция не несут ответственности за возможные последствия, возникшие в результате использования предоставленной информации. Для получения юридически значимых разъяснений рекомендуется обращаться к квалифицированным специалистам. Все совпадения с реальными событиями, именами или названиями организаций случайны. Мнение автора может не совпадать с официальной позицией государственных структур или коммерческих компаний. Текст соответствует требованиям законодательства РФ, включая Гражданский кодекс (ст. 152, 152.4, 152.5), Уголовный кодекс (ст. 128.1), а также Федеральный закон «О средствах массовой информации». Актуальность информации подтверждена на дату публикации. Адреса и контакты организаций, упомянутых в тексте, приведены в ознакомительных целях и могут быть изменены правообладателями. Автор оставляет за собой право на исправление неточностей в случае их выявления.
*Facebook и Instagram являются продуктами компании Meta Platforms inc. признанной экстремистской организацией и запрещенной в Российской Федерации.
In the digital age, few tools are as ubiquitous in creative and professional circles as Adobe Photoshop. Renowned for its exceptional editing capabilities, it has become an indispensable tool for photographers, designers, and marketers worldwide. As with any powerful software, however, maintaining performance is crucial to seamless use.

When using Photoshop, you might encounter situations where the program starts to slow down or performs less efficiently than usual. This situation often results from the accumulation of cache files, which are essentially stored data that the software uses to quickly access frequently used information.
Could not initialize photoshop because the scratch disks are full error — How to fix?
Are you facing the frustrating error “Could not initialize Photoshop” due to full scratch disks? Don’t worry, our troubleshooting guide will help you fix this issue
9to5Software Staff
In this blog post, we’ll walk you through the comprehensive steps on how to clear your Photoshop cache to keep your program running smoothly and efficiently.
What is Photoshop Cache?
Before we dive into how to clear your Photoshop cache, it’s crucial to understand what it is. Photoshop cache is essentially a component of your computer’s Random Access Memory (RAM) that Photoshop uses to store and quickly retrieve data that is frequently accessed. This data can include elements such as layers, histories, or patterns, which Photoshop can then recall faster than if it were to fetch them anew each time.
While this helps to boost the software’s performance, over time, as these cache files build up, they can take up a significant amount of space on your system, thereby causing the program to run slower.
Clearing your Photoshop cache is a relatively straightforward process that can significantly improve your program’s efficiency. Here’s how you can do it:
Method 1: Using the Purge Function
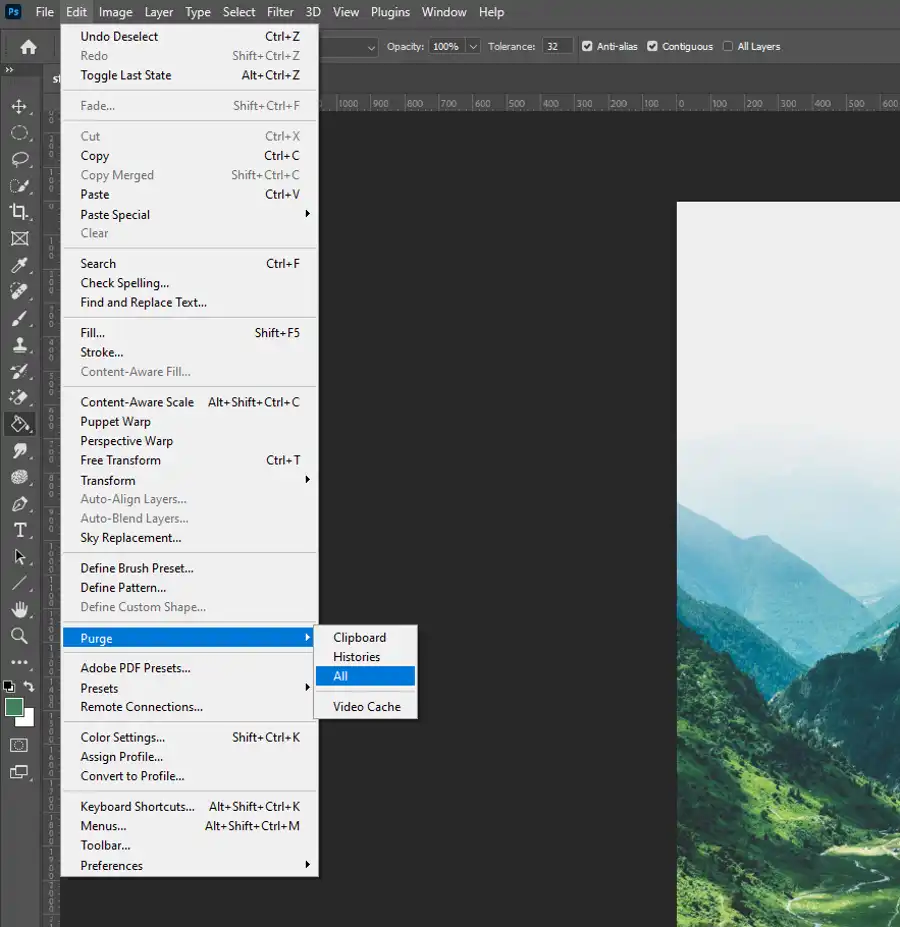
Open Photoshop: Launch your Photoshop application on your computer.
Open the ‘Edit’ Menu: Navigate to the top of your screen and click on the ‘Edit’ option.
Navigate to ‘Purge’: In the dropdown menu, hover over the ‘Purge’ option. This will open up a sub-menu that allows you to choose what specific cache to delete.
Select the Cache to Purge: You will see options like ‘Undo’, ‘Clipboard’, ‘Histories’, ‘All’ and ‘Video Cache’. Choose the one you want to delete. If you select ‘All’, it will clear every cache file.
How to Get Out of 3D Mode in Photoshop — 2 Methods!
Want to navigate Photoshop’s complex 3D mode with ease? Check out our step-by-step guide and never get stuck again.
9to5software.com9to5Software Staff
Note: Keep in mind that this operation cannot be undone. Hence, ensure that you’ve saved your work before proceeding.
Method 2: Adjusting Performance Preferences
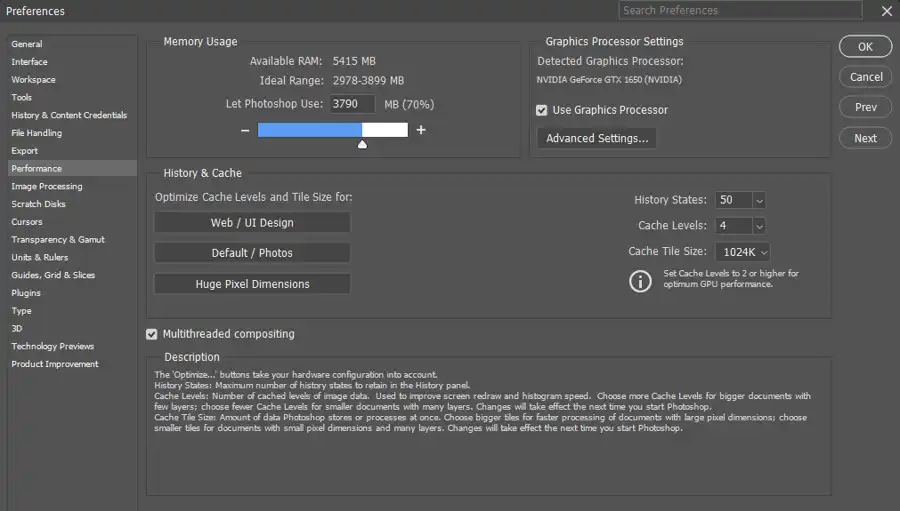
You can also free up cache by adjusting Photoshop’s performance preferences. Here’s how:
Open Photoshop and Navigate to ‘Preferences’: Go to the ‘Edit’ menu, then drop down to ‘Preferences’, and select ‘Performance’.
Adjust the Memory Usage: In the ‘Performance’ dialog box, you can adjust the ‘Memory Usage’ by reducing the percentage of RAM allocated to Photoshop.
Edit History & Cache: In the same ‘Performance’ dialog box, you’ll find the ‘History & Cache’ settings. Here, you can change the number of history states (i.e., the number of operations you can undo) and the cache levels.
Click ‘OK’ to Apply Changes: Once you’re satisfied with your adjustments, click ‘OK’ to apply the changes.
Method 3: Delete Temporary Files
In some cases, Photoshop might not be clearing its temporary files. These are files the software uses and then discards, but sometimes they don’t delete properly. To manually delete these files:
Close Photoshop: Ensure Photoshop is completely closed.
Open Your Temp Folder: The location of this folder varies depending on your operating system. For Windows users, you can type ‘%temp%’ into the search bar. For Mac users, open the ‘Finder’, click on ‘Go’ in
the top menu, hold down the ‘Option’ key, and select ‘Library’. Then navigate to ‘Caches’ -> ‘TemporaryItems’.
- Delete Photoshop Temp Files: Look for files starting with ‘Photoshop’ or ‘pst’. Select these files and delete them.
Remember to be careful when deleting files from your system. Do not delete anything you’re unsure about.s
Conclusion
Clearing your Photoshop cache is an essential practice for maintaining the software’s performance and ensuring your work continues to run smoothly. By regularly purging cache files, adjusting performance preferences, and manually deleting temporary files, you can optimize Photoshop’s performance and enhance your overall user experience. Always remember to save your work before carrying out these operations to prevent any loss of your projects.
So, the next time you notice a slow-down in your Photoshop performance, consider performing a quick cache cleanup. It might just be the solution you need!
Questions you might be asking
Should I clear Photoshop cache?
Yes, you should clear Photoshop cache periodically to ensure optimal performance. Over time, cache files can accumulate, causing slow-downs and glitches in the program. Clearing the cache can free up space and prevent these issues from occurring.
What happens when you clear cache on Photoshop?
When you clear the cache in Photoshop, temporary files are deleted. These files include previews of images, temporary copies of opened files, and other data that Photoshop uses to speed up performance. By clearing the cache, you can free up space on your computer and improve the program’s speed and stability.
Where is my Photoshop cache?
Your Photoshop cache location depends on your operating system and the version of Photoshop you are using. On Windows computers, the cache can typically be found in the C:\Program Files\Adobe\Adobe Photoshop (version)\Plug-ins\Panels\Cache folder. On Mac computers, it is usually located in the /Users/(username)/Library/Caches/Adobe/Adobe Photoshop (version)/Caches folder. However, if you are unsure of where your cache is located, you can generally find the location by searching for «Photoshop cache» in your computer’s search bar or by consulting the Adobe Photoshop documentation.
Sign in to your How-To Geek account

Quick Links
-
Step 2: Close All Adobe Programs
-
Step 2: Navigate to the Temp folder
Adobe Photoshop is taking up more room than you think. But Photoshop also uses massive temporary cache files, many over a gigabyte each, which don’t always go away as they should when you close the program.
Photoshop is already a huge program, with a recommended installation size of 1.6GB (not including another 6-10GB or so if you have the rest of the Creative Suite). But that doesn’t even touch the space that Photoshop’s temp files can eat up. Bigger and more frequent projects exacerbate the problem; I’ve seen my own Photoshop temp files eat over 50GB of space. And the worst part is that the program gives no indication of how much junk it’s accumulating—you’ll have to manually search for the files (or use a tool like SpaceSniffer) to discover the real impact to your storage. Luckily, the problem is easy to rectify.
What Are Temp Files?
Photoshop is a program that works with a lot of data at once, and not all of that data can be kept in your computer’s memory alone. So Photoshop saves a lot of your work to local «scratch» files. These files serve two purposes: they allow Photoshop to operate without relying exclusively on RAM, and they create a de facto backup file in case the program—or your computer—crashes. The files are supposed to be deleted automatically when you close Photoshop.
Unfortunately, Photoshop is kind of crappy at file management, and the temp files can often stick around after the program is closed. If you frequently work with large Photoshop projects, this means the files can be big in both size and number. Some users can fill up their entire hard drive with temp files without even realizing it. If this is a problem for you—or if you just want to do a quick cleaning—follow the steps below.
You can get rid of some temp files, including most Photoshop files, with Windows’ Disk Cleanup tool. But for a faster and more hands-on approach (and a look at how huge some of these files really are), we recommend the manual method.
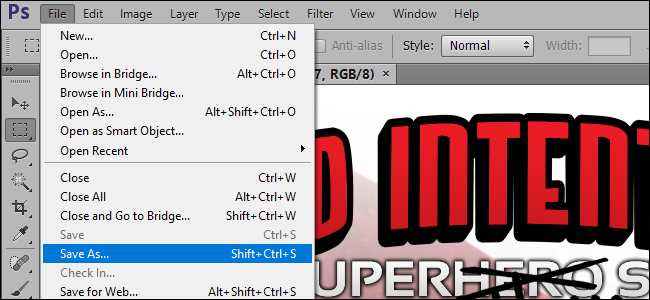
Step One: Save Your Work
Before we go any further, open Photoshop and make sure you don’t have any current projects that you haven’t saved to a local file. Do so now: we’re going to clear out all the temporary files that Photoshop uses to make sure it doesn’t lose any of your work. Save the files in your normal work folder, and then close the program.
You might also want to open File Explorer to the «This PC» window, which gives you a quick look at how full each of your drives are. It’ll be useful to see how much storage you’ve cleared up when you’re finished.
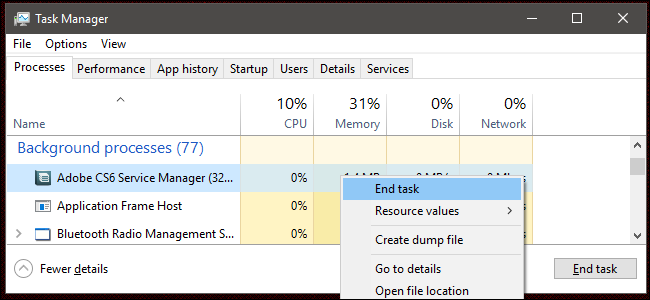
Step 2: Close All Adobe Programs
Close Photoshop, as well as Adobe Bridge, Illustrator, and any other Adobe programs you might have running. Having them open can cause file access conflicts that keep you from deleting one or more of the temp files. Check the Task Manager to see if background programs like the Service Manager are running, too, and close them manually.
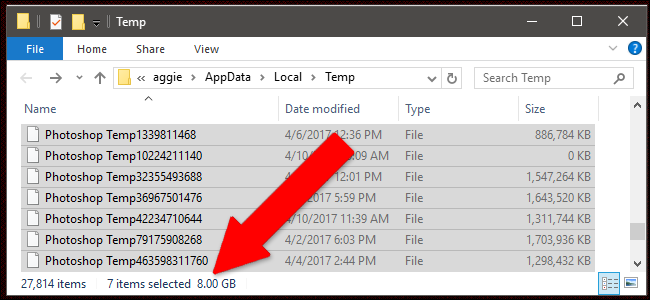
Step 2: Navigate to the Temp folder
Open up a second File Explorer window, and then navigate to your temp data folder, usually found here:
C:\Users\Your Username\AppData\Local\Temp
If you’re using macOS, open the Terminal application (either from Finder or in the Utilities folder), then type «open /tmp» and press Enter.
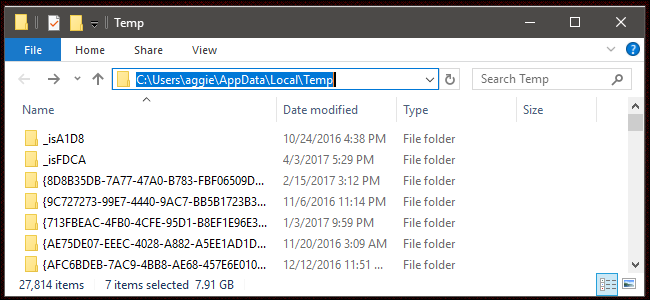
In this folder you’ll find quite a lot of stuff—possibly thousands of files and folders if you’ve been using your computer for a long time. The files you’re looking for are named «Photoshop Temp» followed by a string of ten semi-random numbers. Note the large file sizes in my temp folder below.
Step 3: Delete the Files
Highlight the files and delete them. If you get any «This action can’t be completed» messages, you’ve left an Adobe program open somewhere—check Task Manager to close them manually and try deleting them again.
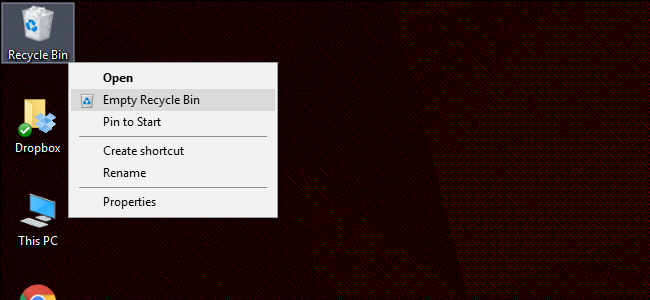
When you’re done, empty the Recycle Bin or Trash folder to reclaim your storage space, and then check to see how much space you’ve saved.
Next time you’re low on storage space, check for these enormous files and make sure your PC isn’t hoarding a collection of temp files you don’t need.
As an Amazon Associate we earn from qualifying purchases.
There are frustrating moments when Photoshop suddenly closes or crashes due to a technical issue while you are working. You may lose your precious work as the PSD files get corrupted. Learn how to open a Photoshop Temp file on Windows and Mac to recover your real estate PSD files easily.
Quick Navigation
- How to Open Photoshop Temp File on Windows and Mac
- Recover PSD Files From Temp Files on Windows
- Recover PSD Files From Temp Files on Mac OS
- How Are Temp Files Formed?
- Related Questions
- How Can I Avoid Losing PSD Files?
- Can I Recover PSD Files From Previous Versions?
- How Do I Restore a Photoshop File From Temp?
- Conclusion
How to Open Photoshop Temp File on Windows and Mac
To open a Photoshop temp file on Windows, you need to locate the file in the Temp folder, convert the files into PSD format, and then access the PSD file. For Mac users, you simply need to open Terminal, enter open $TMPDIR, go to Temporary Items, and open your desired PSD file.
In Photoshop, computer crashes or accidental closings may hinder your real estate photography editing workflow. Follow these recovery methods so you won’t lose the sessions you spent a lot of time and effort on.
Recover PSD Files From Temp Files on Windows
Before anything else, remember that recovering lost PSDs from temp files is not your first line of defense. If your autosave was not turned on, here is what you can do as a Windows user to recover the files and open them in Photoshop.
Navigate to the Temp File

- On Windows, open File Explorer, and go to the C Drive.
- The default path for temp files is C:\Users\User\AppData\Local\Temp.
- Navigate to Users, and open your User Directory, which is a folder with your username.
- From here, you will need to open the AppData folder. You can go to the Advanced Settings and toggle on Show Hidden Files and Folders if it is not visible.
- Alternatively, search the Local Folder in your User Directory search. When the Local Folder is displayed, double-click on it to open the data of all your applications.
- Next, you have to open the Temp folder. Remember that this would be hidden if you didn’t turn on Show Hidden Files and Folders.
- You can locate the applications in the Temp folder. Look for files beginning with Photoshop Temp followed by a number.
Convert the Files Into a PSD Format
The temp files are saved in a .tmp format. To open them in Photoshop, you need to change the file name extensions. It is as simple as changing their format by swapping the .tmp extension with the .psd extension.
- In the temp folder, click on the View menu on top.
- Check the box for File Name Extensions.
- Once the .tmp extension is visible on the file, rename the file.
- Remove the .tmp extension with the .psd extension and save the files.
- You can now access your PSD file easily.
Recover PSD Files From Temp Files on Mac OS
If you are a Mac user, you might be aware that although there is a directory that stores temp files, it isn’t safe to access it like on Windows. The directory holds essential system files without write protection.
Your OS might become unbootable if you accidentally delete an important temp file. Follow these steps to open Photoshop temp files if you won’t use data recovery software for Mac.
- Go to the Finder and click on the Application folder.
- Access Terminal and run it.
- Next, enter the option open $TMPDIR and hit Enter.
- Go to Temporary Items and find the PSD file.
- Open the file with Photoshop and save it on your Mac OS.
- This will successfully recover your temp files on Mac.
How Are Temp Files Formed?
While running an application, data gets saved as temp files on the computer. Photoshop runs on the same principle. It creates temp files in a deeply buried destination folder on your PC or Mac.
When Photoshop is closed normally, these temp files convert into permanent ones. In case of crashing or abrupt closure of the program, you can find these temp files and manually convert them into permanent PSD files to open them.
In addition, temp files are also created in the temp files folder when you open a Smart Object in Photoshop. Until you save the Smart Object out of Photoshop, this temp file will not get deleted.
How Can I Avoid Losing PSD Files?
You can avoid losing PSD files by enabling the Autosave feature. This command ensures your files won’t get lost even in the event of an abrupt crash of the software. When you specify to Photoshop how frequently you want to back up a copy of your work, it automatically saves it after that specified time.
Can I Recover PSD Files From Previous Versions?
To recover PSD files from previous versions, right-click on the PSD file and click Recover Previous Version. Choose the file version you want to restore from the options.
How Do I Restore a Photoshop File From Temp?
To restore an unsaved Photoshop file from temp, go to C:/Users/UserName/AppData/Local/Temp/, open the Temp folder, and locate the PSB or PSD files. Rename the file extension from .tmp to .psd or .pbb to recover the file completely.

Conclusion
Software crashes and computer technical issues are unavoidable, and no one can guarantee that they won’t happen. Luckily, you can easily restore those lost PSD files via the temp file opening method, so you can continue working on your real estate images.