
In our previous article, we’ve seen how to setup network bridge in Windows 10. As setting up the network bridge is not a difficult task but configuring it may be. We recently came around an issue where we were unable to configure earlier created network bridge.
In this case the bridge earlier created was no longer getting DHCP address, after Windows 10 version upgrade. We thought to break the bridge and re-setup it but we can’t. We keep receiving following warning while doing so:
Page Contents
An unexpected error occurred while configuring the network bridge.
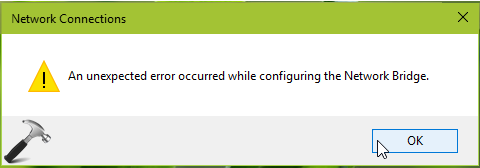
If you’re also victim of this issue, then here is how to fix it.
FIX: An Unexpected Error Occurred While Configuring The Network Bridge
Method 1 – Eliminate Network Adapters From Bridge
1. Run ncpa.cpl command to open Network Connections section inside Control Panel.
2. Right click on existing network bridge and select Properties.
3. On the property sheet, switch to General tab. Remove checks from network adapters that are installed on system and click OK.
4. Next, execute devmgmt.msc command to open Device Manager.
5. Expand Network Adapters, right click on MAC Bridge Miniport and select Uninstall. Click OK on confirmation prompt.
Check the status of issue, it should be resolved.
If the issue is still present, refer Method 2 mentioned below.
Method 2 – Using Command Prompt
This issue may occur if Windows Management Instrumentation (WMI) repository is blocking the network bridge from being configured. We can rename the repository and resolve this issue then. You need to follow these steps:
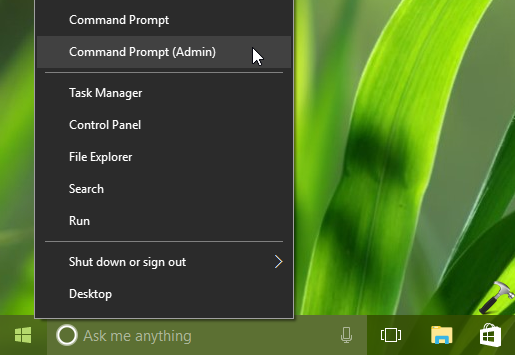
1. Right click on Start Button and choose Command Prompt (Admin). In case if you’re using Windows 8.1/7, you can open Command Prompt using Windows Search.
2. In administrative Command Prompt window, type following commands (mentioned in bold) one-by-one and press Enter key after each:
net stop winmgmt
Note: IP Helper service is dependent upon Windows Management Instrumentation service. So while stopping WMI service, you will be asked to terminate IP Helper service first, so do the needful. If Windows fails to terminate WMI service then, retry above mentioned stop command.
cd /d %windir%\system32\wbem
ren repository repository.old
net start winmgmt
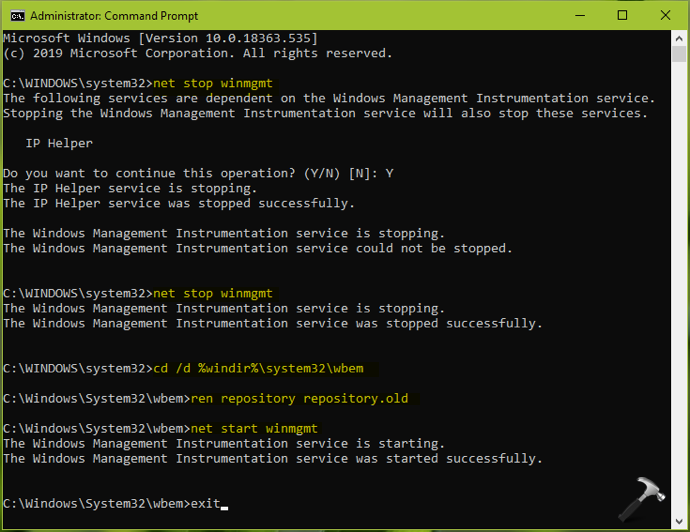
3. Close Command Prompt. Windows may take few minutes to rebuild WMI database. After waiting a while, reboot your system.
After restarting your machine, issue will no longer appear.
Hope this helps!
RELATED ARTICLES
Чем асинхронная логика (схемотехника) лучше тактируемой, как я думаю, что помимо энергоэффективности — ещё и безопасность.
Hrethgir 14.05.2025
Помимо огромного плюса в энергоэффективности, асинхронная логика — тотальный контроль над каждым совершённым тактом, а значит — безусловная безопасность, где безконтрольно не совершится ни одного. . .
Многопоточные приложения на C++
bytestream 14.05.2025
C++ всегда был языком, тесно работающим с железом, и потому особеннно эффективным для многопоточного программирования. Стандарт C++11 произвёл революцию, добавив в язык нативную поддержку потоков,. . .
Stack, Queue и Hashtable в C#
UnmanagedCoder 14.05.2025
Каждый опытный разработчик наверняка сталкивался с ситуацией, когда невинный на первый взгляд List<T> превращался в узкое горлышко всего приложения. Причина проста: универсальность – это прекрасно,. . .
Как использовать OAuth2 со Spring Security в Java
Javaican 14.05.2025
Протокол OAuth2 часто путают с механизмами аутентификации, хотя по сути это протокол авторизации. Представьте, что вместо передачи ключей от всего дома вашему другу, который пришёл полить цветы, вы. . .
Анализ текста на Python с NLTK и Spacy
AI_Generated 14.05.2025
NLTK, старожил в мире обработки естественного языка на Python, содержит богатейшую коллекцию алгоритмов и готовых моделей. Эта библиотека отлично подходит для образовательных целей и. . .
Реализация DI в PHP
Jason-Webb 13.05.2025
Когда я начинал писать свой первый крупный PHP-проект, моя архитектура напоминала запутаный клубок спагетти. Классы создавали другие классы внутри себя, зависимости жостко прописывались в коде, а о. . .
Обработка изображений в реальном времени на C# с OpenCV
stackOverflow 13.05.2025
Объединение библиотеки компьютерного зрения OpenCV с современным языком программирования C# создаёт симбиоз, который открывает доступ к впечатляющему набору возможностей. Ключевое преимущество этого. . .
POCO, ACE, Loki и другие продвинутые C++ библиотеки
NullReferenced 13.05.2025
В C++ разработки существует такое обилие библиотек, что порой кажется, будто ты заблудился в дремучем лесу. И среди этого многообразия POCO (Portable Components) – как маяк для тех, кто ищет. . .
Паттерны проектирования GoF на C#
UnmanagedCoder 13.05.2025
Вы наверняка сталкивались с ситуациями, когда код разрастается до неприличных размеров, а его поддержка становится настоящим испытанием. Именно в такие моменты на помощь приходят паттерны Gang of. . .
Создаем CLI приложение на Python с Prompt Toolkit
py-thonny 13.05.2025
Современные командные интерфейсы давно перестали быть черно-белыми текстовыми программами, которые многие помнят по старым операционным системам. CLI сегодня – это мощные, интуитивные и даже. . .
We use a network bridge when joining two different networks to make them work as a single one. But if you haven’t configured the settings well, this feature might not work for you.
When we use a virtual machine, it creates a new network adapter for itself. However, for some reason, you may lose internet access on your VM if the network bridge setting isn’t done right.
If you want to fix this issue, you’re at the right place. Here, we have discussed what a network bridge is and why it is so important. Also, this article gives an insight on how to resolve the problem within the virtual box settings.
What is Network Bridge?

Before diving into the main topic, let’s first understand what a Bridge is. Basically, it is a networking device that connects two or more networks into one. This way, you can extend your LAN to a slightly larger area.
Let’s suppose you have set up two different networks at your home or office. But, you want one computer (connected to the first network) to communicate with another computer (connected to the second network).
To do this, you can connect the two networks to a Bridge. This way, you’ll have a single LAN network with two segments working on different collision domains.
But, if you’re running a virtual machine, you require at least two network adapters. Then, configuring simple Windows settings can help you bridge these connections.
Should You Bridge Two or More Networks?
Well, there are many advantages if you bridge two or more networks. Here’s a list that includes why you should bridge network:
- Firstly, bridging two or more networks can reduce network collisions.
- Since the network bridge is mainly used to create segmentation, we can notice that the network traffic is significantly reduced.
- Well, network bridging can help create separate collision domains for each segment. This means it can provide enough bandwidth to those computers connected to the network.
- Also, if you’re looking to connect two distinct network segments, a network bridge is probably one of the best options.
- Lastly, you may bridge two or more networks when you don’t have any more ports available on your router, and the Wi-Fi connection isn’t that reliable.
How to Fix Network Bridge Not Working in Virtual Machines
Most of us have faced network bridge issues while using virtual machines. Whether you use VMWare or Oracle VirtualBox, you can easily configure bridged network settings on them. Below are some general fixes you can try if the network bridge is not working in your VM.
Select Bridged Option From Network Adapter Settings
The first thing to check is whether you have chosen the right Network Connection. Well, you must select the Bridged option in Virtual Machine Settings for the network bridge to work fine.
Basically, you’ll find other options too – NAT, Host-Only, Generic, etc. But we can’t achieve a bridged network if any of these is chosen.
On VMWare Workstation 16 Player
Follow these general steps on VMWare Workstation to check whether your Network Connection is set to Bridged or not:
- After launching VMWare, choose your desired OS from the left panel, so the settings get saved for it.
- Move to the right panel and click on Edit virtual machine settings.
- Once a new window pops up, go to the Hardware tab.
- Next, choose the Network Adapter option.

- Then, move to the right panel and click on the radio button for Bridged.

- Finally, click on Ok.
- You may have to restart your PC if it doesn’t resolve the issue immediately.


On Oracle VM VirtualBox Manager
Similar to VMWare, you can choose the Bridged option on Oracle VM VirtualBox Manager using the following process:
- Launch the VirtualBox and choose your desired OS from the left panel.
- From the right panel, click on the Settings icon.

- Next, choose the Network tab from the left side of the window.
- Now, select an adapter you wish to make changes for. To enable the adapter, simply tick the Enable Network Adapter option.

- Expand the Attached to drop-down and choose Bridged Adapter.
- Then, check the Name field. Make sure you select the correct network adapter that provides internet access.

- Finally, tap on the Ok button, and check if your problem has been resolved.


Make VMnet0 Auto-Bridge to Manual In Virtual Network Editor
If your Network Connection is set to Bridged, but your network bridge is still not working, you can try choosing the VMnet0 option. By default, VMnet0 is set to Auto-Bridge. Now, we must bridge it to the network adapter connecting us to the internet.
Well, it’s best to apply these changes using the vmnetcfg application. However, this .exe file is only available in the VMWare Workstation Pro. So, here’s how you can do it:
- Navigate to Desktop and double-click on This PC.
- Then, go to Local Disk (C:).
- Next, choose Program Files (x86) or the folder where your program files are generally stored.
- Choose VMWare and go to VMWare Workstation.
- Now, find and launch the vmnetcfg application with administrative privileges. If you don’t see it, it’s probably because you’re not using the pro version.
- Once the Virtual Network Editor opens, choose Vmnet0.

- Then, under VMNet Information, expand the Bridged to field and select your desired network adapter.
- Finally, press Ok and start the VMWare program. You may even have to restart your PC to make these changes.

Use a New Network Adapter
If neither of the two techniques works for you, it might be because of the corrupted network adapters on your virtual machine. Thus, this section guides you on how to create a new adapter on both VMWare and VirtualBox.
On VMWare
For demonstration, we have used VMWare Workstation 16 Player:
- Launch the application and choose the OS from the left side of the window.
- Next, choose Edit virtual machine settings.
- In the Hardware section, select Network Adapter.
- Move down and choose Remove. This will delete the Network Adapter wizard from the panel.

- Then, click on Add…
- Under Hardware types, choose Network Adapter and press the Finish button.

- Once the new adapter is added, the Summary is set to NAT by default. So, simply choose Bridged from the Network connection section.
- Lastly, choose Ok and see if this has fixed your problem.


On VirtualBox
Unlike on VMWare, you can temporarily disable a certain adapter on VirtualBox and reenable it with a single click:
- Launch the Oracle VM VirtualBox Manager and choose your desired OS.
- Next, click on Settings.
- Then, go to the Network tab and navigate to your adapter.
- Now, untick the Enable Network Adapter option and choose Ok.

- Visit Settings > Network > [Your Network tab] again.
- This time, tick the Enable Network Adapter option and press Ok.

Otherwise, you can choose a new adapter instead of the one you used earlier.
Reinstall Your Virtual Machine
Now, the final option is to reinstall your virtual machine. To do so, you can uninstall the program from the Control Panel:
- Search for Control Panel on the Search Menu and launch it.
- Under Program, click on the Uninstall a program option.

- Scroll down and find VMWare or VirtualBox, whatever you’re using. Right-click on it and choose Uninstall.
- Next, follow the necessary steps to finalize the uninstalling process.

After removing the application from your PC, download the latest virtual machine version. Then, make sure you choose the Bridged option as we discussed above.
How to Fix Network Bridge Not Working on Windows 11 Host PC
Some PCs might lose internet connection after the bridging is complete. Moreover, you can also notice this on the Network Bridge, where it shows ‘Unidentified Network’. If you face this issue, go through the following steps to resolve it:
- Right-click on the Network Bridge and choose Properties.
- In the Adapters section, make sure the adapters you chose are ticked.

- Next, navigate to the This Internet uses the following items: section. Here, tick and select the Internet Protocol Version 4 (TCP/IPV4) option.
- Then, press the Properties button.

- Next, mark the radio button for Use the following IP address.
- Now, in the IP address, enter your valid IPv4 address. For demonstration, we’ve used
192.168.106.1. - Then, press Tab, and the Subnet mask is filled in automatically.
- In the Default Gateway field, you must use your router’s default gateway. For demonstration, we have used
192.168.106.155.
- Again, in the Use the following DNS Server addresses section, enter an IP on the Preferred DNS server field. Let’s say
192.168.106.155.
- Also, you can add another IP in the Alternate DNS Server field or simply skip this step.
- Finally, click on Ok and close the Network Bridge Properties.
- Wait for several seconds until the Network Bridge identifies your network. If it consumes a lot of time, disable and reenable it.


Related Questions
How Can I Manually Bridge Connections on Windows 11?
Well, Windows provides a feature that helps to bridge connections on Windows in just a few minutes. This section covers the manual method of creating a Network Bridge by bridging two different network adapters and fixing the internet connectivity issue.
Follow these general steps to get an idea of how to bridge two or more connections on Windows 11 manually:
- First of all, make sure you have two network adapters active. For example, you can take one wireless network adapter and another ethernet network adapter.
- If you’re connected to the internet via WiFi, right-click on the WiFi icon on your taskbar. Then, choose Network and Internet Settings.

- Scroll down and select Advanced network settings.

- Under Related settings, tap on the More network adapter options.

- Here, you’ll see all the network adapters on your PC. Select your desired adapters (two or more as per your choice).
- Right-click on any one of them and click on Bridge connections.

- Wait for a few seconds until the bridging is complete. The bridge is created and visible in the Network Connections window upon completion.


Fix ‘Can’t Connect to this Network’ in Windows 11: 7+ Methods
Windows 11, the latest operating system from Microsoft, has brought several exciting features and an updated user interface. However, users may encounter various issues, one of the most common being the dreaded «Can’t connect to this network» error. This problem can be particularly frustrating, especially when you rely on a stable internet connection for work or leisure. In this comprehensive guide, we will delve into over seven methods to troubleshoot and resolve this networking issue in Windows 11.
Understanding the Issue
Before jumping into solutions, it’s essential to understand what causes the «Can’t connect to this network» error in Windows 11. This error can manifest due to a variety of reasons, including:
- Issues with Wi-Fi Adapter: Your network adapter may be disabled, outdated, or experiencing a malfunction.
- Incorrect Password: Often, entering the wrong Wi-Fi password leads to connection failures.
- Network Configuration Problems: Misconfigured settings can prevent devices from connecting to the network.
- Interference from Antivirus or Firewall: Security software can sometimes obstruct network connections.
- Windows Updates: Occasionally, updates can affect network performance or settings.
- Router Issues: Problems associated with your router can also hinder connectivity.
Armed with this understanding, let’s explore various methods to troubleshoot and fix the problem effectively.
Method 1: Restart Your Computer and Router
Sometimes, the simplest solution is often the most effective one. If you’re facing connectivity issues, start by restarting both your computer and your router. Here’s how:
-
Restart Your Computer:
- Click on the Start button.
- Select the Power icon.
- Choose Restart.
-
Restart Your Router:
- Unplug the power cable from your router.
- Wait for about 30 seconds.
- Plug the router back in and wait for it to fully reboot (this may take a couple of minutes).
By restarting both devices, you’re allowing them to reset and clear any temporary configurations that might be causing the connection problem.
Method 2: Check Wi-Fi Toggle and Airplane Mode
Windows 11 includes a variety of settings that can inadvertently affect your connection. It’s easy to overlook basic toggles:
-
Wi-Fi Toggle:
- Click on the Wi-Fi icon in the taskbar.
- Ensure that Wi-Fi is toggled on. If it shows that Wi-Fi is off, click it to enable.
-
Airplane Mode:
- Open Settings by pressing
Win + I. - Go to Network & Internet.
- Ensure that the Airplane mode switch is turned off.
- Open Settings by pressing
If either of these settings were disabled, enabling them could resolve your connectivity issues.
Method 3: Forget and Reconnect to the Network
If you’re still having trouble, it may be helpful to forget the network you’re trying to connect to and then reconnect. This allows Windows 11 to refresh any potentially corrupt network settings.
-
Forget Network:
- Open Settings, then go to Network & Internet.
- Click on Wi-Fi and tap on Manage Known Networks.
- Click on the network you’re having trouble with and select Forget.
-
Reconnect to the Network:
- Go back to the Wi-Fi settings.
- Select your network from the available list.
- Enter the password and connect.
By performing these steps, you’re starting fresh with your network settings, potentially resolving any authentication issues.
Method 4: Update Network Drivers
Outdated or incompatible network drivers can cause connection issues. It’s crucial to ensure that your network drivers are up-to-date.
-
Open Device Manager:
- Right-click on the Start button and select Device Manager.
-
Find Your Network Adapter:
- Expand the Network Adapters section.
- Locate your Wi-Fi adapter.
-
Update Driver:
- Right-click on your Wi-Fi adapter and select Update driver.
- Choose Search automatically for updated driver software.
- If updates are found, follow the prompts to install them.
After updating your drivers, restart your computer and try connecting to the network again.
Method 5: Run Network Troubleshooter
Windows 11 includes a built-in troubleshooter designed to diagnose and fix network issues automatically. Let’s see how to utilize this feature:
-
Access Troubleshooter:
- Open Settings by pressing
Win + I. - Navigate to System > Troubleshoot > Other troubleshooters.
- Open Settings by pressing
-
Run the Network Troubleshooter:
- Find the Network Adapter troubleshooter and click on Run.
- Follow the prompts; Windows will attempt to detect and fix any issues automatically.
Method 6: Reset Network Settings
If none of the above methods have worked, a more drastic approach is to reset your network settings. This option will remove all network adapters and reset all networking components back to their default settings.
-
Open Settings:
- Press
Win + I.
- Press
-
Reset Network Settings:
- Navigate to Network & Internet > Advanced network settings.
- Under More Settings, click on Network reset.
- Click on Reset now, and confirm the action.
Your PC will restart automatically after the reset, and you’ll need to reconnect to your networks, entering any required passwords again.
Method 7: Disable and Re-enable the Network Adapter
Disabling and then re-enabling your network adapter can help resolve connectivity issues caused by the adapter itself. Here’s how you can do this:
-
Open Device Manager:
- Right-click on the Start button and select Device Manager.
-
Disable the Network Adapter:
- Find and expand Network Adapters.
- Right-click on your Wi-Fi adapter and choose Disable device.
-
Re-enable the Network Adapter:
- Wait a few seconds, then right-click on the same adapter and select Enable device.
This can refresh your network connection and resolve any temporary issues.
Method 8: Check for Windows Updates
Sometimes, the issue might stem from the operating system itself. Checking for and installing available Windows updates can solve numerous problems, including networking ones.
-
Open Settings:
- Press
Win + I.
- Press
-
Check for Updates:
- Click on Windows Update.
- Click on Check for updates.
If updates are available, download and install them. After the installation, restart your PC and check if the problem persists.
Method 9: Temporarily Disable Firewall/Antivirus
Security software can sometimes interfere with network connections. While you should always keep your antivirus and firewall enabled for protection, you might consider temporarily disabling them to see if they are causing the connectivity issue.
-
Disable Windows Firewall:
- Press
Win + R, typefirewall.cpl, and press Enter. - Click on Turn Windows Defender Firewall on or off.
- Select Turn off Windows Defender Firewall for both private and public networks.
- Press
-
Disable Third-Party Antivirus:
- Open your third-party antivirus program and look for the option to disable it temporarily (the process will vary depending on the software).
After disabling these, try connecting to the network again. If you can connect, you may need to adjust the settings in your firewall or antivirus program.
Conclusion
Encountering the «Can’t connect to this network» error in Windows 11 can be frustrating, but fortunately, there are several methods to address this issue. From simple restarts to more advanced configurations like network resets or driver updates, you have a range of options at your disposal.
Remember that each troubleshooting step should be followed carefully to ensure you effectively resolve the problem. If one method doesn’t work, don’t hesitate to move on to the next. And if all else fails, consider reaching out to your internet service provider for additional support or consult Windows support for more in-depth assistance.
By following the methods outlined in this guide, you should be well on your way to restoring your network connectivity and enjoying everything that Windows 11 has to offer.
Создание сетевого моста может быть полезным решением для объединения сетей и усиления их связи. Однако, иногда в процессе настройки моста могут возникнуть непредвиденные ошибки, препятствующие его успешному созданию. В данной статье мы разберем основные причины возникновения таких ошибок и предложим решения для их устранения.
Причины возникновения ошибок при создании сетевого моста
- Неправильная конфигурация сетевых настроек: одной из основных причин ошибок при создании сетевого моста является неправильная конфигурация сетевых настроек на компьютере. Проверьте настройки IP-адреса, подсети и шлюза по умолчанию, особенно если вы вручную настраивали сетевые параметры.
- Несовместимое оборудование: другой распространенной причиной ошибок является несовместимость оборудования. Проверьте, совместимы ли сетевые адаптеры и коммутаторы, которые вы используете для создания сетевого моста. Если оборудование не совместимо, попробуйте заменить его на совместимое.
- Проблемы с драйверами сетевых устройств: неправильные или устаревшие драйверы сетевых устройств также могут привести к ошибкам при создании сетевого моста. Убедитесь, что у вас установлены последние версии драйверов и, при необходимости, обновите их.
- Поражение сети вирусами или вредоносным ПО: некоторые вирусы и вредоносное ПО могут помешать созданию сетевого моста, блокируя или изменяя сетевые настройки. Проверьте свою систему на наличие вредоносных программ с помощью антивирусного ПО и удалите их при обнаружении.
- Нет доступа к необходимым правам администратора: для создания сетевого моста вам может потребоваться доступ к административным правам на компьютере. Проверьте свои привилегии пользователя и, если необходимо, выдайте себе административные права или свяжитесь с администратором системы для получения соответствующих разрешений.
Решение возникших ошибок при создании сетевого моста

Если вы столкнулись с ошибками при создании сетевого моста, попробуйте следующие действия:
- Проверьте свои сетевые настройки: убедитесь, что вы правильно настроили IP-адреса, подсети и шлюз по умолчанию на всех своих устройствах. Если есть ошибки, исправьте их и повторите попытку создания сетевого моста.
- Обновите драйверы сетевых устройств: проверьте, установлены ли на вашем компьютере последние версии драйверов для всех сетевых адаптеров. Если нет, обновите их и повторите попытку.
- Проверьте наличие вредоносного ПО: запустите антивирусное ПО для проверки вашей системы на наличие вредоносных программ. Если обнаружены вирусы или вредоносное ПО, удалите их и повторите попытку создания сетевого моста.
- Свяжитесь с администратором системы: если у вас нет необходимых прав администратора, обратитесь к администратору системы для получения соответствующих разрешений. Они могут помочь вам с настройкой сетевого моста или предоставить вам права, необходимые для его создания.
Избегайте паники при возникновении ошибок при создании сетевого моста. Хорошая отладка и уточнение причин проблемы могут привести к успешному решению. Будьте терпеливы, экспериментируйте с различными настройками и обратитесь за помощью к специалисту, если необходимо. Вы сможете создать стабильный и эффективный сетевой мост, который улучшит связь и обмен данными между вашими сетями.
Итог

Возникновение ошибок при создании сетевого моста может быть вызвано различными причинами, такими как неправильная конфигурация сетевых настроек, несовместимое оборудование, проблемы с драйверами сетевых устройств, наличие вредоносного ПО или отсутствие прав администратора. Однако, с помощью качественной отладки и последовательности действий, эти проблемы могут быть легко устранены. Будьте терпеливы, уточняйте причины возникших ошибок и обратитесь за помощью, если необходимо. В результате вы сможете создать стабильный и эффективный сетевой мост, который улучшит связь и обмен данными между сетями.
Возникла непредвиденная ошибка при создании сетевого моста
Создание сетевого моста – это важная операция, которая позволяет объединить несколько сетей и обеспечивает передачу данных между ними. Однако, в процессе настройки могут возникнуть непредвиденные проблемы, которые затрудняют успешное создание сетевого моста. В этой статье мы разберем основные причины и возможные решения для этой ошибки.
Чтобы понять причины ошибки, давайте рассмотрим, что такое сетевой мост.
Сетевой мост – это устройство или программное обеспечение, которое соединяет две или более локальные сети и позволяет им взаимодействовать. Он работает на канальном уровне модели OSI и передает кадры данных между сетями, отслеживая MAC-адреса устройств.
Для создания сетевого моста необходимо иметь два или более сетевых интерфейса, которые будут определяться как мостовые. В операционных системах Linux и Windows эту возможность предоставляют специальные программы или утилиты.
Основные причины возникновения ошибки при создании сетевого моста:
- Неправильная настройка сетевых интерфейсов.
- Отсутствие необходимых драйверов устройств.
- Конфликт IP-адресов.
- Неправильные настройки программного обеспечения.
Неправильная настройка сетевых интерфейсов
Одной из основных причин возникновения ошибки является неправильная настройка сетевых интерфейсов. Для успешного создания сетевого моста необходимо установить правильные параметры для каждого интерфейса.
Пример неправильной настройке сетевого интерфейса: если вы случайно указали неверный MAC-адрес или неправильный режим работы интерфейса, то это может привести к проблемам при создании сетевого моста.
Чтобы исправить такую ошибку, необходимо внимательно проверить настройки каждого интерфейса и убедиться, что они соответствуют требованиям.
Отсутствие необходимых драйверов устройств
Еще одной причиной ошибки при создании сетевого моста может быть отсутствие необходимых драйверов устройств. Для работы сетевого моста все сетевые интерфейсы, которые вы планируете использовать, должны иметь соответствующие драйверы.
Пример ошибки из-за отсутствия драйверов: если у вас есть сетевой адаптер без установленных драйверов или с устаревшей версией, то это может привести к неудачному созданию сетевого моста.

Чтобы устранить эту ошибку, необходимо установить или обновить драйверы для каждого сетевого интерфейса, используемого для создания моста.
Конфликт IP-адресов
Еще одной возможной причиной ошибки может быть конфликт IP-адресов. Если у вас уже есть другие устройства в сети с одинаковыми IP-адресами, то при создании сетевого моста может произойти ошибка.
Пример ошибки из-за конфликта IP-адресов: если у вас есть два сетевых интерфейса с одинаковыми IP-адресами, то при попытке создать мост между ними возникнет ошибка и мост не будет создан.
Чтобы решить эту проблему, необходимо изменить IP-адреса устройств, чтобы они были уникальными в сети.
Неправильные настройки программного обеспечения
Наконец, неправильные настройки программного обеспечения также могут привести к ошибке при создании сетевого моста. Некоторые настройки программного обеспечения могут быть неправильно указаны или конфликтовать друг с другом, что вызывает проблемы с созданием моста.
Пример ошибки из-за неправильных настроек программного обеспечения: если у вас установлено программное обеспечение, которое автоматически создает мост, и его настройки не совместимы с настройками операционной системы, то возникнет ошибка.

Чтобы избежать такой ошибки, необходимо внимательно изучить настройки программного обеспечения и убедиться, что они совместимы с настройками операционной системы.
Итог
Создание сетевого моста может столкнуться с непредвиденными ошибками, но каждая из них имеет решение. Необходимо внимательно проверять настройки сетевых интерфейсов, устанавливать или обновлять драйверы устройств, избегать конфликтов IP-адресов и правильно настраивать программное обеспечение. Проведя все эти проверки и решив возникшие проблемы, вы сможете успешно создать свой сетевой мост и наслаждаться безопасным и стабильным соединением между сетями.
Возникла непредвиденная ошибка при создании сетевого моста
Сетевой мост является важным инструментом для объединения двух или нескольких сегментов сети в одну единую сеть. Он позволяет передавать данные между различными сетями, обеспечивая соединение и коммуникацию между устройствами. Однако, иногда при создании сетевого моста возникают непредвиденные ошибки, которые могут привести к проблемам и затруднениям в работе.
Что такое сетевой мост и как он работает?
Сетевой мост – это устройство или программное обеспечение, которое позволяет объединять две или более сегментированные сети в одну. Это позволяет устройствам, находящимся в разных сегментах, обмениваться данными и обеспечивает единую сеть для коммуникации.
Сетевой мост работает на физическом уровне и выполняет функцию коммутации данных между сетями. Он принимает данные от одного сегмента сети, а затем перенаправляет их в другой сегмент сети, где они должны быть доставлены. Это позволяет устройствам из разных сегментов взаимодействовать друг с другом, будто они находятся в одной сети.
Что может привести к возникновению ошибки при создании сетевого моста?
Существует несколько возможных причин, почему может возникнуть ошибка при создании сетевого моста. Одной из самых распространенных является неправильная конфигурация моста или настроек устройств, которые соединяются через него.
Другой причиной может быть несовместимость оборудования или программного обеспечения. Некоторые устройства или программы могут не поддерживать сетевой мост или иметь неправильные настройки, что может привести к ошибкам при его создании.

Также, возникновение ошибки может быть связано с неправильной установкой или подключением кабелей и активных сетевых устройств. Возможно, кабель был неправильно подключен или возникла неполадка в активном сетевом устройстве, что мешает правильной работе моста.
Как решить проблему с ошибкой при создании сетевого моста?
Если возникла ошибка при создании сетевого моста, есть несколько действий, которые могут помочь в ее решении.
- Проверьте настройки сетевого моста и устройств, которые должны быть подключены. Убедитесь, что они настроены правильно и совместимы между собой.
- Проверьте конфигурацию моста и убедитесь, что все настройки указаны корректно.
- Проверьте подключение кабелей и устройств. Убедитесь, что кабели подключены правильно и нет неполадок в активных сетевых устройствах.
- Перезагрузите устройства, подключенные к мосту. Иногда простое перезапуск может решить проблемы с сетевым мостом.
Итог

Создание сетевого моста может быть полезным инструментом для объединения различных сетей в единую сеть и обеспечения коммуникации между устройствами. Однако, иногда возникают непредвиденные ошибки при его создании, которые могут привести к проблемам.
В данной статье мы рассмотрели, что такое сетевой мост, как он работает, а также возможные причины и способы решения ошибок при его создании. Надеемся, что представленная информация поможет вам в решении проблем и обеспечении правильной работы сетевого моста.