
Друзья, всем привет!
MSI Recovery System — repair if fails.

MSI Recovery System
Предыстория проблемы с MSI Recovery System .
Имеется новый моноблок фирмы MSI. Серия Modern. Новейший, я бы сказал. Характеристики для «печатной машинки» — обычные. Камень Core i3 1115G4, ОЗУ 8Гб, SSD SN 530, Intel VGA «встройка», предустановленная мною нелюбимая подделка под Windows 7.
А именно — WIndows 10. Это которая новая, усовершенствованная, самая быстрая и галим… единая для всех платформ — и для ПК, и для смартфонов, и для планшетов.
Так вы все говорили, оплаченные боты-сектанты, господа хорошие?
Теперь она старая и не единая — Windows 11.Бесит прям.
Взяли данный компьютер для офисной работы. Со специфическими программами российской разработки.
В результате установки рабочих программ, выяснилось, что, возможно, существует несовместимость между защитой этих программ и защитой Windows 10. Всё работало только ДО перезагрузки. После перезагрузки — бесконечный цикл «Автоматическое восстановление системы».
Накачал кучу всего — из старых запасов, и из новых типа «WinPE10_8_Sergei_Strelec» — то есть дисков с инструментами и утилитами для восстановления работоспособности операционной системы Windows. К сожалению, восстановить не удалось.
chkdsk /f /r x/, sfc /scannow, dism и прочее — всё показало полное отсутствие проблем, но система стартовать отказалась. Т.к. сохранять было нечего — воспользовался MSI Recovery System. Вообще, система восстановления системы вызывается по клавише F3 на этапе включения. MSI Recovery System вызывается также по клавише F3. Она есть на ноутбуках MSI, и, теперь знаю, на моноблоках MSI. Делает она ровным счётом простую вещь — форматирует диск С, т.е. системный с «виндой» и запускает заново установку десятки.
В первый раз, ребята ставили рабочие программы сразу после включения. Предположил, что был конфликт такого рода: что-то где-то не срослось на этапе — десятка же качает и ставит в фоне «сама, всё сама». Решил зайти с другого пути — сам поставил систему, сам её обновил-перезагрузил-обновил-перезагрузил до состояния отсутствия обновлений. Отдал в офис.
Ставят свои программы. Сотрудники работают 1 день. Выкл-вкл-«Автоматическое восстановление системы».
Третий раз «восстанавливаю», то есть чистая установка со стиранием диска С. Компьютер постоял-постоял, и прилетела обнова до Windows 11. Попытка не пытка.
По установке ничего особенного — ничего не спрашивала, качала что-то куда-то, перезагрузка и у нас Windows 11. Бесплатно. Лицензия. Всё как положено. В ней копаться особо не стал — мне не нравятся WIndows 8, 8.1, 10. 11 также. Перенес нижнее меню в левый угол с середины. В процессе установки всякой мелочи отметил «фризы». Не знаю причины. На 10ке их на данной машине нет. Из придирок — не нашёл как быстро «Всегда отображать все значки и уведомления на панели задач». Нашел только какую-то муть про действия при «переполнении».
P.S. Парни, а что, ccleaner тоже санкции наложил? Пришлось качать с левых сайтов — на официальном access denied. Или господин Simplix там работает? Хе-хе.
Также не нашёл, как в 1 клик отключить защитник Windows. Скачал WinRar с типом лицензии crack. Chrome вообще не дал скачать, но скачал Firefox. Так вот — распаковал архив — и отвечаю — «винда» удалила zip архив crack!!! Далее скачал официальный 7 zip, он бесплатен.
Сотрудники фирм разработчиков необходимых нам рабочих программ 3 раз их ставят. Всё повторяется — выкл-вкл-Автоматическое восстановление системы.
Описание проблемы с MSI Recovery System.
Захожу уже в который раз в MSI Recovery System. Жму System Partition Recovery — только было по-русски.
MSI Recovery System система очень простая — сначала «кругляшок» с надписью в центре Wait. Потом прогресс в процентах. Перезагрузка и пошла установка системы. То есть она быстро форматирует диск С, перезагрузка и пошла установка Windows 10.
Установка Windows 10 НЕ пошла. Выкинуло обратно в «автоматическое восстановление системы». Что бы я не делал, на каком бы моменте я не делал — только «кругляшок» Wait, прогресса в процентах нет — и обратно в «автоматическое восстановление системы». Обратил внимание, что в «автоматическое восстановление системы» была подпись Windows 11. Как Windows 11?! Ведь предустановлена то Windows 10! chkdsk /f /r /x, disk part показали следующее — ошибок нет, тома и диски — всё целое, диск С пуст. Но «автоматическое восстановление системы» даже после запуска MSI Recovery System включается от Windows 11. Появилось некоторое понимание данной «новости». Для восстановления компьютера до заводского состояния, на «харде» — в данном случае ssd — есть 2 раздела. На одном маленьком — «микро ОС», среда восстановления. На большом — 15ГБ — образы системы. Я боялся, что заводским образам пришла хана. Тогда точно уже самому ручками ставить какую-то систему.
То есть, мы получили четкую проблему — невозможность восстановить Windows 10 средствами MSI Recovery System.
Начал шерстить интернет на тему «MSI Recovery System не работает», » MSI Recovery System fails», » MSI Recovery System repair» и так далее.
Нашел много чего. В том числе, человек описывает похожую проблему:
https://answers.microsoft.com/en-us/windows/forum/all/msi-laptop-recovery-failed/8aa01f1d-7684-40e7-be78-b99e33590dfc
То есть «msi Laptop recovery failed». So then I tried to start my laptop and now it‘s in the automatic repair tool loop. Далее I tried some commands и прочее. То есть как и я, он что-то пытался через командную строку выяснить и запустить. Без результатов. Обратите внимание, что сами разделы у него присутствуют. Нужные и необходимые WinRe tools и BIOS_RVY. У меня аналогичные:

diskpart
Как всегда, советчики и «иксперды» там так себе. Не знаю почему, кстати. Далее человек пишет — что сделать, чтобы прекратить бесконечный цикл «автоматическое восстановление системы» и вернуть настройки к заводским значениям через MSI Recovery? А они, то ли английский не знают, потому что он несколько раз ответил, что loop. Надо было «инфинити» ему написать, хе-хе. То ли просто не поняли суть проблемы. И подсказывали способы войти в безопасный режим через трижды reset или выключение. А также способы войти в автоматическое восстановление системы. Которое у него идёт бесконечно. И которое он хочет прекратить. Ребят, не поленитесь, почитайте, я смеялся минут 20.
Способ решения проблемы с неработающим MSI Recovery System.
Очень просто. Есть на официальном сайте MSI статья «Что делать, если при восстановлении Windows произошла ошибка?«. Текущий адрес:
«https://ru.msi.com/support/technical_details/NB_OS_Recovery_Fail.
Там присутствует раздел «Что делать, если после попытки восстановления ОС с помощью функции F3 выводится сообщение об ошибке«.
Напомню, что у меня и немецкого пользователя из примера выше — ошибок и сообщений об ошибках — не было.
Далее цитирую:
1. Подготовьте чистую USB-флешку. 2. Скачайте утилиту WinRE Tool по следующей ссылке. Данная утилита служит для исправления файла с образом ОС: http://download.msi.com/uti_exe/nb/F3_Recovery_USB.zip
3. Распакуйте архив. Скопируйте все файлы из содержащейся в нем папки на чистую USB-флешку.
Я так и сделал, ради эксперимента, кстати. Не «морфатировал», ничего — стёр всё с «флешки» и скопировал архив. Они не обманули — работает. Грузитесь с USB(можно без захода в БИОС — клавиша F11) и, собственно одна кнопка, System partiotion recovery.
Как и в MSI Recovery System на моём моноблоке, как и на ноутбуке немецкого товарища — это та же самая кнопка для форматирования диска С и последующей установки Windows 10 в моём случае.
То ли она чинит саму систему MSI Recovery System по нажатию клавиши F3, то ли она чинит «восстановление системы(windows) по нажатию клавиши F3. То ли скрипт, порядок запуска процедур и прочее по клавишу F3.
Моё мнение:
1) Зря они на одну и ту же кнопку кинули 2 функции — моё мнение.
2) У них кривой, или можно сказать — не соответствующий перевод проблемы «Восстановление системного раздела». Под System partiotion recovery можно многое иметь в виду.
Короче, в архиве «тулза» F3_Recovery_USB.zip весит 458МБ. Разархивированная папка весит 458Мб. Хе-хе.
В результате, мы восстановили нормальную работу MSI Recovery System — и после работы F3_Recovery_USB идёт установка предустановленной Windows 10. Как и должна. А не бесконечное «Автоматическое восстановление системы» да ещё и от Windows 11.
В качестве итогов по MSI Recovery System после upgrade Windows 10 на Windows 11.
В идеальном случае, о данном «баге» было бы неплохо знать Microsoft и MSI. Кто-то повторит такое развитие событий обязательно. И либо Windows 11 не должна заменять собой «заводскую» среду восстановления Windows 10 — от MSI в данном случае. Либо как-то что-то прописать, чтобы среда восстановления 11 спокойно работала с MSI Recovery System с образами Windows 10. Либо сделать на выбор для пользователей 2 среды, 2 диска. Либо ещё 1000 способов. А то мы получили следующее — установил 11, решил вернуть 10 — не угадал, решил вернуть 11 — не угадал. Тупик.
MSI и Microsoft. Сделайте, пожалуйста, элегантно и красиво.
Что касается проблем с моими программами, или их системами самозащиты, или их драйверами — если наши разработчики не решат эту проблему — то выход 1 — ставить Windows 7. Там работает спокойно.
For ENGLISH users. Shortly.
If you have:
— laptop or desktop MSI with installed\pre-isntalled Windows 10 and with MSI Recovery System inside.
— problems with MSI Recovery System. It does not works fine or fails or another glitch.
— problems with Windows automatic repair tool — it always works without result or you can not stop it.
You can try to «recover’ your MSI Recovery System. You have to use MSI’s F3_Recovery_USB tool. Just download it, unpack and copy to USB flash, boot PC\notebook from this USB, press System partiotion recovery. New Windows setup will start from your hidden factory directory. And maybe, you will get your brand new Windows  You have to know that your system disk C can be formatted or you will lose all your data — i didn’t test safety of users data.
Читаю и произношу MSI «эм-си-ай». Можно и дОлжно «эм-эс-ай». Не могу.
С Уважением, WoT Boca Chica.
Telegram-канал @overclockers_news — теперь в новом формате. Подписывайся, чтобы быть в курсе всех новостей!

You can recover you laptop.
Image Credit:
Farknot_Architect/iStock/GettyImages
Restoring an MSI laptop to the original factory settings can resolve a number of issues with the system. Missing file logs and a multitude of changes made over the laptop’s lifetime can cause stalling, fluttering and lag time, and viruses can also cause problems. A full factory reset removes all bugs and malware. MSI laptops are used primarily for gaming purposes, making speed and functionality exceptionally important.
Factory Reset Consequences
Although a factory reset removes bugs and solves large issues, it also removes all modifications and additions made to the system. The system is literally returned to the same state as when it was new. Save any wanted files and programs to an external drive before running the reset because everything that did not come with the factory original is lost in a reset.
After the factory reset is complete, you are starting over with a fresh system. Reload the programs and files that you saved. Otherwise, nothing is needed, and you can use the system as if it’s new.
After performing the factory reset, reinstalling programs is an important part of the process. An older model may not support newer games that require fast processing and a compatible graphics card. If the laptop is older, it may be worth considering an upgrade to a newer model. However, many of the older models remain relevant and useful.
Access Restore Interface
To perform the factory settings restore process, you must first access the Restore interface, which is the menu with the commands specific to the reset. The computer uses this menu to prevent an accidental factory reset that would unintentionally erase your files and programs.
To access the Restore interface, shut down the computer completely. After the shutdown is complete, start the computer and wait for the MSI logo to appear. Press F3 while the logo is active to launch a menu. This menu is the only place where the factory reset option is available. Make sure you want to complete a full factory reset before launching this menu, as it comes with serious consequences.
MSI Factory Reset
Select the «Troubleshoot» option from the menu to enter the reset panel. Several options are available, including «Reset this PC.» This reset provides the option to keep or remove files, and it ultimately uninstalls and reinstalls Windows. It is a great way to restore the original settings and do a cleanup without running the complete factory restore. It means you can keep existing programs, but these programs may carry malware and viruses through the reinstallation process. A full restore is necessary to clean out the system.
To run the factory restore, select «Restore MSI Factory Settings» and «OK» after the warning. The factory restore takes at least a few minutes to complete, and the computer shuts down and restarts to finish the process. When it is complete, you can return to using the computer normally. Load new photos for backgrounds and reinstall any custom programs but be wary of anything that may return viruses and malware to the system.
The computer’s speed and functionality should increase after the MSI factory reset, but accumulating new programs and loading the hard drive will ultimately have a slowing effect. Focus on your favorite gaming platforms and avoid pressing the limits of the laptop to maintain great speed.
MSI F3 Factory Reset WindowsRE- working with latest 22H2 Windows 11 and previous versions of windows as well.
- First disable recovery environment with cmd «reagentc /disable».
- Paste/Replace these two files (winre.wim and ReCustomization.xml) inside Recovery-WindowsRE folder of the recovery drive. (System hidden file, need ownership to access these files)
- Enable Recovery environment with cmd «reagentc /enable»
- Done
P.S. you need to have Factory recovery image or self-made recover image of your system inside recovery drive in order to use this factory reset.
If you don’t have recovery image inside recovery partition, you will enter into boot loop.
So, make sure to read this thread first.
- Addeddate
- 2022-10-12 16:40:32
- Identifier
- MSI-WinRe
- Scanner
- Internet Archive HTML5 Uploader 1.7.0
comment
Reviews
There are no reviews yet. Be the first one to
write a review.
822
Views
2
Favorites
DOWNLOAD OPTIONS
Uploaded by
Bsl K
on
A MSI laptop gains popularity among gaming communities for its high performance and superior hardware. However, as time goes by, you may run into all kinds of glitches. To troubleshoot these problems, it is a good option to perform a factory reset on your MSI laptop. This article on MiniTool Website will show a step-by-step tutorial about how to factory reset a MSI laptop to you.
What Is Factory Reset?
A factory reset, also known as hardware reset, hard reset or master reset, refers to returning your device to the original state when you bought the device. All the data such as files, settings, and applications will be deleted from your device during the factory reset process. At the same time, it will reinstall your operating system.
A factory reset is not harmful and it can be used to resolve some software issues associated with the device like running slowly or freezing for no reason. Factory resetting your device enables your computer to run a little faster. This process is pretty important for you if you intend to give away your laptop or sell it because it avoids making your private data leaked.
Tips:
Do you wonder how long it will take to factory reset your PC and the factors that affect the resetting time? Go to this guide to get more information — How Long Does It Take to Reset a PC? Find Answers and Speed Up It.
Reasons for Factory Reset Your MSI Laptop
Factory resetting is an effective way to tackle bugs or software issues on your MSI laptop. Although a factory reset is not recommended for all electronic devices or in all situations, it gives your MSI laptop a second life, especially in the following situations:
- repairing a malfunction of a device
- removing virus & files
- clearing memory space & settings
- improving the performance of your device
- selling or giving your device to others
Today, we will mainly help MSI users like you to learn 3 ways about how to factory reset MSI laptop without password: factory reset using Windows Recovery Environment, Windows reset utility or a USB flash drive. If you need to factory reset your MSI laptop at some point, keep reading to get a full guide now.
Tips:
The main steps of factory resetting the laptop are similar regardless of whether it is a Windows laptop or an Apple MacBook. For a comprehensive guide about the latter, please read this guide — How To Wipe A MacBook & Reset It To Factory Settings.
Preparation: Back up Your Important Files
As mentioned above, you must perform a factory reset with caution because this action can erase all the files, folders, photos, apps and other personal information restored on your device. Therefore, it is strongly advisable to create a backup for your important files with a professional backup tool before you factory reset your MSI laptop.
Both Windows inbuilt and third-party backup tools can meet your backup demands. However, if you use a third-party backup tool, you don’t have to be an expert in computer or backup because its backup process is quite clear and simple.
Tips:
Do you know what the differences between the Windows inbuilt backup tool and MiniTool ShadowMaker are? This guide will give you a satisfying answer — Windows 10 vs Windows 11 Backup & Restore vs MiniTool ShadowMaker.
To back up your files, we advise you to use a piece of free and professional backup software, MiniTool ShadowMaker. You make full use of this tool to back up your files, folders, systems, partitions, and disks on Windows 11/10/8/7.
What’s more, you can back up your vital files daily, weekly, monthly or even on event according to your backup habit and demand. There are three backup modes to meet your various needs: full backup, incremental backup, and differential backup. Now, let me show you how to back up important documents step by step.
Step 1. Download and install MiniTool ShadowMaker and then double-click on the shortcut of this tool to launch it.
MiniTool ShadowMaker TrialClick to Download100%Clean & Safe
Step 2. Hit Keep Trial to enjoy a 30-day free trial and then go to the Backup page.
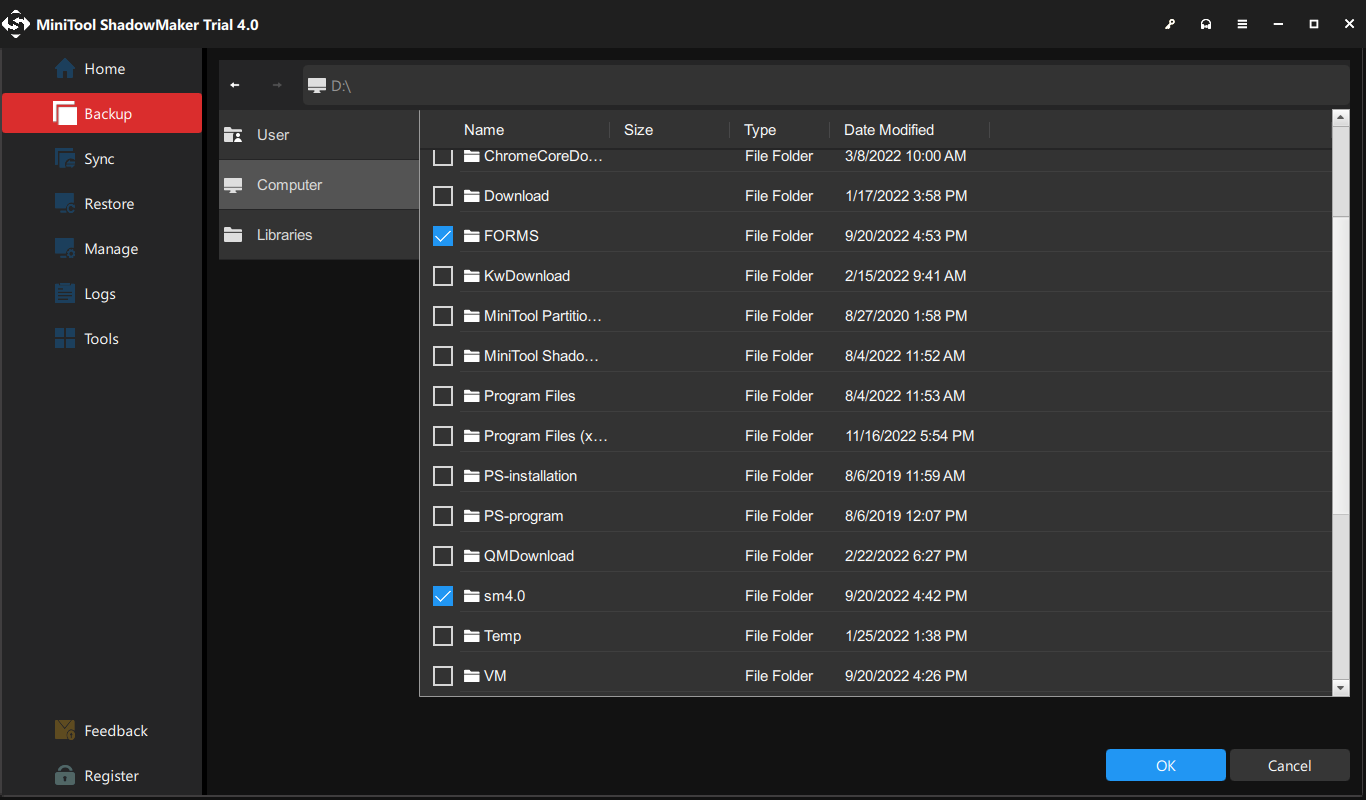
Step 3. Click on SOURCE > Folders and Files and then you can choose the files or folders you want to back up.
Tips:
Checking several files at one time is permitted.
As you can see, MiniTool ShadowMaker selects a default storage path for your backup image file in DESTINATION, you can hit Back Up Now to start the backup task at once.

Tips:
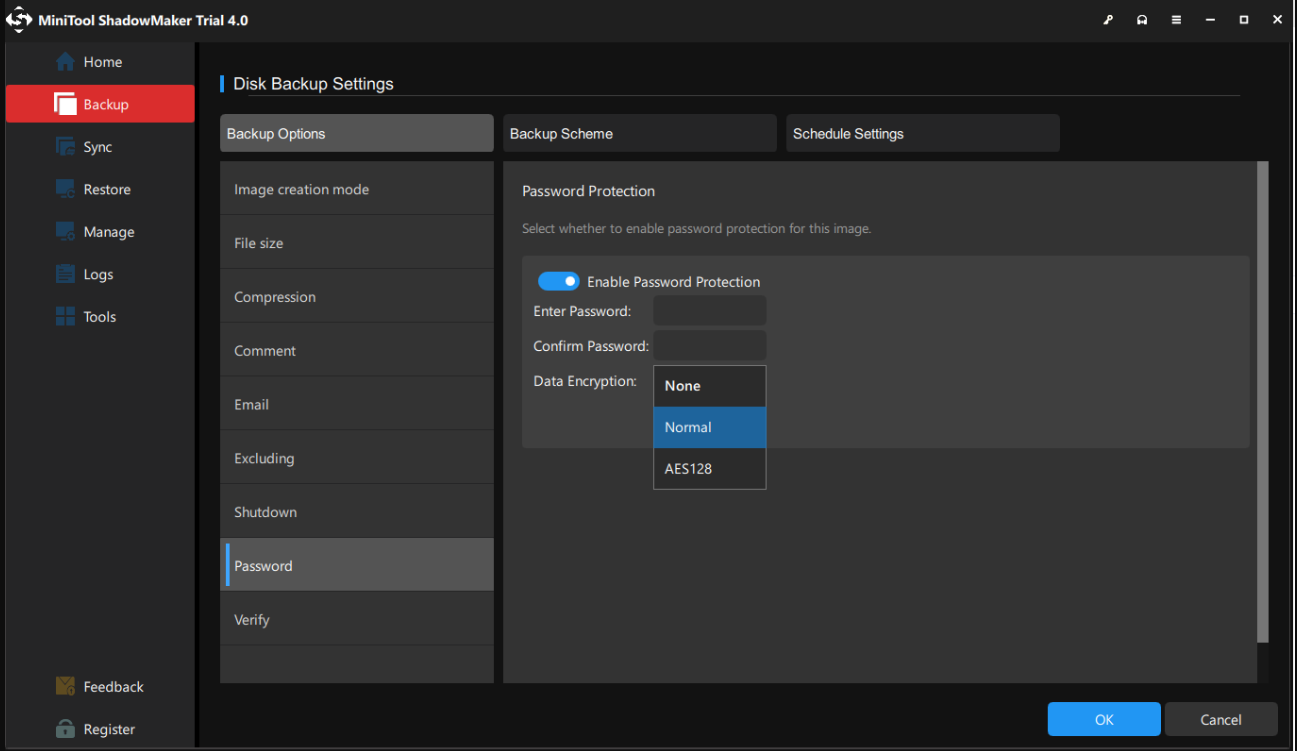
If you don’t want others to access your backups, you can enable password protection for them: go to Options > Password under Backup Options > turn it on > type your password. There are 3 data encryption levels for you: None, Normal, and AES128.
After backing up your data successfully, it’s time to reset your computer to the factory defaults.
How to Factory Reset MSI Gaming Laptop via WinRE
Like any other manufacturer, the manufacturer of MSI also provides you with a preloaded recovery partition on your hard drive. You can access this partition with the help of the F3 or F11 keys (for most MSI laptops, press F3). To do so:
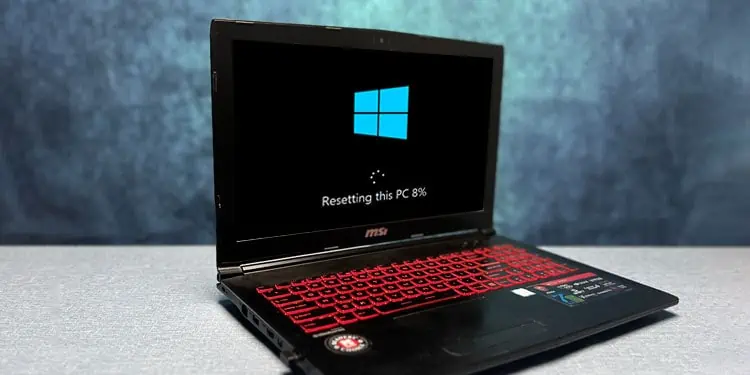
Step 1. Shut down your computer and then turn it on. When the MSI logo appears on the screen, press F3 or F11 (depending on your computer) repeatedly to enter Windows Recovery Environment.
Tips:
- If you don’t bring up the boot menu successfully, repeat step 1 several times.
- During this process, make sure that the power adapter is connected.
Step 2. Hit Troubleshoot under Choose an option.
Step 3. Under Troubleshoot, hit Restore MSI Factory settings.
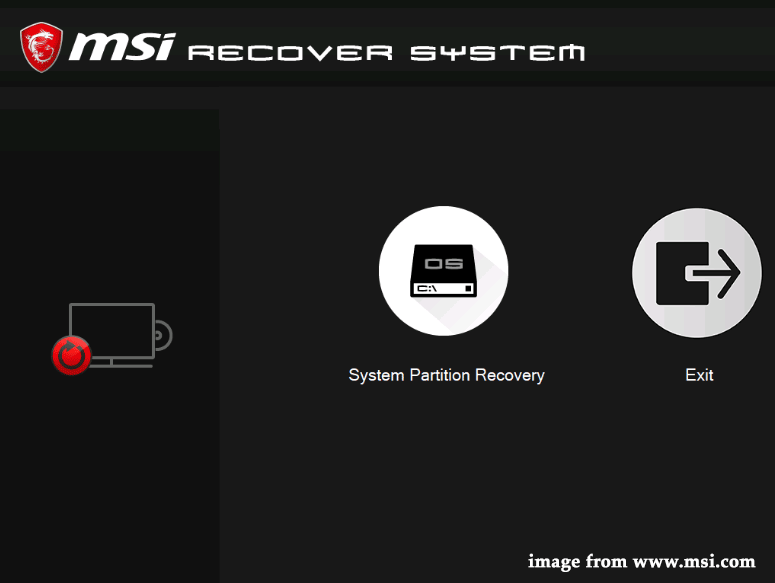
Step 4. Click on System Partition Recovery. After that, you will see a warning message saying that All files and settings will be reset and lost on the computer. Are you sure to continue. Hit Yes to start the resetting process.
Step 5. After the process is finished, press OK to proceed with the setup.
Step 6. Hit Continue to reboot your computer. Once the computer is restarted, your system will return to the factory default state.
Also read: MSI Dragon Center Not Working in Windows 10/11? [5 Proven Ways]
How to Factory Reset a MSI Gaming Laptop via Windows Reset Utility
Windows 10/11 offers you an inbuilt option called Reset this PC that enables you to restore your operating system to its factory default configuration quickly. It is more convenient than reinstalling Windows using the manufacturer’s recovery partition.
Step 1. Press Win + I altogether to open Windows Settings.
Step 2. In the settings menu, scroll down to locate Update & Security and click on it.
Step 3. In the Recovery tab, hit Get started under Reset this PC.
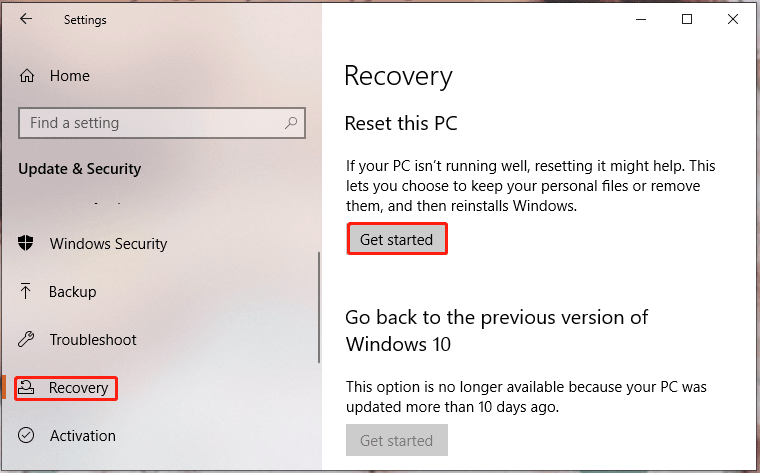
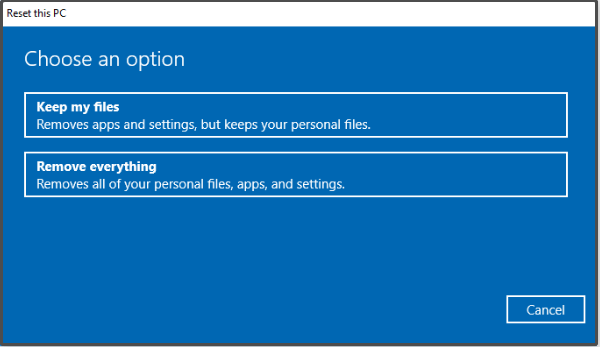
Step 4. Then you will see a window with two options for you: Keep my files and Remove everything. The first option will keep your personal files while the latter will remove all the settings, apps, and files on your MSI laptop.
Step 5. Choose from Cloud download & Local reinstall and then follow the on-screen instructions to factory reset your MSI laptop.
Tips:
Does this method do the trick for you? Some of you may find that Reset this PC stops working. Don’t fret. You can find some easy and feasible solutions in this guide — [Fixes] Reset This PC Not Working on Windows 11/10.
How to Factory Reset MSI Laptop via USB Drive
If your MSI laptop fails to boot or encounters other problems such as the blue screen of death, black screen, freezing and more, you can choose to perform a factory reset via a USB flash drive. Here’s how to do it:
Move 1: Download Windows 10 Installation Media
Step 1. Go to Microsoft Center on another computer.
Step 2. Hit the Download Now button under Create Windows 10 installation media.
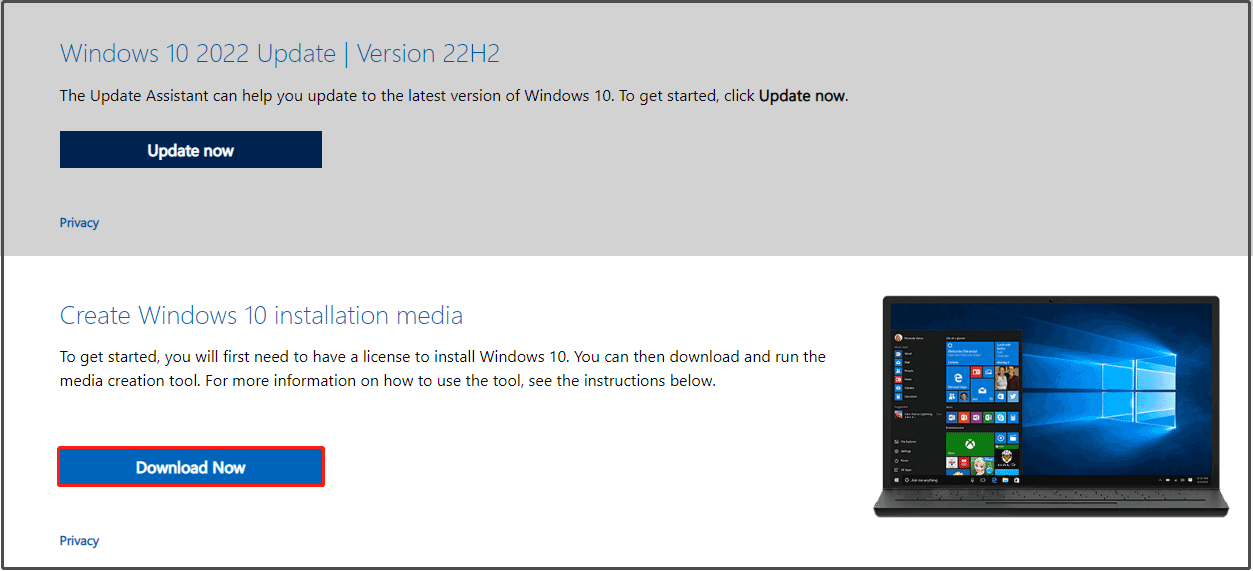
Step 3. After the downloading is complete, run Media Creation Tool and choose Create installation media for another PC.
Step 4. Hit Yes when the UAC window pops up.
Step 5. Connect a USB drive to the computer and then create a bootable USB drive on it.
Tips:
Is your USB flash drive not detected by the computer? Take it easy! You can work it out with the workarounds mentioned in this guide — Fix USB Flash Drive Not Recognized & Recover Data – How To Do.
Step 6. Choose a language, edition, and architecture. Follow the guidance to complete the process and finally hit Finish.
Move 2: Reinstall Windows 10 with Media Creation Tool
Step 1. Remove the USB flash drive from the computer and then connect it to your MSI laptop.
Step 2. Reboot your problematic laptop and select the language & other preferences.

Step 3. Hit Next > Install now > enter the product key to activate Windows or choose skip > tick I accept the license terms > Next > Custom.
Step 4. Choose a partition in Where do you want to install Windows and then follow the rest guidelines on the screen to finish the reinstalling process.
Tips:
If your files are lost after performing a factory reset Windows 10, you can recover your files from the solution in this guide — How To Recover Files After Factory Reset Laptop.
I learned 3 ways to factory reset my MSI laptop and I managed to factory reset my MSI computer under the detailed guidance of this article. Do you need to factory reset your MSI device? Come on and have a try!Click to Tweet
Wrapping Things up
In summary, performing a factory reset allows you to have a fresh system and any issues triggered by third-party software, system setting changes, system file corruption or malware infection can be fixed by a factory reset. Most importantly, remember to back up all your vital documents with MiniTool ShadowMaker before proceeding.
In this article, we provide you with 3 viable methods on how to factory reset MSI laptop without password step by step. If you have tried the methods above, please tell us which method helps you out. For more queries or suggestions, feel free to leave a comment in the comment zone below or share your ideas by sending an email via [email protected]. Thanks for reading!
How to Factory Reset MSI Laptop FAQ
How do I force my laptop to factory reset?
For Windows 10: go to Settings > Update & Security > Recovery > hit Get started under Reset this PC > Remove everything > choose from Cloud download and Local reinstall. Then follow the rest on-screen instructions to complete the factory reset process.
How do I factory reset my MSI laptop Windows 11?
For Windows 11: go to Settings > System > Recovery > hit Reset PC beside Reset this PC > Remove everything > choose Cloud download or Local install > hit Next > Reset.
How do I factory reset my MSI computer without password?
Turn off your computer and reboot it. When you see the MSI logo on the screen, press F3 > Troubleshoot > Restore MSI Factory settings to enter MSI System Restore Interface. Next, hit System Partition Recovery > OK > Continue.
How do you reset a gaming laptop?
Type reset this PC in the search bar and then hit Enter. Hit Get Restarted under Reset this PC.
Home
Laptops
By
Abhishek Silwal
Resetting your MSI laptop is the final resort if you encounter any severe system issues or if you are going to sell it or give it away. While the process to reset the laptop is easy for most devices, it depends on your recovery partition.
The recovery partition contains a default Windows image, which you can use to reset your Operating System (OS) anytime. If you ever remove this recovery partition, you may need to create a recovery disk to factory reset the device.
MSI Factory Restore
The MSI factory restore is MSI’s proprietary restore interface on MSI laptops. While this method does not allow you to protect your user data, it requires fewer steps and uses MSI-recommended options instead of asking you to configure them. As such, you might prefer it if you don’t want to reset Windows with a custom configuration.
Using System Recovery Partition
- Power up or Restart your MSI laptop and press F3 repeatedly as soon as it boots up (you see the logo). It will lead you to the Windows Recovery Environment (WinRE).
- Select Troubleshoot and then Restore MSI factory settings.

- Click System Partition Recovery and then Yes. This process will only clear your system drive (the drive with Windows OS).


Using Recovery Disk
- You need to create a Recovery USB using MSI Burnrecovery first.
- Then, insert the USB device into your laptop and turn it on or restart it.
- Press F11 repeatedly as soon as it starts booting to access the Boot menu.
- Select your USB flash drive and press Enter.
- If you want to clean all the partitions, select Hard Disk Recovery. And if you wish to reset your system drive only, select System Partition Recovery.

- Choose the destination disks per your requirement and follow the on-screen instructions.

Windows Factory Reset
You can access Windows’ own factory reset utility from within your account or the Recovery Environment. The WinRE method is useful if you can’t log in to your account at all.
Also, on older Windows builds, you needed to create an installation or recovery disk if you didn’t have the recovery partition. However, newer builds provide an alternative by using Cloud download to avoid this process.
Through Settings
- Open Run.
- Type
systemreset -factoryresetand press Enter to initiate the System Reset program.
- If your OS is older than Windows 10 build 18970 and the device does not contain a Recovery Partition, the program will ask you to insert a Windows Installation or Recovery media. In some cases, you need to reset it from WinRE. Here, do as it says.
- After that, select Keep my files or Remove Everything per your preference.
- Keep my files: Preserve the files inside your Users folder (user files).
- Remove Everything: Completely clear your system, application, and user files.
- Then, choose between Cloud download and Local reinstall (only available from Windows 10 build 18970 onwards).
- Cloud download: Download the Windows image from the cloud. You need to use this method if your device lacks a recovery partition. Also, an active internet connection is a hard requirement.
- Local reinstall: Use the Windows image in the recovery partition to reset the OS.
- For older systems, click on Change settings to access other options. Otherwise, the program will provide other options in the normal process.
- If you selected Remove everything, you can pick whether to clear the Windows drive only or all drives.
- Then, select Just remove my files or Remove files and fully clean the drive (For older systems, you can enable/disable Clean data). Cleaning the drive actually deletes all of its data. If you don’t enable it, Windows will simply mark the previously occupied space as empty without clearing its contents.
- Follow the rest of the instructions to reset Windows. Finally, click Reset.


Through Windows Recovery Environment
- Boot into the WinRE.
- Go to Troubleshoot and select Reset this PC. It will initiate the Windows System Reset Utility.
- Choose between Keep my files and Remove Everything per your preference.
- Select Cloud download or Local reinstall if prompted.

- For older builds, if the recovery partition does not exist, you need to insert the Windows installation or recovery media.
- If you have more than one OS, select the one you want to reset.
- Choose whether to clear the Windows drive or All drives. (Only if you have more than one drive)
- Select Just remove my files or Fully clean the drive. Selecting the first option will simply mark the space occupied by the files as empty without actually clearing the data.
- Click Reset to begin the process.


Finishing Up
After resetting your OS, you’ll need to set up your user account and set the region/language preferences as well as the privacy settings. If you wish to give someone else the laptop, you can skip this process by using the steps below:
- Press Shift + F10 to open the Command Prompt.
- Type
shutdown /s /t 0and press Enter.

Doing so will turn off the laptop and the next time anyone opens it, they can perform the initial setup themselves.
Note: You can also reinstall Windows on your system drive to achieve the same result as resetting your operating system. In fact, if you overwrite the system drive instead of formatting it during the reinstall, it will create a Windows.old folder containing the backup of your previous system, application, and user data.