
Авторы Владимир и Админ.
Привет друзья! Если почитать различные компьютерные форумы в интернете, то можно обнаружить одну нерешаемую проблему. Эту проблему вам также не решат ни в одном компьютерном сервисе и предложат просто переустановить операционную систему заново. Проблема состоит в том, что в Windows 7, 8.1, 10 есть встроенное средство резервного копирования операционной системы, но средство это в некоторых случаях может не найти при восстановлении созданный (ей же самой) резервный образ Windows. В доказательство я могу вам привести свою же статью, написанную два года назад: «Как создать резервный образ Windows 8.1», если вы прочтёте комментарии к ней, то всё поймёте, а может вы и сами оказывались в подобной ситуации и не нашли из неё выхода.
Что делать, если не получается восстановиться из образа системы, созданным встроенным средством архивации Windows 7, 8.1, 10
Любой пользователь персонального компьютера рано или поздно решает производить резервное копирование своей операционной системы, надо сказать, это очень удобно, вы устанавливаете на свой компьютер операционную систему (на новом ноутбуке она уже установлена с магазина), затем инсталлируете все необходимые программы, после этого создаёте резервный образ Windows, если через год компьютер поведёт себя нестабильно, вы просто восстанавливаете Windows из резервной копии и всё, вот мы и подошли к самому главному.
Для создания резервной копии операционной системы придумано множество программ, как бесплатных, так и платных, к примеру: AOMEI Backupper Standard, Paragon Hard Disk Manager 15 Professional, Acronis True Image Home 2016, но многие пользователи предпочитают встроенное в Windows средство архивации операционной системы, с помощью которого тоже можно создать резервную копию ОС и расположить её на обычном жёстком диске или переносном винчестере USB. Но восстановиться из данного бэкапа получается не всегда и вот почему.
- Примечание: Друзья, в сегодняшней статье я предлагаю воспользоваться, для решения этой проблемы, программой Acronis True Image Home 2014, но не у всех пользователей есть эта программа, поэтому я написал ещё две статьи, в первой я использую встроенную в Windows утилиту утилиту Dism, а во второй, утилиту ImageX.
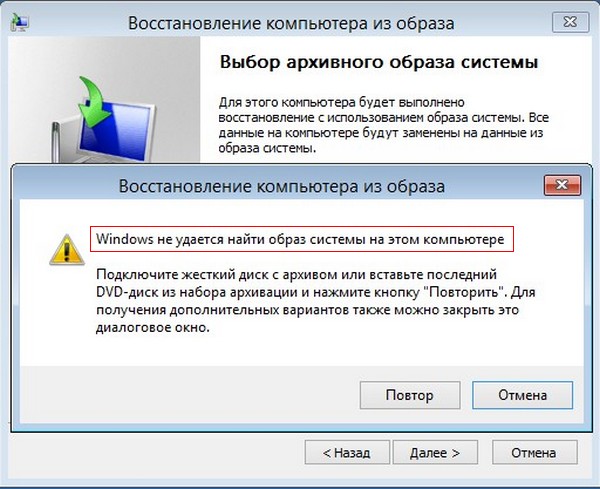
Дело в особой прихотливости встроенного в Windows средства резервного копирования. Если вы создали резервную копию встроенным в Windows средством архивации, то после этого нежелательно изменять конфигурацию жёсткого диска (то есть делить его на дополнительные разделы, изменять буквы дискам и т.д), также нежелательно трогать переносной винчестер USB, на котором находится резервная копия, ни в коем случае нельзя изменять название папки (WindowsImageBackup), в которой находится архив системы или перемещать её. Часто эти условия не соблюдаются пользователями и при восстановлении их ждёт вот такое сообщение: «Windows не удаётся найти образ на этом компьютере».
Соответственно перед пользователем встаёт вопрос, каким тогда образом произвести восстановление. Несмотря на кажущуюся безвыходность ситуации, выход всё же есть и вот какой!
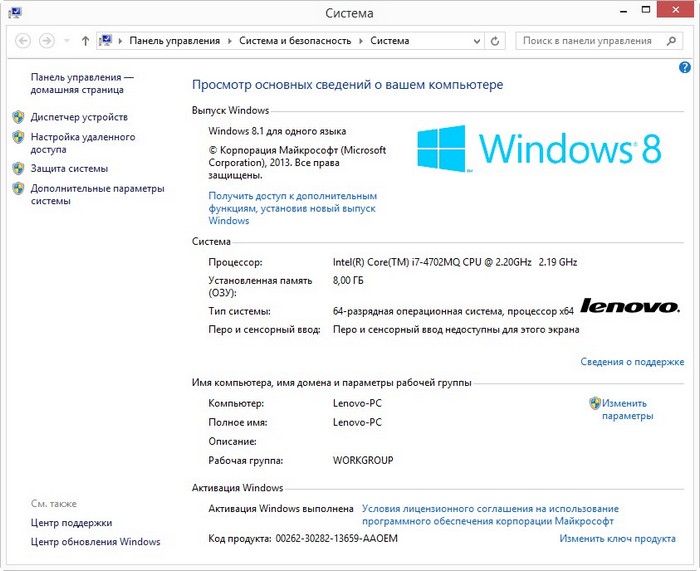
Итак, для начала создадим с помощью встроенного средства архивации резервную копию диска (C:) ноутбука Lenovo G710 с БИОСом UEFI и установленной с магазина Windows 8.1.
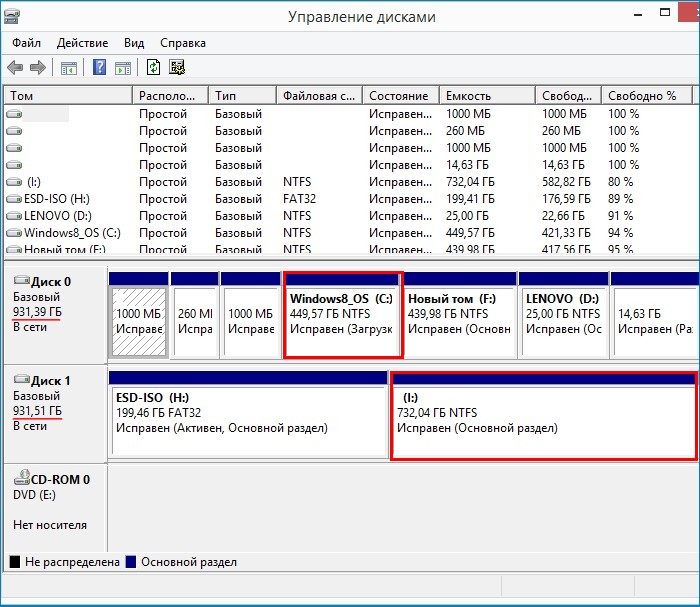
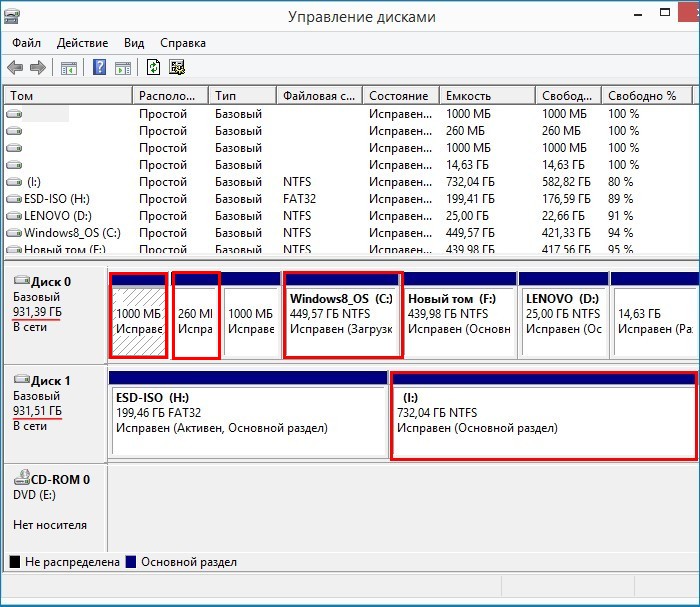
Управление дисками ноутбука
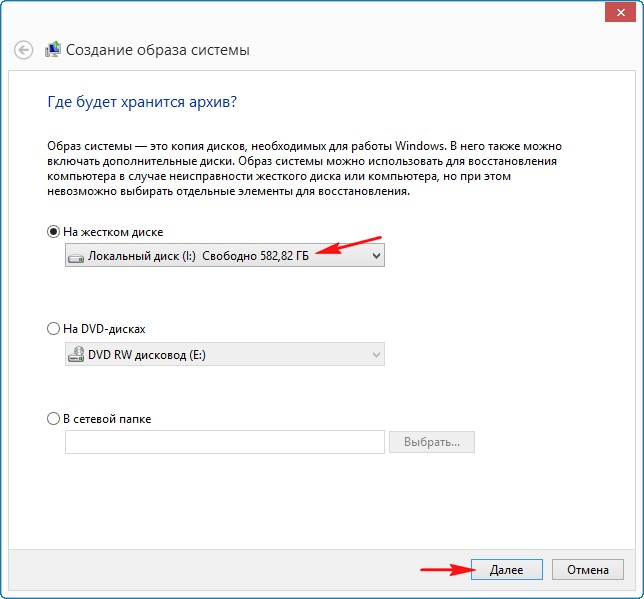
В данном окне видим, что к ноутбуку, кроме штатного Диска 0 (объём 1 Тб), подключен ещё переносной жёсткий диск USB, также объёмом 1 Тб, именно на нём (на разделе I:) и будем сохранять резервную копию операционной системы Windows 8.1 (Диск C:).
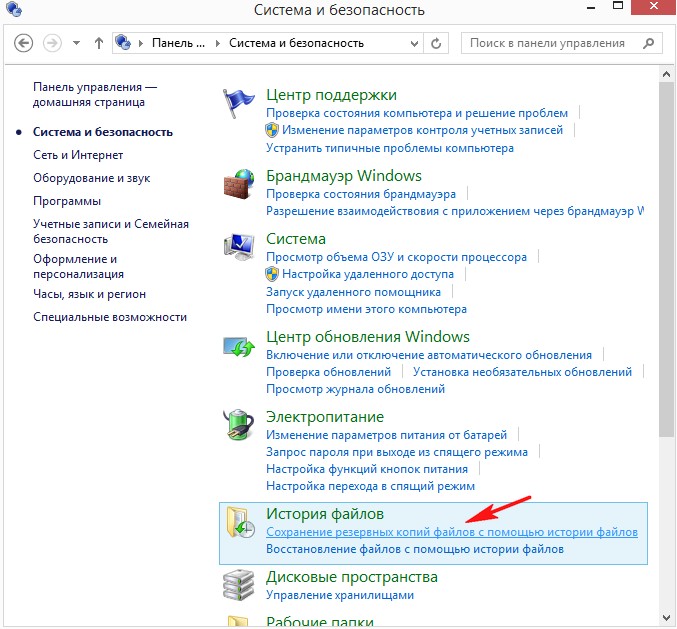
Запускаем средство создания резервных копий файлов с помощью истории файлов.
Жмём на кнопку Резервная копия образа системы.

В этом окне средство архивации Windows 8.1 предлагает сохранить резервную копию системы на переносном жёстком диске USB (раздел (I:)).
Далее
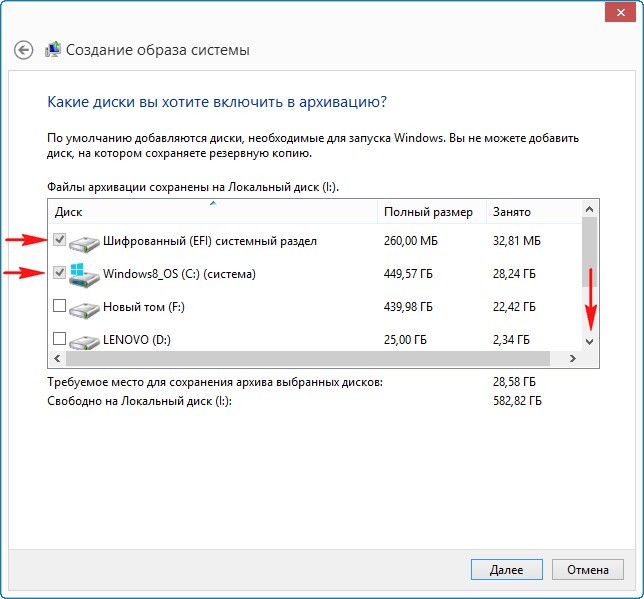
Встроенное средство архивации автоматически включает в резервный бэкап разделы:
1. Скрытый шифрованный (EFI) системный раздел (объём 260 МБ) без буквы содержащий файлы загрузки Windows 8.1.
2. Диск (C:) с установленной Windows 8.1.
Если провернуть колесо прокрутки вниз, то вы увидите,
что в резервный бэкап будет включен ещё один скрытый раздел без буквы, содержащий среду восстановления Windows 8.1.
Далее.

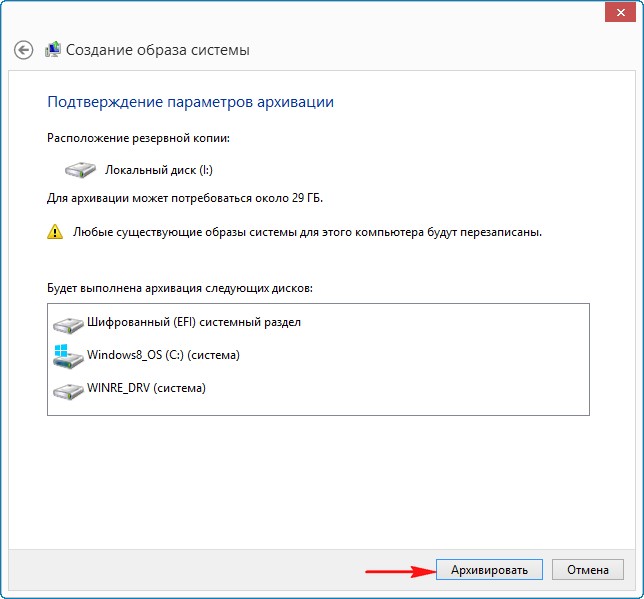
Примечание: На данном скриншоте мы видим три раздела жёсткого диска ноутбука, которые будут включены в резервный архив.
Также видим раздел (I:) переносного жёсткого диска, на котором сохранится архив.
В окне «Подтверждение параметров архивации» проверяем, всё ли правильно мы настроили.
Жмём Архивировать и начнётся процесс архивации.
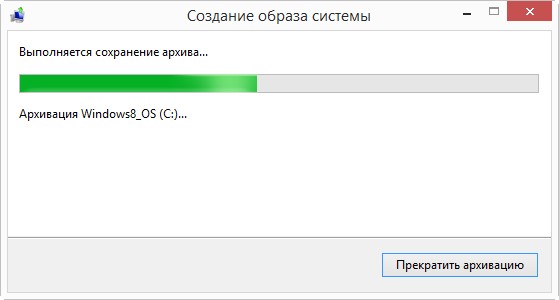
Начинается процесс создания резервного архива.
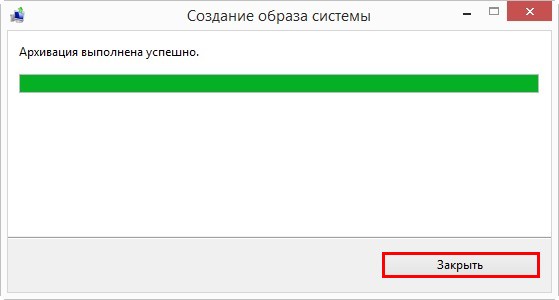
Архивация выполнена успешно.
Закрыть.
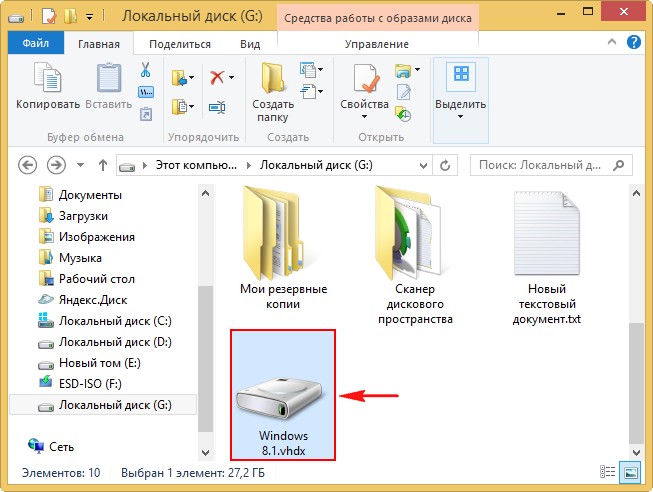
После завершения процесса архивации заходим на переносной винчестер USB, раздел (I:) и видим папку с только что созданным резервным архивом с названием WindowsImageBackup, это и есть — Резервный Образ Windows.
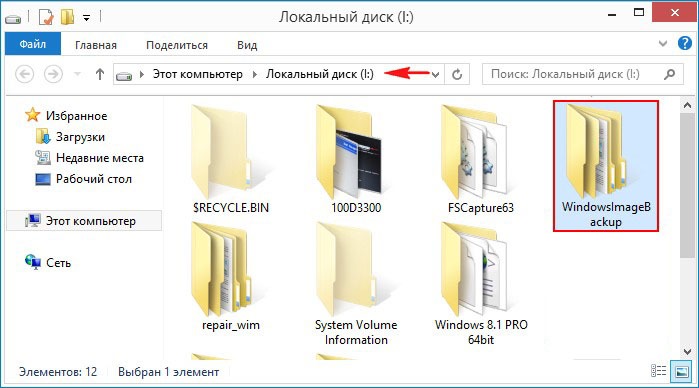
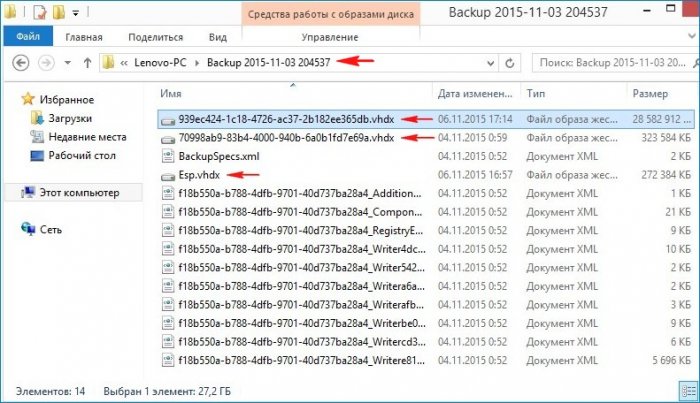
Заходим в архив WindowsImageBackup и находим в нём папку Backup, именно в этой папке находятся три файла с расширением VHDX, данный формат представляет из себя виртуальные диски VHDX, используемые в различных решениях виртуализации Microsoft.
Простыми словами, встроенное средство архивации, конвертировало диск (C:) с установленной Windows 8.1, а также два скрытых раздела — в файлы формата виртуальных жёстких дисков VHDX.
Самый первый файл VHDX содержит операционную систему Windows 8.1, это можно определить по большому размеру файла. Два других файла VHDX содержат в себе соответственно два скрытых раздела, первый со средой восстановления, а второй с файлами загрузки системы (Esp.vhdx). Также вы можете подключить любой виртуальный диск в «Управлении дисками» и увидеть его содержимое, мало того, вы даже можете с ним работать.
Теперь представим ситуацию, прошло пол года и ваш ноутбук по каким-то причинам перестал загружаться, вы решили восстановить ноутбук из созданного ранее резервного архива WindowsImageBackup с помощью встроенного средства архивации. Подсоединили к ноутбуку переносной жёсткий диск USB, затем загрузили ноутбук с установочной флешки Windows 8.1, вошли в среду восстановления, выбрали в дополнительных параметрах «Восстановление образа системы»,
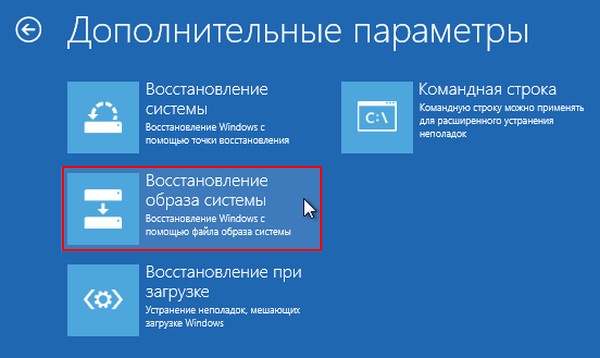
а затем у вас вышла вот такая ошибка: «Windows не удаётся найти образ на этом компьютере»
Друзья, хочу сказать вам, что какого-то определённого решения этой проблемы не существует и даже если вы вспомните, что месяц назад переносили папку с архивом WindowsImageBackup на другой жёсткий диск, а потом вернули опять её на место, то это вам не поможет. 99% пользователей в этом случае просто переустанавливает операционную систему или возвращают ноутбуку заводские настройки.
Мы же переустанавливать винду не будем и предпримем такие шаги.
Находим другой компьютер.
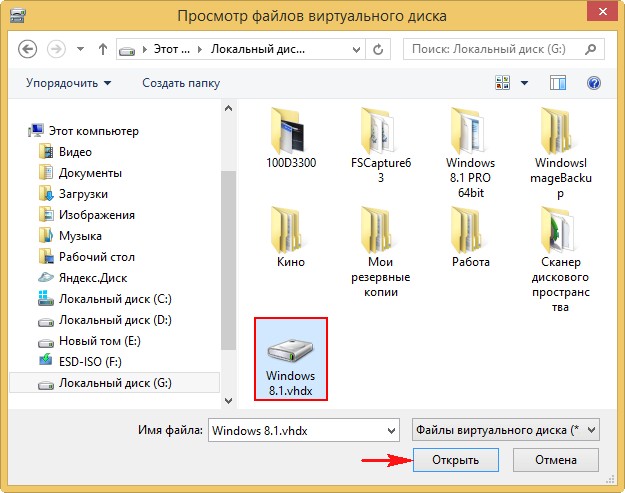
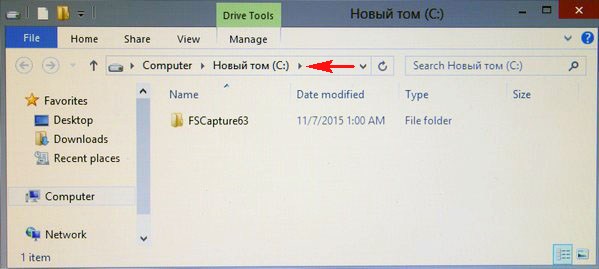
Подключаем к нему наш переносной винчестер USB. Заходим в папку WindowsImageBackup, находим наш виртуальный диск VHDX с файлами Windows 8.1.
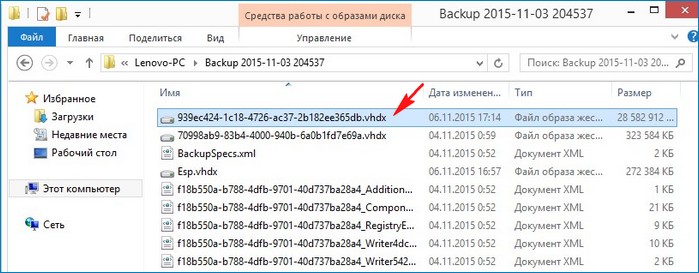
Оригинал трогать не будем, копируем файл в другую папку и присваиваем ему другое название, например Windows 8.1.
В Управлении дисками выбираем Действие ->Присоединить виртуальный жёсткий диск.
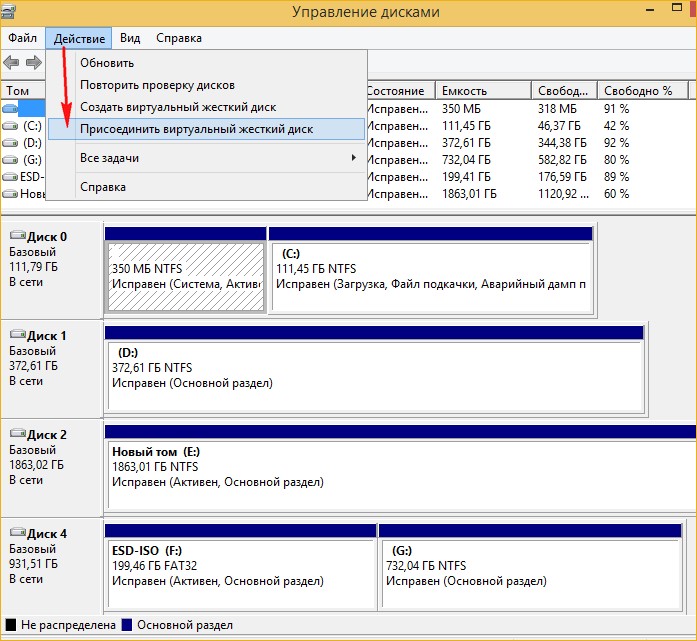
Обзор.
Находим наш виртуальный диск Windows 8.1.vhdx, выделяем его левой мышью и жмём Открыть.
ОК.
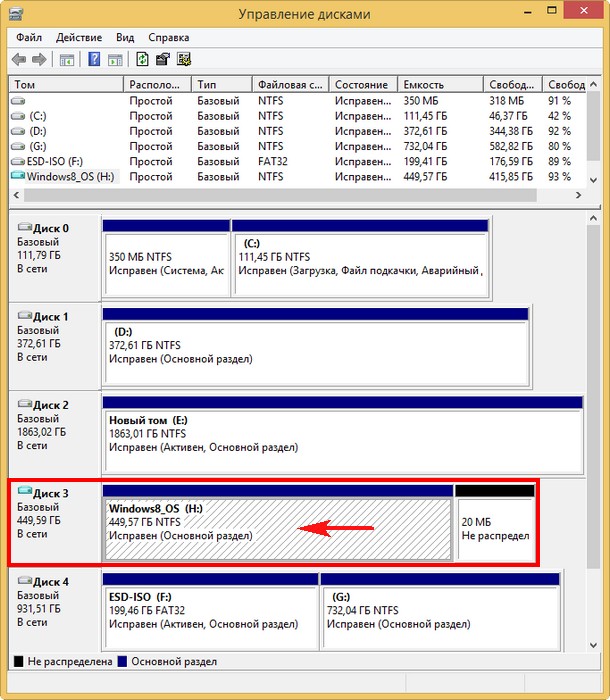
Виртуальный жёсткий диск присоединён, в управлении дисками и ему присвоена буква (H:).
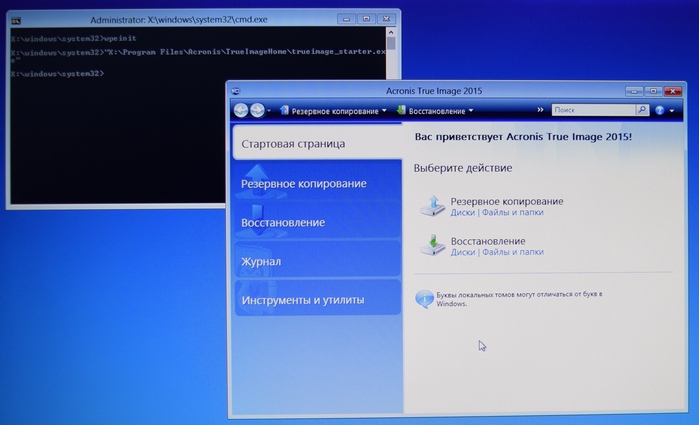
Acronis True Image 2016
Устанавливаем программу Acronis True Image 2016, программа платная, но 30 дней работает в неограниченном пробном режиме. И просто создаём бэкап виртуального диска (H:). К сожалению, в бесплатной версии программы у нас не получится создать загрузочную UEFI флешку на основе WINPE, а это нам будет нужно.
У меня установлена платная версия Acronis True Image 2014.
Начало работы. Резервное копирование системы.
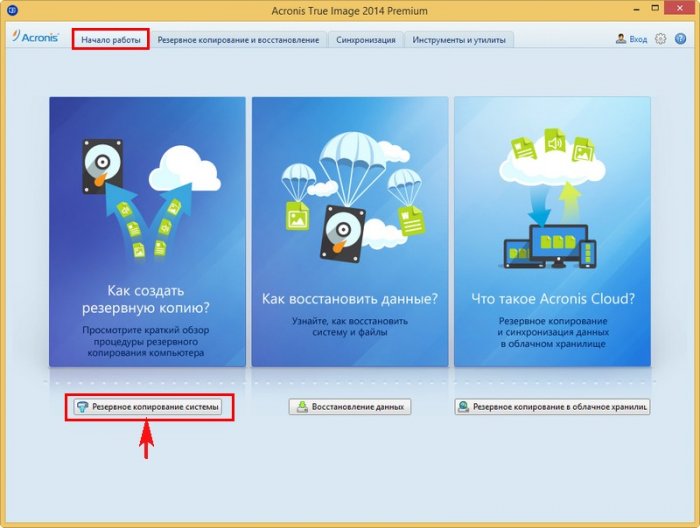
Снимаем везде галочки и отмечаем только наш подсоединённый виртуальный жёсткий диск (H:).
В пункте Место назначения, Локальное хранилище, указываем переносной жёсткий диск USB для сохранения резервной копии и жмём кнопку Архивировать.
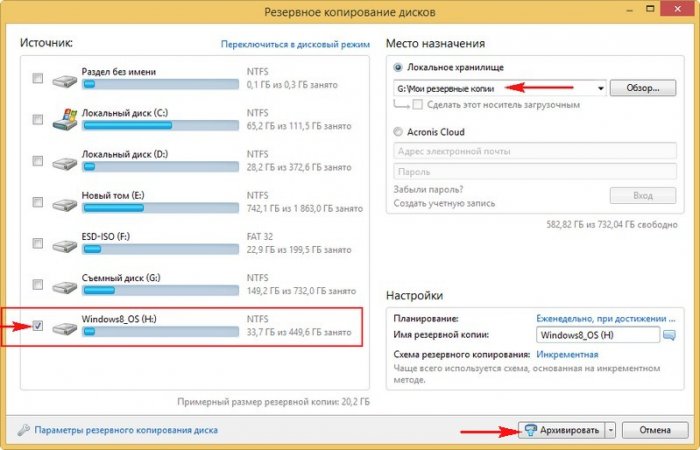
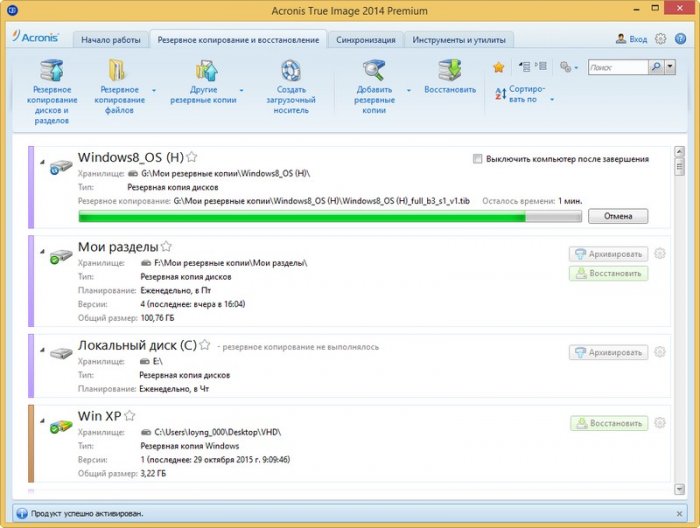
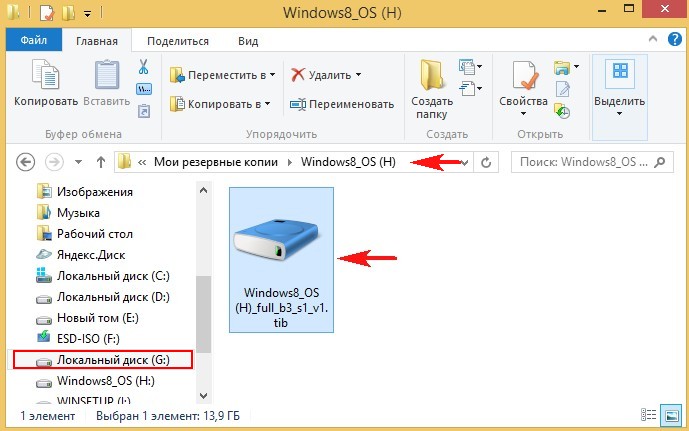
Резервная копия виртуального диска VHDX в формате .TIB программы Acronis True Image 2016 готова и находится в папке G:\Мои резервные копии\Windows8_OS (H) на переносном жёстком диске USB.
В программе Acronis True Image 2016 создаём загрузочную UEFI флешку на основе WINPE.
Я хочу восстановить диск (C:) ноутбука из созданной нами резервной копии.
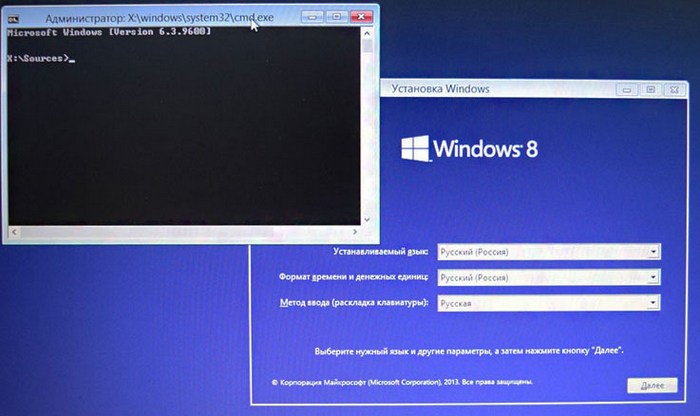
Примечание: Для чистоты эксперимента, перед процессом восстановления, я удалю полностью с ноутбука диск (C:) с установленной Windows 8.1, а затем восстановлюсь из нашего бэкапа с помощью загрузочной флешки с программой Acronis. Естественно, вам делать это необязательно, ну если только вдруг кто-то захочет быстро удалить себе винду в командной строке.
Подсоединяю к ноутбуку загрузочную флешку с Windows 8.1 и загружаю с неё ноутбук

При появлении начального окна установки Windows 8.1 нажимаю комбинацию Shift+F10 и открывается командная строка.
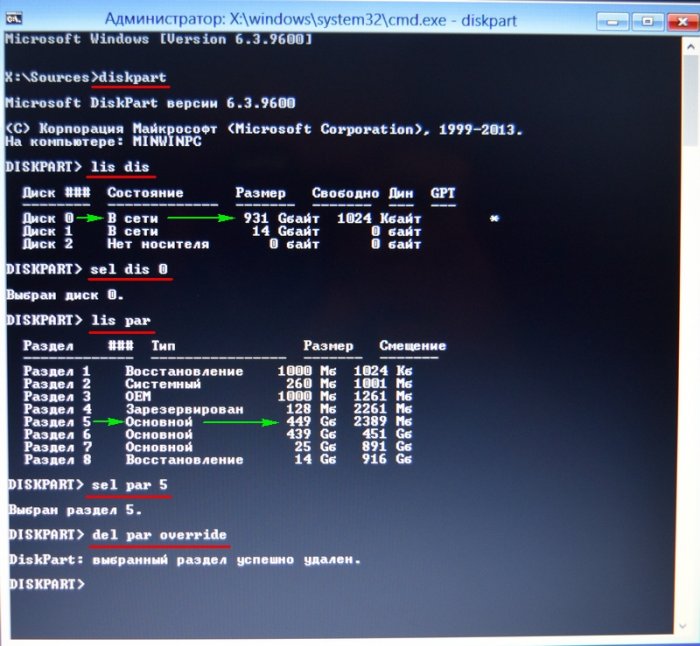
Ввожу команды:
diskpart
lis dis (этой командой выводим список всех подключенных дисков)
sel dis 0 (выбираю Диск 0, так как это и есть основной жёсткий диск ноутбука, ориентируемся по объёму диска 1 Тб))
lis par (вывожу список всех разделов Диска 0, видим, что пятый раздел, это как раз диск (C:) с установленной операционной системой Windows 8.1)
sel par 5 (выбираю раздел 5)
del par override (удаляю раздел 5)
Всё, диск (C:) удалён.
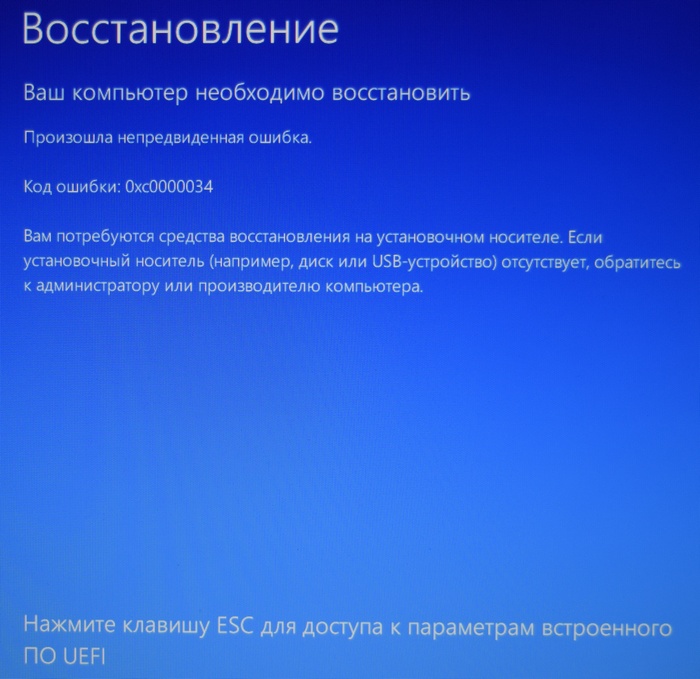
Теперь ноутбук загружается с ошибкой 0xc0000034, так как диск (C:) удалён.
Для проверки загружусь с Live CD AOMEI PE Builder. Видим вместо диска (C:) нераспределённое пространство. Загрузочная среда присвоила букву (C:) другому разделу, но на нём тоже практически ничего нет.
Подсоединяем к ноутбуку переносной жёсткий диск USB и загружаем ноутбук с загрузочной UEFI флешки Acronis True Image
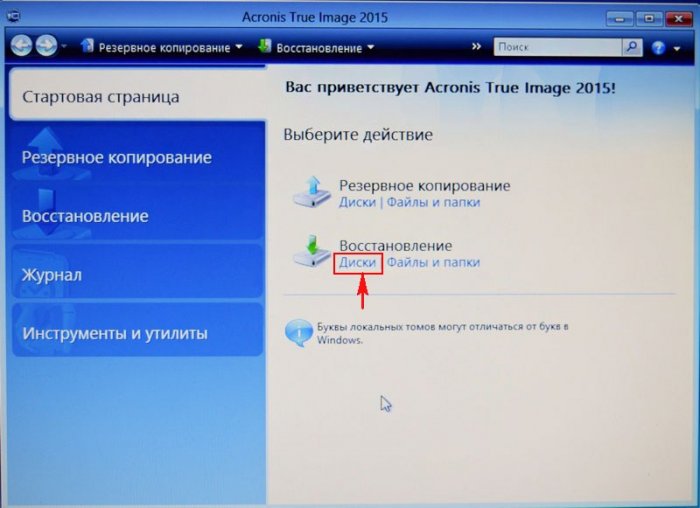
Выбираем Восстановление. Диски.
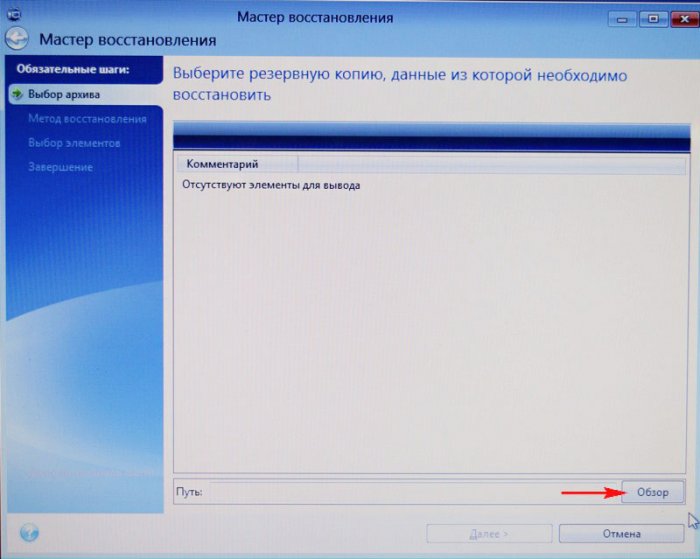
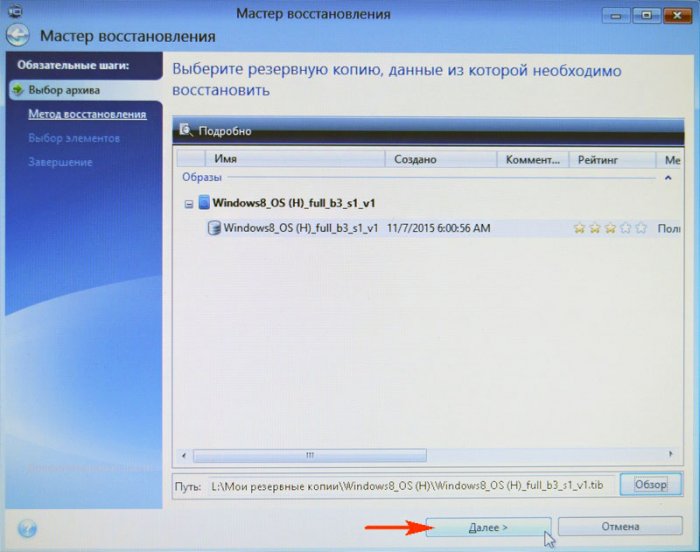
Обзор. Нам нужно найти созданную нами резервную копию, находится она на одном из разделов переносного жёсткого диска USB. Полный путь: G:\Мои резервные копии\Windows8_OS (H), но так как программа Acronis True Image путает буквы дисков в загрузочной среде, то буква может быть не G:, а совсем другой.
Раскрываем пункт Computer.
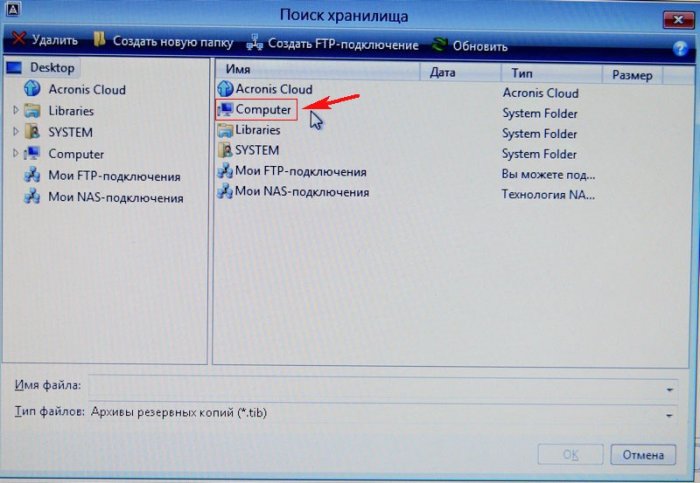
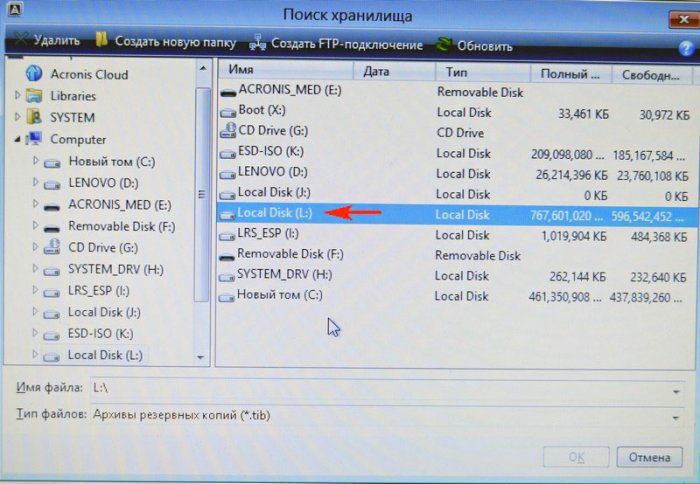
Заходим в Локальный диск (L:), он по объёму подходит к разделу переносного жёсткого диска USB, на котором находится созданная нами резервная копия.
Заходим в папку Мои резервные копии.
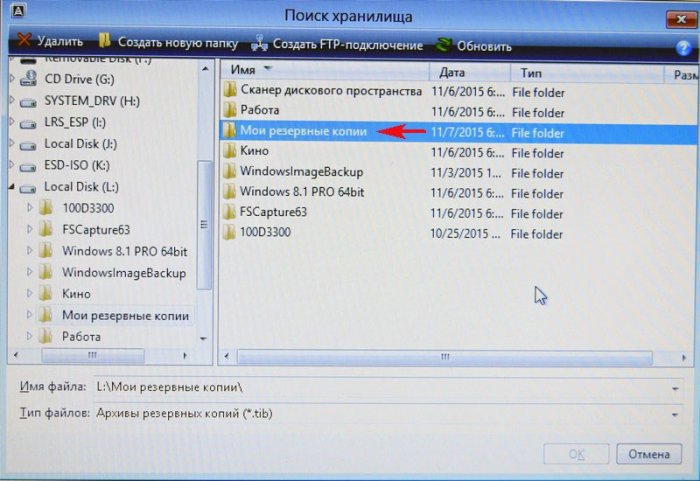
Заходим в папку Windows8_OS (H).
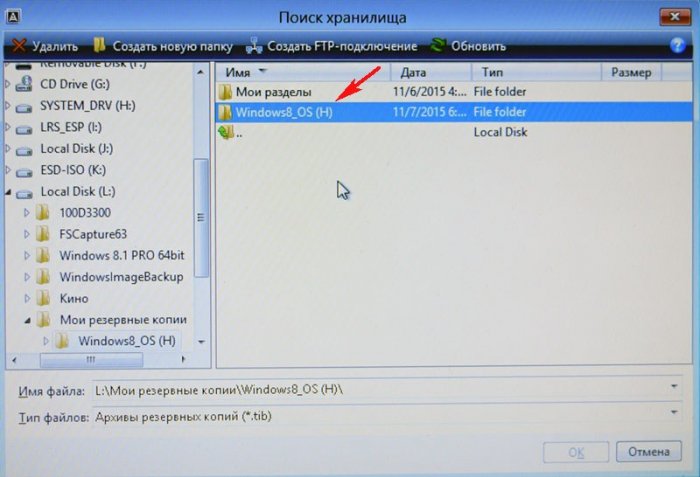
Вот мы и нашли наш образ. Далее.
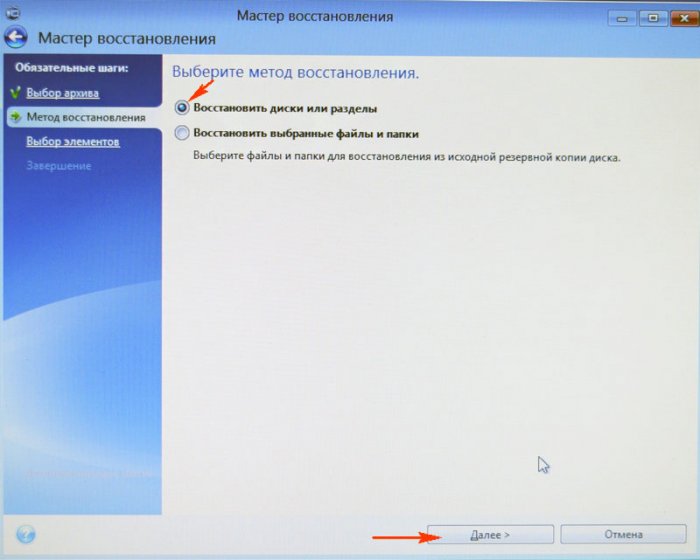
Восстановить диски и разделы. Далее.
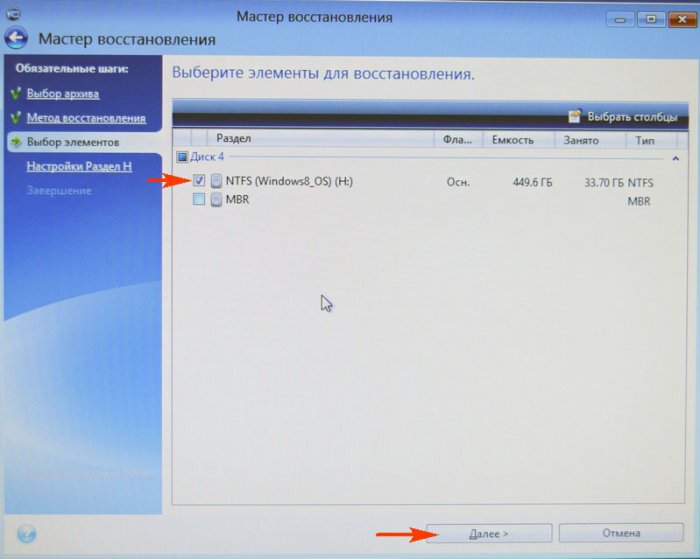
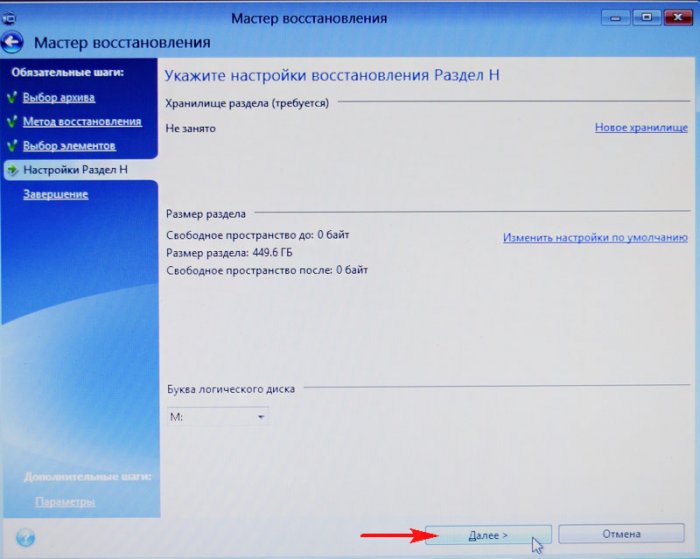
Отмечаем раздел для восстановления Windows8_OS (H).
Пункт MBR не отмечаем, так как жёсткий диск нашего ноутбука имеет стиль разделов GPT и в БИОСе включен интерфейс UEFI.
Жмём на кнопку Новое хранилище.
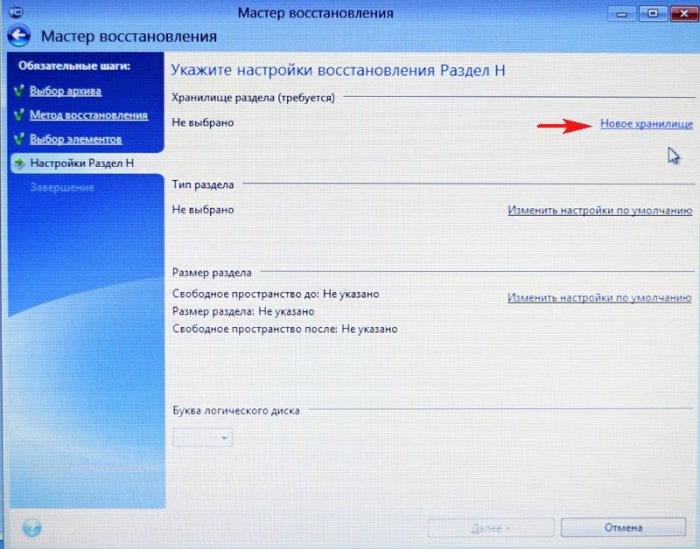
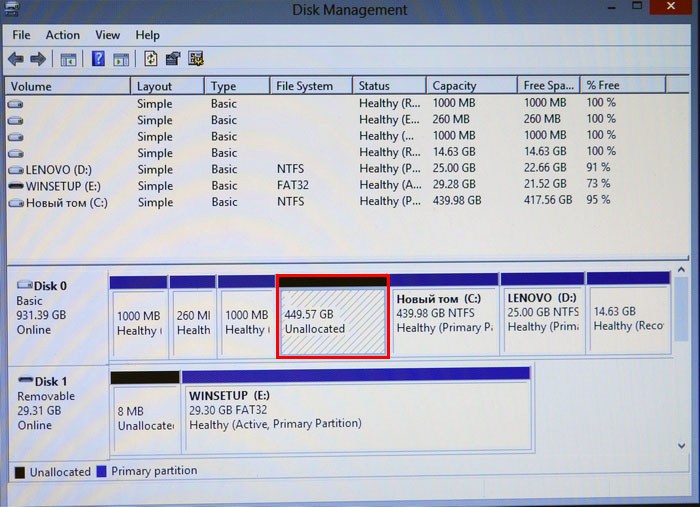
Отмечаем левой мышью незанятое пространство 449,6 Гб и жмём Принять.
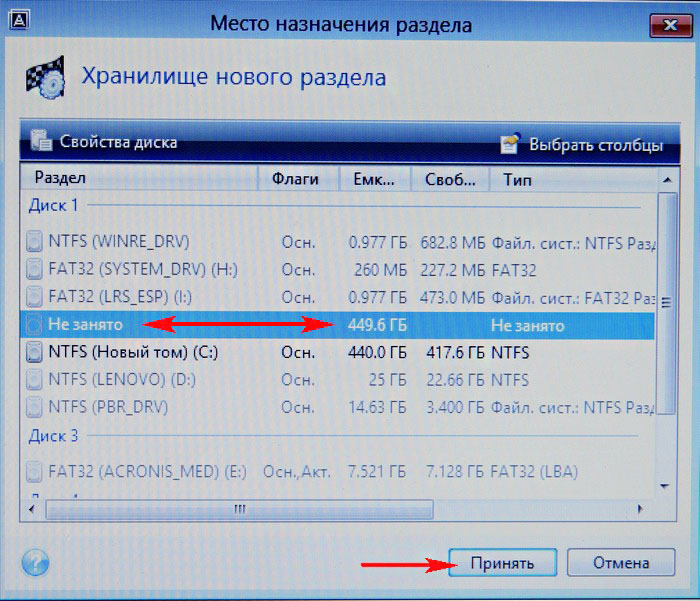
Далее.
Приступить.
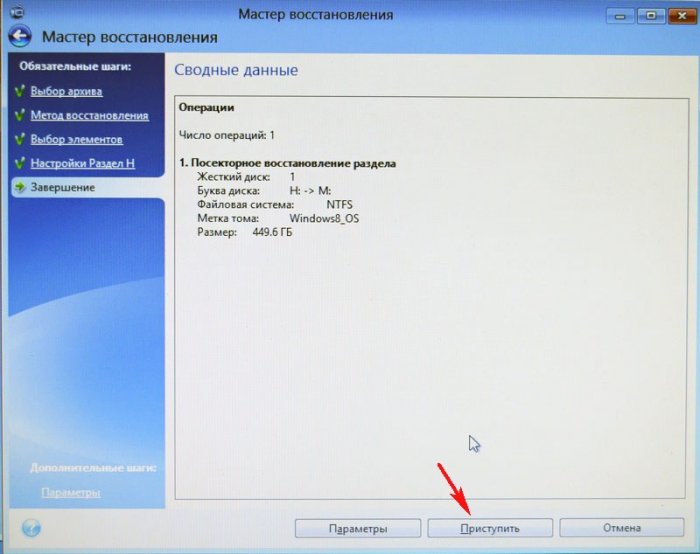
Начинается процесс восстановления ноутбука из созданной нами резервной копии.
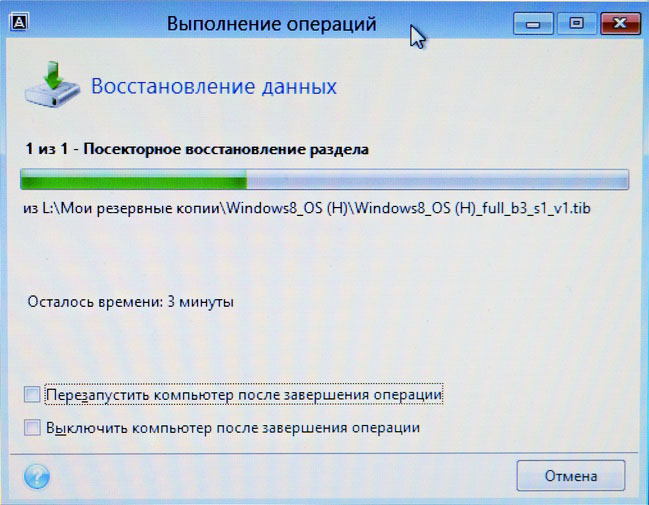
Операция «Восстановление» успешно завершена.
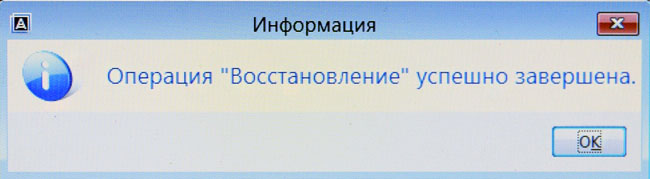
Перезагружаем ноутбук и опять выходит ошибка, а значит восстанавливаем слетевший загрузчик Windows 8.1.
Восстанавливаем загрузчик Windows 8.1
Подсоединяю к ноутбуку загрузочную флешку с Windows 8.1 и загружаю с неё ноутбук.
При появлении начального окна установки Windows 8.1 нажимаю комбинацию Shift+F10 и открывается командная строка.
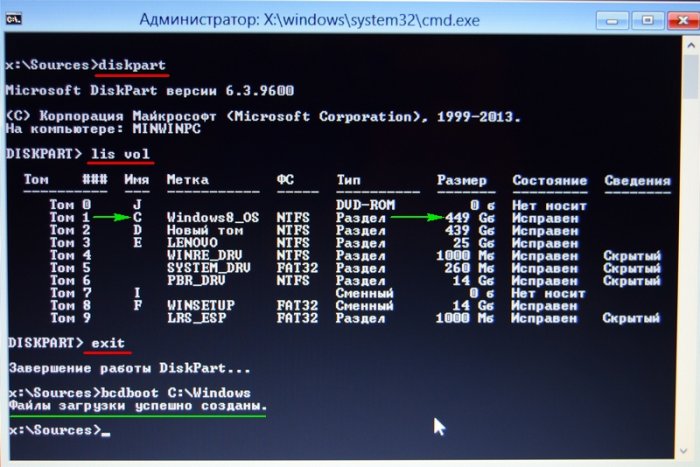
Ввожу команды:
diskpart
list vol (эта команда выводит список всех разделов. Видим, что разделу с операционной системой Windows 8.1 присвоена буква C:)
exit (выходим из diskpart)
Вводим команду, которая полностью перезапишет содержимое хранилища загрузки Windows 8.1 ноутбука.
bcdboot.exe C:\Windows
Файлы загрузки успешно созданы!
Перезагружаем ноутбук и наконец Windows 8.1 загружается!


Статья на эту тему: Что делать, если не получается восстановиться из образа системы, созданным встроенным средством архивации Windows 10. Используем загрузочную флешку Paragon Hard Disk Manager 15 Professional
Recovering-Data-and-Restoring-Windows-from-a-VHDX-Backup
This guide outlines the steps to recover data from a backup disk in VHDX format and restore a Windows system (e.g., Windows Server Active Directory) using the VHDX file. The process involves mounting the VHDX and configuring the Boot Configuration Data (BCD) store using bcdedit to boot from the VHDX.
Tested Date: March 06, 2025
Author: [Dereje S.]
Environment: Windows (assumed Windows Server for AD restoration)
Prerequisites
- A VHDX file containing a backup of the Windows system (e.g., C:\path\to\your.vhdx).
- Administrative access to a Windows machine with bcdedit available.
- The VHDX file must be accessible on the local disk (e.g., C:).
- Ensure the system supports booting from a VHDX (Hyper-V or native VHD boot must be enabled).
Steps
1. Verify the VHDX File
- Confirm the VHDX file exists at the specified location (e.g., C:\path\to\your.vhdx).
- Ensure the file is not corrupted by mounting it manually:
- Open Disk Management (diskmgmt.msc).
- Click Action > Attach VHD.
- Browse to the VHDX file and mount it.
- Verify the data (e.g., Windows system files, Active Directory data) is intact.
- Detach the VHDX after verification.
2. Open an Elevated Command Prompt
- Press Win + X and select Command Prompt (Admin) or Windows PowerShell (Admin).
- Alternatively, search for cmd, right-click, and select Run as administrator.
3. Create a New BCD Entry
- Run the following command to duplicate the current boot entry and create a new one labeled «Windows Server AD»:
bcdedit /copy {current} /d "Windows Server AD"
- This command outputs a GUID (e.g., {xxxxxxxx-xxxx-xxxx-xxxx-xxxxxxxxxxxx}). Note this GUID, as it identifies the new boot entry. Replace {GUID} in subsequent steps with this value.
4. Configure the VHDX as the Boot Device
- Set the device and OS device to the VHDX file using the following commands, replacing {GUID} with the value from Step 3 and C:\path\to\your.vhdx with the actual path to your VHDX file:
bcdedit /set {GUID} device vhd=[C:]\path\to\your.vhdx
bcdedit /set {GUID} osdevice vhd=[C:]\path\to\your.vhdx
- Note: The [C:] syntax (with square brackets) specifies the drive letter where the VHDX resides. Ensure there are no extra spaces or slashes.
5. Enable HAL Detection
- Configure the boot entry to detect the Hardware Abstraction Layer (HAL) automatically:
bcdedit /set {GUID} detecthal on
- This ensures compatibility with the underlying hardware when booting from the VHDX.
6. Verify the BCD Configuration
-
Run the following command to review the BCD store:
bcdedit /enum -
Look for the «Windows Server AD» entry and confirm:
- The device and osdevice fields point to vhd=[C:]\path\to\your.vhdx.
- The detecthal option is set to yes.
7. Restart and Test the Boot
-
Reboot the system:
shutdown /r /t 0 -
During boot, select the «Windows Server AD» option from the boot menu.
-
Verify that the system boots successfully from the VHDX and that all data (e.g.,
Active Directory) is intact.
Example Commands
Assuming the VHDX file is located at C:\Backups\ADBackup.vhdx and the GUID generated is {a1b2c3d4-5678-9012-3456-7890abcdef12}, the full sequence would be:
bcdedit /copy {current} /d "Windows Server AD"
bcdedit /set {a1b2c3d4-5678-9012-3456-7890abcdef12} device vhd=[C:]\Backups\ADBackup.vhdx
bcdedit /set {a1b2c3d4-5678-9012-3456-7890abcdef12} osdevice vhd=[C:]\Backups\ADBackup.vhdx
bcdedit /set {a1b2c3d4-5678-9012-3456-7890abcdef12} detecthal on
Troubleshooting
- Boot Failure: If the system doesn’t boot, recheck the GUID and VHDX path in the BCD store.
- «Element not found» Error: Ensure the VHDX path is correct and the file is accessible.
- Missing Boot Option: Use
bcdedit /displayorder {GUID}to add the entry to the boot menu.
Success Confirmation
This procedure was successfully tested on March 06, 2025. The system booted from the VHDX, and the restored Windows Server AD environment functioned as expected.
Additional Notes
To make this the default boot option, run:
‘bcdedit /default {GUID}`
- To remove the entry if no longer needed:
bcdedit /delete {GUID}
THANKS
VHDX is a virtual image file format, majorly used to create a virtual environment on the Windows device. Windows 10 has an in-built Hyper-V manager; this Hyper-V manager stores all data in VHD or VHDX file format. And just like any other data stored or present in Windows, VHD and VHDX files are also vulnerable to corruption. If your VHDX file is also corrupted, then here we are going to tell you the most perfect and the easiest way to do it. Keep reading the article for the same.
How do VHDX files get corrupt?
Before moving towards the solution to fix the corruption in the VHDX file, let’s first know how it happens. It is very important to understand the reasons so that you can avoid doing the same mistakes and take extra care from now onwards. Here we are going to list some of the popular reasons that are responsible for the corruption in the VHDX file.
- Virus or Malware Attacks: If your system has recently been attacked by any virus or malware, then you might face the corruption in the VHDX files. Virus attack is one of the most common reasons for the corruption in VHDX files. Once infected by a virus, all the files become inaccessible and useless.
- Abrupt System Shut Downs: If you do not practice a proper shutdown routine while working on your system, you can face corruption. Even if you are practicing and following the proper step by step shutdown process, many other factors may lead to a sudden system shut down. Be it intentional or accidental, any sudden shut down of your system may lead to corrupt files.
- Corruption in Storage media: If your storage media is facing some type of corruption issues, then you can face corruption in the VHDX files too. Even a collapse or breakdown of the storage media may lead to corruption in the VHDX files.
- Hard Disk Crashes: If your hard disk has crashed, then no doubt, you are going to face some hard time with those corrupt VHDX files for sure.
How to Recover VHDX Files?
Steps to recover all your files and folders (including lost and missing data) from corrupt virtual hard disk partitions. You can smoothly recover data from VHDX files after a hard disk crash, damaged storage media, RAID failure, unintentional deletion etc.
What All you can Recover from VHDX files?
- Recovery of lost, and deleted files/folders from inaccessible VHDX files
- Data recovery from severely corrupt VHD partitions.
- Restoration of all image files, multimedia files, database files, email files, internet files, archives etc. from damaged VHDX files.
- Supporting of VHDX files created using all Windows platforms: Windows 10, 8.1, 8, 7, Vista, XP, 2000, 98, NT, 95, Hyper-V Server, Windows Server 2008 R2.
- Immediate searching of the specific data file type (like DOCX. PDF, XLS etc.) from VHDX files.
- Configure your recovery settings to skip/rename/overwrite duplicate items, etc.
How to Create VHDX File On Windows Machines
On Widows 8 and Windows 10
- Right-click on Windows Start menu, and select and open Disk Management.
- On Disk Management window, go to Action menu, and choose Create VHD.
- On Create and Attach Virtual hard Disk dialog box, select Browse button to specify VHD location on the machine.
- Specify the desired location, and add a File name to it. Click Save to continue.
- Specify the preferred size of the VHDX file. You can select size type using drop-down button.
- Creating the VHDX file may take some time. After the file is created you can see VHD disk.
- Select right-click on Disk and select Initialize Disk to proceed further.
- On Initialize Disk box, select MBR and click OK.
- Right-click the newly created virtual hard disk, and select New Simple Volume.
- Click Next and specify the value for Disk Space size, from the drop-down menu button.
- When New Simple Volume Wizard dialog box appears, then assign the folder drive letter and click Next.
- Specify your format partition setting, and click Next.
- Click Finish to close the wizard.
Now you have successfully created a VHDX on Windows machine.
How to Recover VHDX Files – Step-by-step Instructions
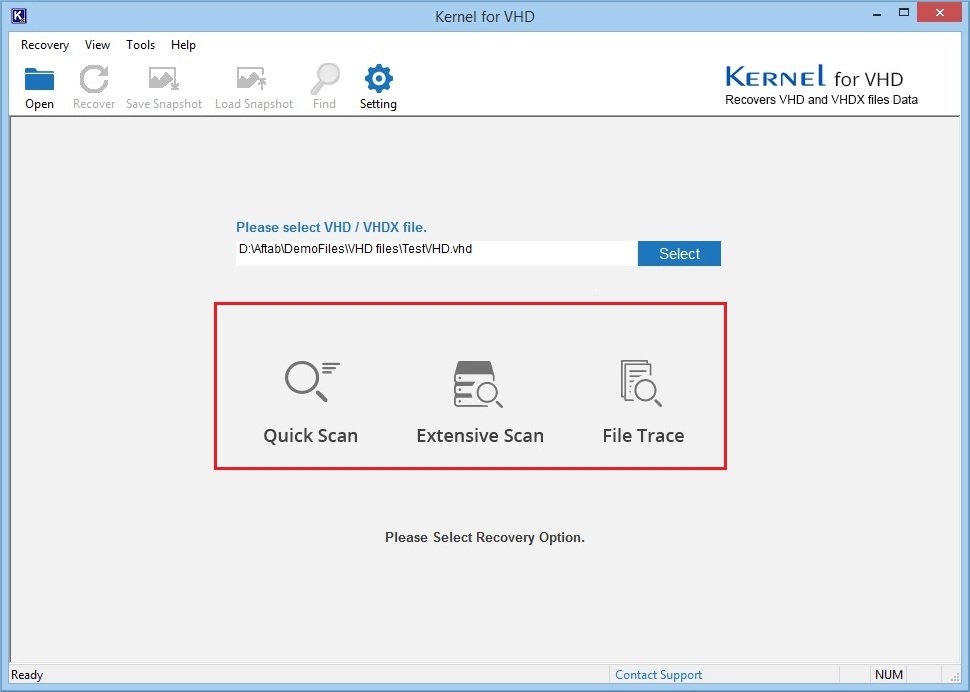
- Launch the program, from Start > All Programs » Kernel for VHD Recovery or simply double click on the application to Launch. Once the VHD Recovery tool is launched, then browse the desired VHD/VHDX file(s) to continue.

- Select any of the recovery modes (depending upon the intensity of damage – considering Quick scan mode the lightest mode, and File Trace the most aggressive mode) to recover the VHDX file.
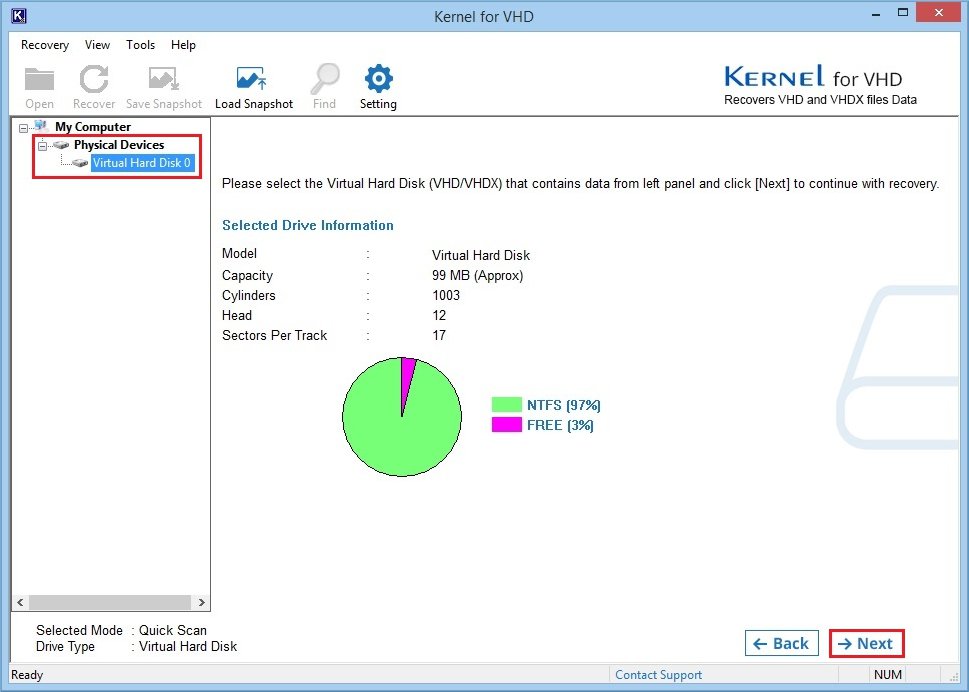
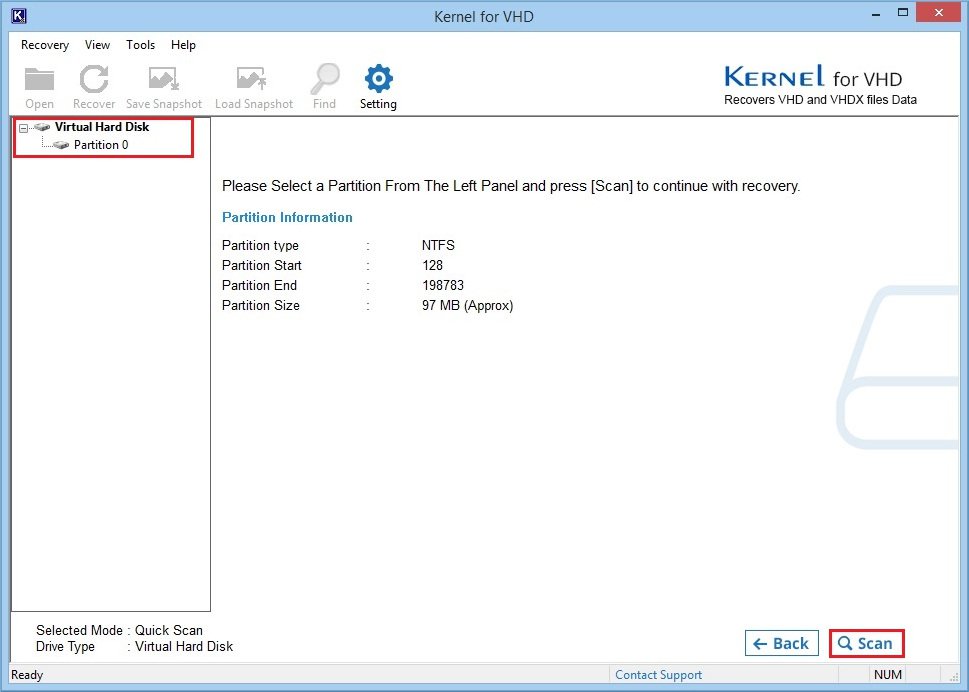
- Select the virtual hard disk drive that you want to recover and click Next.

- Select the desired partition and click Scan button to proceed.
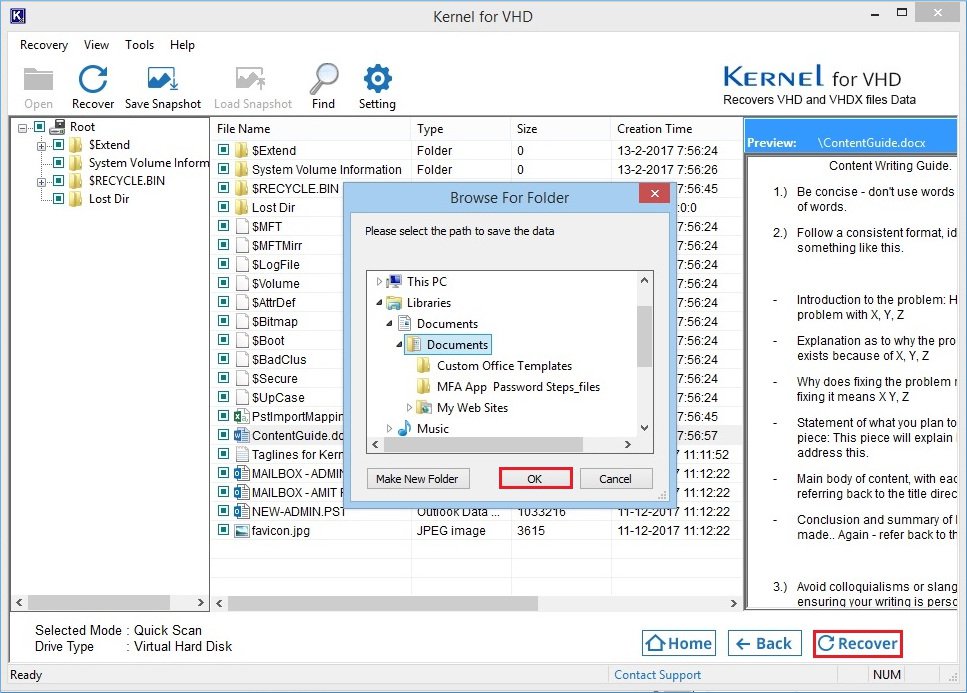
- The tool displays all the files and folders of the selected partition for the preview. Select any specific folders that you want to restore at the desired location. Click Recover and choose a desired location to save files.

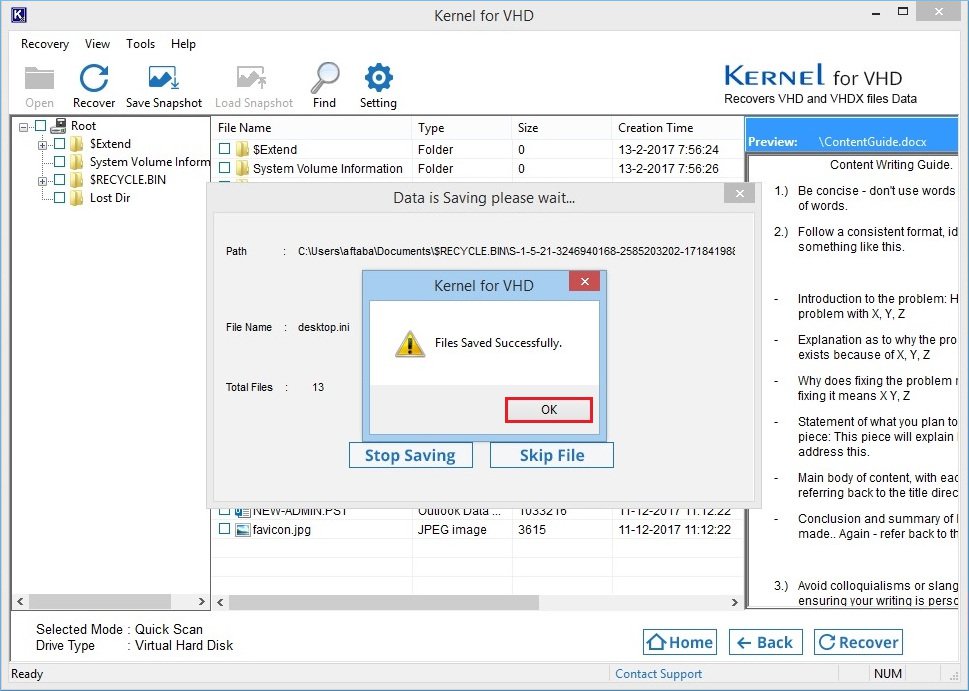
- The files are successfully saved to the desired location.


Conclusion:
In this blog, we have discussed the corruption in VHDX files. We started with knowing what VHDX files are and how they are created on your system. Then we discussed the reasons that may lead to the corruption of the VHDX files. After that, we started mentioning the solution in detail with the help of the step by step process. We used Kernel for VHD to fix the corruption in the VHDX files, as this tool is the best approach for the same. This tool can easily fix the corruption of the VHD and VHDX files in just a few easy steps in no time. This tool comes with a friendly user interface and self-descriptive features. Hope this blog helped you to fix the corruption in the VHDX file.
- Download Free
- Buy Now
Kernel forVHD Recovery
Recover data from corrupted and damaged VHD files
- Download Free
↑
VHD or Virtual Hard Drive is a virtual file form present on the system. This type of file contains everything from partitions to the filing system of the system. Although the VHD and VHDX file shares the protection by the system there are times when the files get corrupted and deleted from the drive. However, there are solutions to counter this problem that we will discuss in this blog.
What are the possible causes for the corruption of VHD and VHDX file formats?
The computer system files are prone to get errors and disruptions at some point if not maintained properly. Similar is the case with VHD and VHDX files; they are also prone to corruption. Here are some of the most common reasons:
- Sudden accidental shutdown – There may be different reasons for the sudden shutdown of the system but sometimes it creates errors and corruption in files.
- Unintentional deletion of files – Many users may want to clean up their system from time to time which may have to lead them to deletion of files unintentionally.
- Human error – There can be incidences where the error occurs due to human-generated error.
- Virus or Malware impact – A virus or Malware attack on any type of system affects the system files which in turn leads to the deletion of files or losing data.
- Defective Hardware usage – If the user is using defective or old hardware on the system it may lead to failure and create defects in files.
- Installation of Antivirus on the VHD – Installing antivirus on the virtual drive can create many problems for the files.
How do recover lost or deleted VHD & VHDX files?
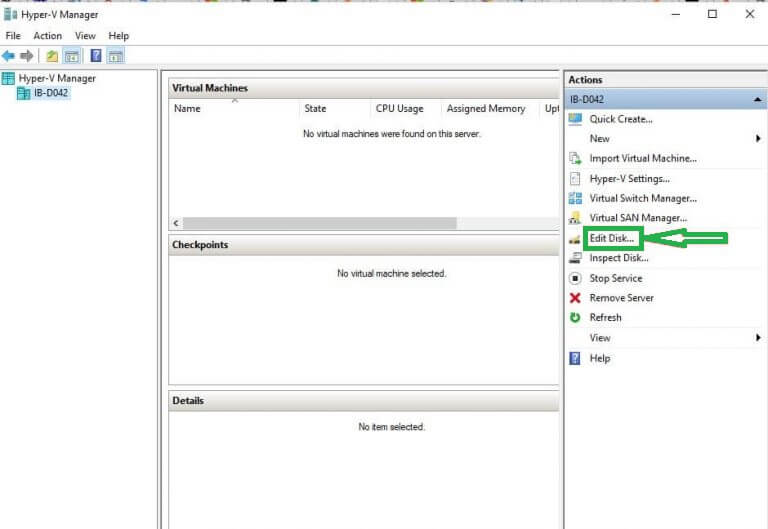
1 st Solution: Use Hyper-V for recovery
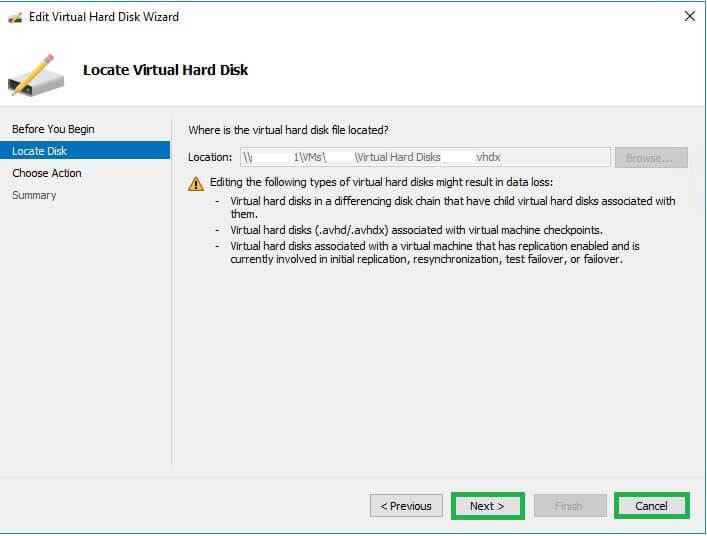
- Launch Hyper-V on your system and tap the Edit Disk option.

- Choose Locate Disk on the left pane in the appeared window. Then from Browse locate the affected VHD files before clicking Next.

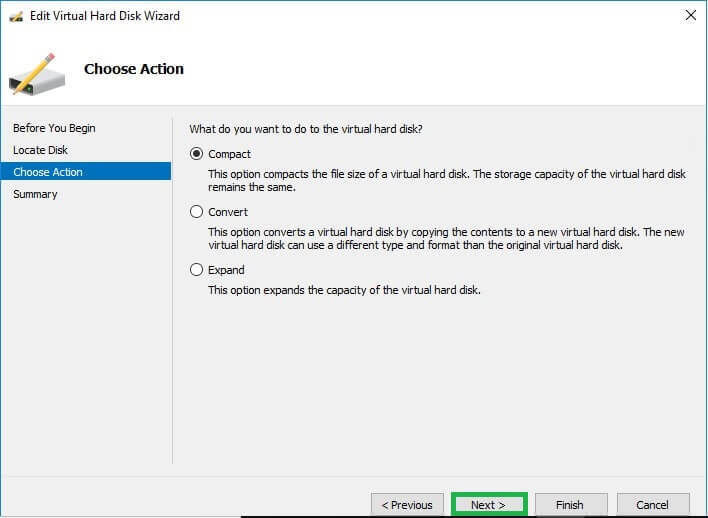
- In Choose Action option, select Compact and click Next.

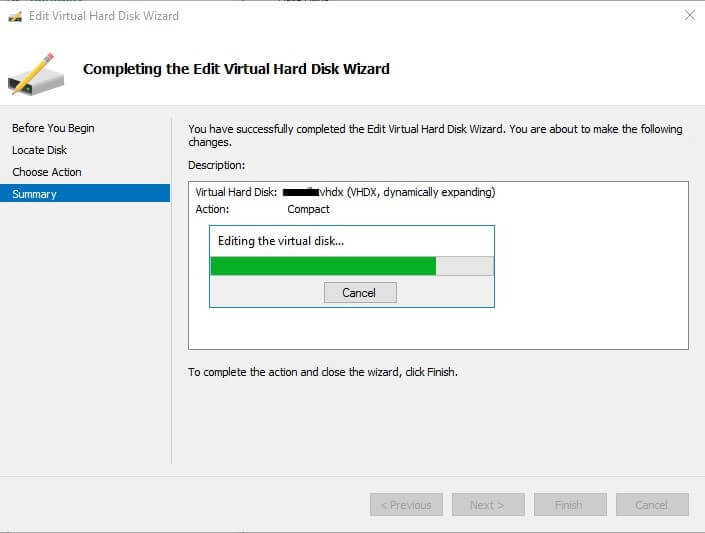
- When it’s done you can click on Finish to complete the process.

- Rename the VHD file.
2nd Solution: Mount the VHD file
This method works when you mount .vhd using a command prompt to help repair and restore windows from VHDX files. Here are the steps to do so:
- Under a parent partition open Command Prompt and then type CHKDSK so that it starts the VHD file repairing process.
- Use Hyper-V virtual machine to verify if the .VHD file is authentic or not.
- VHD/VHDX files will then be added to the IDE controller for the inspection process.
- Download the VHD repair tool with a free repair option. This will allow you to get back on expanding mode with base VHD when multiple VHDs are available.
3rd Solution: Using Windows PowerShell recovers Deleted VHD/VHDX files
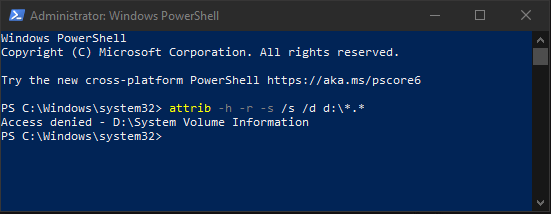
- Launch Windows PowerShell on your system as administrator.
- Now type Mount-VHD –path d:\folder\vdisk.vhdx –ReadOnly then hit Enter.
- In the next step type optimize-VHD –path d:\folder\vdisk.vhdx –Mode full and Enter.
- In the final step type Dismount-VHD- path d:\folder\vdisk.vhdx then hit Enter. The path mentioned d:\folder\vdisk.vhdx is the path of the corrupted VHD file.

4th Solution: Recovery using Diskpart utility
- Diskpart utility is a built-in Windows tool. Click on the Start button and search run. After the run command window appears type cmd in it.
- Right-click on the command prompt and click Run as administrator so that the command prompt is open.
- Type Diskpart > Enter.
- Type select vdisk file=”d:\folder\vdisk.vhdx” and press Enter on keyboard. d:\folder\vdisk.vhdx is the location of corrupt VHD file.
- Now type attach vdisk readonly before hitting Enter.
- Then type Compact vdisk and press Enter.
- In the final step type detach vdisk > Enter> type Exit.
5th Solution: Recovery using virtual machines
To repair the damaged VHD files you can create a virtual machine on your system.
- Firstly create a new virtual server on your system and then connect your hard drive with it.
- Locate the Settings option and click on it. Now select the newly connected hard drive and choose the file to repair.
- Click on the Virtual disk wizard button and choose Compact and proceed to Convert it to a fixed size virtual hard disk option.
- Finally, save your new fixed VHDX files with a new name.
6th Solution: Automatic fix using a third-party tool
Third-party tools are time-saving and easy to use and fix the VHD and VHDX files automatically. Therefore we recommend using the third-party tool in case none of the above methods work. There are many third-party tools easily available such as the VHD recovery tool which also have many other features useful for the users.
Summary
Just like other files on your system VHD and VHDX files are also prone to get corrupted or damaged. However, there are solutions available that can be used to easily solve this problem. Even if the manual solutions don’t work third-party tools can still be used to solve this issue.
Read Related Blog
- Repair Corrupted and Damaged VHD Files
- Convert VMware VMDK to Hyper-V VHD
- Difference Between VHD and VMDK Virtual Disk Files
- Process to Open VHD or VHDX file
- Recover VHDX File On Windows
How to Restore VHDX File Windows 11, 10? Precise Solution
Approved By
Mack John
Published On
January 29th, 2024
Reading Time
6 Minutes Reading
Whenever users have to restore VHDX file Windows 10, 8, 7, and 11 or cloud-based resources, virtual machines may become problems and make data recovery a challenging process. It may be because managing plenty of data types at the same time increases the simplicity of the process.
Although the VHDX is giving many benefits to organizations, it is also making the IT environment of those organizations highly complex. Fortunately, some solutions have arrived on the market to restore Windows from VHDX file safely and instantly.
Causes Behind VHD File Corruption
- Malware and virus attacks: This is the main reason behind any file corruption. When viruses are attached to any file, all files become useless and inaccessible.
- Sudden System Shutdown: If users do not practice a proper shutdown routine while working on their PC, they can face corruption. Even if users are practicing and following the proper step-by-step shutdown procedure, some other factors may lead to a sudden PC shutdown. Be it intentional or mistaken, any sudden shutdown of their PC may lead to corrupt files.
- Hard Disk Crashes: Sometimes users’ hard drives crash, and no doubt, users are going to face a few hard times with those corrupt VHDX files for sure.
- Human Error: Another major cause behind the corruption and deletion of the VHD file is human error.
- Antivirus Software Installation on the VHD: Once the antivirus tool is launched on your virtual drive, the procedure might generate various problems on the VHD.
Restore VHDX File Windows 11, 10 With Reliable Application
Try this amazing software to restore deleted data from the VHD file, named VHD Recovery Software. Users can download this application from any version of Windows OS. With this utility, you can recover any type of lost data, like deleted, corrupted, formatted, VHD, or VHDX files. It is simple to use for anyone who can use this application, whether savvy or non-savvy. It has a simple graphic user interface (GUI).
Download Now Purchase Now
It assured users that they would recover data from corrupt VHD or VHDX files. After recovery, deleted files are highlighted in red. So that users can easily differentiate between normal deleted or permanently deleted VHD or VHDX files in the resultant data. In addition, the utility also supports recovering formatted, corrupted, and unhealthy virtual hard drive files. This tool also has a free demo version, but the demo version has some limitations. In the demo version, users cannot save their files. If users want to save their files, they have to purchase this utility.
Easy Steps to Restore VHDX File Windows 11, 10, 8, and 7
Step 1: Install the VHDX data recovery software tool on your Windows computer. After that, hit the open button.

Step 2: Now click on the browse button and navigate to the destination where .vhd or .vhdx file is saved. Select the VHD files and hit Open.

Step 3: When the software completes the data recovery process, it will list all restored folders in the Explore panel. Just expand the folder and view the recovered data.

Step 4: Two modes to save and restore windows from VHDX file items. Users can save all retrieved files or selected data files.

Key Features of the Software
- Secure data recovery from formatted and deleted VHDX file partition
- Recover healthy VHD file data with the exact file name, type, size, etc. Without installing VM
- This software supports recovering shift+deleted, formatted, or re-formatted data. VHDX and VHDX partition data recovery
- This application supports restoring and scanning any size of VHD file without any file size limitation
- The foremost part of the utility supports various languages setup installation
Well, there is no doubt that technology is making things simpler for us, but it is also bringing exposure. Well, if users are using virtual machines to store crucial data, then they must keep a backup of their data on an everyday basis. It is because keeping a regular backup of your data will help users avoid data loss on the VHD, even if there have been any problems. It is because you can use the backup simply in case anything has gone wrong with the data on virtual machines.
Create a VHDX File on your Windows Computer
- Right-click the Windows Start menu, choose Disk Management, and open Disk Management.
- In the Disk Management window, open the Actions menu and select Create VHD.
- In the Create and Install a Virtual Hard Disk section, click Browse to locate the virtual hard disk on your computer.
- Point out the desired destination and add a file name. Click “Save” to continue.
- Specifies the desired VHDX file size. You can use the drop-down list to select the size type.
- Creating VHDX files can take some time. After creating the file, you will see a VHD disk.
- Right–click the drive and select Initialize Disk to continue.
- In the Initialize Disk field, select MBR and click OK.
- Right-click the created virtual hard disk and select New Simple Volume.
- Click Next and enter the amount of disk space in the drop–down menu.
- When the New Simple Volume Wizard dialog box appears, enter the drive letter of the folder and click Next.
- Enter the partition format settings and click Next.
- Click Finish to close the wizard.
- You have created a VHDX on your Windows computer.
Final Verdict
So, now you understand how to restore VHDX file Windows 10, 8, 7, and 11. Virtualization has made things easy, but the structure of the IT departments has become more complicated than ever. Therefore, it has become essential to look into the best way to reduce the loss of files and folders on virtual machines. But if, unfortunately, users have missed some of their important VHDX files, then users should keep handy a solution like Alternative, which can help users get back their precious data within a few minutes.
Users Questions Asked by Users
Que: How do I restore a VHDX file in Windows?
Ans: Yes, by following the above-mentioned solution, users can restore Windows from VHD files instantly without any hassle.
Que: Can I restore a VHDX file by using the manual method?
Ans: No, there is not any manual method available on the internet to restore a VHDX file. Users can try professional solutions to recover VHD files instantly without any data loss.