
Recovery Console
The
Recovery Console is a text-mode command interpreter that allows you to
access to the hard disk of a computer running Windows Server 2003 for
basic troubleshooting and system maintenance. It is particularly useful
when the operating system cannot be started, as the Recovery Console can
be used to run diagnostics, disable drivers and services, replace
files, and perform other targeted recovery procedures.
Installing the Recovery Console
You can start the
Recovery Console by booting with the Windows Server 2003 CD-ROM and,
when prompted, pressing R to choose the repair and recover option.
However, when a system is down you will typically want to recover the
system as quickly as possible, and you may not want to waste time
hunting down a copy of the CD-ROM or waiting for the laboriously long
restart process. Therefore, it is recommended to proactively install the
Recovery Console.
To install the Recovery Console, insert the Windows Server 2003 CD-ROM and type cd-drive:\i386\winnt32/cmdcons
on the command line. The Setup Wizard will install the 8 MB console in a
hidden folder called Cmdcons, and will modify the boot.ini file to
provide the Recovery Console as a startup option during the boot
process.
Removing the Recovery Console
If you ever decide to
remove the Recovery Console, you must delete files and folders that are
“super hidden.” From Windows Explorer, choose the Folder Options command
from the Tools menu. Click the View tab, select Show Hidden Files and
Folders, clear Hide Protected Operating System Files, click OK and, if
you are prompted with a warning about displaying protected system files,
click Yes.
Then, delete the Cmdcons
folder and the Cmldr file, each of which are located in the root of the
system drive. You must next remove the Recovery Console startup option
from Boot.ini. Open System from Control Panel, click the Advanced tab,
click the Settings button in the Startup And Recovery frame, then, in
the Startup And Recovery dialog box, under System startup, select Edit.
Boot.ini will display in Notepad. Remove the entry for the Recovery
Console, which will look something like this:
c:\cmdcons\bootsect.dat="Microsoft Windows Recovery Console" /cmdcons
Save the file and close Boot.ini.
Using the Recovery Console
After
you have installed the Recovery Console, you can boot the system and
select Microsoft Windows Recovery Console from the startup menu. If the
console was not installed or cannot be launched successfully, you can
restart using the Windows Server 2003 CD-ROM and, at the Welcome To
Setup screen, press R to select Repair. The loading takes significantly
longer from the CD-ROM, but the resulting Recovery Console is identical
to that installed on the local system.
Once the Recovery Console has started, as shown in Figure 3,
you will be prompted to select the installation of Windows to which you
wish to log on. You will then be asked to enter the Administrator
password. You must use the password assigned to the local Administrator
account, which, on a domain controller, is the password configured on
the Directory Services Restore Mode Password page of the Active
Directory Installation Wizard.
Figure 3. The Recovery Console

You can type help at the console prompt to list the commands available in the Recovery Console, and help command name
for information about a specific command. Most are familiar commands
from the standard command-line environment. Several of the commands
deserve particular attention:
-
Listsvc
Displays the services and drivers that are listed in the registry as
well as their startup settings. This is a useful way to discover the
short name for a service or driver before using the Enable and Disable
commands. -
Enable/Disable
Controls the startup status of a service or driver. If a service or
driver is preventing the operating system from starting successfully,
use the Recovery Console’s Disable command to disable the component,
then restart the system and repair or uninstall the component. -
Diskpart
Provides the opportunity to create and delete partitions using an
interface similar to that of the text-based portion of Setup. You can
then use the Format command to configure a file system for a partition. -
Bootcfg Enables you to manage the startup menu.
The
Recovery Console has several limitations imposed for security purposes.
These limitations can be modified using a combination of policies
(located in the Computer Configuration, Windows Settings, Security
Settings, Local Policies, Security Options node of the Local Computer
Policy console) and Recovery Console environment variables.
-
Directory access You can only view files in the root directory, in %Windir%
and in the \Cmdcons folder. Disable this limitation by setting the
policy Allow Floppy Copy And Access To All Drives And All Folders, and
using the command set AllowAllPaths = true. Be sure to include the space on either side of the equal sign when typing the set command. -
File copy You can only copy files to the local hard disk, not from it. Use the policy mentioned above and the command set AllowRemovableMedia = true. Be sure to include the space on either side of the equal sign when typing the set command.
-
Wild cards
You cannot use wildcards such as the asterisk to delete files.
Implement the policy mentioned above then, in the Recovery Console, type
the command set AllowWildCards = true. Be sure to include the space on either side of the equal sign when typing the set command.
Practice: Recovering from System Failure
In this practice, you will
back up the System State and create an Automated System Recovery Set.
You will also install and use the Recovery Console to troubleshoot
driver or service failures. Finally, if you have access to a second
physical disk drive, you will be able to perform Automated System
Recovery to restore a failed server.
Exercise 1: Back Up the System State
|
1. |
Log on to Server01 as Administrator. |
|
2. |
Open the Backup Utility. |
|
3. |
If the Backup And Restore Wizard appears, click Advanced Mode. |
|
4. |
Click |
|
5. |
Type a file name for the backup file, such as C:\SystemState.bkf. |
|
6. |
Start the backup. |
|
7. |
When the backup is complete, examine the file size of the System State backup file. How big is the file? |
Exercise 2: Create an ASR Set
This
exercise requires a blank floppy disk and approximately 1.5 GB of free
disk space. If you have a second physical disk in Server01, direct the
backup to that disk so that you can perform an Automated System Recovery
in Exercise 4.
|
1. |
Open the Backup Utility. If the Backup And Restore Wizard appears, click Advanced Mode. |
|
2. |
Click Automated System Recovery Wizard, or choose ASR Wizard from the Tools menu. |
|
3. |
Follow |
|
4. |
When |
Exercise 3: Installing and Using the Recovery Console
|
1. |
Insert the Windows Server 2003 CD-ROM. |
|
2. |
Click Start, Run, and then type the following command in the Open box: D:\i386\winnt32.exe /cmdcons
|
|
3. |
To |
|
4. |
Restart the server. |
|
5. |
When the server presents the startup boot menu, select Microsoft Windows Recovery Console. |
|
6. |
When prompted, type 1 to select the installation of Windows Server 2003. |
|
7. |
Type the password for the local Administrator account. |
|
8. |
When the Recovery Console prompt appears (by default, C:\Windows>), type help to display a list of commands. |
|
9. |
Type listsvc |
|
10. |
Type disable messenger |
|
11. |
To quit the Recovery Console, type exit and press Enter. |
Exercise 4: Restoring a System Using Automated System Recovery
Warning
This
exercise requires a second physical disk on which an ASR backup has
been created in Lesson 2. This exercise will delete all data on the
physical disk that contains the system and boot partition. Do not
proceed if you have stored any data that you cannot afford to lose.
|
1. |
Power off your computer. |
|
2. |
Restart the computer and open the computer’s BIOS. Make sure the system is configured to start from the CD-ROM. |
|
3. |
Insert the Windows Server 2003 installation CD-ROM. |
|
4. |
Restart Server01. Watch carefully and, when prompted, press a key to start from the CD-ROM. |
|
5. |
Early in the text-mode setup phase, setup prompts you to press F2 to run an Automatic System Recovery. Press F2. |
|
6. |
You |
|
7. |
Text-mode |
|
8. |
Eventually, a Windows Server 2003 Setup screen will appear. |
|
9. |
Windows |
|
10. |
Remove the floppy disk from the disk drive and allow the computer to restart. The installation will continue. When the installation completes, the computer should be restored to its previous state. |
This guide is about Recovery Console, the command-line tool available for the following Windows versions: Windows XP, Windows 2000, Windows Server 2003.
What is Recovery Console
Recovery Console is a command-line tool available only for these versions of Windows: XP, 2000 and Server 2003.
The tool loads with this message:
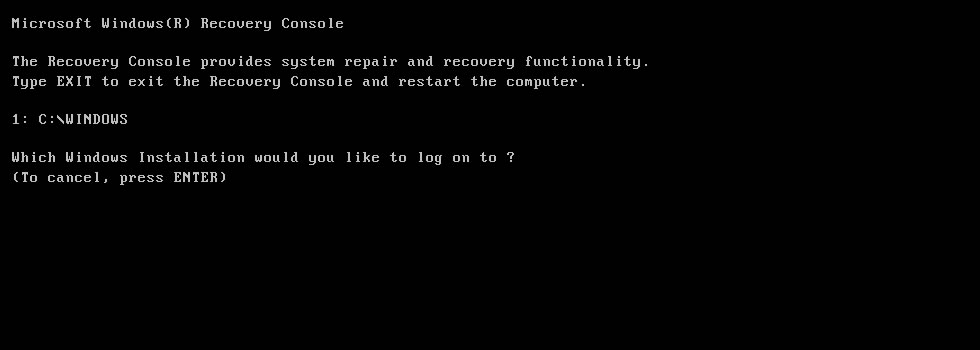
Microsoft Windows(R) Recovery Console

The Recovery Console provides system repair and recovery functionality.
Type EXIT to exit the Recovery Console and restart the computer.

1: C:\WINDOWS

Which Windows Installation would you like to log on to ?
(To cancel, press ENTER)
In the above example, Windows is installed on C:\. You need to type 1 and press Enter to load the Windows available on the C:\ drive.
The command-line tool isn’t available for Windows Vista, Windows 7, Windows 8 or Windows 8.1. It’s only available for Windows XP and Server 2003, these two operating systems being the last versions of Windows to have it installed.
Windows Vista, 7 and 8 replaced Recovery Console with System Recovery Options, a collection of recovery tools.
You can perform the following with Recovery Console:
- Manipulate system files (copy, rename, replace etc.)
- Enable or disable startup services (services that run automatically at boot)
- Repair the MBR (related: Fix the MBR guide)
- Create and format partitions
- Run the chkdsk command
You can only use the Recovery Console as an Administrator of the system or as any user part of the Administrator group.
You can access the tool from the original installation CD or from the boot menu if you already installed it on your computer. Follow these instructions on how to install it and make it available at boot without a CD.
Access Recovery Console
To access the Recovery Console, you have the following options:
- Use the original Windows XP installation CD, if you still have it
- If you installed Recovery Console on your system, select it from the Startup Options menu
- Use Easy Recovery Essentials to access Command Line and run Recovery Console-specific commands
If you have the installation CD
If you have the original Windows XP installation CD, follow these steps to access Recovery Console:
- Boot your computer
- Insert the Windows XP CD
- Press any key at the Press any key to boot from CD message
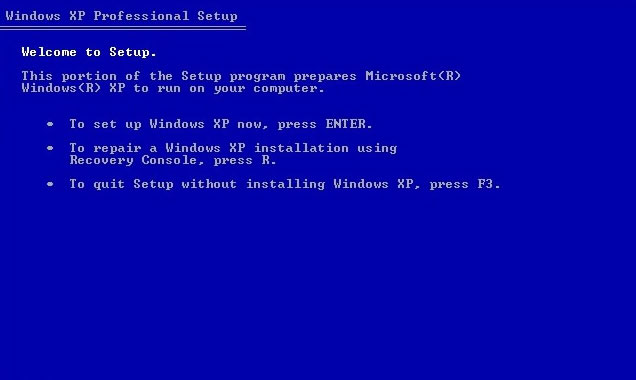
- At the Welcome to Setup screen, press R:
To repair a Windows XP installation using Recovery Console, press R.

Windows XP Press R for Recovery Console
- The Windows XP CD will now load Recovery Console:
Microsoft Windows(R) Recovery Console

The Recovery Console provides system repair and recovery functionality.
Type EXIT to exit the Recovery Console and restart the computer.

1: C:\WINDOWS

Which Windows Installation would you like to log on to ?
(To cancel, press ENTER)
- Type
1and press Enter - Recovery Console is now loaded
If you installed Recovery Console
If you haven’t installed the tool, follow these instructions.
If you already installed Recovery Console on your computer, you may access it at the Startup Options menu. To do so, follow these steps:
- Start your computer
- Wait for your computer to boot into the Boot Options menu
- At the Please select the operating system to start: message, select Microsoft Windows XP Recovery Console

- Press Enter

If you use Easy Recovery Essentials
If you use Easy Recovery Essentials, our repair and recovery disk, you can access Command Line and run the commands you need:
- Download Easy Recovery Essentials
- Burn the ISO Image. Follow our instructions on how to burn a bootable ISO image. If you’d like to have a recovery USB instead, follow our instructions on how to make a recovery USB.
- Boot Easy Recovery Essentials from the CD, DVD or USB
- Select Launch Command Line


Install Recovery Console
You can install Recovery Console on your system.
Before you do, read these notes:
- You need to have the Windows XP installation CD
- You need to use the Windows XP installation CD, the CD that you used to install Windows XP on your computer.
If you have Windows XP SP1 on the CD, you need to have Windows XP SP1 installed and not SP2 installed.
If you do have SP2 installed, while your original CD is with SP1, read KB 898594.
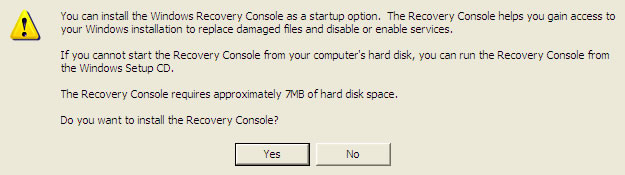
To install Recovery Console, follow these steps:
- Boot into Windows XP
- Insert the Windows XP CD in the disk drive
- Go to Start
- Go to Run
- Type the following command, but replace
e:with your computer’s optical drive letter:e:\i386\winnt32.exe /cmdcons
- Press Enter
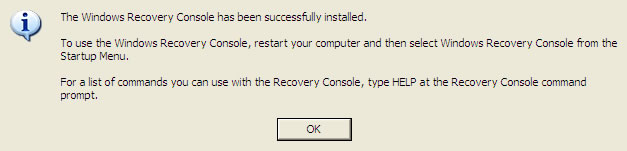
- Click Yes at the Windows Setup warning message

- Wait for the process to finish
- Click OK at the The Windows Recovery Console has been successfully installed message

- After Recovery Console is installed, you can restart your computer and see it at the boot options menu:
Delete Recovery Console
If you installed Recovery Console, you can also delete it from the boot options menu.
To delete it, follow these steps:
- Restart your Windows XP system
- Click Start
- Click My Computer
- Double-click on
C:\or the drive where Windows XP is installed - Click Tools, then Folder Options, and then click the View tab
- Click Show hidden files and folders and make sure Hide protected operating system files is unchecked
- Click OK
- Delete the
Cmdconsfolder and theCmldrfile fromC:\ - Right-click on the
Boot.inifile (warning: do not delete this file) and click Properties - Make sure the Read-only option is unchecked
- Click OK
- Open the
Boot.inifile with Notepad - Remove the Recovery Console line from the file. This line looks like this:
C:\cmdcons\bootsect.dat="Microsoft Windows Recovery Console" /cmdcons
- Save the
Boot.inifile
Commands
The following commands are available to use in Recovery Console:
attrib– changes the attributes of a folderbatch– will run commands that are specified in a text filebootcfg– this command is for boot configuration and recovery. For more information, see the bootcfg guidecd– will change to a different folderchdir– it’s similar tocdabove, it will change to a different folderchkdsk– will check the specified drive and repair it, if needed. For more information, see the chkdsk guidecls– clear the command screencopy– copies a file to a specified destinationdel– deletes a filedelete– similar todelabove, deletes a filedir– displays a list of files and folders from the current folderdisable– disables a specified Windows servicediskpart– manages partitions on the hard disk. For more information, see the diskpart guideenable– enables a specified Windows service. To disable a service, usedisableexit– exit Recovery Consoleexpand– expands a filefixboot– writes a new boot sector on the partitionfixmbr– repair the MBR of the boot partition. For more information, see the Fix MBR guideformat– formats a specified drivelistsvc– lists all available services and driverslogon– lists all detected Windows installationsmap– list drive letters, types, partition sizes and mappingsmd– create a new foldermkdir– similar tomd, creates a new foldermore– displays a text file to the screenrd– delete a folderrmdir– similar tord, deletes a folderren– rename a filerename– similar toren, renames a fileset– displays and modifies environment optionssystemroot– set the current folder to the %SystemRoot% folder of the current Windows installationtype– displays a text file
Troubleshooting
Password for Recovery Console
Recovery Console will ask you for the Administrator password.
If you usually log into Windows XP without a password, simply press Enter without typing any password to check if Recovery Console would accept this.
If this method doesn’t work, you’ll need to know the Administrator password.
Another alternative is to boot into Windows XP and open the Registry Editor to set the DWORD SecurityLevel to 1. To do so, follow these steps:
- Boot into Windows XP
- Click Start
- Click Run
- Type
regedit - Click OK or press Enter
- Navigate to this key:
HKEY_LOCAL_MACHINE\SOFTWARE\Microsoft\WindowsNT\CurrentVersion\Setup\RecoveryConsole
- Set the value of
DWORD SecurityLevelto1 - Exit the Registry Editor
- Reboot your Windows XP system
Recovery Console in Windows Vista or 7
Recovery Console is not available on Windows Vista or Windows 7 systems. Windows Vista, 7 and 8 systems are using the System Recovery Options set of tools instead of Recovery Console that you can use to repair or restore your computer.
To boot into System Recovery Options on a Windows Vista, follow these steps:
- Boot from the installation CD/DVD
- At the “Press any key to boot from CD or DVD…” message, press any key to boot from the DVD
- Click Repair your computer
- Choose the operating system from the list
- System Recovery Options is now available
To boot into System Recovery Options on a Windows 7, follow these steps:
- Boot from the Windows 7 installation DVD
- At the “Press any key to boot from CD or DVD…” message, press any key to boot from the DVD
- At the Install Windows screen, select a language, time and keyboard
- Click Next
- Click Repair your computer or press R
- System Recovery Options is now available


More Information
Support Links
- Easy Recovery Essentials for Windows – our repair and recovery disk.
It’s an easy-to-use and automated diagnostics disk. It’s available for Windows 8, Windows 7 and Windows Vista. It’s also available for Windows XP and Windows Server.
Read more at Windows Recovery Disks.
- The NeoSmart Support Forums, member-to-member technical support and troubleshooting.
- Get a discounted price on replacement setup and installation discs: Windows XP.
Applicable Systems
This Windows-related knowledgebase article applies to the following operating systems:
- Windows XP (all editions)
- Windows Server 2003 (all editions)
Propose an edit
Posted by decipherinfosys on February 16, 2007
Every now and then a Windows 2003 Server’s operating system will become corrupted, and repair procedures to bring the server back online must be initiated. These procedures vary from one organization to the next, but there is one step that all system administrators should add to their checklists if they have not done so already – the Windows repair feature. This feature is accessed by booting the damaged server from the Windows 2003 Server installation CD.
Repair vs. Recovery
The Repair feature should not be confused with the Recovery Console, which is also accessed from the boot CD. The Recovery Console is a much less comprehensive repair tool, and requires that you either use a repair (floppy) disk or manually copy files from a CD or floppy to the server’s %Windows% directory manually via a command line. Most of you have probably tried both with limited or no success. The repair disks must be constantly updated to account for changes to the server’s configuration, otherwise the recovery will fail. Manually copying system files is only effective if you know exactly which files are corrupt and need to be replaced, which is nearly impossible. In addition, if dozens or hundreds of files need to be replaced, manually copying them via a command line can become quite tedious.
The option to actually repair the operating system is a little deeper into the Windows installation process. Once the system has been booted with the Windows 2003 installation CD, you will see the option to repair the system via the Recovery Console first, as shown below:
At this point you will want to select Enter to set up Windows now. After agreeing to the licensing disclaimer you will arrive at the following screen:
Here you will select “R” to repair the Windows installation. What follows looks suspicously like a full reinstall, but have no fear – it is not. The repair simply overwrites the Windows system files, and will allow the system to recover at least 90% of the time. The repair will save all system and application settings, so you will not need to re-specify the server’s name. In addition, you will not have to reinstall any of the applications running on the server. The author has personally had success with this repair procedure, and has been able to recover systems suffering from a number of ailments, including damage caused by viruses, TCP/IP stack problems, as well as system files corruption resulting from poorly fragmented disks.
This entry was posted on February 16, 2007 at 1:53 pm and is filed under Windows.
You can follow any responses to this entry through the RSS 2.0 feed.
Responses are currently closed, but you can trackback from your own site.
Sorry, the comment form is closed at this time.
Консоль восстановления (Recovery Console)
Самым лучшим в Recovery Console, которая появилась в Windows 2000, является то, что она действительно работает. Кроме того, она проста и логична в использовании. Microsoft наконец-то предоставила нам средство восстановления после катастроф, на которое мы можем полагаться! Это программа, запускаемая из командной строки, которая позволяет исправлять ОС и которая работает как в файловой системе FAT, так и в NTFS.
Работая в Recovery Console, вы можете запускать и прекращать работу служб, исправлять главную загрузочную запись (MBR — Master Boot Record), читать и записывать данные на локальный жесткий диск, копировать данные (такие как поврежденные или отсутствующие системные файлы) с гибкого диска или CD-ROM и выполнять другие задачи из командной строки.
Вы можете войти в Recovery Console, когда захотите, запустив ее с CD Windows Server 2003, или можете заранее установить ее на случай какой-либо аварии.
Имеет смысл заранее установить Recovery Console на важных серверах, а также на рабочих станциях персонала ИТ. Это компьютеры, которые вам требуется быстро восстановить, когда на них возникают серьезные проблемы, и установка консоли восстановления означает, что вам не придется тратить время на поиск CD Windows Server 2003 или выполнять процессы, через которые приходится проходить для доступа к Recovery Console с этого CD.
Доступ к Recovery Console с CD
Если вы не установили заранее Recovery Console, используйте CD Windows Server 2003 как спасительное средство, если операционная система не загружается совсем или загружается с таким количеством ошибок, что становится ясным наличие проблемы.
Запустите загрузку вашего компьютера с этого CD (для этого вам, видимо, потребуется изменить настройки BIOS во время запуска) и позвольте запуститься программе установки (Setup). Когда появится вопрос, хотите ли вы продолжить установку операционной системы, нажмите для продолжения клавишу ENTER. Setup загрузит файлы, как при стандартной установке. По окончании этой функции на вашем экране появится сообщение Welcome to Setup (Приглашение к установке). В сообщении содержится три опции.
- To set up Windows, press ENTER (Для установки Windows нажмите клавишу ENTER).
- To repair Windows, press R (Для исправления Windows нажмите клавишу R).
- To quit Setup, press F3 (Для прекращения установки нажмите клавишу F3).
Для запуска Recovery Console нажмите клавишу R. Recovery Console работает в текстовом режиме, и на экране появляется нумерованный список папок операционных систем. Если у вас не действует двойственная загрузка, то будет присутствовать только одна запись (обычно C:\Windows).
Введите номер установки Windows Server 2003, в которую вы хотите войти, чтобы внести исправления, и нажмите клавишу ENTER. Вы должны ввести номер до нажатия клавиши ENTER, даже если представлена только одна запись. Если нажать ENTER без ввода номера, то компьютер перезагрузится и вам придется начать все заново.
Примечание. Зеркальные тома представлены дважды в списке установок Windows в Recovery Console, но в каждой записи указана одна и та же буква диска, то есть это одна и та же установка. Любые изменения, которые вы вносите в окне Recovery Console, будут «зеркалироваться».
Recovery Console автоматически осуществляет вход администратора, поэтому введите пароль локального администратора и нажмите клавишу ENTER. (Вы входите под учетной записью локального администратора, а не администратора домена.)
Примечание. Поскольку вам нужно выполнить вход, чтобы войти в Recovery Console, это средство не работает, если поврежден или отсутствует улей SAM (Security Accounts Manager). В этом случае вам придется переустановить операционную систему.
Вы оказываетесь в папке %SystemRoot% и можете вводить команды Recovery Console для выполнения задач восстановления (см. ниже в этом разделе).
Установка Recovery Console на компьютере
Вы можете заранее установить Recovery Console, чтобы эта консоль была доступна в любой момент, когда вам это потребуется. Вам следует выполнить эту задачу на всех компьютерах вашего предприятия, которые считаются критически важными. Вы сами должны решить, какие компьютеры являются для вас «критически важными», но обычно это компьютеры, проблемы которых нужно быстро устранить во избежание «хаоса», то есть контроллеры домена, серверы, которые предоставляют услуги пользователям клиентских компьютеров, ваша собственная рабочая станция и рабочие станции членов персонала ИТ.
Чтобы заранее установить Recovery Console, поместите CD Windows Server 2003 в накопитель CD-ROM. Выберите Start/Run (Пуск/Выполнить) и введите d:\i386\winnt32.exe /cmdcons (где d — это буква диска для накопителя CD-ROM). Вы можете также использовать UNC-путь для установки Recovery Console из разделяемой точки сети.
Система попросит вас подтвердить установку. Щелкните на кнопке Yes, чтобы запустить процедуру установки (Setup). Setup скопирует соответствующие файлы на ваш жесткий диск и затем выведет сообщение, что Recovery Console успешно установлена. Вы должны перезагрузить компьютер, чтобы закончить этот процесс.
Внимание. Вы не можете заранее установить Recovery Console на зеркальном томе. Если компьютер, на котором вы хотите заранее установить Recovery Console, имеет зеркальный том, то вы должны сначала разделить (Break) это зеркало. Установите Recovery Console и затем снова создайте зеркальный том. Вы не сможете заранее установить Recovery Console на компьютере с процессором Itanium. В этом случае вы должны использовать CD.
Затем во время загрузки вы будете видеть в меню пункт для Recovery Console. Используйте клавишу «стрелка вниз», чтобы выбрать пункт меню Recovery Console, что требует входа по учетной записи Administrator.
Использование Recovery Console
Используя Recovery Console, вы работаете в специальной командной строке, которая отличается от обычной командной строки Windows Server 2003. Recovery Console имеет собственный интерпретатор команд.
Правила для использования Recovery Console
Когда вы работаете в окне Recovery Console, по умолчанию действуют несколько правил, наиболее важными из которых являются следующие правила.
- Вы имеете доступ только в папку %SystemRoot% и ее подпапки той ОС, в которую выполнили вход в Recovery Console.
- Вы не имеете доступа к корню диска и к другим папкам, таким как Program Files, Documents and Settings, а также к папке %SystemRoot% других установленных у вас ОС Windows.
- Вы не можете копировать файл с жесткого диска на съемный носитель.
- Вы можете изменять эти параметры — см. ниже раздел «Изменение правил для Recovery Console».
Команды Recovery Console
При работе с Recovery Console вам доступен определенный ограниченный набор команд. Многие из этих команд доступны также в стандартной командной консоли Windows, но в большинстве случаев эти команды имеют другие параметры или параметры имеют иной смысл в Recovery Console. Поэтому имеет смысл ознакомиться с этими командами и с действием этих параметров в Recovery Console.
Attrib. Используйте команду attrib для изменения атрибутов одного файла или подпапки. Синтаксис:
attrib имя_файла|имя_папки
Batch. Используйте команду batch для выполнения команд, заданных в текстовом файле. Используйте следующий синтаксис:
batch входнойфайл [выходнойфайл]
где:
входнойфайл — это текстовый файл, содержащий команды,
выходнойфайл cодержит выходные результаты команд (если он опущен, то результаты выводятся на экран).
CD ( Chdir ). В Recovery Console команда CD работает только с системными папками текущей установки Windows, со съемными носителями, с корневой папкой любого раздела жесткого диска или с локальными источниками установки.
Chkdsk. Вы можете использовать chkdsk в Recovery Console для проверки и исправления сбойных секторов на диске. Для chkdsk используется следующий синтаксис:
где:
/p указывает проверку диска, даже если диск не помечен как проблемный. /r указывается для обнаружения сбойных секторов и восстановления любой читаемой информации (подразумевается использование /p ).
Chkdsk требует autochk.exe и автоматически ищет эту программу в загрузочной папке. Если она не найдена, то chkdsk ищет ее на установочном CD Windows Server 2003. Если установочный CD не найден, то chkdsk запрашивает у пользователя местоположение autochk.exe (обычно это %SystemRoot%\System32 ).
Cls. Введите cls для очистки экрана.
Copy. Используйте команду copy для копирования одного файла в указанное место со следующими ограничениями.
- Это не должен быть съемный носитель.
- Вы не можете использовать символы подстановки.
При копировании сжатого файла с установочного CD Windows Server 2003 на локальный диск происходит автоматическая распаковка этого файла.
Del ( Delete ). В Recovery Console вы можете использовать команду del только с одним файлом; в данном случае она не поддерживает символы подстановки. Команда работает с системными папками ОС Windows, выбранной вами при входе в Recovery Console, со съемными носителями и с корневой папкой любого раздела жесткого диска.
Dir. Используйте команду dir, чтобы вывести список всех файлов в текущей папке. Система автоматически включает в этот список скрытые и системные файлы.
Disable. Используйте команду disable, чтобы отключать какую-либо системную службу или драйвер Windows. Эта команда имеет следующий синтаксис:
Когда вы вводите эту команду, система выводит сначала первоначальный тип запуска данной службы, прежде чем изменить его на SERVICE DISABLED. Вам следует записать первоначальный тип запуска, чтобы можно было снова активизировать эту службу (см. ниже описание команды enable ).
Diskpart. Используйте команду diskpart для управления разделами на томах жестких дисков, применяя следующий синтаксис.
Diskpart [/add//delete] [имя-устройства/имя-диска/имя-раздела] [размер]
где:
/add указывает добавление нового раздела. /delete указывает удаление существующего раздела.
имя-устройства — это имя устройства для нового раздела (например, \Device\ HardDisk1 ).
имя-диска — это буква диска для раздела, который вы удаляете (например, D:).
имя-раздела — это имя уровня раздела для раздела, который вы удаляете (можно использовать вместо параметра имя-диска, например, \Device\HardDisk0\Partition1 ).
размер — это размер нового раздела в мегабайтах.
Enable. Используйте команду enable, чтобы активизировать первоначально или повторно какую-либо системную службу или драйвер Windows. Эта команда имеет следующий синтаксис:
enable имя_службы [тип-запуска]
где:
имя_службы — это имя службы или драйвера, который вы хотите активизировать.
тип-запуска — это один из следующих типов запуска уникальной службы:
- SERVICE BOOT START
- SERVICE SYSTEM START
- SERVICE AUTO START
- SERVICE DEMAND START
Exit. Используйте команду exit для выхода из Recovery Console. Компьютер автоматически выполнит перезагрузку.
Expand. Используйте команду expand для распаковки сжатого файла или . cab -файла. Эта команда обычно применяется для извлечения драйверов с использованием следующего синтаксиса.
Expand источник [/f:файлы] [целевая-папка] [/y] Expand источник [/f:файлы] /d
где:
источник — файл, который вы хотите распаковать, если этим источником является один файл. Символы подстановки не допускаются.
целевая-папка — папка для извлекаемого файла Если этот параметр опущен, то используется текущая папка. Целевой папкой не может быть съемный носитель. /y указывает автоматическое подтверждение перезаписи существующего файла. /f:файлы используется, если источник содержит более одного файла. Обычно это несколько файлов из одного .cab -файла. Разрешается использовать символы подстановки.
/d — вывод на экран списка файлов, содержащихся в .cab -файле источника. Файлы не распаковываются и не копируются.
Fixboot. Используйте команду fixboot для записи нового загрузочного сектора в системном разделе. Используется следующий синтаксис.
Fixmbr. Используйте команду fixmbr для исправления кода MBR в загрузочном разделе. Используется следующий синтаксис.
где:
имя-устройства указывает устройство, которому требуется новая MBR. Вы можете получить имя-устройства с помощью команды map (см. ниже). Если этот параметр опущен, то происходит запись новой MBR на загрузочное устройство (диск, который содержит системные файлы для ОС Windows, с которой вы работаете).
Если система «сомневается» в состоянии указанного устройства,то вы получаете предупреждение и у вас запрашивается, хотите ли вы продолжить работу команды. Сомнения возникают, если сигнатура таблицы разделов выглядит как ошибочная или нестандартная. Если причиной вашего использования Recovery Console является проблема доступа к дискам, не продолжайте. Запись новой MBR может вызвать повреждение таблицы разделов, что сделает раздел недоступным.
Format. Используйте команду format для форматирования диска, используя следующий синтаксис.
format [диск:] [/q] [/fs:файловая-система]
где:
диск: — это диск, который вы хотите форматировать. Вы не можете указать гибкий диск.
/q указывает быстрое форматирование, при котором диск не проверяется на сбойные участки.
/fs:файловая-система указывает один из следующих вариантов файловой системы:
- FAT
- FAT32
- NTFS
Help. Используйте команду help для получения информации о командах Recovery Console. Используйте следующий синтаксис.
Если не указано никакой команды, то система выводит все команды, поддерживаемые в Recovery Console.
Примечание. Для получения справки по конкретной команде вы можете также ввести команда /?
Listsvc. Используйте команду listsvc для вывода списка всех доступных служб и драйверов на данном компьютере.
Logon. Используйте команду logon для входа в другую установленную ОС Windows после того, как вошли в Recovery Console для первоначально выбранной ОС Windows. При вводе этой команды на экран выводится список всех ОС, установленных на данном компьютере. После выбора конкретной ОС у вас запрашивается пароль локального администратора для этой ОС.
Внимание.Если вы вводите неверный пароль три раза, то Recovery Console автоматически выполняет команду exit и перезагружает компьютер.
Map. Используйте команду map, чтобы вывести список отображений устройств, тип файловой системы и размер дисков на данном компьютере. Эта информация требуется вам, чтобы вы могли использовать команды fixboot и fixmbr. Синтаксис:
где:
arc указывает использование имен Advanced RISC Computing (ARC) вместо стандартных имен устройств.
Примечание. ARC-формат используется для задания путей к устройствам в файле boot.ini. Информацию по файлу boot.ini и ARC-формату см. в лекции 5 курса «Администрирование Microsoft Windows Server 2003».
MD ( Mkdir ). Используйте команду MD для создания новой папки или подпапки. В Recovery Console эта команда работает только со следующими областями.
- Системные папки текущей установки Windows (то есть установленной ОС, в которую вы выполнили вход).
- Съемные носители.
- Корневая папка любого раздела жесткого диска.
More. Используйте команду more, чтобы вывести на экран текстовый файл. Синтаксис:
где:
имя-файла — это полный путь к этому файлу (если файл находится вне локальной папки).
net use. Используйте эту команду, чтобы указывать (отображать) букву накопителя для сетевого разделяемого ресурса. Команда net use имеет следующий синтаксис.
net use [\\Имя-компьютера\Имя-разделяемого-ресурса
[/user:[Имя-домена\]Имя-пользователя] пароль] |
[буква-накопителя:] [/d]
где:
\\Имя-компьютера\Имя-разделяемого-ресурса — имя сервера и разделяемого ресурса.
/user: используется для пользовательского имени, которое вы хотите использовать для подсоединения к разделяемому ресурсу.
Имя-домена — имя домена, который может опознать пользователя.
Имя-пользователя — пользовательское имя, под которым выполняется вход.
Пароль — это пароль, необходимый для доступа к этому разделяемому ресурсу (если он опущен и если для доступа к разделяемому ресурсу требуется пароль, то система запрашивает пароль).
/d указывает отсоединение отображаемого накопителя.
Примечание. Если имя-компьютера содержит пробелы, заключите в кавычки все имя компьютера (от двух обратных слэшей до конца имени компьютера).
RD ( Rmdir ). Используйте команду RD для удаления пустой папки. Вы не можете использовать символы подстановки. Эта команда работает только со следующими областями.
- Системные папки установки Windows, в которую вы выполнили вход в окне Recovery Console.
- Съемные носители.
- Корневая папка любого раздела жесткого диска или локальные источники установки.
Ren ( Rename ). Используйте команду ren для изменения имени файла, применяя следующий синтаксис.
ren [диск:] [путь] имя-файла-1 имя-файла-2
Вы можете использовать эту команду только с одним файлом и не можете использовать символы подстановки. Вы не можете указать другой путь для параметра имя-файла-2.
Set. Используйте команду set, чтобы выводить на экран и задавать переменные среды Recovery Console. Вы должны разрешить использование команды set в Recovery Console, используя шаблоны безопасности Group Policy Security Templates. См. следующий раздел, «Изменение правил для Recovery Console».
Systemroot. Используйте команду systemroot, чтобы задать текущую папку для папки %SystemRoot% ОС Windows, в которую вы выполнили вход, когда начали работать с Recovery Console.
Type. Используйте команду type, чтобы выводить на экран текстовый файл. Синтаксис: