
Различные средства восстановления работоспособности Windows 11/10 — восстановление системных файлов, точки восстановления, сброс в исходное состояние полезны, но не всегда работают. На этот случай есть ещё одна возможность — использование «In-Place Upgrade» или «Обновление на месте» для исправления большинства ошибок системы с сохранением данных, программ и настроек пользователя.
В этой инструкции о том, какие действия потребуются для выполнения «Обновления на месте», что при этом происходит и какие нюансы следует учитывать.
С помощью ISO-образа Windows
«Обновление на месте» позволяет переустановить Windows 11/10, исправив большинство ошибок, вызванных проблемами во встроенных приложениях (в том числе, отвечающих за работу меню «Пуск» и других системных элементов), службах и файлах системы, сохранив при этом пользовательские данные и установленные программы. Для выполнения далее описанных действий должны выполняться следующие условия:
- Текущая Windows должна запускаться.
- Необходимо иметь достаточное количества свободного места на системном диске — в идеале 20 и более Гб.
- В случае, если действия выполняются на ноутбуке, подключите его к зарядному устройству.
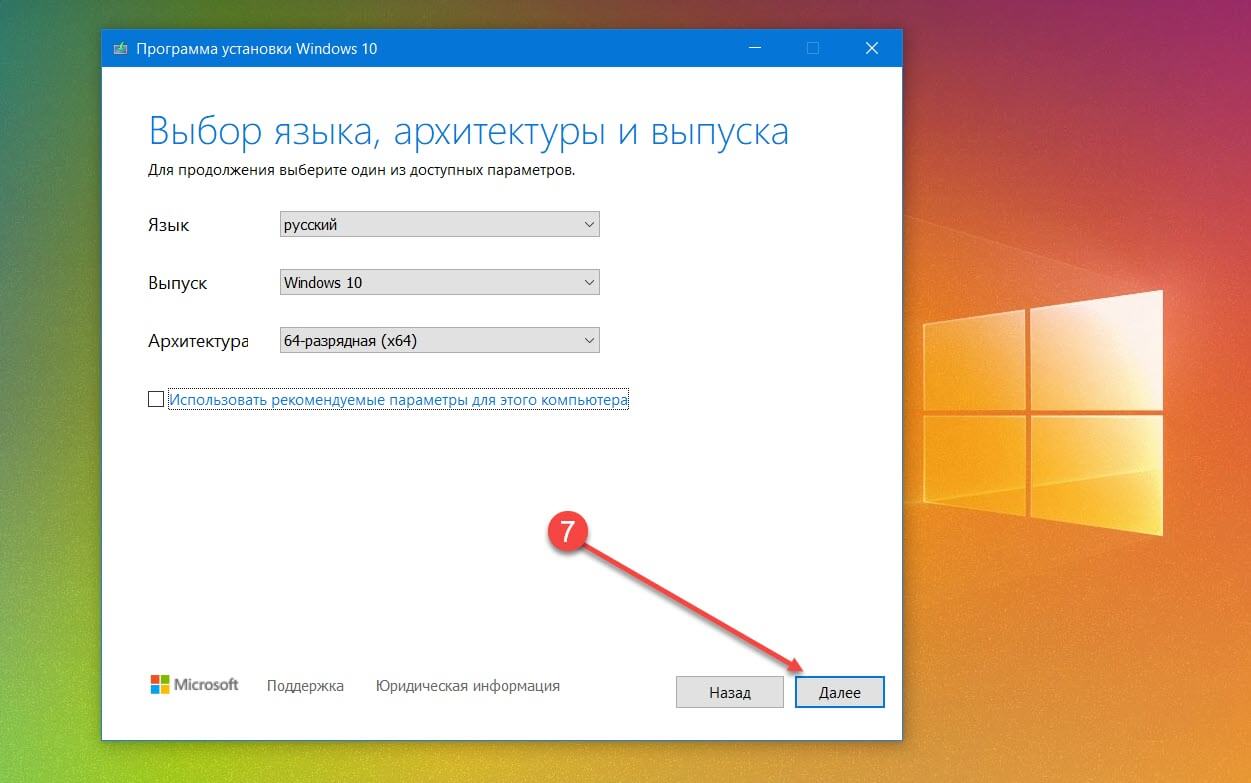
Самый простой способ выполнения In-Place Upgrade — использование ISO-образа Windows 11/10, шаги в этом случае будут следующими:
- Скачайте ISO образ Windows 11/10 с той же или более новой версией системы, что уже установлена на компьютере. Подробнее: Как скачать Windows 11 ISO, Как скачать Windows 10 ISO. Лучше не оставлять файл образа в папке «Загрузки» или «Рабочий стол», а переместить его в какую-то отдельную папку на диске или на другой диск.
- Смонтируйте образ ISO в системе: правый клик по нему — «Подключить».
- В проводнике появится новый виртуальный «DVD-дисковод», откройте его и запустите файл setup.exe с него.

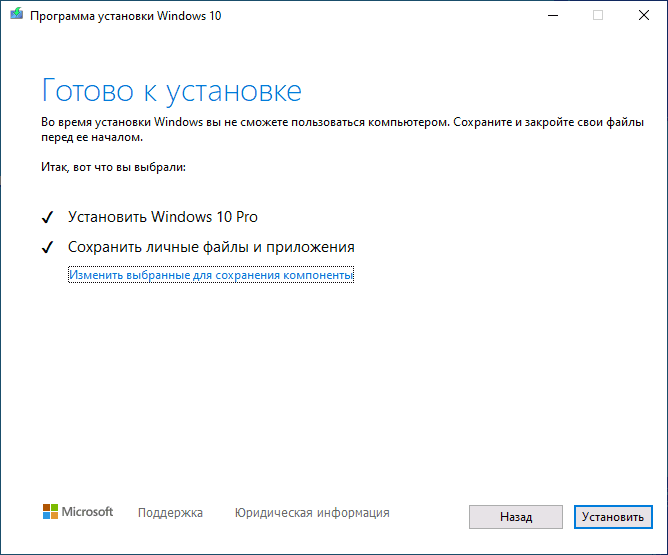
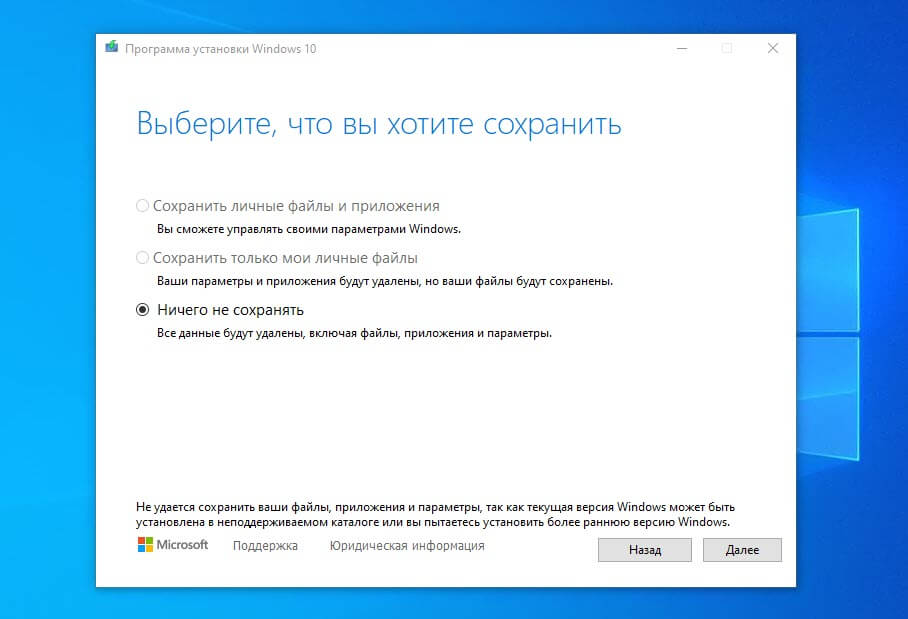
- Пройдите первые шаги: ожидание проверки наличия обновление, принятие лицензии и другие, после чего на экране «Выберите, что вы хотите сохранить» отметьте опцию «Храните файлы, настройки и приложения». Нажмите «Далее».

- Дождитесь завершения установки.


По окончании процесса вы сможете зайти в переустановленную и исправленную Windows. Подключенный ранее ISO-образ можно отключить.
С помощью Media Creation Tool (Windows 10)
Для выполнения «Обновления на месте» Windows 10 можно использовать не ISO-образ, а утилиту Media Creation Tool, шаги будут следующими:
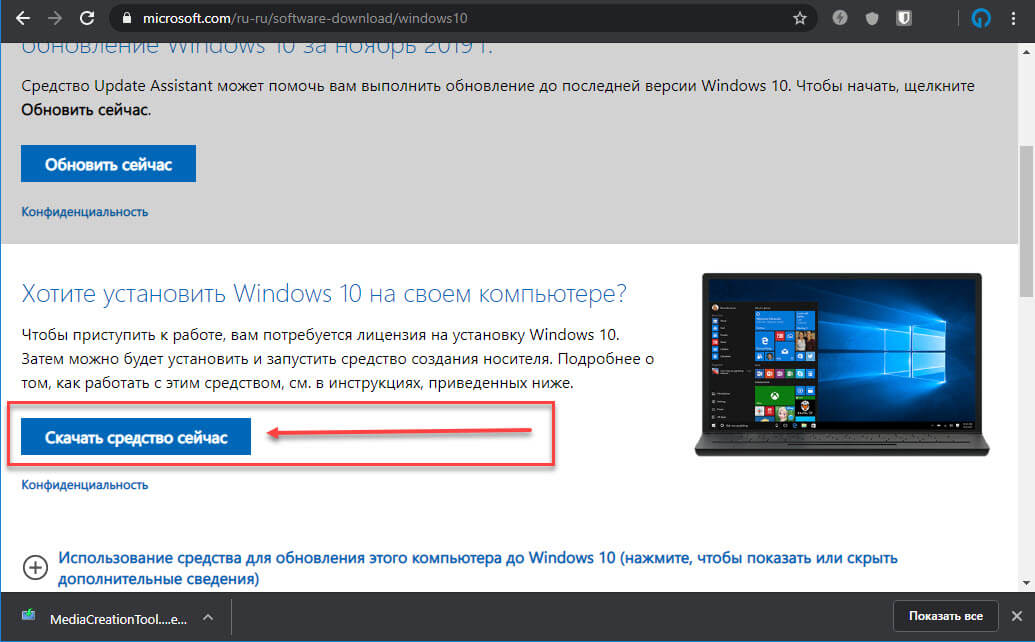
- Зайдите на официальный сайт Майкрософт и нажмите кнопку «Скачать средство сейчас», дождитесь загрузки утилиты.
- Запустите скачанную утилиту, нажмите «Далее», затем выберите пункт «Обновить этот компьютер сейчас» и нажмите «Далее».
- Дождитесь завершения загрузки файлов для установки Windows 10.
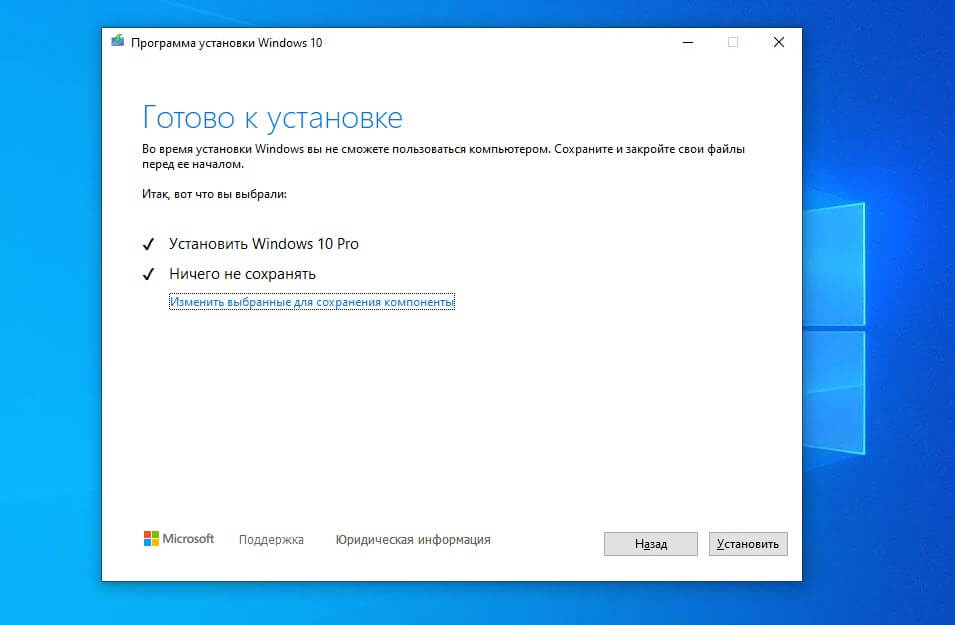
- Примите условия лицензии, дождитесь проверки наличия обновлений, а на экране «Готово к установке» оставьте отмеченным пункт «Сохранить личные файлы и приложения» и нажмите кнопку «Установить».
- Дождитесь завершения установки.

После успешного завершения установки вы сможете зайти в систему со своей прежней учетной записью и приступить к работе.
Некоторые дополнительные нюансы, которые могут быть полезными при выполнении описанных действий:
- После успешного выполнения переустановки имеет смысл очистить диск, в частности — удалить папку Windows.old с компьютера.
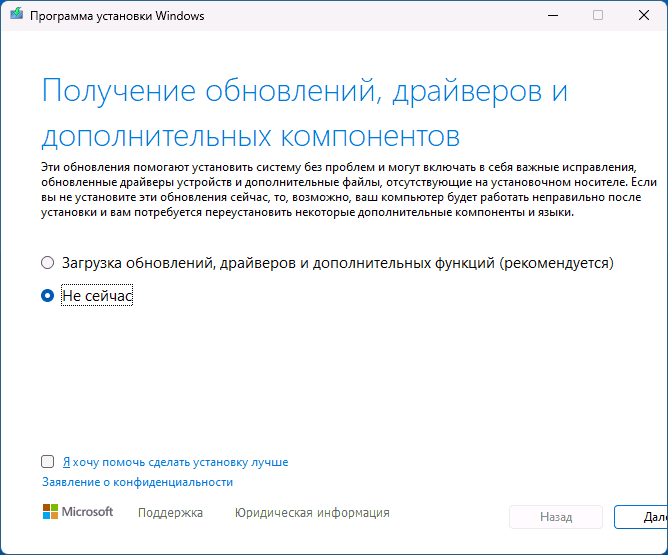
- Если процесс зависает на этапе проверки наличия обновлений, то при использовании первого способа вы можете нажать «Настройка скачивания обновлений программой установки» на первом экране и выбрать опцию «Не сейчас».
Надеюсь, инструкция была полезной. Если у вас остаются вопросы, вы можете задать их в комментариях ниже. В Windows 11 при наличии доступа к Интернету всё описанное можно выполнить прямо в Параметрах, подробнее в инструкции при восстановление Windows 11 в Центре обновления.
Очень много ситуаций и причин неработоспособности и соответственно методов восстановления.
Не существует простого метода и коротких инструкций сделать это универсально.
Без специалиста на месте, который уже решал много различных проблем на windows, решить что либо без готовых инструментов — нереально. Да и специалист скорее всего будет использовать готовый набор инструментов, которые шире чем озвученный media creation tool.
p.s. Диск восстановления (и вообще механизмы резервного копирования, о которых нужно думать заранее) — это та технология которая максимально приближает методы решения к универсальным.
p.p.s. Со времен winxp и win7 сложилось мнение (и оно продолжает подкрепляться кучей ситуаций) когда переустановить операционную систему с ручным переносом программ и их настроек быстрее и проще чем пытаться понять что же сломалось здесь и как это починить.
И да, переносить установленное приложение без установочной программы, реально только если это приложение простое,.. при наличии же установочной программы это универсально выполнимая задача (но требует ручной анализ и соответственно время), максимум будут проблемы со средствами контроля за лицензиями приложений (каждый придумывает свой паравоз и в общем случае перенести лицензию без ее наличия не получится)
Applies ToWindows 11 Windows 10
Support for Windows 10 will end in October 2025
After October 14, 2025, Microsoft will no longer provide free software updates from Windows Update, technical assistance, or security fixes for Windows 10. Your PC will still work, but we recommend moving to Windows 11.
Learn more
The installation media for Windows is a versatile tool that serves multiple purposes, including in-place installations for recovery and new installations. This media, typically created on a USB drive or DVD, contains all the necessary files to install or reinstall Windows on your device. It is particularly useful in scenarios where your system encounters significant issues, such as software corruption or hardware failure, that prevent it from booting or functioning correctly.
For recovery purposes, the installation media allows you to perform an in-place installation, which essentially reinstalls Windows without affecting your personal files, settings, or installed applications. This method is ideal for resolving system problems while preserving your data and configurations. By booting from the installation media and selecting the appropriate recovery options, you can restore your system to a stable state without the need for a complete wipe.
In cases where a fresh start is required, the installation media can be used for a new installation of Windows. This process involves completely erasing the existing data on your device and installing a clean version of Windows. It’s a suitable option when you want to remove all previous data, settings, and applications, or when setting up a new device.
Alternatives to reinstallation with media
Before reinstalling Windows using the installation media, review the article Recovery options in Windows, which provides an overview of the different solutions to recover Windows.
Before you start the reinstall
If a device isn’t performing as expected or Windows is having issues, it might be because of low disk space. Before reinstalling Windows, try freeing up disk space to see if it resolves the problems. For more information, see Free up drive space in Windows.
If personal data and files need to be saved before reinstalling Windows, back them up before performing the reinstall. Personal data and files can be backed up to an external hard drive, USB flash drive, or a cloud location, such as OneDrive.
If Windows is reinstalled after making a significant hardware change to the device, such as replacing the motherboard, it might no longer be activated. Activation troubleshooter can be used to reactivate Windows. For more information, see Using the Activation troubleshooter.
When reinstalling Windows, select the edition of Windows that matches your digital license. For example, if the current edition of Windows is Home, Windows Home must be installed again.
To check which edition of Windows is currently running, follow these steps:
-
Right-click on the Start menu and select Settings > System > About
Or
Select the following About shortcut:
About
-
In the System > About window that opens, the edition of Windows is displayed in the Windows specifications section next to Edition
Steps to reinstall Windows with media
You can reinstall Windows when you are signed in to Windows (in-place upgrade), or from the Windows Recovery Environment (clean install).
Select the option that best suits your needs:
Note: If you suspect that your device has been infected, make sure that your antivirus software is up to date.
Having trouble playing the video? Watch it on YouTube.
-
Create the installation media for Windows
-
Connect the installation media you created to your PC
-
Open File Explorer and select the drive with the installation media
-
From the root directory of the drive, open the file setup.exe, and then select Yes when asked if you’d like to allow the app to make changes to your device
-
Select Change what to keep
-
Select one of the following options, and then select Next:
-
Keep personal files and apps — This will preserve your personal data, apps, and settings
-
Keep personal files only — This will preserve your personal data and settings, but all your apps will be removed
-
Keep nothing — This will remove all personal data, settings, and apps
-
-
To finish, select Install to start reinstalling Windows on your PC
Your PC will restart several times during the reinstallation.
If your PC doesn’t start and you don’t have a recovery drive or a repair disc, you can use the Media Creation Tool to create installation media for Windows. This tool can be used to download the latest version of Windows and create a bootable USB drive or DVD, which can then be used to perform a clean installation of Windows.
Warning: A clean installation is an advanced option to help start fresh on a device. Microsoft recommends following the below steps only if you’re confident in making these changes. For more help, contact support. A clean installation removes all of the following items:
-
Personal files
-
Apps
-
Customizations from the device manufacturer
-
Any changes made in Settings
-
On a working PC, create the installation media for Windows
-
Connect the installation media you created to your nonfunctional PC. Start the PC using the installation media
Note: Check with the PC manufacturer on how to start the PC using media.
-
The Windows 11 Setup starts once the device boots from the Windows installation media. If you don’t see the setup screen, your PC might not be set up to boot from a drive. Check your PC manufacturer’s website for info on how to change your PC’s boot order and then try again. In the Select language settings window, select language and localization settings, and then select Next
-
In the Select keyboard settings window, select keyboard settings, and then select Next.
-
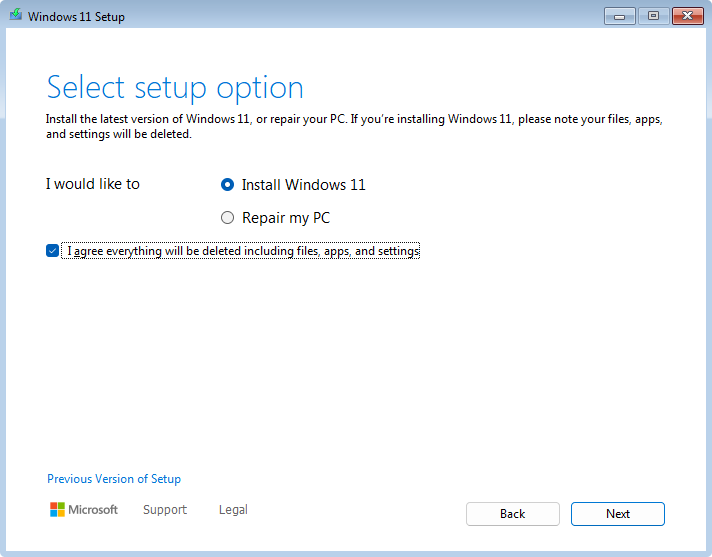
In the Select setup option window, select Install Windows 11, select I agree everything will be deleted including files, apps, and settings, and then select Next

-
If the Product key window appears:
-
Select I don’t have a product key
-
In the Select Image window that appears, select the edition of Windows that is installed on the device as determined in the section The edition of Windows being reinstalled needs to match your license. Once the proper Windows edition is selected, select Next. Once Windows is reinstalled, Windows applies the product key automatically based on the product key linked to your Microsoft account.
Warning: If you don’t have a product key and your product key isn’t linked to your Microsoft account, don’t proceed forward. Instead, cancel the Windows setup by closing the window, and then follow the instructions in the section Link your digital license to your Microsoft account before reinstalling Windows.
Note: The Product key window might not appear. For example, if Windows Setup finds a product key stored in the firmware of the device, it automatically applies that product key, and the Product key window doesn’t appear.
-
-
In the Applicable notices and license terms window, select the Accept button
-
In the Select location to install Windows 11 window:
-
Delete all partitions on Disk 0 that aren’t listed as Unallocated Space. Partitions are deleted by selecting and highlighting each one individually and then selecting ❌Delete Partition
Warning: If a device has more than one disk, there might be additional disks listed, for example, Disk 1. Don’t modify or delete the partitions on any other disks besides Disk 0.
-
Once all partitions on Disk 0 are deleted, there should only be one item left called Disk 0 Unallocated Space. Make sure Disk 0 Unallocated Space is selected and highlighted, and then select Next
-
-
In the Ready to install window, select Install
-
The Windows reinstall begins. The device restarts several times during the reinstallation
-
Once Windows finishes reinstalling, step through the Windows configuration wizard and configure settings as desired. Make sure to connect to and sign in with your Microsoft account so that the digital license and product key saved to your Microsoft account is properly applied to Windows
Need more help?
Want more options?
Explore subscription benefits, browse training courses, learn how to secure your device, and more.
В этой статье представлена информация о том, как получить и использовать средство Media Creation Tool. Вы можете использовать этот инструмент для создания загрузочной USB и DVD-дисков, файлов ISO, обновления и восстановления вашей системы Windows 10.
Media Creation Tool представляет собой специальный инструмент, который позволит вам создать загрузочный носитель с Windows 10. Приложение использует форматы, оптимизированные для быстрой загрузки.
Для данного процесса требуется компьютер с доступом в Интернет, USB-накопитель объемом не менее 8 ГБ или DVD диск.
Примечание: Вся информация на USB-накопителе будут стерта для создания загрузочного флеш-диска Windows 10.
Media Creation Tool Создание загрузочного флеш-накопителя с Windows 10/
- Посетите страницу Microsoft для загрузки инструмента «Media Creation Tool». На странице нажмите «Скачать средство сейчас».
- Сохраните приложение в любой удобной вам папке, по умолчанию будет использована папка «Загрузки».
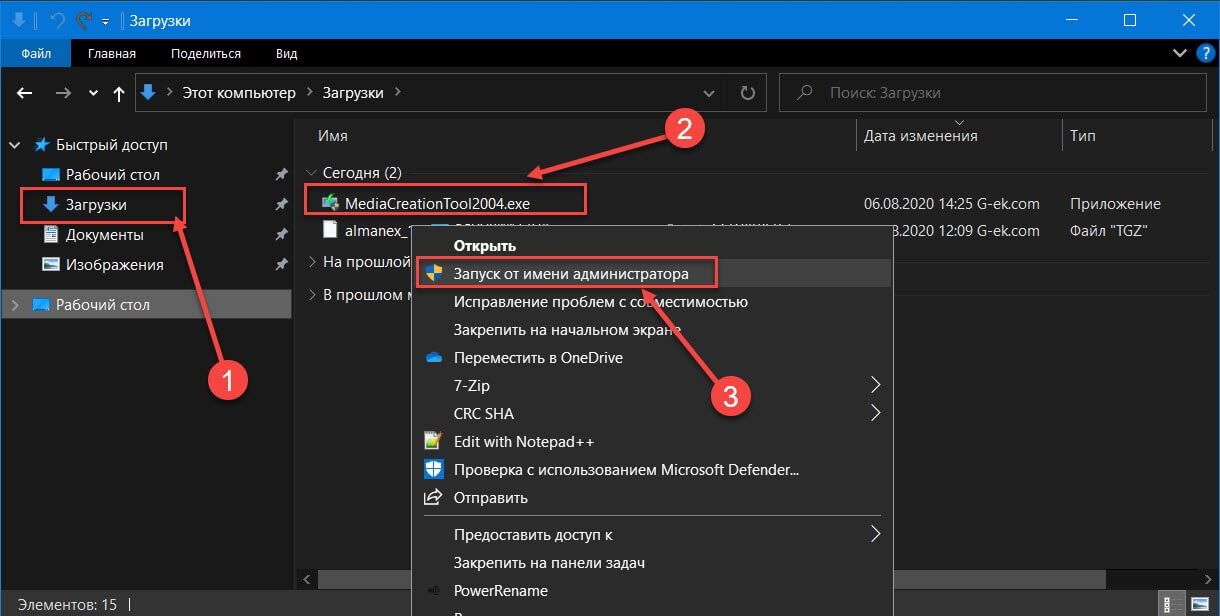
- Запустите приложение «Media Creation Tool».
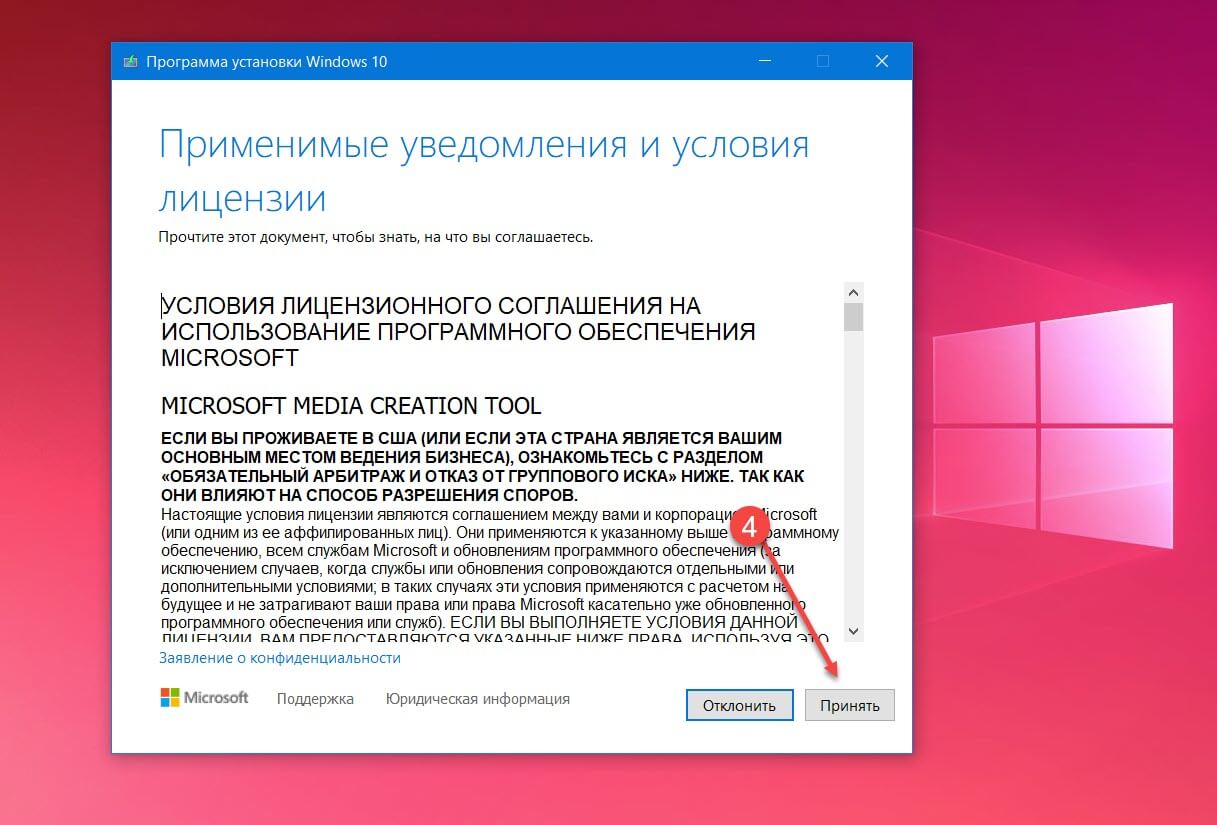
- Примите условия лицензионного соглашения, кнопка «Принять».
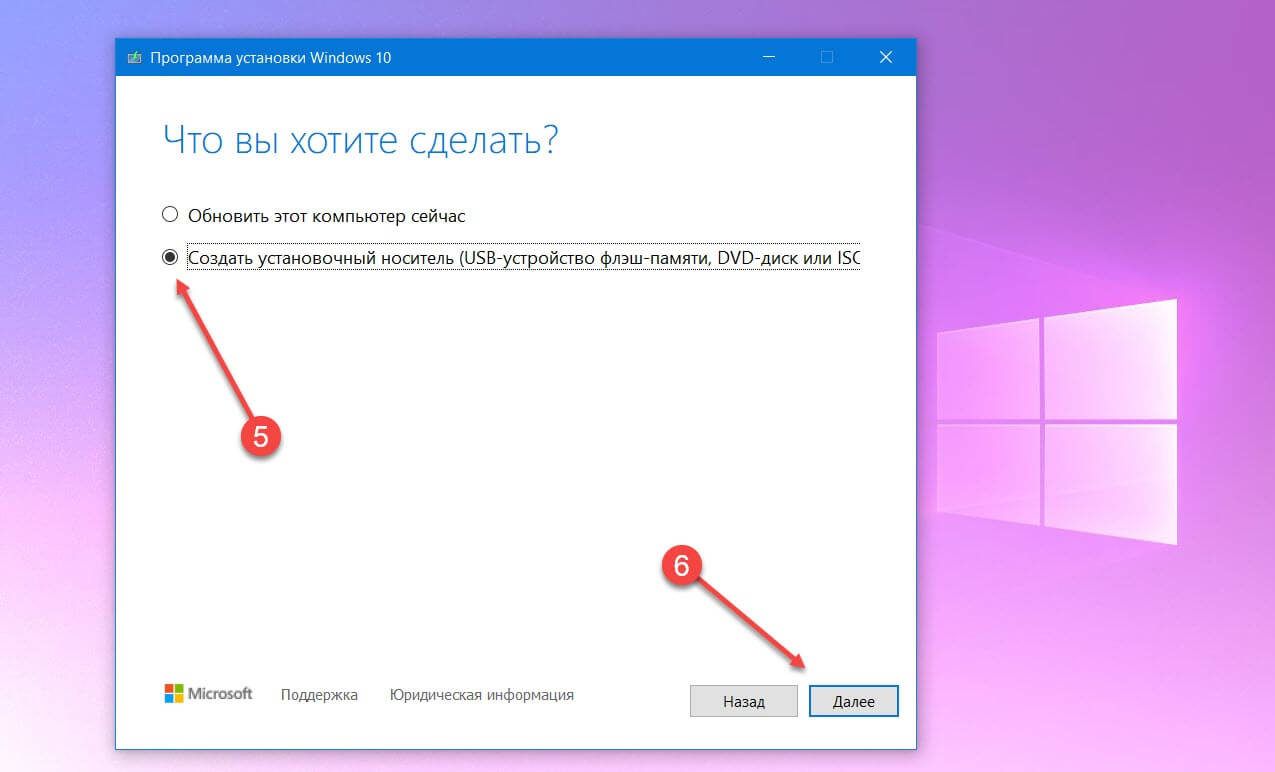
- Выберите «Создать установочный носитель (USB-устройство флеш памяти, DVD диск или ISO файл)» и нажмите «Далее».
- Выберите правильные настройки для вашей версии Windows 10
- Язык (страна)
- Windows 10
- 32 или 64-разрядная
- Нажмите «Далее».
- Выберите «USB устройство флеш памяти» и нажмите «Далее».

- Выберите свою флешку и снова нажмите кнопку «Далее».
- Дождитесь завершения процесса (Вы можете продолжать пользоваться компьютером).
- По окончании загрузки и записи нажмите кнопку «Готово» и извлеките загрузочную флешку с Windows.
Создание ISO файла или загрузочного DVD диска с Windows 10.
Если вам необходимо получить ISO файл, процесс будет следующим:
- Посетите страницу Microsoft (ссылка в первом примере) для загрузки Media Creation Tool
- На странице нажмите «Скачать средство сейчас».
- Вставьте DVD диск для записи или в случае создания ISO пропустите этот шаг.
- Запустите приложение и примите условия лицензионного соглашения.
- Выберите «Создать установочный носитель (USB-устройство флеш памяти, DVD диск или ISO файл)» и нажмите «Далее».
- Выберите правильные настройки для вашей версии Windows 10 и нажмите «Далее».
- Выберите носитель, в нашем случае это «ISO файл» и нажмите «Далее».
- Укажите место для его сохранения. Нажмите кнопку «Сохранить».
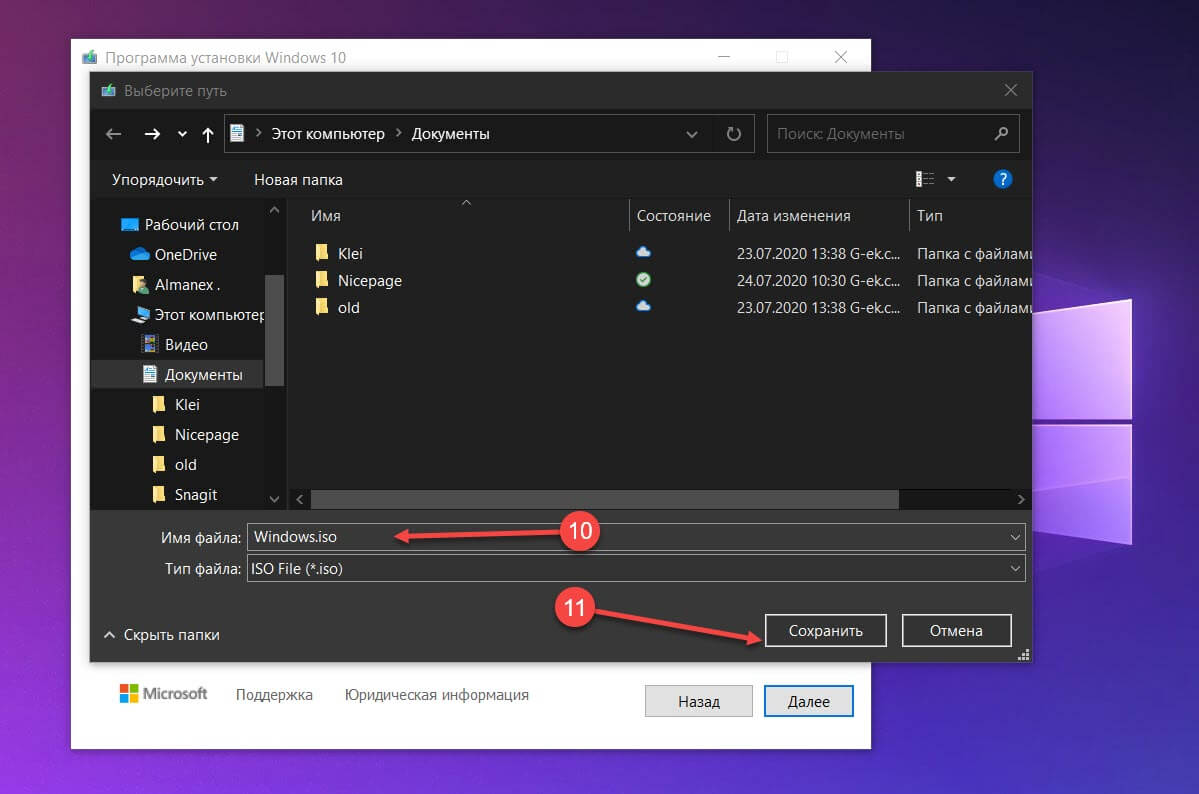
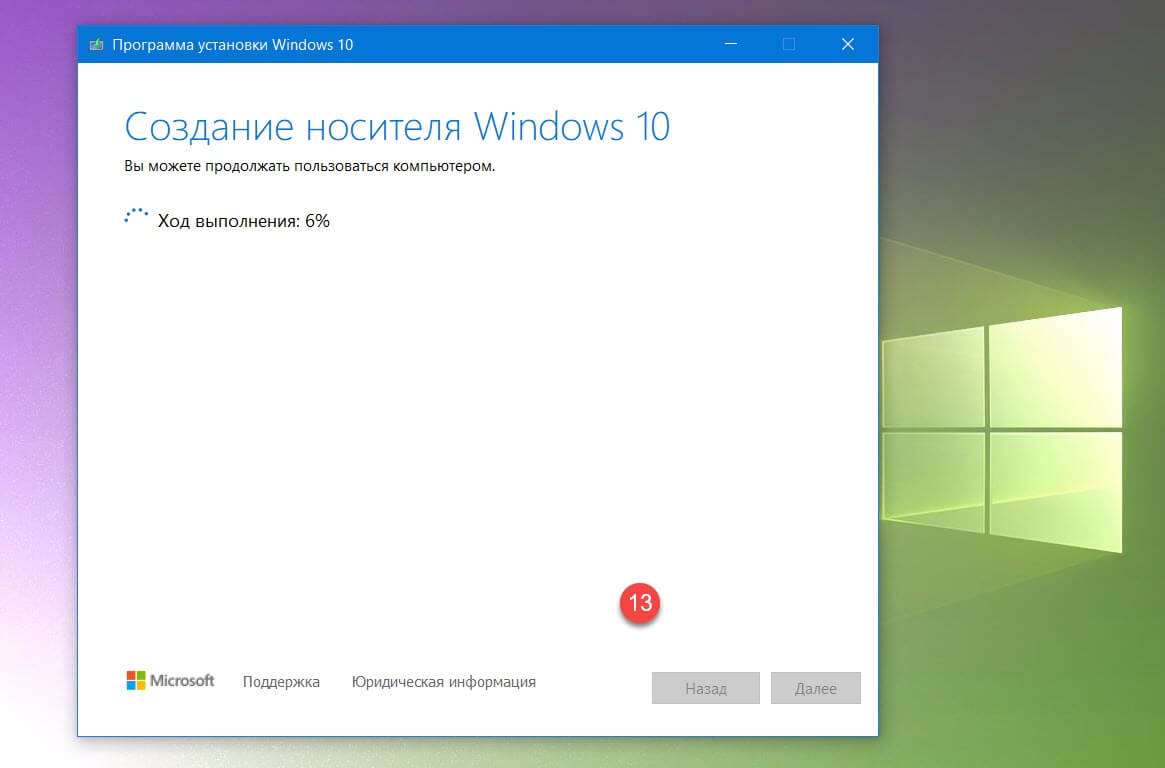
- Дождитесь завершения процесса (Вы можете продолжать пользоваться компьютером).

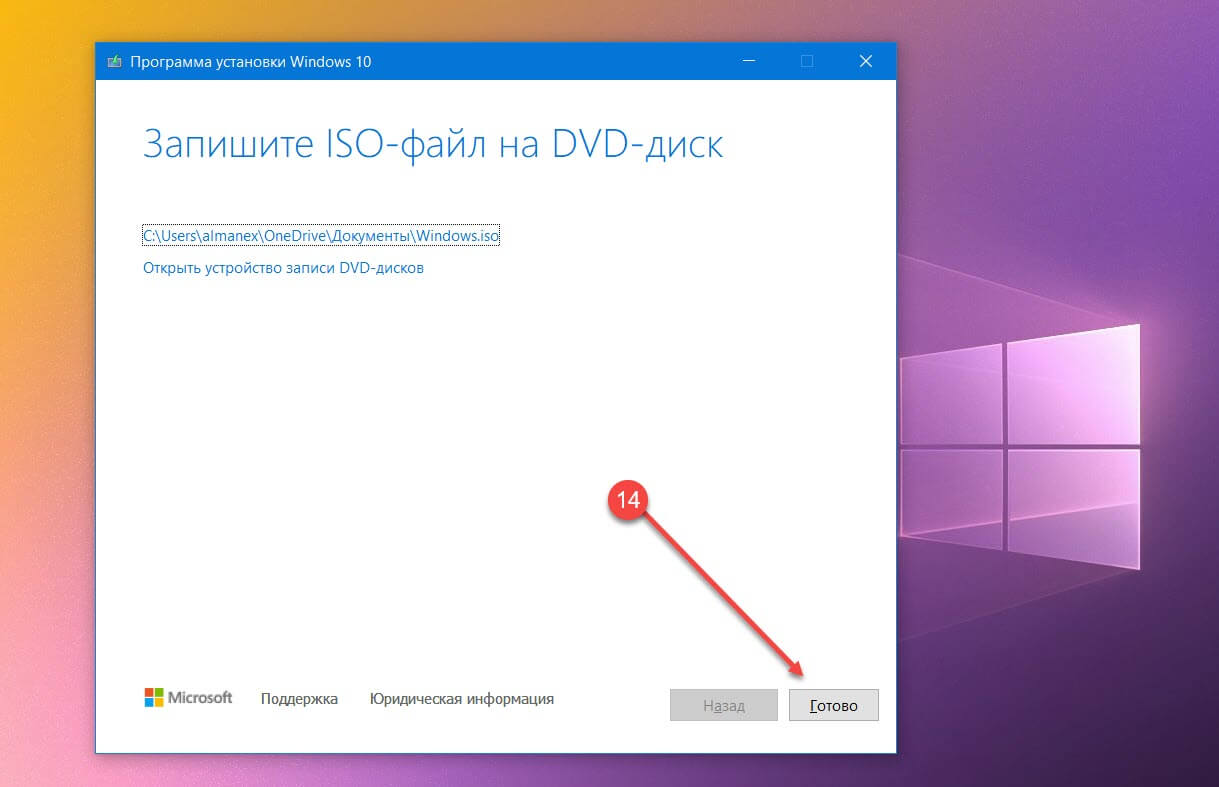
- По окончании процесса вы найдете готовый ISO файл Windows 10, также вам будет предложено записать DVD диск или вы можете сделать это позже, с помощью сохраненного образа системы, нажмите кнопку «Готово».
Все.
Обновление или восстановление Windows 10 с помощью Media Creation Tool.
- Перейдите на страницу загрузки Media Creation Tool
- На странице нажмите кнопку «Скачать средство сейчас» и сохраните приложение в любой удобной вам папке.
- Запустите инструмент Media Creation Tool.
- Примите условия лицензионного соглашения, кнопка «Принять».
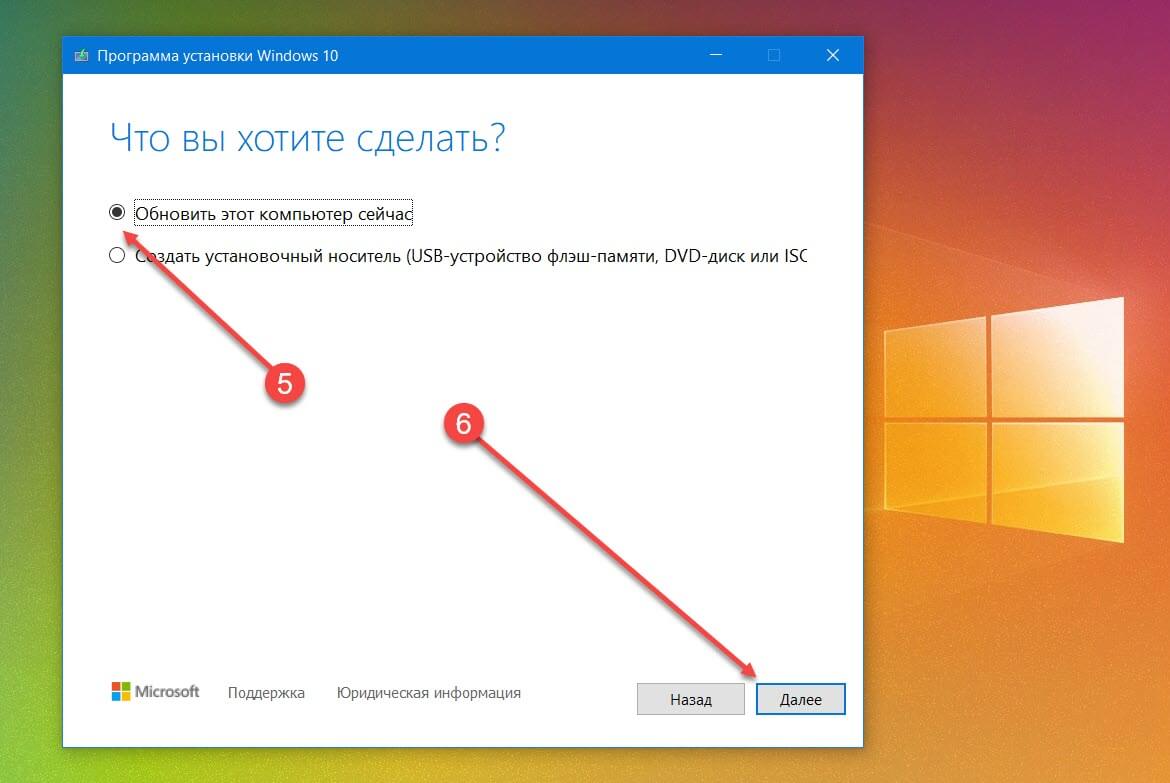
- Выберите «Обновить это устройство сейчас» и нажмите «Далее».
Утилита выполнит загрузку установочных файлов на серверах Microsoft.
Media Creation Tool сохраняет ваши персональные файлы и приложения и устанавливает Windows 10 Домашняя (или Pro, в зависимости от вашей старой системы). Выполняется обновление компьютера, никакие данные не стираются.
- Снова примите условия лицензионного соглашения, кнопка «Принять».
- Выберите что вы хотите сохранить и нажмите «Далее»:
- Сохранить личные файлы и приложения
- Сохранить только мои личные файлы
- Ничего не сохранять
- Подтвердите свои действия нажав кнопку «Да».
- Система проверит и установит последние обновления.
- В окне «Готово к установке» нажмите кнопку «Установить».
Приложение установит файлы и автоматически перезагрузит компьютер. После перезагрузки инициализируется процесс настройки операционной системы.
Все! Надеюсь эта информация пригодится.
Рекомендуем: Загрузочная флешка Windows 10 с помощью командной строки.
Как создать загрузочный USB-накопитель Windows 10 с помощью PowerShell
Introduction
Windows 10 has been out for a few years at this point, and with the Windows 10 April 2018 Update, it now has more features than ever before.
Most people have been using Windows 10 without issue, but what happens when something does happen and you need to reinstall? And, now that Microsoft seems to be pushing updates on people who don’t want them, it might happen sooner, rather than later.
If you run into problems with your OS, you’ll need to know how to create a Windows 10 Recovery Disk, or you’ll get stuck with a very expensive paperweight. And, you can’t simply roll back to Windows 7 or 8 anymore.
Don’t worry though, we’ll show you how to create a Windows 10 recovery disk in this guide.
- Also check out: How to use Windows 10

1. Run the Media Creation Tool
If you upgraded to Windows 10 using the media creation tool you have the option to use it to create install media either on a disc or a USB flash drive. Even if you waited for Windows 10 to be delivered in the background you can still download and use the tool after you’ve installed the OS, and you can create media for use on other machines too.
Run the tool – there are different versions for 32-bit and 64-bit systems so make sure you get the right one – and select the ‘Create installation media for another PC’ option.
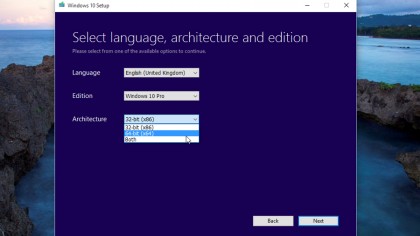
2. Select a language and version
You now need to select the language to use and the version of Windows 10. Note that this must match the version you’ve installed or your licence key won’t be valid. If you’re making media for another machine use the appropriate version for that. You also need to choose whether to create a 32-bit or 64-bit version – you can make media for either regardless of the machine you’re using.
On the next screen you need to select either to burn a disc or create a USB drive, and then you simply wait for Windows to download the files and create the media.
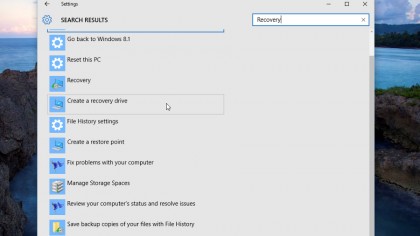
3. Create a recovery drive
Previous versions of Windows had the option to create a recovery disc from the Recovery Options section in Control Panel. In Windows 10 you won’t find this option on any of the Settings screens but it is still available, you just need to hunt for it.
Open up Settings from the Start menu and type Recovery in the Search box at the top right, then select ‘Create a recovery drive’ from the list of options that appears on the left side of the screen. You can also find it by typing Recovery drive in the Cortana Search box on the taskbar.
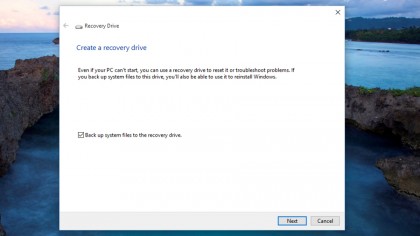
4. Back up system files
You’ll need to provide User Account Control approval, then the Recovery Drive tool will launch. A recovery drive will allow you to reset your system or troubleshoot problems.
You have the option to back up your system files to the drive, and if you do this you can also use it to perform a reinstall of Windows. Tick the box to back up system files and then click on Next to continue. There will be a short wait while your system is checked, and you’ll then be asked to connect a USB drive.
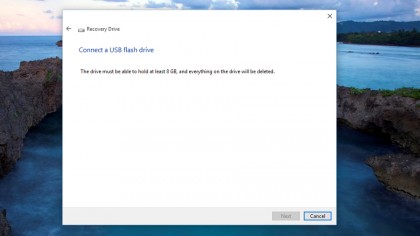
5. Find out flash drive size
The program will tell you what size flash drive you need – this will vary depending on what other software is installed on your system but will usually be at least 4GB. Note that any existing content on the drive will be wiped out as part of the process. Select the drive you want to use and click on Next to continue.
Before beginning to create the drive make sure that your version of Windows 10 is activated – if your old Windows was activated this should have happened automatically – you won’t then need a licence key to reinstall.
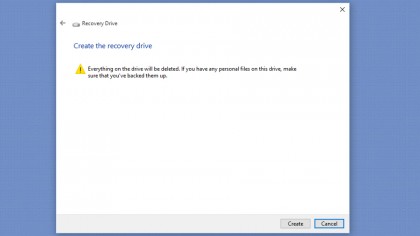
6. Create a recovery drive
You’ll get a further warning that the content of the drive will be deleted, so click on Create if you’re sure you want to proceed. The system will then begin to create your recovery drive – this will take some time but you can continue to use your PC for other tasks while it’s happening.
You’ll see it go through various stages including copying utilities and copying system. Once it’s complete there will be a message saying ‘The recovery drive is ready’ and you can click on Finish to complete the task.
7. Try a different install method
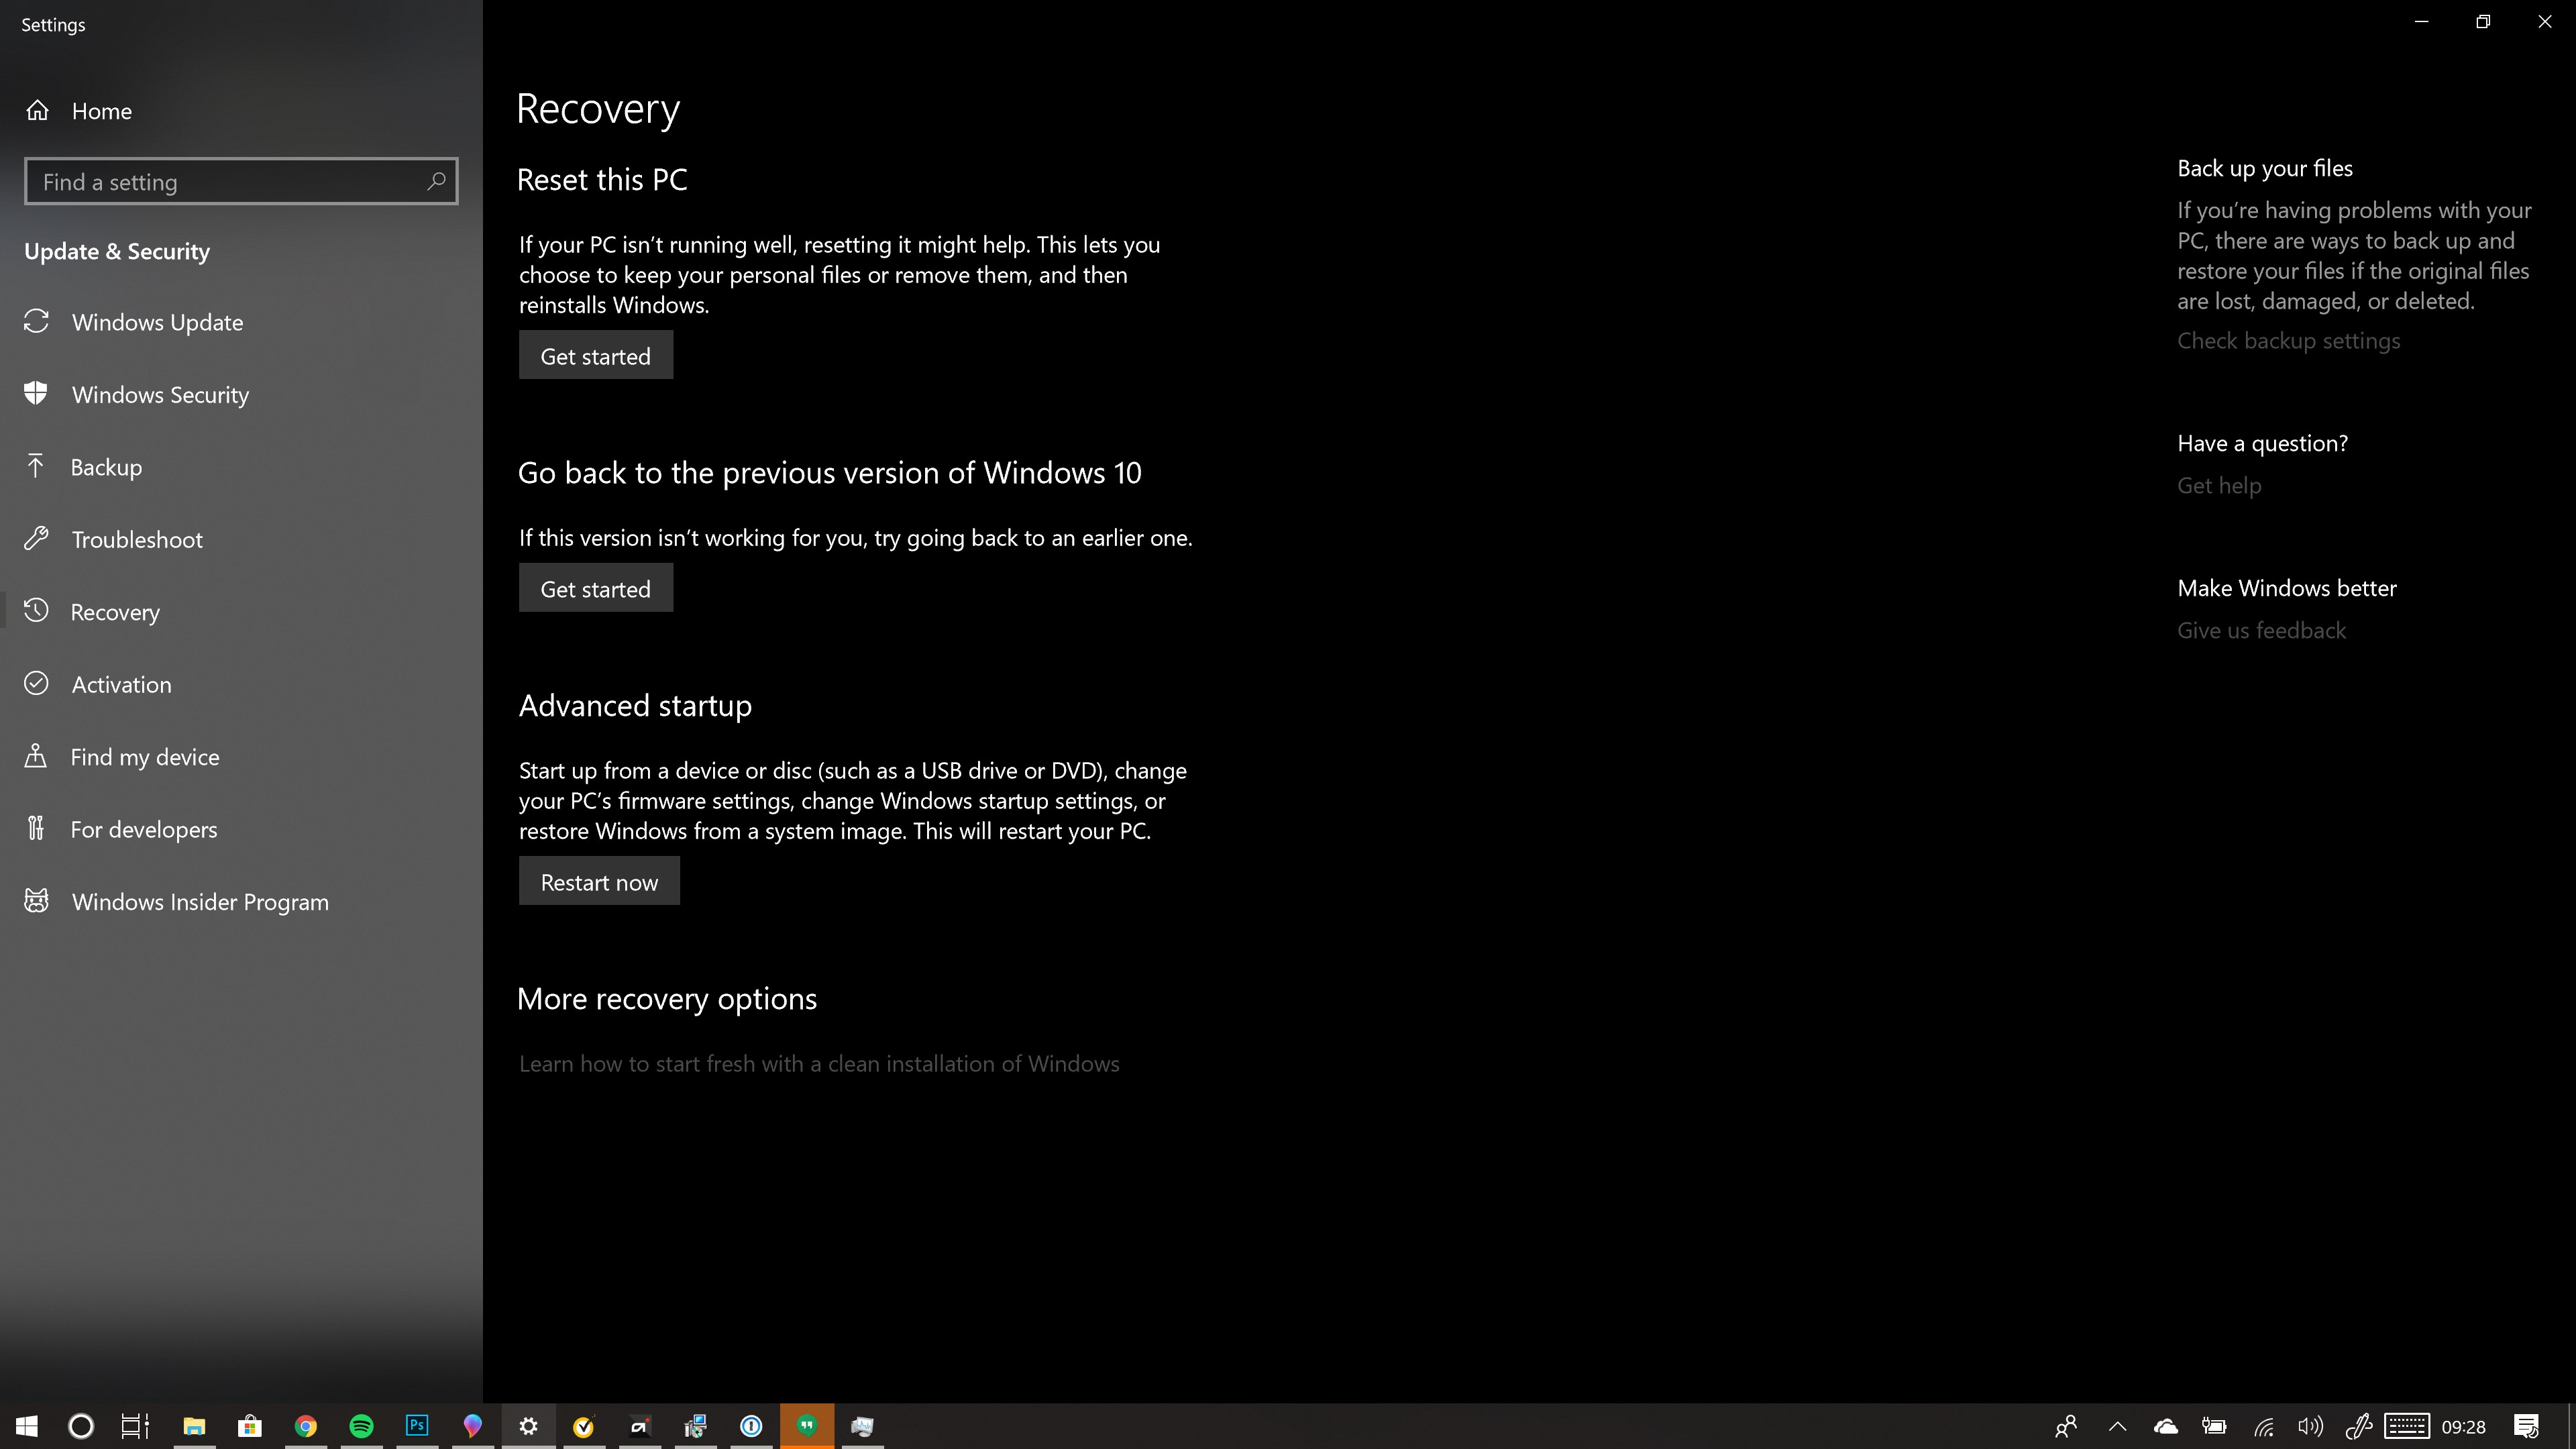
If you don’t want to do a complete reinstall there are other options. If you open Settings from the Start menu, select Update & Security, then choose Recovery from the left-hand menu, you have a number of options.
You can reset the PC which effectively allows you to do an in-place reinstall, though of course this only works if your PC is still running. There’s also an Advanced start-up option, which we’ll cover in the next slide.
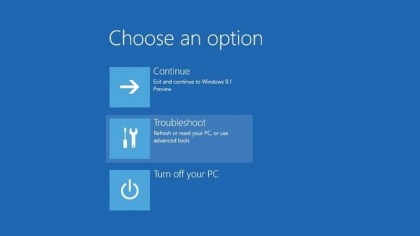
8. Do an advanced start-up
The Advanced start-up option allows you to start from the media you’ve created, either on disc or USB. You can also access the system’s firmware or restore the system from an image. Note that this will only work on recent machines with a UEFI (Unified Extensible Firmware Interface) rather than the BIOS used by older PCs.
On UEFI systems it’s not possible to run 32-bit Windows on a 64-bit computer as it was on older machines. You can access Advanced start-up from Settings or by holding down Shift when you click Restart from the Start menu.
9. Try an alternative
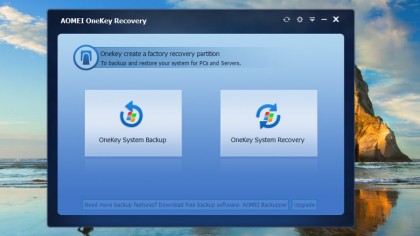
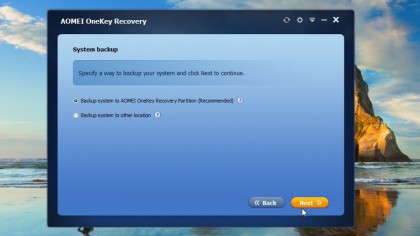
If you’re not happy with any of the recovery options that are offered as standard by Windows there is an alternative available – you can download the free AOMEI OneKey Recovery tool. This allows you to create a recovery partition on your hard drive similar to those supplied by manufacturers on pre-installed systems.
The advantage here is that AOMEI images your current system state with all of your settings included. When you download and install it, you’ll be presented with two choices – click on OneKey System Backup to start.
10. Create a partition
The program then walks you through the entire process of creating a partition – you will need to have around 25GB of unallocated space available on your drive. If you don’t have unallocated space you’ll need to create a new partition. You can choose to back up your system to another location, such as an external drive, if you prefer.
After creating the partition AOMEI adds itself to the boot menu of the system allowing you to access the recovery partition on startup. You have the option to add a message allowing you to simply press a key to access recovery.
- Check out our collection of guides on how to use Windows 10