
Для проверки целостности системных файлов и восстановления поврежденных файлов (библиотек) компонентов в Windows (Windows Server) можно использовать команды SFC и DISM. Эти две утилиты могут быть крайне полезными, если операционная система Windows работает нестабильно, появляются ошибки при запуске стандартных приложений или служб, после вирусного заражения и т.д.
В этой статье мы рассмотрим, как использовать команды
sfc /scannow
,
DISM /Online /Cleanup-Image /RestoreHealth
или
Repair-WindowsImage -Online -RestoreHealth
для восстановления образа и системных фалов в Windows 10/11 и Windows Server 2022/2019/2016.
Содержание:
- SFC /scannow: восстановление системных файлов Windows
- Проверка целостности хранилища компонентов Windows с помощью DISM
- Восстановление образа Windows с помощью DISM /RestoreHealth
- DISM /Source: восстановление образа Windows с установочного диска
- Восстановление образа Windows с помощью PowerShell
- DISM: восстановление поврежденного хранилища компонентов, если Windows не загружается
SFC /scannow: восстановление системных файлов Windows
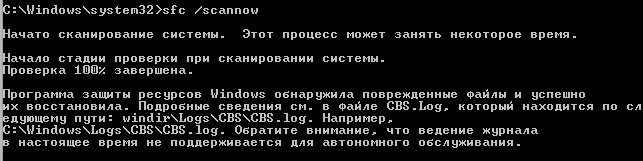
Перед тем, как восстанавливать образ Windows с помощью DISM, рекомендуется сначала попробовать проверить целостность системных файлов с помощью утилиты SFC (System File Checker). Команда
sfc /scannow
позволяет проверить целостность системных файлов Windows. Если какие-то системные файлы отсутствуют или повреждены, утилита SFC попробует восстановить их оригинальные копии из хранилища системных компонентов Windows (каталог C:\Windows\WinSxS).
Утилита SFC записывает все свои действия в лог-файл
windir%\logs\cbs\cbs.log
. Для всех записей, оставленных SFC в файле CBS.log проставлен тег [SR]. Чтобы выбрать из лога только записи, относящиеся к SFC, выполните команду:
findstr /c:"[SR]" %windir%\Logs\CBS\CBS.log >"%userprofile%\Desktop\sfc.txt"
Если команда sfc /scannow возвращает ошибку “
Программа защиты ресурсов Windows обнаружила повреждённые файлы, но не может восстановить некоторые из них / Windows Resource Protection found corrupt files but was unable to fix some of them
”, скорее всего утилита не смогла получить необходимые файла из хранилища компонентов (образа) Windows.
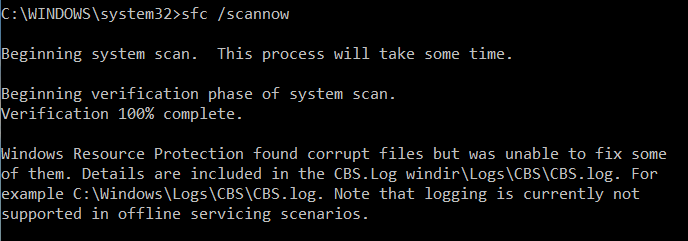
В этом случае вам нужно попробовать восстановить хранилище компонентов вашего образа Windows с помощью DISM.
После восстановления образа вы можете повторно использовать утилиту SFC для восстановления системных файлов.
Проверка целостности хранилища компонентов Windows с помощью DISM
Утилита DISM (Deployment Image Servicing and Management) доступна во всех версиях Windows, начиная с Vista.
Для сканирования образа Windows на наличие ошибок и их исправления используется параметр DISM /Cleanup-image. Команды DISM нужно запускать из командной строки, с правами администратора.
Чтобы проверить наличие признака повреждения хранилища компонентов в образе Windows (флаг CBS), выполните команду (не применимо к Windows 7/Server 2008R2):
DISM /Online /Cleanup-Image /CheckHealth
Эта команда не выполняет полное сканирование хранилища компонентов. Проверяются лишь записанные ранее маркеры повреждений и события в журнале Windows. Изменения в образ не вносятся. Команда проверит, не помечен ли ваш образ Windows как поврежденный и возможно ли исправить его.
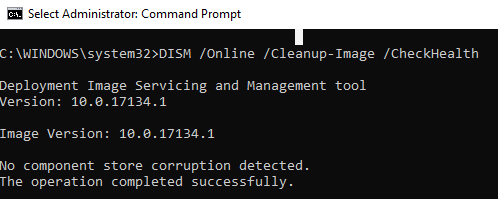
В этом примере команда вернула, что с образом все хорошо:
No component store corruption detected.
The operation completed successfully.
Чтобы выполнить полное сканирование хранилища компонентов на наличие повреждений в хранилище компонентов Windows, запустите команду:
DISM /Online /Cleanup-Image /ScanHealth
Команда проверки образа Windows может выполняться довольно долго (от 10 до 30 минут). И вернет один из трех результатов:
- No component store corruption detected – DISM не обнаружил повреждения в хранилище компонентов;
- The component store is repairable – DISM обнаружил ошибки в хранилище компонентов и может исправить их;
- The component store is not repairable – DISM не может исправить хранилище компонентов Windows (попробуйте использовать более новую версию DISM или вам придется восстанавливать образ Windows из резервной копии, сбрасывать или полностью переустанавливать вашу копию Windows.

В Windows 7 и Windows Server 2008 R2 для использования параметра DISM /ScanHealth нужно установить отдельное обновление KB2966583. Иначе при запуске DISM будет появляться “
Ошибка 87. Параметр ScanHealth не распознан в этом контексте
”.
Команда DISM /ScanHealth может вернуть ошибки:
- Ошибка: 1726. Сбой при удалённом вызове процедуры;
- Ошибка: 1910. Не найден указанный источник экспорта объекта.
Это однозначно говорит о том, что ваш образ Windows поврежден и его нужно восстановить.
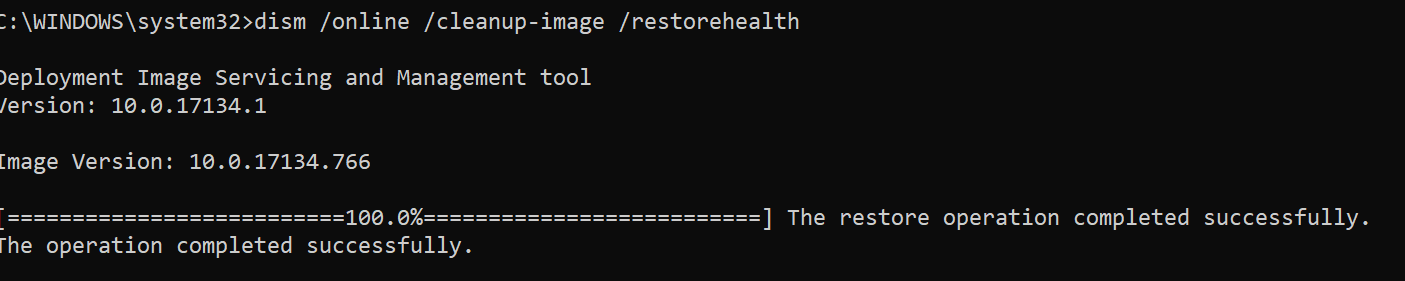
Восстановление образа Windows с помощью DISM /RestoreHealth
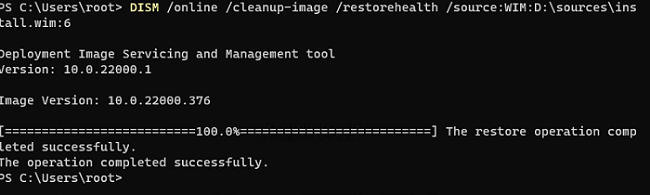
Чтобы исправить повреждения в хранилище компонентов образа Windows нужно использовать опцию RestoreHealth команды DISM. Эта опция позволит исправить найденные в образе ошибки, автоматически скачать и заменить файлы повреждённых или отсутствующих компонентов эталонными версиями файлов из центра обновлений Windows (на компьютере должен быть доступ в Интернет). Выполните команду:
DISM /Online /Cleanup-Image /RestoreHealth
В Windows 7/2008 R2 эта команда выглядит по другому:
DISM.exe /Online /Cleanup-Image /ScanHealth
Процесс сканирования и восстановления компонентов может быть довольно длительным (30 минут или более). DISM автоматически загрузит недостающие или поврежденные файлы образа с серверов Windows Update.
Восстановление выполнено успешно. Операция успешно завершена.
The restore operation completed successfully.
DISM /Source: восстановление образа Windows с установочного диска
Если на компьютере (сервере) отсутствует доступ в Интернет или отключена/повреждена служба Windows Update (как восстановить клиент Windows Update), то при восстановлении хранилища компонентов появятся ошибки:
- 0x800f0906 — Не удалось скачать исходные файлы. Укажите расположение файлов, необходимых для восстановления компонента, с помощью параметра Источник (0x800f0906 — The source files could not be downloaded. Use the source option to specify the location of the files that are required to restore the feature);
- Ошибка: 0x800f0950 — Сбой DISM. Операция не выполнена (0x800f0950 — DISM failed. No operation was performed);
- Ошибка:0x800F081F. Не удалось найти исходные файлы. Укажите расположение файлов, необходимых для восстановления компонента, с помощью параметра Источник (Error 0x800f081f, The source files could not be found. Use the «Source» option to specify the location of the files that are required to restore the feature).

<
Во всех этих случаях вы можете использовать альтернативные средства получения оригинальных файлов хранилища компонентов. Это может быть:
- Установочный диск/флешка/iso образ Windows
- Смонтированный файл wim
- Папка \sources\SxS с установочного диска
- Файл install.wim с установочным образом Windows
Вы можете указать WIM или ESD файл с оригинальным установочным образом Windows, который нужно использовать в качестве источника для восстановления файлов системы. Предположим, вы смонтировали установочный ISO образ Windows 11 в виртуальный привод D:.
Примечание. Для восстановления поврежденных файлов в хранилище компонентов из локального источника версия и редакция Windows в образе должна полностью совпадать с вашей.
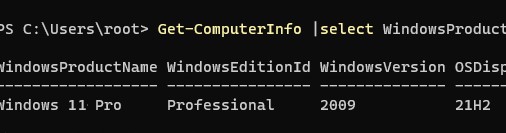
С помощью следующей PowerShell команды проверьте, какая версия Windows установлена на вашем компьютере:
Get-ComputerInfo |select WindowsProductName,WindowsEditionId,WindowsVersion, OSDisplayVersion
Выведите список доступных версий Windows в установочном образе:
Get-WindowsImage -ImagePath "D:\sources\install.wim"
В нашем случае образ Windows 11 Pro в образе install.wim имеет
ImageIndex = 6
.
Для восстановления хранилища компонентов из локального WIM/ESD файла с блокированием доступа в интернет, выполните следующую команду (не забудьте указать ваш индекс версии Windows в файле):
DISM /online /cleanup-image /restorehealth /source:WIM:D:\sources\install.wim:6 /limitaccess
Или:
DISM /online /cleanup-image /restorehealth /source:ESD:D:\sources\install.esd:6 /limitaccess
Если при запуске появляется
- Ошибка Error: 50: DISM does not support servicing Windows PE with the /Online option, значит ваша DISM считает, что вы используете WinPE образWindows. Чтобы исправить это, удалите ветку реестра HKEY_LOCAL_MACHINE\SYSTEM\CurrentControlSet\Control\MiniNT.
Ошибка DISM Error 87: проверьте правильно написания команды, убедитесь что вы используете версию DISM для вашей версии Windows (обычно бывает при загрузке через WinPE/WinRE).
Утилита DISM пишет подробный журнал сканирования и восстановления системных файлов в файл
C:\Windows\Logs\DISM\dism.log
.
После восстановления хранилища компонентов вы можете запустить утилиту проверки системных файлов
sfc /scannow
. Скорее всего она успешно восстановит поврежденные файлы:
Программа защиты ресурсов Windows обнаружила поврежденные файлы и успешно их восстановила.
Windows Resource Protection found corrupt files and successfully repaired them.
Если все системные файлы целы, появится сообщение:
Windows Resource Protection did not find any integrity violations
Восстановление образа Windows с помощью PowerShell
В версии PowerShell в Windows 10/11 и Windows Server 2022/2019 есть аналоги рассмотренных выше команд DISM. Для сканирования хранилища компонентов и поиска повреждений в образе выполните:
Repair-WindowsImage -Online –ScanHealth
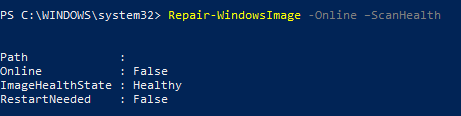
Если ошибок в хранилище компонентов не обнаружено, появится сообщение:
ImageHealth State: Healthy
Для запуска восстановления системных компонентов и файлов наберите:
Repair-WindowsImage -Online -RestoreHealth
При отсутствии доступа к интернету эта команда может зависнуть в процессе восстановления образа. Вы можете восстановить системные компоненты из локальной копии образа Windows в виде WIM/ESD файла, скопированного с установочного ISO образа Windows 10 (здесь также нужно указать индекс версии Windows в wim файле в качестве источника восстановления):
Repair-WindowsImage -Online -RestoreHealth -Source D:\sources\install.wim:5 –LimitAccess
DISM: восстановление поврежденного хранилища компонентов, если Windows не загружается
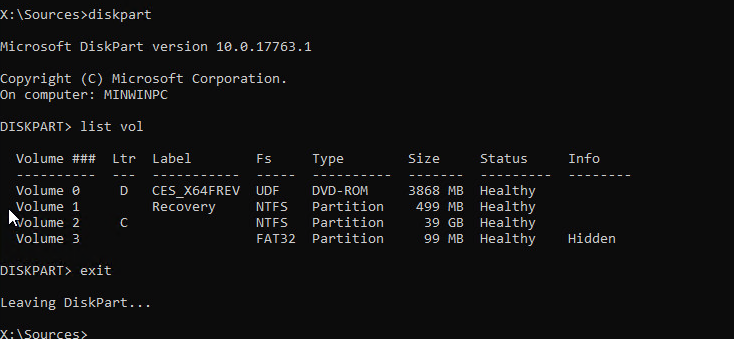
Если Windows не загружается корректно, вы можете выполнить проверку и исправление системных файлов в оффлайн режиме.
- Для этого загрузите компьютер с установочного образа Windows (проще всего создать загрузочную USB флешку с Windows 10/11 с помощью Media Creation Tool) и на экране начала установки нажмите
Shift + F10 - Чтобы разобраться с буквами дисков, назначенных в среде WinPE, выполните команду
diskpart
->
list vol
(в моем примере диску, на котором установлена Windows присвоена буква C:\, эту букву я буду использовать в следующих командах);
- Проверим системные файлы и исправим поврежденные файлы командой:
sfc /scannow /offbootdir=C:\ /offwindir=C:\Windows
- Для исправления хранилища компонентов используйте следующую команду (в качестве источника для восстановления компонентов мы используем WIM файл с установочным образом Windows 10, с которого мы загрузили компьютер):
Dism /image:C:\ /Cleanup-Image /RestoreHealth /Source:WIM:D:\sources\install.wim:6
- Если на целевом диске недостаточно места, то для извлечения временных файлов нам понадобится отдельный диск достаточного размера, например F:\, на котором нужно создать пустой каталог:
mkdir f:\scratch
и запустить восстановление хранилища компонентов командой:
Dism /image:C:\ /Cleanup-Image /RestoreHealth /Source:D:\sources\install.wim /ScratchDir:F:\scratch


Совет. Другие полезные команды DISM, которые должен знать администратор:
-
DISM /Add-Package
– установка MSU/CAB файлов обновлений, интеграция обновлений в образ Windows; -
DISM /Get-Drivers
– получение списка установленных драйверов; -
DISM /Add-Driver
– добавление драйверов в образ; -
DISM /Export-Driver
– экспорт установленных драйверов Windows; -
DISM /Add-Capability
– установка дополнительных компонентов Windows через Features on Demand (например, RSAT, сервер OpenSSH или ssh клиент Windows; -
DISM /Enable-Features
и
/Disable-Features
– включение и отключение компонентов Windows (например, протокола SMBv1), -
DISM /online /Cleanup-Image /StartComponentCleanup
– очистка хранилища компонентов и удаление старых версий компонентов (папки WinSxS); -
DISM /set-edition
– конвертирование ознакомительной редакции Windows на полную без переустановки.
Перед тем как перейти к восстановлению Windows Server 2019, нужно создать резервную копию.
Этот шаг мы пропустим и перейдем к пункту восстановления Windows Server 2019.
Нужна помощь? Настройки Windows Server и обслуживание серверов мы осуществляем в рамках услуги ИТ-аутсорсинг. Также возможны разовые проектные работы.
Способ 1 — Операционная система работоспособна.
- Восстановим систему из созданной копии. Это можно сделать из основного окна системы архивации Windows Server, нажав на строчку Восстановление.
- В первом пункте открывшегося мастера восстановления выбираем место расположения архива. Нажимаем Далее.
- Выбираем дату создания архивной копии. Можно нажать на ссылку Элементы подлежащие восстановлению и посмотреть эти элементы. Нажимаем Далее.
- Тип восстановления Файлы и папки. Нажимаем Далее.
- Восстанавливаемые элементы – выбираем Локальный диск (С:). Нажимаем Далее.
- Параметры восстановления – можно ничего не изменять. Нажимаем Далее.

Рисунок 1 – Мастер добавления ролей и компонентов
- Подтверждаем восстановление, нажав кнопку Восстановить. Ожидаем ход восстановления.

По завершению восстановления, в главном окне приложения можно посмотреть какие возникли ошибки.
Способ 2 — Операционная система не работоспособна.
- Выполняем загрузку ОС с установочного носителя (флэшка, диск). Доходим до окна, в котором есть ссылка Восстановление системы. Нажимаем на неё.
- Выбираем пункт Поиск и устранение неисправностей. Нажимаем Далее.
- В следующем меню выбираем Восстановление образа системы. Нажимаем Далее.
- Выбираем нашу ОС. Нажимаем Далее.
- Откроется окошко Восстановление компьютера из образа. Выбираем образ любым из предложенных способов. Нажимаем Далее.
- Выбираем доступный образ и нажимаем Далее.
- Можно оставить галочку напротив пункта Форматировать и разбить на разделы. Нажимаем Далее.
- Подтверждаем восстановление нажатием на кнопку Готово.
- Подтверждаем форматирование.
- Ожидаем некоторое время, пока происходит процесс восстановления. После перезагрузки, сервер восстановлен по состоянию последней резервной копии.
Hello! The registry is one of the essential elements within Windows Server. Additionally, the system has an editor to be able to modify it. However, any change can greatly affect the stability and performance of the system. Therefore, it is essential to use this editor carefully and responsibly. On the other hand, it is possible to backup the information contained in this registry. This way if there is any problem when modifying it, then we can always return to the original version. Without further ado, let’s see how to create a registry backup in Windows Server 2019/2016.
How to create a backup of the Windows Server registry using the registry editor.
In fact, in order to perform the backup, it is necessary to access the Registry Editor. With this in mind, press the Win+R combination and run the following command:
regedit

The Windows Server Registry Editor will be immediately displayed. Once there, click on the File menu. Then click on Export

A window will then be displayed. Please assign the name and location of the backup file. It is recommended to attach the date of creation. This way we will know the specific day of the registry backup. Please press Save.

From the selected location, you can see the attributes of the backup. To do so, right click on it and select Properties.

How to restore registry backup.
If the system has stability or performance failures derived from the registry editor, then we can restore the backup. With this in mind, please within the Registry Editor click on the File Menu and then on Import.

Then select the backup from the location. Please click on Open.

Immediately the process of restoring the registry backup will begin. Please wait a few moments while the task is completed. This may take several minutes depending on the size of the file.
Finally, we have seen how to create a registry backup in Windows Server 2019/2016. Accordingly, we restore the registry editor to its normal state so that all system parameters work properly. In addition, it is a simple process that increases the security of the system. All right, we’ve come to the end for today. Before I go, I invite you to see our post about changing the administrator password in Windows Server. See you soon!
— Advertisement —
Everything Linux, A.I, IT News, DataOps, Open Source and more delivered right to you.
Subscribe
«The best Linux newsletter on the web»
Contents
- What are the Common Causes of Data Loss or System Failure on Windows Server 2019?
- Windows Server 2019 file recovery software
-
HDD partition recovery software
- Recover a hard disk non-system partition
- Recover an HDD system partition
- Recover a hard disk system partition with LiveCD
- Windows Server 2019 Dll file recovery software
- Windows Server 2019 Registry recovery software
- Password recovery software
Sometimes during the work of a Windows Server 2019, various bugs, freezes, hardware or software failures may occur, even in spite of regular update and cleaning. Complete reinstallation of the system and full formatting of its local drives is not always the only way to restore the system back to normal. Use software to recover passwords, registry, bootloader, system files and dll files of your Windows Server 2019.
In such cases, the operating system can be restored with the use of special disks or programs created specifically for system recovery or recovery of files which determine its uninterrupted operation.
What are the Common Causes of Data Loss or System Failure on Windows Server 2019?
- Hardware failure: Components such as hard drives, power supplies, or memory modules can fail, leading to data loss or system failure.
- Software corruption: Errors in the operating system or applications can cause data loss or system instability.
- Human error: Accidentally deleting files, misconfiguring settings, or installing incompatible software can lead to data loss.
- Malware or viruses: Malicious software can infect a Windows Server 2019 system, causing data loss or system failure.
- Power outages: Sudden power loss can result in data corruption or system crashes.
- Natural disasters: Events such as floods, fires, or earthquakes can damage hardware and lead to data loss.
- Network issues: Problems with network connectivity or configuration can cause data loss or system instability.
- Software bugs: Errors or vulnerabilities in software can lead to data loss or system failure.
- Insufficient backups: Failure to regularly back up data can result in permanent data loss in the event of a system failure.
- Overheating: Excessive heat can damage hardware components and lead to data loss or system failure.
Windows Server 2019 file recovery software
Are you looking for a way to recover files?
In cases when files were deleted and they cannot be restored by using standard Windows Server 2019 options, use Hetman Partition Recovery.
Partition Recovery™ 5.0
The tool recovers data from any devices, regardless of the cause of data loss.
For this purpose, do the following:
-
Download the program, install and launch it. Learn about the program functions and step-by-step guide.
-
By default, users are suggested to start with File Recovery Wizard. Click «Next», and the program will ask you to select the disk you want to recover your files from.
-
Double-click on the disk from which you need to recover files and select analysis type. Choose «Full analysis» and wait for the disk scanning procedure to finish.
-
When the scanning is over, you will be shown files for recovery. Select the ones you need and click «Recover».
-
Select one of the options to save files. Do not save the recovered files to the disk from where they have been deleted previously because they can be erased.

Go to view

How to Recover Deleted Files With Hetman Partition Recovery Software
HDD partition recovery software
Methods applied to recover hard disk partitions depend on whether the system is in operable condition. Let us study most typical cases:
Recover a hard disk non-system partition
For this purpose, do the following:
-
Download the program for hard disk data recovery — Hetman Partition Recovery, install and launch it.
-
After launch, the program will find and display all physical disks as well as available and unavailable partitions and areas on your disks, showing this information in the left part of the main window.

-
Double-click on the disk or the area from which you need to recover files and select analysis type (in our case, this area is a non-formatted area). Choose «Full analysis» and wait for the disk scanning procedure to finish.
-
When the scanning is over, you will be shown files for recovery. Select the ones you need and click «Recover».
-
Select one of the options to save files. Do not save the recovered files to the disk from where they have been deleted previously because they can be erased.

Recover an HDD system partition
If the system partition is lost, a computer will not boot.
That is why:
-
Disconnect and take out of the computer the hard disk where the system partition was lost.
-
Connect this HDD to another computer.
-
Make sure that your hard disk is recognized by the other computer correctly.
-
Now follow the steps as shown in the previous section.
Go to view
How to Recover Data After Formatting, Deleting or Creating Partitions
Recover a hard disk system partition with LiveCD
If there is no possibility to connect a hard disk with a lost or damaged system partition to another computer, you can recover such partition by starting your computer with LiveCD, an alternative portable version of an operating system.
For this purpose, do the following:
-
Find a LiveCD which is good enough for your needs, download it and copy it to a CDDVD or a flash drive.
-
Connect the LiveCD to your computer and turn it on. The computer will boot automaticaly with the LiveCd.
-
Copy files from the system partition to another media (often it can be an external hard disk).
Windows Server 2019 Dll file recovery software
There can be various causes for DLL library errors in Windows. They can include deletion or damage to a library file, problkems with the system registry, malware (viruses), hardware failures or bad sectors in your HDD.
There are various methods to recover DLL library files, and one of these is DLL recovery software. Such programs can help you to restore damaged DLL files or install the missing ones.
Go to view
How to Recover Windows 10, 8, 7 System Files (SFC, DISM)
Windows operating systems also have their own utility for such purpose – sfc /scannow
In order to use it:
-
Launch the Command prompt as Administrator.
-
In the Command prompt window type in the command sfc /scannow and Enter.

When the command is executed, it will find and restore system and DLL files. For the changes to take place, you will have to restart Windows.
Windows Server 2019 Registry recovery software
Are you looking for a way to restore a Windows registry?
There is plenty of software to acess and manage Windows registry. Such programs can help you to find and correct registry errors. As a rule, they scan the registry for invalid paths and file types, control elements, obsolete entries, incorrect fonts, obsolete Start menu items, unused file extensions, program startup errors and list all the problems they have found.
With registry recovery software, you can correct errors and therefore restore your operation system back to normal.

Go to view
Programs to Clean Your Hard Disk and Registry from Junk Files in Windows 10, 8, 7
Windows operating systems also have their own utility for such purpose – Regedit.exe

To start Regedit.exe:
-
Start the line «Run» (with a key combination Win + R).
-
Type in the command regedit and press Enter.
Password recovery software
How to reset admin password in Windows Server 2019?
User account passwords can be recovered with special software created for resetting or recovering passwords. Such programs are especially relevant if Administrator account password has been lost (because passwords for other user accounts can be reset from this main account).
For this purpose, do the following:
-
Download and install the software for resetting or recovering user account passwords.
-
Create a boot CD/DVD disc or USB drive with the help of such program (if necessary).
-
Restart the computer and load it with a bootable media you have created.
-
Reset or recover passwords for the required user account.
Go to view
How to Recover Windows 10, 8, 7 Administrator Password for a Computer or Laptop

In this tutorial you will learn how to repair Windows Server 2019 installation with DISM. If you’re experiencing problems with your Windows Server 2019 installation, using the DISM /restorehealth can help repair it. DISM is a command-line tool that can scan and fix issues with Windows images, including those used by the Server operating system. This process can be done by following a few simple steps such as opening an elevated command prompt, running the DISM tool, waiting for the process to complete, and restarting your system.
Remember to always have a backup. Or if it’s a virtual machine at least a snapshot.
1.Lets get started by Opening up CMD as administrator and running the following:
dism /online /cleanup-image /scanhealth
2. Once /scanhealth is complete, run the following.
dism /online /cleanup-image /checkhealth
3. Now lets mount your Windows Server 2019 ISO as a drive. Take note of your mounted drive letter because you may need to change it to reflect it within this next command. Start elevated command prompt.
dism /online /cleanup-image /restorehealth /source:WIM:d:\sources\install.wim:2 /limitaccess
4. Now run the following to find and repair additional corruption
5. Hopefully all has been repaired restart your server, then run some windows updates and you should be good to go.
I hope this article was helpful, if you have any questions, please feel free to contact me. If you would like to be notified of when I create a new post, you can subscribe to my blog alert.
Discover more from Patrick Domingues
Subscribe to get the latest posts sent to your email.