
Если после каких-либо действий по оптимизации работы служб Windows 10 вы столкнулись с проблемами, может потребоваться восстановить параметры служб в состояние «по умолчанию». В зависимости от ситуации сделать это можно разными способами.
В этой инструкции подробно о различных методах восстановить службы по умолчанию в Windows 10 и дополнительная информация, которая может оказаться полезной.
- Конфигурация системы
- Точки восстановления
- Файл реестра
- Тип запуска служб по умолчанию
- Другие методы восстановления
- Видео
- Дополнительная информация
Конфигурация системы — способ, который может помочь, но не восстанавливает первоначальную конфигурацию всех служб
Самый часто рекомендуемый способ случай восстановления запуска служб — использовать «Конфигурация системы». По факту он не восстанавливает тип запуска всех служб, но в некоторых случаях может сработать и исправить возникшие из-за неполадок служб проблемы, поэтому рекомендую начать с него:
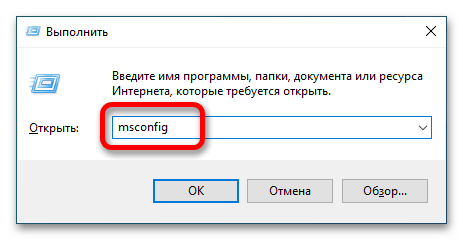
- Нажмите клавиши Win+R на клавиатуре (Win — клавиша с эмблемой Windows), введите msconfig и нажмите Enter.
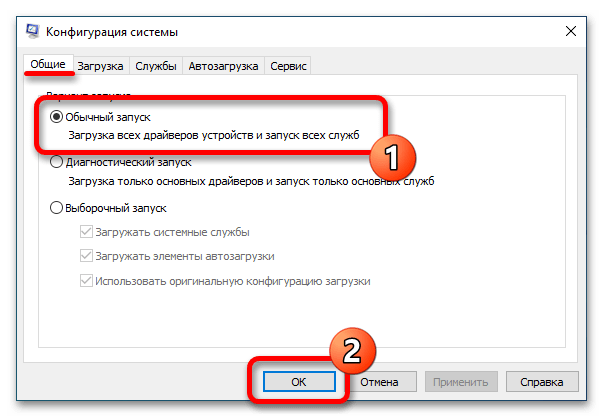
- На вкладке «Общие» выберите пункт «Обычный запуск» и нажмите «Применить».

- Перезагрузите ваш компьютер.

После этого проверьте, была ли решена проблема.
Обратите внимание: если вы снова зайдёте в msconfig после перезагрузки, с большой вероятностью вы увидите, что отметка вновь установлена в состоянии «Выборочный запуск» — это нормально и как-то это исправлять не следует.
Точки восстановления — самый быстрый метод восстановления работы служб
Если на вашем компьютере сохраняются точки восстановления и в наличии есть точки восстановления, созданные на момент, предшествующий появлению проблем, это будет самым быстрым способом восстановления работоспособности служб.
В случае если Windows 10 запускается и работает:
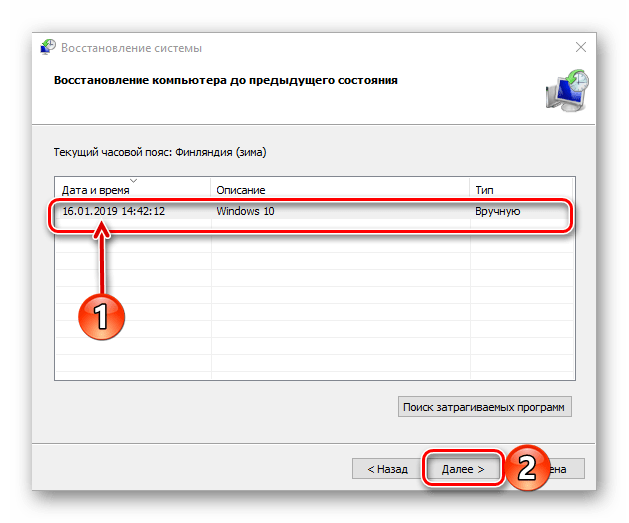
- Нажмите клавиши Win+R на клавиатуре, введите rstrui.exe и нажмите Enter. Используйте предложенную точку восстановления или отметьте пункт «Выбрать другую точку восстановления».

- Выберите точку восстановления на дату, когда проблема не проявила себя.
- Запустите восстановление и дождитесь его завершения.


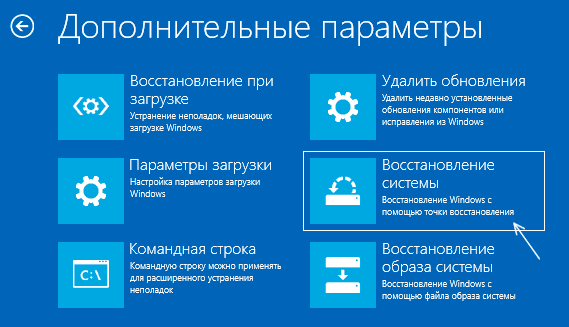
Если Windows 10 не запускается:
- Если отображается синий экран с кнопкой «Дополнительные параметры», вы можете перейти в них, а затем в дополнительных параметрах восстановления системы использовать точки восстановления.

- Можно загрузиться с загрузочной флешки Windows 10, перейти на второй экран программы установки и внизу слева нажать «Восстановление системы», затем перейти к восстановлению из точки восстановления.
REG-файл с параметрами работы служб Windows 10 по умолчанию
Это не лучший способ (и потенциально что-то может пойти не так), так как набор служб и их параметров отличается от версии к версии Windows 10 и в зависимости от редакции системы. Важно: если вы решите использовать этот способ, предварительно создайте точку восстановления Windows 10.
Но при желании и на свой страх и риск, вы можете использовать файл реестра со всеми параметрами служб по умолчанию (кроме сторонних служб) для Windows 10 Pro 20H2 — скачайте этот ZIP-файл — https://yadi.sk/d/cw1yhXAIU-Sq0A, распакуйте его, «запустите» REG-файл и согласитесь с добавлением параметров в реестр Windows 10 после этого перезагрузите компьютер.
Учитывайте, что при добавлении данных в реестр вы с большой вероятностью получите сообщение «Не удается импортировать, не все данные были успешно записаны в реестр». Это связано с тем, что изменение параметров некоторых служб запрещено в Windows 10 и изменения для них произведены не будут.
Тип запуска различных служб Windows 10
На скриншотах ниже — типы запуска служб по умолчанию для Windows 10, представлены только встроенные системные службы в Профессиональной редакции системы (в Домашней некоторые службы могут отсутствовать).


Другие методы восстановления типа запуска и других настроек служб на значения по умолчанию
Если какие-либо методы восстановления работы служб не позволяют решить проблемы, вы можете:
Видео
Дополнительная информация
Настройки запуска и другие параметры служб Windows 10 располагаются в реестре в разделе HKEY_LOCAL_MACHINE\SYSTEM\CurrentControlSet\Services — этот раздел реестра при желании можно импортировать для редактирования даже в случае, когда система не загружается (пример импорта и редактирования в несколько ином контексте в инструкции Как сбросить пароль Windows 10 в разделе про сброс без программ).
В этом разделе присутствуют подразделы с именами, соответствующими «коротким именам» служб Windows. Внутри — параметры этих служб. Тип запуска задаётся параметром Start, обычно он принимает значения 2 (автоматически), 3 (вручную), 4 (отключена).
Все способы:
- Вариант 1: Штатные средства операционной системы
- Способ 1: Обычный запуск Windows 10
- Способ 2: Включение всех служб
- Способ 3: Откат системы через точки восстановления
- Способ 4: Реестровый файл
- Способ 5: Откат системы до заводских настроек
- Вариант 2: Стороннее программное обеспечение
- Способ 1: Easy Service Optimizer
- Способ 2: Windows Repair All In One
- Вопросы и ответы: 0
Вариант 1: Штатные средства операционной системы
Чтобы восстановить службы по умолчанию в Windows 10, понадобится изменить режим запуска ОС, активировать специальную опцию в меню загрузки или воспользоваться точкой восстановления.
Важно! Гарантировано сбросить настройки служб операционной системы Windows 10 можно только путем отката до заводских настроек, о чем детальнее будет рассказываться далее в статье. В противном случае есть вероятность, что некоторые из них не вернутся к изначальным значениям.
Способ 1: Обычный запуск Windows 10
Службы могут иметь настройки не по умолчанию из-за неверно выбранного режима запуска. Например, некоторые компоненты отключаются автоматически при входе в безопасный режим. В таком случае вам необходимо внести изменения в параметры загрузки Виндовс 10, и делается это в специальной утилите. Для ее вызова откройте окно «Выполнить» клавишами Win + R, в которое вставьте команду msconfig и нажмите Enter.
Читайте также: Как открыть окно «Выполнить» в Windows 10
В появившемся меню, находясь на вкладке «Общие», установите переключатель в положение «Обычный запуск», а затем щелкните по «ОК».
После этого перезапустите компьютер. По итогу операционная система загрузится в обычном режиме, активировав все службы, которые были включены изначально.
Обратите внимание! После перезапуска в меню «Конфигурация системы» режим запуска будет автоматически изменен — это нормально, повторно выбирать вариант «Обычный запуск» не нужно.
Способ 2: Включение всех служб
Если изменения в работу служб вы вносили посредством описанного выше меню «Конфигурация системы», то восстановить значения можно таким же способом. Для этого достаточно перейти на вкладку «Службы» и кликнуть по «Включить все». Сразу после этого напротив всех служб в списке будут установлены галочки, а сама кнопка станет серого цвета. Затем вам останется нажать «ОК», чтобы сохранить внесенные изменения.

Способ 3: Откат системы через точки восстановления
Если вы создавали точку восстановления еще до того, как вносили изменения в работу служб, то для возврата их состояния в изначальное достаточно будет произвести процедуру отката. Правда, в этом случае есть вероятность, что некоторые приложения, инсталлированные уже после создания контрольной точки, перестанут корректно работать.
Если вы все-таки выбираете этот способ выполнения поставленной задачи, тогда рекомендуется предварительно ознакомиться со статьей на нашем сайте, в которой рассказывается о том, как совершить откат ОС до точки восстановления. Воспользуйтесь для этого предоставленной ниже ссылкой.
Подробнее: Откат к точке восстановления в Windows 10
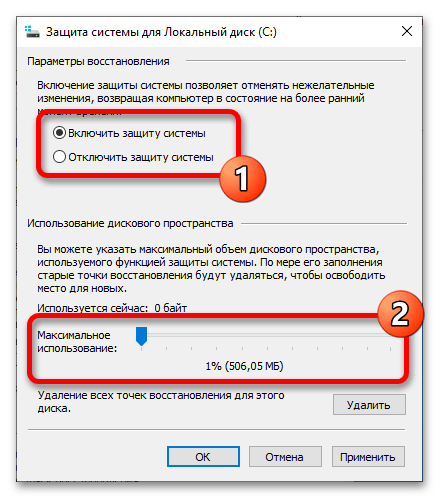
Важно! Если в вашей системе нет точек восстановления, рекомендуется активировать опцию их автоматического создания. Таким образом вы избавите себя от необходимости систематически выполнять это действие вручную и всегда будете иметь доступ к разным версиям вашей Виндовс 10 для выполнения быстрого отката.
Подробнее: Автоматическое создание точек восстановления в Windows 10
Способ 4: Реестровый файл
Восстановить службы по умолчанию в Виндовс 10 вы можете путем использования реестрового файла, вносящий изменения в системный реестр, возвращая все настройки целевых компонентов в состояние, которое было изначальным (сразу после установки операционной системы).
Важно! Этот метод рекомендуется использовать только пользователям системы Windows 10 редакции «Профессиональная» версии 20H2, так как реестровый файл основывается именно на ней. В противном случае восстановятся не все службы, а сама процедура будет сопровождаться появлением сообщения об ошибке (не критической).
Если вы не знаете версию ОС, посмотреть ее можно в свойствах компьютера или посредством специального программного обеспечения. На эту тему у нас есть отдельная статья, с которой вы можете ознакомиться при помощи ссылки ниже.
Подробнее: Просмотр версии операционной системы в Windows 10

Специальный реестровый файл, содержащий нужные для восстановления служб ключи, вы можете скачать с нашего Яндекс.Диска, воспользовавшись кнопкой ниже.
Скачать реестровый файл с Яндекс.Диска
Сам файл находится в архиве, поэтому перед продолжением вам необходимо его оттуда извлечь. Сделать это можно штатными средствами Windows 10 или сторонними приложениями — на ваше усмотрение.
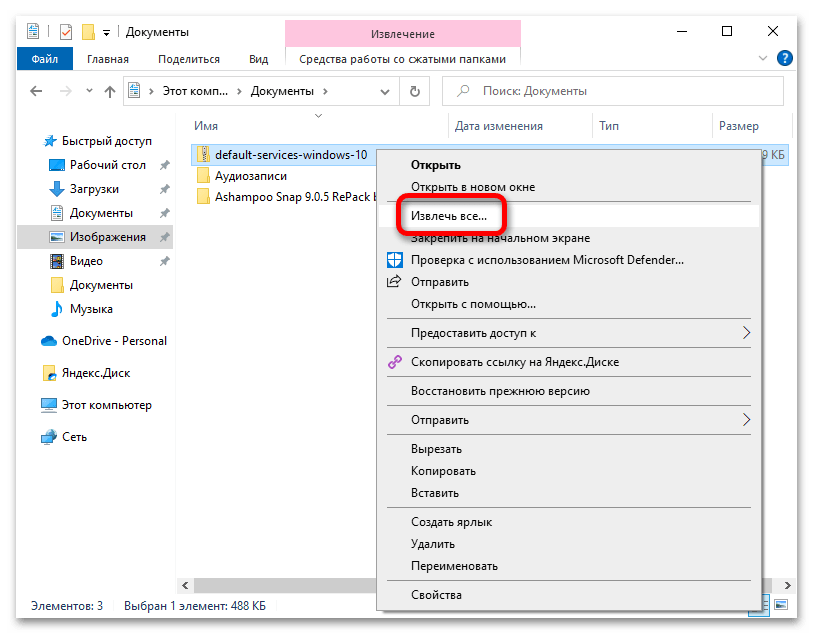
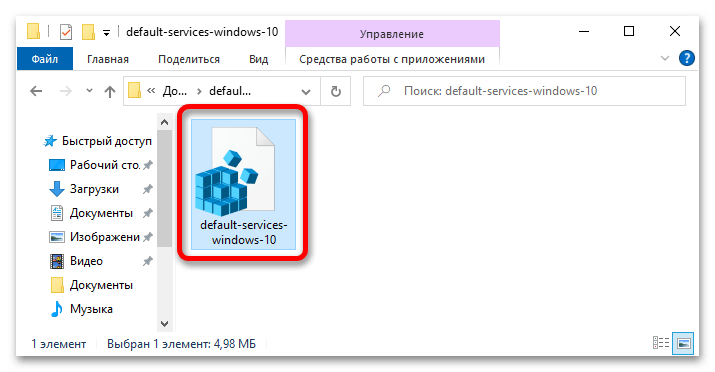
Распаковав файл реестра, запустите его, дважды кликнув по названию.
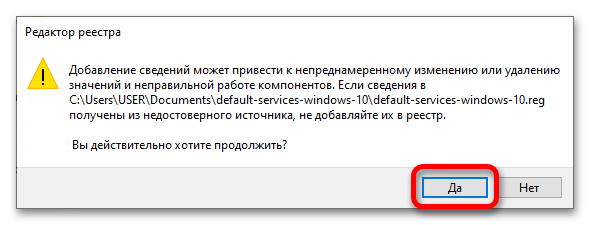
В появившемся окне с уведомлением о возможных рисках нажмите «Да», чтобы продолжить выполнение процедуры.
Примечание! Если вы являетесь пользователем отличной от 20H2 версии операционной системы, тогда, вероятнее всего, у вас появится уведомление об ошибке, показанное на следующем скриншоте. Суть заключается в проблеме импорта — некоторые ветки реестра отсутствуют и система сообщает, что пропустила их при редактировании ключей. Это означает только то, что не все службы были восстановлены. Нажмите по кнопке «ОК», чтобы закрыть предупреждение и продолжить работу за компьютером.

Читайте также: Как создать REG-файл в Windows 10
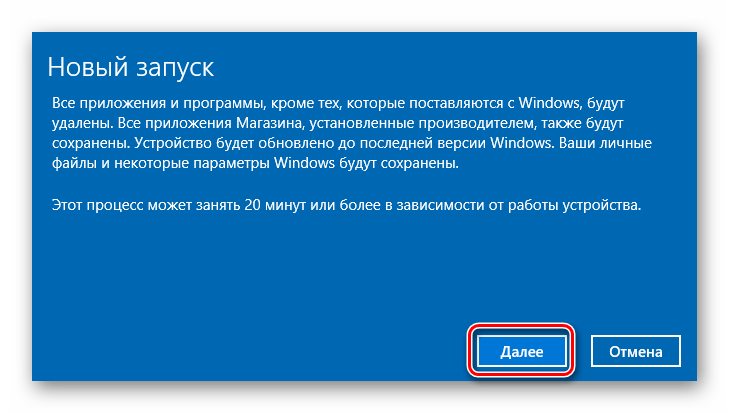
Способ 5: Откат системы до заводских настроек
Если вам обязательно нужно восстановить работу всех служб в ОС, то гарантировано поможет только откат Windows 10 до заводских настроек. Но учтите, что все установленные на компьютере приложения и игры в результате будут удалены. Подробнее об этой процедуре и ее последствиях вы можете прочитать в другом материале на нашем сайте. Там же и найдете пошаговую инструкцию выполнения поставленной задачи.
Подробнее: Как откатить Windows 10 до заводских настроек
Вариант 2: Стороннее программное обеспечение
Для восстановления служб по умолчанию в Windows 10 вы можете использовать специальное программное обеспечение, которое предоставляет соответствующие функции. Далее будет описан способ их применения.
Важно! Представленные ниже приложения используйте на свой страх и риск, так как нет достоверных сведений об их эффективности, несмотря на то, что разработчиками заявлены корректно работающие функции по откату служб до заводских настроек.
Способ 1: Easy Service Optimizer
Программа Easy Service Optimizer предоставляет удобный интерфейс для автоматизации работы со службами операционной системы. С ее помощью вы можете всего в два клика восстановить все значения по умолчанию. Скачайте приложение с официального сайта разработчика, воспользовавшись представленной ниже кнопкой.
Скачать Easy Service Optimizer с официального сайта
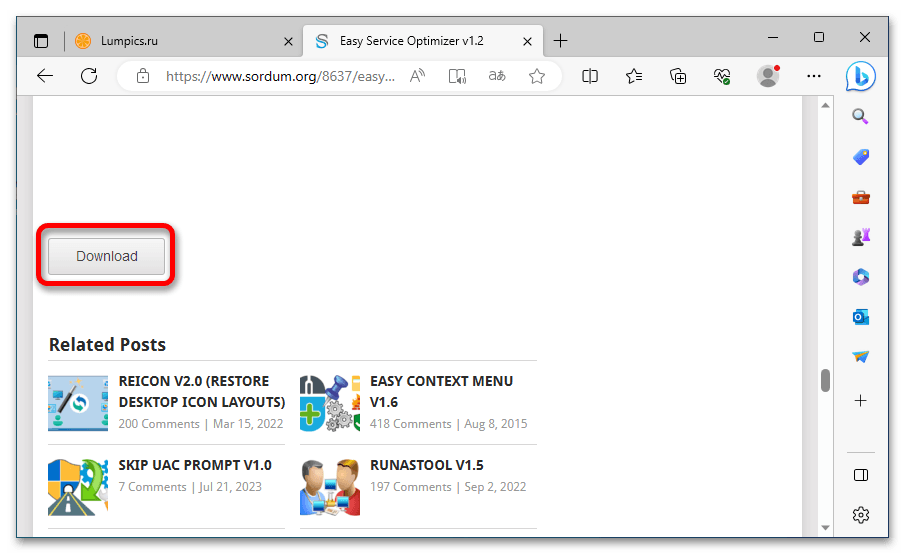
- Чтобы загрузить приложение на компьютер, в открывшейся вкладке браузера пролистайте страницу вниз практически до самого конца, пока не найдете кнопку «Download». Кликните по ней для инициализации процесса скачивания.
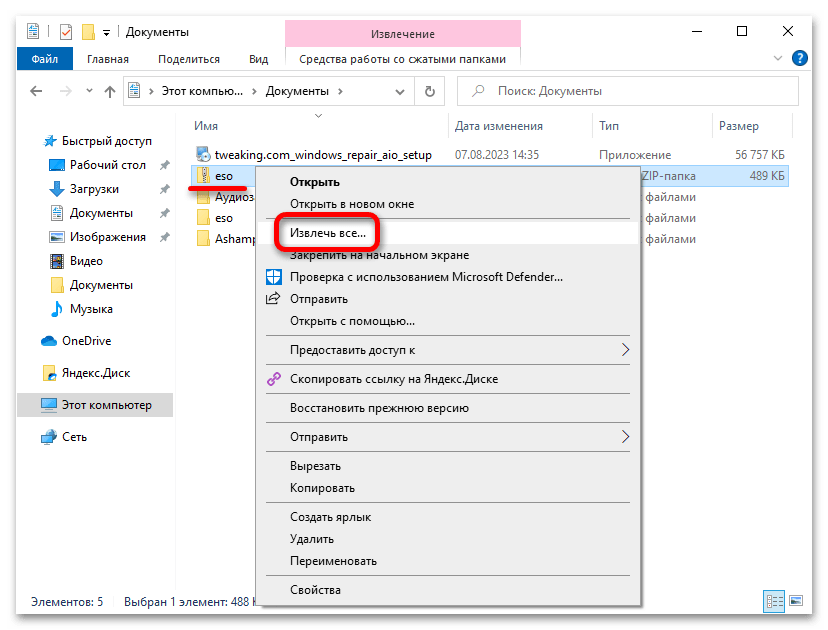
- После того как архив с программой будет загружен, перейдите в директорию с ним и извлеките все находящиеся внутри файлы встроенным или сторонним архиватором.
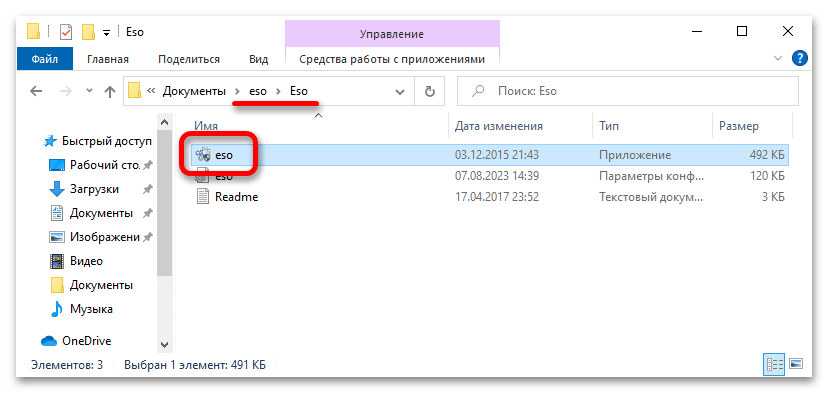
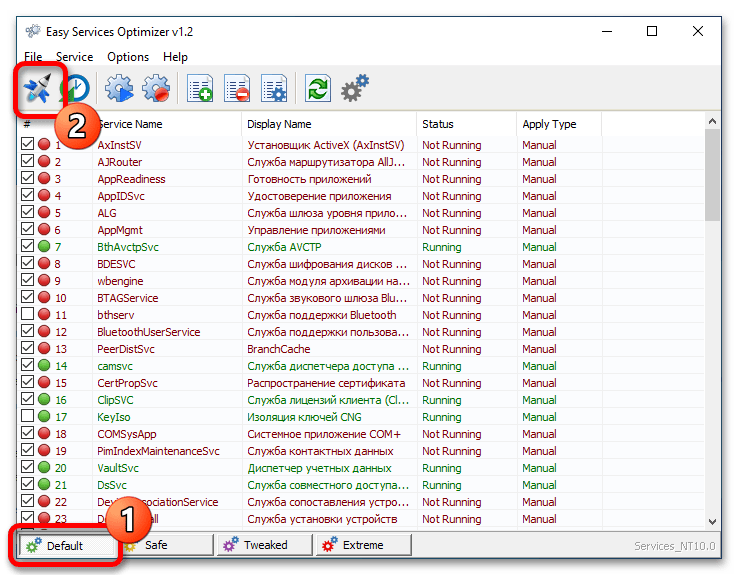
- Перейдите в разархивированную папку с программой и запустите ее исполняемый файл под названием «eso». После двойного клика по нему появится диалоговое окно контроля учетных записей, где нажмите «Да».
- В появившемся окне приложения Easy Service Optimizer восстановите настройки служб по умолчанию, кликнув по «Default», расположенной в нижнем левом углу. После этого примените изменения, нажав по кнопке в виде ракеты, находящейся в верхнем левом углу. Точное месторасположение указанных элементов интерфейса вы можете видеть на изображении ниже.
- После выполненных действий перезапустите компьютер, чтобы все изменения вступили в силу.
Способ 2: Windows Repair All In One
Windows Repair All In One — это многофункциональное приложение, которое предоставляет инструменты для оптимизации и изменения внешнего стиля операционной системы. Скачать его вы можете с официального сайта разработчика, воспользовавшись кнопкой ниже.
Скачать Windows Repair All In One с официального сайта
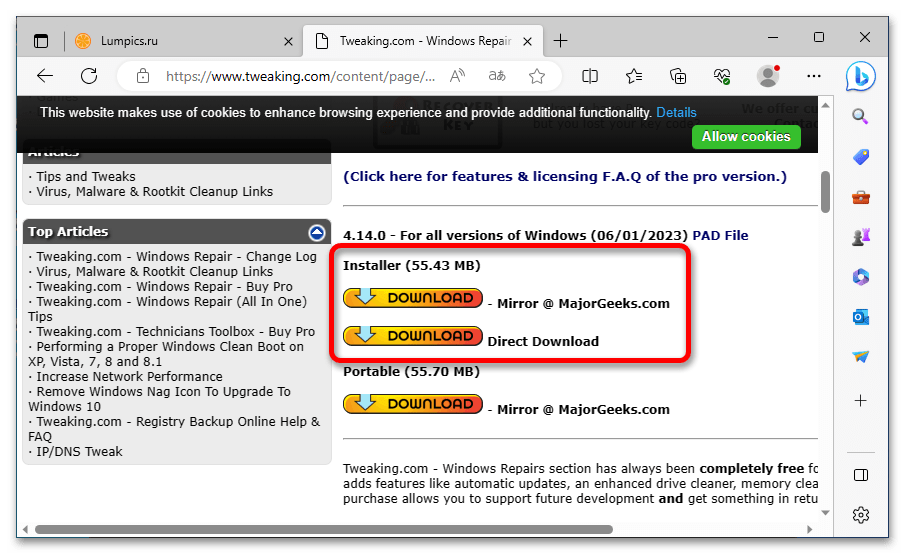
- Попав на страницу загрузки приложения, щелкните по одной из кнопок «Download», находящихся в блоке «Installer». Точное их расположение видно на скриншоте ниже.
- Windows Repair All In One распространяется в виде стандартного инсталлятора, поэтому после его скачивания просто произведите процедуру установки, а затем дважды кликните по появившемуся на рабочем столе ярлыку программы.
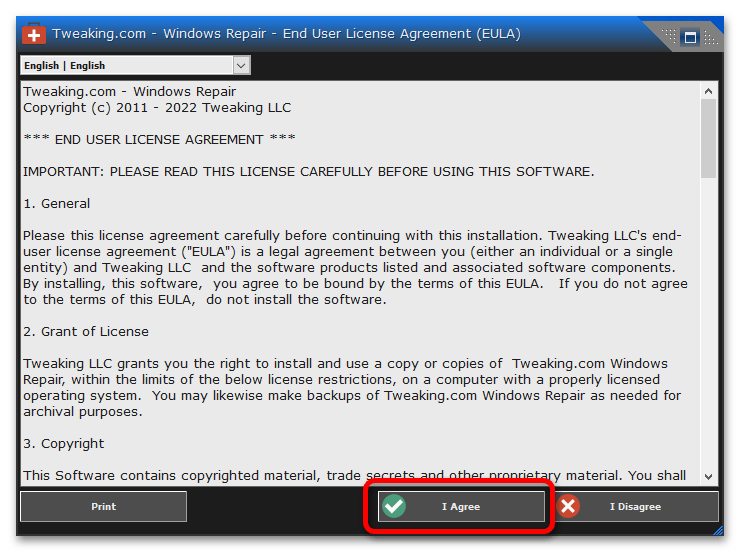
- Примите условия лицензионного соглашения, щелкнув по кнопке «I Agree». В противном случае вы не сможете пользоваться функциями программы.
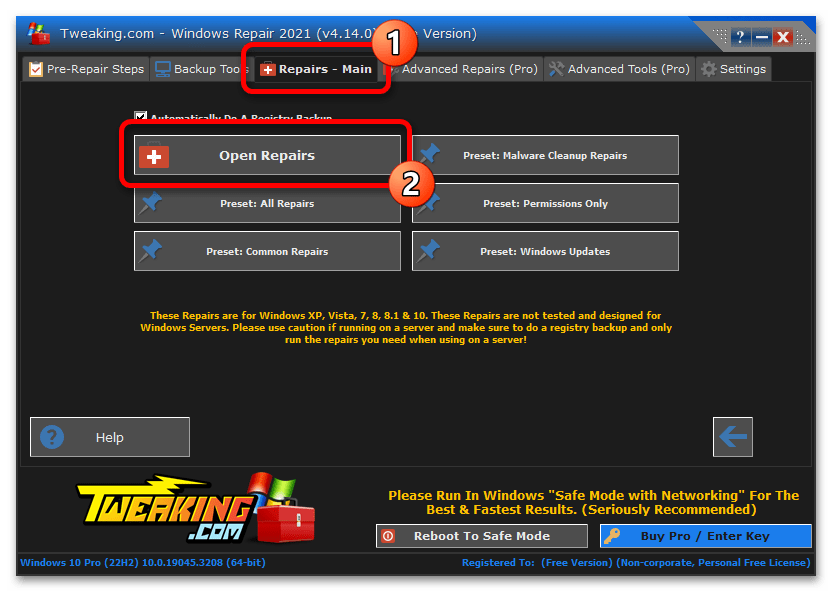
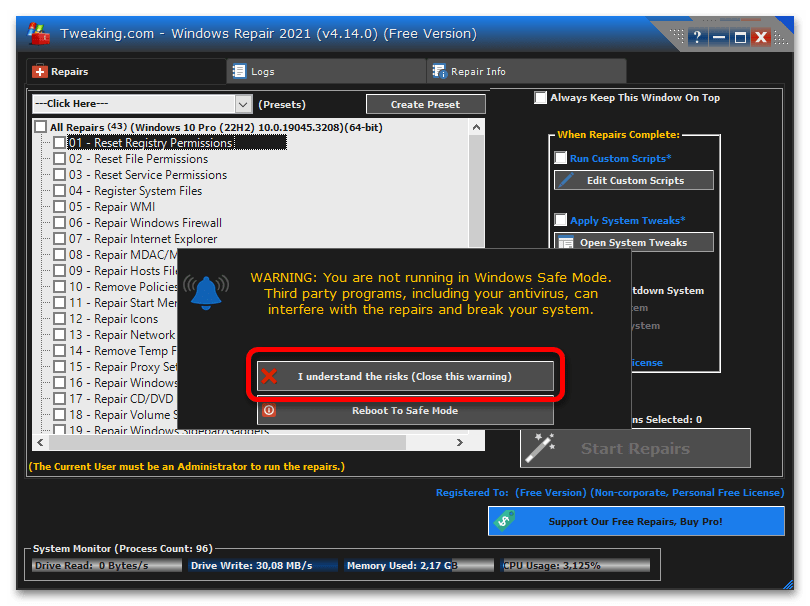
- Находясь в приложении, перейдите на вкладку «Repairs — Main» и кликните по пункту «Open Repairs».
- В диалоговом окне кликните по «I understand the risks (Close this warning)», чтобы закрыть его и продолжить пользоваться Windows Repair All In One.
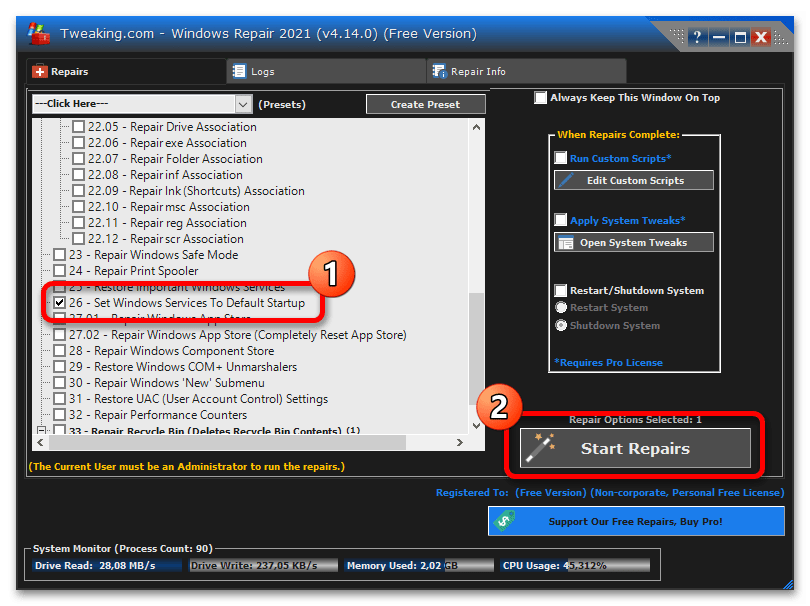
- В списке многочисленных функций программы найдите 26 пункт под названием «Set Windows Services To Default Startup». Именно он отвечает за восстановление значений служб по умолчанию. Поставьте напротив этой строки галочку и щелкните по кнопке «Start Repairs».
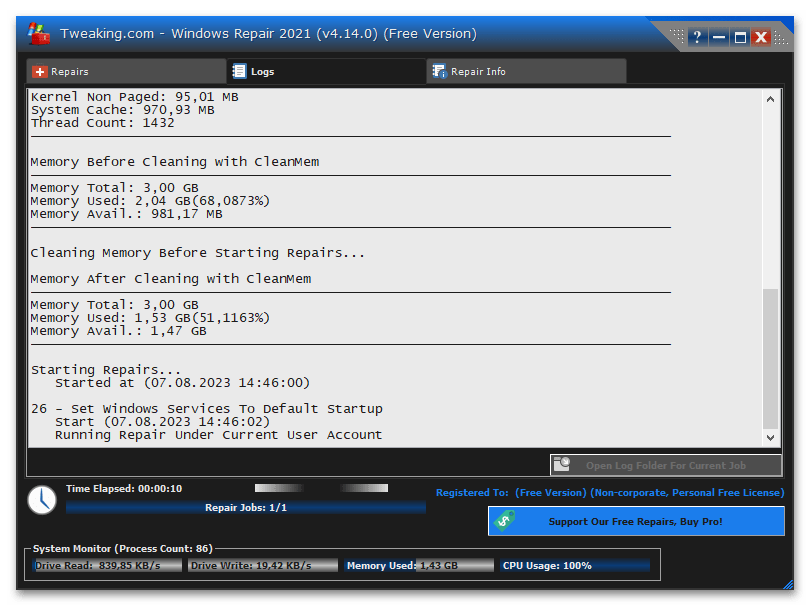
- Запустится процесс выполнения процедуры, во время которого появится окно, показанное на изображении ниже. Дождитесь завершения.
- В диалоговом окне щелкните по «Да», чтобы выполнить перезапуск компьютера. Сделать это нужно обязательно, чтобы все внесенные программой изменения вступили в силу.
В итоге, как заявляет разработчик, у всех служб Виндовс 10 будет восстановлено значение по умолчанию.
Наша группа в TelegramПолезные советы и помощь
,
Sometimes, when your computer is infected with a malware program (virus, trojan, rootkit, etc.), you face problems with critical Windows services, like Windows Firewall, Windows Update or other services which have been compromised or corrupted by the harmful program. In such cases, you must repair or restore these services to their default state.
This tutorial proposes an easy to try solution to restore critical Windows services to their default state.
Important steps before proceeding below:
1. Ensure that your computer is 100% clean from harmful programs like rootkits or viruses by following the steps in this guide: Quick Malware Scan and Removal Guide for PC’s.
2. Enable the System Restore Protection (if disabled) and create a restore point before running the Services Repair Tool, in order to restore your computer back in current state if something goes wrong.

How to easily repair, restore or reset Windows services to their default state.
We have successfully applied the below solution several times to different computers in order to fix the following critical Windows services when they are missing or when they present errors as they are corrupted: *
- Windows Firewall service (MpsSvc): Error Code 5 or Error Code 0x8007042c
- Windows Update: Service cannot be started or service is missing from services list.
- Base filtering engine (BFE): couldn’t be started (Error 5: Access is denied).
* Note for Windows 10 Users: The instructions of this article was written in 2014 and has been proven to work on Windows 7, Vista, XP and on Windows Server 2003 & 2008. Because in the latest versions of Windows several services have changed, I recommend you to try to repair your Windows 10 system by running the SFC /SCANOW command in Admin Command Prompt, and then to manually restore the default «Startup Type» of the Windows services as mentioned in this PDF file: DefaultServicesWin10.pdf
1. Download the services repair tool by ESET on your computer (e.g. on your desktop).
2. Run «Services repair tool by ESET» with Administrative privileges.
To do this right-click on “ServicesRepair.exe” file and choose “Run as administrator”.
3. Press “Yes” to the information window.

4. Restart your computer to apply changes.
Windows critical services should run now!
Additional step to perform if Windows services are still missing, cannot be started or they are corrupted:
If you face problems with several services on your computer, then you can run the System File Checker (SFC) tool from command prompt to fix Windows services. To do that:
1. Open an elevated command prompt window by going to:
- Start > All Programs > Accessories
- Right-click to “Command prompt” item and choose “Run as administrator”.
2. In the command window type the following command and press Enter.
SFC /SCANNOW

3. Wait and do not use your computer until SFC tool checks and fixes the corrupted system files or services.
4, When SFC tool finishes, reboot your computer and check if Windows services are working again.
Note: If you face errors with specific Windows services then you can download and merge the default registry file for any specific service from this link: http://www.sevenforums.com/tutorials/236709-services-restore-default-services-windows-7-a.html
Good luck!
If this article was useful for you, please consider supporting us by making a donation. Even $1 can a make a huge difference for us in our effort to continue to help others while keeping this site free:
- Author
- Recent Posts
Konstantinos is the founder and administrator of Wintips.org. Since 1995 he works and provides IT support as a computer and network expert to individuals and large companies. He is specialized in solving problems related to Windows or other Microsoft products (Windows Server, Office, Microsoft 365, etc.).
-
-
#2
Here is a zip file of over 700 default services found on a new, fresh, clean install of Windows 11 Pro x64
The zip file includes both .REG file format as well as .HIV file format which are hive files of the Registry.
For most services, you can simply run the .reg file to merge it into your registry. For some of the protected services like Windows Defender or SecurityHealthService you cannot import or merge from Normal Mode as they are protected keys. You can merge them from Safe Mode.
In the case where the entire key has been removed for a protected service, it’s better to use REG.EXE to do a restore with a .HIV file as it will restore the entire key along with the permissions needed.
:: Examples of restoring a HIVE file from Safe Mode
reg restore «HKEY_LOCAL_MACHINE\SYSTEM\CurrentControlSet\Services\WinDefend» C:\win-service\win-11\WinDefend.hiv
reg restore «HKEY_LOCAL_MACHINE\SYSTEM\CurrentControlSet\Services\SecurityHealthService» C:\win-service\win-11\SecurityHealthService.HIV
reg restore «HKEY_LOCAL_MACHINE\SYSTEM\CurrentControlSet\Services\wscsvc» C:\win-service\win-11\wscsvc.HIV
-
win-service-registry-restore-windows-11.zip
win-service-registry-restore-windows-11.zip
1.6 MB
· Views: 11,501
-
- OS
- Windows 10
- Computer type
- PC/Desktop
- Manufacturer/Model
- MSI Custom build
- CPU
- Intel i9-9900K
- Motherboard
- MSI MPG Z390 Gaming Edge AC
- Memory
- 64GB
- Graphics Card(s)
- EVGA GeForce GTX 1070 TI
- Internet Speed
- 1 Gbps
- Browser
- Firefox
- Antivirus
- Malwarebytes
-
-
#3
Hey Shawn, can you help in getting a good copy from Retail Build 22000 of Windows Modules Installer service?
-
- OS
- Windows 10
- Computer type
- Laptop
- Manufacturer/Model
- Dell Inspiron 5590
- CPU
- Intel Core i5 1021U
-
-
#4
Hey Shawn, can you help in getting a good copy from Retail Build 22000 of Windows Modules Installer service?
Hello Sumit,
Windows Modules Installer (TrustedInstaller) now added to the table. This is a protected registry key that you’ll have to take ownership of first before being able to merge the REG file.
-
- OS
- Windows 11 Pro for Workstations
- Computer type
- PC/Desktop
- Manufacturer/Model
- Custom self build
- CPU
- Intel i7-8700K 5 GHz
- Motherboard
- ASUS ROG Maximus XI Formula Z390
- Memory
- 64 GB (4x16GB) G.SKILL TridentZ RGB DDR4 3600 MHz (F4-3600C18D-32GTZR)
- Graphics Card(s)
- ASUS ROG-STRIX-GTX1080TI-O11G-GAMING (11GB GDDR5X)
- Sound Card
- Integrated Digital Audio (S/PDIF)
- Monitor(s) Displays
- 2 x Samsung Odyssey G75 27″
- Screen Resolution
- 2560×1440
- Hard Drives
- 1TB Samsung 990 PRO M.2,
4TB Samsung 990 PRO M.2,
8TB WD MyCloudEX2Ultra NAS
- PSU
- Seasonic Prime Titanium 850W
- Case
- Thermaltake Core P3 wall mounted
- Cooling
- Corsair Hydro H115i
- Keyboard
- Logitech wireless K800
- Mouse
- Logitech MX Master 3
- Internet Speed
- 1 Gbps Download and 35 Mbps Upload
- Browser
- Google Chrome
- Antivirus
- Microsoft Defender and Malwarebytes Premium
- Other Info
- Logitech Z625 speaker system,
Logitech BRIO 4K Pro webcam,
HP Color LaserJet Pro MFP M477fdn,
CyberPower CP1500PFCLCD
Galaxy S23 Plus phone
-
- Operating System
- Windows 11 Pro
- Computer type
- Laptop
- Manufacturer/Model
- Surface Laptop 7 Copilot+ PC
- CPU
- Snapdragon X Elite (12 core) 3.42 GHz
- Memory
- 16 GB LPDDR5x-7467 MHz
- Monitor(s) Displays
- 15″ HDR
- Screen Resolution
- 2496 x 1664
- Hard Drives
- 1 TB SSD
- Internet Speed
- Wi-Fi 7 and Bluetooth 5.4
- Browser
- Chrome and Edge
- Antivirus
- Windows Defender
-
-
#5
Appreciate that, Shawn. I hope the customer would have the issue of optionalfeatures.exe fixed by this.
-
- OS
- Windows 10
- Computer type
- Laptop
- Manufacturer/Model
- Dell Inspiron 5590
- CPU
- Intel Core i5 1021U
-
-
#6
Appreciate that, Shawn. I hope the customer would have the issue of optionalfeatures.exe fixed by this.
Fingers crossed.
-
- OS
- Windows 11 Pro for Workstations
- Computer type
- PC/Desktop
- Manufacturer/Model
- Custom self build
- CPU
- Intel i7-8700K 5 GHz
- Motherboard
- ASUS ROG Maximus XI Formula Z390
- Memory
- 64 GB (4x16GB) G.SKILL TridentZ RGB DDR4 3600 MHz (F4-3600C18D-32GTZR)
- Graphics Card(s)
- ASUS ROG-STRIX-GTX1080TI-O11G-GAMING (11GB GDDR5X)
- Sound Card
- Integrated Digital Audio (S/PDIF)
- Monitor(s) Displays
- 2 x Samsung Odyssey G75 27″
- Screen Resolution
- 2560×1440
- Hard Drives
- 1TB Samsung 990 PRO M.2,
4TB Samsung 990 PRO M.2,
8TB WD MyCloudEX2Ultra NAS
- PSU
- Seasonic Prime Titanium 850W
- Case
- Thermaltake Core P3 wall mounted
- Cooling
- Corsair Hydro H115i
- Keyboard
- Logitech wireless K800
- Mouse
- Logitech MX Master 3
- Internet Speed
- 1 Gbps Download and 35 Mbps Upload
- Browser
- Google Chrome
- Antivirus
- Microsoft Defender and Malwarebytes Premium
- Other Info
- Logitech Z625 speaker system,
Logitech BRIO 4K Pro webcam,
HP Color LaserJet Pro MFP M477fdn,
CyberPower CP1500PFCLCD
Galaxy S23 Plus phone
-
- Operating System
- Windows 11 Pro
- Computer type
- Laptop
- Manufacturer/Model
- Surface Laptop 7 Copilot+ PC
- CPU
- Snapdragon X Elite (12 core) 3.42 GHz
- Memory
- 16 GB LPDDR5x-7467 MHz
- Monitor(s) Displays
- 15″ HDR
- Screen Resolution
- 2496 x 1664
- Hard Drives
- 1 TB SSD
- Internet Speed
- Wi-Fi 7 and Bluetooth 5.4
- Browser
- Chrome and Edge
- Antivirus
- Windows Defender
-
-
#7
Here is a zip file of over 700 default services found on a new, fresh, clean install of Windows 11 Pro x64
The zip file includes both .REG file format as well as .HIV file format which are hive files of the Registry.
For most services, you can simply run the .reg file to merge it into your registry. For some of the protected services like Windows Defender or SecurityHealthService you cannot import or merge from Normal Mode as they are protected keys. You can merge them from Safe Mode.
In the case where the entire key has been removed for a protected service, it’s better to use REG.EXE to do a restore with a .HIV file as it will restore the entire key along with the permissions needed.
:: Examples of restoring a HIVE file from Safe Mode
reg restore «HKEY_LOCAL_MACHINE\SYSTEM\CurrentControlSet\Services\WinDefend» C:\win-service\win-11\WinDefend.hiv
reg restore «HKEY_LOCAL_MACHINE\SYSTEM\CurrentControlSet\Services\SecurityHealthService» C:\win-service\win-11\SecurityHealthService.HIV
reg restore «HKEY_LOCAL_MACHINE\SYSTEM\CurrentControlSet\Services\wscsvc» C:\win-service\win-11\wscsvc.HIV
Can I use this to fix sfc /scannow. I cannot import some reg. You mention » take ownership of first before» Ownership of what? The HIV file?
-
- OS
- Windows 11 Pro
- Computer type
- PC/Desktop
- Manufacturer/Model
- ASUS
- CPU
- i7 8700K
- Motherboard
- Asus Prime A Z370
- Memory
- 32GB
- Graphics Card(s)
- Nvidia GFX 1060
- Sound Card
- RealTek onboard
- Monitor(s) Displays
- Samsung 23′
- Screen Resolution
- 1920×1080
- Hard Drives
- Samsung NVME 1TB EVo 970
Samsung SSD Evo 890 500GB
- PSU
- 1200 Gold Gibagyte
- Case
- Full Tower Cooler master
- Cooling
- Corsair H100i V2
- Keyboard
- Logitech
- Mouse
- Logitech
- Internet Speed
- 1000Mbps
- Browser
- Chrome
- Antivirus
- iObit Malware
-
-
#8
Can I use this to fix sfc /scannow. I cannot import some reg. You mention » take ownership of first before» Ownership of what? The HIV file?
Hello,
That only applies to the «Windows Modules Installer» service.
-
- OS
- Windows 11 Pro for Workstations
- Computer type
- PC/Desktop
- Manufacturer/Model
- Custom self build
- CPU
- Intel i7-8700K 5 GHz
- Motherboard
- ASUS ROG Maximus XI Formula Z390
- Memory
- 64 GB (4x16GB) G.SKILL TridentZ RGB DDR4 3600 MHz (F4-3600C18D-32GTZR)
- Graphics Card(s)
- ASUS ROG-STRIX-GTX1080TI-O11G-GAMING (11GB GDDR5X)
- Sound Card
- Integrated Digital Audio (S/PDIF)
- Monitor(s) Displays
- 2 x Samsung Odyssey G75 27″
- Screen Resolution
- 2560×1440
- Hard Drives
- 1TB Samsung 990 PRO M.2,
4TB Samsung 990 PRO M.2,
8TB WD MyCloudEX2Ultra NAS
- PSU
- Seasonic Prime Titanium 850W
- Case
- Thermaltake Core P3 wall mounted
- Cooling
- Corsair Hydro H115i
- Keyboard
- Logitech wireless K800
- Mouse
- Logitech MX Master 3
- Internet Speed
- 1 Gbps Download and 35 Mbps Upload
- Browser
- Google Chrome
- Antivirus
- Microsoft Defender and Malwarebytes Premium
- Other Info
- Logitech Z625 speaker system,
Logitech BRIO 4K Pro webcam,
HP Color LaserJet Pro MFP M477fdn,
CyberPower CP1500PFCLCD
Galaxy S23 Plus phone
-
- Operating System
- Windows 11 Pro
- Computer type
- Laptop
- Manufacturer/Model
- Surface Laptop 7 Copilot+ PC
- CPU
- Snapdragon X Elite (12 core) 3.42 GHz
- Memory
- 16 GB LPDDR5x-7467 MHz
- Monitor(s) Displays
- 15″ HDR
- Screen Resolution
- 2496 x 1664
- Hard Drives
- 1 TB SSD
- Internet Speed
- Wi-Fi 7 and Bluetooth 5.4
- Browser
- Chrome and Edge
- Antivirus
- Windows Defender
-
-
#9
Here is a zip file of over 700 default services found on a new, fresh, clean install of Windows 11 Pro x64
The zip file includes both .REG file format as well as .HIV file format which are hive files of the Registry.
For most services, you can simply run the .reg file to merge it into your registry. For some of the protected services like Windows Defender or SecurityHealthService you cannot import or merge from Normal Mode as they are protected keys. You can merge them from Safe Mode.
In the case where the entire key has been removed for a protected service, it’s better to use REG.EXE to do a restore with a .HIV file as it will restore the entire key along with the permissions needed.
:: Examples of restoring a HIVE file from Safe Mode
reg restore «HKEY_LOCAL_MACHINE\SYSTEM\CurrentControlSet\Services\WinDefend» C:\win-service\win-11\WinDefend.hiv
reg restore «HKEY_LOCAL_MACHINE\SYSTEM\CurrentControlSet\Services\SecurityHealthService» C:\win-service\win-11\SecurityHealthService.HIV
reg restore «HKEY_LOCAL_MACHINE\SYSTEM\CurrentControlSet\Services\wscsvc» C:\win-service\win-11\wscsvc.HIV
when I right-click «save as» (since I am unable to download anything any other way since im missing a service that I dont know what it is) there is no .exe file in there. what are you referring to? I dont see a single exe file on this page.
-
- OS
- win11
-
-
#10
when I right-click «save as» (since I am unable to download anything any other way since im missing a service that I dont know what it is) there is no .exe file in there. what are you referring to? I dont see a single exe file on this page.
Sorry I missed your post.
The link above seems to still work for me at least when you’re logged in.
-
- OS
- Windows 10
- Computer type
- PC/Desktop
- Manufacturer/Model
- MSI Custom build
- CPU
- Intel i9-9900K
- Motherboard
- MSI MPG Z390 Gaming Edge AC
- Memory
- 64GB
- Graphics Card(s)
- EVGA GeForce GTX 1070 TI
- Internet Speed
- 1 Gbps
- Browser
- Firefox
- Antivirus
- Malwarebytes
-
-
#11
What are the steps to restore the services after i downloaded the file
-
- OS
- windows 11
- Computer type
- Laptop
- Manufacturer/Model
- Huawei d15
- CPU
- Intel i5
-
-
#12
What are the steps to restore the services after i downloaded the file
Hello Rocket, and welcome.
The steps in the tutorial on the first post will show what to do with it from step 1.
-
- OS
- Windows 11 Pro for Workstations
- Computer type
- PC/Desktop
- Manufacturer/Model
- Custom self build
- CPU
- Intel i7-8700K 5 GHz
- Motherboard
- ASUS ROG Maximus XI Formula Z390
- Memory
- 64 GB (4x16GB) G.SKILL TridentZ RGB DDR4 3600 MHz (F4-3600C18D-32GTZR)
- Graphics Card(s)
- ASUS ROG-STRIX-GTX1080TI-O11G-GAMING (11GB GDDR5X)
- Sound Card
- Integrated Digital Audio (S/PDIF)
- Monitor(s) Displays
- 2 x Samsung Odyssey G75 27″
- Screen Resolution
- 2560×1440
- Hard Drives
- 1TB Samsung 990 PRO M.2,
4TB Samsung 990 PRO M.2,
8TB WD MyCloudEX2Ultra NAS
- PSU
- Seasonic Prime Titanium 850W
- Case
- Thermaltake Core P3 wall mounted
- Cooling
- Corsair Hydro H115i
- Keyboard
- Logitech wireless K800
- Mouse
- Logitech MX Master 3
- Internet Speed
- 1 Gbps Download and 35 Mbps Upload
- Browser
- Google Chrome
- Antivirus
- Microsoft Defender and Malwarebytes Premium
- Other Info
- Logitech Z625 speaker system,
Logitech BRIO 4K Pro webcam,
HP Color LaserJet Pro MFP M477fdn,
CyberPower CP1500PFCLCD
Galaxy S23 Plus phone
-
- Operating System
- Windows 11 Pro
- Computer type
- Laptop
- Manufacturer/Model
- Surface Laptop 7 Copilot+ PC
- CPU
- Snapdragon X Elite (12 core) 3.42 GHz
- Memory
- 16 GB LPDDR5x-7467 MHz
- Monitor(s) Displays
- 15″ HDR
- Screen Resolution
- 2496 x 1664
- Hard Drives
- 1 TB SSD
- Internet Speed
- Wi-Fi 7 and Bluetooth 5.4
- Browser
- Chrome and Edge
- Antivirus
- Windows Defender
-
-
#13
Hello, can you please add the WinHTTP Proxy service? Thank you!
-
- OS
- Windows 11
-
-
#14
Hello, can you please add the WinHTTP Proxy service? Thank you!
WinHttpAutoProxySvc now added.
-
- OS
- Windows 11 Pro for Workstations
- Computer type
- PC/Desktop
- Manufacturer/Model
- Custom self build
- CPU
- Intel i7-8700K 5 GHz
- Motherboard
- ASUS ROG Maximus XI Formula Z390
- Memory
- 64 GB (4x16GB) G.SKILL TridentZ RGB DDR4 3600 MHz (F4-3600C18D-32GTZR)
- Graphics Card(s)
- ASUS ROG-STRIX-GTX1080TI-O11G-GAMING (11GB GDDR5X)
- Sound Card
- Integrated Digital Audio (S/PDIF)
- Monitor(s) Displays
- 2 x Samsung Odyssey G75 27″
- Screen Resolution
- 2560×1440
- Hard Drives
- 1TB Samsung 990 PRO M.2,
4TB Samsung 990 PRO M.2,
8TB WD MyCloudEX2Ultra NAS
- PSU
- Seasonic Prime Titanium 850W
- Case
- Thermaltake Core P3 wall mounted
- Cooling
- Corsair Hydro H115i
- Keyboard
- Logitech wireless K800
- Mouse
- Logitech MX Master 3
- Internet Speed
- 1 Gbps Download and 35 Mbps Upload
- Browser
- Google Chrome
- Antivirus
- Microsoft Defender and Malwarebytes Premium
- Other Info
- Logitech Z625 speaker system,
Logitech BRIO 4K Pro webcam,
HP Color LaserJet Pro MFP M477fdn,
CyberPower CP1500PFCLCD
Galaxy S23 Plus phone
-
- Operating System
- Windows 11 Pro
- Computer type
- Laptop
- Manufacturer/Model
- Surface Laptop 7 Copilot+ PC
- CPU
- Snapdragon X Elite (12 core) 3.42 GHz
- Memory
- 16 GB LPDDR5x-7467 MHz
- Monitor(s) Displays
- 15″ HDR
- Screen Resolution
- 2496 x 1664
- Hard Drives
- 1 TB SSD
- Internet Speed
- Wi-Fi 7 and Bluetooth 5.4
- Browser
- Chrome and Edge
- Antivirus
- Windows Defender
-
-
#15
Hi Shawn,
I noticed you have IKE and AuthIP IPSec Keying Modules set on Manual (trigger start), and it is not running. I have always set it to Automatic because the description in its properties states:
The IKEEXT service hosts the Internet Key Exchange (IKE) and Authenticated Internet Protocol (AuthIP) keying modules. These keying modules are used for authentication and key exchange in Internet Protocol security (IPsec). Stopping or disabling the IKEEXT service will disable IKE and AuthIP key exchange with peer computers. IPsec is typically configured to use IKE or AuthIP; therefore, stopping or disabling the IKEEXT service might result in an IPsec failure and might compromise the security of the system. It is strongly recommended that you have the IKEEXT service running. [Emphasis added]
Perhaps it would always be triggered if set on Manual (trigger start). But if it is always supposed to be running, Automatic seems like the safer choice to me.
I’m no tech wizard, but I thought you may have inadvertently used the wrong setting, since it’s so easy to do that when going through multiple columns. Anyhow, no harm in posting this.
Sincerely,
Anthony
Last edited:
-
- OS
- Windows 11
- Computer type
- PC/Desktop
- Manufacturer/Model
- Dell Vostro 3910
- CPU
- 8C+4c Intel Core i7-12700, 4700 MHz (47 x 100)
- Motherboard
- Dell Vostro 3910
- Memory
- 65224 MB (DDR4 SDRAM)
- Graphics Card(s)
- Intel® UHD Graphics 770
- Sound Card
- Cirrus Logic Superior High Definition Audio
- Monitor(s) Displays
- Generic Monitor (KB242Y) [NoDB] (2208033B13W01) {2022}
- Screen Resolution
- 1920 x 1080
- Hard Drives
- Internal: C (SSD) & E (NTFS)
External: F (SSD , 1TB), G (NFTS with USB3, 5TB), H (NTFS with USB3, 5TB), I (SSD, 1 TB), and J (NFTS with USB3, 2TB)
- PSU
- CyberPower Power Panel, Personal
- Keyboard
- Microsoft Ergonomic
- Internet Speed
- 1 GB
- Browser
- Brave
- Antivirus
- Malwarebytes Pro
-
-
#16
Hi again,
Also, I assume these settings are for people running a server, since you have Internet Connection Sharing services running, Hyper-V Host Compute Service running, and Hyper-V Virtual Machine Management running. It’s my understanding that those are not correct settings for a home user. Perhaps you mentioned that and I missed it.
Sincerely,
Anthony
-
- OS
- Windows 11
- Computer type
- PC/Desktop
- Manufacturer/Model
- Dell Vostro 3910
- CPU
- 8C+4c Intel Core i7-12700, 4700 MHz (47 x 100)
- Motherboard
- Dell Vostro 3910
- Memory
- 65224 MB (DDR4 SDRAM)
- Graphics Card(s)
- Intel® UHD Graphics 770
- Sound Card
- Cirrus Logic Superior High Definition Audio
- Monitor(s) Displays
- Generic Monitor (KB242Y) [NoDB] (2208033B13W01) {2022}
- Screen Resolution
- 1920 x 1080
- Hard Drives
- Internal: C (SSD) & E (NTFS)
External: F (SSD , 1TB), G (NFTS with USB3, 5TB), H (NTFS with USB3, 5TB), I (SSD, 1 TB), and J (NFTS with USB3, 2TB)
- PSU
- CyberPower Power Panel, Personal
- Keyboard
- Microsoft Ergonomic
- Internet Speed
- 1 GB
- Browser
- Brave
- Antivirus
- Malwarebytes Pro
-
-
#17
Hi Shawn,
I noticed you have IKE and AuthIP IPSec Keying Modules set on Manual (trigger start), and it is not running. I have always set it to Automatic because the description in its properties states:
The IKEEXT service hosts the Internet Key Exchange (IKE) and Authenticated Internet Protocol (AuthIP) keying modules. These keying modules are used for authentication and key exchange in Internet Protocol security (IPsec). Stopping or disabling the IKEEXT service will disable IKE and AuthIP key exchange with peer computers. IPsec is typically configured to use IKE or AuthIP; therefore, stopping or disabling the IKEEXT service might result in an IPsec failure and might compromise the security of the system. It is strongly recommended that you have the IKEEXT service running. [Emphasis added]
Perhaps it would always be triggered if set on Manual (trigger start). But if it is always supposed to be running, Automatic seems like the safer choice to me.
I’m no tech wizard, but I thought you may have inadvertently used the wrong setting, since it’s so easy to do that when going through multiple columns. Anyhow, no harm in posting this.
Sincerely,
Anthony
Hello Anthony, and welcome.
IKE does indeed show as «Manual (Trigger Start)» by default. This will allow it to run on demand though.

-
- OS
- Windows 11 Pro for Workstations
- Computer type
- PC/Desktop
- Manufacturer/Model
- Custom self build
- CPU
- Intel i7-8700K 5 GHz
- Motherboard
- ASUS ROG Maximus XI Formula Z390
- Memory
- 64 GB (4x16GB) G.SKILL TridentZ RGB DDR4 3600 MHz (F4-3600C18D-32GTZR)
- Graphics Card(s)
- ASUS ROG-STRIX-GTX1080TI-O11G-GAMING (11GB GDDR5X)
- Sound Card
- Integrated Digital Audio (S/PDIF)
- Monitor(s) Displays
- 2 x Samsung Odyssey G75 27″
- Screen Resolution
- 2560×1440
- Hard Drives
- 1TB Samsung 990 PRO M.2,
4TB Samsung 990 PRO M.2,
8TB WD MyCloudEX2Ultra NAS
- PSU
- Seasonic Prime Titanium 850W
- Case
- Thermaltake Core P3 wall mounted
- Cooling
- Corsair Hydro H115i
- Keyboard
- Logitech wireless K800
- Mouse
- Logitech MX Master 3
- Internet Speed
- 1 Gbps Download and 35 Mbps Upload
- Browser
- Google Chrome
- Antivirus
- Microsoft Defender and Malwarebytes Premium
- Other Info
- Logitech Z625 speaker system,
Logitech BRIO 4K Pro webcam,
HP Color LaserJet Pro MFP M477fdn,
CyberPower CP1500PFCLCD
Galaxy S23 Plus phone
-
- Operating System
- Windows 11 Pro
- Computer type
- Laptop
- Manufacturer/Model
- Surface Laptop 7 Copilot+ PC
- CPU
- Snapdragon X Elite (12 core) 3.42 GHz
- Memory
- 16 GB LPDDR5x-7467 MHz
- Monitor(s) Displays
- 15″ HDR
- Screen Resolution
- 2496 x 1664
- Hard Drives
- 1 TB SSD
- Internet Speed
- Wi-Fi 7 and Bluetooth 5.4
- Browser
- Chrome and Edge
- Antivirus
- Windows Defender
-
-
#18
Hi again,
Also, I assume these settings are for people running a server, since you have Internet Connection Sharing services running, Hyper-V Host Compute Service running, and Hyper-V Virtual Machine Management running. It’s my understanding that those are not correct settings for a home user. Perhaps you mentioned that and I missed it.
Sincerely,
Anthony
Usually, you won’t have those services by default unless you enable the Hyper-V feature. Those two services would then be running by default.
-
- OS
- Windows 11 Pro for Workstations
- Computer type
- PC/Desktop
- Manufacturer/Model
- Custom self build
- CPU
- Intel i7-8700K 5 GHz
- Motherboard
- ASUS ROG Maximus XI Formula Z390
- Memory
- 64 GB (4x16GB) G.SKILL TridentZ RGB DDR4 3600 MHz (F4-3600C18D-32GTZR)
- Graphics Card(s)
- ASUS ROG-STRIX-GTX1080TI-O11G-GAMING (11GB GDDR5X)
- Sound Card
- Integrated Digital Audio (S/PDIF)
- Monitor(s) Displays
- 2 x Samsung Odyssey G75 27″
- Screen Resolution
- 2560×1440
- Hard Drives
- 1TB Samsung 990 PRO M.2,
4TB Samsung 990 PRO M.2,
8TB WD MyCloudEX2Ultra NAS
- PSU
- Seasonic Prime Titanium 850W
- Case
- Thermaltake Core P3 wall mounted
- Cooling
- Corsair Hydro H115i
- Keyboard
- Logitech wireless K800
- Mouse
- Logitech MX Master 3
- Internet Speed
- 1 Gbps Download and 35 Mbps Upload
- Browser
- Google Chrome
- Antivirus
- Microsoft Defender and Malwarebytes Premium
- Other Info
- Logitech Z625 speaker system,
Logitech BRIO 4K Pro webcam,
HP Color LaserJet Pro MFP M477fdn,
CyberPower CP1500PFCLCD
Galaxy S23 Plus phone
-
- Operating System
- Windows 11 Pro
- Computer type
- Laptop
- Manufacturer/Model
- Surface Laptop 7 Copilot+ PC
- CPU
- Snapdragon X Elite (12 core) 3.42 GHz
- Memory
- 16 GB LPDDR5x-7467 MHz
- Monitor(s) Displays
- 15″ HDR
- Screen Resolution
- 2496 x 1664
- Hard Drives
- 1 TB SSD
- Internet Speed
- Wi-Fi 7 and Bluetooth 5.4
- Browser
- Chrome and Edge
- Antivirus
- Windows Defender
-
-
#19
Hi! I tried installing the Windows Update file, running it, then restarting. However, when my laptop booted back up, it gave me an error window with the words «Windows could not start the service on Local computer. Error 0x8007007e: The specified module could not be found.» Is there any fix for this? Thanks.
-
Screenshot Services.png
25.9 KB
· Views: 70
-
- OS
- Windows 11
- Computer type
- Laptop
- Manufacturer/Model
- HP Stream
- Monitor(s) Displays
- Built-in display, Samsung monitor
- Keyboard
- Quickfire TK — Blue
- Mouse
- Microsoft Wireless mouse
- Browser
- Chrome
-
-
#20
Hi! I tried installing the Windows Update file, running it, then restarting. However, when my laptop booted back up, it gave me an error window with the words «Windows could not start the service on Local computer. Error 0x8007007e: The specified module could not be found.» Is there any fix for this? Thanks.
Hello, and welcome.
If you like, you could do a repair install of Windows 11 like in the tutorial below that should fix this without losing anything.
Repair Install Windows 11 with an In-place Upgrade
This tutorial will show you how to do a repair install of Windows 11 by performing an in-place upgrade without losing anything. If you need to repair or create a new recovery partition or having problems with the Windows 11 operating system on your PC, and the usual solutions will not fix it…
www.elevenforum.com
-
- OS
- Windows 11 Pro for Workstations
- Computer type
- PC/Desktop
- Manufacturer/Model
- Custom self build
- CPU
- Intel i7-8700K 5 GHz
- Motherboard
- ASUS ROG Maximus XI Formula Z390
- Memory
- 64 GB (4x16GB) G.SKILL TridentZ RGB DDR4 3600 MHz (F4-3600C18D-32GTZR)
- Graphics Card(s)
- ASUS ROG-STRIX-GTX1080TI-O11G-GAMING (11GB GDDR5X)
- Sound Card
- Integrated Digital Audio (S/PDIF)
- Monitor(s) Displays
- 2 x Samsung Odyssey G75 27″
- Screen Resolution
- 2560×1440
- Hard Drives
- 1TB Samsung 990 PRO M.2,
4TB Samsung 990 PRO M.2,
8TB WD MyCloudEX2Ultra NAS
- PSU
- Seasonic Prime Titanium 850W
- Case
- Thermaltake Core P3 wall mounted
- Cooling
- Corsair Hydro H115i
- Keyboard
- Logitech wireless K800
- Mouse
- Logitech MX Master 3
- Internet Speed
- 1 Gbps Download and 35 Mbps Upload
- Browser
- Google Chrome
- Antivirus
- Microsoft Defender and Malwarebytes Premium
- Other Info
- Logitech Z625 speaker system,
Logitech BRIO 4K Pro webcam,
HP Color LaserJet Pro MFP M477fdn,
CyberPower CP1500PFCLCD
Galaxy S23 Plus phone
-
- Operating System
- Windows 11 Pro
- Computer type
- Laptop
- Manufacturer/Model
- Surface Laptop 7 Copilot+ PC
- CPU
- Snapdragon X Elite (12 core) 3.42 GHz
- Memory
- 16 GB LPDDR5x-7467 MHz
- Monitor(s) Displays
- 15″ HDR
- Screen Resolution
- 2496 x 1664
- Hard Drives
- 1 TB SSD
- Internet Speed
- Wi-Fi 7 and Bluetooth 5.4
- Browser
- Chrome and Edge
- Antivirus
- Windows Defender