
Some people do not like the universal apps installed by default In Windows 10 or Windows 11 and want to get rid of them. They can manually uninstall most of them using the Settings app or PowerShell. Apps like Calendar, Mail, Camera, Photos, or Candy Crush Soda Saga can be gone from a Windows 10 or Windows 11 computer in no time. So how do you get all the default apps back when you learn that you need them or when they are broken and no longer work correctly? In this tutorial, we show you how to reinstall and re-register all the default apps shipped with Windows 10 or Windows 11. Don’t worry, this is a straightforward process. Let’s get started:
NOTE: If you’ve arrived here looking for ways to uninstall Windows apps with PowerShell, check this guide instead: How to uninstall Windows apps with PowerShell.
Things you should know about reinstalling Windows apps with PowerShell
The steps in this tutorial help you reinstall all the default apps from Windows 10 or Windows 11, including the Microsoft Store. Furthermore, they also allow you to reinstall Windows apps without the Store. However, note that everything we show is tested and confirmed to work only in the latest versions of Windows 10 and in Windows 11.
If you have an older version of Windows 10, you can follow the steps we show for getting the built-in apps back, but you might not be able to also re-install the Microsoft Store. The only proven way to get the Microsoft Store back in older versions of Windows 10 to then be able to install other apps is to reinstall Windows 10.
Step 1. Open PowerShell as Administrator
First of all, you must open PowerShell with administrative rights. The fastest way to do that in Windows 10 is to use the search bar on the taskbar. Type “powershell,” and then click or tap on “Run as administrator” on the panel to the right of the Windows PowerShell search result.
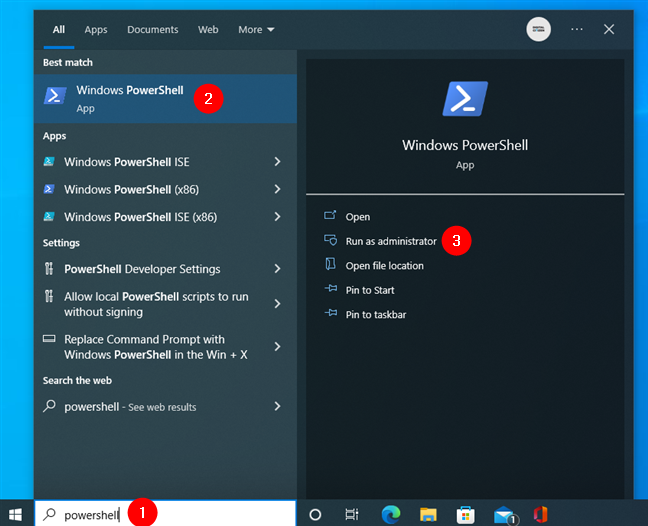
Open Windows PowerShell in Windows 10 as admin
If you’re using Windows 11, press the Search button on the taskbar and type “powershell” in the search box. Then, select the Windows PowerShell result on the left and click or tap “Run as Administrator” on the right-hand panel.
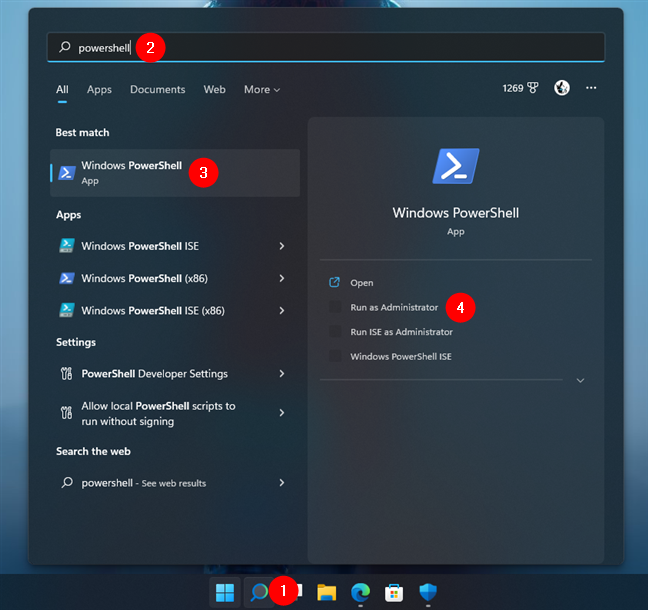
Open Windows PowerShell in Windows 11 as admin
TIP: You can find many other ways of opening PowerShell in this tutorial: 9 ways to open PowerShell in Windows (including as administrator).
Once PowerShell is launched, you should see a window similar to this one:
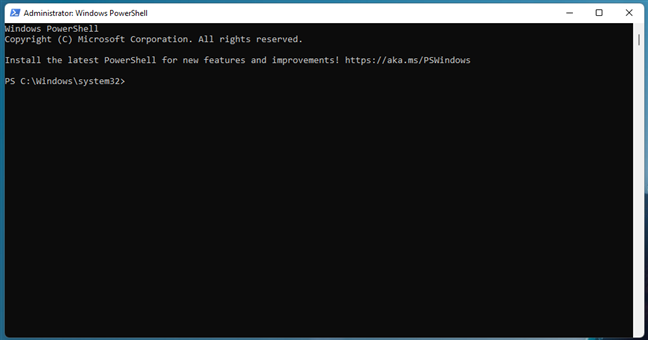
The PowerShell window
TIP: You can also start Windows Terminal as an administrator and run a PowerShell tab.
Opening a PowerShell tab in Windows Terminal works just as well
Step 2. Run the reinstall and re-register command for built-in Windows 10 or Windows 11 apps
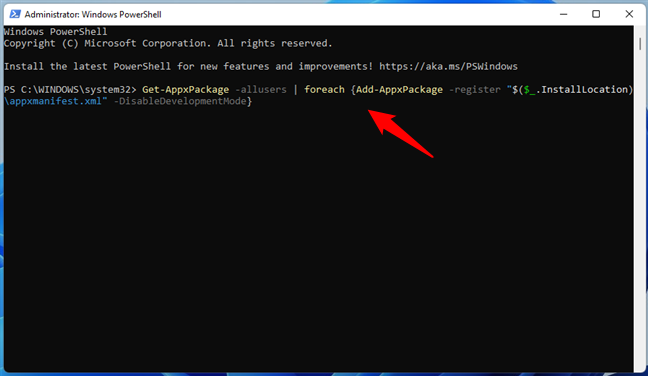
To reinstall all the Windows apps that you uninstalled over time, all you have to do is run a specific command. Type or copy-paste the following command inside your PowerShell window:
Get-AppxPackage -allusers | foreach {Add-AppxPackage -register “$($_.InstallLocation)\appxmanifest.xml” -DisableDevelopmentMode}
The PowerShell command for reinstalling all Windows apps
After you’ve entered the above command in PowerShell, press Enter. Then, your Windows 10 or Windows 11 PC begins reinstalling and re-registering all their default built-in apps. Note that this step might take a while, depending on the speed of your PC.
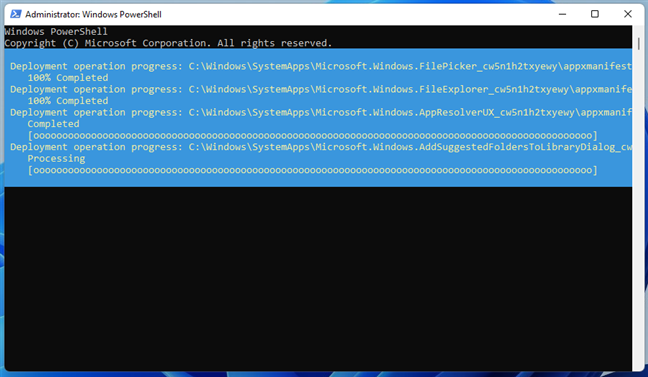
Default Windows apps are reinstalled in PowerShell
Step 3. Reboot your Windows PC
Once the command has finished running, PowerShell displays the current folder path. There are no messages or additional confirmations displayed. Close PowerShell and reboot your Windows 10 or Windows 11 PC or device. You should find all your missing Windows 10 or 11 default apps when you log in.
What if the Windows apps I reinstalled still don’t work well?
If your Windows 10 or Windows 11 built-in apps are reinstalled but still do not work correctly, you should try one more thing before losing hope: run the Windows Store Apps troubleshooter.
On Windows 10, open the Settings app (Windows + I), head to Update & Security > Troubleshoot, and click or tap Additional troubleshooters on the right.
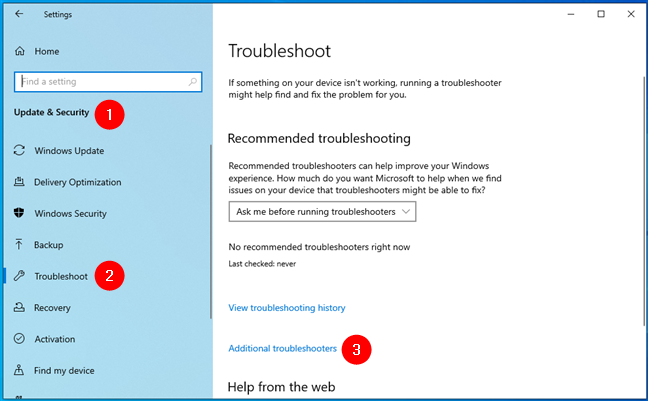
Additional troubleshooters in Windows 10
Then, scroll down to the end of the list and click or tap on Windows Store Apps.
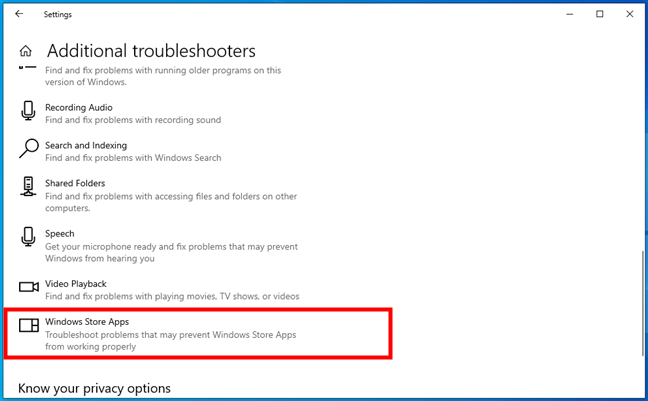
The Windows Store Apps troubleshooter in Windows 10
In Windows 11, launch Settings (Windows + I) and navigate to System > Troubleshoot > Other troubleshooters. Then, scroll down, and you’ll find the Windows Store Apps troubleshooter towards the end of the list. When you do, click or tap the Run button to its right.
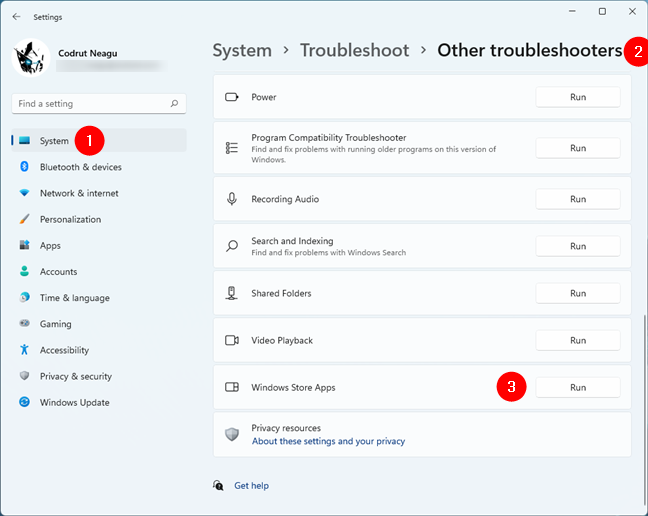
Run the Windows Store Apps troubleshooter in Windows 11
Whether you’re using Windows 10 or Windows 11, once you start the Windows Store Apps troubleshooter, it will begin to detect potential problems.
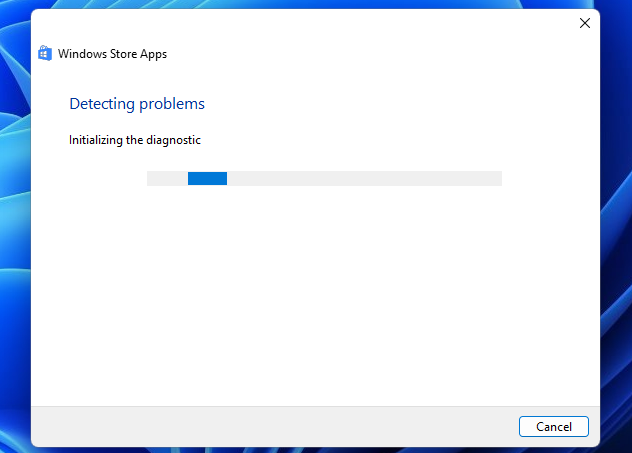
Using the Windows Store Apps troubleshooter
If it finds anything that could affect how the Windows apps run on your PC, it makes the necessary repairs. When that process is done, it might ask you to reboot your Windows 10 or Windows 11 computer or device. If that happens, restart it and check whether your apps are working correctly. If they still don’t, we’re sorry, but the best thing you can do is reset or reinstall each app on its own or even try resetting Windows altogether. If you need help with that, you might like these guides:
- How to reset apps in Windows 10 and clear their data
- How to reset Windows 10 without losing your files
- How to reset Windows 11 without losing your files
Did you reinstall Windows apps with PowerShell?
As you can see, bringing back all the Windows 10 or Windows 11 default apps is easy, at least in theory. Furthermore, it shouldn’t take too long. After all, it’s all about running just one PowerShell command. However, as with all things in life, it might not go as planned, and, in some cases, Windows can fail to reinstall its standard apps. So, do you know other ways to get the built-in apps back into Windows 10 or Windows 11? Don’t hesitate to let us know in the comments section below.
Многие пользователи Windows 10 при удалении встроенных приложений случайно удаляют и магазин приложений (Microsoft Store). Чаще всего это происходит при бездумном запуске сторонних утилит или PowerShell скриптов вида
Get-AppXProvisionedPackage -online | Remove-AppxProvisionedPackage -online
, которые удаляют все современные APPX приложения без исключения (см. статью по корректному удалению предустановленные APPX приложения в Windows 10). Если Microsoft Store отсутствует в Windows 10 или работает с ошибками, вы можете установить его или сбросить состояние в соответствии с инструкциями из этой статьи.
Содержание:
- Сброс приложения Microsoft Store в Windows 10
- Восстановление Microsoft Store в Windows 10 с помощью PowerShell
- Ручная установка Microsoft Store в Windows 10 после полного удаления
Сброс приложения Microsoft Store в Windows 10
Если приложение Microsoft Store в Windows 10 не запускается, или работает с ошибками, вы можете попробовать сбросить его настройки на дефолтные и удалить сохраненные данные:
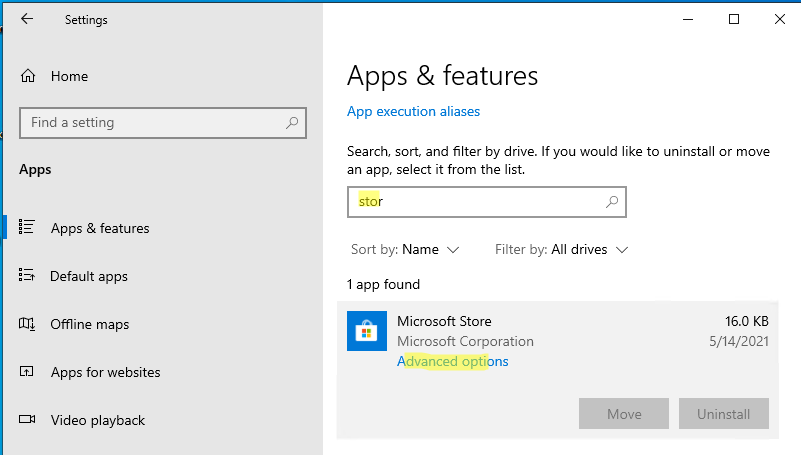
- Перейдите в меню Settings -> Apps -> Apps & features;
- Найдите приложение Microsoft Store и нажмите на ссылку Advanced options;

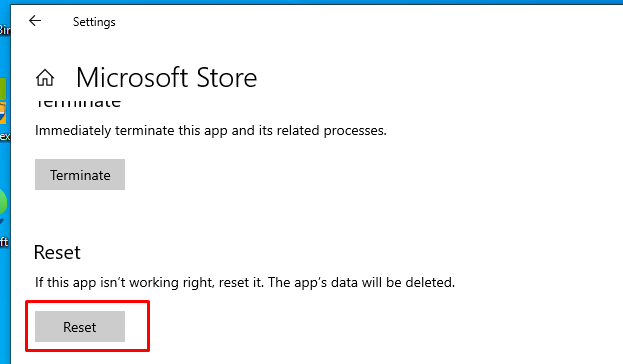
- В открывшемся окне нажмите на кнопку Reset и подтвердите удаление всех старых настроек.

Также вы можете сбросить настройки Microsoft Store из команды строки с помощью команды:
WSReset.exe
Восстановление Microsoft Store в Windows 10 с помощью PowerShell
При удалении системных APPX приложений с помощью PowerShell командлета
Remove-AppxPackage
, Windows на самом деле не удаляет приложения с диска, а просто отменяет их регистрацию. Можно попробовать перерегистрировать приложение WindowsStore с помощью XML файла манифеста приложения.
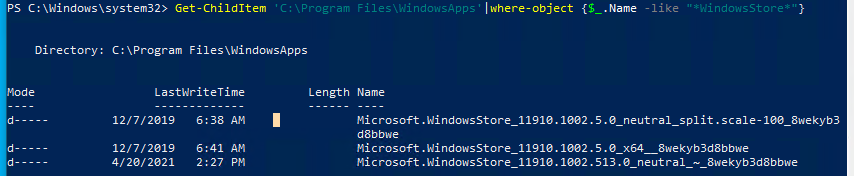
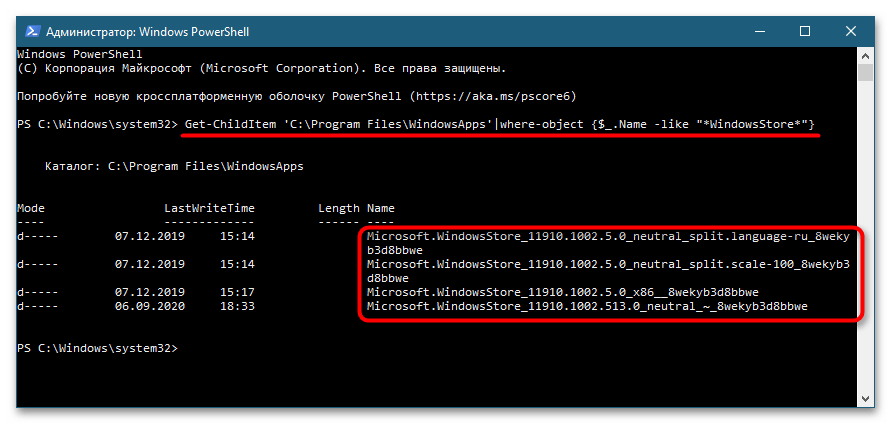
- Проверьте, что файлы приложения остались на месте:
Get-ChildItem 'C:\Program Files\WindowsApps'|where-object {$_.Name -like "*WindowsStore*"} - В моем примере каталоги с именами Microsoft.WindowsStore _* остались на месте;

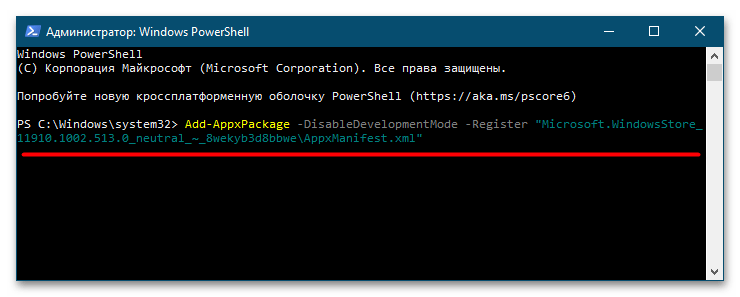
- Зарегистрируйте appx приложение WindowsStore в Windows 10 с помощью файла AppXManifest.xml командой:
Get-AppXPackage *WindowsStore* -AllUsers | Foreach {Add-AppxPackage -DisableDevelopmentMode -Register “$($_.InstallLocation)\AppXManifest.xml”}Совет. Если вы выполнении команды Add-AppxPackage появится ошибка с отказом доступа, попробуйте с помощью утилиты icacls предоставить своей учетной записи права владельца на каталог C:\Program Files\WindowsApps\.
- Проверьте, что в меню пуск появился значок Microsoft Store.
Ручная установка Microsoft Store в Windows 10 после полного удаления
Если в каталоге каталог
C:\Program Files\WindowsApps
не сохранилось каталога с файлами Windows Store, то при попытке зарегистрировать приложение с помощью Add-AppxPackage появятся ошибки вида:
Add-AppxPackage : Cannot find path.
Add-AppxPackage : Deployment failed with HRESULT: 0x80073CF6, Package could not be registered.
Сannot register the Microsoft.WindowsStore package because there was a merge failure.
В этом случае вы можете вручную скачать файлы WindowsStore и все зависимости с сайта Microsoft, и установить APPX приложения вручную.
- Откройте консоль PowerShell с правами администратора;
- Выполните следующую команду, чтобы убедиться, что приложение WindowsStore полностью удалено:
Get-AppXPackage -AllUsers |where-object {$_.Name -like "*WindowsStore*"}
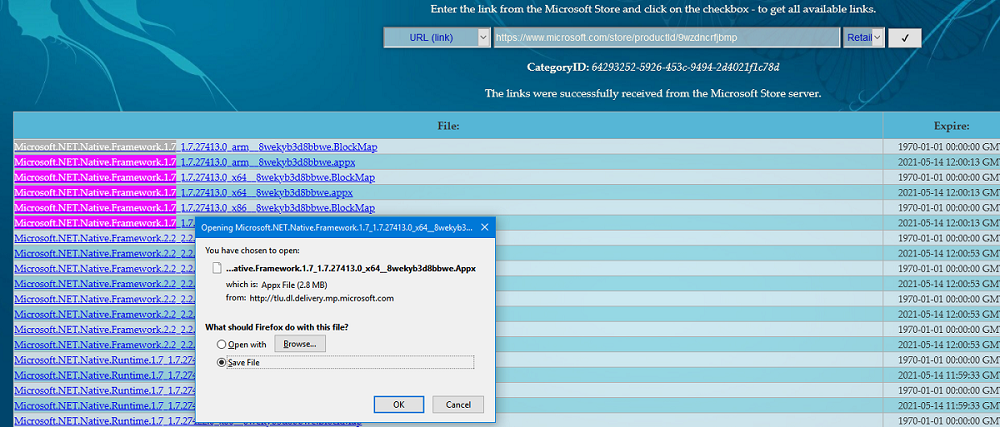
- Перейдите на сайт https://store.rg-adguard.net/ (сайт позволяет получить прямые ссылки и скачать установочные APPX файлы приложений магазина с сайта Microsoft) , вставьте в строку поиска ссылку на Microsoft Store (
https://www.microsoft.com/store/productId/9wzdncrfjbmp
), в выпадающем списке выберите Retail; - Для корректной работы Store вам нужно скачать шесть APPX файлов c зависимостями для вашей версии Windows (x64 или x86):
Microsoft.NET.Native.Framework.1.7
,
Microsoft.NET.Native.Framework.2.2
,
Microsoft.NET.Native.Runtime.1.7
,
Microsoft.NET.Native.Runtime.2.2
,
Microsoft.VCLibs
,
Microsoft.UI.Xaml.2.4
;
- В моем случае у меня получился такой список файлов:
Microsoft.NET.Native.Framework.1.7_1.7.27413.0_x64__8wekyb3d8bbwe.Appx
Microsoft.NET.Native.Framework.2.2_2.2.29512.0_x64__8wekyb3d8bbwe.Appx
Microsoft.NET.Native.Runtime.1.7_1.7.27422.0_x64__8wekyb3d8bbwe.Appx
Microsoft.NET.Native.Runtime.2.2_2.2.28604.0_x64__8wekyb3d8bbwe.Appx
Microsoft.VCLibs.140.00_14.0.29231.0_x64__8wekyb3d8bbwe.Appx
Microsoft.UI.Xaml.2.4_2.42007.9001.0_x64__8wekyb3d8bbwe.Appx
- Теперь аналогичным образом скачайте пакет Microsoft.WindowsStore с расширением appxbundle (например,
Microsoft.WindowsStore_12104.1001.113.0_neutral_~_8wekyb3d8bbwe.appxbundle
). Если у скачанного файла нет расширения, добавьте расширение
.appxbundle
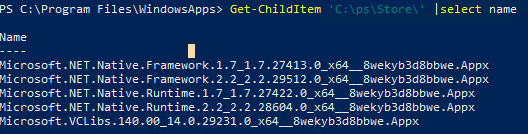
вручную; - Скопируйте все пакеты в один каталог и установите их следующими командами PowerShell:
$Path = 'C:\PS\Store'
Get-Childitem $Path -filter *.appx| %{Add-AppxPackage -Path $_.FullName}
Get-Childitem $Path -filter *.appxbundle | %{Add-AppxPackage -Path $_.FullName}
Если при установке Microsoft.WindowsStore появятся ошибки с зависимостями, скачайте и установите указанные appx пакеты вручную.
- Проверьте, что Windows Store восстановился, и его значок появился в меню Пуск.


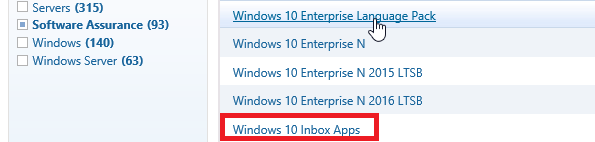
Если у вас есть корпоративная подписка VLSC (Software Assurance), вы можете скачать с сайта Microsoft ISO образ Windows 10 Inbox Apps. В данном офлайн образе содержатся все встроенные приложения, в том числе магазин Microsoft.
Для установки Windows Store с такого ISO образа можно использовать следующую команду:
Add-AppxProvisionedPackage -Online -PackagePath "E:\x86fre\Microsoft.WindowsStore_8wekyb3d8bbwe.appxbundle" –LicensePath "E:\x86fre\Microsoft.WindowsStore_8wekyb3d8bbwe.xml"
Windows Registry Editor Version 5.00

[HKEY_LOCAL_MACHINE\SOFTWARE\Microsoft\Windows Photo Viewer\Capabilities\FileAssociations]
".jpg"="PhotoViewer.FileAssoc.Jpeg"
".wdp"="PhotoViewer.FileAssoc.Wdp"
".jfif"="PhotoViewer.FileAssoc.JFIF"
".dib"="PhotoViewer.FileAssoc.Bitmap"
".png"="PhotoViewer.FileAssoc.Png"
".jxr"="PhotoViewer.FileAssoc.Wdp"
".bmp"="PhotoViewer.FileAssoc.Bitmap"
".jpe"="PhotoViewer.FileAssoc.Jpeg"
".jpeg"="PhotoViewer.FileAssoc.Jpeg"
".gif"="PhotoViewer.FileAssoc.Gif"

[HKEY_CLASSES_ROOT\PhotoViewer.FileAssoc.Bitmap]
"ImageOptionFlags"=dword:00000001
"FriendlyTypeName"=hex(2):40,00,25,00,50,00,72,00,6f,00,67,00,72,00,61,00,6d,\
  00,46,00,69,00,6c,00,65,00,73,00,25,00,5c,00,57,00,69,00,6e,00,64,00,6f,00,\
  77,00,73,00,20,00,50,00,68,00,6f,00,74,00,6f,00,20,00,56,00,69,00,65,00,77,\
  00,65,00,72,00,5c,00,50,00,68,00,6f,00,74,00,6f,00,56,00,69,00,65,00,77,00,\
  65,00,72,00,2e,00,64,00,6c,00,6c,00,2c,00,2d,00,33,00,30,00,35,00,36,00,00,\
  00

[HKEY_CLASSES_ROOT\PhotoViewer.FileAssoc.Bitmap\DefaultIcon]
@="%SystemRoot%\\System32\\imageres.dll,-70"

[HKEY_CLASSES_ROOT\PhotoViewer.FileAssoc.Bitmap\shell]

[HKEY_CLASSES_ROOT\PhotoViewer.FileAssoc.Bitmap\shell\open]

[HKEY_CLASSES_ROOT\PhotoViewer.FileAssoc.Bitmap\shell\open\command]
@=hex(2):25,00,53,00,79,00,73,00,74,00,65,00,6d,00,52,00,6f,00,6f,00,74,00,25,\
  00,5c,00,53,00,79,00,73,00,74,00,65,00,6d,00,33,00,32,00,5c,00,72,00,75,00,\
  6e,00,64,00,6c,00,6c,00,33,00,32,00,2e,00,65,00,78,00,65,00,20,00,22,00,25,\
  00,50,00,72,00,6f,00,67,00,72,00,61,00,6d,00,46,00,69,00,6c,00,65,00,73,00,\
  25,00,5c,00,57,00,69,00,6e,00,64,00,6f,00,77,00,73,00,20,00,50,00,68,00,6f,\
  00,74,00,6f,00,20,00,56,00,69,00,65,00,77,00,65,00,72,00,5c,00,50,00,68,00,\
  6f,00,74,00,6f,00,56,00,69,00,65,00,77,00,65,00,72,00,2e,00,64,00,6c,00,6c,\
  00,22,00,2c,00,20,00,49,00,6d,00,61,00,67,00,65,00,56,00,69,00,65,00,77,00,\
  5f,00,46,00,75,00,6c,00,6c,00,73,00,63,00,72,00,65,00,65,00,6e,00,20,00,25,\
  00,31,00,00,00

[HKEY_CLASSES_ROOT\PhotoViewer.FileAssoc.Bitmap\shell\open\DropTarget]
"Clsid"="{FFE2A43C-56B9-4bf5-9A79-CC6D4285608A}"

[HKEY_CLASSES_ROOT\PhotoViewer.FileAssoc.JFIF]
"EditFlags"=dword:00010000
"ImageOptionFlags"=dword:00000001
"FriendlyTypeName"=hex(2):40,00,25,00,50,00,72,00,6f,00,67,00,72,00,61,00,6d,\
  00,46,00,69,00,6c,00,65,00,73,00,25,00,5c,00,57,00,69,00,6e,00,64,00,6f,00,\
  77,00,73,00,20,00,50,00,68,00,6f,00,74,00,6f,00,20,00,56,00,69,00,65,00,77,\
  00,65,00,72,00,5c,00,50,00,68,00,6f,00,74,00,6f,00,56,00,69,00,65,00,77,00,\
  65,00,72,00,2e,00,64,00,6c,00,6c,00,2c,00,2d,00,33,00,30,00,35,00,35,00,00,\
  00

[HKEY_CLASSES_ROOT\PhotoViewer.FileAssoc.JFIF\DefaultIcon]
@="%SystemRoot%\\System32\\imageres.dll,-72"

[HKEY_CLASSES_ROOT\PhotoViewer.FileAssoc.JFIF\shell]

[HKEY_CLASSES_ROOT\PhotoViewer.FileAssoc.JFIF\shell\open]
"MuiVerb"=hex(2):40,00,25,00,50,00,72,00,6f,00,67,00,72,00,61,00,6d,00,46,00,\
  69,00,6c,00,65,00,73,00,25,00,5c,00,57,00,69,00,6e,00,64,00,6f,00,77,00,73,\
  00,20,00,50,00,68,00,6f,00,74,00,6f,00,20,00,56,00,69,00,65,00,77,00,65,00,\
  72,00,5c,00,70,00,68,00,6f,00,74,00,6f,00,76,00,69,00,65,00,77,00,65,00,72,\
  00,2e,00,64,00,6c,00,6c,00,2c,00,2d,00,33,00,30,00,34,00,33,00,00,00

[HKEY_CLASSES_ROOT\PhotoViewer.FileAssoc.JFIF\shell\open\command]
@=hex(2):25,00,53,00,79,00,73,00,74,00,65,00,6d,00,52,00,6f,00,6f,00,74,00,25,\
  00,5c,00,53,00,79,00,73,00,74,00,65,00,6d,00,33,00,32,00,5c,00,72,00,75,00,\
  6e,00,64,00,6c,00,6c,00,33,00,32,00,2e,00,65,00,78,00,65,00,20,00,22,00,25,\
  00,50,00,72,00,6f,00,67,00,72,00,61,00,6d,00,46,00,69,00,6c,00,65,00,73,00,\
  25,00,5c,00,57,00,69,00,6e,00,64,00,6f,00,77,00,73,00,20,00,50,00,68,00,6f,\
  00,74,00,6f,00,20,00,56,00,69,00,65,00,77,00,65,00,72,00,5c,00,50,00,68,00,\
  6f,00,74,00,6f,00,56,00,69,00,65,00,77,00,65,00,72,00,2e,00,64,00,6c,00,6c,\
  00,22,00,2c,00,20,00,49,00,6d,00,61,00,67,00,65,00,56,00,69,00,65,00,77,00,\
  5f,00,46,00,75,00,6c,00,6c,00,73,00,63,00,72,00,65,00,65,00,6e,00,20,00,25,\
  00,31,00,00,00

[HKEY_CLASSES_ROOT\PhotoViewer.FileAssoc.JFIF\shell\open\DropTarget]
"Clsid"="{FFE2A43C-56B9-4bf5-9A79-CC6D4285608A}"

[HKEY_CLASSES_ROOT\PhotoViewer.FileAssoc.Jpeg]
"EditFlags"=dword:00010000
"ImageOptionFlags"=dword:00000001
"FriendlyTypeName"=hex(2):40,00,25,00,50,00,72,00,6f,00,67,00,72,00,61,00,6d,\
  00,46,00,69,00,6c,00,65,00,73,00,25,00,5c,00,57,00,69,00,6e,00,64,00,6f,00,\
  77,00,73,00,20,00,50,00,68,00,6f,00,74,00,6f,00,20,00,56,00,69,00,65,00,77,\
  00,65,00,72,00,5c,00,50,00,68,00,6f,00,74,00,6f,00,56,00,69,00,65,00,77,00,\
  65,00,72,00,2e,00,64,00,6c,00,6c,00,2c,00,2d,00,33,00,30,00,35,00,35,00,00,\
  00

[HKEY_CLASSES_ROOT\PhotoViewer.FileAssoc.Jpeg\DefaultIcon]
@="%SystemRoot%\\System32\\imageres.dll,-72"

[HKEY_CLASSES_ROOT\PhotoViewer.FileAssoc.Jpeg\shell]

[HKEY_CLASSES_ROOT\PhotoViewer.FileAssoc.Jpeg\shell\open]
"MuiVerb"=hex(2):40,00,25,00,50,00,72,00,6f,00,67,00,72,00,61,00,6d,00,46,00,\
  69,00,6c,00,65,00,73,00,25,00,5c,00,57,00,69,00,6e,00,64,00,6f,00,77,00,73,\
  00,20,00,50,00,68,00,6f,00,74,00,6f,00,20,00,56,00,69,00,65,00,77,00,65,00,\
  72,00,5c,00,70,00,68,00,6f,00,74,00,6f,00,76,00,69,00,65,00,77,00,65,00,72,\
  00,2e,00,64,00,6c,00,6c,00,2c,00,2d,00,33,00,30,00,34,00,33,00,00,00

[HKEY_CLASSES_ROOT\PhotoViewer.FileAssoc.Jpeg\shell\open\command]
@=hex(2):25,00,53,00,79,00,73,00,74,00,65,00,6d,00,52,00,6f,00,6f,00,74,00,25,\
  00,5c,00,53,00,79,00,73,00,74,00,65,00,6d,00,33,00,32,00,5c,00,72,00,75,00,\
  6e,00,64,00,6c,00,6c,00,33,00,32,00,2e,00,65,00,78,00,65,00,20,00,22,00,25,\
  00,50,00,72,00,6f,00,67,00,72,00,61,00,6d,00,46,00,69,00,6c,00,65,00,73,00,\
  25,00,5c,00,57,00,69,00,6e,00,64,00,6f,00,77,00,73,00,20,00,50,00,68,00,6f,\
  00,74,00,6f,00,20,00,56,00,69,00,65,00,77,00,65,00,72,00,5c,00,50,00,68,00,\
  6f,00,74,00,6f,00,56,00,69,00,65,00,77,00,65,00,72,00,2e,00,64,00,6c,00,6c,\
  00,22,00,2c,00,20,00,49,00,6d,00,61,00,67,00,65,00,56,00,69,00,65,00,77,00,\
  5f,00,46,00,75,00,6c,00,6c,00,73,00,63,00,72,00,65,00,65,00,6e,00,20,00,25,\
  00,31,00,00,00

[HKEY_CLASSES_ROOT\PhotoViewer.FileAssoc.Jpeg\shell\open\DropTarget]
"Clsid"="{FFE2A43C-56B9-4bf5-9A79-CC6D4285608A}"

[HKEY_CLASSES_ROOT\PhotoViewer.FileAssoc.Gif]
"ImageOptionFlags"=dword:00000001
"FriendlyTypeName"=hex(2):40,00,25,00,50,00,72,00,6f,00,67,00,72,00,61,00,6d,\
  00,46,00,69,00,6c,00,65,00,73,00,25,00,5c,00,57,00,69,00,6e,00,64,00,6f,00,\
  77,00,73,00,20,00,50,00,68,00,6f,00,74,00,6f,00,20,00,56,00,69,00,65,00,77,\
  00,65,00,72,00,5c,00,50,00,68,00,6f,00,74,00,6f,00,56,00,69,00,65,00,77,00,\
  65,00,72,00,2e,00,64,00,6c,00,6c,00,2c,00,2d,00,33,00,30,00,35,00,37,00,00,\
  00

[HKEY_CLASSES_ROOT\PhotoViewer.FileAssoc.Gif\DefaultIcon]
@="%SystemRoot%\\System32\\imageres.dll,-83"

[HKEY_CLASSES_ROOT\PhotoViewer.FileAssoc.Gif\shell]

[HKEY_CLASSES_ROOT\PhotoViewer.FileAssoc.Gif\shell\open]

[HKEY_CLASSES_ROOT\PhotoViewer.FileAssoc.Gif\shell\open\command]
@=hex(2):25,00,53,00,79,00,73,00,74,00,65,00,6d,00,52,00,6f,00,6f,00,74,00,25,\
  00,5c,00,53,00,79,00,73,00,74,00,65,00,6d,00,33,00,32,00,5c,00,72,00,75,00,\
  6e,00,64,00,6c,00,6c,00,33,00,32,00,2e,00,65,00,78,00,65,00,20,00,22,00,25,\
  00,50,00,72,00,6f,00,67,00,72,00,61,00,6d,00,46,00,69,00,6c,00,65,00,73,00,\
  25,00,5c,00,57,00,69,00,6e,00,64,00,6f,00,77,00,73,00,20,00,50,00,68,00,6f,\
  00,74,00,6f,00,20,00,56,00,69,00,65,00,77,00,65,00,72,00,5c,00,50,00,68,00,\
  6f,00,74,00,6f,00,56,00,69,00,65,00,77,00,65,00,72,00,2e,00,64,00,6c,00,6c,\
  00,22,00,2c,00,20,00,49,00,6d,00,61,00,67,00,65,00,56,00,69,00,65,00,77,00,\
  5f,00,46,00,75,00,6c,00,6c,00,73,00,63,00,72,00,65,00,65,00,6e,00,20,00,25,\
  00,31,00,00,00

[HKEY_CLASSES_ROOT\PhotoViewer.FileAssoc.Gif\shell\open\DropTarget]
"Clsid"="{FFE2A43C-56B9-4bf5-9A79-CC6D4285608A}"

[HKEY_CLASSES_ROOT\PhotoViewer.FileAssoc.Png]
"ImageOptionFlags"=dword:00000001
"FriendlyTypeName"=hex(2):40,00,25,00,50,00,72,00,6f,00,67,00,72,00,61,00,6d,\
  00,46,00,69,00,6c,00,65,00,73,00,25,00,5c,00,57,00,69,00,6e,00,64,00,6f,00,\
  77,00,73,00,20,00,50,00,68,00,6f,00,74,00,6f,00,20,00,56,00,69,00,65,00,77,\
  00,65,00,72,00,5c,00,50,00,68,00,6f,00,74,00,6f,00,56,00,69,00,65,00,77,00,\
  65,00,72,00,2e,00,64,00,6c,00,6c,00,2c,00,2d,00,33,00,30,00,35,00,37,00,00,\
  00

[HKEY_CLASSES_ROOT\PhotoViewer.FileAssoc.Png\DefaultIcon]
@="%SystemRoot%\\System32\\imageres.dll,-71"

[HKEY_CLASSES_ROOT\PhotoViewer.FileAssoc.Png\shell]

[HKEY_CLASSES_ROOT\PhotoViewer.FileAssoc.Png\shell\open]

[HKEY_CLASSES_ROOT\PhotoViewer.FileAssoc.Png\shell\open\command]
@=hex(2):25,00,53,00,79,00,73,00,74,00,65,00,6d,00,52,00,6f,00,6f,00,74,00,25,\
  00,5c,00,53,00,79,00,73,00,74,00,65,00,6d,00,33,00,32,00,5c,00,72,00,75,00,\
  6e,00,64,00,6c,00,6c,00,33,00,32,00,2e,00,65,00,78,00,65,00,20,00,22,00,25,\
  00,50,00,72,00,6f,00,67,00,72,00,61,00,6d,00,46,00,69,00,6c,00,65,00,73,00,\
  25,00,5c,00,57,00,69,00,6e,00,64,00,6f,00,77,00,73,00,20,00,50,00,68,00,6f,\
  00,74,00,6f,00,20,00,56,00,69,00,65,00,77,00,65,00,72,00,5c,00,50,00,68,00,\
  6f,00,74,00,6f,00,56,00,69,00,65,00,77,00,65,00,72,00,2e,00,64,00,6c,00,6c,\
  00,22,00,2c,00,20,00,49,00,6d,00,61,00,67,00,65,00,56,00,69,00,65,00,77,00,\
  5f,00,46,00,75,00,6c,00,6c,00,73,00,63,00,72,00,65,00,65,00,6e,00,20,00,25,\
  00,31,00,00,00

[HKEY_CLASSES_ROOT\PhotoViewer.FileAssoc.Png\shell\open\DropTarget]
"Clsid"="{FFE2A43C-56B9-4bf5-9A79-CC6D4285608A}"

[HKEY_CLASSES_ROOT\PhotoViewer.FileAssoc.Wdp]
"EditFlags"=dword:00010000
"ImageOptionFlags"=dword:00000001

[HKEY_CLASSES_ROOT\PhotoViewer.FileAssoc.Wdp\DefaultIcon]
@="%SystemRoot%\\System32\\wmphoto.dll,-400"

[HKEY_CLASSES_ROOT\PhotoViewer.FileAssoc.Wdp\shell]

[HKEY_CLASSES_ROOT\PhotoViewer.FileAssoc.Wdp\shell\open]
"MuiVerb"=hex(2):40,00,25,00,50,00,72,00,6f,00,67,00,72,00,61,00,6d,00,46,00,\
  69,00,6c,00,65,00,73,00,25,00,5c,00,57,00,69,00,6e,00,64,00,6f,00,77,00,73,\
  00,20,00,50,00,68,00,6f,00,74,00,6f,00,20,00,56,00,69,00,65,00,77,00,65,00,\
  72,00,5c,00,70,00,68,00,6f,00,74,00,6f,00,76,00,69,00,65,00,77,00,65,00,72,\
  00,2e,00,64,00,6c,00,6c,00,2c,00,2d,00,33,00,30,00,34,00,33,00,00,00

[HKEY_CLASSES_ROOT\PhotoViewer.FileAssoc.Wdp\shell\open\command]
@=hex(2):25,00,53,00,79,00,73,00,74,00,65,00,6d,00,52,00,6f,00,6f,00,74,00,25,\
  00,5c,00,53,00,79,00,73,00,74,00,65,00,6d,00,33,00,32,00,5c,00,72,00,75,00,\
  6e,00,64,00,6c,00,6c,00,33,00,32,00,2e,00,65,00,78,00,65,00,20,00,22,00,25,\
  00,50,00,72,00,6f,00,67,00,72,00,61,00,6d,00,46,00,69,00,6c,00,65,00,73,00,\
  25,00,5c,00,57,00,69,00,6e,00,64,00,6f,00,77,00,73,00,20,00,50,00,68,00,6f,\
  00,74,00,6f,00,20,00,56,00,69,00,65,00,77,00,65,00,72,00,5c,00,50,00,68,00,\
  6f,00,74,00,6f,00,56,00,69,00,65,00,77,00,65,00,72,00,2e,00,64,00,6c,00,6c,\
  00,22,00,2c,00,20,00,49,00,6d,00,61,00,67,00,65,00,56,00,69,00,65,00,77,00,\
  5f,00,46,00,75,00,6c,00,6c,00,73,00,63,00,72,00,65,00,65,00,6e,00,20,00,25,\
  00,31,00,00,00

[HKEY_CLASSES_ROOT\PhotoViewer.FileAssoc.Wdp\shell\open\DropTarget]
"Clsid"="{FFE2A43C-56B9-4bf5-9A79-CC6D4285608A}"

[HKEY_LOCAL_MACHINE\SOFTWARE\Microsoft\Windows Photo Viewer]

[HKEY_LOCAL_MACHINE\SOFTWARE\Microsoft\Windows Photo Viewer\Capabilities]
"ApplicationDescription"="@%ProgramFiles%\\Windows Photo Viewer\\photoviewer.dll,-3069"
"ApplicationName"="@%ProgramFiles%\\Windows Photo Viewer\\photoviewer.dll,-3009"
Windows 10 comes with a number of built-in universal apps such as Start menu, Cortana, Microsoft Edge browser, Xbox, Microsoft store, photos, paint 3D, one-note, skype etc. These are default build-in apps that come pre-installed while installing upgrade to windows 10. Sometimes after a recent windows 10 upgrade, you may notice certain apps missing. Or after installing the latest updates, Apps does not perform properly, Crashes, or Not respond. Or for some others number of apps get broken and not work properly.
In Such Causes, we recommend resetting the app following the steps below.
- Press Windows + I keyboard shortcut to open the Settings app,
- Click on apps then Apps and features,
- Now select the problematic app and click on Advanced options
- Scroll down and click on the reset option,
- Click reset again to reset the app to its default setup.
But if the reset option didn’t fix the problem, Or apps missing after Windows 10 1903 Upgrade, Here is how to restore removed apps on windows 10
Contents
- 1 How To Re-register default Windows apps
- 1.1 Reinstall All Built-in Apps in Windows 10
- 1.2 Reinstall a Specific Built-in App in Windows 10
- 2 Reset your PC to its default settings
How To Re-register default Windows apps
You Can Re-install or Re-register Build-in Windows apps by performing some command line on Windows PowerShell. Here step by step guide to re-install a particular default app or all the default built-in apps on your Windows 10 computer using PowerShell commands.
Reinstall All Built-in Apps in Windows 10
To Re-install All Built-in Windows apps
- Open the Windows PowerShell with administrative privileges.
- You can do this by press win + X and select PowerShell ( admin ).
- Now copy/paste the command below on PowerShell and hit the enter key to execute the same.
Get-AppXPackage | Foreach {Add-AppxPackage -DisableDevelopmentMode -Register “$($_.InstallLocation)\AppXManifest.xml”}
It then tries to install all of the default apps on Windows 10 for the account you are currently logged in to. Or you can use the below command to Re-register Windows Apps for All Users :
Get-AppxPackage -Allusers | Foreach {Add-AppxPackage -register “$($_.InstallLocation)\appxmanifest.xml” -DisableDevelopmentMode}
If one of the default apps is already installed on the computer, then you get shown the name of it in red. Simply Ignore the Red lines after complete the command Restart windows to get a fresh start. Now check apps related problems get resolved.
Reinstall a Specific Built-in App in Windows 10
If you Getting problems with any specific windows app and others working properly then no need to Re-register / Reinstall All apps by performing above command. Check the below commands to Re-register only a Specific windows app.
- Again open PowerShell (admin) by press Win + X and select.
- On the Administrator PowerShell prompt copy/paste command below and hit enter to execute the same.
- 3D Builder:
PowerShell -ExecutionPolicy Unrestricted -Command “& {$manifest = (Get-AppxPackage *3DBuilder*).InstallLocation + ‘\AppxManifest.xml’ ; Add-AppxPackage -DisableDevelopmentMode -Register $manifest}”
- Alarms & Clock:
PowerShell -ExecutionPolicy Unrestricted -Command “& {$manifest = (Get-AppxPackage *WindowsAlarms*).InstallLocation + ‘\AppxManifest.xml’ ; Add-AppxPackage -DisableDevelopmentMode -Register $manifest}”
- App Connector:
PowerShell -ExecutionPolicy Unrestricted -Command “& {$manifest = (Get-AppxPackage *AppConnector*).InstallLocation + ‘\AppxManifest.xml’ ; Add-AppxPackage -DisableDevelopmentMode -Register $manifest}”
- Calculator:
PowerShell -ExecutionPolicy Unrestricted -Command “& {$manifest = (Get-AppxPackage *WindowsCalculator*).InstallLocation + ‘\AppxManifest.xml’ ; Add-AppxPackage -DisableDevelopmentMode -Register $manifest}”
- Calendar and Mail:
PowerShell -ExecutionPolicy Unrestricted -Command “& {$manifest = (Get-AppxPackage *windowscommunicationsapps*).InstallLocation + ‘\AppxManifest.xml’ ; Add-AppxPackage -DisableDevelopmentMode -Register $manifest}”
- Camera:
PowerShell -ExecutionPolicy Unrestricted -Command “& {$manifest = (Get-AppxPackage *WindowsCamera*).InstallLocation + ‘\AppxManifest.xml’ ; Add-AppxPackage -DisableDevelopmentMode -Register $manifest}”
- Candy Crush Soda Saga:
PowerShell -ExecutionPolicy Unrestricted -Command “& {$manifest = (Get-AppxPackage *CandyCrushSodaSaga*).InstallLocation + ‘\AppxManifest.xml’ ; Add-AppxPackage -DisableDevelopmentMode -Register $manifest}”
- Connect:
PowerShell -ExecutionPolicy Unrestricted -Command “& {$manifest = (Get-AppxPackage *PPIProjection*).InstallLocation + ‘\AppxManifest.xml’ ; Add-AppxPackage -DisableDevelopmentMode -Register $manifest}”
- Contact Support:
PowerShell -ExecutionPolicy Unrestricted -Command “& {$manifest = (Get-AppxPackage *ContactSupport*).InstallLocation + ‘\AppxManifest.xml’ ; Add-AppxPackage -DisableDevelopmentMode -Register $manifest}”
- Cortana:
PowerShell -ExecutionPolicy Unrestricted -Command “& {$manifest = (Get-AppxPackage *Windows.Cortana*).InstallLocation + ‘\AppxManifest.xml’ ; Add-AppxPackage -DisableDevelopmentMode -Register $manifest}”
- Feedback Hub:
PowerShell -ExecutionPolicy Unrestricted -Command “& {$manifest = (Get-AppxPackage *WindowsFeedbackHub*).InstallLocation + ‘\AppxManifest.xml’ ; Add-AppxPackage -DisableDevelopmentMode -Register $manifest}”
- Get Office:
PowerShell -ExecutionPolicy Unrestricted -Command “& {$manifest = (Get-AppxPackage *MicrosoftOfficeHub*).InstallLocation + ‘\AppxManifest.xml’ ; Add-AppxPackage -DisableDevelopmentMode -Register $manifest}”
- Get Started:
PowerShell -ExecutionPolicy Unrestricted -Command “& {$manifest = (Get-AppxPackage *GetStarted*).InstallLocation + ‘\AppxManifest.xml’ ; Add-AppxPackage -DisableDevelopmentMode -Register $manifest}”
- Mail and Calendar:
PowerShell -ExecutionPolicy Unrestricted -Command “& {$manifest = (Get-AppxPackage *windowscommunicationsapps*).InstallLocation + ‘\AppxManifest.xml’ ; Add-AppxPackage -DisableDevelopmentMode -Register $manifest}”
- Maps:
PowerShell -ExecutionPolicy Unrestricted -Command “& {$manifest = (Get-AppxPackage *WindowsMaps*).InstallLocation + ‘\AppxManifest.xml’ ; Add-AppxPackage -DisableDevelopmentMode -Register $manifest}”
- Messaging:
PowerShell -ExecutionPolicy Unrestricted -Command “& {$manifest = (Get-AppxPackage *Messaging*).InstallLocation + ‘\AppxManifest.xml’ ; Add-AppxPackage -DisableDevelopmentMode -Register $manifest}”
- Microsoft Edge:
PowerShell -ExecutionPolicy Unrestricted -Command “& {$manifest = (Get-AppxPackage *MicrosoftEdge*).InstallLocation + ‘\AppxManifest.xml’ ; Add-AppxPackage -DisableDevelopmentMode -Register $manifest}”
- Microsoft Solitaire Collection:
PowerShell -ExecutionPolicy Unrestricted -Command “& {$manifest = (Get-AppxPackage *MicrosoftSolitaireCollection*).InstallLocation + ‘\AppxManifest.xml’ ; Add-AppxPackage -DisableDevelopmentMode -Register $manifest}”
- Money:
PowerShell -ExecutionPolicy Unrestricted -Command “& {$manifest = (Get-AppxPackage *BingFinance*).InstallLocation + ‘\AppxManifest.xml’ ; Add-AppxPackage -DisableDevelopmentMode -Register $manifest}”
- Movies & TV:
PowerShell -ExecutionPolicy Unrestricted -Command “& {$manifest = (Get-AppxPackage *ZuneVideo*).InstallLocation + ‘\AppxManifest.xml’ ; Add-AppxPackage -DisableDevelopmentMode -Register $manifest}”
- News:
PowerShell -ExecutionPolicy Unrestricted -Command “& {$manifest = (Get-AppxPackage *BingNews*).InstallLocation + ‘\AppxManifest.xml’ ; Add-AppxPackage -DisableDevelopmentMode -Register $manifest}”
- OneNote:
PowerShell -ExecutionPolicy Unrestricted -Command “& {$manifest = (Get-AppxPackage *Office.OneNote*).InstallLocation + ‘\AppxManifest.xml’ ; Add-AppxPackage -DisableDevelopmentMode -Register $manifest}”
- Paint 3D:
PowerShell -ExecutionPolicy Unrestricted -Command “& {$manifest = (Get-AppxPackage *MSPaint*).InstallLocation + ‘\AppxManifest.xml’ ; Add-AppxPackage -DisableDevelopmentMode -Register $manifest}”
- People:
PowerShell -ExecutionPolicy Unrestricted -Command “& {$manifest = (Get-AppxPackage *People*).InstallLocation + ‘\AppxManifest.xml’ ; Add-AppxPackage -DisableDevelopmentMode -Register $manifest}”
- Phone:
PowerShell -ExecutionPolicy Unrestricted -Command “& {$manifest = (Get-AppxPackage *CommsPhone*).InstallLocation + ‘\AppxManifest.xml’ ; Add-AppxPackage -DisableDevelopmentMode -Register $manifest}”
- Phone Companion:
PowerShell -ExecutionPolicy Unrestricted -Command “& {$manifest = (Get-AppxPackage *WindowsPhone*).InstallLocation + ‘\AppxManifest.xml’ ; Add-AppxPackage -DisableDevelopmentMode -Register $manifest}”
- Photos:
PowerShell -ExecutionPolicy Unrestricted -Command “& {$manifest = (Get-AppxPackage *Photos*).InstallLocation + ‘\AppxManifest.xml’ ; Add-AppxPackage -DisableDevelopmentMode -Register $manifest}”
- Settings:
PowerShell -ExecutionPolicy Unrestricted -Command “& {$manifest = (Get-AppxPackage *immersivecontrolpanel*).InstallLocation + ‘\AppxManifest.xml’ ; Add-AppxPackage -DisableDevelopmentMode -Register $manifest}”
- Skype:
PowerShell -ExecutionPolicy Unrestricted -Command “& {$manifest = (Get-AppxPackage *SkypeApp*).InstallLocation + ‘\AppxManifest.xml’ ; Add-AppxPackage -DisableDevelopmentMode -Register $manifest}”
- Sports:
PowerShell -ExecutionPolicy Unrestricted -Command “& {$manifest = (Get-AppxPackage *BingSports*).InstallLocation + ‘\AppxManifest.xml’ ; Add-AppxPackage -DisableDevelopmentMode -Register $manifest}”
- Sticky Notes:
PowerShell -ExecutionPolicy Unrestricted -Command “& {$manifest = (Get-AppxPackage *MicrosoftStickyNotes*).InstallLocation + ‘\AppxManifest.xml’ ; Add-AppxPackage -DisableDevelopmentMode -Register $manifest}”
- Microsoft Store:
PowerShell -ExecutionPolicy Unrestricted -Command “& {$manifest = (Get-AppxPackage *microsoftStore*).InstallLocation + ‘\AppxManifest.xml’ ; Add-AppxPackage -DisableDevelopmentMode -Register $manifest}”
- Sway:
PowerShell -ExecutionPolicy Unrestricted -Command “& {$manifest = (Get-AppxPackage *Office.Sway*).InstallLocation + ‘\AppxManifest.xml’ ; Add-AppxPackage -DisableDevelopmentMode -Register $manifest}”
- Twitter:
PowerShell -ExecutionPolicy Unrestricted -Command “& {$manifest = (Get-AppxPackage *Twitter*).InstallLocation + ‘\AppxManifest.xml’ ; Add-AppxPackage -DisableDevelopmentMode -Register $manifest}”
- Voice Recorder:
PowerShell -ExecutionPolicy Unrestricted -Command “& {$manifest = (Get-AppxPackage *WindowsSoundRecorder*).InstallLocation + ‘\AppxManifest.xml’ ; Add-AppxPackage -DisableDevelopmentMode -Register $manifest}”
- Weather:
PowerShell -ExecutionPolicy Unrestricted -Command “& {$manifest = (Get-AppxPackage *BingWeather*).InstallLocation + ‘\AppxManifest.xml’ ; Add-AppxPackage -DisableDevelopmentMode -Register $manifest}”
- Xbox:
PowerShell -ExecutionPolicy Unrestricted -Command “& {$manifest = (Get-AppxPackage *XboxApp*).InstallLocation + ‘\AppxManifest.xml’ ; Add-AppxPackage -DisableDevelopmentMode -Register $manifest}”
- Xbox One SmartGlass:
PowerShell -ExecutionPolicy Unrestricted -Command “& {$manifest = (Get-AppxPackage *XboxOneSmartGlass*).InstallLocation + ‘\AppxManifest.xml’ ; Add-AppxPackage -DisableDevelopmentMode -Register $manifest}”
Note: windows add new apps regularly. So may the app you are getting problem not listed above then you can follow the below steps to re-register the specific app.
On Admin PowerShell type Get-AppxPackage -AllUsers | Select Name, PackageFullName and hit the enter key. This will display available packages (for installation) on your computer. look for the App that you want to re-register (re-install) for the current user. ( for ex we want to re-install Skype app )
Here first copy the package name by select and press Ctrl + C and paste on notepad. ( for ex: Microsoft.SkypeApp_11.8.204.0_x64__kzf8qxf38zg5c ) and the perform command below.
Get-AppXPackage | Foreach {Add-AppxPackage -DisableDevelopmentMode -Register “C:\Program Files\WindowsApps\PackageFullName\appxmanifest.xml” -DisableDevelopmentMode
Note: Replace the package name which you copied from PowerShell. This means the command would be like bellow
Get-AppXPackage | Foreach {Add-AppxPackage -DisableDevelopmentMode -Register “C:\ProgramFiles\WindowsApps\Microsoft.SkypeApp_11.8.204.0_x64__kzf8qxf38zg5c\appxmanifest.xml” -DisableDevelopmentMode
Press enter and wait until executing the command, After that Restart windows and check the specific which you recently re-install working properly.
Reset your PC to its default settings
If the above solutions didn’t fix the problem then Reset this PC is probably a good fix that reinstalls Windows 10 without affecting your files and folder.
- Open Settings.
- Click on Update & Security.
- Click on Recovery.
- Under “Reset this PC,” click the Get Started button.
Select the Keep may files options. and follow on-screen instructions to reset Windows 10 Without effecting files.
Did this help to reinstall preinstalled apps for windows 10? Let us know on the comments below, also read:
- How to Remove Activate Windows 10 watermark permanently
- Windows 10 laptop won’t wake up from sleep mode? Here how to fix it
- Fix error status 0xc000012f Bad Image Error on Windows 10
- Fix This App Has Been Blocked For Your Protection in Windows 10
- How To Update, Re-install, Roll Back Device Drivers in Windows 10
Все способы:
- Способ 1: Перерегистрация в «PowerShell»
- Способ 2: Установка вручную
- Способ 3: Копирование с другого компьютера
- Способ 4: Обновление Windows
- Вопросы и ответы: 0
Способ 1: Перерегистрация в «PowerShell»
Деинсталлированные средствами консоли универсальные приложения Windows 10, как правило, не удаляются полностью. Их исполняемые и ключевые конфигурационные файлы остаются на месте, благодаря чему программы можно восстанавливать путем их повторной регистрации в системе. В той же мере это касается Магазина Windows.
- Запустите от имени администратора консоль «PowerShell» из контекстного меню кнопки «Пуск» или другим известным способом.
- Убедитесь, что файлы Магазина имеются на диске, для чего выполните команду
Get-ChildItem 'C:\Program Files\WindowsApps'|where-object {$_.Name -like "*WindowsStore*"}. - Выполните команду регистрации приложения
Get-AppXPackage *WindowsStore* -AllUsers | Foreach {Add-AppxPackage -DisableDevelopmentMode -Register "$($_.InstallLocation)\AppXManifest.xml"}.

Процедура регистрации и развертывания приложения в системе обычно занимает не более минуты. Если при выполнении команды будет выдана ошибка доступа, получите права на каталог C:\Program Files\WindowsApps.Для ознакомления с разными методами получения прав доступа на каталоги Windows перейдите по ссылке ниже.
Подробнее: Как получить полные права на папку в Windows 10
Если с правами доступа все в порядке, но при выполнении команды возвращается ошибка, указывающая на неверность пути, перестройте команду, вставив в нее путь, полученный первой командой. Вот так: Add-AppxPackage -DisableDevelopmentMode -Register "Microsoft.WindowsStore_11910.1002.513.0_neutral_~_8wekyb3d8bbwe\AppxManifest.xml". Используйте путь к последней версии приложения.
Способ 2: Установка вручную
Если команда Add-AppxPackage вернет сообщение «Путь не найден», «Не удается зарегистрировать пакет Microsoft.WindowsStore. Ошибка слияния», скорее всего, Магазин Windows удален полностью. В этом случае его можно попробовать установить в ручном режиме, скачав установочный файл с сервера Microsoft.
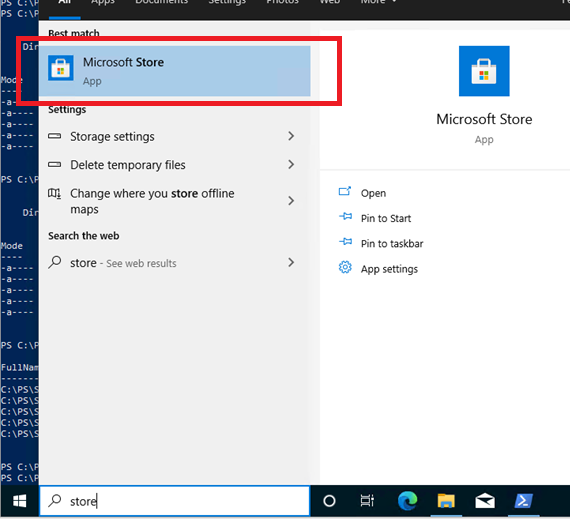
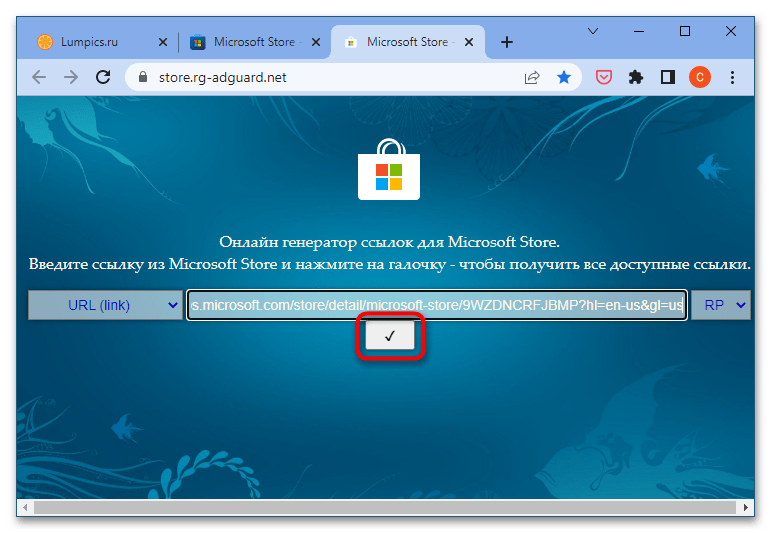
- Зайдите в Windows Store в любом браузере, найдите там приложение Магазин Майкрософт и скопируйте ссылку на страницу с приложением.
- Перейдите на сайт онлайн-генератора ссылок для Microsoft Store, вставьте поле скопированный URL и нажмите кнопку с галочкой.
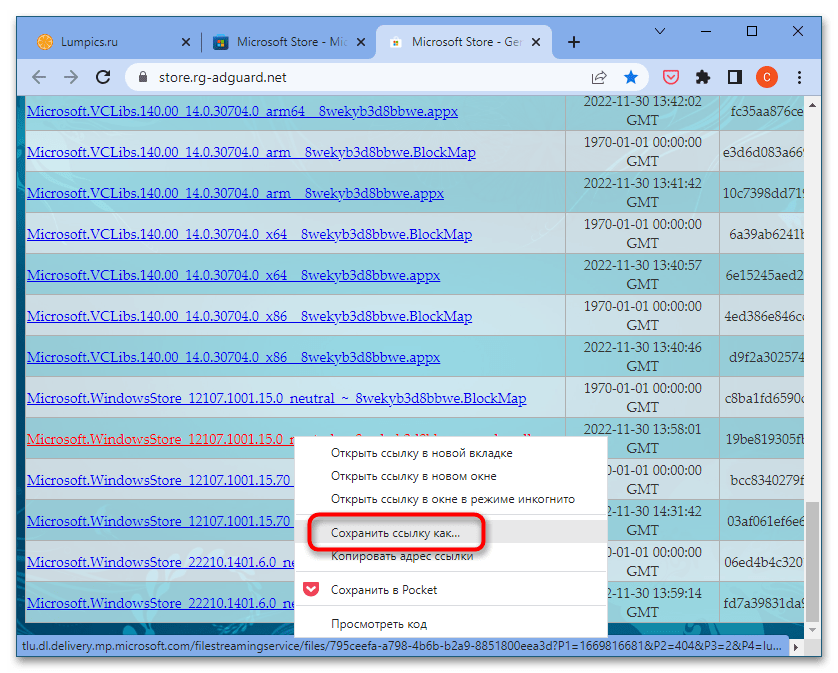
- Сервис выдаст список ссылок на установочные файлы, среди которых нужно найти и скачать файл с названием «Microsoft.WindowsStore…» и расширением «.appxbundle». Чтобы загрузить файл, кликните по нему правой кнопкой мыши и выберите в меню «Сохранить ссылку как…».
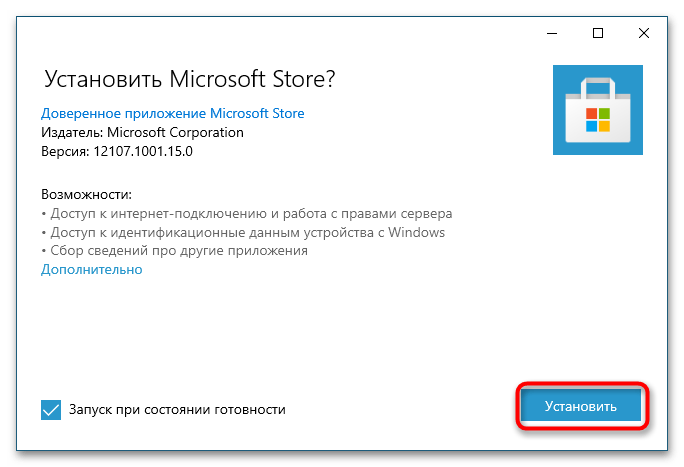
- Запустите скачанный файл двойным кликом и нажмите кнопку «Установить».

Открыть сайт генератора ссылок Microsoft Store
Подробнее: Установка приложений формата Appxbundle в Windows 10
Не исключено, для работы приложения понадобится установить актуальные версии компонентов «Microsoft.NET.Native.Framework», «Microsoft.NET.Native.Runtime», «Microsoft.VCLibs» и «Microsoft.UI.Xaml». Скачать и установить их можно тем же способом, что и файл Магазина.
Способ 3: Копирование с другого компьютера
В случае возникновения трудностей с установкой в автономном режиме, файлы Магазина можно скопировать с другого компьютера или виртуальной машины — главное, чтобы другая система имела ту же версию и разрядность.
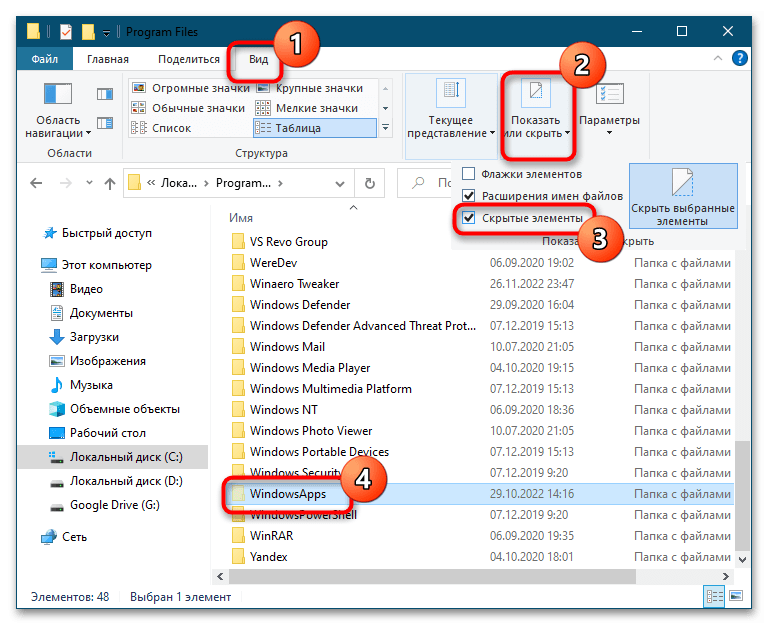
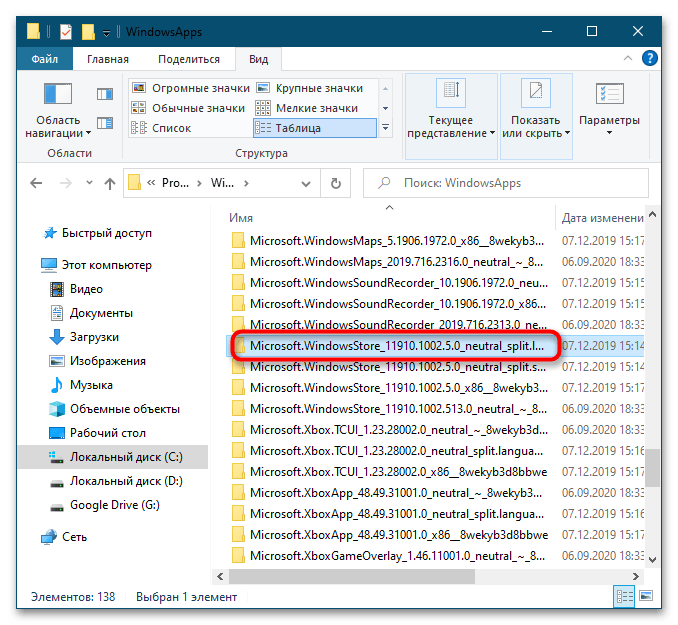
- На компьютере с установленным Магазином перейдите в «Проводнике» в расположение
C:\Program Files, переключитесь на вкладку «Вид» и включите отображение скрытых элементов. - Получите полные права на скрытую папку «WindowsApps», зайдите в нее и скопируйте каталог «Microsoft.WindowsStore_11910.1002.5.0_neutral_split.language-ru_8wekyb3d8bbwe» (версия может отличаться) на флешку. Лучше даже скопировать всю папку WindowsApps, так как она может содержать необходимые для работы Магазина зависимости.
Подробнее: Получение полных прав на папку в Windows 10
- Перенесите скопированный каталог на компьютер с удаленным Магазином, получив полные права на указанные выше системные каталоги. Если решите перенести папку «WindowsApps» целиком, согласитесь на замену файлов.
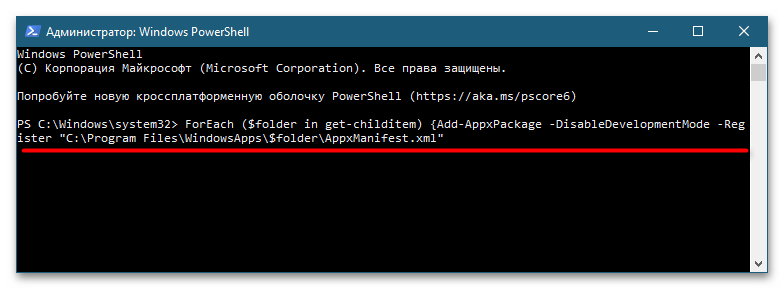
- Запустив от имени администратора «PowerShell», перерегистрируйте все UWP-приложения командой
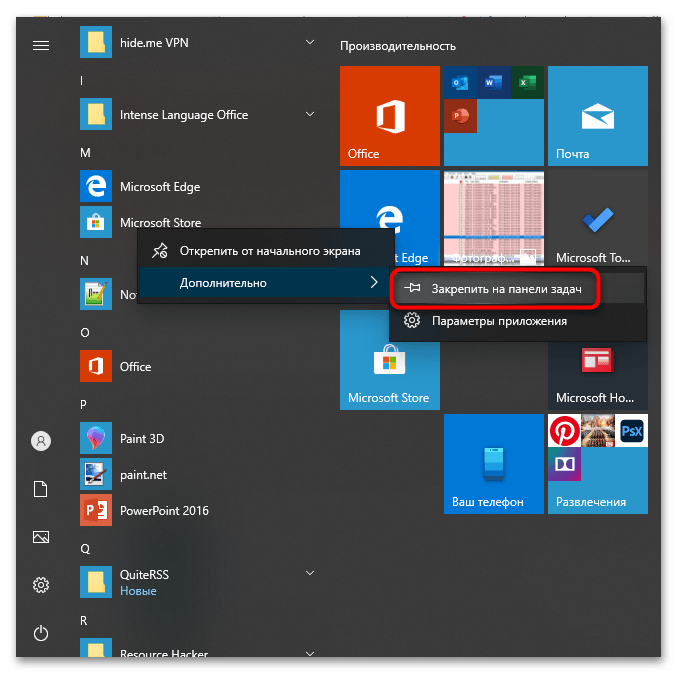
ForEach ($folder in get-childitem) {Add-AppxPackage -DisableDevelopmentMode -Register "C:\Program Files\WindowsApps\$folder\AppxManifest.xml"}. - Закрепите, если нужно, ярлык Магазина Windows на «Панели задач» из меню кнопки «Пуск».
Способ 4: Обновление Windows
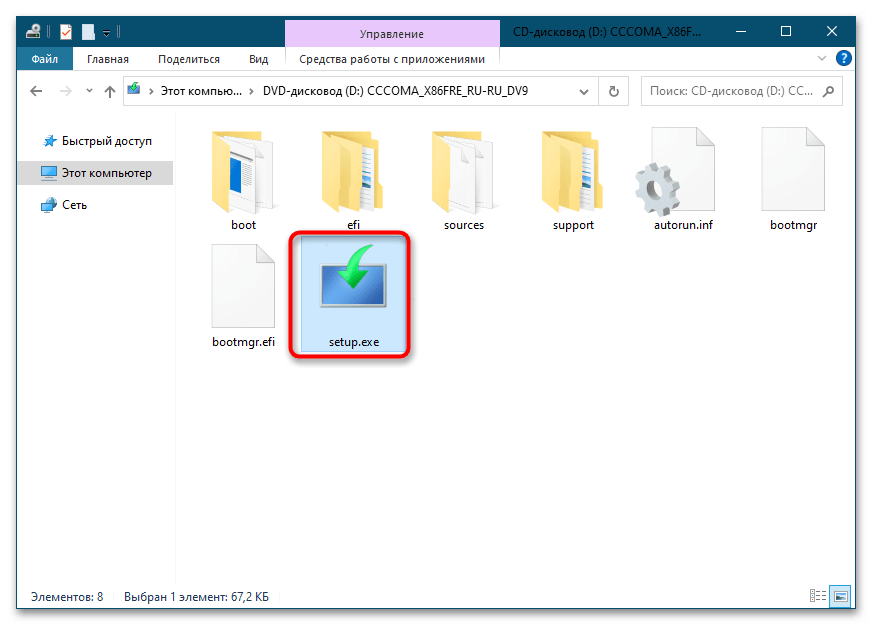
Еще одним способом решения проблемы с отсутствием Магазина является обновление операционной системы до новой версии. Для обновления лучше всего использовать скачанный с официального сайта Microsoft установочный ISO-образ. Смонтировав двойным кликом образ в «Проводнике», запустите исполняемый файл «setup.exe» и проследуйте дальнейшим указаниям мастера.
Подробнее:
Обновление Windows 10 до последней версии
Установка новой версии Windows 10 поверх старой
Наша группа в TelegramПолезные советы и помощь