
Microsoft’s insistence on sign-ins can be annoying for Windows 11 users. But, there are ways to put a stop to it! Simply follow a few steps and you can avoid Microsoft constantly asking for your credentials. Here’s how:
- Open the Settings app on your Windows 11 device.
- Go to the “Accounts” section and select the “Sign-in options” tab. Here, you’ll find settings related to signing in.
- One method is to toggle off the “Use my sign-in info” setting. This will stop Windows 11 from requesting your credentials repeatedly.
- Alternatively, if you don’t want to disable the sign-in prompts completely, you can enable automatic sign-in with your Microsoft account. Choose the relevant checkbox in the “Sign-in options” tab. Windows 11 will remember your credentials and log you in automatically.
It’s great that we have more control over our sign-in experiences than we did in previous versions of Windows. Technology has come a long way!
Understand the Issue: Explaining why Microsoft keeps asking for sign-in on Windows 11
Microsoft’s frequent requests for signing in on Windows 11 can be irritating. This is to provide a smooth user experience and improved security. Signing in allows Microsoft to offer tailored settings, sync data between devices, and protect against unauthorized access.
These sign-in prompts give access to the operating system’s features and services. After signing in, users can enjoy cloud storage, automatic app updates, and integration with other Microsoft products. This authentication process makes Windows 11 more user-friendly and useful.
This continuous sign-in request is not meant to breach privacy or cause trouble. Instead, it wants to give a unified ecosystem where users can easily switch between devices while keeping their preferences in sync.
To heighten the user experience, Microsoft has included security measures such as Windows Hello facial recognition and PIN requirements. These extra authentication layers guarantee that only authorized persons can get to sensitive data and personal files.
Knowing why this feature exists is enlightening. With the increasing dependence on cloud-based services and connected devices, Microsoft realized the need for a secure and tailored experience for users. So, they came up with these sign-in prompts to make operations smoother and protect user data.
Benefits of Signing In: Discussing the advantages of signing in to Microsoft on Windows 11
Signing into Microsoft on Windows 11 is great! Let’s explore the advantages:
- Personalized settings across devices.
- Sync files and documents.
- Integrate with Microsoft services like Outlook, OneDrive, and Teams.
- Apps from the Microsoft Store, easy to install and update.
- Be part of the Microsoft ecosystem, with innovative solutions.
- Tight security – use Windows Hello or fingerprint authentication.
Moreover, sign-in grants you access to exclusive features. Enjoy the enhanced gaming experience with Direct Storage technology and Auto HDR support. Plus, get cloud-based storage options to back up your files.
Jane, a Windows 11 user, activated sign-in. She experienced convenience – adjusting display preferences, syncing email accounts within Outlook. It was great!
Reasons to Stop Microsoft Sign-In Prompts: Highlighting the reasons why someone may want to stop Microsoft from asking for sign-in
Microsoft Sign-In prompts can be annoying and take up valuable time. Disabling them allows for a smoother user experience.
Privacy and security are improved by opting out of signing in. This is especially important if you share your device or use public networks.
Entering credentials repeatedly is tedious. Disabling the sign-in prompts saves time.
Individuals may not want their usage tracked across Microsoft services. Opting out of the prompts permits autonomy over data.
Microsoft’s decision to implement Sign-In prompts is to strengthen security for users. These messages remind them to protect against unauthorized access.
Method 1: Adjusting Account Settings
Want to stop Microsoft constantly asking for sign-in on Windows 11? Follow this easy guide!
- Open Settings App: Find the Start button on your screen’s bottom left corner. Select the Settings app.
- Navigate to Accounts: In the Settings app, look for “Accounts” and click it.
- Select Sign-in Options: Go to the “Sign-in options” tab in Accounts.
- Adjust Preferences: Look for “Require Windows Hello sign-in for Microsoft accounts”. It’s on by default. Switch it off to stop the prompts.
It’s that easy! Now, enjoy a smooth user experience without annoying interruptions.
Pro Tip: If you still get sign-in prompts, make sure your device has no additional security measures like PIN or fingerprint authentication. They could be triggering it.
Method 2: Local Account Setup
No more incessant sign-in requests from Microsoft on Windows 11! Utilize the Local Account Setup method. Here’s how:
- Open Start menu and select the Settings icon.
- In Settings, choose “Accounts”.
- Go to the “Sign-in options” tab in the left sidebar.
- Click on “Switch to a local account” under the “Account type” section.
- A prompt will appear. Enter your password and click “Next”.
- Input the details for your local account, such as username and password.
Now you can successfully prevent Microsoft from bugging you with sign-ins.
Pro Tip: Ensure your local account credentials are protected. Choose a unique, strong password that is difficult to guess.
Thanks to this simple method, you can stay signed out from Microsoft on Windows 11. Enjoy!
Method 3: Disabling Sign-in Prompts
Say goodbye to annoying sign-in prompts on Windows 11! Here’s how you can get a hassle-free experience with your Microsoft account:
- Click the Windows icon in the bottom left corner of your screen.
- Type “Settings” into the search bar and open the app.
- Select “Accounts” in Settings.
- Pick the “Sign-in options” from the left sidebar.
- Toggle off the button under “Require Windows Hello sign-in for Microsoft accounts” in the right pane.
- Restart your computer to apply the changes.
No more interruptions! With these steps, you can easily disable sign-in prompts on your Windows 11 device.
Pro Tip: Save time and make life easier by disabling sign-in prompts on Windows 11.
Conclusion: Summarizing the methods to stop Microsoft from asking to sign in on Windows 11
- Open the Start menu: Click on the Windows logo in the bottom left corner of your screen.
- Access the Settings app: Select the gear icon from the left-hand menu.
- View Accounts page: Select “Accounts” from the Settings app.
- Uncover Sign-in options: Select “Sign-in options” from the left-hand menu.
- Make your selection: Under “Require Windows Hello sign-in for Microsoft accounts,” switch off this option if it is turned on.
- Doing this will help you steer clear of Microsoft’s sign-in requests and savor a smoother Windows 11 experience. Keep in mind, though, that these methods won’t inhibit access to other Microsoft services connected to your account. If you require more customization or assistance, check out Microsoft support resources.
- Take charge now and bid farewell to those pesky sign-in prompts!
Additional Tips: Providing some additional tips and recommendations for managing Microsoft sign-in prompts effectively
Managing Microsoft sign-in prompts is an important issue for Windows 11 users. Here are some tips to help you out:
- First, adjust your account settings in the Windows Settings. Try different options like facial recognition or PIN instead of passwords.
- Make sure your device has the latest Windows 11 updates. This may fix sign-in prompt issues.
- Check your internet connection. Poor or unstable internet connection can cause frequent sign-in requests.
- If none of these tips work, contact Microsoft’s support team. They have experts who can help.
Remember, finding the best solution requires patience and exploring various options.
Also, regularly maintain your OS by clearing cache files and optimizing performance.
Surprisingly, according to a July 2021 report from StatCounter, 80% of desktop computers still run on Windows OS.
Когда компьютер с ОС Windows 11 Домашняя включается впервые, он должен быть подключен к сети для входа в систему по умолчанию. Подробную информацию см. в разделе «Настройка компьютера с ОС Windows 11 при первом включении». Если компьютер не может подключиться к сети или зависает на экране подключения к сети, выполните следующие действия, чтобы принудительно пропустить этап настройки сетевого соединения.
- Не регистрируйте локальную учетную запись в качестве учетной записи суперадминистратора (Administrator), после того как вы пропустили этап настройки сетевого соединения. Не используйте «Administrator» в качестве имени локальной учетной записи.
- После того как вы пропустили этап настройки сетевого соединения, система Windows не сможет синхронизировать время должным образом. В результате время системных журналов или временных меток будет раньше текущего времени. Это не будет указывать на проблему в работе устройства. Подробную информацию см. в разделе «Синхронизация времени с Интернетом на компьютере Windows».
Руководство
Выполните следующие действия:
- При первом включении компьютера отобразится экран основных настроек. Следуя инструкциям, перейдите к экрану Давайте подключим вас к сети. Затем нажмите комбинацию клавиш Shift + F10, чтобы открыть командную строку cmd.
Этот экран не отобразится, если ваш компьютер уже подключен к сети проводным способом. Чтобы не использовать проводное сетевое соединение, отключите сетевой кабель и выполните следующие действия.
- В окне cmd введите «OOBE\BypassNRO.cmd» (без учета регистра) и нажмите на клавишу Enter. После этого компьютер автоматически перезагрузится.
- После перезагрузки компьютера отобразится экран основных настроек. Следуя инструкциям, перейдите к экрану Давайте подключим вас к сети и нажмите У меня нет подключения к сети (или Пропустить).
- Нажмите Продолжить настройку ограниченных параметров, чтобы пропустить этап настройки сетевого соединения и перейти к следующему экрану. Завершите настройку прочих параметров, следуя инструкциям, чтобы войти в систему Windows.
Если проблема сохраняется, обратитесь в службу поддержки Microsoft и следуйте предоставленным инструкциям. Кроме того, вы можете войти на официальный веб-сайт Microsoft, нажать Связаться с Майкрософт в нижней части главной страницы и следовать инструкциям на экране для решения проблемы.
Всем привет! Как-то столкнулся с такой ситуацией при обновлении Windows 10. После очередного обновления и перезагрузке системы при старте появляется синее окно «Войдите с помощью учетной записи Майкрософт». В окне не предусмотрена возможность зайти под локальной учеткой. Или входи под Майкрософтом, или создавай учетку Майкрософта. Кнопка «Далее» или «Отмена» не помогает и невозможно пропустить создание учетной записи. Что делать?
Решение
Как оказалось все довольно просто. Для того, чтобы пропустить создание учетной записи Microsoft необходимо временно отключиться от интернета (вынуть шнур из компьютера, отключить wifi роутер) и попробовать снова. И ура…. наш компьютер даст нам возможность зайти под локальной учеткой. Проверено — работает!
Since Windows 10 debuted and the introduction of Microsoft Account, it’s a usual routine that user has to go through the Windows login screen regardless if you have a Microsoft account or a local account with or without password. This short tutorial will show you how to bypass or skip the Microsoft Sign In screen entirely during Windows 11 or Windows 10 startup.
When you setup your Windows for the first time, you are bound to use a Microsoft account. Even if you manage to create a local account without any password, you would still need to click on your user profile on the sign in screen to login to Windows 11/10.
However, there is actually a hidden option to bypass the Windows login screen entirely when you boot your PC, or better explained as auto-login to Windows 10/11, which ultimately skipping the Microsoft sign in screen.
The option has always been there since many versions of Windows ago. It’s just that Microsoft doesn’t make the option as obvious with good reasons – carelessly allow auto-login would risk your computer along with sensitive information in it getting exposed to other unauthorized person if you leave it at a public place or when it’s stolen.
Also see: How to Auto Login Windows 11 Without Password or PIN

How to skip Microsoft sign in on Windows 11/10 using auto-login
The auto-login option is applicable to both Microsoft account and local account. If you are logging to Windows with an existing Microsoft account, you don’t need to create a local account just to skip the Microsoft Sign in screen. You can bypass the login screen even with a Microsoft account. Here’s how to do it.
Alternative solution: How to Login Windows 11 Without Microsoft Account
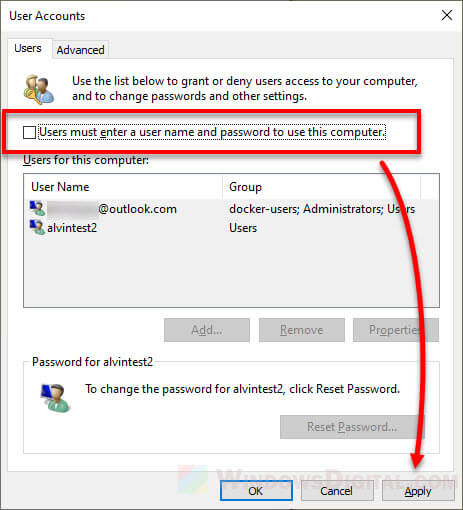
- In the Start menu, search for and open “netplwiz“.
Windows 11
Windows 10
- In the User Accounts window, uncheck the checkbox that says “Users must enter a user name and password to use this computer”.

- Click Apply.
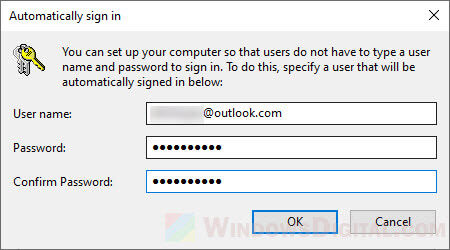
- You will then be prompted to enter the username and password for the user account that you want Windows to automatically sign in to. Once you’re done, click OK.

See also: How to Remove PIN Login From Windows 10/11 Startup
For the user name and password of the user account to login to:
- If you have a Microsoft account, simply enter your Microsoft account’s user name and password.
- If you have a local account instead, enter the user name and password of that user account.
- If your local account doesn’t have a password, just leave the password fields empty.
After the you’ve completed the steps above, the next time you restart your PC, it should boot directly onto the Windows desktop screen, skipping the Microsoft Sign In screen entirely.
What is my user name in Windows 11/10?
If you’re not sure what the your user account’s username is, in the netplwiz window, click on your user account in the list of user accounts, then click on “Properties“. From there, you can view the user name of the selected user account.
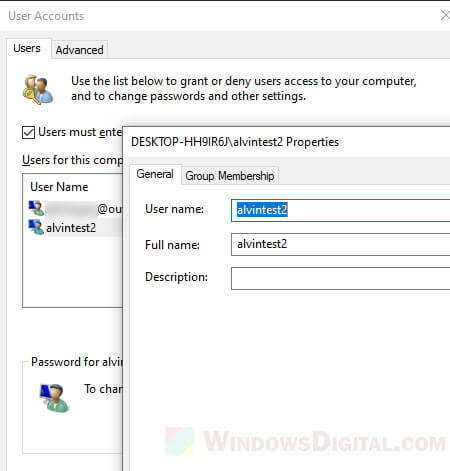
If the “Properties” button is grayed out, temporary enable the “Users must enter a user name and password to use this computer” before selecting your user account.
Read: How to Create Local Admin Account Without Password on Windows 11/10
What if I have multiple user accounts?
If you have multiple user accounts, Windows will only automatically sign in to the user account which you’ve entered the user name and password during the prompt in step 4 above. If you want to login to other user account, you can only do that from within Windows by first logging out and then switch to another user account.
Since the auto-login will skip the Microsoft sign in screen entirely, it can be annoying if you have other users who need to sign in to their own user accounts on the same computer. They will need to logout from the already logged in user account in order to sign in to their own user accounts.
Other issues trying to skip Microsoft sign in Windows 11/10
For users who have issue skipping the Microsoft sign in screen with a local account that doesn’t have a password, supposedly you can leave the password field blank if your account is truly a local account. If you can’t resolve the issue, we recommend to just create a Microsoft account or another local account with password and repeat the steps above to setup the auto-login again.
If you are setting up Windows 10/11 for the first time, we recommend using a Microsoft account instead. If you use a local account, you will lose access to many features that requires an online account such as Microsoft Store, Cortana search, One drive backup, etc.