
Привет друзья, я Ro8! В предыдущей статье мы с вами установили виртуальную машину VMware Workstation, а сегодня я расскажу вам, как создать общую папку сообщающую виртуальную машину и операционную систему, в которую она установлена. Создание общей папки необходимо, так как она сильно упрощает работу, например, вам необходимо из основной Windows быстро перекинуть файл в виртуальную машину, вы просто берёте и копируете этот файл в общую папку, данный файл тут же становится доступным в виртуальной машине, сейчас сами всё увидите.
Создание общей папки в виртуальной машине VMware Workstation
У нас есть виртуальная машина VMware Workstation, на которую установлена Windows 7 в редакции Максимальная 64 бит.
Вызываем свойства виртуальной машины Windows 7 x64, нажав на Edit virtual machine settings

Переходим на вкладку Options

На вкладке Options выбираем Shared Folders, далее отмечаем пункт Always enabled и нажимаем кнопку Add

Далее

Нажимаем Browse

К примеру в качестве общей папки между основной и виртуальной машиной Windows 7 x64 укажем папку VMware Workstation
Далее
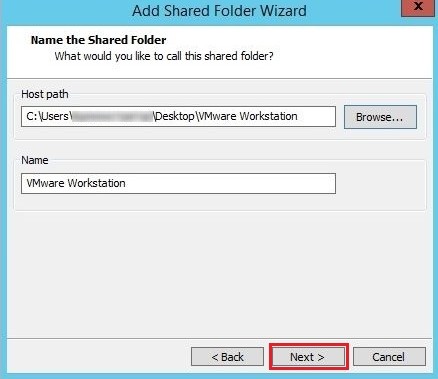
Убеждаемся что стоит галочка на пункте Enable this share. Нажимаем Finish

OK

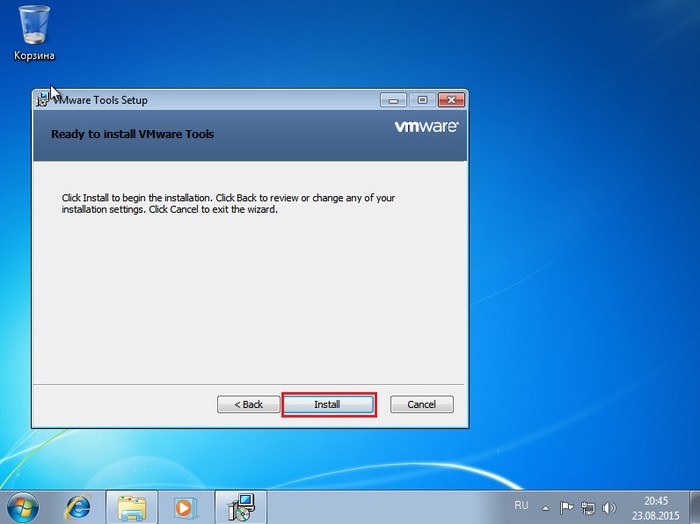
Запускаем нашу виртуальную машину Windows 7 x64, идем на вкладку VM и выбираем Install VMware Tools

Нажимаем Install

Выполнить setup 64.exe

Далее

Далее


Нажимаем Install

Установка VMware Tools завершена

После установки Vmware Tools будет предложено перезагрузить виртуальную машину. Соглашаемся нажав Yes
После перезагрузки виртуальной машины идем в Компьютер, далее выбираем Сеть и щелкаем по
«Сетевое обнаружение и общий доступ к файлам отключен. Сетевые компьютеры и устройства не видны. Щелкните для изменения»

Выбираем Включить сетевое обнаружение и общий доступ к файлам

В данном окне должна появится папка vmware-host (как на скриншоте). Заходим в нее

Далее открываем папку Shared Folders

Общая папка VMware Workstation

Открытая общая папка VMware Workstation

To share data and files between host the operating system and guest operating system, you need to add or create VMware shared folder. Here’s how.
After installing the guest operating system in VMware, you can share folders between the host and guest. This allows you to quickly share files and data between the systems without having to drag and drop or use cloud services. Moreover, the shared folders also allow you to set quick rules for different users if you are sharing the VMware virtual machine with other users.
One of the best things about VMware is that it makes it easy to add shared folders via the VM settings panel. In this quick and simple guide, let me show the steps to create VMware shared folder in Windows 10.
The steps shown below will work in Windows 7 and Windows 8 too.
Jump to:
- How to create shared folder in VMware Player
- How to create shared folder in VMware Workstation
- VMware mount shared folder
- VMware shared folder FAQ
Important Note: Make sure the virtual machine is completely turned off. i.e, not in the paused/saved state. When in paused or saved state, the Shared folder option in VM settings will be disabled. If it is in the paused/saved state, turn it off before adding the shared folder in VMware.
If you are using VMware Player, these the steps you should follow to add a shared folder in the virtual machine.
- Open “VMware Player“.
- Select the virtual machine for which you want to add the shared folder.
- Click on the “Edit Virtual Machine Settings” link at the bottom on the right panel.

- Go to the “Options” tab.
- Select the “Shared folders” option on the left panel.
- Select the “Always enabled” option on the right panel.

- Click the “Add” button.
- Click “Next“.

- Point and click on the “Browse” button.
- Select the folder you want to share and click “Ok“.
- Type a name in the Name field and click “Next“.
- Select “Enable this share” checkbox.
- (Optional) Select “Read-only” checkbox if you want the shared folder to be read-only.
- Click “Finish“.
- Click “Ok” in the main settings window.


That is it. You’ve added a shared folder to VMware virtual machine.
Note: When you set a shared folder as Read-only, the VM cannot write or modify data in it. This option is a must if you want to protect the host operating system from malicious software running in VM.
Following the same steps, you can add as many VMware shared folders as you want.
If you are using VMware workstation, these are the steps you should follow to add a shared folder.
- Open “VMware Workstation“.
- Select the virtual machine for which you want to add the shared folder.
- Click on the “Edit virtual machine settings” link.

- Go to the “Options” tab and select the “Shared folders” option.
- Select the “Always enabled” option.
- Click “Add“.
- Click “Next“.
- Select the folder you want to share and click “Ok“.
- Name the shared folder.
- Select “Enable this share” option.
- To make the shared folder read-only, select the “Read-Only” checkbox (optional).
- Click “Finish“.
- Click “Ok“.


That is all. You’ve added the shared folder in VMware Workstation. You can access it directly from the File Explorer in the guest operating system.
Note: When you set a shared folder as Read-only, the VM cannot write or modify data in it. This option is a must if you want to protect the host operating system from malicious software running in VM.
Following the same steps, you can add as many VMware shared folders as you want.
Once you add the shared folder in the virtual machine settings, it is added to the guest operating system.
To mount the shared folder in VMware, turn on the virtual machine, open the File Explorer, and click on the “Network” option on the left panel.
Go to “vmware-host → Shared Folders“. You will see the shared folder with the name you chose in the steps above. Click on it to mount the shared folder. If you want to, you can pin the folder to the File Explorer. To do that, right-click on the folder and select “Pin to quick access”.

—
I hope that helps. If you are stuck or need some help, comment below and I will try to help as much as possible. If you like this article, check out how to increase VMware disk size.
FAQ: VMware Shared Folder Windows 10
Can I share folders with VMware virtual machine?
Yes, you can. Open the VM settings and add the folder from the Shared Folder option. You can follow the steps shown above.
I cannot see shared folder in the VMware virtual machine.
If you are not able to see the shared folder in the guest operating system, make sure that the file sharing is enabled. In case of Windows, go to “Control Panel → Network & Sharing Center → Advanced Sharing Settings”. Select both “Turn on network discovery” and “Turn on file and printer sharing” options.

Can I share folders with all VMs at once?
You have to manually share folders with each VM individually. VMware has no option to bulk share folders with all VMs in VMware.
How to protect the shared folder?
To protect the host operating system, you can make the shared folder “read-only”. This prevents the guest OS from writing or modifying data in the shared folder.
How do I remove shared folder in VMware?
To remove the shared folder, open the VM settings, go to “Shared Folder”, select the shared folder you want to remove and click “Remove”.
VMware Workstation is a powerful desktop virtualization software that allows users to run multiple operating systems on a single physical machine. One of the useful features of VMware Workstation is the ability to create shared folders, which enable easy file sharing between the host operating system and virtual machines (VMs). This article will guide you through the steps to create a shared folder in VMware Workstation.
1. Prerequisites
VMware Workstation Installed
Make sure you have VMware Workstation Pro or VMware Workstation Player installed on your host machine.
-
If you haven’t installed it yet, you can download the latest version from the official VMware website.
-
Ensure that your system meets the minimum hardware requirements for VMware Workstation, including:
-
Processor: 64-bit processor with at least 2 cores (Intel or AMD).
-
RAM: Minimum 4GB (8GB or more recommended).
-
Disk Space: At least 10GB of free space (depending on the VM size).
-
Operating System: Supported Windows or Linux version as a host OS.
-
2. A Virtual Machine Running on VMware Workstation
Ensure you have a configured and operational virtual machine (VM) inside VMware Workstation.
-
The VM should have an installed guest operating system (Windows, Linux, etc.).
-
Make sure the VM has VMware Tools installed, as this enhances performance and allows better integration between the host and guest systems.
-
Verify that the networking mode (NAT, Bridged, Host-Only) is correctly set based on your requirements.
-
Ensure the VM is powered on and responsive before proceeding with any further steps.
Optional but Recommended:
-
Backup your VM before making any major changes.
-
Check your VMware Workstation version—if you’re running an older version, consider updating it to ensure compatibility with new features and security patches.
-
If using VMware Workstation Player, note that it has fewer features compared to the Pro version (such as no snapshots).
Once these prerequisites are confirmed, you can proceed with the next steps. ?
2. Steps to Create a Shared Folder
Step 1: Open VMware Workstation
Launch VMware Workstation on your host machine.
Step 2: Select the Virtual Machine
- In the VMware Workstation interface, select the virtual machine you want to share a folder with from the library.
- Ensure the VM is powered off before configuring shared folders.
Step 3: Access Virtual Machine Settings
- Click on Edit in the menu bar.
- Select Virtual Machine Settings from the dropdown.
Step 4: Add a Shared Folder
- In the Virtual Machine Settings window, go to the Options tab.
- Select Shared Folders from the left pane.
- On the right side, you will see options to add a shared folder. Click on the Add button.
Step 5: Shared Folder Wizard
The Add Shared Folder Wizard will open. Follow these steps:
- Select a Host Folder: Browse and select the folder on your host machine that you want to share with the virtual machine.
- Choose Sharing Options: Decide whether to make the folder read-only or allow write access:
- Read-only: The VM can read files in the folder but cannot modify or delete them.
- Enabled: The VM can read, write, and delete files in the folder.
- Finish: Click Finish to add the shared folder.
Step 6: Configure the Shared Folder
- You can further configure options such as whether to share the folder when the VM is powered on.
- Click OK to save your changes and close the Virtual Machine Settings window.
3. Accessing the Shared Folder in the Virtual Machine
Step 1: Start the Virtual Machine
Power on the virtual machine to which you just added the shared folder.
Step 2: Locate the Shared Folder
- For Windows VMs:
- Open File Explorer and navigate to \\vmware-host\Shared Folders. You should see the shared folder listed there.
- For Linux VMs:
The shared folder should be listed there. If it’s not mounted, ensure that VMware Tools is installed and running in your Linux VM.
4. Conclusion
Creating a shared folder in VMware Workstation is a straightforward process that enhances collaboration between your host machine and virtual machines. By following the steps outlined in this article, you can easily share files and improve your workflow. Regularly review shared folder settings and access permissions to ensure security and proper functionality.
Are you tired of manually transferring files between virtual machines in Vmware Workstation 15? Creating a shared folder can be the perfect solution!
By creating a shared folder in Vmware Workstation 15, you can easily share files and folders between the host operating system and the virtual machine. This feature not only simplifies file transfer but also enhances collaboration and productivity within your virtual environment.
Want to create a shared folder in Vmware Workstation 15? Follow these steps to quickly set it up. First, open your virtual machine in Vmware Workstation 15. Then, go to the virtual machine settings and select the «Options» tab. Under the «Shared Folders» section, click on «Add» and browse for the folder you want to share. Finally, specify the name and location for the shared folder. That’s it! You have successfully created a shared folder in Vmware Workstation 15.

Overview of Creating a Shared Folder in Vmware Workstation 15
Vmware Workstation 15 allows users to create shared folders between the host operating system and the virtual machine, enabling seamless file sharing and collaboration. This feature is particularly useful when you need to transfer files between your host system and the virtualized environment without relying on external devices or network shares.
Creating a shared folder in Vmware Workstation 15 involves a few simple steps, and this article will guide you through the process. Whether you are using Vmware Workstation for software development, testing, or other purposes, the ability to create shared folders enhances productivity and workflow efficiency.
Step 1: Install Vmware Tools
The first step in creating a shared folder is to ensure that Vmware Tools is installed in the virtual machine. Vmware Tools is a suite of utilities and drivers that improves the overall performance of the virtual environment and enables features like folder sharing.
To install Vmware Tools, go to the Vmware Workstation menu and click on «VM» > «Install Vmware Tools.» This mounts an ISO image containing the installation files within the virtual machine. Open the mounted image and run the appropriate installer for your guest operating system.
Follow the on-screen instructions to complete the installation. Once Vmware Tools is installed, restart the virtual machine to ensure that the changes take effect. Now you can proceed to the next step of creating the shared folder.
Step 2: Configure the Shared Folder in Vmware Workstation
After installing Vmware Tools, you can configure the shared folder within Vmware Workstation. Follow these steps:
- Open Vmware Workstation and select the virtual machine for which you want to create a shared folder.
- Go to the «VM» menu and click on «Settings.» This opens the Virtual Machine Settings window.
- In the Virtual Machine Settings window, click on the «Options» tab and select «Shared Folders.»
- Click on the «Add» button to add a new shared folder.
At this point, you can choose whether to create a new shared folder or select an existing folder on the host system. If you select an existing folder, changes made within the virtual machine will be reflected in the host operating system, and vice versa.
To create a new shared folder, click on the «Next» button and specify the path to the folder on the host system. You can also give the shared folder a distinctive name that will be displayed in the virtual machine.
After configuring the shared folder settings, click on the «Finish» button to complete the setup. The shared folder is now ready for use in the virtual machine.
Step 3: Enable the Shared Folder in the Virtual Machine
To access the shared folder from within the virtual machine, you need to enable it within the guest operating system. Follow these steps:
Open your virtual machine and log in to the guest operating system. The specific steps may vary depending on the operating system you are using.
Once you are logged in, locate the Vmware Tools icon in the system tray or taskbar and right-click on it. Select «Open Vmware Tools» to bring up the Vmware Tools control panel.
In the Vmware Tools control panel, click on the «Shared Folders» tab. Here, you should see the shared folder that you created in Vmware Workstation.
To access the shared folder, click on the «Map…» button and specify a drive letter or path within the guest operating system where you want the shared folder to be mounted.
Click on the «OK» button to save the changes. The shared folder is now accessible from within the virtual machine, and you can easily transfer files between the host operating system and the guest operating system.
Step 4: Managing Shared Folders
Vmware Workstation provides options for managing shared folders, including adding new folders, modifying existing ones, and removing folders. To manage shared folders, follow these steps:
1. Open Vmware Workstation and select the virtual machine with the shared folders.
2. Go to the «VM» menu and click on «Settings.» In the Virtual Machine Settings window, click on the «Options» tab and select «Shared Folders.»
3. In the Shared Folders settings, you can add new folders by clicking on the «Add» button. You can also modify existing folders by selecting them and clicking on the «Modify» button. To remove a shared folder, select it and click on the «Remove» button.
4. After making any changes, click on the «OK» button to apply the modifications.
By managing shared folders, you can ensure that the file sharing capabilities in your virtual machine align with your requirements.
Exploring Advanced Features of Shared Folders in Vmware Workstation 15
In addition to the basic sharing functionality, Vmware Workstation 15 offers several advanced features that enhance the shared folder experience. Let’s explore some of these features:
Folder Sharing Modes
Vmware Workstation 15 allows you to specify the sharing mode for each shared folder. The available modes are:
- Read-Only: In this mode, the shared folder is accessible from within the virtual machine, but files cannot be modified. This is useful when you want to provide read-only access to certain files or folders.
- Read-Write: This mode allows full access to the shared folder, including the ability to create, modify, and delete files. This is the default mode for shared folders.
- Disabled: This mode disables the shared folder, preventing any access from within the virtual machine.
To change the sharing mode of a shared folder, follow the steps outlined in Step 4: Managing Shared Folders.
Automounting Shared Folders
Vmware Workstation 15 provides the option to automount shared folders, allowing them to be automatically mounted within the guest operating system when the virtual machine starts. This eliminates the need to manually map the shared folders each time.
To enable automounting, follow these steps:
1. Open the Virtual Machine Settings window by going to the «VM» menu and clicking on «Settings.» Select the virtual machine with the shared folders.
2. In the Virtual Machine Settings window, click on the «Options» tab and select «Shared Folders.»
3. Enable the «Enable this share» checkbox for each shared folder that you want to automount.
4. Click on the «OK» button to save the changes.
From now on, the specified shared folders will be automatically mounted within the guest operating system when the virtual machine starts.
Mapping Multiple Shared Folders
If you need to share multiple folders between the host and guest operating systems, Vmware Workstation 15 allows you to map multiple shared folders within the virtual machine.
To map additional shared folders, follow these steps:
1. Open the Vmware Tools control panel by right-clicking on the Vmware Tools icon in the system tray or taskbar and selecting «Open Vmware Tools.»
2. In the Vmware Tools control panel, click on the «Shared Folders» tab.
3. Click on the «Map…» button and specify the drive letter or path where you want the additional shared folder to be mounted within the guest operating system.
4. Click on the «OK» button to save the changes.
You can repeat these steps to map as many shared folders as needed, providing efficient access to multiple directories across the host and guest operating systems.
Performance Considerations
When using shared folders in Vmware Workstation 15, it is essential to keep performance considerations in mind. Here are some tips to optimize shared folder performance:
- Prefer using shared folders for smaller files and occasional file transfers. For large file transfers or frequent access, consider alternative methods like FTP or network shares.
- Ensure that the host system has sufficient resources, including CPU, memory, and disk space, to handle the file sharing operations.
- Keep the shared folder directory structure organized to prevent performance degradation caused by having a large number of files in a single shared folder.
- Regularly update Vmware Tools to take advantage of performance improvements and bug fixes.
By following these guidelines, you can achieve optimal performance when using shared folders in Vmware Workstation 15.
Conclusion
Creating a shared folder in Vmware Workstation 15 is a simple and effective way to facilitate file sharing and collaboration between the host and guest operating systems. By following the steps outlined in this article, you can set up shared folders, manage them as needed, and leverage advanced features to enhance your workflow.

Creating a Shared Folder in VMware Workstation 15
Sharing files between your host computer and virtual machine is essential for efficient workflow. VMware Workstation 15 allows you to create a shared folder to easily transfer files and data between the two.
Here’s how to create a shared folder in VMware Workstation 15:
- Open VMware Workstation 15 and select your virtual machine.
- Click on the «VM» menu and go to «Settings».
- In the «Options» tab, select «Shared Folders».
- Click on «Add» to choose the folder on your host computer that you want to share.
- Specify a name for the shared folder and select the file system type.
- Click «Next» and choose the access permissions for the shared folder.
- Click «Finish» to create the shared folder.
Once the shared folder is created, you can access it from your virtual machine by mapping the shared folder to a network drive.
Now you can conveniently share and transfer files between your host computer and VMware Workstation 15 virtual machine.
Key Takeaways for «How to Create a Shared Folder in Vmware Workstation 15»
- Shared folders in VMware Workstation 15 allow easy file sharing between the host and virtual machine.
- To create a shared folder, go to the Virtual Machine Settings and navigate to the Options tab.
- In the Options tab, select Shared Folders and click on Add.
- Choose a folder on the host machine that you want to share with the virtual machine.
- Specify the name and location for the shared folder and choose the sharing permissions.
Frequently Asked Questions
Here are some common questions and answers about creating a shared folder in VMware Workstation 15.
1. How do I create a shared folder in VMware Workstation 15?
To create a shared folder in VMware Workstation 15, follow these steps:
1. Open VMware Workstation 15.
2. Power on the virtual machine you want to share the folder with.
3. Go to the «VM» menu and select «Settings.»
4. In the «Virtual Machine Settings» window, click on «Options» and select «Shared Folders.»
5. Click on the «Add» button to add a new shared folder.
6. Browse to the folder you want to share on your host machine and select it.
7. Specify a name for the shared folder that will be visible in the virtual machine.
8. Choose the options for the shared folder, such as whether it should be read-only or writable.
9. Click «OK» to save the settings.
2. How can I access the shared folder from the virtual machine?
To access the shared folder from the virtual machine, follow these steps:
1. Power on the virtual machine.
2. Open the file explorer in the virtual machine.
3. Look for the shared folder under the network locations or in the «My Computer» section.
4. Double-click on the shared folder to open it and access the files.
3. Can I share a folder between multiple virtual machines in VMware Workstation 15?
Yes, you can share a folder between multiple virtual machines in VMware Workstation 15. Follow the same steps mentioned in question 1 for each virtual machine that you want to share the folder with.
4. What are the permissions options for a shared folder in VMware Workstation 15?
When creating a shared folder in VMware Workstation 15, you can choose from the following permissions options:
— Read-only: Users can only view the files in the shared folder but cannot make any changes.
— Writable: Users can view and make changes to the files in the shared folder.
Choose the appropriate permission option based on your requirements.
5. Can I change the shared folder settings after it has been created?
Yes, you can change the shared folder settings after it has been created. Follow these steps to modify the settings:
1. Power off the virtual machine.
2. Go to «VM» > «Settings» > «Options» > «Shared Folders» in VMware Workstation 15.
3. Select the shared folder you want to modify and click on the «Remove» button.
4. Add the shared folder again using the steps mentioned in question 1, with the desired modifications.
In this guide, we have learned how to create a shared folder in VMware Workstation 15. First, we explored the necessary prerequisites, such as installing VMware Tools and setting up a virtual machine. Then, we walked through the step-by-step process of creating a shared folder.
By following the instructions, you can seamlessly transfer files between your host and guest operating systems. Shared folders provide a convenient way to share data and collaborate on projects. With this knowledge, you can now easily set up shared folders in VMware Workstation 15 and enhance your virtualization experience.
Introduction
VMware Workstation is a popular virtualization platform that allows users to run multiple operating systems on a single physical machine. One of the key features of VMware Workstation is the ability to share folders between the host operating system and the virtual machines running within it. This allows for seamless file transfer and easy access to files and data from both the host and guest operating systems.
In this article, we will explore different methods for accessing shared folders in VMware Workstation. These methods provide flexible options to suit different user preferences and requirements. Whether you prefer to use the built-in shared folders feature or directly access shared folders in your virtual machine, we will cover the steps to help you get started.
Accessing shared folders in VMware Workstation has several benefits. It enables you to easily share files and collaborate between the host and guest operating systems. This feature is especially useful for developers, testers, and IT professionals who need to transfer files or access shared data within a virtual machine environment. By following the methods outlined in this article, you will be able to take advantage of this feature and streamline your workflow.
Now, let’s dive into the different methods you can use to access shared folders in VMware Workstation.
Method 1: Shared Folders Option in VMware Workstation
VMware Workstation provides a built-in feature that allows you to create and manage shared folders between the host and guest operating systems. This method is straightforward and requires minimal configuration, making it a convenient option for accessing shared folders.
To set up shared folders using the VMware Workstation interface, follow these steps:
- Open VMware Workstation and power on your virtual machine.
- From the menu, select VM and then click on Settings.
- In the Virtual Machine Settings window, click on the Options tab.
- Under the Shared Folders section, click on the Always Enabled button to enable shared folders for the virtual machine.
- Click on the Add button to add a new shared folder.
- In the Add Shared Folder window, browse and select the folder you want to share.
- Specify the name for the shared folder as it will appear in the guest operating system.
- Select the Enable this share option and choose the desired access settings.
- Click OK to save the shared folder settings.
Once the shared folders are configured, you can access them from within the guest operating system. To do this:
- Power on your virtual machine and log in.
- Open the file manager or explorer in the guest operating system.
- Navigate to the Network or Shares section.
- You should see the shared folder listed.
- Double-click on the shared folder to access its contents.
With this method, you can easily transfer files between the host and guest operating systems by simply copying and pasting or dragging and dropping them into the shared folder.
Using the shared folders option in VMware Workstation provides a user-friendly and convenient way to access shared folders. However, if you prefer a more seamless integration between the host and guest operating systems, you may consider using VMware Tools, which we will explore in the next section.
Method 2: Using VMware Tools
VMware Tools is a suite of utilities that enhances the performance and functionality of virtual machines running on VMware Workstation. Among its many features, VMware Tools includes the ability to share folders between the host and guest operating systems, providing a seamless integration and improved file transfer capabilities.
To utilize VMware Tools for accessing shared folders, follow these steps:
- Power on your virtual machine and log in.
- From the VMware Workstation menu, go to VM and then select Install VMware Tools.
- A virtual CD/DVD drive will be mounted in the guest operating system. Open the CD/DVD drive and run the installer.
- Follow the on-screen instructions to install VMware Tools.
- Once VMware Tools is installed, restart your virtual machine.
After the virtual machine restarts, you can access the shared folders using the following steps:
- Power on your virtual machine and log in.
- Open the file manager or explorer in the guest operating system.
- Navigate to the VMware Shared Folders or Shared Folders directory.
- You should see the shared folders listed there.
- Double-click on the desired shared folder to access its contents.
By using VMware Tools, you have the added benefit of automatic folder synchronization. This means that any changes made to the shared folders on either the host or guest operating system will be immediately synchronized, ensuring that both systems have the most up-to-date files and data.
Using VMware Tools provides a seamless integration between the host and guest operating systems, allowing for efficient file transfer and easy access to shared folders. However, if you prefer to directly access shared folders within the virtual machine without installing any additional software, you can use the method described in the next section.
Method 3: Directly Accessing Shared Folders in Virtual Machine
If you prefer to access shared folders in your virtual machine without relying on the built-in features of VMware Workstation or VMware Tools, you can directly access the shared folders using the network path or UNC (Uniform Naming Convention) path.
Follow these steps to directly access shared folders in your virtual machine:
- Power on your virtual machine and log in.
- Open the file manager or explorer in the guest operating system.
- In the address bar or file path field, type the following UNC path:
\\vmware-host\Shared Folders\or\\vmware-host\host-shared-folder-name\. Replacevmware-hostwith the hostname or IP address of your host machine, andhost-shared-folder-namewith the name of the shared folder you want to access. - Press Enter or click Go to navigate to the shared folder.
Once you have accessed the shared folder using the UNC path, you can view and work with the files and data within it, just like any other folder in the guest operating system.
This method provides direct access to shared folders without the need for additional software installations or configuration. However, it does require knowledge of the network path or UNC path of the shared folder. The network path may vary depending on your network configuration, so ensure you have the correct hostname or IP address of your host machine.
Now that you have learned how to directly access shared folders in your virtual machine, you can choose the method that best suits your needs and preferences. Whether you opt for the built-in shared folders option in VMware Workstation, utilize VMware Tools, or directly access shared folders using the network path, you can take advantage of this feature to easily share and transfer files between the host and guest operating systems.
Conclusion
Accessing shared folders in VMware Workstation is essential for seamless file transfer and collaboration between the host and guest operating systems in a virtual machine environment. In this article, we explored three different methods to access shared folders.
The first method involved using the built-in shared folders option in VMware Workstation. This method provides a user-friendly interface for creating and managing shared folders, making it a convenient choice for many users.
The second method focused on using VMware Tools, a suite of utilities that enhances virtual machine performance and functionality. By installing VMware Tools, users can benefit from automatic folder synchronization and a seamless integration between the host and guest operating systems.
The third method allowed users to directly access shared folders in the virtual machine by using the network path or UNC path. While this method requires knowledge of the network configuration, it provides a more straightforward approach for accessing shared folders without additional software installations.
Overall, each method offers its own advantages and may be best suited to different user preferences and requirements. Whether you prioritize simplicity, integration, or direct access, you can choose the method that aligns with your needs to efficiently share, collaborate, and transfer files between the host and guest operating systems.
By utilizing shared folders in VMware Workstation, you can streamline your workflow, enhance productivity, and reduce the complexities associated with file transfer in a virtualized environment. Experiment with the methods described in this article and discover the most effective approach for accessing shared folders in your virtual machines on VMware Workstation.