In this article, we will mention all the steps on how to install VMware vCenter on Windows Server. These steps contain step by step guidelines on how to install VMware vCenter v6.7 on Windows. Before you continue to install the vCenter server for Windows, it is necessary to understand the requirements and the necessary steps to ensure successful deployment of the vCenter VMware server on Windows.
Table of Contents
Hardware Requirements for Windows vCenter Server
When you need to install the vCenter Server or Platform Services Controller on a physical server or virtual machine running Microsoft Windows, your system hardware meets Specific Requirements.
Download VMware vCenter Server for Windows
Download the VMware vCenter Server for Windows 6.7 ISO image from VMware’s Website.
Install VMware vCenter on Windows
After downloading the VMware vCenter 6.7 ISO file, mount your vCenter Server 6.7 ISO image, and then start the installation.
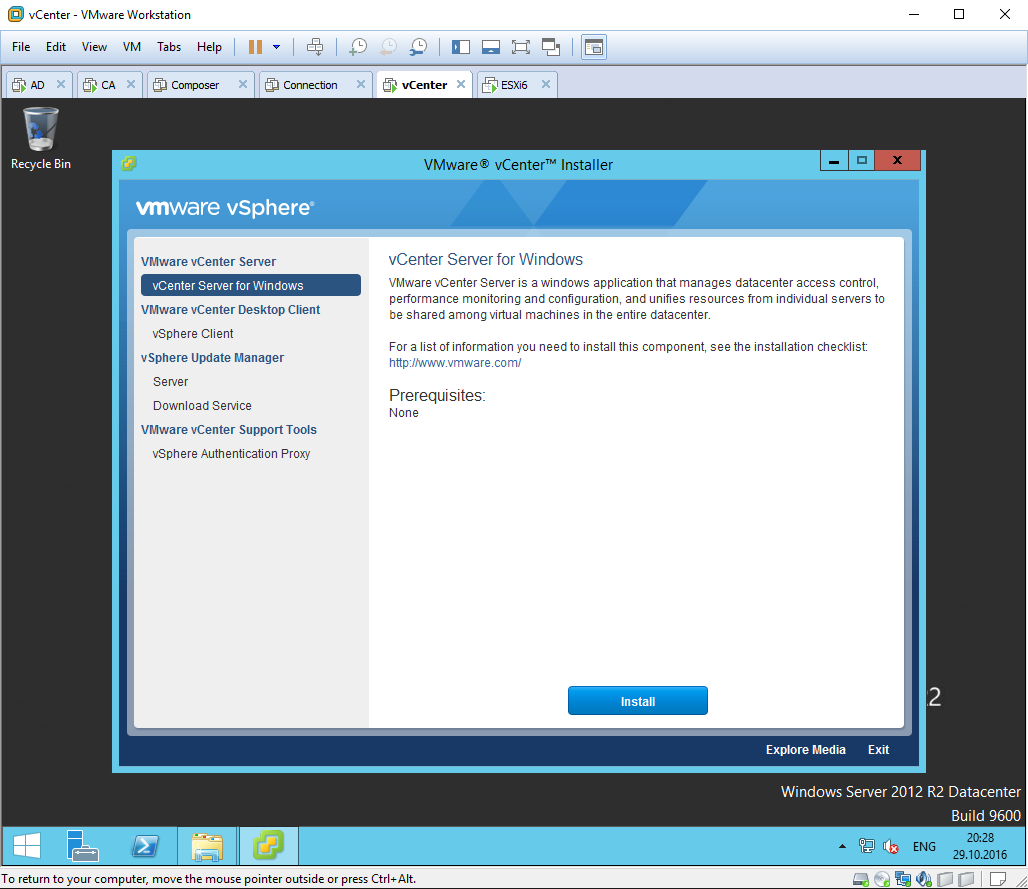
The VMware vCenter Installer will open. Click on vCenter Server for Windows, and then click on the Install button.
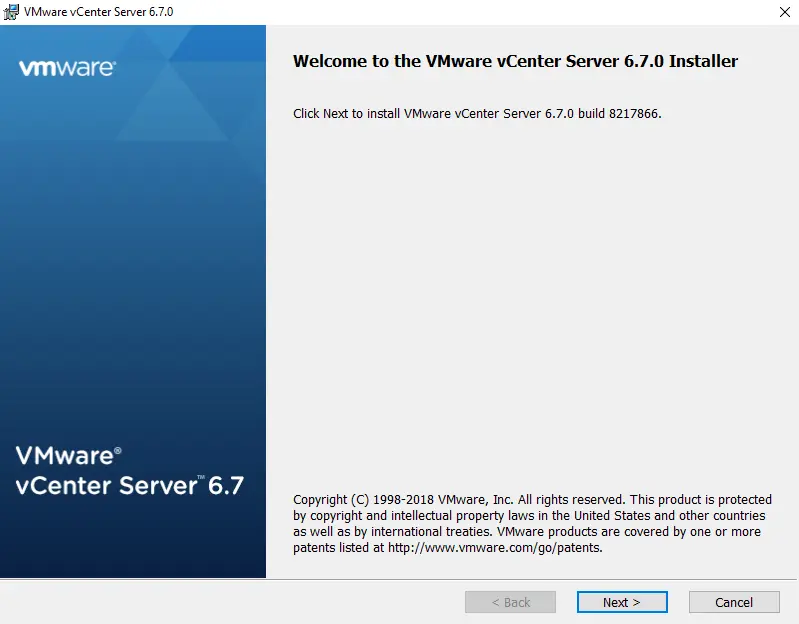
Welcome to the VMware vCenter 6.7 Installer. Choose next.
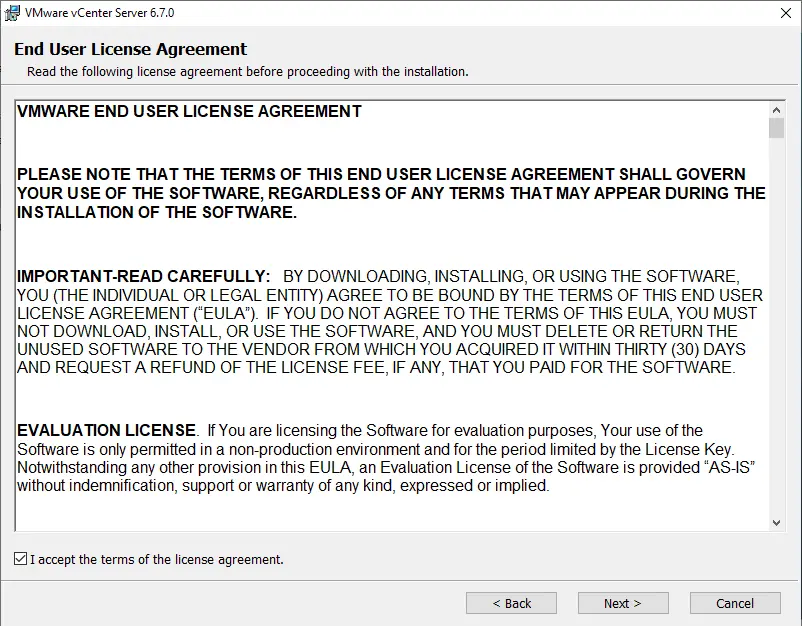
Accept the end user license and choose next.
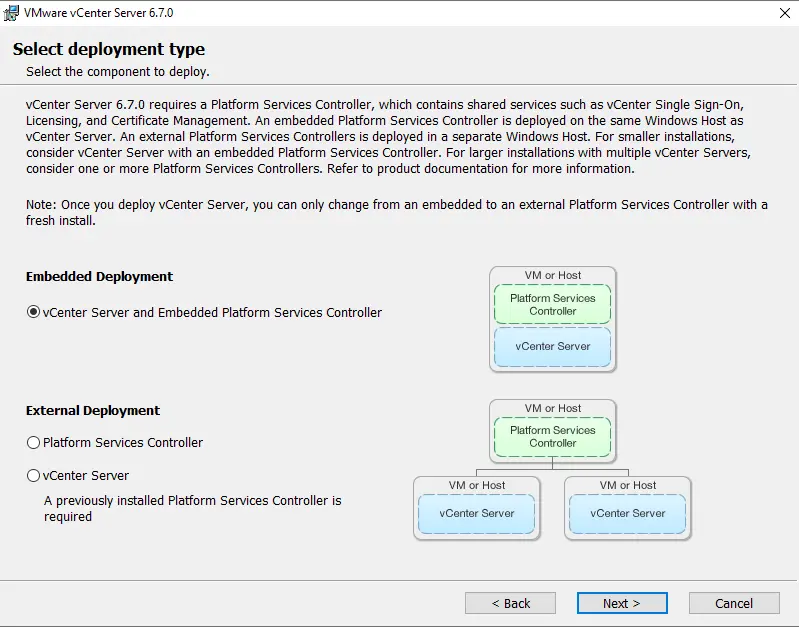
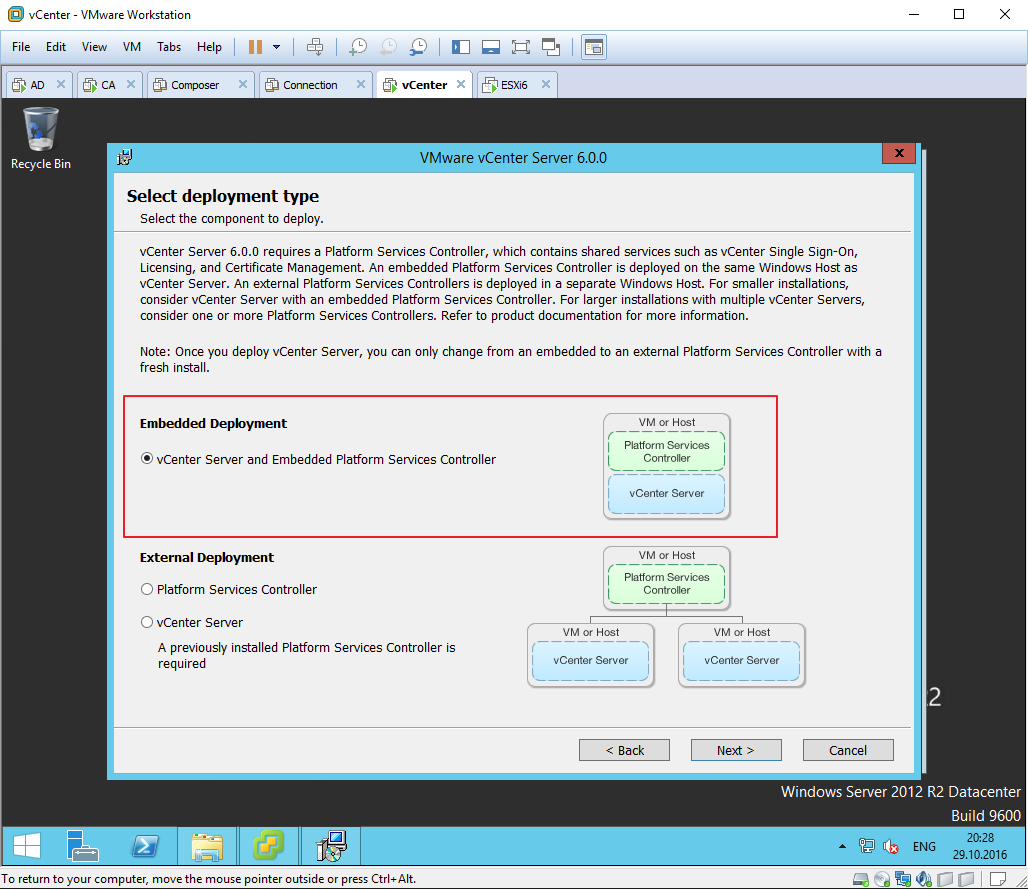
Select the deployment type, choose “Embedded Deployment” and then click next.
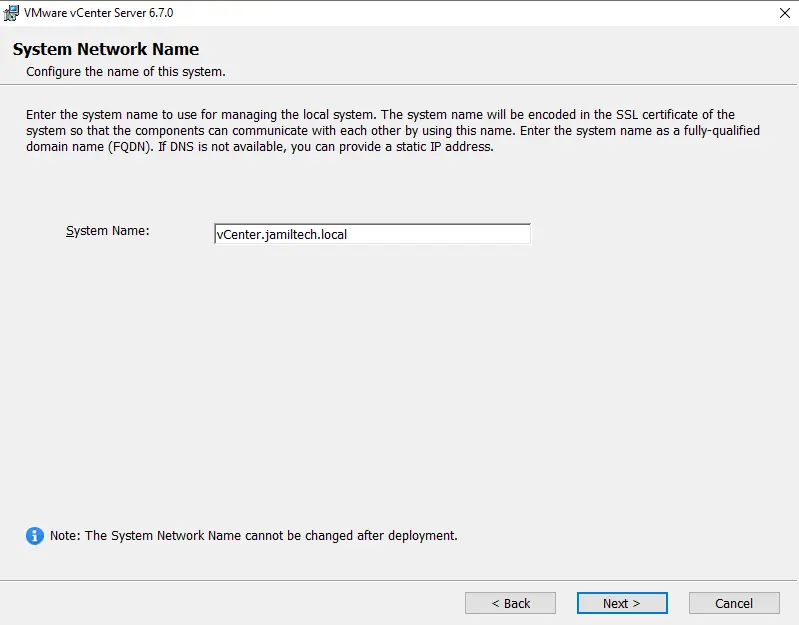
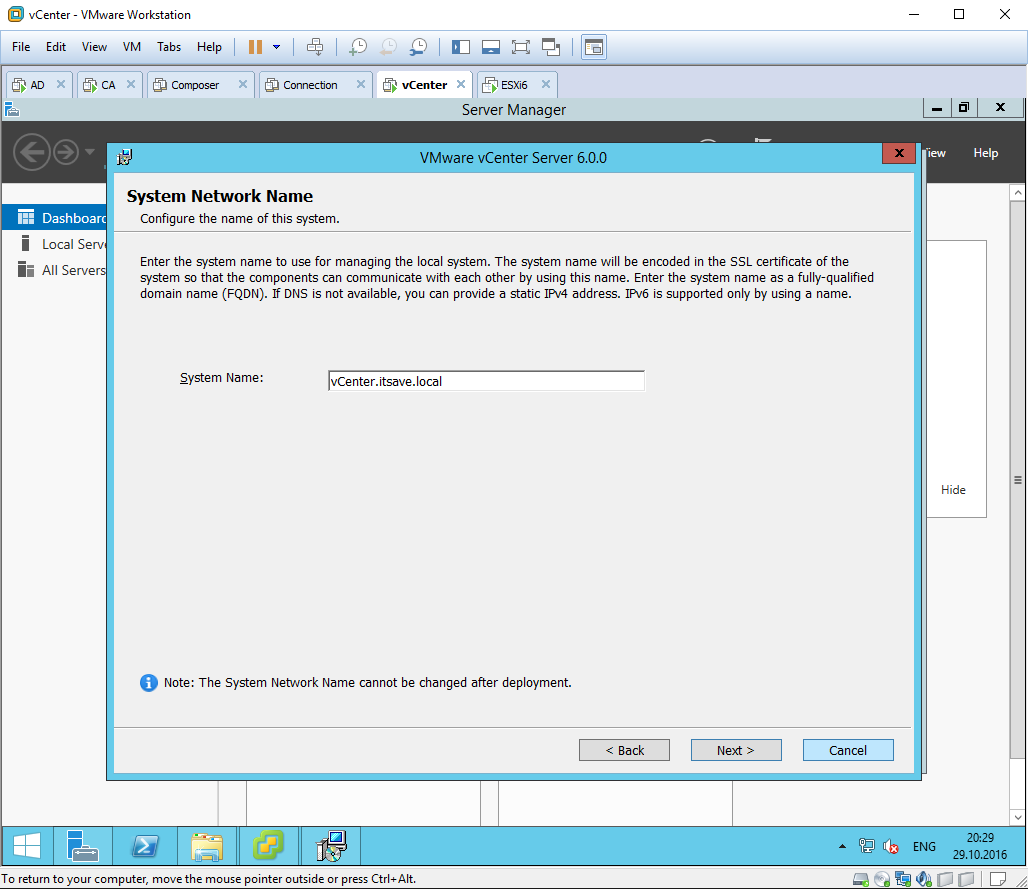
Enter the FQDM in the System Name field, and then click Next.
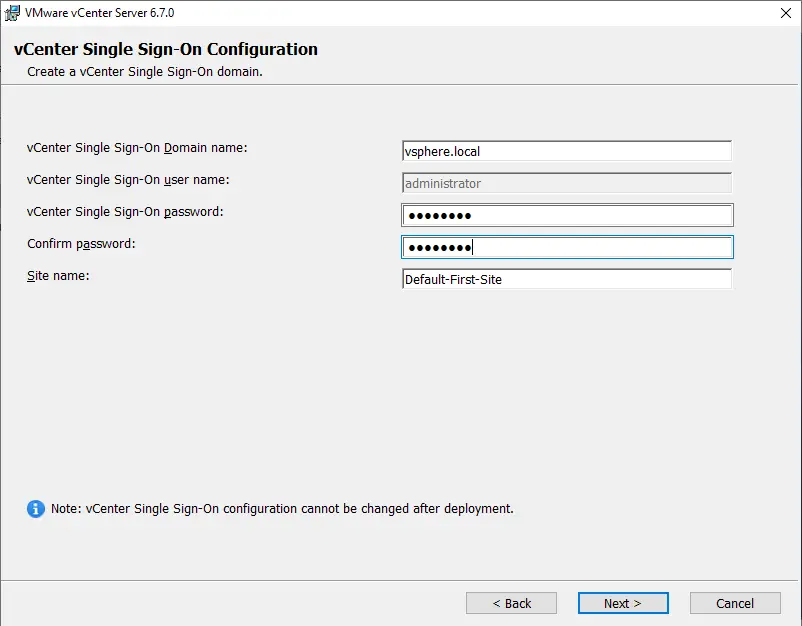
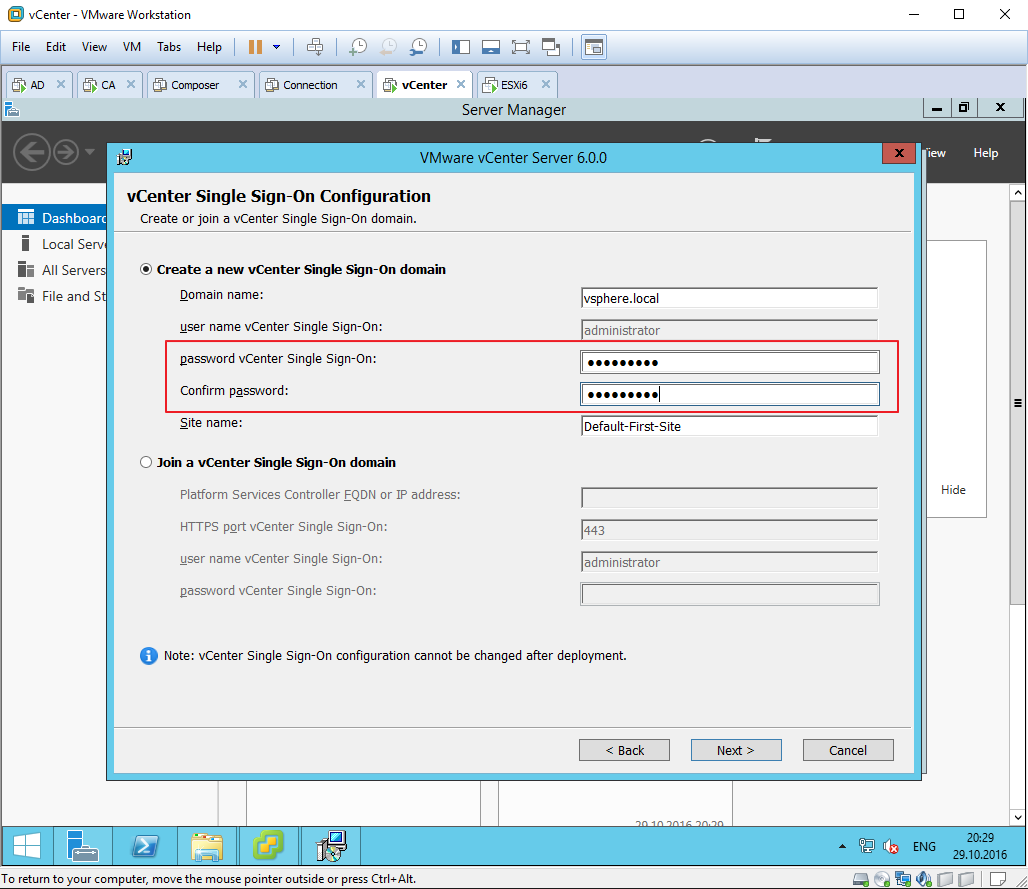
vCenter Single Sign-On Configuration
Leave it as the default vsphere.local, enter the password for the SSO administrator account, and then click next.
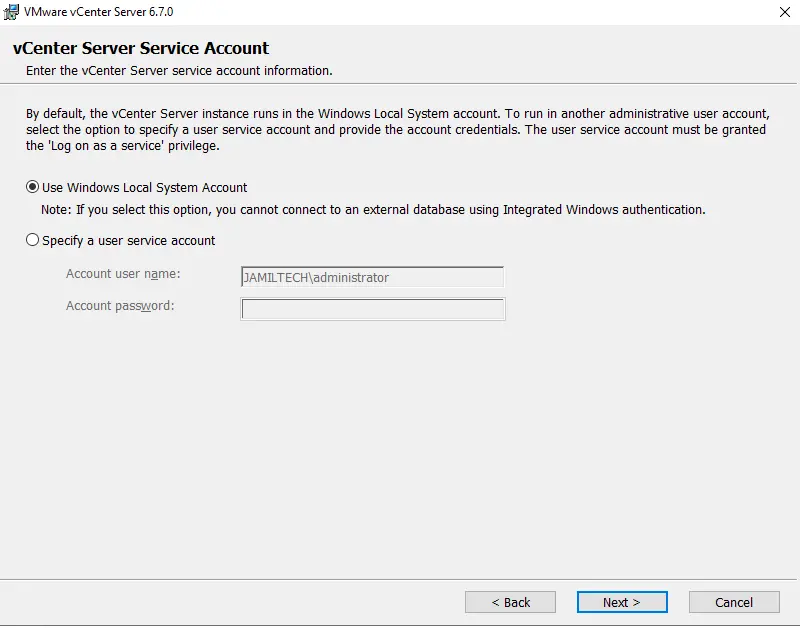
Choose to use a Windows local system account, and then click next.
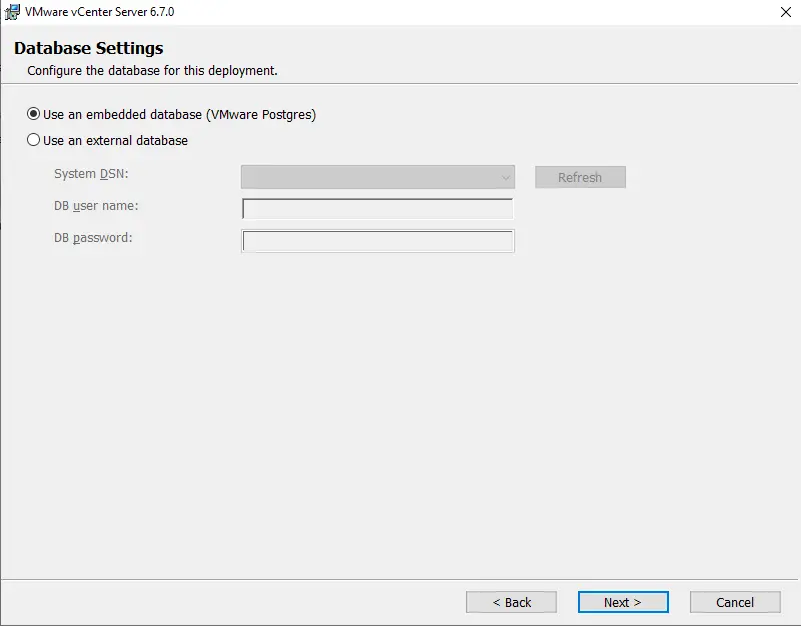
Configure database settings and click next.
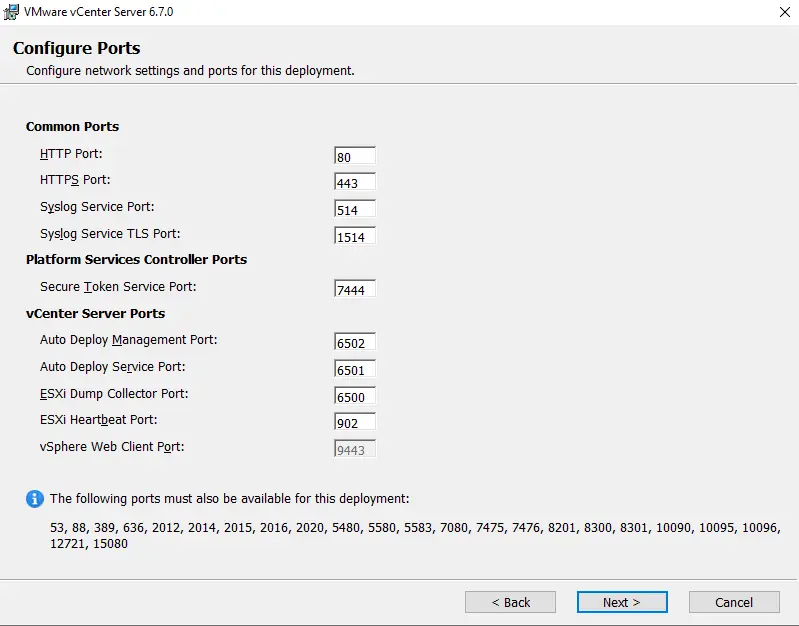
Keep the default port configuration, and then click next.
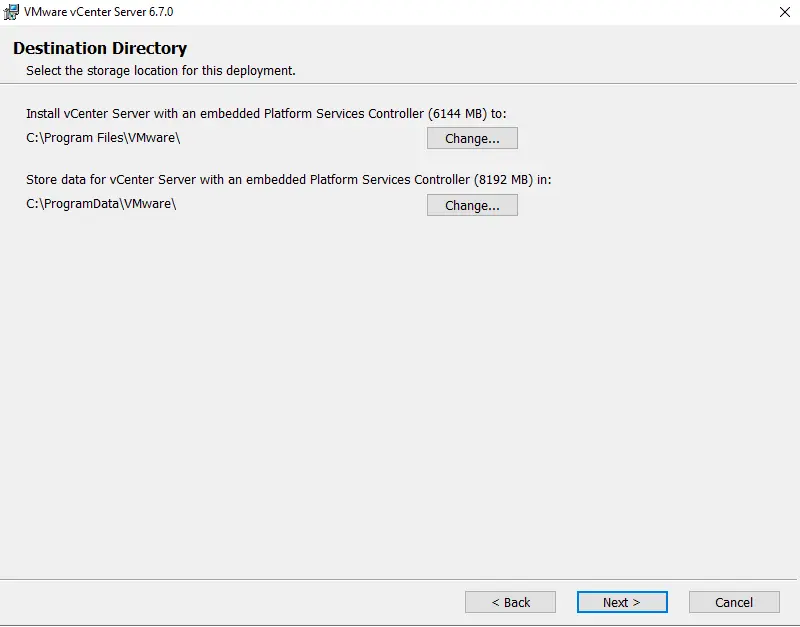
Select the storage location where you wish to install vCenter services, and then click next.
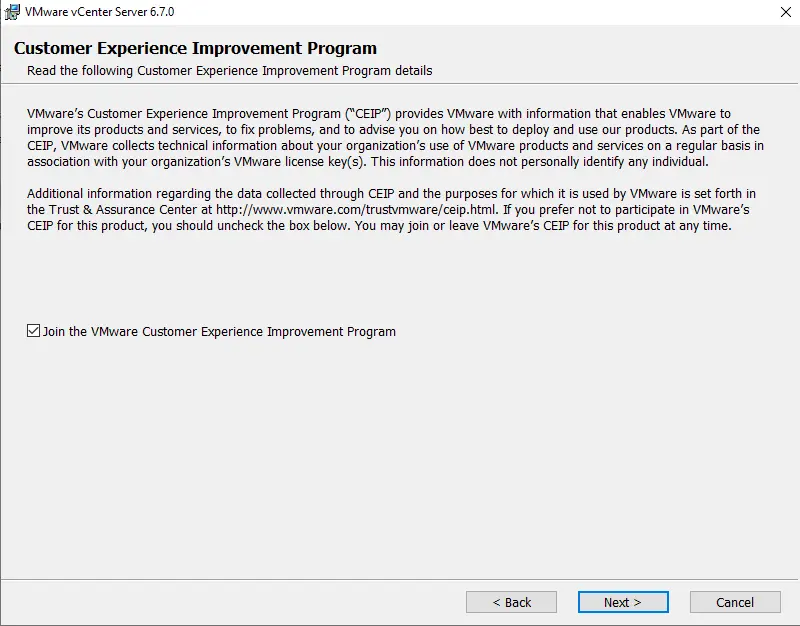
VMware Customer Experience Improvement Program, choose next.
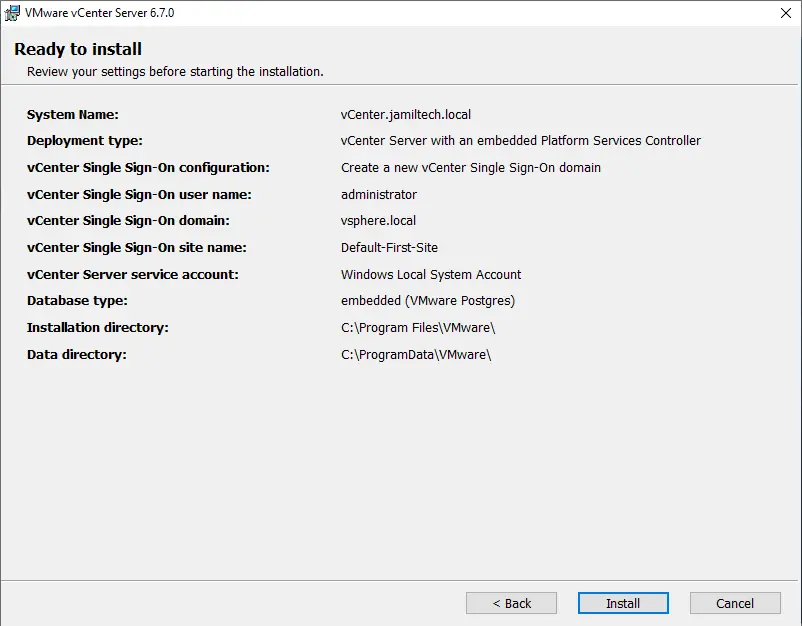
Review the Windows vCenter Server configuration, and then click on the Install button to start the process.
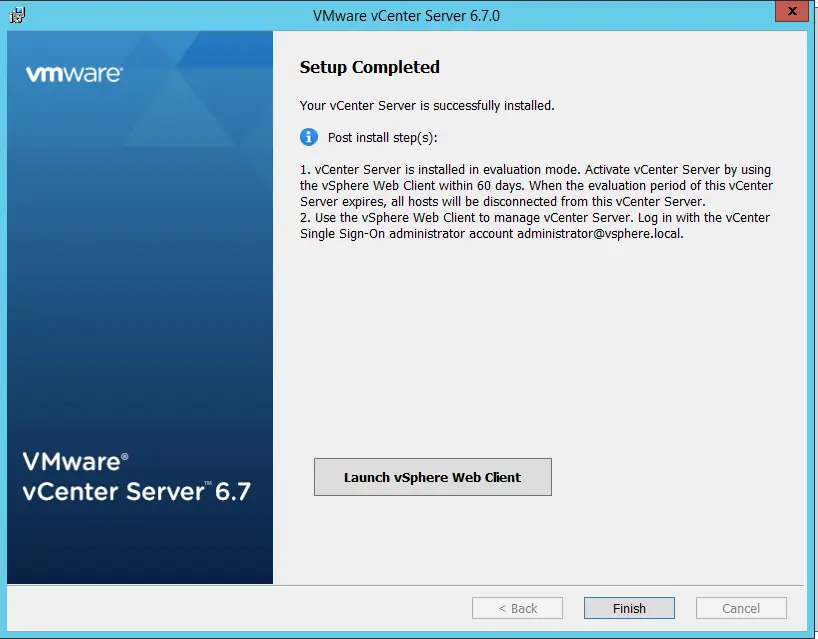
Your vCenter Server for Windows is successfully installed; choose Finish.
VMware vCenter for Windows Post-Installation
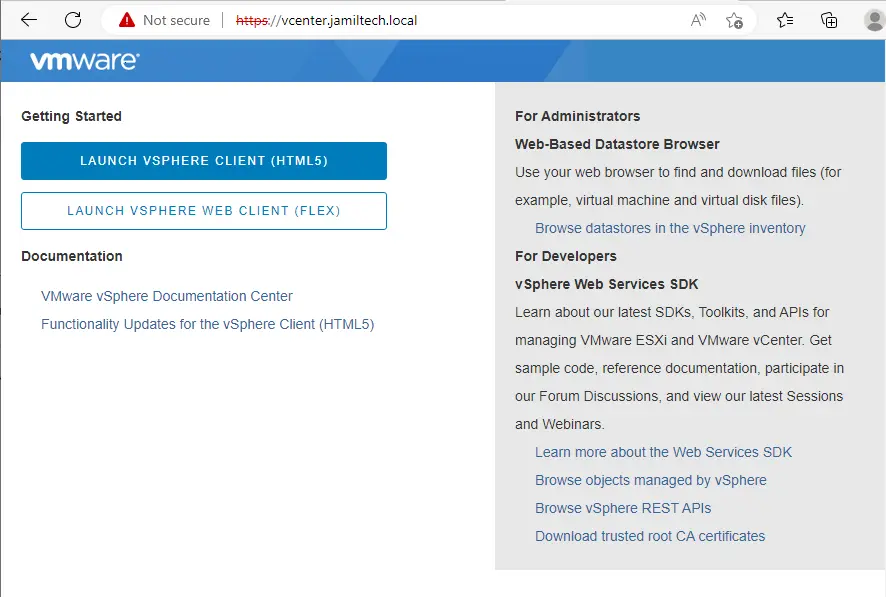
Open any browser, type the vCenter IP or FQDN, and then hit enter. Click on Launch vSphere Client.
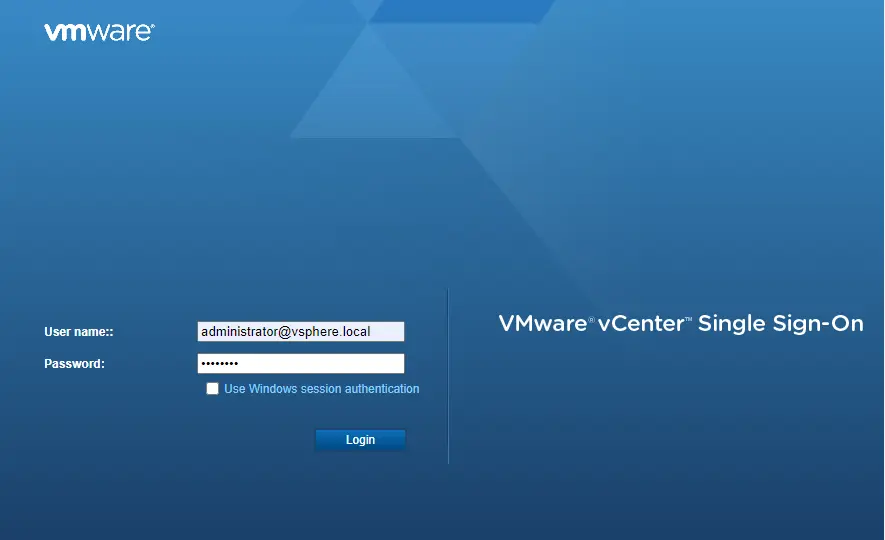
Log in with your credentials, and then hit login.
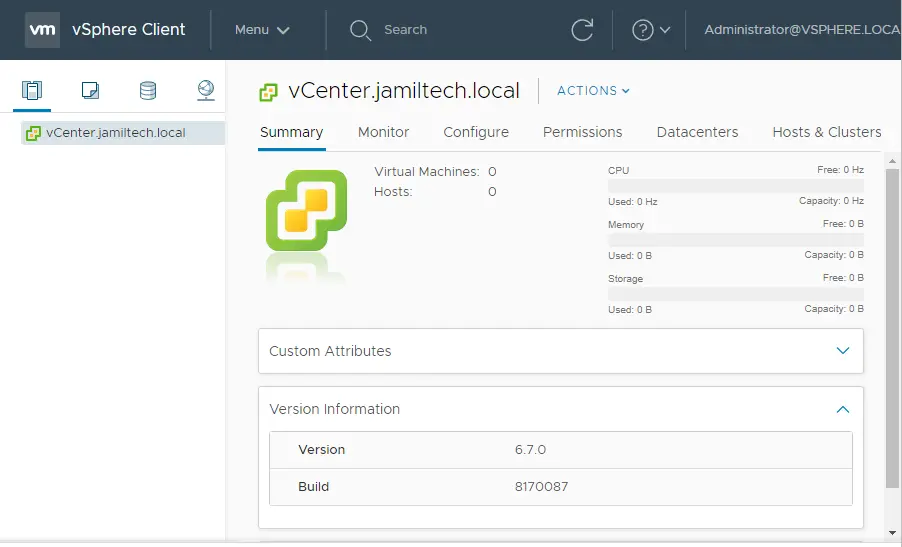
VMware vCenter for Windows 6.7 login with a 60-day trial period.
Related: How to Migrate Windows vCenter to VCSA 8.0
Jamilhttp://jamiltech.com
A Professional Technology Blog Writer | An energetic professional with more than 20+ years of rich experience in Technology, Planning, Designing, Installation, and Networking.
VMWare vCenter Server — это второй базовый элемент продукта vSphere. Он используется для объединения нескольких хостов ESXi в единое целое и идет в комплектах VMWare vSphere Essentials Kits. Для того чтобы его установить, нам в первую очередь необходимо скачать его установочный пакет.
Для этого переходим на страницу загрузок VMWare, и нажимаем Go to Downloads напротив VMWare vCenter Server. Попадете на страницу загрузки. Казалось бы что уже все. Осталось только скачать, но таки нет. Чтобы скачать продукт, необходимо иметь учетку VMWare. Имея учётку VMWare вы запускаете триал и уже тогда получаете доступ к файлам загрузки.
Так же для установки vCenter нам необходимо иметь уже работающий гипервизор ESXi. Если его у вас еще нету, то сперва надо установить ESXi
Относительно установленного ESXi, необходимо знать его IP адрес, логин (root) и пароль от него. Далее по пунктам.
Монтируем наш iso файл с vCenter.
Называться он будет как-то типа VMware-VCSA-all-6.7.0-8217866
Открываем виртуальный диск, переходим по пути \vcsa-ui-installer\win32 и запускаем файл installer.exe

Выбираем Install
Так как инструкция подразумевает наше первое столкновение с vCentre, мы жмем на Install

Приступаем к первому этапу установки
Следующее окно несет чисто информативную роль, и сообщает нам на каком из двух этапов установки мы сейчас находимся.
Первый этап это деплой, второй этап — настройка.

Читаем EULA
Ознакомившись с EULA, и согласившись с её условиями, нажимаем Next

Выбираем тип установки vCenter
Далее перед нами стоит выбор, что как будет установлен vCenter
— Как маленькая инсталляция, то есть vCenter в сети один и вместе с Platform Services Controller они представляют один апплаенс. Это как раз случай любого из китов и многих других спец решений VMWare
— Как крупная инсталяция. В прочем, в этой ситуации я думаю работодатель не пожалел бы полторы тыщщи баксов на спец курс подготовки. В случае такой инсталяции Platform Services Controller и vCenter Server разделяются на разные апплаенсы
Мы конечно же выбираем Embedded Platform Services Controller 🙂

Настраиваем подключение к ESXi
На этом этапе мы уазываем тот хост ESXi куда мы хотим залить образ vCentre. В поле ESXi host or vCenter Server name указываем IP нашего ESXi. В полях User name и Password указываем логин и пароль админской учетки этого хоста

Оно может выдать запрос на подтверждение неизвестного ранее сертификата безопасности. Жмем YES
Настраиваем имя апплаенса и учетку рута
Указываем имя нашей устанавливаемой виртмашины с vCentre и пароль от учетки root этого хоста

Выбираем масштаб инсталяции.
Задача не тривиальная. Разработчики любезно позаботились о нас на этом этапе и избавили от необходимости курить маны. Нам показывают табличку, в которой уже описаны все шаблоны установки. Можно даже особо не вдумываться и выбирать Tiny. Такого хоста хватит чтобы обслуживать до 100 виртмашин на 10 ESXi хостах. Если у вас какой-то из Essentials паков, у вас физически хостов может быть всего 3. Упихать в 3 хоста 100 виртмашин будет проблемотично, но если вы считаете что что у вас получится это сделать, выберите установку small, на 100 ESXi гипервизоров :). Но вмварь как бы определяет что в среднем на 1 ESXi хост приходится 10 виртуальных хостов.

Выбираем хранилище куда будем ставить свой первый vCenter.
Если у вас еще не создано хранилище, вам необходимо открыть админку своего ESXi хоста. В админке перейти в Storage => New datastore => Create new VMFS datastore => Выбрать диск на котором хотите разместить первое хранилище и задать имя хранилища => потыкать Next пока не увидите Finish => Нажать Finish

Я еще предпочитаю ставить опцию Enable Thin Disk Mode. Эта опция позволяет виртмашине отъедать дисковое пространство физической подсистемы постепенно. В зависимости от того сколько фактически её данные занимают места на диске. Без этой опции виртмашина займет у вас на диске сразу же все 300 гигов tiny инсталяции, и никогда за всю жизнь может не утилизировать этот объем на 100%
Настройка сети нашего апплаенса

Относительно настройки сети апплаенса, нет желания долго и глубоко размышлять о том какой адрес ему выдать. Да и это не ESXi хост, у которого может не быть встроенных средств удаленного администрирования типа iLO, а физически вы с ним контактируете последний раз в жизни. Если вы ставите vCenter, значит у вас есть доступ к ESXi. А если у вас есть доступ к ESXi, значит вы в любой момент сможете попасть в консоль апплаенса и переделать там всё вручную. А так, я больше предпочитаю отдавать все на откуп DHCP серверу, через который потом уже и меняю настройки сети 🙂
Смотрим суммарную информацию по нашей инсталяции
Если всё устраивает — нажимаем Finish. Начинается непосредственно деплой апплаенса.
Завершение первого этапа установки
Если установка прошла успешно, вы увидите следующее окно:

фыУстановщик проинформирует вас о результатах завершения первого этапа. Так же он уведомит вас о том, что если вдруг после успешного деплоя вы закроете инсталлятор, вы сможете продолжить процесс настройки перейдя по адресу http://ip_vcenter:5480.
Если мы придерживаемся стандартного сценария, жмем Continue
Начало 2-го этапа установки

Жмем NEXT
Настройка времени и SSH

Я сразу же включаю доступ по SSH
Настраиваем домен для сквозной авторизации

Если у вас есть свой локальный домен, можно заделаться его поддоменом, для test.local было бы vsphere.test.local, если домена нет то можно назваться стандартным названием vsphere.local. Вместо vsphere можно написать что угодно, главное что имя домена должно состоять из двух частей и разделено точкой.
В любом случае, нужно запомнить и домен, и пароль и то что учетка называется administrator. Первое подключение вы будете делать именно с неё, вбивая в поле Username: administrator@vsphere.local, ну или какой домен вы там себе выберете.
Подключение к CEIP
CEIP — служба сбора инфы о пользователях которая по уверениям собирает различную анонимную информацию которая позволяет улучать продукт. Не знаю насколько сильно наличие или отсутствие галочки повлияет на то что вмварь будет отправлять определенную инфу разработчику, но если у вас стоит принципиальная цель недать вмвари отправлять что-либо наружу, лучше воспользоваться соответствующими правилами трафика на вашем шлюзе.

По окончании установки оно выдаст вам адрес https://photon-machine:443, на который не попасть пока у вас на днс сервере не появится соответствующий алиас.
Чтобы попасть в только что установившийся vCenter, необходимо перейти по адресу который получил апплаенс https://vcenter_ip, подсмотреть его можно в пункте 12 данного мануала.

Жмем на Launch vSphere Client (HTML5)

И попадаем наконец-то в наш vCenter
,
This tutorial contains step by step instructions on how to install VMware vCenter Server v6.7 on Windows. Before, you continue to install vCenter for Windows, it is essential to understand the requirements, options, and the steps necessary to ensure successful deployment of vCenter server on Windows.
The two core components in any VMware vSphere infrastructure are VMware vSphere ESXi and VMware vSphere vCenter server. ESXi provides a layer of virtualization that abstract the physical server’s hardware resources like the CPU, memory, network, and storage, and allocates them to multiple virtual machines. It provides capabilities of creating and running virtual machines and virtual appliances. VMware vCenter Server is a tool that allows you to manage all your ESXi hosts and their respective virtual machines from a central location.
There are two deployment options for vCenter Center supported by VMware. The first one is installing vCenter Server on a Windows virtual or physical machine, and the second one is deploying the Linux vCenter Server Appliance (VCSA) on ESXi host.
In this article, we will mention all the steps you need to follow, to successfully install vCenter Server on a Windows Server.
About the vCenter Server on Windows
The vCenter Server installed on Windows Server was the first and only deployment option available for the vCenter server until the Linux appliance was introduced.
VMware has however made a lot of enhancements on the VCSA and recommends migrating any vCenter Server Windows installation to the Linux VCSA. VMware also recently announced that vCenter version 6.7 would be the last version of vCenter on windows and any new features will only be released on the VCSA.
vCenter Server on Windows pre-installation considerations.
Before installing the vCenter server, you will need to have the following minimum requirements covered:
- A 64-bit Windows Server 2008 service pack 2 operating system and above.
- The system you are installing the vCenter server on, should not be an Active Directory Domain controller.
- There are three database options supported:
- PostgreSQL database which is bundled with the installer.
- Microsoft SQL Server 2008 R2 SP2 database and above.
- Oracle 11g or 12c database.
- Synchronize the clocks for all the vSphere components, including the windows virtual machine you will be using. An NTP server is recommended for this.
- Review the hardware requirements for vCenter Server and Platform Services Controller on Windows.
- Review the storage requirements.
- The windows server must have the most recent patches and updates. You can review the software requirements for vCenter Server and Platform Services Controller on Windows here.
- If you plan to run the vCenter Server services with a user that is not the local system account, then it has to be a member of the administrator’s group.
- A pre-install check runs when you start the installer to ensure that all the requirements have been met for the installer to complete successfully. If any of the conditions have not been met, then you will not be able to do the installation until the issue is resolved.
It is highly recommended to visit VMware Compatibility Guide for a more comprehensive link of all supported options.
How to install vCenter Server 6.7 on Windows.
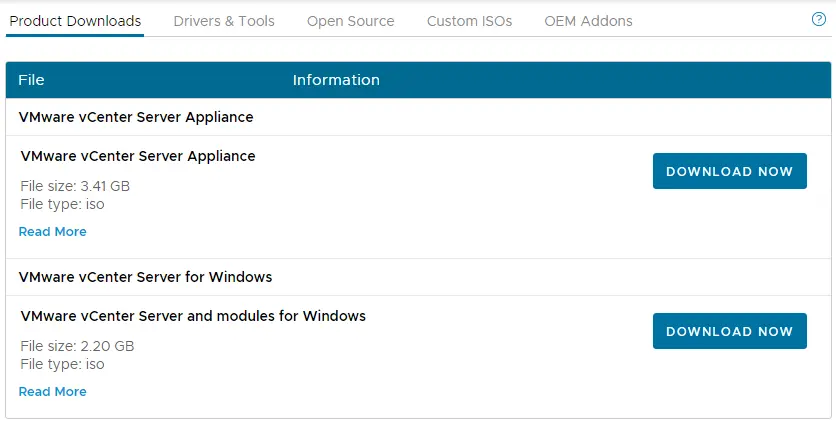
1. Download the vCenter Server 6.7 ISO image file from the VMware product download website.
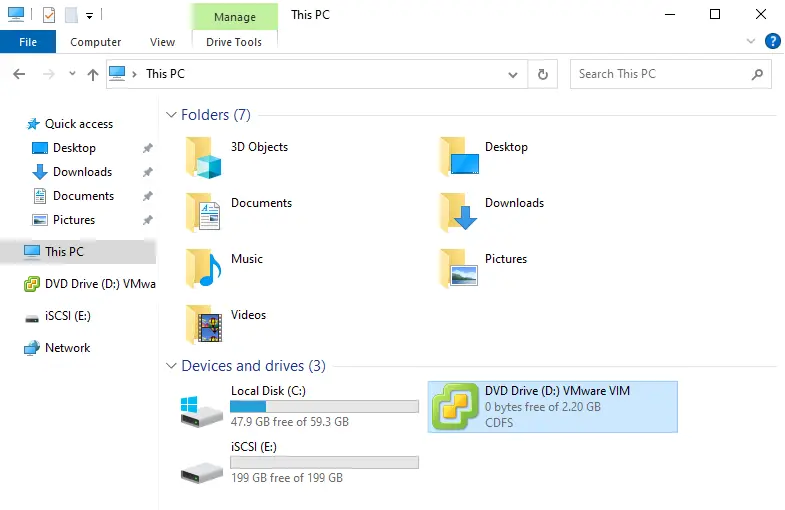
2. When the download is completed, mount the ISO file on the Windows server you will be using for the installation.
3. Right-click at autorun.exe (located on the root directory of the ISO image) and run as administrator.
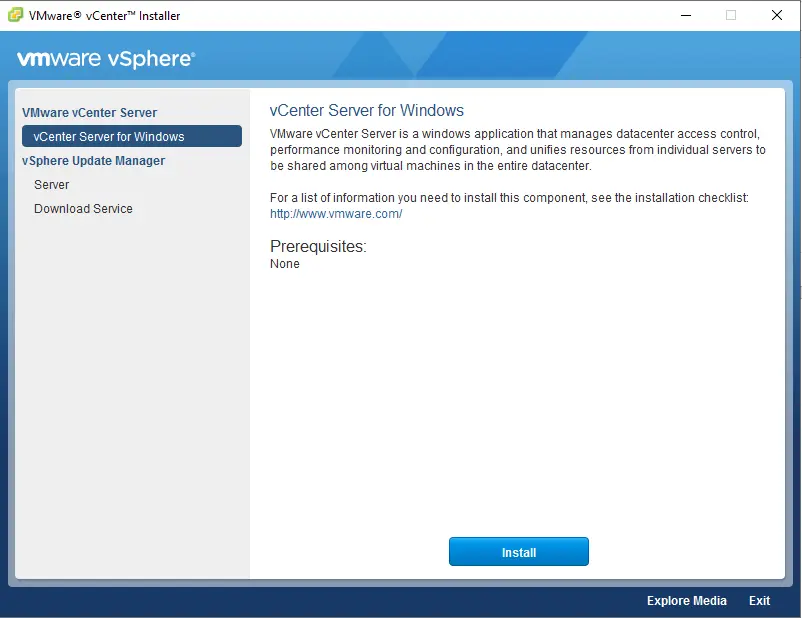
4. The VMware vCenter Server for Windows installation wizard, will start. Click Install.

5. At «Welcome to VMware vCenter Server 6.7 installer» window, click Next.

6. Accept the terms of the license agreement and then click Next to continue with the installation.

7. At the next screen you ‘ll be prompted to choose between the Embedded Platform Services Controller Deployment Model and the External Platform Services Controller Deployment Model. Leave the default option and click Next. *
* Note: We are using the embedded option in our guide. If you wish to use the external option, then the PSC must be deployed before installing the vCenter Server.

8. Type the IP Address or the FQDN of your vCenter Server in the System Name field. *
* Note: The value configured here is permanent, and you will not be able to change it after the installation.

9. At «vCenter Simple Sign-On Configuration» settings: *
a. At «vCenter Single Sign-on Domain Name»: type your existing SSO Domain name or create a new domain, or leave the default SSO Domain which is the «vsphere.local».
b. Enter the SSO username, password, and leave the default site name.
c. Click Next to continue.
* Note: the SSO configuration cannot be changed after the installation.

10. At the next screen, leave the default setting, to use the «Windows Local System Account» to start the vCenter Server instance, and click Next.

11. At the next screen, we are going to configure a database to be used for our vCenter server instance. At this point, select «Use the embedded VMware Postgres», or, give the details of the external database,) and click Next.

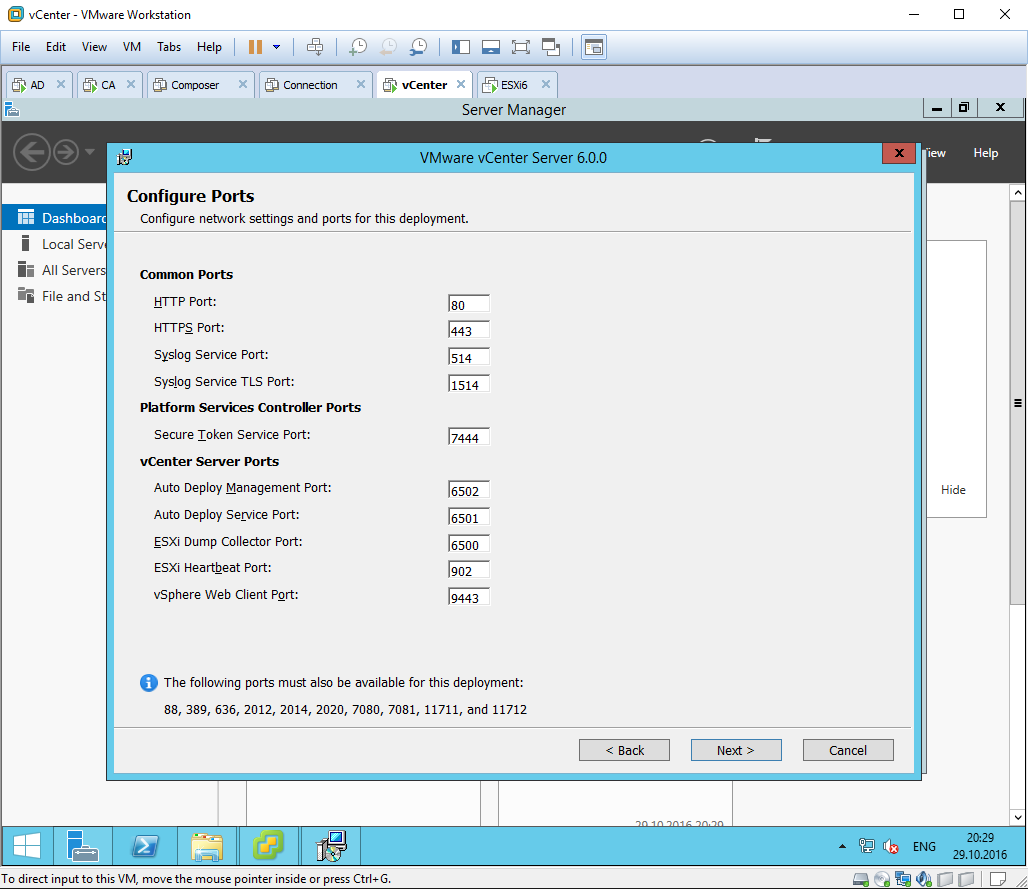
13. At «Configure ports» settings, leave the default port configuration, or change the default values according your choice, and click Next.

14. Leave the default destination directory, (or click ‘Change’ to specify a different destination directory), for installing the vCenter services, and click Next to continue.

15. Select the corresponding checkbox, if you want to «Join the Customer Experience Improvement Program» and then click Next to continue.

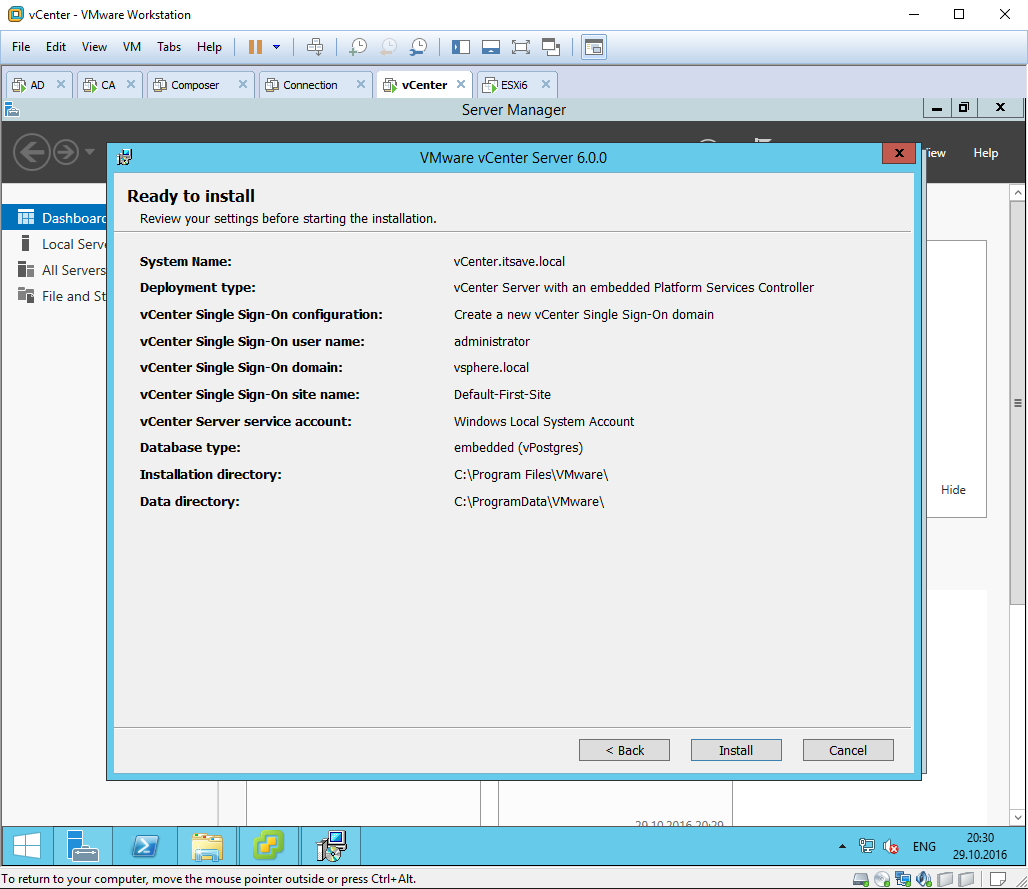
16. Review all the configured settings and if everything is okay, click Install.

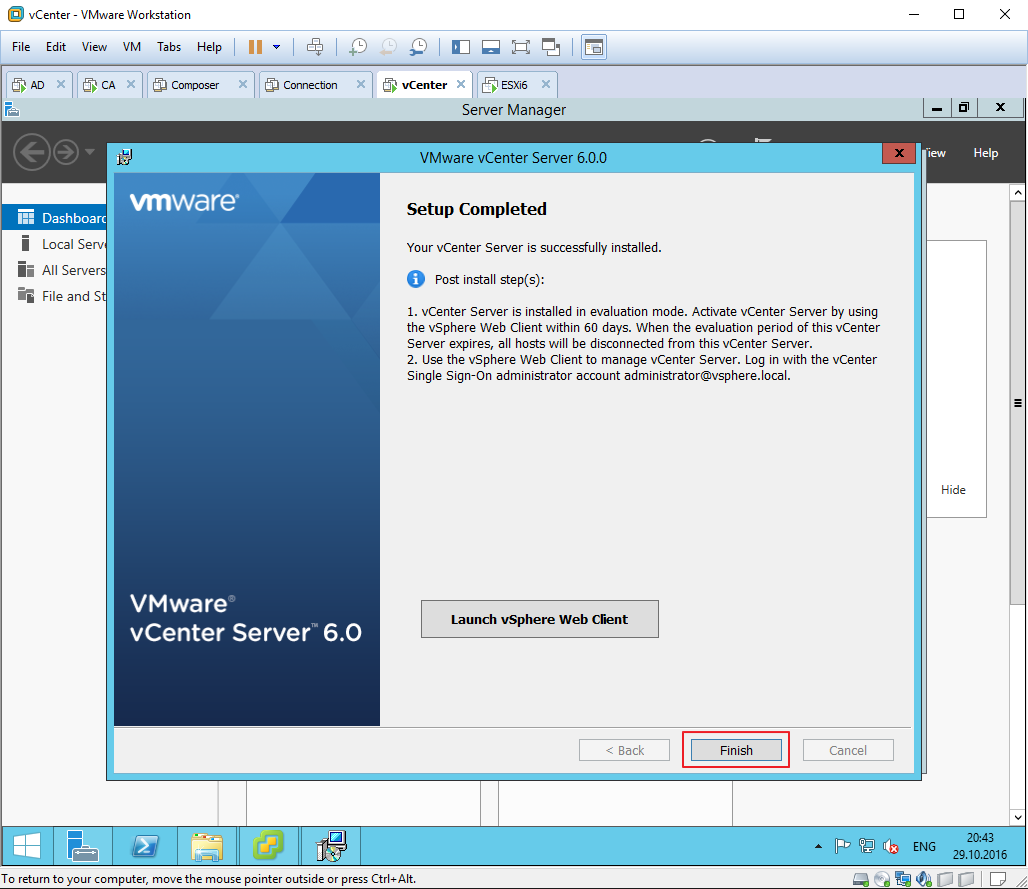
17. Once the installation completes, you can Launch the vSphere Web Client immediately, or click Finish to close the installer.

18. Once the setup is complete, you can log in to your new vCenter server from a web browser of your choice, by typing its IP address or the DNS name. *
* Note: By default, you will get a 60-day evaluation period for vCenter. After that, you will need to buy a license in order to use the vCenter server.

That’s it! Let me know if this guide has helped you by leaving your comment about your experience. Please like and share this guide to help others.
If this article was useful for you, please consider supporting us by making a donation. Even $1 can a make a huge difference for us in our effort to continue to help others while keeping this site free:
- Author
- Recent Posts
Konstantinos is the founder and administrator of Wintips.org. Since 1995 he works and provides IT support as a computer and network expert to individuals and large companies. He is specialized in solving problems related to Windows or other Microsoft products (Windows Server, Office, Microsoft 365, etc.).
VMware vSphere 6.0 reached end of general support 12 March 2020, with vSphere 6.5 scheduled for 15 October 2022, both referenced in the VMware Lifecycle Matrix. See also How to Install vSphere 7.0. Upgrade to vSphere 7 can be achieved directly from vSphere 6.5.0 and above, whereas vSphere 6.0 requires an intermediate upgrade to 6.5 or 6.7 first. For more information see the VMware Upgrade Matrix. Finally, the Windows vCenter Server and external PSC deployment models are now depreciated and not available with vSphere 7.0.
VMware vCenter Server pools ESXi host resources to provide a rich feature set delivering high availability and fault tolerance to virtual machines. The vCenter Server is a centralised management application and can be deployed as a virtual appliance or Windows machine. This post gives a walk through on installing a new Windows based vCenter v6.0.
Software Considerations
- The operating system should be 64 bit and Windows Server 2008 SP2 or above.
- For environments with up to 20 hosts and 200 VMs the bundled internal PostgreSQL database can be used.
- An external database should be Microsoft SQL Server 2008 R2 SP1 or above, or Oracle 11g or 12c. You can review a full list of compatible versions at the Database Interoperability Matrix.
- You must check compatibility of any third party products and plugins that might be used for backups, anti-virus, monitoring, etc. as these may need upgrading for vSphere 6 compatibility.
- Any hosts you plan on connecting to vCenter 6.0 should be running version 5.x.
- To check version compatibility with other VMware products see the Product Interoperability Matrix.
Architectural Considerations
- The implementation of vSphere 6 introduces a Platform Services Controller (PSC) which contains infrastructure services such as Single Sign On, Certificate Authority, licensing, etc. The PSC is deployed internally with vCenter Server or as an external component. You can read more about the PSC in this kb.
- When implementing a new vSphere 6 environment you should plan your topology in accordance with the list of recommended topologies for VMware vSphere 6.
- For more information on deploying an external PSC see the Deploying an External PSC post.
- Most deployments will follow the embedded deployment model, which I will use in this guide.
Hardware Considerations
- Windows vCenter Server with embedded PSC requires the following hardware resources:
- Tiny (up to 10 hosts, 100 VMs) – 2 CPUs, 8 GB RAM.
- Small (up to 100 hosts, 1000 VMs) – 4 CPUs, 16 GB RAM.
- Medium (up to 400 hosts, 4000 VMs) – 8 CPUs, 24 GB RAM.
- Large (up to 1000 hosts, 10,000 VMs) – 16 CPUs, 32 GB RAM.
- Where the PSC is deployed on a separate machine this requires 2 CPUs, 2 GB RAM.
- The Windows vCenter Server requires the following free disk space for installation: (the first 2 may not necessarily be the system drive depending on installation location) Program Files 6 GB, Program Data 8 GB, System folder 3 GB. The PSC machine requires; Program Files 1 GB, Program Data 2 GB, System folder 1 GB.
- A Windows based vCenter Server can be installed on either a physical or virtual machine.
Other Considerations
- It may be necessary to temporarily stop any third party software which could interfere with the installer, such as anti-virus scanner (see post vCenter 6 Upgrade Internal Error).
- If the vCenter Server services are running as a user other than the Local System account then the user must be a member of the administrators group and have the following permissions; log on as a service, act as part of the operating system (if a domain user).
- The account used for external database authentication requires Oracle DBA role, or SQL sysadmin server role, or db_owner fixed database role. If you receive error: the user associated with the DSN has insufficient privileges see this kb.
- All vSphere components should be configured to use an NTP server.
- FQDN resolution should be in place when deploying the vCenter Server in a production environment.
- Review the list of required ports for vCenter in this kb.
- Official resources – vSphere 6 Documentation Centre.
Create Data Source
Before beginning if you intend to use vCenter Server with an external SQL database be sure to install the SQL Server Native Client.
You must also configure a 64-bit ODBC data source for external databases. ODBC Data Source Administrator can be accessed via Control Panel > Administrative Tools. Click System DNS, Add and input the details for the external database, test the data source before continuing. If you are using the internal PostgreSQL database then the System DSN is added automatically during installation.

Installation
Download the VMware vCenter Server and Modules for Windows ISO from VMware downloads.
Mount the ISO and right click autorun.exe, select Run as administrator. The VMware vCenter Installer will open. Ensure vCenter Server for Windows is selected and click Install.

The vCenter Server 6 Installer will open in a separate window, click Next.

Accept the end user license agreement and click Next.

Select the deployment type and click Next. In this guide we will be using an embedded deployment model. If you are using an external deployment model the PSC component must be installed first before the vCenter.

The system name should be auto-populated with the FQDN, click Next. If you are not using IPv6 click Ok to the message about IPv6 resolution.

Create a new Single Sign-On domain, or join the vCenter to an existing SSO domain. If you are creating a new SSO domain give this a meaningful name, (not the same as your Active Directory name) the default is vsphere.local. Configure a password for the SSO administrator account and a vCenter specific site name, click Next.

Select whether to run vCenter services as the local system account or enter details of a service account and click Next. Ensure the account running vCenter services has been granted permissions as per the other considerations section of this guide.

Select an embedded PostgreSQL database or point the installer to the DSN for an external database, click Next.

Accept the default port configuration and click Next.

Select the directory to install vCenter services and click Next.

Tick or untick the VMware Customer Experience Improvement Program as appropriate and click Next.

Check the configuration on the review page and click Install to begin the installation process.

Once the installation has completed click Finish.

Post-Installation
Connect to the vCenter post install using the IP or FQDN of the vCenter, and select Log in to the vSphere Web Client. Using the SSO administrator login, verify the installed version is correct when selecting the vCenter under Hosts and Clusters, you can also go to Help > About.

You must apply a new vCenter license key within 60 days:
Web client: Click Hosts and Clusters and select the upgraded vCenter. Click Actions and Assign License. Select a license or use the green plus button to add a new license and click Ok.
Windows client: On the Home screen under Administration click vCenter Server Settings. Under licensing select a license or enter a new key under Assign a new license key to this vCenter Server and click Ok.
You can obtain a 60 day trial license for vCenter Server here. If you have purchased vCenter Server then log into your licensing portal here. If the license key does not appear then check with your VMware account manager.

If you are have an Active Directory domain then vCenter can use this as a source for permissions and sign on credentials. First join the vCenter to the domain; from the home page click System Configuration, Nodes, and select the vCenter server. In the Active Directory section of the Manage tab click Join, input your AD details and click Ok. Reboot the appliance either right clicking the vCenter server under Nodes and selecting Reboot.
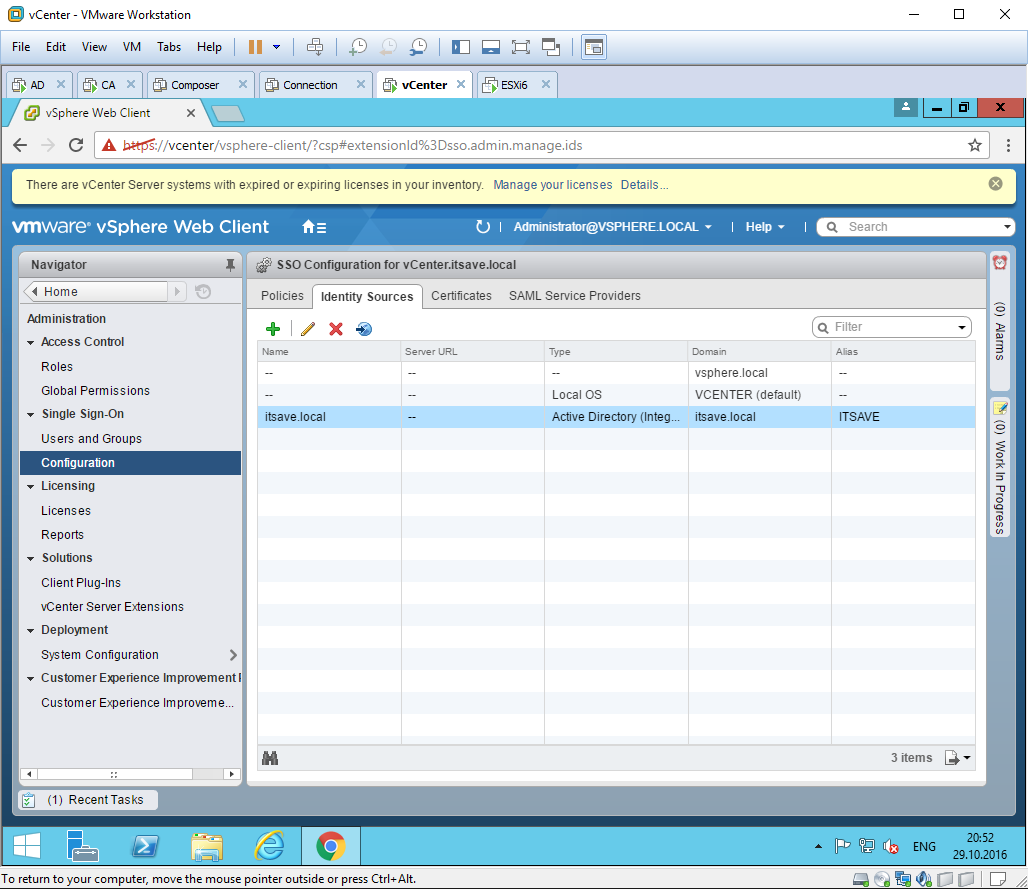
When the vCenter server comes back online we can add AD as an identity source; from the home page click Administration, under Single Sign-On select Configuration. Ensure the Identity Sources tab is open and click the green plus symbol to add a source. Fill in the Active Directory details for your domain and click Ok.

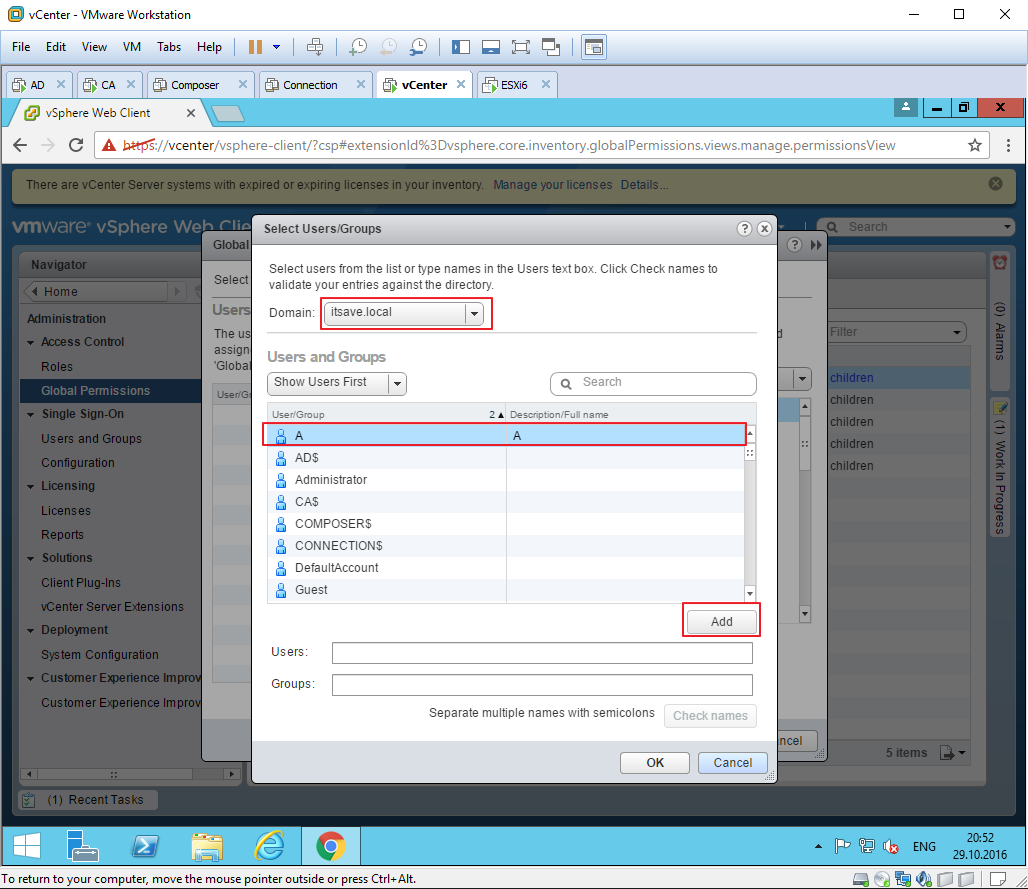
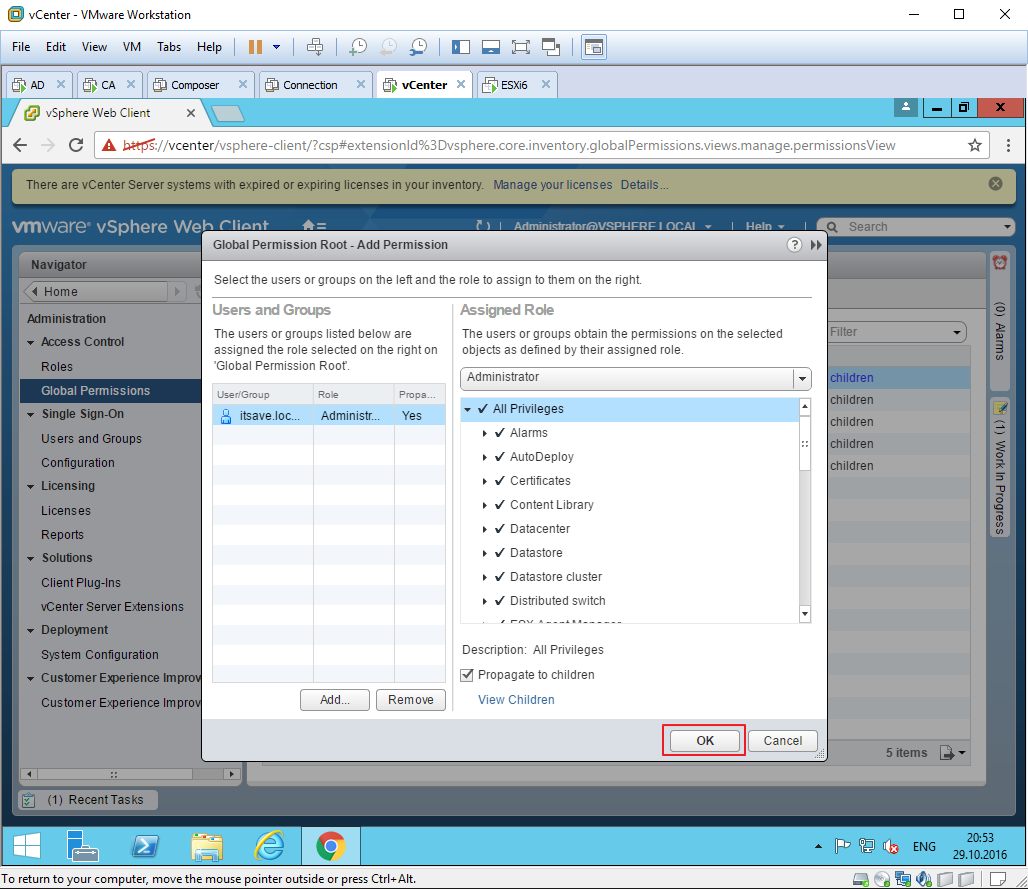
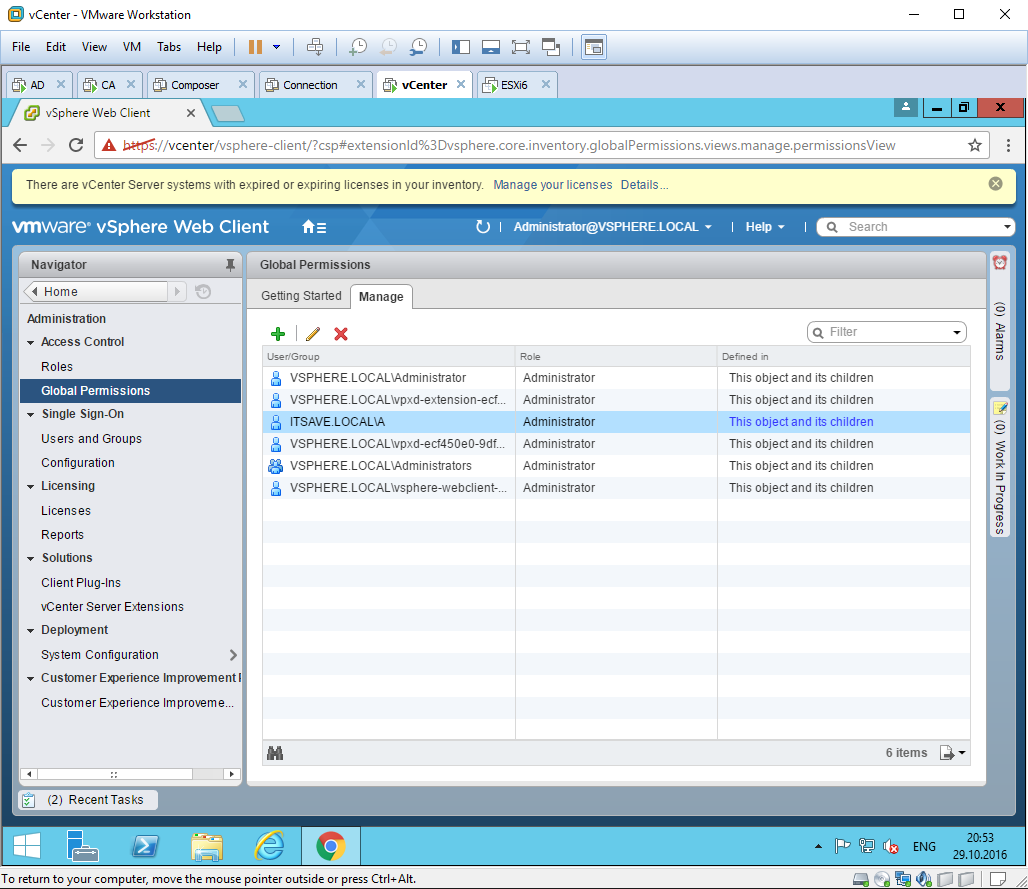
You can now add permissions to vCenter objects such as datacentres, clusters, folders, individual virtual machines, etc. for Active Directory users and groups by selecting the object and clicking Permissions under the Manage tab. To learn more about how vSphere permissions work review the vSphere permissions documentation section.
Установка vCenter Server 6.0.0 под операционную систему Windows server стала значительно проще и быстрее, чем была на предыдущих версиях. Есть основанное на опыте мнение, что администрирование Windows версии vCenter на порядок понятнее, чем vCenter Server Appliance. Работа Windows версии, опять же, по опыту стабильнее. Так или иначе, для стенда по Horizon 7 необходима установка vCenter, т.к. он используется VMware Connection сервером для создания пользовательских виртуальных машин под VDI. Другой гипервизор и другой сервер управления для VMware Horizon не подходит, только ESXi и только vCenter.
Приступаем к установке vCenter server 6.0.0
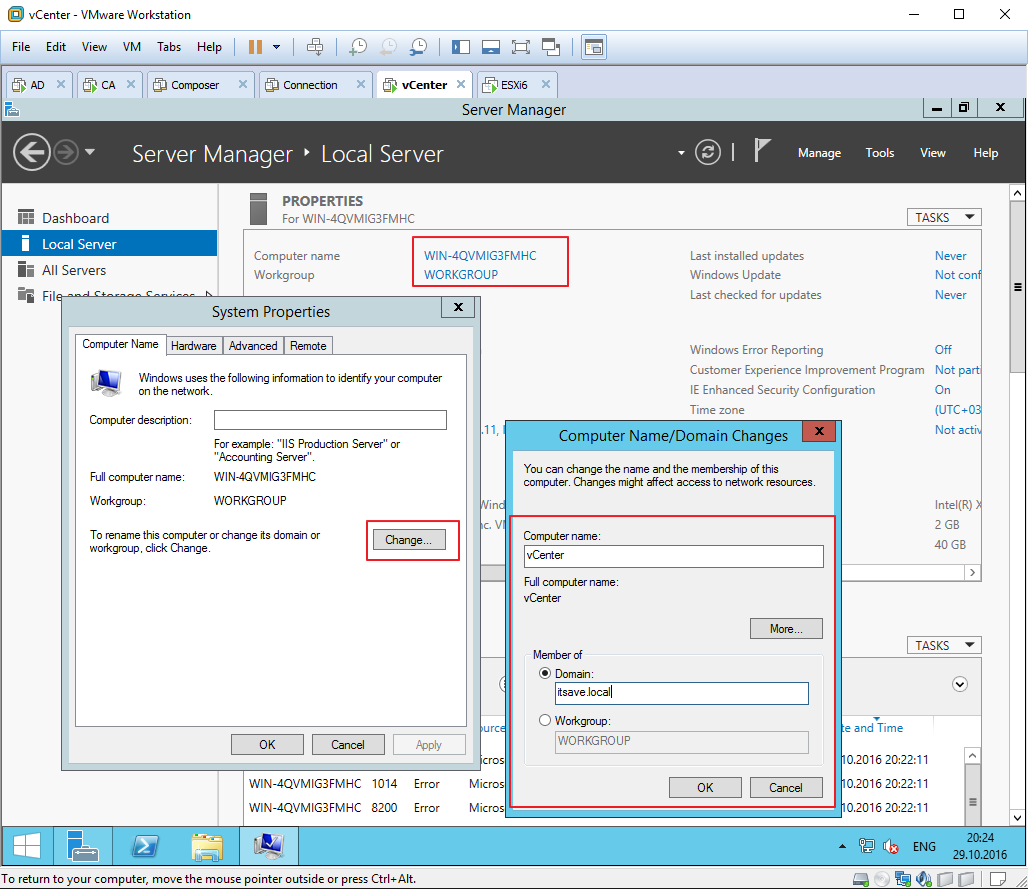
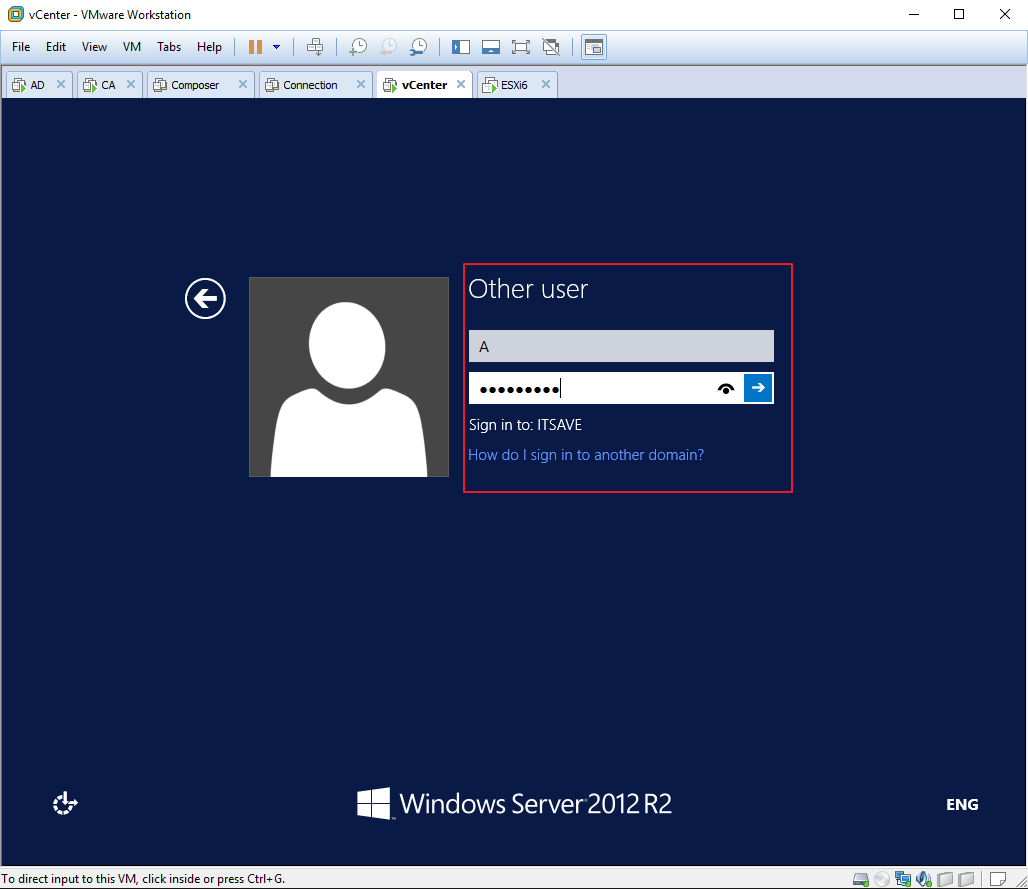
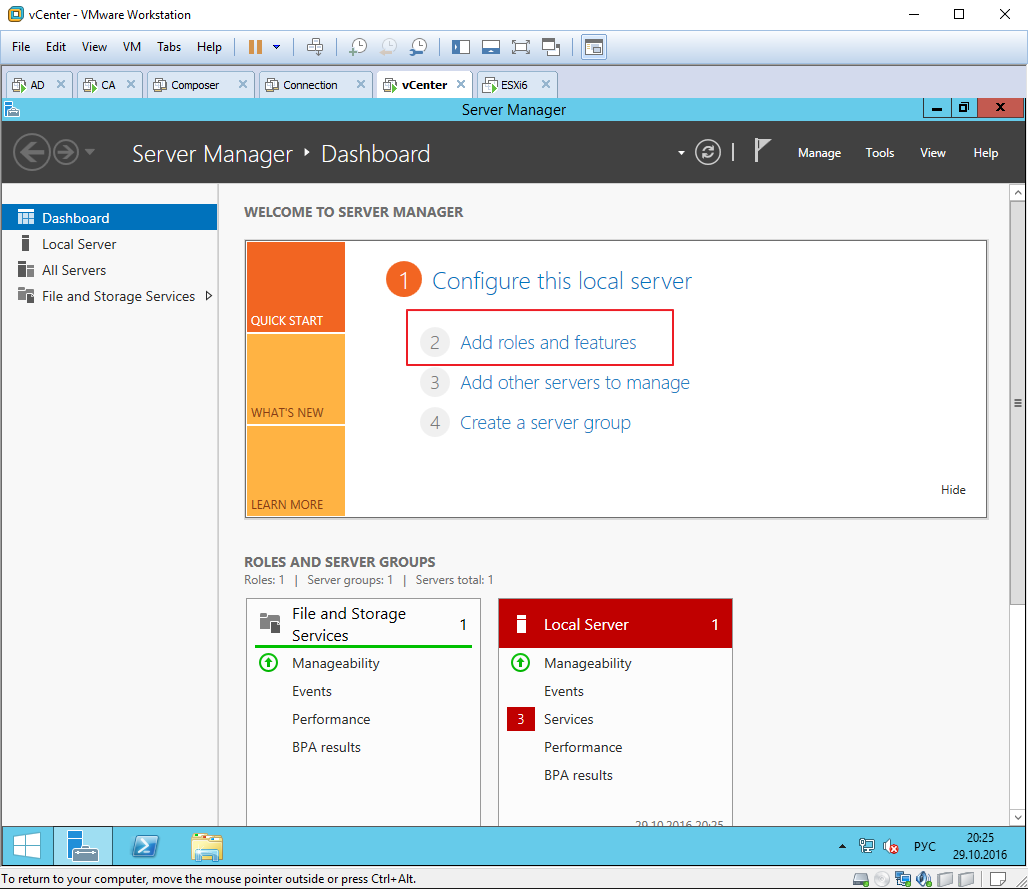
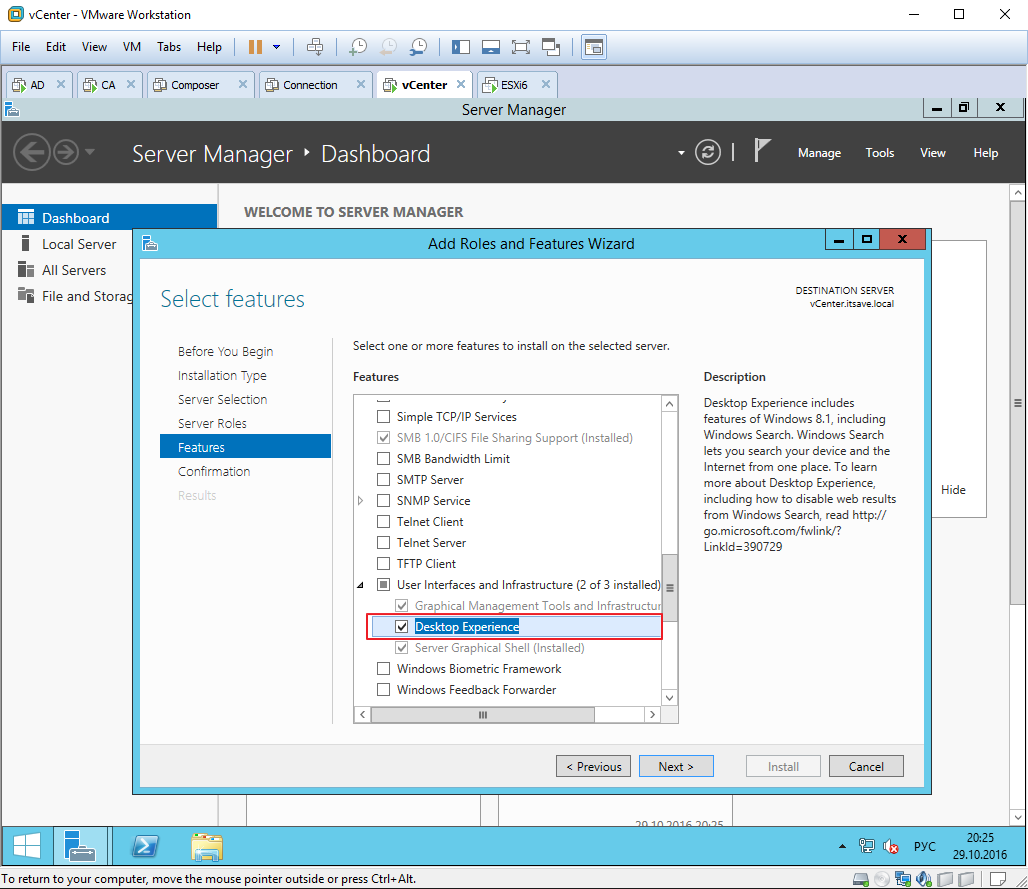
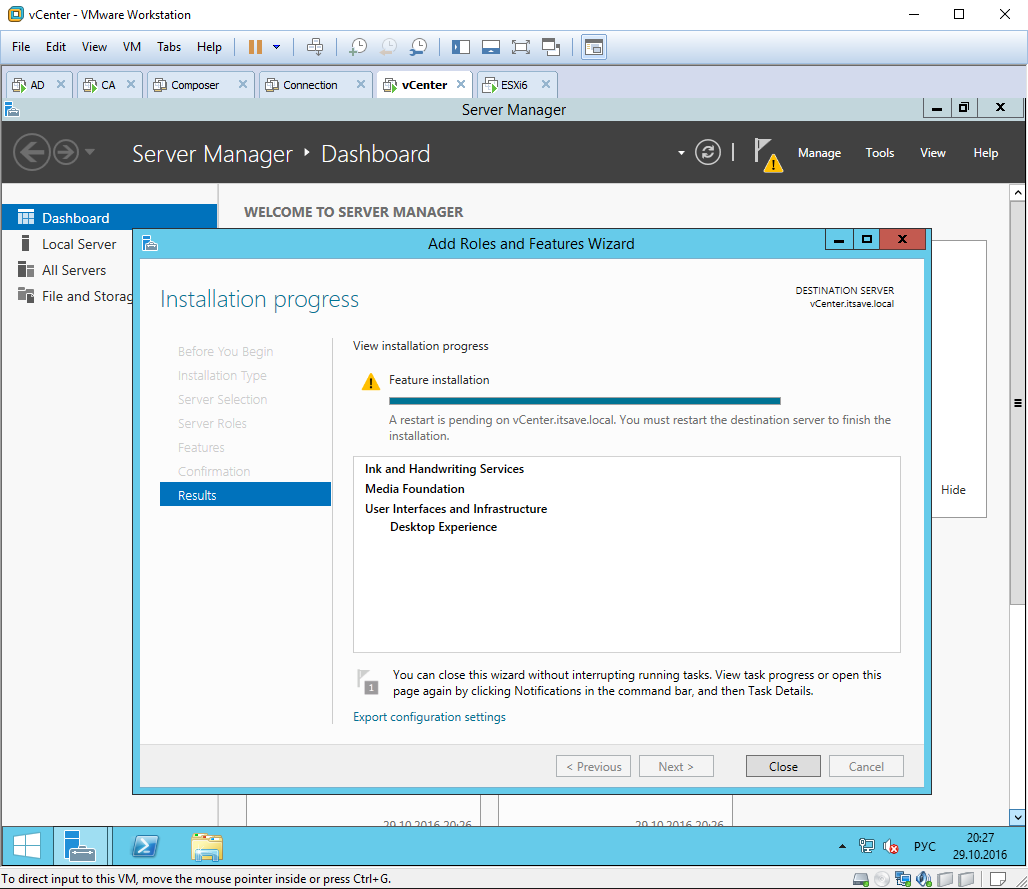
1 -6 Из шаблона развернута операционная система Windows server 2012 R2. На нее уже установлены последние обновления и .NET 3.5 В сетевых настройках рекомендуется прописать статический IP адрес, после чего машина вводится в домен itsave.local Для работы с уже установленным vCenter server через Web консоль управления потребуется браузер с поддержкой Adobe Flash. По умолчанию Windows server 2012 R2 в IE 11 не поддерживает Flash, чтобы это исправить нужно установить компонент «Desktop Experience»
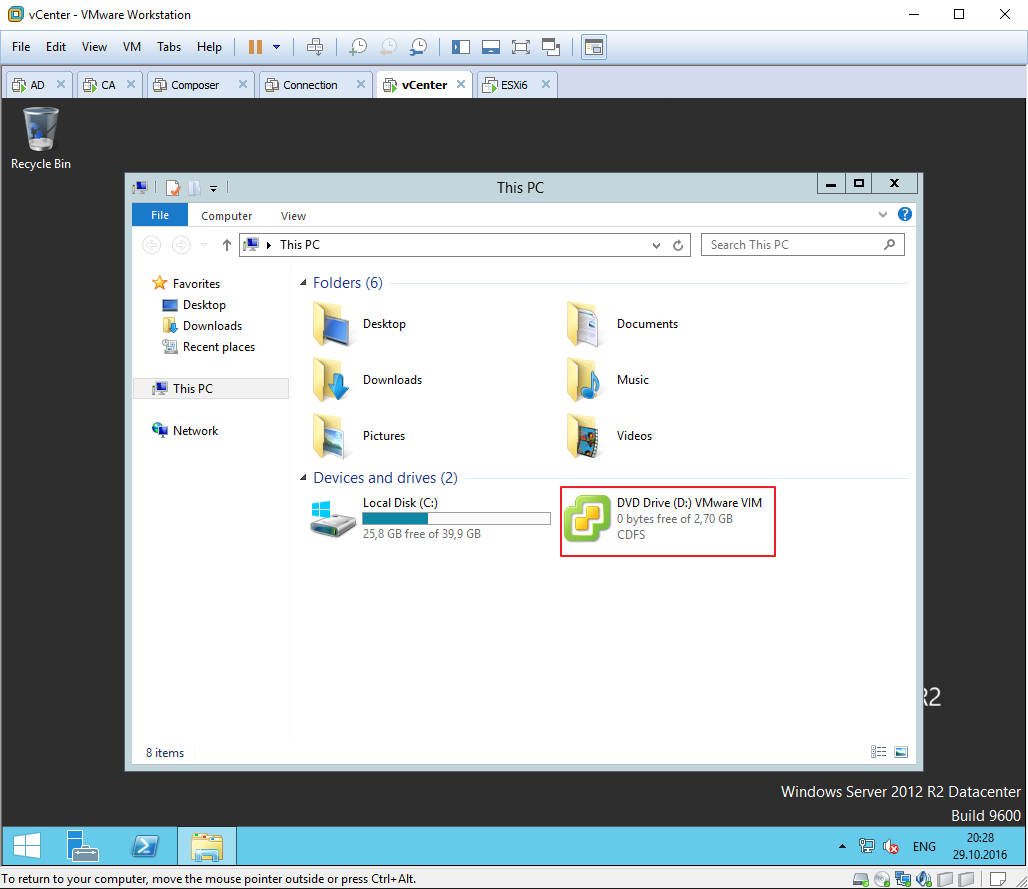
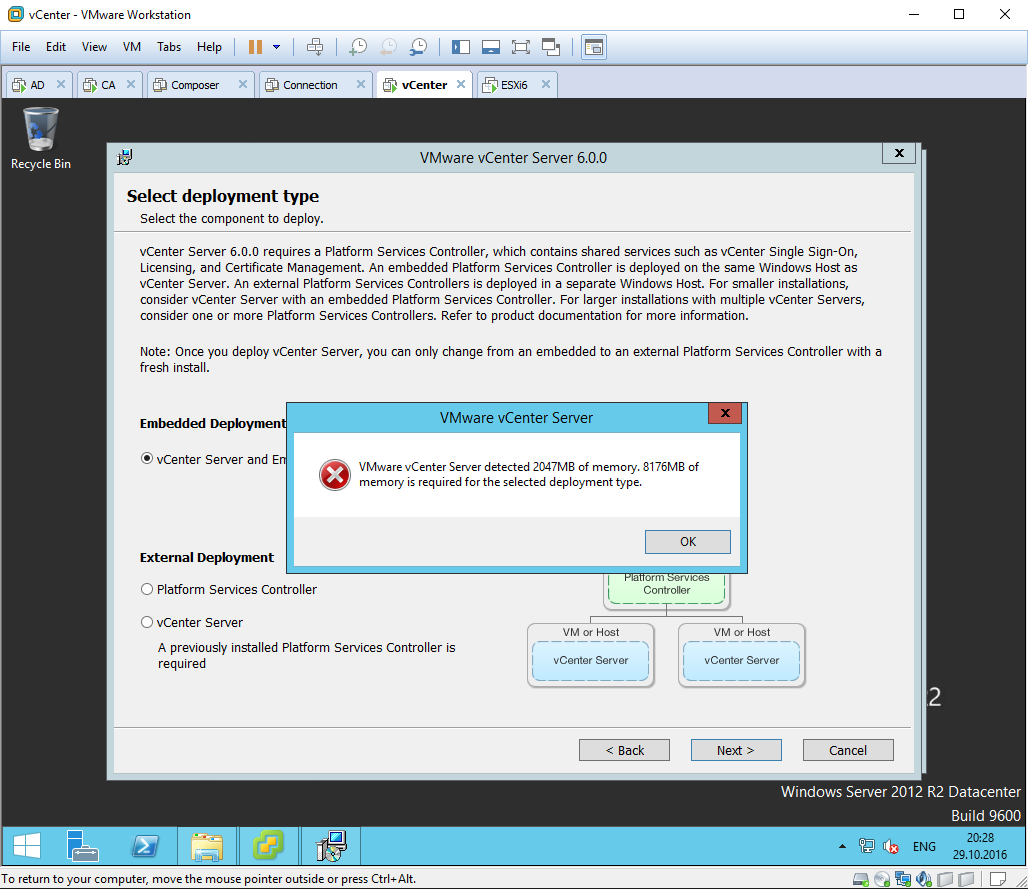
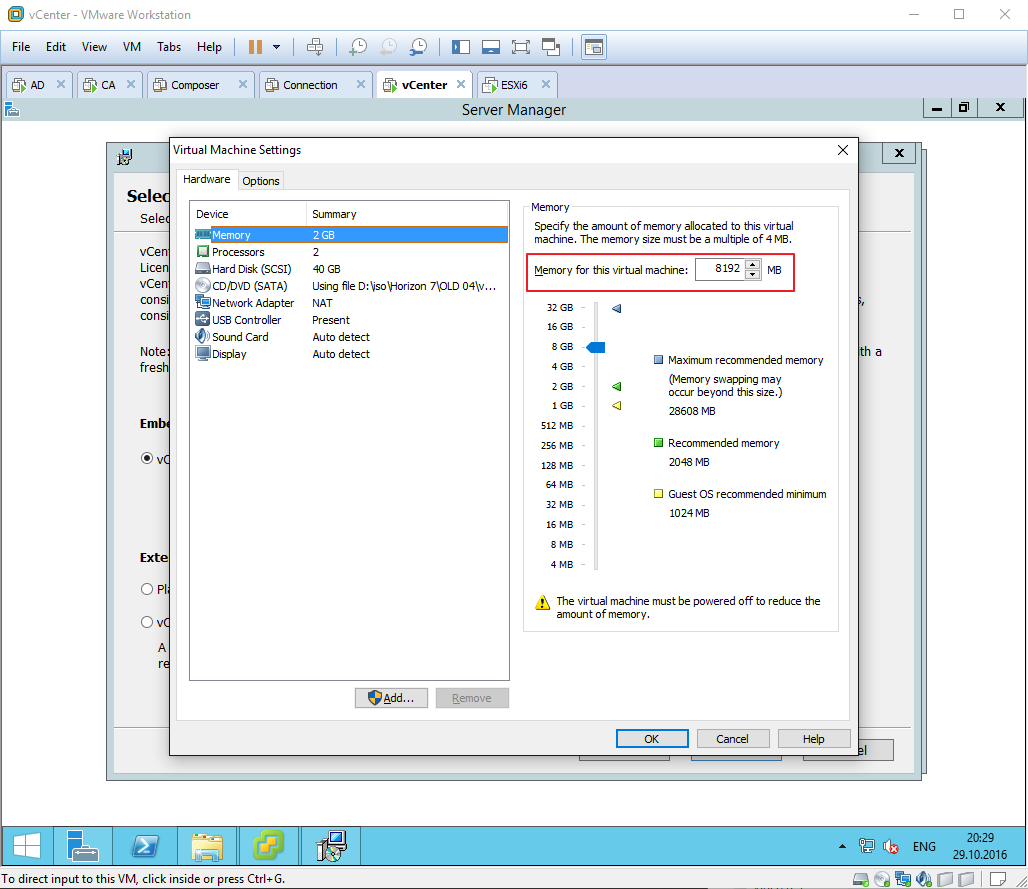
7 — 16 Можно приступать к установке vCenter server 6.0.0 Для этого к виртуальной машине монтирую установочный дистрибутив, скачанный с официального сайта VMware. Критичным для установки является объем оперативной памяти, — не менее 8 Гб ОЗУ. В противном случае продолжить установку законным способом не получится.
Для тех, кто переходит на 6-ую версию VMware vSphere будет любопытно узнать, что по умолчанию для vCenter server используется база данных Posgres SQL, причем как для Linux версии vCenter, так и для Windows. Теперь сервисы vCenter server разделены на 2 основные части: Platform Services Controller и vCenter Server. Эти части можно разделять, разносить по разным виртуальным, создавать отказоустойчивые кластеры, что актуально для больших распределенных инфраструктур.
В Platform Service Controller есть служба единого входа Single Sign-On, которая позволяет для учетной записи внутреннего домена (по умолчанию vsphere.local) давать доступ к различным сервисам vSphere. На этапе первоначальной установки необходимо задать пароль для учетной записи administrator@vsphere.local, у которой будут глобальные неограниченные права на доступ.
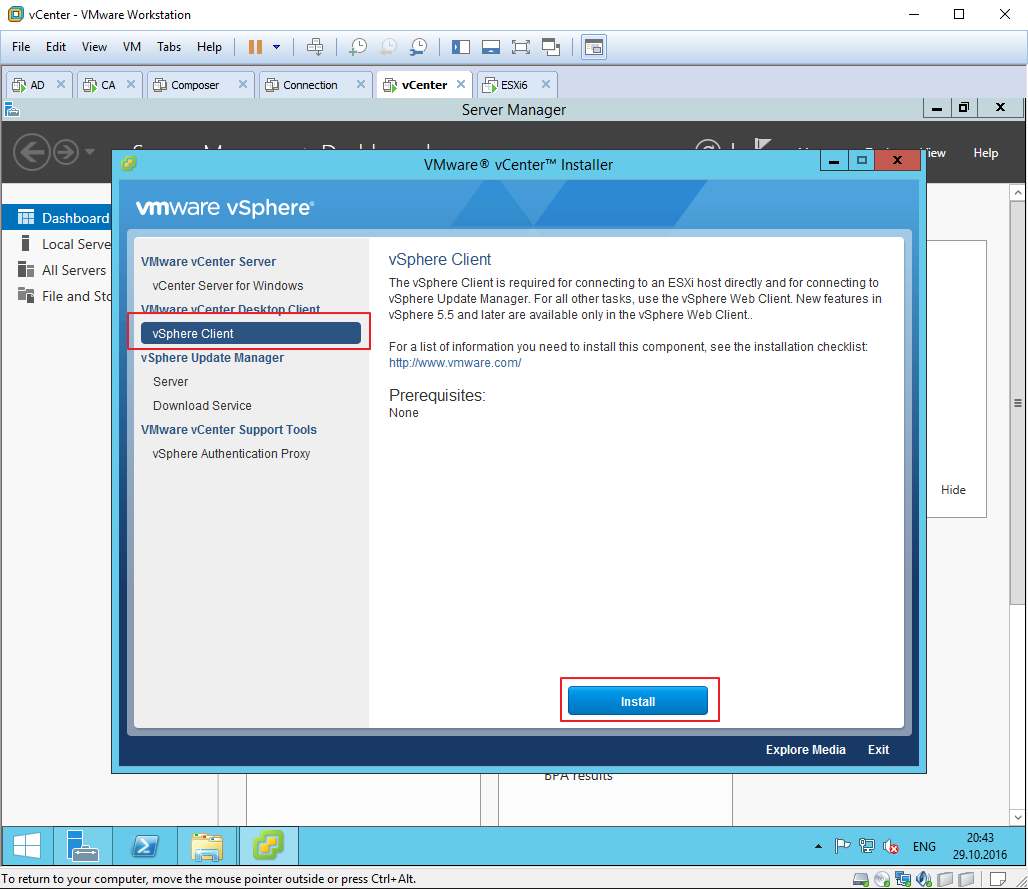
17 — После установки vCenter server можно поставить «толстый» vSphere client. Для привыкших к его интерфейсам администраторам, работать в нем намного проще, чем в Web клиенте. Особенно удобно реализована в толстом клиенте консоль подключения к виртуальной машине.
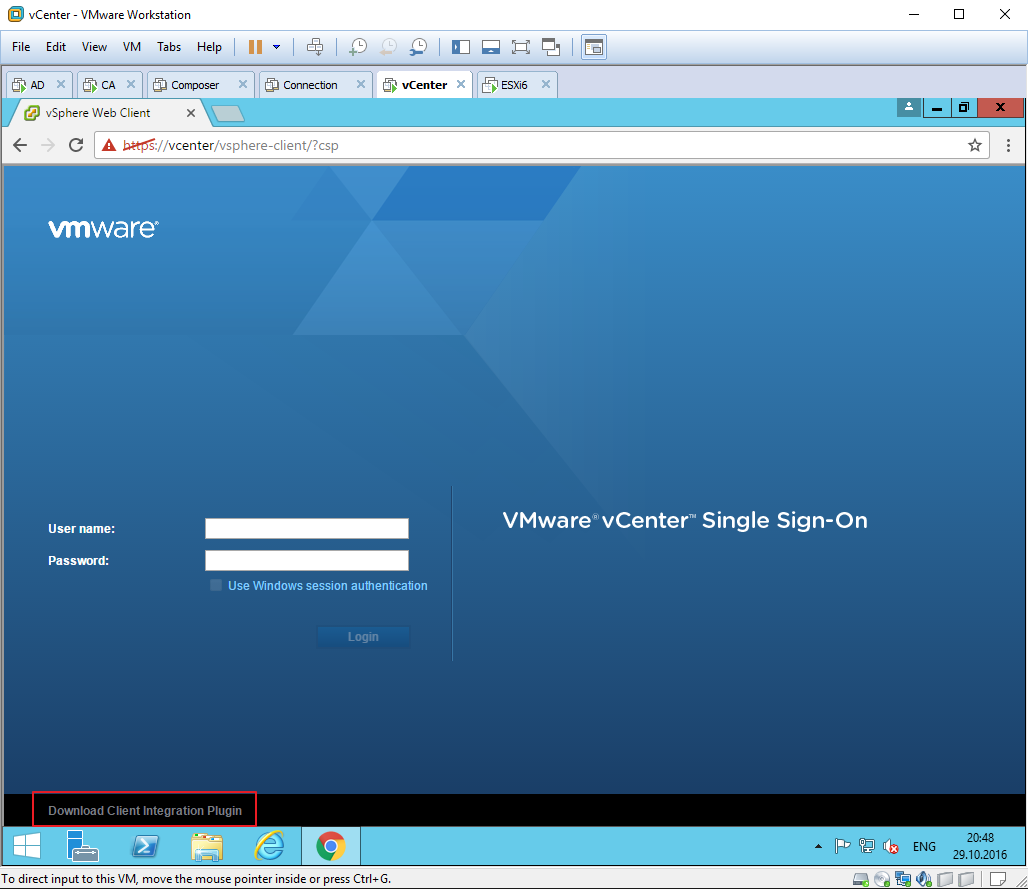
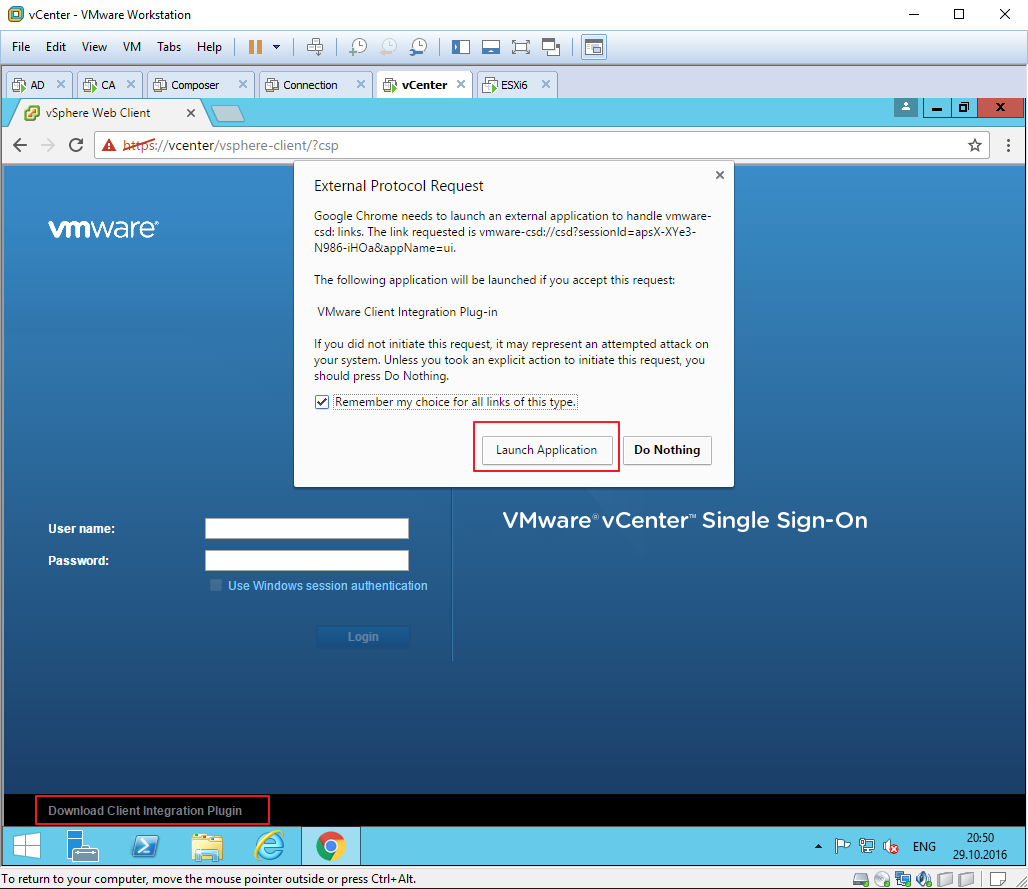
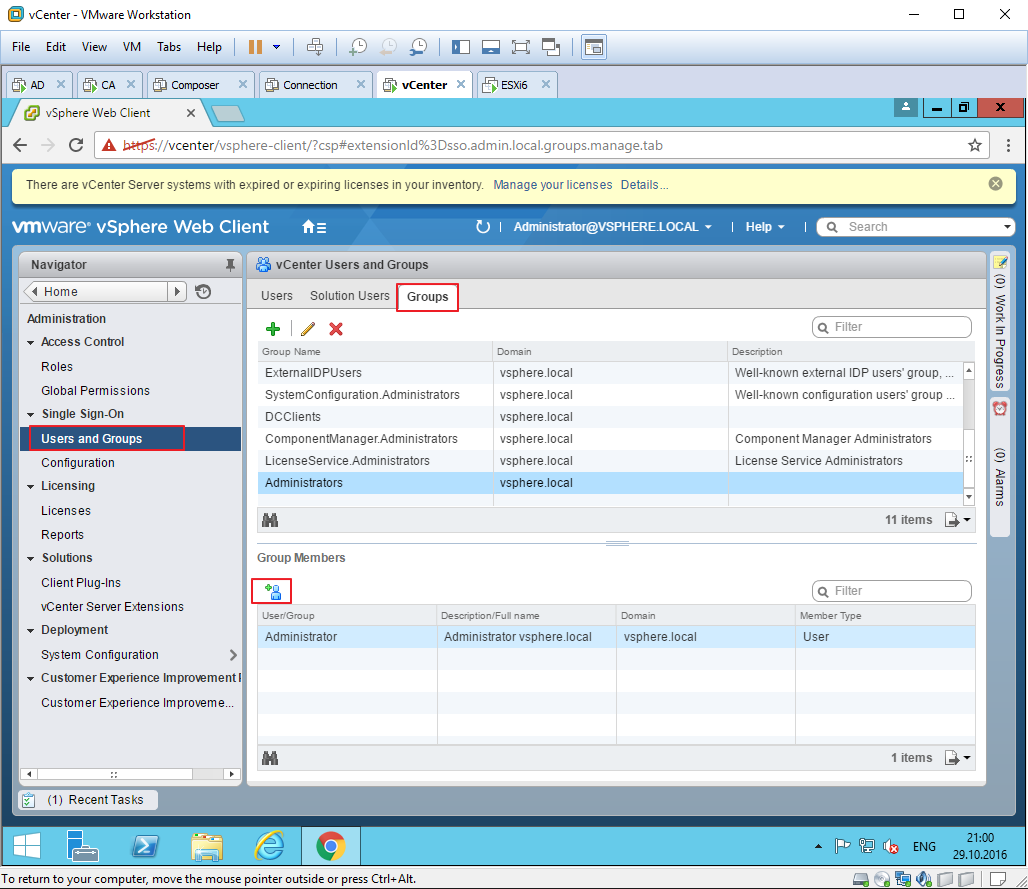
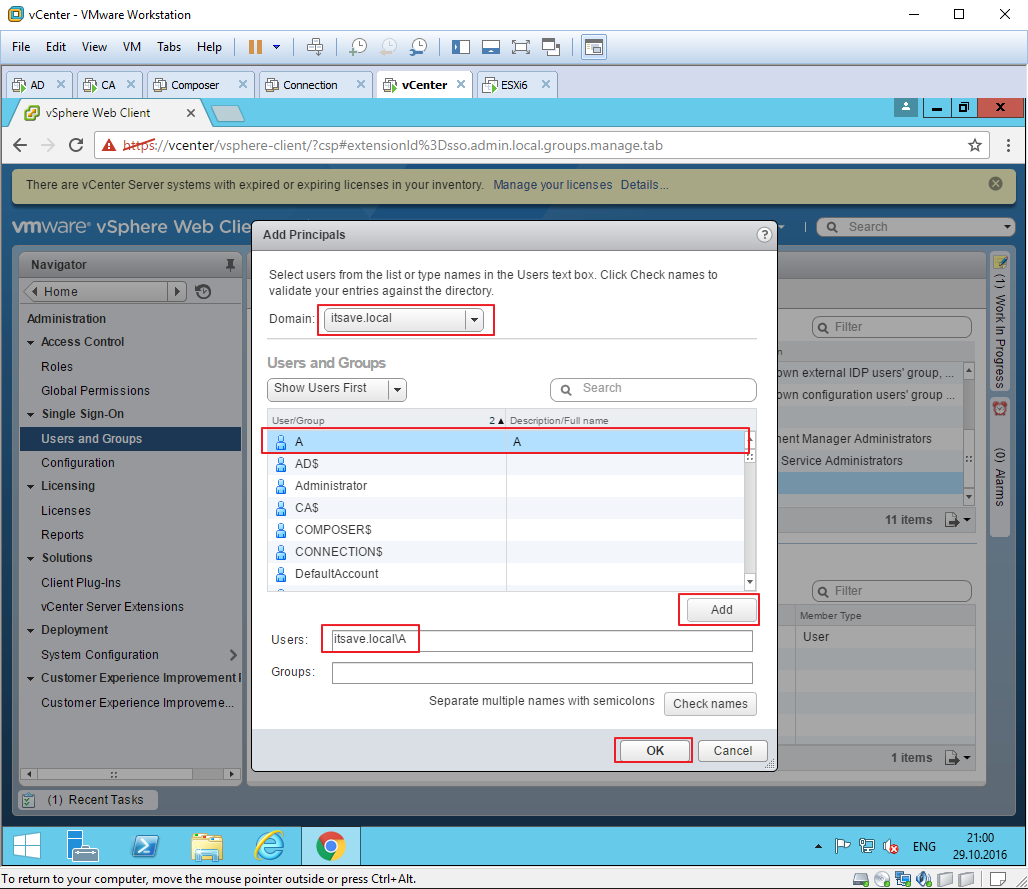
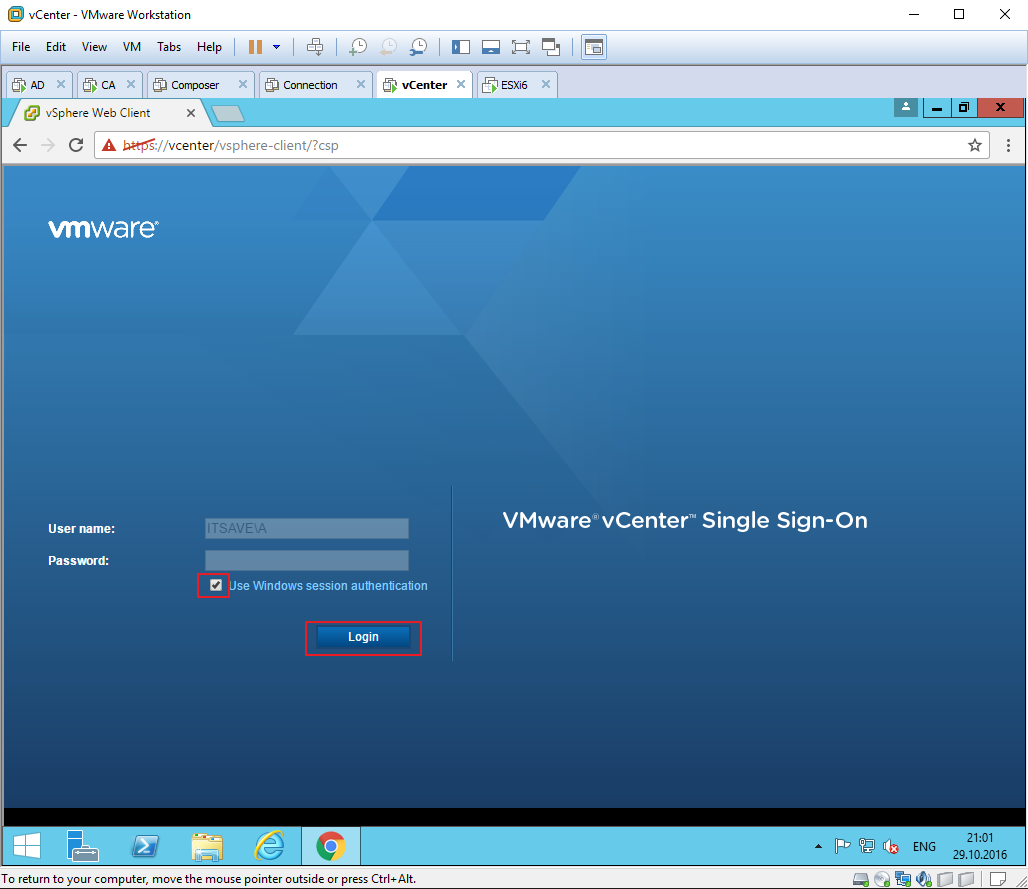
18 — 33 Первая задача дать права администратора доменной учетной записи a@itsave.local . Internet Explorer так и не дал мне доступ к Web клиенту vSphere, поэтому в пару кликов устанавливаю Google Chrome и перехожу по адресу https://vcenter.itsave.local/vsphere-client
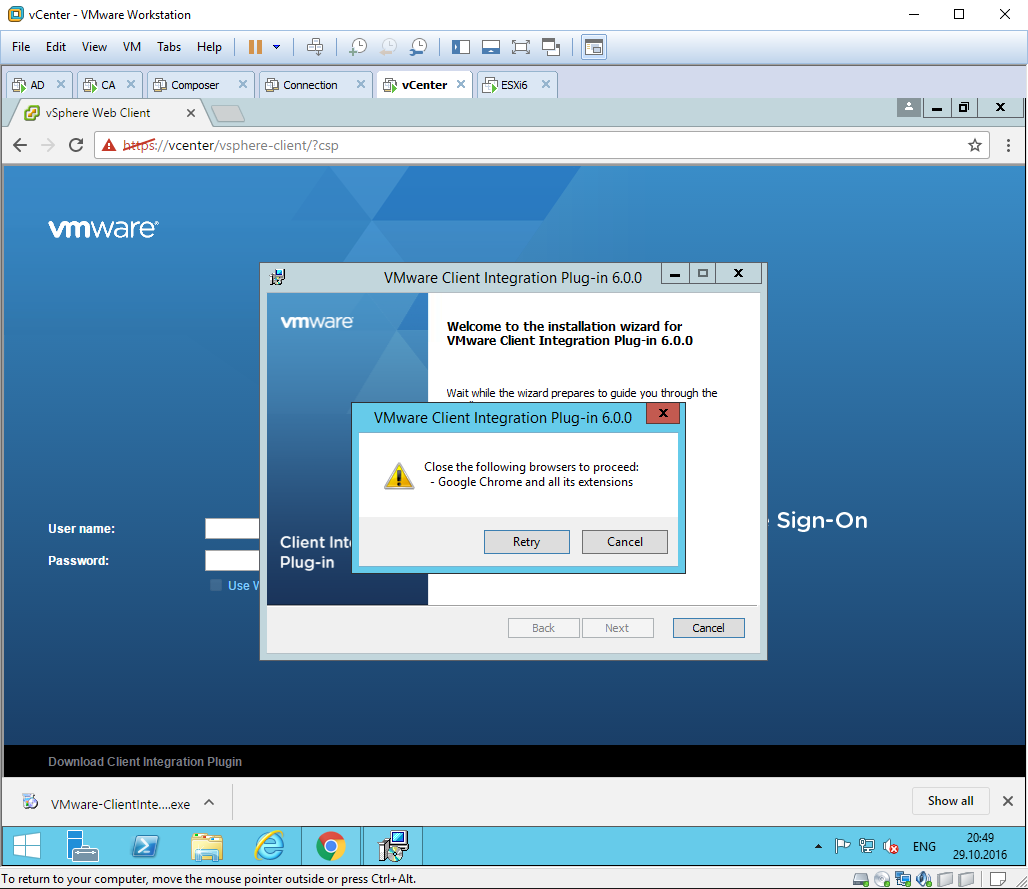
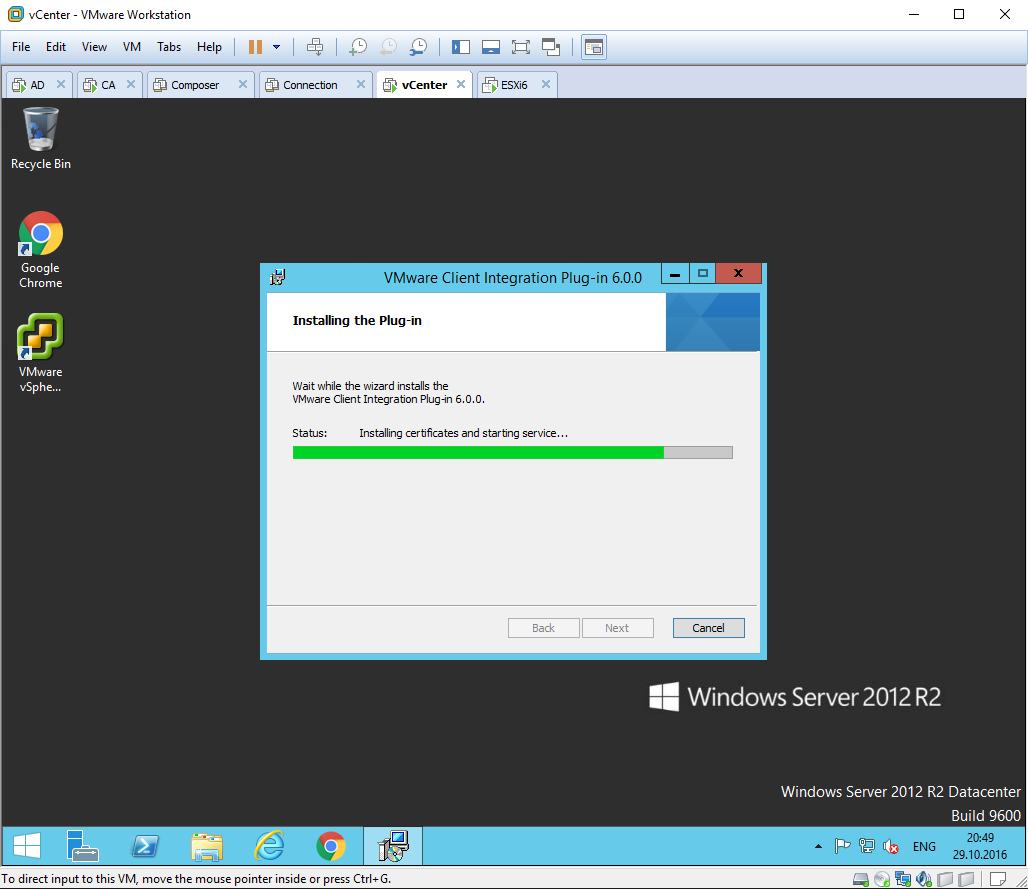
Для получения всех возможностей от работы с Web клиентом необходимо установить VMware Client Integration Plugin. Например, он нужен для того, чтобы иметь возможность передавать файлы на datastore с локального компьютера.
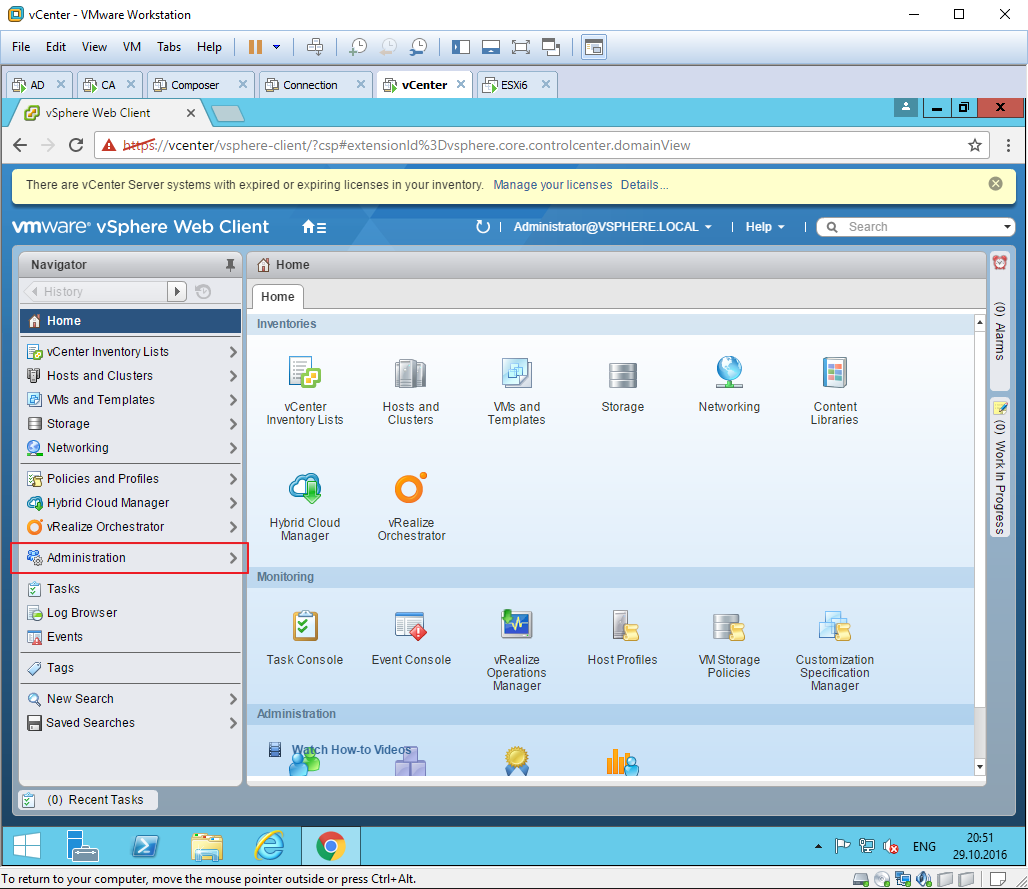
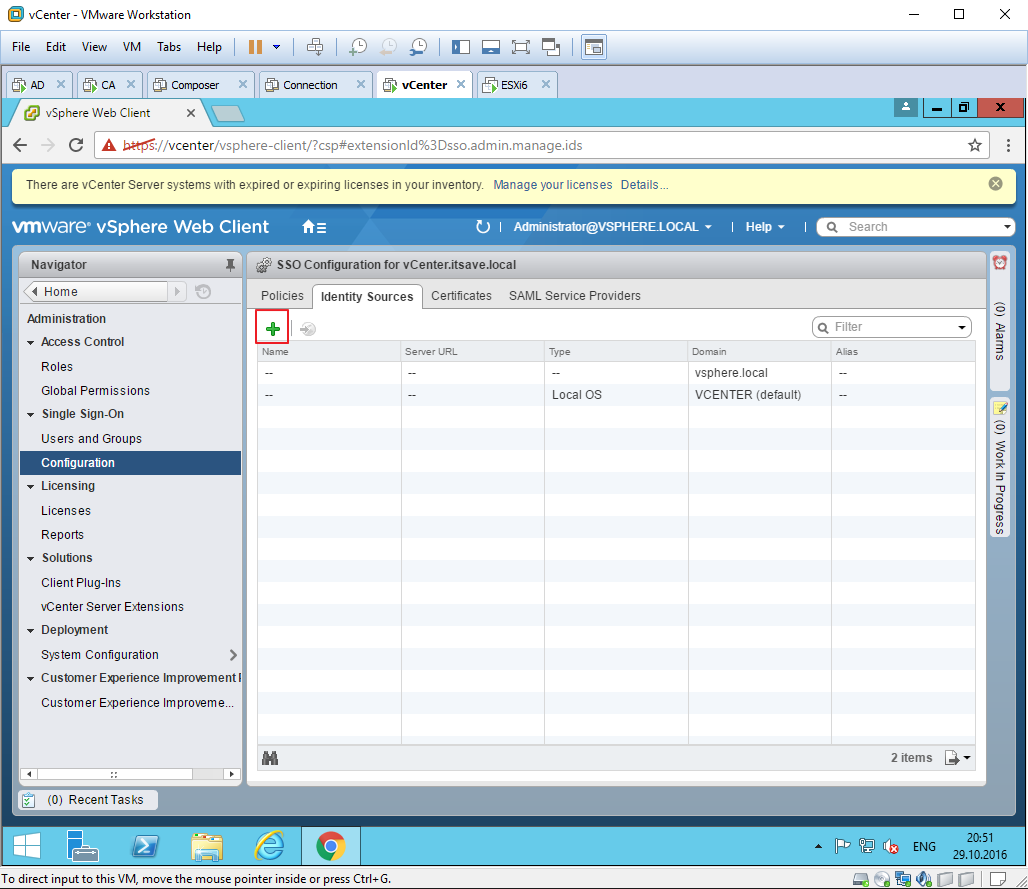
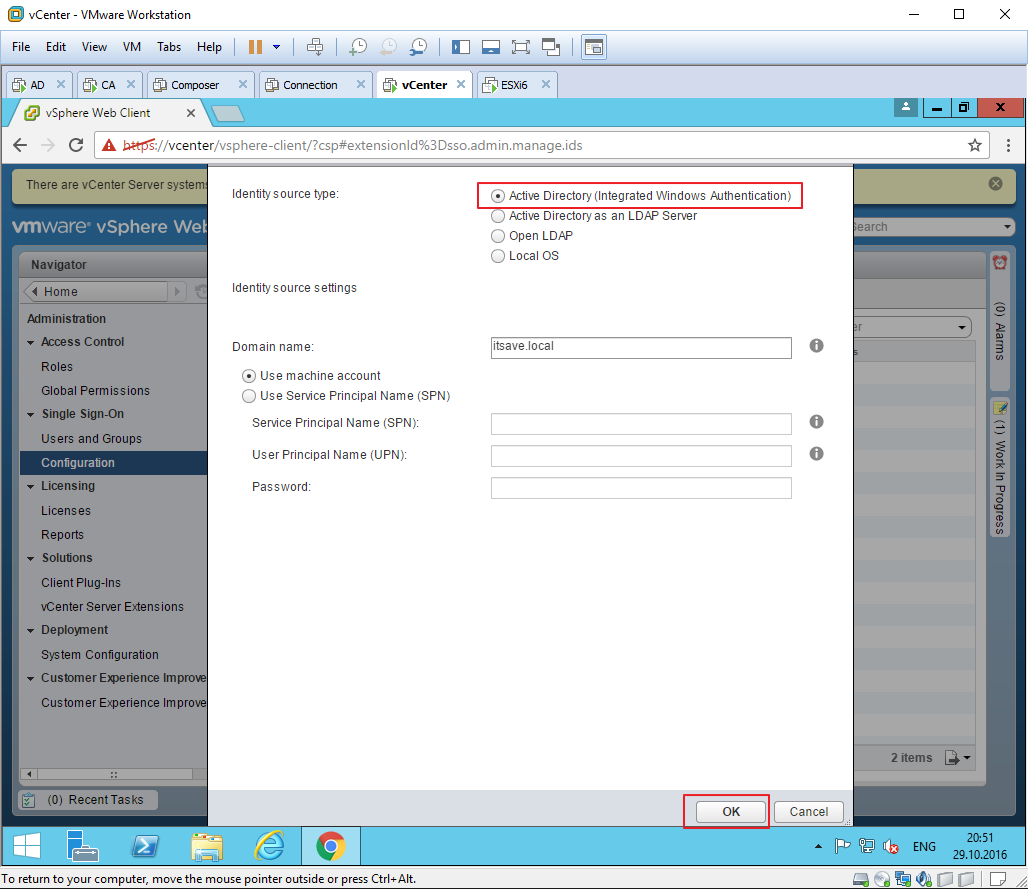
После установки плагина, входим под учетной записью administrator@vsphere.local В левом меню выбираем пункт Administration -> Configuration -> Identity Sources Для добавления домена itsave.local в качестве источника учетных записей, жмем на зеленый плюс.
После чего даю учетной записи доменного администратора роль глобального администратора vsphere.local и администратора vCenter server.
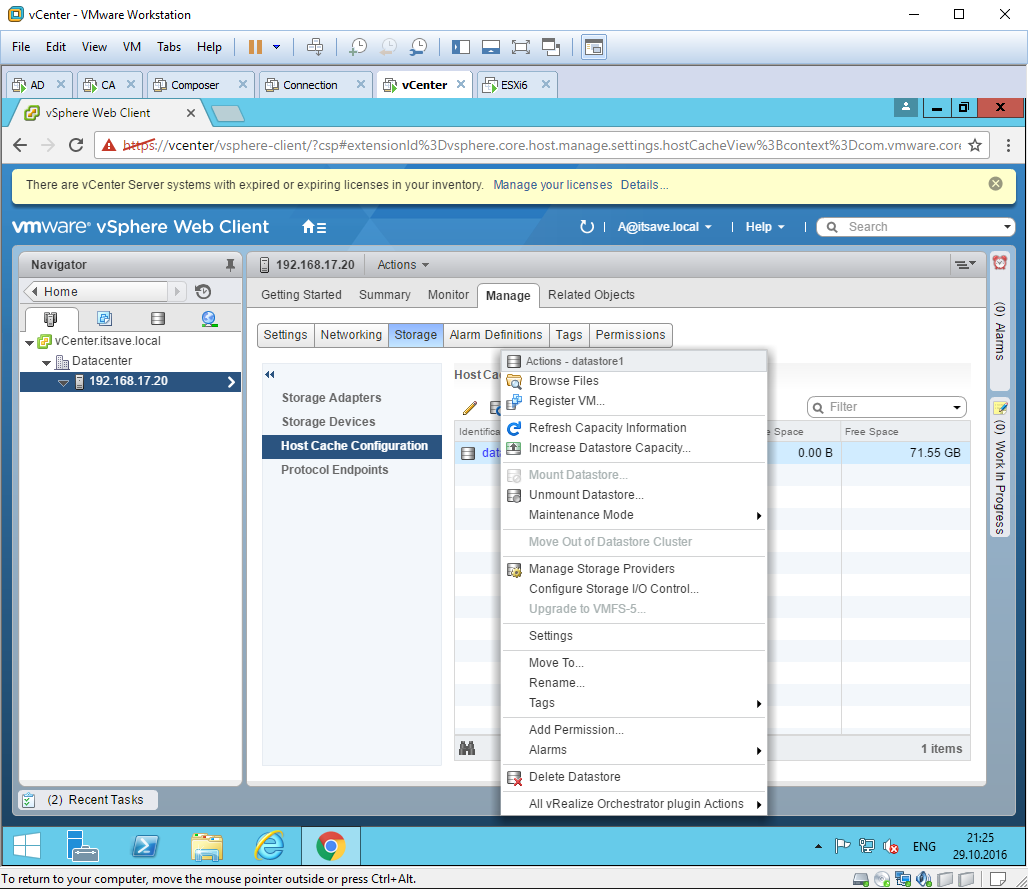
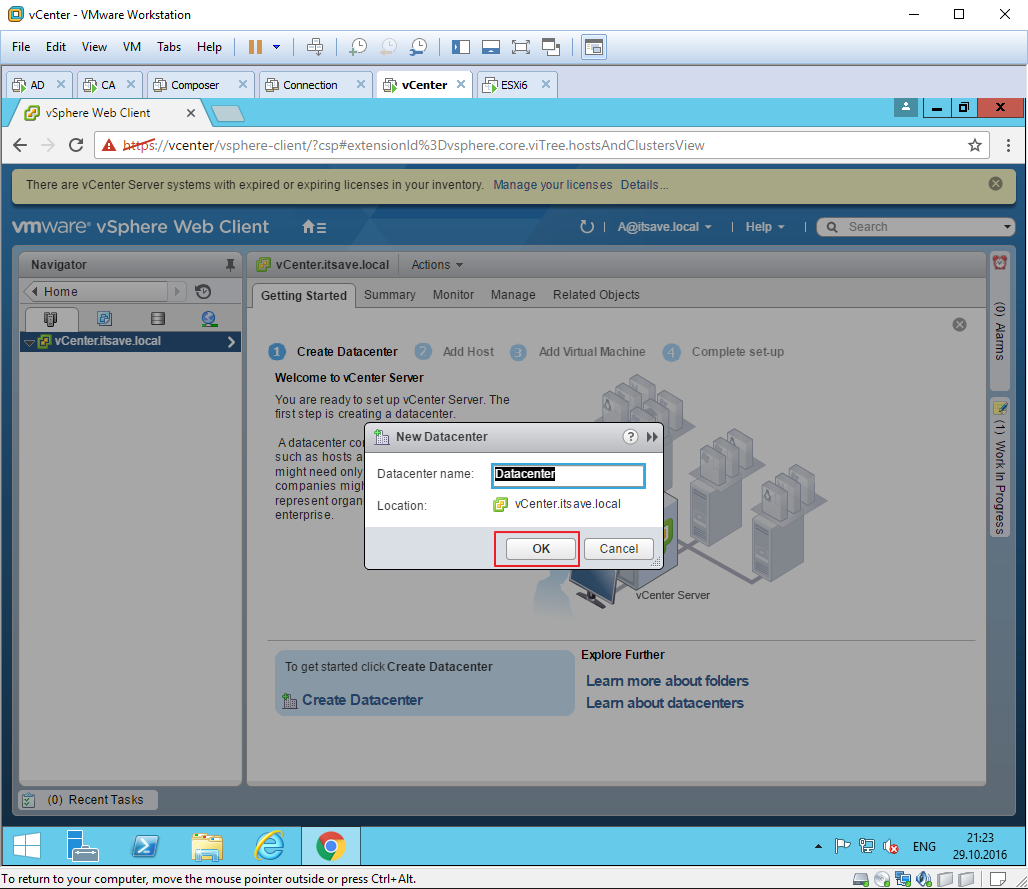
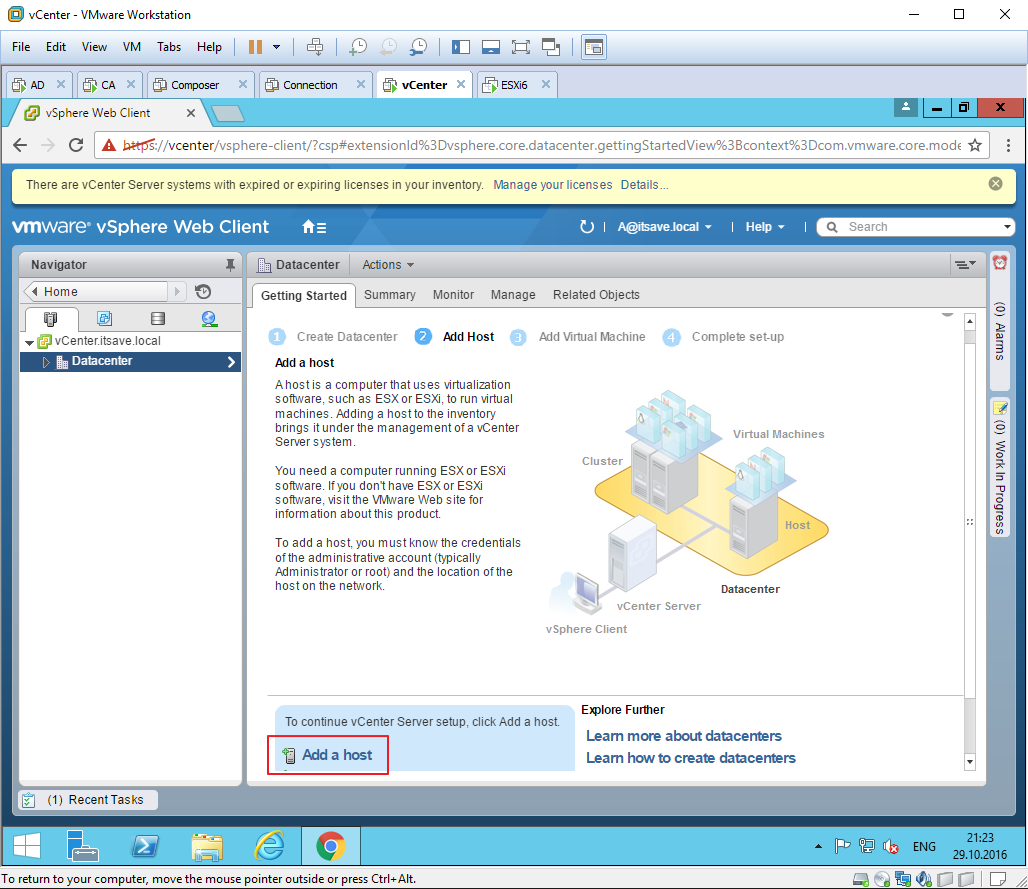
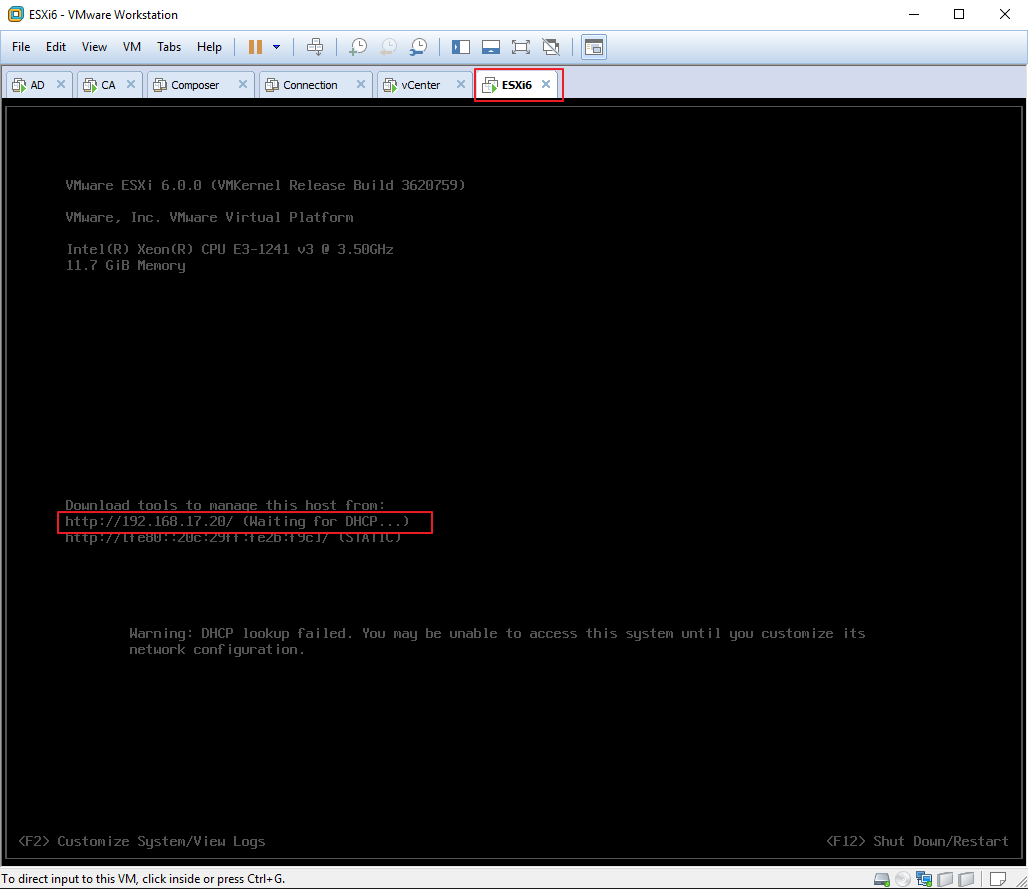
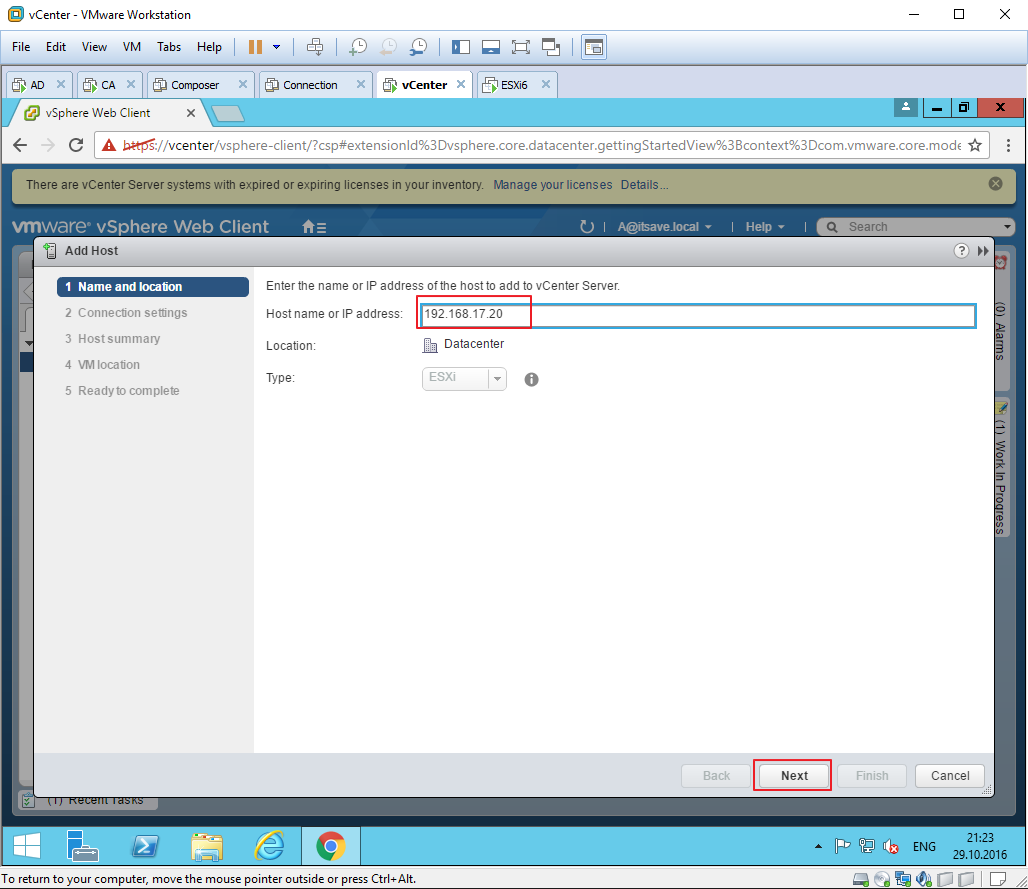
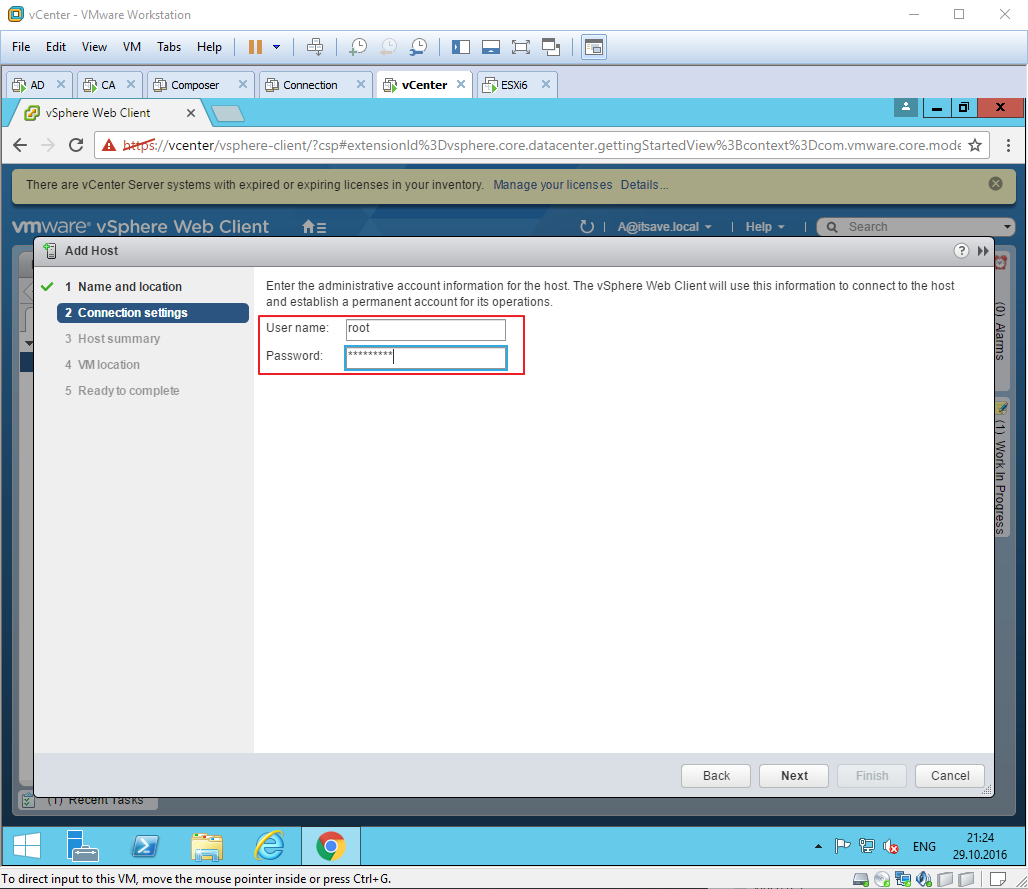
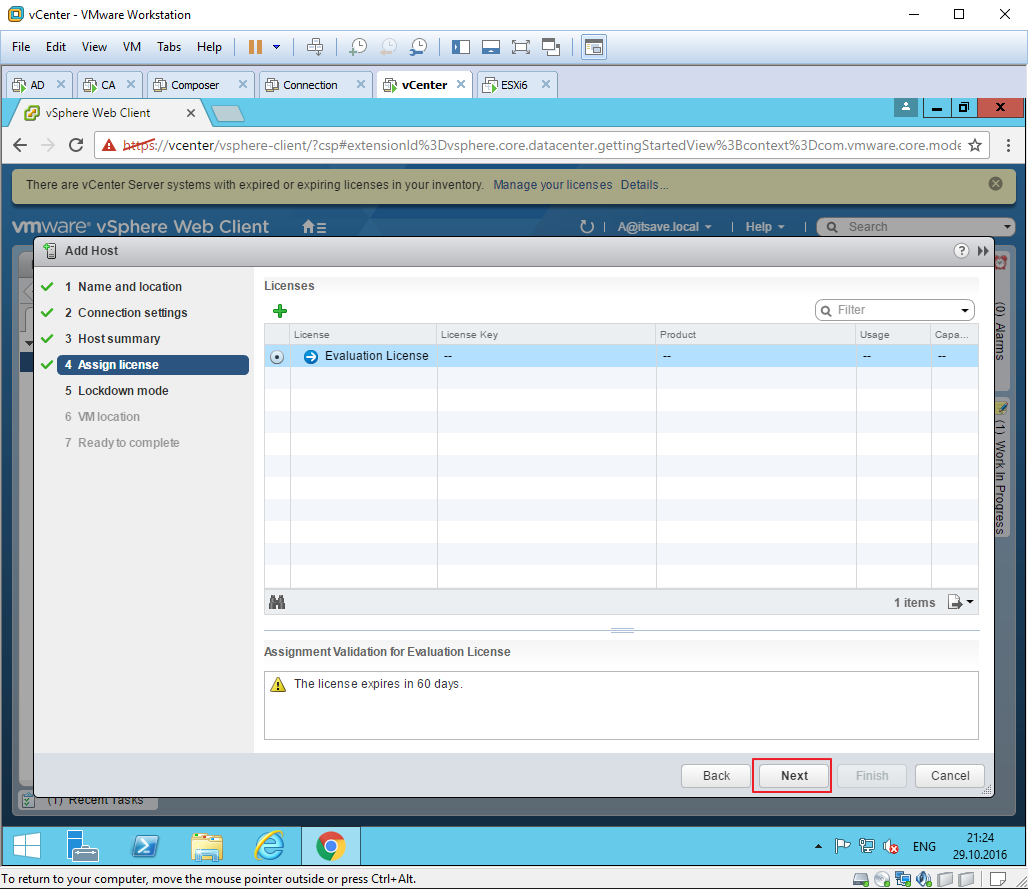
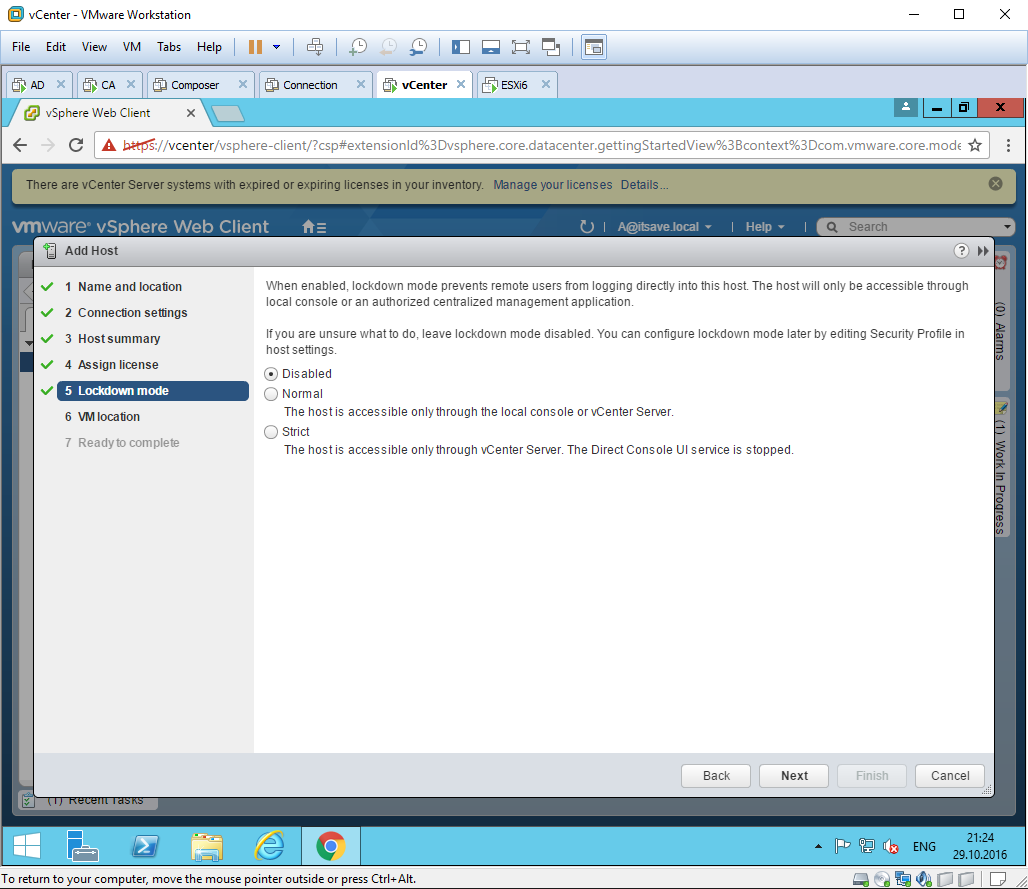
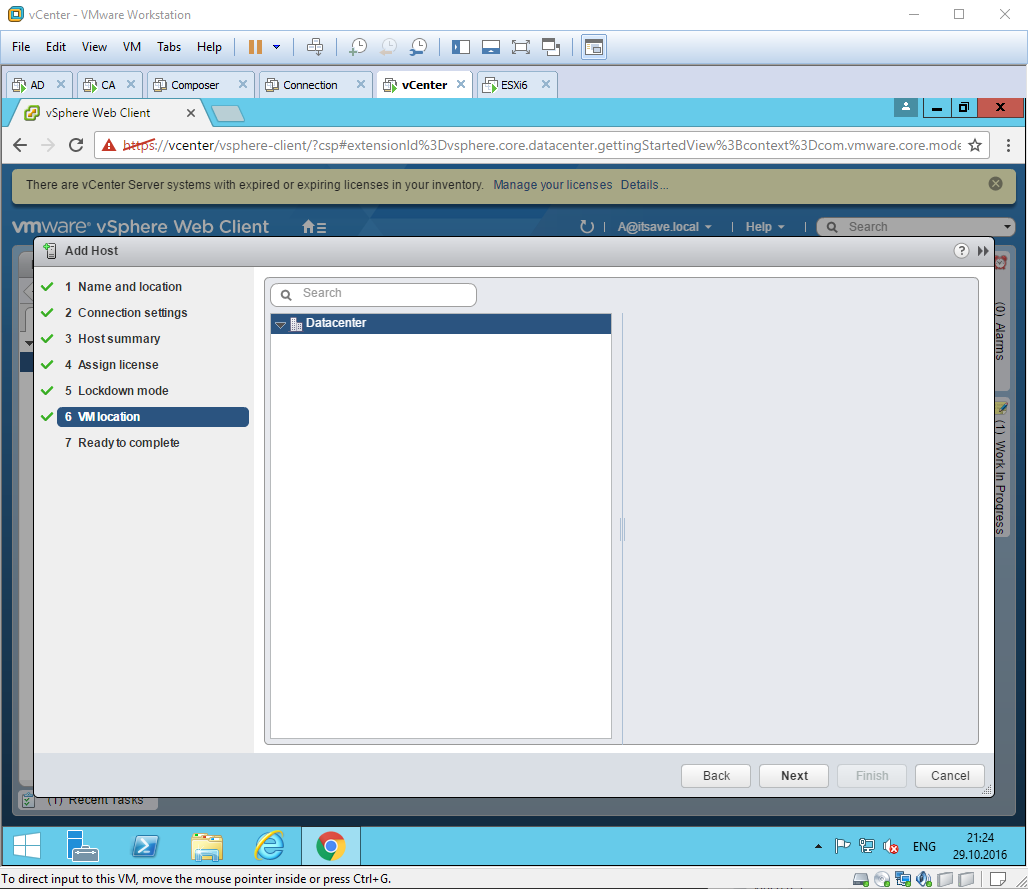
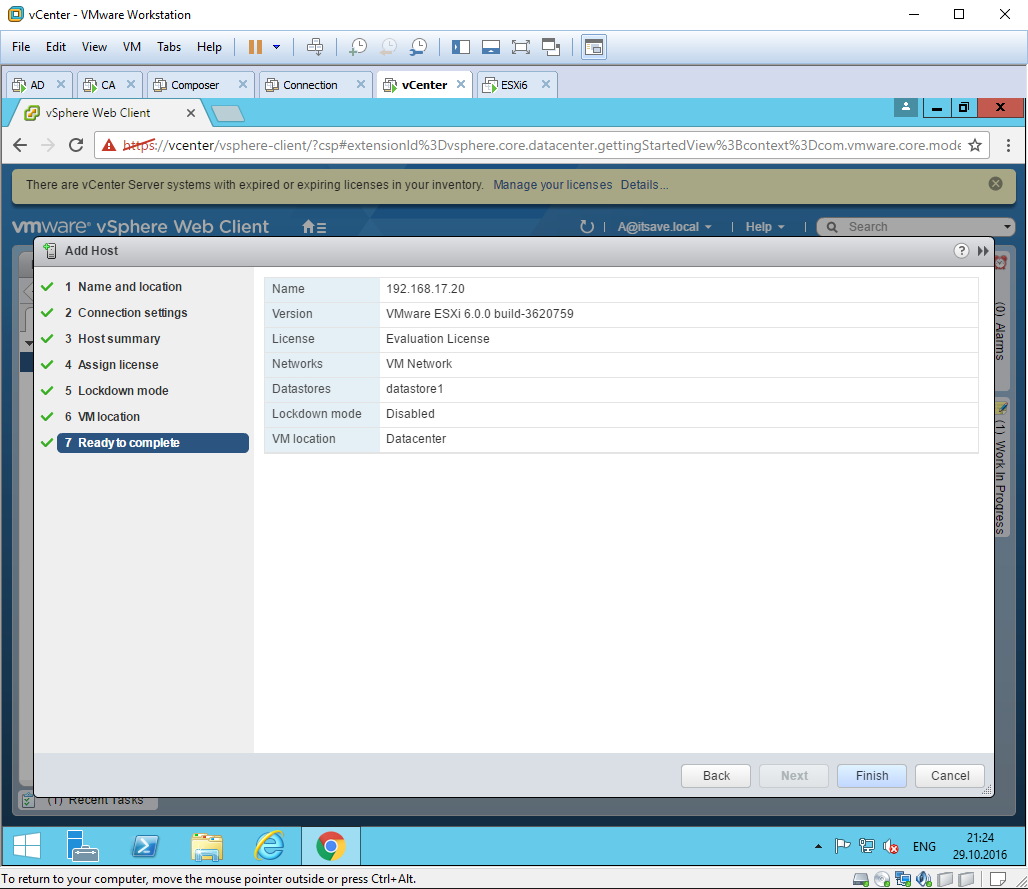
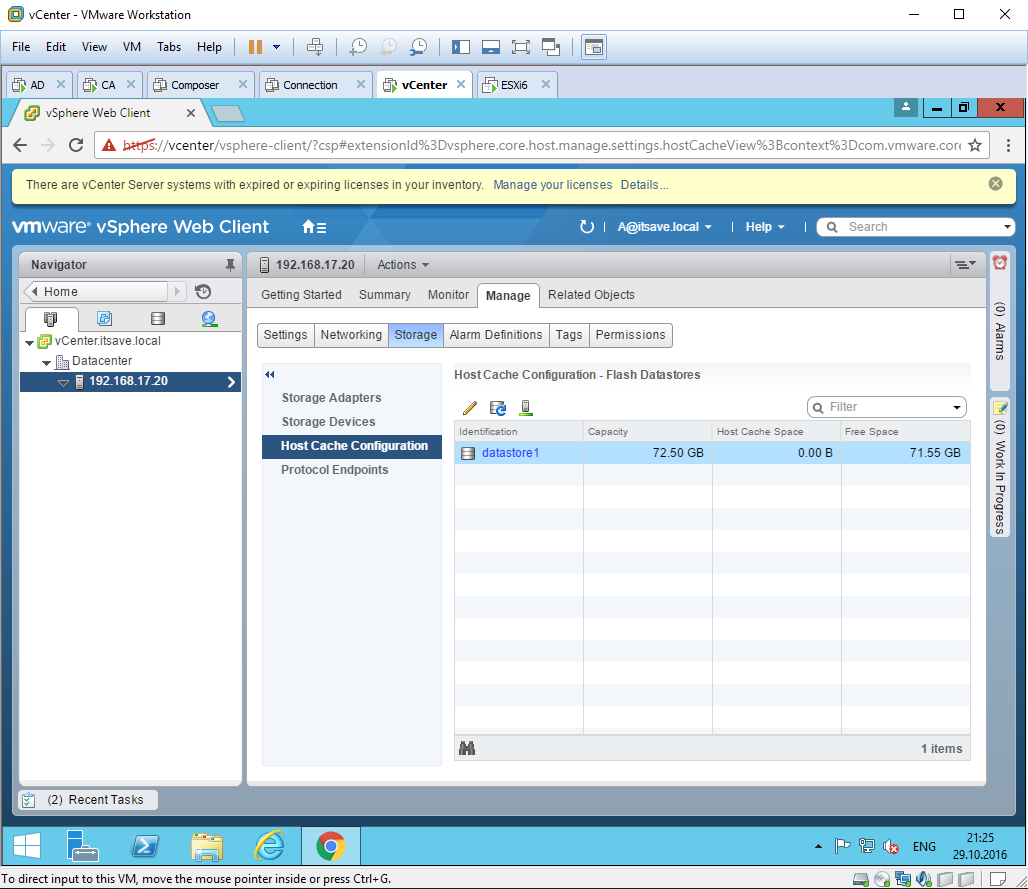
34 — 47 Логинимся под доменным администратором в vCenter serever. Добавляем хост ESXi через пункт меню Hosts and Clusters. Проверяю, что на хосте ESXi доступны 4 виртуальных ядра процессора, 12Gb оперативной памяти и локальное хранилище на 71Gb
1
2
3
4
5
6
7
8
9
10
11
12
13
14
15
16
17
18
19
20
21
22
23

24
25
26
27
28

29
30
31
32
33
34
35

36
37
38
39
40
41
42
43
44
45

46
47