
Прочитано: 1 341
Прорабатываю установку на виртуальную машину под управление Windows Server 2008 R2 Ent установленную из образа SW_DVD5_Windows_Svr_DC_EE_SE_Web_2008_R2_64Bit_English_w_SP1_MLF_X17-22580.iso утилит VMware Tools на хосте ESXi 7.0 Update 3 (ESXi-7.0U3b-18905247-standard (VMware, Inc.)), т.к. при проверке есть ли на всех хостах гипервизора VMware Tools столкнулся, что на VM с осью внутри Windows Server 2008 R2 не установлен пакет VMware Tools, а при попытке его установке установка выходит в ошибку, странно что я не разобрал ранее как победить ошибку, но ничего, разберемся.
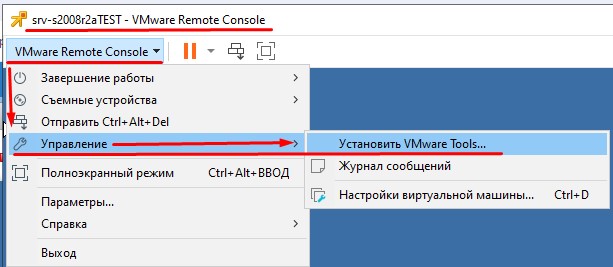
Через браузер подключаюсь к хосту srv-esxi03
https://srv-esxi03 - Username&Password (root&712mbddr@) и нажимаю Log in - Virtual Machines – нахожу свою VM, т.е. VM=srv-s2008r2aTEST – перехожу в Console - Launch remote console, затем VMware Remote Console - Управление - Установить VMware Tools
после чего в "Computer" появляется подмонтированный образ:
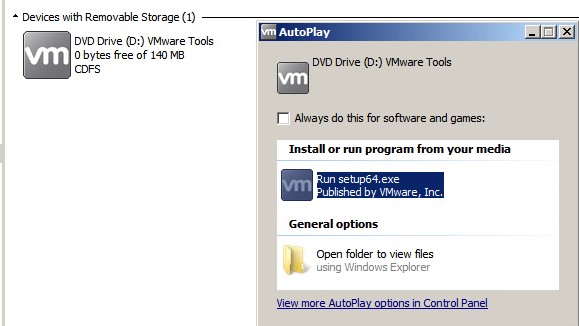
соглашаюсь с предложенным в окне, что нужно запустить setup64.exe, запускается мастер:
Welcome to the installation wizard for WMware Tools - 11.3.0.18090558
Нажимаю Next
Please select a setup type: выбираю Custom
и нажимаю Next
указываю что установить все компоненты
Toolbox
VMware Carbon Black HelperWMI Performance Logging
VMware Device Drivers
VMCI DriverAppDefenseNSX File Introspection DriverNSX Network Introspection Driver
Service DiscoveryDevice HelperShared Folders
SVGA DriverVMXNet3 NIC DriverParavirtual SCSIEFI Firmware UpdateMemory Control DriverPS2 Mouse DriverUSB Mouse DriverVMXNet NIC DriverAuto DriverVolume Shadow Copy Services Support
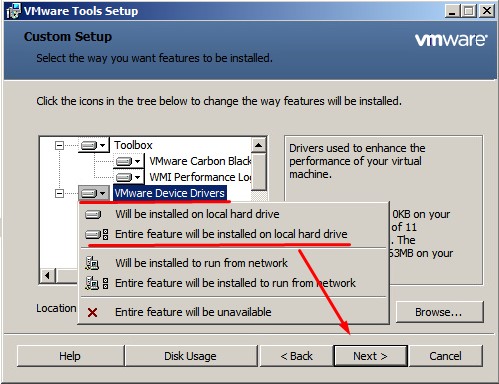
и нажимаю Next, Install
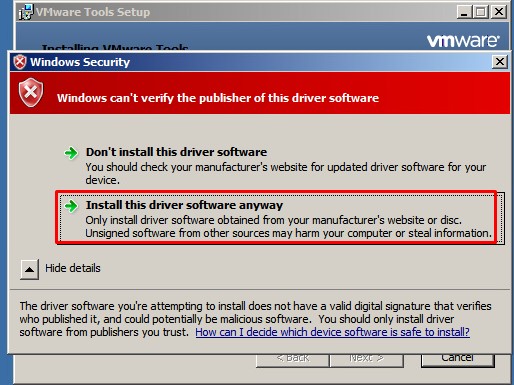
ожидаю
Install this driver software anyway: выбираю
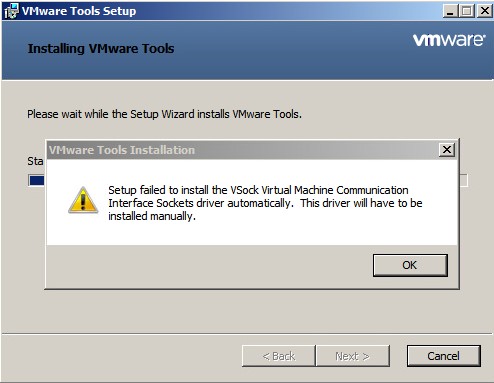
и получаю
Setup failed to install the VSock Virtual Machine Communication Interface Sockets driver automatically. This driver will have to be installed manually.
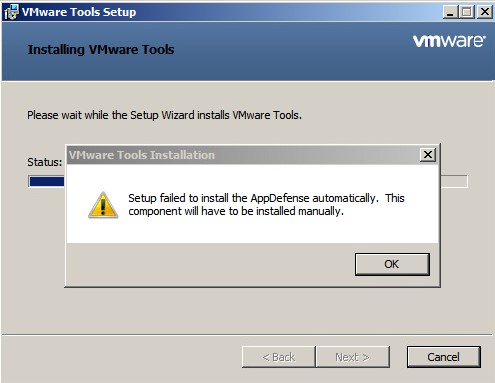
Setup failed to install the AppDefense automatically. This component will have to be installed manually.
VMware Tools Setup Wizard ended prematurely
WMware Tools Setup Wizard ended prematurely because of an error. Your system has not been modified. To install this program at a later time, run Setup Wizard again. Click the Finish button to exit the Setup Wizard.
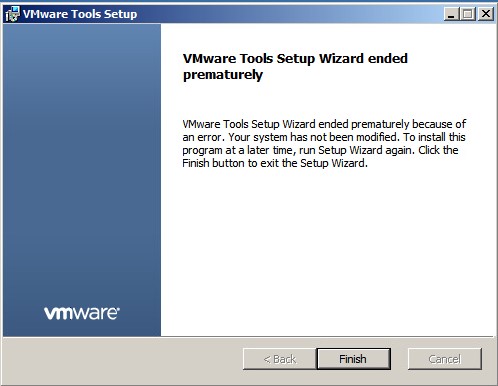
увы установка завершается ошибкой
Если при установке Vmware Tools на Windows Server 2008 R2 Ent у Вас такие же ошибки как у меня выше, значит в системе не хватает определенных пакетов KB, а именно:
KB4490628KB4474419
Скачиваем их с URL обращения: https://www.catalog.update.microsoft.com/search.aspx?q=kb4474419

На заметку: Скачать пакеты KB можно у меня: https://vpn.ekzorchik.ru/index.php/s/b6ptsIhElSqDSR0 - v7 - Server2008R2 – и внутри два msu файла.
и устанавливаем в систему с обязательной последующей перезагрузкой системы.
На заметку: чтобы установить данные пакеты служба Windows Update должна быть включена
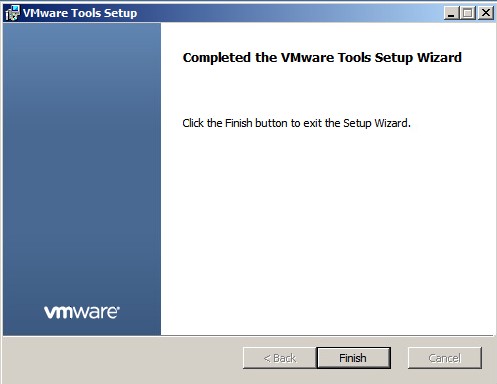
После заново проходим по этапам выше по установки VMware tools и вот в этот раз установка завершается успешно:
Completed the VMware Tools Setup Wizard
Нажимаю Finish и соглашаюсь что текущую систему для активации внесенных изменений нужно перезагрузить:
You must restart your system for the configuration changes made to VMware Tools to take effect. Click Yes to restart now or No if you plan to manually restart later.
Нажимаю Yes
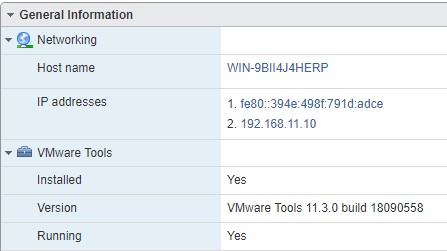
Теперь если при обращении через Web интерфейс к ESXi и последующему переходу в Virtual Machines - VM: srv-s2008r2aTEST я вижу IP адрес системы Windows Server 2008 R2 Ent и статус утилит VMware Tools
(Networking)
Host name: WIN-9BII4J4HERPIP address: fe80::394e:498f:791d:adce & 192.168.11.10
(VMware Tools)
Installed: YesVersion: VMware Tools 11.3.0 build 18090558Running Yes
Наличие VMware Tools даем мне возможность активировать AutoStart (Автозапуск) виртуальной машины после включения хоста если такое произошло, плюс понимание системой как работать в качестве виртуальной машины и многое другое.
На заметку: VMware Tools обязательно должны быть установлены и запущены на всех виртуальных машинах ESXi хоста.
На заметку: После установки KB пакетов службу Windows Updates можно выключить.
Итого: я столкнулся с проблемой и разобрал себе как ее решить в виде заметки где все указано от и до.
На этом прощаюсь, с уважением автор блога Олло Александр aka ekzorchik.
Утилита очистки диска (Disk Cleanup) позволяет администратору быстро очистить системный диск Windows Server, удалив ненужные и временные файлы, в том числе очистить каталог WinSxS от файлов устаревших компонентов, которые остались после установки обновлений. Утилита Disk Cleanup (cleanmgr.exe) по умолчанию уже установлена в графической версии Windows Server 2016/2019 (Desktop Experience), однако в предыдущих версиях Windows Server (2012 R2/ 2012/ 2008 R2) утилита cleanmgr.exe по-умолчанию отсутствует.
Содержание:
- Очистка диска с помощью Disk Cleanup в Windows Server 2016
- Очистка диска с помощью cleanmgr.exe из командной строки
- Запуск cleanmgr в Windows Server 2012 R2/ 2008 R2 без установки Desktop Experience
- Использование Disk Cleanup в Windows Server Core
Очистка диска с помощью Disk Cleanup в Windows Server 2016
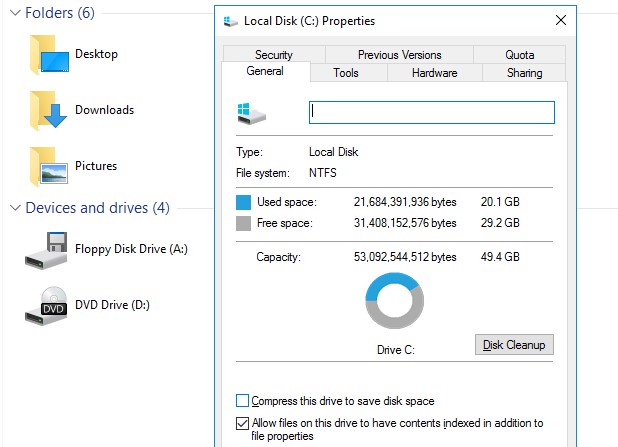
Чтобы очистить системный диск от ненужных файлов в Windows Server 2016 с помощью утилиты Disk Cleanup, нужно в File Explorer открыть свойства диска и нажать кнопку Disk Cleanup.
Также можно в поисковой строке набрать «disk cleanup» или cleanmgr.exe.
Выберите диск, который вы хотите очистить.
Дождитесь пока мастер очистки проверит ваш диск и найдет ненужные файлы, которые можно безболезненно удалить.
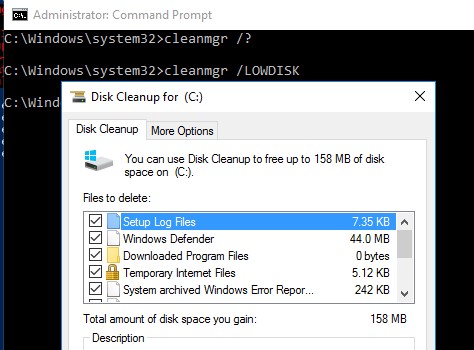
Вы можете выбрать компоненты, файлы которых можно удалить. Вам предлагается удалить следующие временные файлы:
- Setup Log Files
- Downloaded Program Files
- Temporary Internet Files
- Recycle Bin
- Temporary files
- Thumbnails
Чтобы удалить ненужные системные файлы нажмите на кнопку Clean up system files.
Дополнительно предлагается очистить:
- Устаревшие файлы Windows Defender
- System archived Windows Error Reporting (каталог C:\ProgramData\Microsoft\Windows\WER\ReportQueue)
- System queued Windows Error Reporting
- Device driver packages
- Windows Update Cleanup — при этом выполняется очистка хранилища компонентов в каталоге WinSxS. Удаляются старые версии компонентов, которые остались после установки обновленных версий.
Выберите нужные опции, при этом Disk Cleanup покажет количество места, которое освободится. Нажмите Ок и подтвердите удаление временных файлов.
Дождитесь, пока утилита cleanmgr.exe удалит ненужные файлы.
Очистка диска с помощью cleanmgr.exe из командной строки
Утилита
cleanmgr.exe
имеет различные параметры командной строки, которые позволяют использовать ее в различных сценариях автоматической очистки системного диска. Их можно использовать как в Windows Server, так и на рабочих станциях пользователей с Windows 10.
cleanmgr [/d driveletter] [/SAGESET:n | /SAGERUN:n | TUNEUP:n | /LOWDISK | /VERYLOWDISK | /SETUP | /AUTOCLEAN]
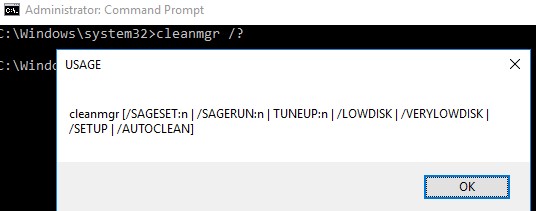
Ключ
/AUTOCLEAN
используется для очистки старых файлов, оставшихся после апгрейда билда Windows. Параметр
/SETUP
позволяет удалить файлы, оставшиеся от предыдущей версии Windows (если вы выполняли in-place upgrade).
Команда
cleanmgr /LOWDISK
– запускает графический интерфейс Disk Cleanup с уже выбранными параметрами очистки.
Команда
cleanmgr /VERYLOWDISK
выполняет автоматическую очистку, а после окончания оторажает информацией о выполненных действиях и свободном месте.
You have successfully resolved the low disk space condition. Your C:\ volume now has 10000 Mb of free space remaining.
С помощью параметров
/sageset:n
и
/sagerun:n
вы можете создать и выполнить настроенный набор параметров очистки.
Например, выполните команду
cleanmgr /sageset:11
. В открывшемся окне выберите компоненты и файлы, которые нужно автоматически очищать (я выбрал все опции).
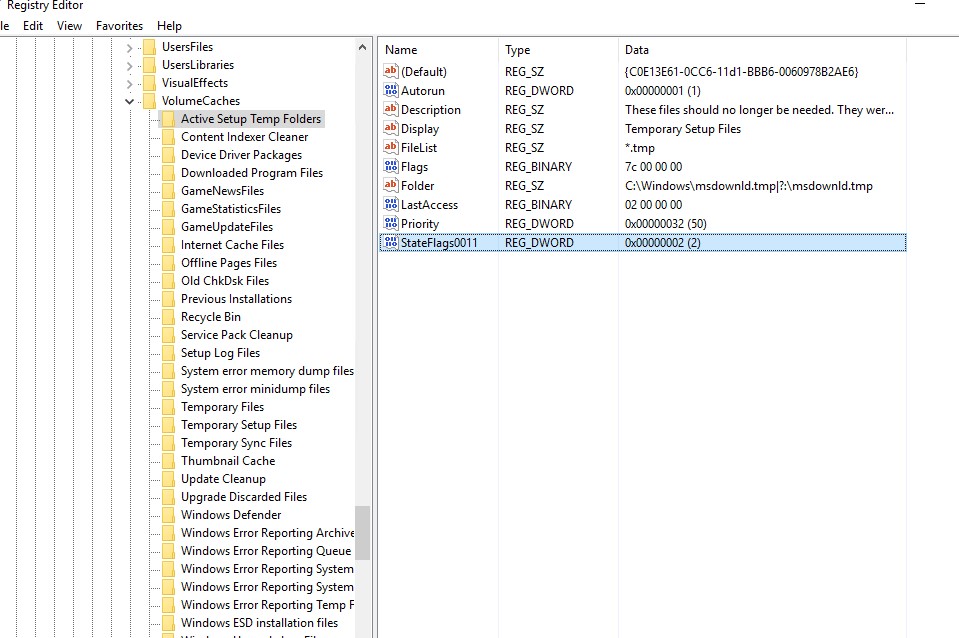
Эти настройки сохраняются в ветке реестра HKEY_LOCAL_MACHINE\SOFTWARE\Microsoft\Windows\CurrentVersion\Explorer\VolumeCaches. В этой ветке перечислены все компоненты Windows, которые можно очистить с помощью Disk Cleanup. Для каждой опции, которую вы выбрали создается параметр типа DWORD с именем StateFlags0011 (
0011
это число, которое вы указали в параметре sageset).
Чтобы запустить процесс очистки с выбранными параметрами, выполните команду:
cleanmgr /sagerun:11
Если вам нужно настроить автоматическую очистку дисков на компьютерах (или серверах) в домене, вам достаточно экспортировать эту ветку реестра и распространить ее через GPO.
Для автоматического запуска очистки системного диска на рабочих станциях с Windows 10 можно создать задание в планировщике со следующим PowerShell скриптом:
Start-Process -FilePath CleanMgr.exe -ArgumentList '/sagerun:11' -WindowStyle Hidden -Wait
Запуск cleanmgr в Windows Server 2012 R2/ 2008 R2 без установки Desktop Experience
В Windows Server 2012 / R2 и 2008 /R2 по умолчанию не установлена утилита очистки диска Disk Cleanup (cleanmgr.exe). Чтобы воспользоваться утилитой cleanmgr сначала нужно установить отдельный компонент сервера Desktop Experience (Возможности рабочего стола) с помощью Server Manager или PowerShell (
Install-WindowsFeature Desktop-Experience
).
Но вместе с Desktop Experience устанавливается множество других компонентов, которые абсолютно не нужны на сервере:
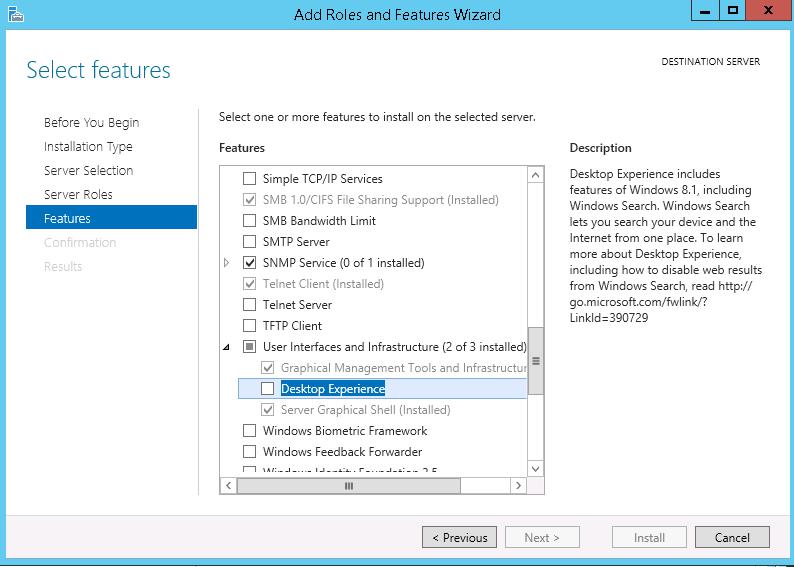
- Windows Media Player
- Темы рабочего стола
- Поддержка AVI для Windows
- Windows SideShow
- Windows Defender
- Disk Cleanup
- Sync Center
- Запись звука
- Character Map
- Snipping Tool
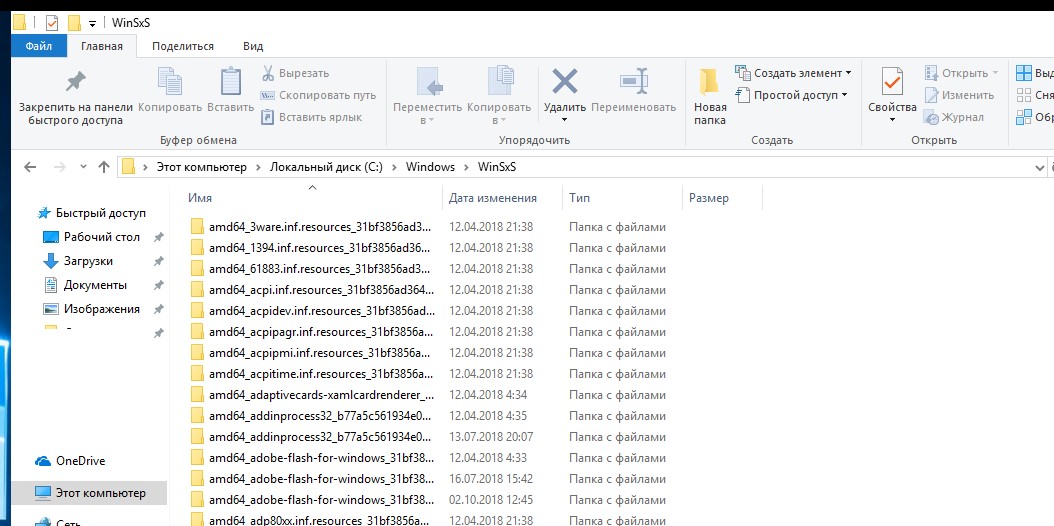
Для запуска мастера очистки дисков в Windows Server можно воспользоваться более простым методом: достаточно скопировать в системный каталог два файла из каталога WinSxS: Cleanmgr.exe и Cleanmgr.exe.mui. Ниже представлены команды для копирования файлов cleanmgr из каталога WinSxS для разных версий Windows Server (во всех случаях используется путь для английских редакций ОC).
| ОС | Команда копирования файлов cleanmgr |
| Windows Server 2008 R2 x64 |
copy C:\Windows\winsxs\amd64_microsoft-windows-cleanmgr_31bf3856ad364e35_6.1.7600.16385_none_c9392808773cd7da\cleanmgr.exe C:\Windows\System32\
|
| Windows Server 2008 x64 |
copy C:\Windows\winsxs\amd64_microsoft-windows-cleanmgr_31bf3856ad364e35_6.0.6001.18000_none_c962d1e515e94269\cleanmgr.exe C:\Windows\System32\
|
| Windows Server 2012 x64 |
copy C:\Windows\WinSxS\amd64_microsoft-windows-cleanmgr_31bf3856ad364e35_6.2.9200.16384_none_c60dddc5e750072a\cleanmgr.exe C:\Windows\System32\
|
Windows Server 2012 R2 x64
Рассмотренный выше трюк не работает в Windows Server 2012 R2 из-за изменений, внесенных обновлением KB2821895. Дело в том, что после установки данного обновления для хранения бинарных файлов компонентов стала использоваться компрессия. При попытке запустить скопированный cleanmgr.exe появляется ошибка:
The Program or feature \??\C:\Windows\system32\cleanmgr.exe cannot start or run due to incompatibility with 64-bit version of Windows
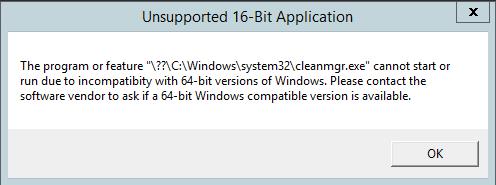
В качестве обходного решения можно воспользоваться такой методикой:
- Установить компонент Windows Desktop Experience:
Install-WindowsFeature Desktop-Experience - Перезагрузить сервер;
- Скопировать файлы %windir%\system32\cleanmgr.exe и %windir%\system32\en-US\cleanmgr.exe.mui в произвольный каталог (c:\temp)
- Удалить компонент:
Uninstall-WindowsFeature Desktop-Experience - Перезагрузка;
- Скопировать файлы cleanmgr.exe и cleanmgr.exe.mui в указанные выше каталоги
В дальнейшем эти два файла можно скопировать и на все другие сервера или интегрировать в шаблоны виртуальных машин с Windows Server 2012 R2.
Ссылка на скачивание готового комплекта файлов cleanmgr.exe.mui + cleanmgr.exe для Windows Server 2012 R2 на ЯндексДиске (thks Alex Kornev).
Для запуска утилиты очистки диска теперь достаточно выполнять с правами администратора команду
cleanmgr.exe
.

Совет. Для очистки устаревших файлов компонентов, оставшихся после установки обновлений, в Windows Server R2 можно воспользоваться командой DISM:
dism.exe /online /Cleanup-Image /StartComponentCleanup /ResetBase
В Windows Server 2008 R2, чтобы cleanmgr могла удалять устаревшие файлы обновлений нужно установить отдельный патч KB2852386.
Использование Disk Cleanup в Windows Server Core
В Windows Server Core 2016, в котором отсутствует полноценный графический интерфейс, утилита Disk Cleanup также не установлена. Если вы хотите использовать cleanmgr.exe для очистки диска в Server Core, достаточно скопировать следующие файлы из каталога WinSXS:
copy C:\Windows\WinSxS\amd64_microsoft-windows-cleanmgr_31bf3856ad364e35_10.0.14393.0_none_9ab8a1dc743e759a\cleanmgr.exe C:\Windows\System32\
copy C:\Windows\WinSxS\amd64_microsoft-windows-cleanmgr.resources_31bf3856ad364e35_10.0.14393.0_en-us_8b4adb68af596a23\cleanmgr.exe.mui C:\Windows\System32\en-US\
В этой статье мы поговорим о каталоге WinSxS в Windows, причинах его постоянного роста и способах очистки. Каталог C:\windows\WinSxS является хранилищем компонентов Windows. В этом каталоге хранятся dll библиотеки, бинарные и xml файлы, необходимые для установки и работы различных ролей и компонентов Windows. Каждый раз когда вы устанавливаете обновления Windows (это происходит ежемесячно), новая версия обновляемого компонента устанавливается в систему, а старая сохраняется в хранилище компонентов WinSxS (это необходимо для обеспечения совместимости и возможности “отката“ к старым версиям компонентов при удалении проблемного обновления).
Со временем размер каталога WinSxS постоянно увеличивается. Причем его размер ничем не ограничен (хотя на практике размер папки WinSxS в Windows 10 редко превышает 15-20 Гб.)
В этой статье мы рассмотрим наиболее безвредные способы очистки папки WinSxS в Windows 10 и Windows Server.
- Оптимизация хранилища компонентов и удаление старых версий компонентов, оставшихся после установки обновлений Windows;
- Технология Features on Demand (функции по требованию), позволяющая удалить неиспользуемые компоненты Windows с диска;
- Сжатие файлов в папке WinSxS – способ уменьшить размер каталога WinSxS за счет включения NTFS компрессии.
У многих пользователей возникает естественный вопрос можно ли вручную удалить файлы из папки WinSxS. Ответ на этот вопрос – категоричное НЕТ! Такими действиями с большой долей вероятности вы сломаете свою Windows. И хотя отдельные попытки удаления конкретных файлов из папки WinSxS могут быть удачными, рекомендовать этот способ нельзя.
Содержание:
- Как узнать реальный размер папки WinSxS в Windows 10?
- Очистка хранилища компонентов WinSxS в Windows
- Удаление неиспользуемых компонентов Windows (Windows Server)
- Включаем NTFS сжатие на папке WinSxS в Windows
Как узнать реальный размер папки WinSxS в Windows 10?
Самый простой способ получить текущий размер каталога WinSxS в Windows, запустить проводник File Explorer и открыть свойства папки %windir%\WinSxS (или воспользоваться скриптом PowerShell). Но имейте в виду, что большинство файловых менеджеров (в том числе File Explorer) показывают несколько больший размер каталога WinSxS, чем он занимает на диске.
Дело в том, что в каталоге WinSxS есть большое количество hard links (жестких символических ссылок) на файлы в других системных каталогах. Файловые менеджеры при подсчете размера папки WinSxS учитывают объем файлов, на которые ссылаются жесткие ссылки, а это не корректно.
Чтобы реальный (без учета жестких ссылок) размер папки WinSxS, воспользуйтесь утилитой SysInternal du:
du -v c:\windows\winSXS
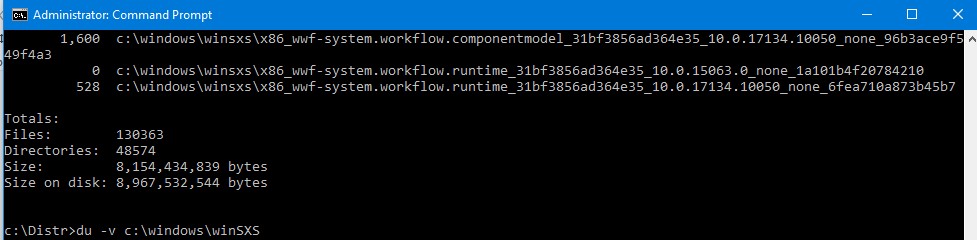
Но проще всего проанализировать размер хранилища компонентов в папке WinSxS с помощью команды DISM:
Dism.exe /Online /Cleanup-Image /AnalyzeComponentStore
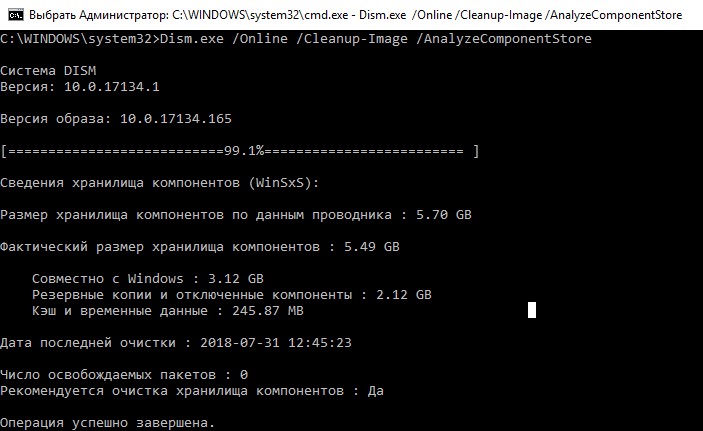
Разберемся, что возвращает данная команда:
Размер хранилища компонентов по данным проводника : 5.70 GB (это размер хранилища с учета жестких ссылок, который отображается в проводнике)
Фактический размер хранилища компонентов : 5.49 GB (реальный размер хранилища компонентов за исключением жестких ссылок)
Совместно с Windows : 3.12 GB (обязательные файлы системы, не могут быть удалены)
Резервные копии и отключенные компоненты : 2.12 GB (устаревшие файлы компонентов, которые нужны на случай проблем с установленными обновлениями)
Кэш и временные данные : 245.87 MB (файлы используются для ускорения работы системы обслуживания)
Дата последней очистки : 2018-07-31 12:45:23
Число освобождаемых пакетов : 10 (файлы, которые обновились после установки обновлений Windows, они будут удалены при очистке хранилища)
Рекомендуется очистка хранилища компонентов : Да
Как вы видите, в данном случае можно уменьшить размер каталога WinSxS на 2.1 Гб + 250 Мб.
Очистка хранилища компонентов WinSxS в Windows
Самый быстрый и простой способ освободить место в хранилище компонентов Windows (т.е. очистить папку WinSxS) – оптимизация хранилища командой:
Dism.exe /Online /Cleanup-Image /StartComponentCleanup
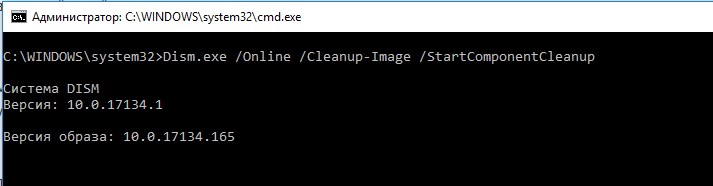
Опция Dism /StartComponentCleanup поддерживается во всех версиях Windows, начиная с Windows 8/Windows Server.
После окончания очистки проверьте текущий размер хранилища компонентов:
Dism.exe /Online /Cleanup-Image /AnalyzeComponentStore
В моем примере это помогло уменьшить размер папки WinSxS на 2,5 Гб.
С помощью еще одного параметра /ResetBase вы можете удалить все предыдущие версии компонентов, оставшиеся после установки обновлений Windows. После этого вы не сможете удалить установленные обновления или Service Pack, а в панели обновлений
appwiz.cpl
у обновлений пропадет кнопка «Удалить»).
Чтобы очистить старые версии компонентов, выполните:
Dism.exe /Online /Cleanup-Image /StartComponentCleanup /ResetBase
В Windows 7 и Windows Server 2008 R2 для очистки старых версий компонентов, оставшихся после установки сервис пака, использовался еще один параметр DISM:
dism /online /Cleanup-Image /spsuperseded
Также вы можете удалить устаревшие обновления с помощью мастера очистки диска. Выполните команду cleanmgr c правами администратора.
В окне утилиты выберите диск и в следующем окне нажмите кнопку «Очистить системны файлы».
Далее выберите опцию “Файлы журнала обновления Windows» и нажмите ОK. Утилита очистки диска покажет сколько места вы можете освободить, удалив файлы журнала старых обновлений Windows. В моем примере это 427 Мб.
После окончания очистки хранилища с помощью DISM проверьте сколько освободилось места на диске.
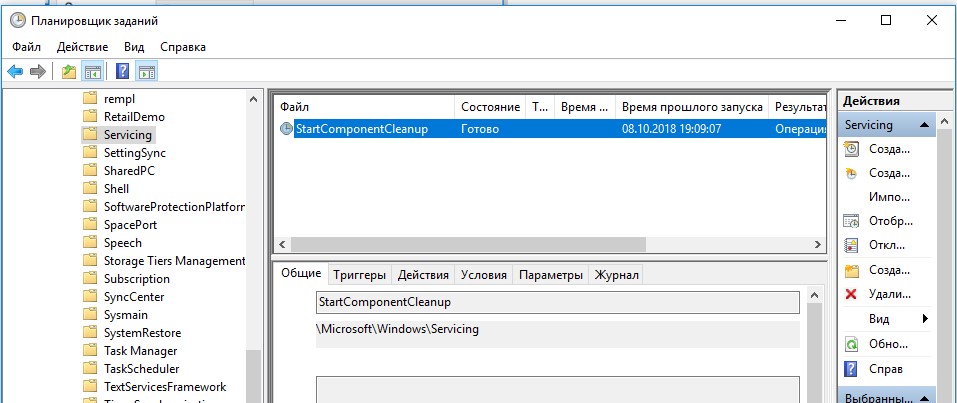
В планировщике задания Windows 10 и Windows Server 2016 есть специальное задание автоматического обслуживания, которое регулярно выполняет оптимизацию и очистку каталога WinSxS (выполняется действия, аналогичные команде dism с ключом StartComponentCleanup). Это задание StartComponentCleanup находится в разделе \Microsoft\Windows\Servicing. Данное задание запускается в фоновом режиме и автоматически удаляет версии компонентов старше 30 дней, которое были заменены более новыми версиями.
Можно запустить это задание вручную так:
schtasks.exe /Run /TN "\Microsoft\Windows\Servicing\StartComponentCleanup"
Удаление неиспользуемых компонентов Windows (Windows Server)
В статье Безопасная очистка папки WinSxS в Windows Server 2016/2012 мы рассмотрели функцию Features on Demand (функции по требованию), предоставляющую возможность удаления с диска бинарных файлов неиспользуемых ролей и компонентов из каталога WinSxS. Для этого в Windows Server используется командлет PoweShell Uninstall-WindowsFeature.
В Windows 10 командлет Uninstall-WindowsFeature отсуствует, и для удаления компонентов Windows из образа нужно использовать DISM.
DISM в отличии от Uninstall-WindowsFeature не удаляет зависимые компоненты.
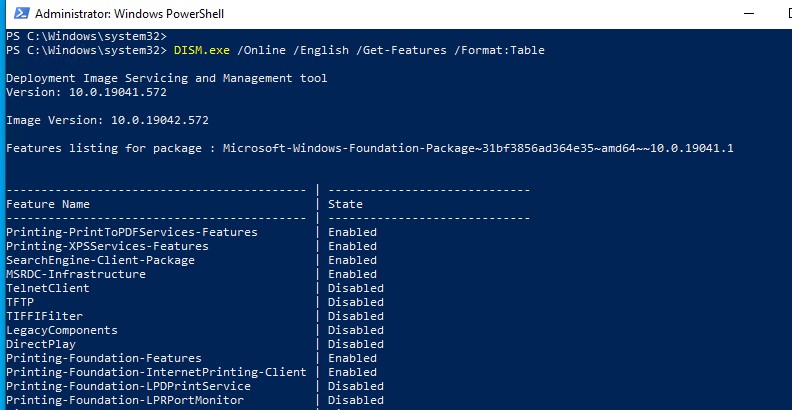
Полный список доступных функций в образе Windows 10 можно получить с помощью команды:
DISM.exe /Online /English /Get-Features /Format:Table
Чтобы удалить, например компонент TelnetClient с диска (из каталога WinSxS), выполните команду:
DISM.exe /Online /Disable-Feature /Featurename:TelnetClient /Remove

Если еще раз вывести список всех доступных функций по требованию в Windows, вы увидите, что статус компонента изменится на Disabled with Payload Removed.
Таким образом в Windows можно существенно уменьшить размер папки WinSxS, удалив с диска неиспользуемые компоненты. Единственный нюанс, это вариант очистки каталога WinSxS подойдет для достаточной продвинутых пользователей, которые разбираются в компонентах Windows 10 и их назначении.
Включаем NTFS сжатие на папке WinSxS в Windows
Еще один способ уменьшить размера каталога WinSxS в Windows 10 – сжать содержимое каталога на уровне файловой системы NTFS.
- Откройте командную строку с правами администратора;
- Остановите и отключите службы Windows Installer и Windows Module Installer:
sc stop msiserver

sc stop TrustedInstaller

sc config msiserver start= disabled

sc config TrustedInstaller start= disabled
- Создайте резервную копию списков доступа (ACL) назначенных на файлы и папки в каталоге WinSxS с помощью утилиты icacls. Резервная копия ACL представляет собой обычной текстовый файл, в котором указаны все файлы и каталоги и назначенные на них NTFS разрешения (в дальнейшем этот файл понадобиться для восстановления оригинальных ACL):
icacls "%WINDIR%\WinSxS" /save "%WINDIR%\WinSxS_NTFS.acl" /t

- Назначьте себя владельцем папки WinSxS и всех вложенных каталогов:
takeown /f "%WINDIR%\WinSxS" /r
- Предоставьте своей учетной записи полные права на каталог WinSxS:
icacls "%WINDIR%\WinSxS" /grant "%USERDOMAIN%\%USERNAME%":(F) /t
- Теперь можно выполнить сжатие файлов в каталоге WinSxS с помощью команды compact. Т.к. часть файлов может использоваться Windows, нужно указать параметр /i. Иначе сжатие будет остановлено на первом же занятом файле (в Windows 10 можно использовать более прогрессивное LZX сжатие):
compact /s:"%WINDIR%\WinSxS" /c /a /i *

- Теперь нужно восстановить TrustedInstaller как владельца каталога WinSxS:
icacls "%WINDIR%\WinSxS" /setowner "NT SERVICE\TrustedInstaller" /t
- И вернуть оригинальные NTFS разрешения на каталог WinSxS из резервной копии ACL:
icacls "%WINDIR%" /restore "%WINDIR%\WinSxS_NTFS.acl" - Измените типа тип запуска служб Windows Installer и Windows Module Installer:
sc config msiserver start= demand

sc config TrustedInstaller start= demand


Проверьте текущий размер каталога WinSxS.
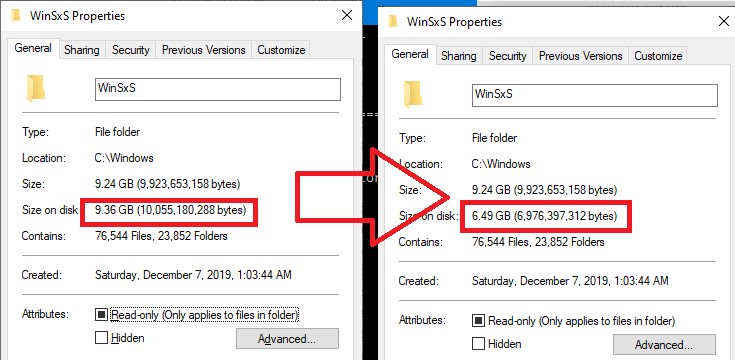
Как вы видите, в нашем примере размер папки WinSxS за счет сжатия уменьшился с 9,36 Гб до 6,5 Гб (примерно на треть). Неплохо, особо для небольшого по размеру SSD-диска.
Указанные команды можно выполнять по отдельности (так проще контролировать успешность выполнения каждой из них), либо можно объединить все операции в один файл скрипт. Вы можете скачать готовый bat файл для сжатия WinSxS здесь compress_winsxs.bat
Данный скрипт нужно запускать периодически, т.к. в каталоге WinSxS будут появляться новые «несжатые» файлы после установки новых обновлений Windows и программ.
На что может повлиять сжатие каталога WinSxS? Windows работает со сжатыми файлами в прозрачном режиме, однако при обработке таких файлов, ей может понадобиться дополнительное время на их декомпрессию/компрессию. Это может вызвать небольшое замедление при установке компонентов Windows или обновлений. Однако для современных процессоров (CPU) операция компрессии/декомпрессии файлов выполняется практически мгновенно, так что реального уменьшения скорости пользователь даже не заметит.
First published on TechNet on May 13, 2014
It’s finally here! After pages and pages of comments from you requesting the ability to clean up the WinSxS directory and component store on Windows Server 2008 R2, an update is available.
http://support.microsoft.com/kb/2852386
As a refresher, the Windows Server 2008 R2 update is directly related to my previous blog post announcing a similar fix for Windows 7 client .
The Windows 7 version of this fix introduced an additional option to the Disk Cleanup wizard that would cleanup previous versions of Windows Update files. KB2852386 adds a Disk Cleanup option on Windows Server 2008 R2, similar to the Windows 7 update.
What does this mean for Windows Server 2008 R2? After installing this update and prior to being able to perform the cleanup, the Desktop Experience feature must be installed. Why you ask? Disk Cleanup is not installed by default on Windows Server 2008 R2. It is instead a component installed with the Desktop Experience feature.
Why was the update not included as a DISM switch like Windows Server 2012 R2?
This was evaluated, however, due to the amount of changes required and the rigorous change approval process, it was not feasible to back port the functionality this way. Knowing that it would be some time before everyone could upgrade to Windows Server 2012 R2 and based on feedback from an internal survey taken of a subset of enterprise customers, it was determined that this update would still be useful in its Disk Cleanup form, even with the Desktop Experience prerequisite. We hope you agree. However, we are aware that for some of you, the Desktop Experience requirement will be a deal breaker, but decided to release it anyway hoping it will help in some instances.
How can I get the update?
The update is available on Windows Update. It can also be manually downloaded from the Microsoft Update Catalog . The KB article listed above will also direct you to a download link in the Microsoft Download Center.
Let’s Cleanup those Old Windows Update Files!
First, let’s take a look at our starting point. Looking at my Windows 2008 R2 Server with SP1 installed, according to Windows Explorer, the size of my Windows/WinSxS directory is as follows:
The size of the WinSxS directory will vary by server. Some of you will have smaller WinSxS directories, some larger.
Installing the update is just like installing any other update. Just download and double-click on the .msu file:
Installing the update does not require Desktop Experience to be installed beforehand, but if you check your WinSxS directory again, you’ll see there has been no change to the size. This is expected as we need to run Disk Cleanup in order for this to take effect. It also does not require a reboot to install the hotfix.
But…we can’t do anything with what we just installed until we get Disk Cleanup which is installed with the Desktop Experience feature.
When installing Desktop Experience, it does require additional features. Select the button to Add Required Features and click Next and then Install:
A reboot is required to finalize the install.
Click Close and Reboot when prompted.
After we reboot, a Disk Cleanup option can be found under Start —> All Programs —> Accessories —> System Tools:
On launch, Disk Cleanup prompts for the drive you want to clean up:
After clicking Ok, a scan is performed:
Several options are provided for cleanup, including a new option for Windows Update Cleanup:
Just like the Windows 7 cleanup, mileage will vary. Also like Windows 7, the actual cleanup occurs during the next reboot. After the reboot, taking a look at the WinSxS directory, it has shrunk to the following:
Automation
My super knowledgeable scripting cohort Tom Moser wrote a PowerShell script that automates THE ENTIRE PROCESS. Can I get a cheer? Ok. So maybe it is a bit much to expect IT admins to cheer, but can I get an appreciative grunt? The script certainly beats the alternative of doing this all manually.
You can find the script on the TechNet Script Center here:
http://gallery.technet.microsoft.com/scriptcenter/CleanMgrexeKB2852386-83d7a1ae
What does the script do?
In short, the script does the following:
1) Installs Desktop Experience, if not previously installed, and performs a reboot.
2) Sets the appropriate registry keys to automate the cleanup. The script will cleanup not only previous Windows Update files as well as Service Pack files.
3) The script then initiates the cleanup.
4) If Desktop Experience was not previously installed, the script uninstalls it.
5) Performs final reboot.
For more details, read below.
The script can be run from any directory on the server. It has two parameters: LogPath and a switch called NoReboot. LogPath will allow the user to specify a log location or if none is specified, by default, the script will create a log in the same directory from which the script was executed. NoReboot allows the user to suppress reboots, but will require manual reboots by an administrator.
Note : Make sure to check the log file to verify the process completed successfully and to verify there is no manual interaction required. If the script has completed successfully, the log will end with CleanMgr complete .
The script has several phases, using a registry key to keep track of progress. After initial run, it inserts itself as a scheduled task, which runs as local system. The final phase removes the task.
Depending on pending reboots, etc, we have found that this phase may generate a few reboots. Do not be concerned if the server reboots a few times.
Other Options
Aside from the cleanup mechanism included with this fix, if you have applied SP1 and have not cleaned up afterwards, I’d highly recommend doing so by running the following command from an administrative command prompt:
dism /online /cleanup-image /spsuperseded
or
If you have installed the Desktop Experience feature and thus have the Disk Cleanup utility, you can select the following option to do the same thing:
Specifying the /spsuperceded switch or choosing to remove service pack backup files will remove the ability to uninstall the service pack. If you haven’t done it before, it is certain to free up some space.
The Origins of this Update (Hint: Windows Server 2012 R2)
I’ve mentioned a couple of times that this is a back port. What does that mean? Well, it means that this functionality is already built into a later operating system. In this case, that operating system is Windows Server 2012 R2. Not only do we have several mechanisms to automatically cleanup previous versions of Windows Update files like this update does, we even have the ability to more accurately determine the size of the component store (aka the WinSxS directory).
The command to accurately determine the size of the component store on Windows Server 2012 R2 is as follows:
Dism.exe /Online /Cleanup-Image /AnalyzeComponentStore
Running this command analyzes the component store to determine the size and whether cleanup is recommended. Notice in the screen shot that it provides you with the Windows Explorer reported size and the actual size:
Notice that the component store is much smaller than Windows Server 2008 R2 right out of the gate? This isn’t because I’ve used Features on Demand to remove roles and features. It’s because by default in Windows Server 2012 R2, we compress all unused binaries. Another win for Windows Server 2012 R2!
Looking at the breakdown of the 5.12GB. We see that Shared with Windows accounts for 3.83GB of the 5.12GB. Shared with Windows refers to the size of the files that are hardlinked between the WinSxS directory and the Windows location of the file. Because these hardlinks appear to take up space, but don’t really, we can subtract them from our component store size. Therefore, the actual size of the component store is the total of Backups and Disabled Features plus Cache and Temporary Data or 1.28GB.
But back to our cleanup.
In the above screen shot, it’s stated that component store cleanup is recommended. We can manually cleanup the component store on Windows Server 2012 R2 by running the following command:
Dism.exe /online /Cleanup-Image /StartComponentCleanup
What does this do? When this runs, Windows cleans up the previous versions of the component that was updated. In other words, it is doing exactly what our update does for Windows Server 2008 R2 SP1. It removes previous versions of the files updated by Windows Updates.
After running /StartCompomentCleanup, upon analyzing the size again, we see it is as follows:
So no notable difference really. Largely because we’ve been running this cleanup all along. This same command is run every 30 days as a scheduled task with a time limit of 1 hour.
With the scheduled task however, the task will wait at least 30 days after an updated component has been installed before uninstalling the previous versions of the component. This scheduled task can be found in Task Scheduler under the Task Scheduler Library\Microsoft\Windows\Servicing\StartComponentCleanup directory:
More information on this can be found here: http://technet.microsoft.com/en-us/library/dn251565.aspx
If you’re in all out spring cleaning mode and want to perform super deep cleanup, you can use the /resetbase command with the /startcomponentcleanup to remove all superseded versions of every component in the component store:
Dism.exe /online /Cleanup-Image /StartComponentCleanup /ResetBase
This removes the ability to uninstall any updates applied until this point in time.
And don’t forget the ability to completely remove any role or feature which also reduces the size. Take a look at one of my earlier blogs for more details on Features on Demand: http://blogs.technet.com/b/askpfeplat/archive/2013/02/24/how-to-reduce-the-size-of-the-winsxs-directory-and-free-up-disk-space-on-windows-server-2012-using-features-on-demand.aspx
Here’s a handy table showing when we introduced the various different cleanup and WinSxS size reductions by operating system:
| Operating System | Compress Unused WinSxS Binaries | Cleanup Previous Windows Update Files | Automatically Clean Up Previous Windows Update Files | Cleanup All Components | Features on Demand |
| Windows Server 2008 R2 | With KB2852386 | ||||
| Windows Server 2012 | With KB2821895 | x | x | x | |
| Windows Server 2012 R2 | x | x | x | x | x |
Want more information on how all this works under the covers?
Check out the following series on the AskCore team blog for an in-depth look at servicing improvements on Windows Server 2012 R2:
What’s New in Windows Servicing: Part 1
What’s New in Windows Servicing: Reduction of Windows Footprint : Part 2
What’s New in Windows Servicing: Service Stack Improvements: Part 3
More on the Desktop Experience Feature
The Desktop Experience feature includes the following components and features:
* Windows Media Player
* Desktop themes
* Video for Windows (AVI support)
* Windows SideShow
* Windows Defender
* Disk Cleanup
* Sync Center
* Sound Recorder
* Character Map
* Snipping Tool
* Ink Support
Most of these are not automatically turned on with the exception of Windows Defender whose service is started after reboot. You’ll likely want to stop the service and disable it after reboot. Not all 3rd party anti-viruses conflict with Windows Defender, but there have been reports that some do.
~ Charity Shelbourne and Tom Moser, Spring cleaning servers since 1998
Update May 15th, 2014
We are aware of a method of copying in the appropriate Disk Cleanup/CleanMgr files into the appropriate location to avoid installing the Desktop Experience. If this were a tested and supported option, we certainly would have included these details in this post and definitely would have used this method to automate the cleanup. However, it was determined early on that this method would not be supported. If you decide to do this, do so at your own risk.
I finally found some good information for cleaning up the WinSXS folder on new instances of Windows. I found the following site extremely helpful:
http://blogs.technet.com/b/askpfeplat/archive/2014/05/13/how-to-clean-up-the-winsxs-directory-and-free-up-disk-space-on-windows-server-2008-r2-with-new-update.aspx.
Consequently, I was able to get 7GB of data cleaned up from the WinSXS folder on the first Server 2008R2 machine I followed this process on.
Here are the basic steps:
1. Make sure the server has Server 2008R2 SP1 or newer.
2. Download and install the Disk Cleanup Wizard Add-on (http://support.microsoft.com/kb/2852386) for your version of Windows 7 or Server 2008 R2. I believe it is now built into newer versions of the OS, but haven’t had a chance to verify yet. If you are using Server 2008, you will also need to add the Desktop Experience Feature and all required components (this WILL require a reboot to take effect).
3. After the add-on and features have been fully installed (and the system rebooted if necessary), search for Disk Cleanup under System Tools.
4. Open the Disk Cleanup and select the drive with the WinSXS folder (typically the C drive or system drive).
5. Let the Disk Cleanup run. I’ve seen some images where Windows Update Cleanup is right on the main Disk Cleanup tab. Others have you click on the Clean Up System Files button on the bottom-left of the Disk Cleanup window and have it re-scan.
6. Once either option is selected, you should see the options to cleanup Service Pack Backup Files and Windows Update Cleanup like listed below. These two options will “safely” remove items from the WinSXS folder and free up space. Remember that once these items have been removed, you will be unable to revert back to an older service pack state and/or possibly remove updates from the system that are causing problems. Also, make sure you have a good backup. If you are unsure how this will affect your system, skip this as a possible cleanup option.