
Item Preview
There Is No Preview Available For This Item
This item does not appear to have any files that can be experienced on Archive.org.
Please download files in this item to interact with them on your computer.
Show all files
9,922
Views
24
Favorites
4
Reviews
DOWNLOAD OPTIONS
Uploaded by
LegacyPreserver
on
SIMILAR ITEMS (based on metadata)
Sometimes decommissioning old system is not easy as it looks, as this has a lots of dependency on business as well as on end users. As Microsoft had already made the announcement few years back about the End of Support for Microsoft Windows Server 2003 as well as some other old traditional legacy EUC OS. Microsoft Product Life Cycle . As last few weeks back at one of my customer site we got to know that one of the machine they had recently migrated from physical to Virtual (VMware vSphere 6.7U1) and are facing trouble to install the VMware Tools. Later at the time of troubleshooting I found out the machine is Windows 2003 which they need to up and running for at least 2 quarters as they are coming up with new solution for that particular project. Once the migration was done from physical to virtual which was successful one for the support teams once they trying to install the VMware tools they were getting errors stating that ” The required VMware Tools ISO image does not exist or is inaccessible.”

Installing and Using VMware Tools. As VMware Tools is a suite of utilities that enhances the performance of the virtual machine’s guest operating system and improves management of the virtual machine. Although the guest operating system can run without VMware Tools, you would lose important functionality and convenience. Whenever I design or deploy/implement VMware solution I generally go through the release notes of the product which is very important at the time of every vSphere Major Release VMware announces the release of Latest VMware tools,
These Notes clear stats that there is no iso or packages has been released for Windows 2003 or earlier OS. The list of the OS which support these latest VMware tools are below.
Windows OS level prerequisites
- Windows Server 2016
- Windows 10
- Windows Server 2012 R2
- Windows 8.1
- Windows Server 2012
- Windows 8
- Windows Server 2008 R2 Service Pack 1 (SP1)
- Windows 7 SP1
- Windows Server 2008 Service Pack 2 (SP2)
- Windows Vista SP2
- Windows Server 2012 R2 with Microsoft update KB2919355
- Windows 8.1 with Microsoft update KB2919355
But As we all know VMware tools comes with drivers and some other important metrics which will be helpful in future for troubleshooting and managing and planning the resources accordingly with the behavior of a virtual machine. As this newly migrated VM was running on vSphere 6.7 U1 and after several tries and getting the above mentioned error, I come up with an idea that lets install the Older Version of VMware tools which I downloaded from VMware, but that also resulted in a failure. After reading the release notes of vSphere 6.5 I found out that the VMware Tools Version 10.0.12 and after going through the release notes I found out that this contains a winprevista.iso “Bingo” here you go, I was fortunate enough that in one of my lab environment I was running vSphere 6.5U1 and now I need to extract the Winprevista.iso file from this host to my machine and need to extract using WinZip or 7Zip program. To get this file you can use the any SFTP client which works over port number 22, then you need to login to your host using root credentials and password, navigate to the location /usr/lib/vmware/isoimages/ and look for the desired mentioned image download it and extract it using the tools which you are comfortable with I used the 7zip program for this.

Now you will be thinking why I didn’t copied this iso file directly to the host where my newly migrated VM was residing, So when we install the VMware tools a mount has been initiated and to get the mount we need to have the supportive Windows 2003 CD ROM driver on that machine which we didn’t had, So now I had Copy all the content to a folder in my machine for that first I used the WinSCP client to copy that iso than mount it using the default mount options which we are getting in Windows 2012 Servers. Copy all the content to your local media or other NTFS drive.


As the machine neither had the CD ROM driver nor has the network connectivity, then I utilized the VMware Edit Virtual Machine Feature, for that.
Hope this have been informative for you. See you in the another blog post.
Published by sajag007
Experienced Delivery Lead with a demonstrated history of working in the IT industry. Strong operations professional skilled in IT Infrastructure Specially within Private Cloud Servers & Network Architecture, Engagement Management and Program Management.
View all posts by sajag007
I converted a physical windows server 2003 R2 32 bit machine to esxi virtual. Now it boots up but no network driver for the auto selected network card. Also if I try to install vmware tools from esxi it does nothing. Other windows systems automatically mount the tools cvc and install. This one does not even mount a tools dvd.
I am heading over to that branch this wekend and hope someone has some pointers on how to proceed to get a working network card and vmware tools installed. This is esxi 7. When I converted I did not use latest esxi hardware version. It suggested I use version 18, I went with version 14. I know I can upgrade later but cannot downgrade. so first question is should I update to a higher hardware version or leave it at 14.
Next, where do I find the tools DVD on the esxi host so I can manually mount it on this virtual machine? or can I download the tools dvd somewhere?
Finally what do you suggest to use as network card. I see in the compatibility guide I can use e1000, vmxnet or vmxnet3. I think what it automatically selected was an AMD something adapter so I obviously have to change that.
Установка Windows Server 2003 на виртуальную машину VMware Workstantion 6.0
Далее перед нами стоит задача построить сеть из нескольких компьютеров и сделать один из них сервером. Windows Server 2003 существует в четырех редакциях, из которых наиболее популярны две:
- Windows Server 2003 Standard Edition — сетевая операционная система для выполнения серверной части бизнес-решений и рассчитанная на применение в небольших компаниях и подразделениях.
- Windows Server 2003 Enterprise Edition — ОС, которая, прежде всего, предназначена для средних и крупных компаний.
Запустите приложение ВМ и начните установку с CD-ROM или подключите к созданной ранее виртуальной машине ISO-образ установочного диска Windows 2003 Server. Для установки сервера из образа выполните команду ВМ-Настройки-CD-ROM и активируйте переключатель Использовать образ ISO (
рис.
43.9).
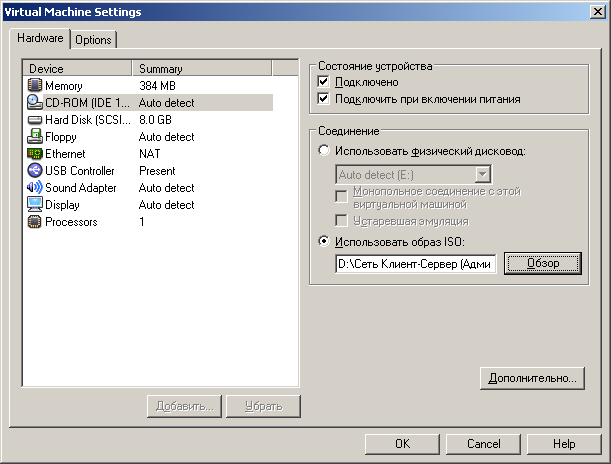
Рис.
43.9.
Для установки сервера используем образ ISO
Теперь запускаем установку ОС Windows Server 2003 (
рис.
43.10).
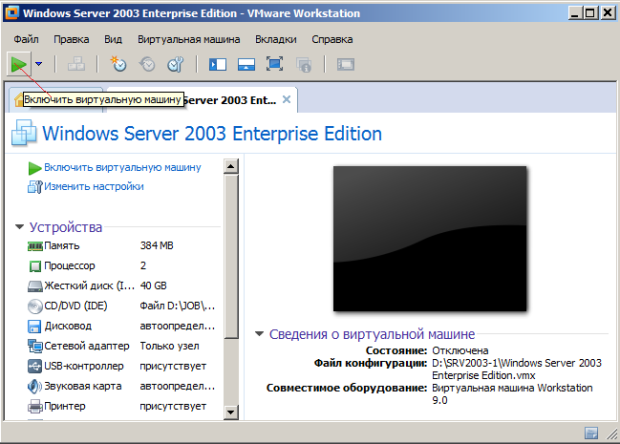
Рис.
43.10.
Кнопка включения машины на запуск установки сервера
В начале установки ознакомьтесь с информацией программы установки и нажмите на Enter (
рис.
43.11).
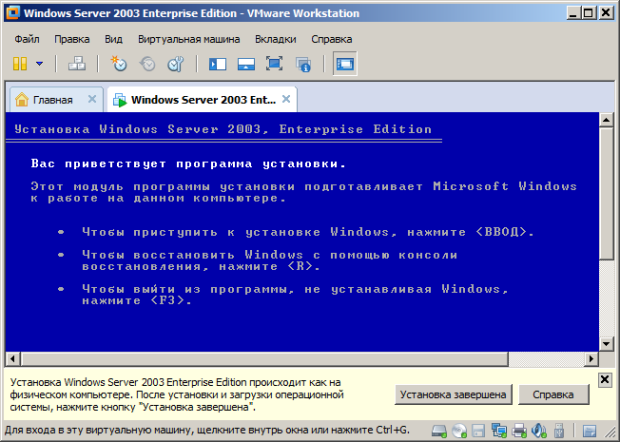
Рис.
43.11.
Начало установки
Ознакомьтесь с лицензионным соглашением и согласитесь с ним (клавишa F8).
Создайте раздел для ОС на жестком диске клавишей ENTER (
рис.
43.12)
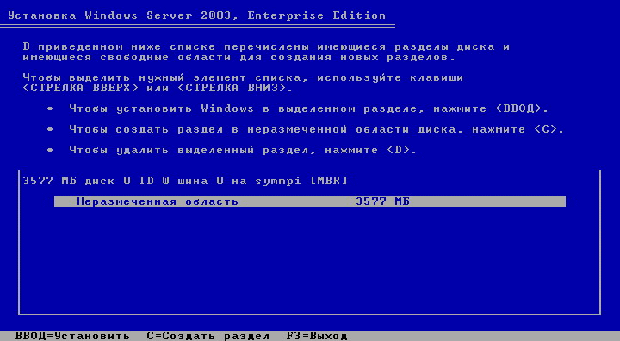
Рис.
43.12.
Создание раздела на жестком диске
Выполните форматирование созданного раздела в файловой системе NTFS — нажмите ENTER. Дождитесь окончания форматирования раздела, и копирования файлов установки на него. В процессе копирования компьютер перезагрузится и продолжит установку автоматически. Укажите параметры языка и раскладки клавиатуры (
рис.
43.13) и перейдите к следующему шагу кнопкой Далее.
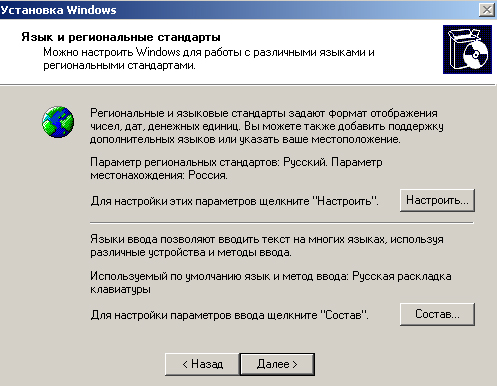
Рис.
43.13.
Установка русского языка (Язык и региональные стандарты)
Укажите регистрационные данные: ведите в поле Имя (например, SRV-2003, ведите в поле наименование организации (например, PTK NOVGU) завершите ввод кнопкой Далее. Введите в поле Ключ продукта лицензионный ключ и щелкните Далее.
Укажите вариант лицензирования при котором для каждого подключения требуется отдельная лицензия, т.е. установите радиокнопку На сервере и введите в текстовое поле количество одновременных подключений (например, 10) — рис. 14. Подтвердите параметры кнопкой Далее.
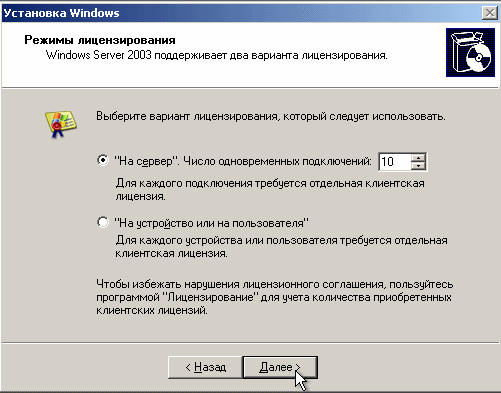
Рис.
43.14.
Выбираем вариант лицензирования
Укажите имя компьютера и пароль администратора. Например, SRV-2003 и 123456. Укажите дату и время и щелкните Далее. Установите сетевые параметры для использования статического IP-адреса: выберите радиокнопку Обычные параметры и щелкните Далее. Укажите сетевую рабочую группу (например 110) и щелкните Далее (
рис.
43.15).
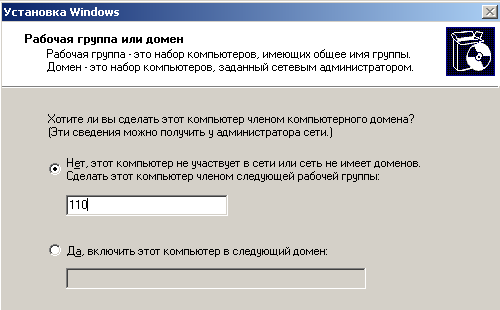
Рис.
43.15.
Задаем рабочую группу
Дождитесь окончания выполнения установки ОС. По окончании установки компьютер перезагрузится. (
рис.
43.16).

Рис.
43.16.
На виртуальную машину установлен Windows Server 2003 Enterprise Edition
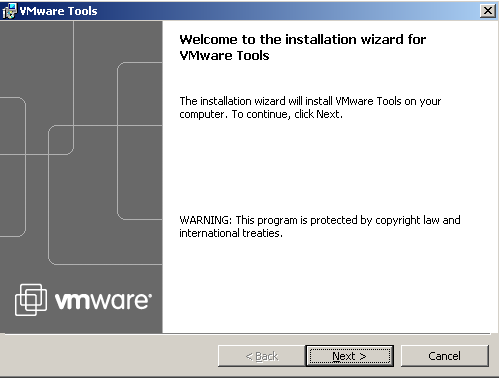
Рис.
43.17.
Установка средств VMware Tools
Примечание
Установка средств VMware Tools позволит нам входить в хост-систему и расшаривать на ней файлы, например, дистрибутивы нужных нам программ.
Обновив сферу, столкнулся с ошибкой:
Unable to install VMware Tools. An error occurred while trying to access image file «/usr/lib/vmware/isoimages/winPreVista.iso» needed to install VMware Tools: 2 (No such file or directory). Please refer the product documentation or KB article 2129825 for details about how to get VMware Tools package for this guest operating system
Также ошибка может звучать более лаконично:
The required VMware Tools ISO image does not exist or is inaccessible.
Оказывается, в составе новых ESXI нет исошника с тулзами под старые системы, хотя некоторая обратная совместимость, в виде «знания» какой исошник нужно монтировать — осталась.
Решение этой проблемы — скачать legacy-tools и добавить нужные исошники. Но так как это придется делать для каждого хоста, то проще на общедоступном сторадже выделить папку, свалить туда все исошники и поправить на каждом из серверов параметр, указывающий на папку с тулзами.
Собственно, тулзы качаются с сайта вмвари: легаси и текущие на данный момент.
Оба архива содержат папки «floppies» и «vmtools» — совмещаем их содержимое (для легаси и новых тулзов содержимое не пересекается) и аплоадим эти две папки в отдельную папку в хранилище. Допустим, в папку vmwaretools на сторадже myStorage (таким образом у нас две папки: «myStorage/vmwaretools/floppies» и «myStorage/vmwaretools/vmtools»)
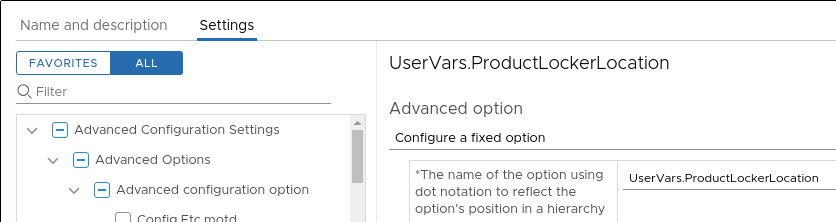
Теперь заходим в «Advanced System Settings» одного из серверов:
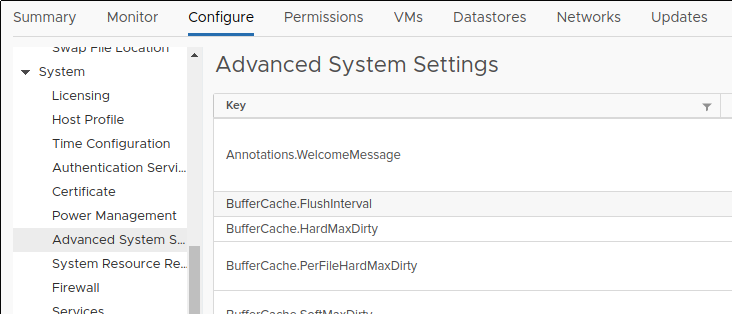
Ищем в них параметр «UserVars.ProductLockerLocation«, по дефолту его значение — «/locker/packages/vmtoolsRepo/», меняем его на «/vmfs/volumes/myStorage/vmwaretools/«.
Теперь сервер придется перезагрузить (по крайней мере у меня он не подхватил новое значение без ребута). После перезагрузки тулзы будут корректно ставиться уже из хранилища.
Технически можно повторить процедуру вручную на каждом из серверов, или включить этот параметр в host profile:
Ссылки по теме:
- Configuring a VMware Tools Repository in vSphere 6.7U1
- latest version of vmware-tools for windows xp guest