Привет друзья, я Ro8! В предыдущей статье мы с вами установили виртуальную машину VMware Workstation, а сегодня я расскажу вам, как создать общую папку сообщающую виртуальную машину и операционную систему, в которую она установлена. Создание общей папки необходимо, так как она сильно упрощает работу, например, вам необходимо из основной Windows быстро перекинуть файл в виртуальную машину, вы просто берёте и копируете этот файл в общую папку, данный файл тут же становится доступным в виртуальной машине, сейчас сами всё увидите.
Создание общей папки в виртуальной машине VMware Workstation
У нас есть виртуальная машина VMware Workstation, на которую установлена Windows 7 в редакции Максимальная 64 бит.
Вызываем свойства виртуальной машины Windows 7 x64, нажав на Edit virtual machine settings

Переходим на вкладку Options

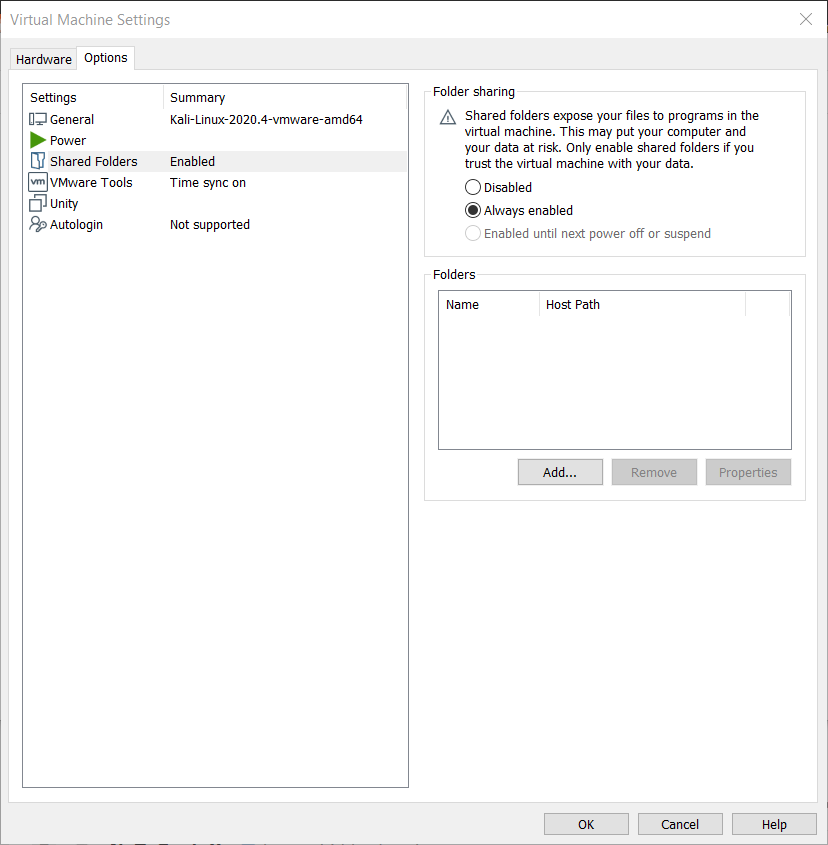
На вкладке Options выбираем Shared Folders, далее отмечаем пункт Always enabled и нажимаем кнопку Add

Далее

Нажимаем Browse

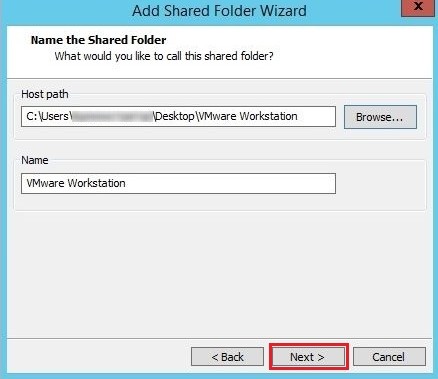
К примеру в качестве общей папки между основной и виртуальной машиной Windows 7 x64 укажем папку VMware Workstation
Далее
Убеждаемся что стоит галочка на пункте Enable this share. Нажимаем Finish

OK

Запускаем нашу виртуальную машину Windows 7 x64, идем на вкладку VM и выбираем Install VMware Tools

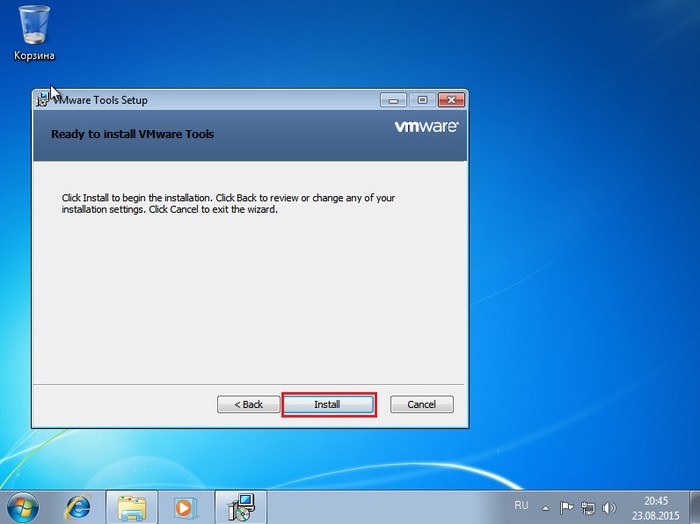
Нажимаем Install

Выполнить setup 64.exe

Далее

Далее


Нажимаем Install

Установка VMware Tools завершена

После установки Vmware Tools будет предложено перезагрузить виртуальную машину. Соглашаемся нажав Yes
После перезагрузки виртуальной машины идем в Компьютер, далее выбираем Сеть и щелкаем по
«Сетевое обнаружение и общий доступ к файлам отключен. Сетевые компьютеры и устройства не видны. Щелкните для изменения»

Выбираем Включить сетевое обнаружение и общий доступ к файлам

В данном окне должна появится папка vmware-host (как на скриншоте). Заходим в нее

Далее открываем папку Shared Folders

Общая папка VMware Workstation

Открытая общая папка VMware Workstation

Введение
При использовании VMware для запуска виртуальных машин (ВМ) одной из распространенных задач является обмен файлами между операционной системой хоста (ОС) и гостевой ОС, запущенной внутри виртуальной машины. VMware позволяет создать общую папку, которая действует как мост между хостом и гостем, упрощая передачу файлов. В этом руководстве описаны шаги по настройке общей папки между хост-машиной и гостевой VMware, охватывающие гостевые операционные системы Windows и Linux.
Необходимые условия
Перед настройкой общей папки убедитесь в следующем:
- На хост-системе установлены VMware Workstation, VMware Player или VMware Fusion.
- Виртуальная машина настроена и запущена.
- В гостевой ОС установлены VMware Tools. VMware Tools необходим для правильной работы функции общей папки.
Шаг 1: Установка VMware Tools
Если VMware Tools еще не установлена в гостевой операционной системе, ее необходимо установить. VMware Tools обеспечивает повышенную производительность графики, общий доступ к буферу обмена и возможность использования общих папок.
- Запустите виртуальную машину и войдите в гостевую ОС.
- В меню виртуальной машины выберите Install VMware Tools. Если появится опция Переустановить VMware Tools, выберите ее.
- VMware смонтирует виртуальный компакт-диск с программой установки VMware Tools.
- Для гостей Windows: Откройте смонтированный диск в File Explorer и запустите файл setup.exe. Следуйте подсказкам для установки.
- Для гостей Linux: Откройте терминал и извлеките содержимое смонтированного компакт-диска VMware Tools, затем запустите сценарий vmware-install.pl.
- После завершения установкиперезагрузите гостевую операционную систему.
Шаг 2: Включите общую папку
После установки VMware Tools можно включить и настроить общую папку между хостом и гостем.
- Выключите питание виртуальной машины, если она запущена.
- Откройте VMware Workstation или VMware Player и выберите виртуальную машину в списке.
- Нажмите кнопку Редактировать параметры виртуальной машины или Настройки.
- В окне Настройки перейдите на вкладку Параметры.
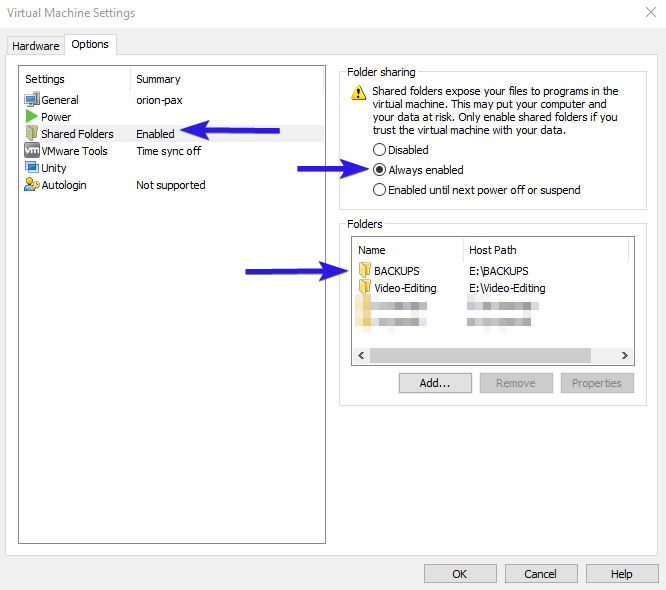
- Выберите Общие папки из списка слева.
- В правой части выберите вариант Всегда включен или Включен до следующего выключения или приостановки в зависимости от ваших предпочтений.
- Нажмите Добавить, чтобы создать новую общую папку.
Шаг 3: Настройка общей папки
После нажатия кнопки Добавить вам будет предложен мастер для создания общей папки:
- Откроетсямастер создания общей папки. Нажмите кнопку Далее.
- Выберите папку хоста, которую вы хотите открыть для гостевой ОС:
- Нажмите Browse, чтобы выбрать существующую папку на хост-системе.
- Также можно создать новую папку на хост-машине и выбрать ее здесь.
- Назовите общую папку: Это имя, под которым папка будет отображаться в гостевой ОС.
- Включите общую папку, установив флажок Включить этот ресурс.
- Если вы хотите, чтобы общая папка была доступна только для чтения, выберите Только для чтения. Это означает, что гостевая ОС может просматривать, но не изменять содержимое папки.
- Нажмите Finish, чтобы завершить настройку, а затем OK, чтобы закрыть окно настроек виртуальной машины.
Шаг 4: Доступ к общей папке в гостевой ОС
Процесс доступа к общей папке зависит от гостевой операционной системы (Windows или Linux).
Для гостей Windows
- Запустите виртуальную машину и войдите в систему.
- Откройте проводник файлов.
- Перейдите к разделу Сеть или Этот компьютер в Проводнике, и вы увидите папку с именем vmware-host.
- Откройте vmware-host и перейдите к общим папкам. Здесь вы найдете общую папку, которую создали ранее.
- Теперь вы можете копировать, вставлять и получать доступ к файлам между хостовой и гостевой операционными системами с помощью этой общей папки.
Для гостей Linux
- Запустите виртуальную машину и войдите в систему.
- Откройте окно терминала.
- По умолчанию общие папки обычно монтируются в каталог /mnt/hgfs/. Чтобы получить доступ к общей папке, используйте:
В списке должна появиться общая папка, которую вы настроили в предыдущих шагах.
- Теперь вы можете перейти в общую папку и получить доступ к ее содержимому:
cd /mnt/hgfs/shared_folder_name
Замените имя_общей_папки на имя, которое вы присвоили общей папке.
- Если вы не видите общую папку, возможно, вам нужно смонтировать ее вручную:
sudo mount -t vmhgfs .host:/shared_folder_name /mnt/hgfs/shared_folder_name
Шаг 5: Устранение общих проблем
Если у вас возникли проблемы с общей папкой, выполните следующие действия по устранению неполадок:
- Убедитесь, что VMware Tools установлены: Общие папки зависят от VMware Tools, поэтому дважды проверьте, правильно ли они установлены.
- Проверьте разрешения папки: Убедитесь, что общая папка имеет соответствующие разрешения на чтение/запись в хост-системе.
- Перезапустите виртуальную машину: Иногда для того, чтобы изменения вступили в силу, требуется перезапуск гостевой ОС.
- Вручную смонтируйте общие папки: Если на гостевых компьютерах Linux общая папка не отображается в каталоге /mnt/hgfs/, попробуйте смонтировать ее вручную, как показано выше.
- Проверьте настройки VMware: Убедитесь, что общие папки включены в настройках VMware (Edit virtual machine settings > Options > Shared Folders).
Шаг 6: Управление общими папками
Вы можете управлять общими папками или удалять их в любое время:
- Выключите питание виртуальной машины.
- Перейдите в меню Редактировать параметры виртуальной машины > Параметры > Общие папки.
- Выберите общую папку и нажмите Удалить, если вы больше не хотите предоставлять к ней общий доступ, или Изменить, чтобы изменить ее свойства (например, режим только для чтения).
Заключение
Настройка общей папки в VMware обеспечивает беспрепятственную передачу файлов между хостовой и гостевой операционными системами, повышая производительность и улучшая рабочий процесс. Выполнив шаги, описанные в этом руководстве, вы сможете легко настраивать общие папки, получать к ним доступ и управлять ими на виртуальных машинах под управлением Windows или Linux. Не забывайте обновлять VMware Tools для обеспечения совместимости и производительности общих папок.
To share data and files between host the operating system and guest operating system, you need to add or create VMware shared folder. Here’s how.
After installing the guest operating system in VMware, you can share folders between the host and guest. This allows you to quickly share files and data between the systems without having to drag and drop or use cloud services. Moreover, the shared folders also allow you to set quick rules for different users if you are sharing the VMware virtual machine with other users.
One of the best things about VMware is that it makes it easy to add shared folders via the VM settings panel. In this quick and simple guide, let me show the steps to create VMware shared folder in Windows 10.
The steps shown below will work in Windows 7 and Windows 8 too.
Jump to:
- How to create shared folder in VMware Player
- How to create shared folder in VMware Workstation
- VMware mount shared folder
- VMware shared folder FAQ
Important Note: Make sure the virtual machine is completely turned off. i.e, not in the paused/saved state. When in paused or saved state, the Shared folder option in VM settings will be disabled. If it is in the paused/saved state, turn it off before adding the shared folder in VMware.
If you are using VMware Player, these the steps you should follow to add a shared folder in the virtual machine.
- Open “VMware Player“.
- Select the virtual machine for which you want to add the shared folder.
- Click on the “Edit Virtual Machine Settings” link at the bottom on the right panel.

- Go to the “Options” tab.
- Select the “Shared folders” option on the left panel.
- Select the “Always enabled” option on the right panel.

- Click the “Add” button.
- Click “Next“.

- Point and click on the “Browse” button.
- Select the folder you want to share and click “Ok“.
- Type a name in the Name field and click “Next“.
- Select “Enable this share” checkbox.
- (Optional) Select “Read-only” checkbox if you want the shared folder to be read-only.
- Click “Finish“.
- Click “Ok” in the main settings window.


That is it. You’ve added a shared folder to VMware virtual machine.
Note: When you set a shared folder as Read-only, the VM cannot write or modify data in it. This option is a must if you want to protect the host operating system from malicious software running in VM.
Following the same steps, you can add as many VMware shared folders as you want.
If you are using VMware workstation, these are the steps you should follow to add a shared folder.
- Open “VMware Workstation“.
- Select the virtual machine for which you want to add the shared folder.
- Click on the “Edit virtual machine settings” link.

- Go to the “Options” tab and select the “Shared folders” option.
- Select the “Always enabled” option.
- Click “Add“.
- Click “Next“.
- Select the folder you want to share and click “Ok“.
- Name the shared folder.
- Select “Enable this share” option.
- To make the shared folder read-only, select the “Read-Only” checkbox (optional).
- Click “Finish“.
- Click “Ok“.


That is all. You’ve added the shared folder in VMware Workstation. You can access it directly from the File Explorer in the guest operating system.
Note: When you set a shared folder as Read-only, the VM cannot write or modify data in it. This option is a must if you want to protect the host operating system from malicious software running in VM.
Following the same steps, you can add as many VMware shared folders as you want.
Once you add the shared folder in the virtual machine settings, it is added to the guest operating system.
To mount the shared folder in VMware, turn on the virtual machine, open the File Explorer, and click on the “Network” option on the left panel.
Go to “vmware-host → Shared Folders“. You will see the shared folder with the name you chose in the steps above. Click on it to mount the shared folder. If you want to, you can pin the folder to the File Explorer. To do that, right-click on the folder and select “Pin to quick access”.

—
I hope that helps. If you are stuck or need some help, comment below and I will try to help as much as possible. If you like this article, check out how to increase VMware disk size.
FAQ: VMware Shared Folder Windows 10
Can I share folders with VMware virtual machine?
Yes, you can. Open the VM settings and add the folder from the Shared Folder option. You can follow the steps shown above.
I cannot see shared folder in the VMware virtual machine.
If you are not able to see the shared folder in the guest operating system, make sure that the file sharing is enabled. In case of Windows, go to “Control Panel → Network & Sharing Center → Advanced Sharing Settings”. Select both “Turn on network discovery” and “Turn on file and printer sharing” options.

Can I share folders with all VMs at once?
You have to manually share folders with each VM individually. VMware has no option to bulk share folders with all VMs in VMware.
How to protect the shared folder?
To protect the host operating system, you can make the shared folder “read-only”. This prevents the guest OS from writing or modifying data in the shared folder.
How do I remove shared folder in VMware?
To remove the shared folder, open the VM settings, go to “Shared Folder”, select the shared folder you want to remove and click “Remove”.
TL;DR
If you are using Open VMWare Tools on a Linux Mint (or Ubuntu) virtual machine, here is how you get the “Shared Folders” to work between the host operating system (Windows 10 in my case), and the host operating system (Linux Mint 19):
Note: Run these commands from the guest operating system.
- Make sure you have Open VMWare Tools installed on your guest operating system. If not, install it, and then reboot your guest virtual machine.
|
|
- Create the directory in which the shared folders will be accessed on the guest operating system:
|
|
- Mount the file system, and you should then be able to see the folders you have shared in the guest operating system in the directory
/mnt/hgfs:
|
|
- Finally, in order to get the shared folders to automatically mount every time you boot up your virtual operating system, add the following line to
/etc/fstab:
|
|
Source
Steps taken from this post.
The Rest of the Story
I recently decided to upgrade, and virtualize my Desktop environment. The outcome vision is basically all my day-to-day activities will run on my Linux Mint 19 virtual machine, and leave my Windows 10 host machine for gaming only.
Ironic that I went to this extent to get back into PC gaming, and then I heard about Steam Play Beta, which allows crap-ton of Windows-only games to now be played on Linux via Steam. Oh well…maybe when Linux Mint 20 gets released, I’ll redo my setup; I’m too far in now 
Ok, jumping out of that rabbit hole, here is what I wanted to share. Usually when I install a guest operating system using VMWare, I immediately install the VMWare Tools that are included with, in my case, VMWare Player for integration between the guest and host operating system. However, this time, after installing Linux Mint 19 as the guest operating system, I was prompted to install the Open VMWare Tools. Now these have been around for a while, but I never bothered to use them until now.
I have had issues updating the standard VMWare Tools on my guest operating systems in the past after kernel updates, plus it’s a manual process, but with Open VMWare Tools it’s all taking care of by the Linux Mint (guest operating system) package manager.
However, upon trying to use “Shared Folders” (see screenshot), I was unable to find the folders on the guest operating system (/mnt/hgfs).
After some searching, I ran across this post, and the following steps to get VMWare Shared Folders to work for Linux Mint 19 (or Ubuntu) guest operating systems with Open VMWare Tools are taken from that post. Many thanks to the author for the original post.
Just to make sure I’m clear my host operating system (physical PC) is Windows 10, and my guest operating system (VMWare virtual machine) is Linux Mint 19.
Steps to Access Shared Folders
Note: Run these commands from the guest operating system, in my case, Linux Mint 19
- Make sure you have Open VMWare Tools installed on your guest operating system. If not, install it, and then reboot your guest virtual machine.
|
|
- Create the directory in which the shared folders will be accessed on the guest operating system:
|
|
- Mount the file system, and you should then be able to see the folders you have shared in the guest operating system in the directory
/mnt/hgfs:
|
|

- Finally, in order to get the shared folders to automatically mount every time you boot up your virtual operating system, add the following line to
/etc/fstab:
|
|

That’s all there is to it. Feel free to leave comments, or questions below.
End of Line.
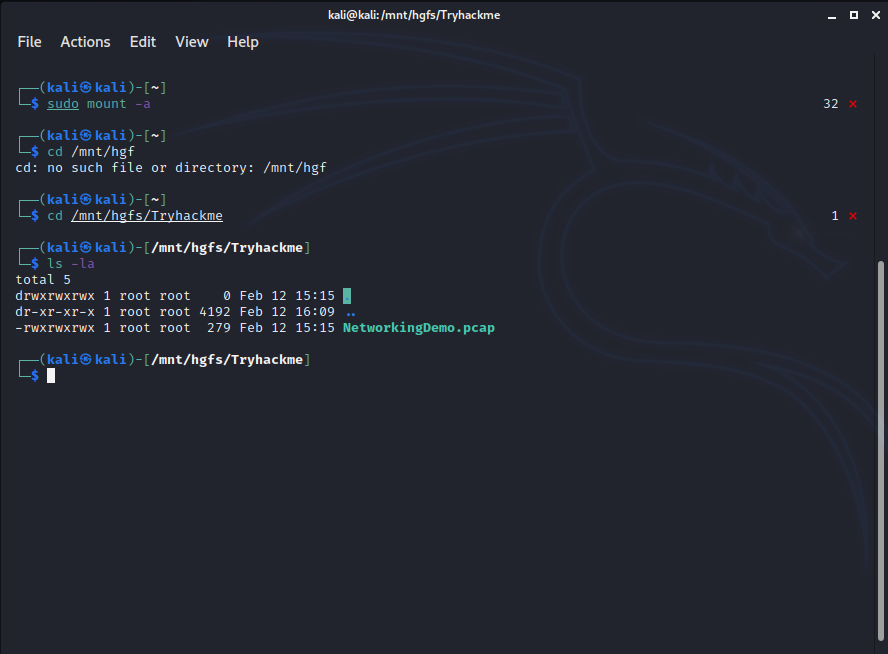
Shared Folder Not Visible Inside VMware
If you experience missing share folder in the /mnt directory while using VMware Player with your Linux image, follow these steps. This tutorial is based on Kali Linux OS image, but it will work for any linux flavor, including Ubuntu.
VMvare Settings
Open your Virtual Machine settings and browse to Options. Select Shared Folders and add your Windows host folder. Start your virtual machine.
-

VMvare Virtual Machine Settings – Shared Folders
Edit System Configuration File
Configure fstab file for auto-mounting of your shared folders.
- open fstab in nano editor
sudo nano /etc/fstab- add this command
vmhgfs-fuse /mnt/hgfs fuse defaults,allow_other 0 0- save (CTRL – O) and go back to terminal
Create Directory
- Create directory for mount point.
sudo mkdir /mnt/hgfsReload Configuration File
To refresh fstab entries without reboot, use mount command.
sudo mount -aShared Folder Preserved During Reboots
You should have access now to your shared folders. The change is preserved during reboots, because it’s permanently added to fstab configuration. You can browse to your Windows 10 folders and access all the files from within the VMware virtual machine.
-

VMware Windows 10 Shared Folder Access From Linux