
В VMware Workstation и VMware Player отсутствует опция автоматического запуска виртуальных машин при загрузке Windows или входе пользователя. Если вы хотите запускать ВМ автоматически, нужно создать задание планировщика.
- Автозапуск виртуальных машин VMware Workstation с помощью планировщика
- Автозапуск ВМ в VMware Workstation Pro
Содержание:
Автозапуск виртуальных машин VMware Workstation с помощью планировщика
Для автоматического запуска виртуальных машин можно использовать утилиту командной строки vmrun.exe. Она находится в каталоге:
- Для VMware Workstation:
"C:\Program Files (x86)\VMware\VMware Workstation\” - Для VMware Player:
"C:\Program Files (x86)\VMware\VMware Player\"
Чтобы запустить ВМ из командной строки нужно указать полный путь к ее конфигурационному VMX файлу. Например:
"C:\Program Files (x86)\VMware\VMware Player\vmrun.exe" start "G:\VM\ubuntu1\ubntu1.vmx"
С помощью опций gui|nogui можно запустить ВМ в отдельном окне или в фоновом режиме.
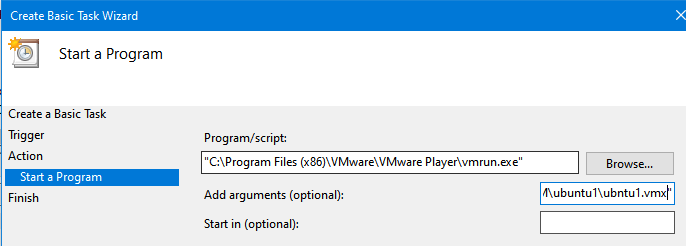
Теперь настроим автоматическое задание планировщика. Откройте консоль Windows Task Scheduler (taskschd.msc):
- Создайте новое задание (Action -> Create Basic Task).
- Укажите имя задания;
- На вкладке Trigger укажите When the computer starts;
- Action -> Start a program;
- В поле Program укажите:
"C:\Program Files (x86)\VMware\VMware Player\vmrun.exe" - В поле Add arguments:
start "G:\VM\ubuntu1\ubntu1.vmx"
- Теперь эта ВМ будет автоматически запускаться при загрузке Windows.

Если вы хотите запустить зашифрованную ВМ, можно указать ее пароль с помощью опции -vp encryptionpasssword.
Также вы можете использовать для запуска ВМ файл vmware.exe. Например, следующая команда запустит ВМ и развернет ее консоль на полный экран:
“C:\Program Files(x86)\VMware\VMware Workstation\vmware.exe” -X "G:\VM\ubuntu1\ubntu1.vmx"
Если нужно запустить последовательно несколько ВМ, создайте StartVMs.bat файл с порядком запуска виртуалок и запускайте его через планировщик заданий:
@echo off
timeout /t 5
"C:\Program Files (x86)\VMware\VMware Player\vmrun.exe" start "G:\VM\DC1\DC1.vmx" nogui
timeout /t 20
"C:\Program Files (x86)\VMware\VMware Player\vmrun.exe" start "G:\VM\ubuntu1\ubntu1.vmx" nogui
timeout /t 20
REM заблокировать рабочий стол
rundll32.exe user32.dll,LockWorkStation
Автозапуск ВМ в VMware Workstation Pro
Опция автозапуска ВМ появилась в VMware Workstation Pro 17.0. При установке этой версии VMware Workstation, в Windows появится новая служба VMware Autostart Service.
Настройте автоматический запуск для этой службы:
Set-Service VMwareAutostartService –startuptype automatic –passthru

Затем в консоли VMware Workstation перейдите в меню View -> Customize -> Library -> My computer -> Configure Auto Start VMs.

Здесь вы можете выбрать виртуальные машины, которые нужно запускать автоматически при загрузке хостовой операционной системы.
Нельзя настроить автозапуск для зашифрованных ВМ (например, если вы используете виртуальный TPM).
В некоторых случаях при настройке может появится ошибка:
Failed to update AutoStart configuration. Ensure that the vmAutoStart.xml file exists and you have permissions to write this file.
Если вы запускаете службу VMwareAutostartService от имени пользователя (задается в свойствах службы на вкладке LogOn), проверьте что у этого пользователя есть права записи в файл %ALLUSERSPROFILE%\VMware\VMware Workstation\vmAutoStart.xml.
VMware Workstation and VMware Player do not have a built-in option to automatically start virtual machines when Windows boots up or when a user logs in. If you want the VM to start automatically, you must create an automated task in the Scheduler.
How to Start VMware Workstation/Player VM Using the Task Scheduler?
You can use the vmrun.exe command-line utility to automatically start virtual machines. It is located in the following directory:
- VMware Workstation:
"C:\Program Files (x86)\VMware\VMware Workstation” - VMware Player:
"C:\Program Files (x86)\VMware\VMware Player\vmrun.exe"
To start a VM from the command line, you must specify the full path to its VMX configuration file. For example
"C:\Program Files (x86)\VMware\VMware Player\vmrun.exe" start "G:\VM\ubuntu1\ubntu1.vmx" Using the gui|nogui options, you can run the VM in a separate window or in the background.
Now let’s configure the automatic task scheduler. Open the Windows Task Scheduler console (taskschd.msc):
- Select Action -> Create Basic Task;
- Specify the task name;
- On the Trigger tab, select When the computer starts;
- Action -> Start a program;
- Paste the full path to vmrun.exe into the Program/Script field:
"C:\Program Files (x86)\VMware\VMware Player\vmrun.exe" - Add the arguments:
start "G:\VM\ubuntu1\ubntu1.vmx”
- This VM will start automatically when Windows boost.
If you want to start an encrypted VM, you can specify its password using the option: -vp encryptionpasssword.
If you need to start multiple VMs in sequence, create a StartVMs.bat file with the order in which the VMs will be started and run it through the Task Scheduler:
@echo off
timeout /t 5
"C:\Program Files (x86)\VMware\VMware Player\vmrun.exe" start "G:\VM\DC1\DC1.vmx" nogui
timeout /t 20
"C:\Program Files (x86)\VMware\VMware Player\vmrun.exe" start "G:\VM\ubuntu1\ubntu1.vmx" nogui
timeout /t 20
REM Lock Windiws desktop
rundll32.exe user32.dll,LockWorkStation
You can also use the vmware.exe file to start the VM. For example, the following command will start the virtual machine and expand its console to the full screen:
“C:\Program Files(x86)\VMware\VMware Workstation\vmware.exe” -X "G:\VM\ubuntu1\ubntu1.vmx"Configuring Virtual Machine Autostart in VMware Workstation Pro
VMware Workstation Pro 17.0 introduced the option to autostart a VM. When you install this version of VMware Workstation, you will see a new VMware Startup Service appear in Windows.
Set this service to start automatically:
Set-Service VMwareAutostartService –startuptype automatic –passthru
Then open the VMware Workstation console and navigate to View -> Customize -> Library -> My computer -> Configure Auto Start VMs.
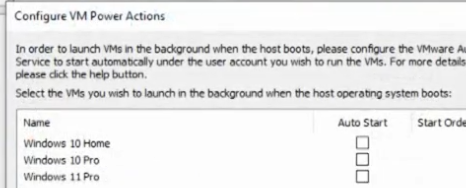
Select the virtual machines you want to start automatically when the host OS starts up.
You cannot enable autorun for encrypted VMs (for example, if you are using a virtual TPM).
In some cases, an error may occur during configuration:
Failed to update AutoStart configuration. Ensure that the vmAutoStart.xml file exists and you have permissions to write this file.
If you start the VMwareAutostartService service under a specific user account (configured in the Logon tab of the service properties), verify that this user has write permissions to the %ALLUSERSPROFILE%\VMware\VMware Workstation\vmAutoStart.xml file.
How-To
How to Autostart VMware Workstation VMs

In my series of articles on using VMware Workstation on an Intel NUC 13 Pro Desk Edition PC (starting here), I configured a half dozen or so virtual machines (VMs) as thin clients so I could use them for demonstrations and testing.
It worked fine, but recently, Windows 11 (the base OS that I was running Workstation on) rebooted automatically; when it came back up, I had to restart the VMs manually. I knew that with ESXi (VMware’s bare-metal hypervisor), you can set VMs to auto restart after a host reboots. After some searching, I found instructions for how to do the same for Workstation Pro 17 in the VMware workstation documentation. It should be noted that VMware Player and earlier versions of Workstation may or may not have this ability, and the information on which edition of Workstation Autostart is available is also a little sketchy.
In this article, I will show you how I enabled Autostart on Workstation Pro 17, hopefully giving this powerful feature more visibility.
Enable the Autostart Service
The Autostart feature is disabled by default. To enable it, enter run in the Search text box.
In the Run text box, enter services.msc.
In the Services screen, right-click VMware Autostart Service, and then click Properties from the drop-down menu.
In the Startup Type drop-down menu, select Automatic or Automatic (Delayed Start). Select Start to start service immediately. Then, click Apply.
Select the Log On tab and enter the user account that you installed Workstation with. Click Apply and then OK.
The Services dialog will now show that the service is running.
Select Which VMs to Autostart
Once the Autostart service has been enabled, you need to specify which VMs to start automatically.
From Workstation, right-click My Computer, and then select Configure Auto Start VMs from the drop-down menu. This must be done from the right navigation pane.
If you get the message «Failed to update AutoStart configuration. Ensure that the vmAutoStart.xml file exists and you have permissions to write this file,,» you may have file permission issues.
Verify that the user you configured when setting up the VMwareAutostartService service has write permissions to the %ALLUSERSPROFILE%\VMware\VMware Workstation\vmAutoStart.xml.
Autostart will only work on VMs in the root folder. If you don’t see any VMs or a particular VM in the Autostart dialog, ensure it is the root folder. The screenshot below shows that the only VM that can be auto-started is the one in the root folder.
You can specify the order in which the VMs start. For example, you may want a database to start before an application. From the Configure VM Power Actions dialog, you can specify the order.
Once VMs have been added to Autostart, they will start when the host system that Workstation is installed on is powered on, but not when they are initially added to the Autostart dialog.
I wanted to verify that when I rebooted the machine, the VMs would actually start when the host system rebooted and not when Workstation was powered on; using my monitoring tool, I could see that they were.
However, when I tried to interact with the VMs from Workstation, I only had a black screen. The services were running in the background, but I could not interact with them from the GUI; however, I could use RDP or SSH to interact with them.
Using Autostart, I ensured that the VMs I needed for testing were available after the host system rebooted. Autostart does have some quirks, such as only working in VMs in the root folder. It could also be enhanced by specifying a delay in the startup of the VMs that are auto-started. However, it is useful, and I hope VMware will continue to put resources into developing it.
About the Author
Tom Fenton has a wealth of hands-on IT experience gained over the past 30 years in a variety of technologies, with the past 20 years focusing on virtualization and storage. He previously worked as a Technical Marketing Manager for ControlUp. He also previously worked at VMware in Staff and Senior level positions. He has also worked as a Senior Validation Engineer with The Taneja Group, where he headed the Validation Service Lab and was instrumental in starting up its vSphere Virtual Volumes practice. He’s on X @vDoppler.
By default, both VMware ESXi and VMware Workstation don’t automatically start virtual machines after the host has been rebooted. After a host reboots (due to maintenance or a crash), the VMware administrator must manually start the virtual machines. In this guide, we’ll show how to enable automatic startup and startup order for VMs running on a VMware ESXi or Workstation host.
How to Configure Automatic Startup of VMs on VMware ESXi
For a standalone ESXi host, you can configure VM autostart through the ESXi host client interface.
For a standalone VMware ESXi 8.0 host:
- Sign-in the ESXi Host Client web UI;
- Select Manage > System > Autostart;
- Autostart is disabled by default (Unset) for all VMs;

- Select the VM and click Enable.
- Use the Start Later and Start Earlier buttons to change the order in which the VM starts (the VM with autostart order 1 starts first).


Click the Configure button to configure individual VM advanced startup and shutdown settings.
- Startup delay — how many seconds to wait before powering on the VM (120 seconds by default). This delay allows you to wait for booting of custom services and scripts execution;
- Shutdown delay — the maximum time the ESXi host waits to shutdown (120 seconds by default). If a VM doesn’t shut down within the specified delay time, the host executes a power off command against the VM and then begins shutting down the next VM.
- Stop Action — select one of four shutdown actions for the VM at host shutdown (System default, Shut Down, Suspend, or Power off). This requires VMware Tools to be installed on the guest OS. Default action is Shut down.
- Wait for heartbeat — if enabled, the boot sequence continues after the ESXi host receives the first heartbeat from the VM (also requires VMWare tools).

These options allow to configure the correct virtual machine startup order. For example, the domain controller VM should boot before the application servers, and so on.
It is possible to configure global startup defaults for all VMs on the ESXi host. Click the Edit Settings button at the top of the Autostart dialog box.
To enable autostart for all VMs, change the Enabled to Yes. Then configure the default start/stop delay and stop action.

Note. Individual VM AutoStartup settings override the default values.
Automatically Start Virtual Machines on VMware vCenter
A different set of automatic startup and shutdown settings is used if your ESXi hosts are connected to a VMware vCenter (VCSA).
You can manage startup settings on a standalone host in vCenter, but when VMs are migrated to another host via vMotion, the startup settings do not move with the VM.

In vCenter 7 and 8, Scheduled Task can be used to automatically start infrastructure VMs after an outage.
- Select VM in vCenter and go to the Configure tab.
- Select Scheduled Tasks.
- Select New Scheduled Task > task name Power On.
- Run the task After vCenter startup with a 2 minutes delay.
- Save the task.

Such a task will automatically boot the VM after vCenter starts.
The automatic startup and shutdown options for VMs are disabled when an ESXi host is part of a vSphere HA (High Availability) cluster. HA automatically manages VM restarts across hosts in the event of failures that conflict with autostart settings.

Configure VMs Autostart using PowerShell
You can configure VM autostart settings on ESXi or vCenter using PowerShell. This requires the VMware PowerCLI module to be installed on the administrator’s machine.
Connect to ESXi host or vCenter using the command:
connect-viserver -server yourESXihost
Check the current startup settings for VMs on the host:
Get-VM | Get-VMStartPolicy

Use the following command to enable autostart for a specific VM:
Get-VMHostStartPolicy | Set-VMHostStartPolicy -Enabled $true

Get-VM hq-dc01 | Get-VMStartPolicy | Set-VMStartpolicy -StartAction PowerOn -StartOrder 2 -StartDelay 300 -StopAction GuestShutDown -StopDelay 300

Also, you can enable autostart manager from the ESXi shell.
# vim-cmd hostsvc/autostartmanager/enable_autostart 1

List the boot order and other AutoStart parameters for VMs on an ESXi host:
# vim-cmd hostsvc/autostartmanager/get_autostartseq

Get the default VM startup setting on a host:
# vim-cmd hostsvc/autostartmanager/get_defaults

(vim.host.AutoStartManager.SystemDefaults) {

enabled = false,

startDelay = 120,

stopDelay = 120,

waitForHeartbeat = false,

stopAction = "powerOff"

}
How to Automatically Start VMs on VMware Workstation
Starting with VMware Workstation Pro 17.0, you can use the AutoStart feature to automatically power on local virtual machines when the Windows host computer starts.
- Open the services.msc console and change the startup type to Automatic for the VMware Autostart Service;

- Launch VMware Workstation Pro;
- Right-click My Computer > Configure Auto Start VMs;
- Select VMs what you want to start automatically and set the startup order.

- Autostart can only be enabled for VMs in the root folder. If you don’t see a specific VM in the startup list, make sure it is the root folder.


In some cases, the error message may appear when saving the AutoStart settings:
Failed to update AutoStart configuration. Ensure that the vmAutoStart.xml file exists and you have permissions to write this file.

In this case, make sure that the user account that is used to start the VMwareAutostartService service has write permission to the %ALLUSERSPROFILE%\VMware\VMware Workstation\vmAutoStart.xml file.
You can run any virtual machine by creating the following batch file AutoStartVM.bat.
start “C:\Program Files (x86)\VMware\VMware Workstation\vmrun.exe” start “D:\VM\TestVm1\TestVm1.vmx”

ping 127.0.0.1 -n 40 > nul

start “C:\Program Files (x86)\VMware\VMware Workstation\vmrun.exe” start “D:\VM\freebsd2\freebsd2.vmx”
The second line of code is used to add a 40 second delay before the second VM starts. You can copy this file to the desktop (and run it manually by double-clicking it), add it to the Windows Startup, or run it through the Task Scheduler job.
Cyril Kardashevsky
I enjoy technology and developing websites. Since 2012 I’m running a few of my own websites, and share useful content on gadgets, PC administration and website promotion.
Are you tired of manually starting your VMware Workstation virtual machine every time you need to use it? Imagine the convenience of having your virtual machine automatically start up as soon as you start your computer, without any extra effort on your part. Well, you’re in luck! In this guide, we will explore how to auto start VMware Workstation virtual machines, allowing you to save time and streamline your workflow.
Auto starting your VMware Workstation virtual machine can greatly enhance your productivity and efficiency. By automating the startup process, you eliminate the need to manually start your virtual machine each time you want to use it. Whether you use VMware Workstation for development, testing, or any other virtual machine needs, this feature can be a game-changer. With just a few simple steps, you can have your virtual machine up and running automatically, so you can focus on what really matters.
Automatically starting a virtual machine in VMware Workstation is a simple process. Here’s how you can do it:
- Open VMware Workstation and go to the «Edit» menu.
- Click on «Preferences» and navigate to the «Power» tab.
- Under «Startup/Shutdown,» click on «Shared VMs» and then on «Enable at startup.»
- Select the virtual machines you want to auto-start and arrange their startup order.
- Click on «OK» to save the settings.

Understanding Auto Start in VMware Workstation
Auto Start is a feature in VMware Workstation that allows you to automatically start virtual machines when the Workstation application launches. This can be particularly useful for streamlining your workflow and ensuring that your virtual machines are up and running without manual intervention. In this article, we will explore different aspects of auto-starting virtual machines in VMware Workstation. We will discuss the benefits of using the auto-start feature, how to configure it, and explore some advanced options and considerations.
Benefits of Auto Start
Auto Start is a valuable feature in VMware Workstation that brings several benefits to users:
- Saves time: Auto Start eliminates the need to manually start each virtual machine, saving you time and effort.
- Efficient workflow: By automatically launching virtual machines, you can maintain a streamlined workflow and avoid delays.
- Consistency: Auto Start ensures that the same virtual machines are always launched in the correct order, maintaining consistency in your work environment.
- Remote management: Auto Start allows for easy management of remote virtual machines by automatically starting them upon connection.
Configuring Auto Start
To configure Auto Start in VMware Workstation, follow these steps:
1. Open VMware Workstation and go to the «Edit» menu.
2. Click on «Preferences» to open the Preferences dialog box.
3. In the Preferences dialog box, select the «Workspace» category.
4. Under «Workspace,» click on «Auto Start.» You will see a list of virtual machines available for auto-start.
5. Enable the «Enable Auto Start» checkbox to activate the Auto Start feature.
6. Select the virtual machines you want to auto-start and arrange them in the desired order using the up and down arrows.
7. Click on «OK» to save your changes and exit the Preferences dialog box.
Advanced Auto Start Options
VMware Workstation also offers advanced options for Auto Start:
- Delay Start: You can set a delay time (in seconds) for each auto-started virtual machine, allowing for specific startups.
- Shutdown Delay: The shutdown delay allows virtual machines to be gracefully shutdown before the host system shuts down.
- Start Minimized: Start Minimized launches virtual machines in a minimized window to avoid interruption of your workspace.
- Start with VMware Workstation: Enabling this option ensures that the auto-started virtual machines start whenever VMware Workstation is opened.
- Automatically connect to server: If you are working with virtual machines located on a remote server, this option allows for automatic connection upon startup of VMware Workstation.
Considerations for Auto Start
When using the Auto Start feature in VMware Workstation, there are some important considerations to keep in mind:
- Resource usage: Auto-starting multiple virtual machines simultaneously may impact system resources, so ensure that your host machine can handle the load.
- Order of startup: Arrange your virtual machines in the correct order to ensure dependencies are met.
- Hardware compatibility: Verify that the host system and virtual machines are compatible to avoid any issues during auto start.
Automating Virtual Machine Startup for Seamless Workflows
Another dimension of auto-starting virtual machines in VMware Workstation is the ability to automate startup for seamless workflows. By utilizing scripting and command-line tools, you can create a customized startup sequence for your virtual machines. This level of automation is particularly beneficial for environments that require specific order of startup or have complex dependencies.
Using Scripts for Auto Start
VMware Workstation provides the ability to use scripts for auto-starting virtual machines. By utilizing scripting languages like PowerShell or Bash, you can create sophisticated startup sequences and perform actions such as launching applications and performing system tasks.
To use scripts for auto start, follow these steps:
1. Create a script in your preferred scripting language (such as PowerShell or Bash).
2. Configure the script to launch the desired virtual machines in the desired order.
3. Save the script in a location accessible by VMware Workstation.
4. In VMware Workstation, go to «Edit» > «Preferences» > «Workspace» > «Custom Scripts.»
5. Under the «Startup scripts» section, click on «Add» and browse for your script file.
6. Click on «OK» to save your changes and exit the Preferences dialog box.
Command-Line Tools for Automation
In addition to using scripts, VMware Workstation provides command-line tools that enable automation of virtual machine startup and other management tasks. The command-line tool, vmrun, allows you to control virtual machines and perform operations such as power on, power off, and suspend from the command line.
Here are a few examples of how to use the vmrun command-line tool:
| Command | Description |
| vmrun list | List all running virtual machines. |
| vmrun start «path_to_vm» | Start a virtual machine. |
| vmrun stop «path_to_vm» | Stop a virtual machine. |
| vmrun suspend «path_to_vm» | Suspend a virtual machine. |
By utilizing vmrun and integrating it into your automation workflows, you can achieve seamless startup and management of virtual machines in VMware Workstation.
Take Advantage of Automation
Automating the startup and management of virtual machines in VMware Workstation can significantly enhance your productivity and efficiency. Whether you utilize the built-in Auto Start feature or leverage scripting and command-line tools, automation provides a seamless way to ensure your virtual machines are ready when you need them. Experiment with these options and find the setup that works best for your specific needs and workflows.

How to Automatically Start a VMware Workstation Virtual Machine
VMware Workstation is a powerful virtualization software that allows you to create and run virtual machines on your computer. If you want to ensure that a specific virtual machine starts automatically when you launch VMware Workstation, here’s a step-by-step guide to help you:
Method 1: VMware Workstation Startup Preferences
The easiest way to auto-start a virtual machine is by configuring the startup preferences in VMware Workstation. Follow these steps:
- Open VMware Workstation and go to the «Edit» menu.
- Select «Preferences» from the drop-down menu.
- In the «Workspace» tab, click on «Startup» settings.
- Tick the box next to «Start VMware Workstation with Windows».
- Under «Open virtual machines», choose the virtual machine you want to auto-start.
- Click «OK» to save the changes.
Method 2: Windows Task Scheduler
If you prefer a more advanced method, you can use the Windows Task Scheduler to auto-start a VMware Workstation virtual machine:
- Press the Windows key + R to open the Run dialog box.
- Type «taskschd.msc» and press Enter to open the Task Scheduler.
- Automatically starting a VMware Workstation virtual machine can save time and streamline workflows.
- You can configure a virtual machine to start automatically when the host computer powers on.
- To enable auto-start, go to the Virtual Machine Settings, select the «Power» tab, and choose «Power on this virtual machine automatically» option.
- You can also set a delay time for auto-start to allow other virtual machines or services to start first.
- Auto-starting virtual machines can be particularly useful in environments where multiple virtual machines need to be running simultaneously.
- Select the virtual machine you want to auto start in the VMware Workstation library.
- Click on «Edit» in the menu bar, then select «Virtual Machine Settings».
- In the «Options» tab, select «Power» and check the box next to «Power on this virtual machine automatically».
- Click «OK» to save the settings.
- Select the virtual machine you want to change the order of in the VMware Workstation library.
- Click on «Edit» in the menu bar, then select «Virtual Machine Settings».
- In the «Options» tab, select «Power» and use the up and down arrows to change the order of the virtual machines.
- Click «OK» to save the settings.
- Select the virtual machines you want to auto start in the VMware Workstation library.
- Click on «Edit» in the menu bar, then select «Virtual Machine Settings».
- In the «Options» tab, select «Power» and check the box next to «Power on this virtual machine automatically».
- Click «OK» to save the settings.
- Select the virtual machine you want to disable auto start for in the VMware Workstation library.
- Click on «Edit» in the menu bar, then select «Virtual Machine Settings».
- In the «Options» tab, select «Power» and uncheck the box next to «Power on this virtual machine automatically».
- Click «OK» to save the settings.
- Open VMware Workstation.
- Select the virtual machine you want to auto start.
- Click on «Edit» in the menu bar, then select «Virtual Machine Settings».
- In the «Options» tab, select «Power» and check the box next to «Power on this virtual machine automatically».
- Close VMware Workstation.
- Press Windows key + R, type «shell:startup», and press Enter.
- In the folder that opens, create a shortcut to VMware Workstation by right-clicking and selecting «New» > «Shortcut».
- In the «Create Shortcut» window, click «Browse» and select the VMware Workstation executable file.
- Click «Next» and enter a name for the shortcut.
- Click «Finish» to create the shortcut.
- Open the virtual machine settings
- Go to the Options tab
- Select Startup/Shutdown
- Check the «Start and stop with host» box
- Click OK to save your changes
Key Takeaways — How to Auto Start Vmware Workstation Virtual Machine
Frequently Asked Questions
Here are some common questions about auto starting VMware Workstation virtual machines:
1. How can I configure VMware Workstation to auto start a virtual machine?
To configure VMware Workstation to automatically start a virtual machine, follow these steps:
Now, whenever you start VMware Workstation, the selected virtual machine will automatically power on.
2. How can I change the auto start order of virtual machines in VMware Workstation?
To change the auto start order of virtual machines in VMware Workstation, follow these steps:
The virtual machines will now auto start in the new order you have set.
3. Can I auto start multiple virtual machines in VMware Workstation?
Yes, you can auto start multiple virtual machines in VMware Workstation by following these steps:
All the selected virtual machines will now auto start when VMware Workstation is launched.
4. How do I disable auto start for a virtual machine in VMware Workstation?
To disable auto start for a virtual machine in VMware Workstation, follow these steps:
The virtual machine will no longer auto start when VMware Workstation is launched.
5. Can I auto start VMware Workstation and a virtual machine on system startup?
Yes, you can configure VMware Workstation and a specific virtual machine to auto start on system startup with these steps:
Now, when you restart your system, VMware Workstation
So there you have it! Auto starting your VMware Workstation virtual machine is a convenient feature that saves you time and ensures your VM is up and running when you need it. Remember to follow these steps:
With these simple instructions, you can have your virtual machine automatically start whenever you boot up your computer, ensuring you’re ready to work or play without the hassle of manual startup.