
The VLC media player from VideoLAN is a free, open-source player that runs on Mac, UNIX, Windows and Linux. It can be used as both a media client and a media server, serving audio and/or video files to any size network — public or private.
You can set up VLC to act as a media server using the built-in Streaming/Transcoding Wizard.
Step 1
Download and install the VLC media player (videolan.org/vlc).
Step 2
Start VLC. Select the «Streaming/Exporting Wizard» from the File menu.
Step 3
Select «Stream to network» and click «Next.»
Step 4
Choose the location of the items you wish to stream. To stream from your iTunes library, for example, check the «Existing playlist item,» expand the «My Music» directory, and select «iTunes.» Click «Next.»
Step 5
Specify your streaming method. If you would like to stream online, select HTTP. Leave the «Destination» field blank and click «Next.»
Step 6
Check either the «Transcode video» or «Transcode audio» boxes to change compression rates and codecs for your stream. Leave them both blank if you don’t want to change settings. Click «Next.»
Step 7
Choose an encapsulation format. Any of the possible formats will work for an audio stream. Click «Next.»
Step 8
Leave «Additional streaming options» blank and click «Next.» Double-check your settings in the last window and click «Finish» to begin streaming your media source.
Время на прочтение5 мин
Количество просмотров186K
В этой части мы рассмотрим «Простой Стриминг» через GUI для домохозяек, а для примера нам послужат ситуации:
1. Когда мы выступаем в роли локального транслятора, для людей с лимитированным интернетом, с отключенным интернетом, или для тех, кто считается с вашим вкусом и хочет смотреть то, что вы им порекомендуете.
3. Если вы захотите передавать видео со своей вебкамеры, просто цифровой камеры и любых других подобных устройств, через DirectShow.
Если у кого будут вопросы, которые уже освещались, посмотрите ответы в темах:
Серьезный разговор о VLC
Серьезный разговор о VLC #2
VLC: Стрим и Стрим-Сервер #1
и
Стабильное вещание IPTV через VLC
Комментарии:
1. Для удобства, в случае если вы будете засовывать множества файлов, советую заранее подготовить плейлист в формате M3U.
2. В последних версиях VLC, стрим можно смело настроить на вещание практически по всем протоколам сразу, если конечно это потребуется.
3. Для отладки и изучения, рекомендую начинать работу с VLC используя модуль «logger»
vlc -extraintf logger
4. Для наложения логотипа на стрим используйте фильтр logo, лучше в формате PNG.
5. В качестве альтернативных плееров для воспроизведения потоков с VLC брали Windows и Winamp Media Player.
Методы вывода потоков
- Play localy: Просмотр/прослушивание того, что вы вещаете на данный момент поддерживает транскодинг, рескалинг и так далее… (для локального применения)
- File: Сохраняет пущенный в эфир поток на жесткий диск. (пригоден если вы ретранслируете что-либо мимо себя, и хотите это сохранить)
- HTTP/S: Стрим потока по HTTP. Необходимо указать IP адрес и порт TCP.
- MMS/H: Чаще всего используется для потока в Windows Media Player. И работает только с методом ASF инкапсуляции.
- UDP: multicast и unicast (возможна поддержка IPv6). И работает только с методом TS инкапсуляции.
- RTP: Real-Time Transfer Protocol. похож на UDP, и может использовать unicast multicast адреса одновременно.
- RTMP: Real Time Messaging Protocol — проприетарный протокол потоковой передачи данных, в основном используется для передачи потокового видео и аудио-потоков с веб-камер через интернет. (Поддерживается VLC только в качестве входящего потока, который можно ретранслировать.)
Настройка входящих данных
Для всех типов вещание начальный GUI-диалог выглядит одинаково:
File: Достаточно выбрать плейлист или любой файл (Аудио/Видео), а зависимости от того, что вы собираетесь вещать в сеть.
Disk: DVD. AudioCD. VCD, здесь же можно отключить вывод меню, выбрать привод, и главу.
Network: здесь мы можем выбрать любой протокол и адрес входящего потока, который будем ретранслировать/конвертировать/сохранять (например с Youtube), Также вчера было проверено, что VLC отлично справляется с RTMP потоками, так что можете вещать видео со своей веб-камеры, поток которой идет на любой сервис управляемый red5.
Capture Device: Здесь можно выбрать, при наличии такового, любое устройство которое работают через Direct Show, Камеру, Вебкамеру, Цифровое или Спутниковое ТВ, а также Ваш Рабочий стол (Будет вещаться все, что происходит у вас на экране монитора).
После того как вы определились с выбором входящего потока, достаточно нажать кнопку «Stream». После чего откроется новое диалоговое окно, которое одновременно работает как настройка стриминга и/или конвертации, и конечный результат зависит от внесенных здесь настроек. Нажимаем кнопку Next, или вкладку Destination.
Как показано на рисунке, и как я уже упоминал, мы можем вести трансляции по всем поддерживаемым протоколам одновременно, в данном примере я показываю пример трансляции по HTTP/MMS.
Выбираем:
New Destination — HTTP, нажимаем Add, вбиваем адрес (0.0.0.0, или смотрим по ipconfig), указываем порт. Если нам нужны еще протоколы, то просто нажимаем «+».
Transcoding Options: Выбираем метод транскодинга из готовых профилей, или создаем свой (а также можно пустить поток без обработки для клиентского VLC).
Наморочавшись с кодеками, я пришел к выводу, а потом почитав в сети, я понял что не я один, — передача видео стрима по протоколам mms и http с тех.данными:
Инкапсуляция — ASF
Кодек — DivX3
Ширина — 320 (для уменьшения нагрузки)
Высота — 200 (для уменьшения нагрузки)
Аудио — mp3
Битрейт — 96
cамая оптимальная, для передачи на большинство плееров.
:sout=#transcode{vcodec=DIV3,vb=800,scale=1,width=320,height=200,acodec=mp3,ab=96,channels=2,samplerate=44100}:std{access=mmsh,mux=asfh,dst=0.0.0.0:1234}
При таких раскладах, протестировав на 10 клиентах, загрузка процессора была ~5-12%
Этот же метод можно использовать для людей у которых вообще нет медийного плеера, для просмотра/прослушивания стрима с вашего веб сайта (локального, или если у вас Внешний IP, то этот метод так же сработает на сайт в сети интернет).
Для этого создайте документ с расширением *.asx, например stream.asx и поместить туда код:
<ASX version ="3.0">
  <TITLE>Домашний Стрим</TITLE>
  <ENTRY>
    <REF HREF="http://127.0.0.1:1234" />
  </ENTRY>
</ASX>
Где HREF, — Ваш IP и порт. Поместите этот файл на сервер, например в папку /stream/, а в html файле, где бы вы хотели отобразить стрим, напишите следующее:
<embed src="stream.asx” height=”320” width=”200">
В случае же если у клиентов стоит Mplayer или VLC, то можно поиграть с другими типами инкапсуляций и кодеков, таких как TS и h264 соответственно.
:sout=#std{access=http,mux=ts,dst=0.0.0.0:8080}
В таком случае мы получим меньшую нагрузку на систему, большую на канал, но при этом клиенты получают оригинальное видео.
Следующая/последняя вкладка Options не обязательна, в нее стоит заглянуть только для тех кто будет настраивать Анонсы, или захочет посмотреть сгенерированный скрипт, который можно будет в дальнейшем использовать из командной стройки, так же полезен если вы будете запускать вещания по «Крону». О том как использовать я уже писал.
Нажимаем последний раз «Stream» и приглашаем друзей.
Выводы: Качество стрима и его приема может быть достигнуто только при наличии VLC или Mplayer с обоих сторон, так как в случае с VLC не потребует заморочек с плагинами и кодеками, Все, что он стримает по любому протоколу, он быстро и безболезненно подхватывает и на стороне клиента, вне заисимости от кодеков и инкапсуляций и прочих раздражающих факторов. Данный вывод основан только на том факте, что рассматриваемый метод хорош для «домохозяек», и людей которые не умеют пользоватся консолями и командными строками. В следющей части мы попробуем раскрыть тему и возможности вещания на основе «Command Line», которые увеличивают спектр возможностей по стрмингу.
PS: Если возникают проблемы с доступностью из сети,
1. Проверьте Фаервол, Прокси, Файл C:\****\VideoLAN\VLC\http\.hosts на наличие раскомментированных строк
::/0
0.0.0.0/0
UPD: Для передачи потока по UDP unicast
со стороны сервера необходимо указать IP и порт назначения. Например:
Сервер (192.168.0.1), Клиент (192.168.0.2)
На сервере в настройках стриминга указать
Media — Stream — UDP, 192.168.0.2:1234
У клиента для просмотра потока:
Media — Open Network Stream — UDP, @:1234
UDP Multicast
В multicast, стрим вещается на multicast IP адреса (IP адреса зарезервированные для этих целей, диапазон которых от 224.0.0.0 до 239.255.255.255). Затем, любая машина в сети, может присоединится к multicast группе, посылая запрос в сеть, автоматически получит транслируемый поток.
Потом отправляет запрос об остановке воспроизведения потока и выходит из данной группы. Преимущество multicast стрима, в том, что поток получают только те машины, которые хотят его получать, а сервер вещает только один поток, который получают все участники группы.
Активация multicast, происходит также как в случае с unicast, только во вкладке Options необходимо указать количество TTL* (например 50) IP пакетов, Это означает, что multicast поток сможет пересекать 50 маршрутизаторов.
* — Time To Live
А со стороны клиента, достаточно просто открыть поток в любом плеере который поддерживает multiсast и в строке имени потока указать
udp://@_IP_:port
Ссылки по теме
Multicast на Википедии
IP Multicast на сайте Cisco
Более подробно multicast мы рассмотрим в теме продвинутого стриминга с использованием командной строки и телнета
В широком перечне функций VideoLAN Client достойное место занимает возможность превратить компьютер, на котором установлен проигрыватель в сервер потокового вещания мультимедиа в сеть. Настроить VLC-server совсем несложно, а получаемый при этом результат может удовлетворить потребности пользователей крупной локальной сети.

В качестве источников потоковой трансляции с помощью сервера, созданного по инструкции ниже, могут быть видеофайлы различных форматов, DVD-Video, а также видео в реальном времени. В качестве приемника вещания можно использовать компьютеры, работающие под управлением практически любой современной операционной системы, а также мобильные устройства в основе функционирования которых лежит Android либо iOS.
Настройка сервера потокового вещания
Единственным условием для того чтобы нижеизложенное принесло положительные результаты является тот фактор, что на всех устройствах в сети, которые планируются к использованию в качестве принимающей поток стороны, как и на ПК-сервере должен быть установлен VLC-проигрыватель актуальной версии.
- Запускаем плеер, открываем меню «Медиа» и заходим в пункт «Передавать».

- Добавляем файл-источник в соответствующее поле на вкладке «Файл». В том случае, если в качестве основы трансляции будет использоваться не локальное видео или аудио, а физический диск-носитель, источник в Интернете или устройство видеозахвата, воспользуемся соответствующими вкладками в верхней части окна.

- После того как источник определен, нажимаем кнопку «Поток», которая запустит Мастер «Вывод потока». Первый шаг работы мастера завершаем нажатием кнопки «Следующий».

- Параметры, определяемые в окне «Настройка вывода», являются важнейшими для правильной настройки проигрывателя в качестве сервера.


Нажимаем «+» и добавляем из раскрывающегося списка протокол, возможности которого будут использованы при будущей передаче медиапотока.
- Можно добавлять несколько протоколов для большей «универсальности» трансляции в отношении устройств-приемников. Простейшим методом осуществления передачи медиаданных на устройства в локальной сети является использование протокола «HTTP». Создаем трансляцию на его основе, нажав кнопку «Добавить».

- Значения полей «Порт» и «Путь» не меняем, сразу нажимаем кнопку «Следующий».

- Выбираем профиль, определяющий формат передаваемых видео и аудио данных из раскрывающегося списка. Если есть сомнения в правильности определения, можно оставить профиль по умолчанию.

- Открывается финальное окно Мастера «Вывод потока», предлагающее возможности по настройке дополнительных параметров. В большинстве случаев менять значения в этом окне нет необходимости, нажимаем кнопку «Поток».

- Создание сервера окончено, а передача стартует автоматически.


Для того чтобы принимать созданную трансляцию на других устройствах, понадобится IP-адрес компьютера-сервера. Определить значение этого параметра можно обратившись к окну свойств сетевого подключения. В рассматриваемом примере значение 192.168.0.104

Прием потока
Для просмотра трансляции с VLC-сервера, созданного по инструкции выше, на устройствах, подключенных к локальной сети необходимо осуществить несколько простых шагов. В качестве примера используем Андроид-версию проигрывателя. В других ОС настройка приема осуществляется аналогично.
- Открываем плеер, а в меню выбора источника воспроизведения выбираем пункт «Открыть MRL…».

- В поле «Сетевой адрес MRL» вводим IP-адрес устройства-сервера и порт.

- Нажимаем на добавленный пункт, в результате чего будет открыто окно проигрывания видео.


Как видим организация потокового вещания в пределах небольшой сети – простая процедура, если использовать такой инструмент, как VLC-Server и следовать несложным инструкциям.
Enjoying music or movies via Netflix or YouTube is great, but what about when there’s no Internet? If you set up a VLC media server, you will be able to entertain anytime, anywhere.
VLC Media Player is a powerful media server for a number of reasons. It allows you to store a large collection of videos or music files on a PC and stream that content to any computer or mobile device in your home.
After setting up a VLC media server to stream video and music with the instructions below, you can sit back and watch movies, listen to your favorite music, or even enjoy videos at home. Suspension from any device in the home that accepts content streaming.
How to create media server on Linux using VLC to stream media at home
- Ways to stream from VLC
- Set up VLM configuration
- Add media to the streaming library
- Launch VLC Video on Demand
- Set up the VLC Streaming Client
Ways to stream from VLC
Before going into the approach to streaming media from a VLC ‘server’, you should know that there are many ways to stream media using VLC. The options you choose will depend on the complexity you want.
— Using HTTP allows you to use the remote interface but not always works, unless you know the correct protocol settings to use.
— Using VLC’s ‘stream’ command from the file menu is the simplest approach, but requires configuring the personal computer IP address that you can stream to.
— Using VLM (VideoLAN Manager) and Video on Demand (VOD) via command line code is the fastest and simplest way to stream online on the home network.
For the following settings, VLM is chosen to run on a Linux computer running Ubuntu, because it simplifies setting up the server and any client in the house with just a few quick lines, as long as You remember the names of the media streams.
If you don’t have a Linux computer to use as a ‘server’ for streaming media, you should use it. Set up a PC running Linux because these PCs are lighter, faster, stream more seamless and reliable than anything else.
Set up VLM configuration
To use the VLM tool, you need to access it using VLC GUI. If your VLC installation does not display the VLM tool like the screenshots below, then you need to upgrade your VLC to the latest version.
Open VLC and select Tools, then select VLM Configuration.

The VLM Configurator tool you see here makes it easy to stream content. All you have to do is add media (eg MP4 or MP3 video files) to Media Manager List with a specific name.
The name you give to these streams is very important, because that’s how you will determine the stream when you set up the clients, so remember the name you chose (note the name does not include spaces).
Add media to the streaming library
First select the Video On Demand (VOD) from the list. Then, specify a simple name for the streamed video or audio.

Finally, click Input and select the media file you want to stream. Leave the Output and Muxer fields blank .
Click Add and you will see the stream with the name specified displayed in the Media Manager List .

After adding all the media you need to stream, you’ll have a list of media displayed here (ignoring Bcast items).

The idea here is to build a rich content library. These can be video files that you have downloaded from the Internet, DVD movies you have saved to your hard drive or any other video or audio file, in any format that VLC can handle.
After you’ve set up the media library, it’s time to export the VLM configuration to a file. This will allow you to launch your streaming service according to the steps below. Note the .VLM file needs to exist.
Click Export and put a memorable name for the file. Save it to any folder, but you should save it to ‘Video’ or ‘Documents’ for easy remember.

That’s all you need to set up everything in VLC GUI.
You don’t have to worry about having to click the ‘Stream’ for each file you will play online, because in the commands below, you will launch all the media files that you have configured in VLM at the same time. This will save a lot of time.
Launch VLC Video on Demand
The ‘Video on Demand’ streams you just set up in the video manager will allow any PC to connect to any available stream, at any time.
But first you need to start all the streams. Open a command window by typing Ctrl + Alt + T.
Start VLC with the following command. Enter it carefully and accurately.
vlc -vvv --color -I telnet --telnet-password --rtsp-host 0.0.0.0 --rtsp-port 5554
Replace with the password you chose (for the telnet connection you will use below).
This will move an entire paragraph of text on the command window. And don’t worry too much about any errors (which means you’ve clicked on some settings that don’t work in VLC) — important parts are set up correctly by the command you just launched.

This command activates telnet, but now you need to load the newly created VLM configuration file to properly launch streaming media files.
Open a new terminal window with Ctrl + Alt + T and navigate to the folder containing your media files (in this case, the Documents folder ). Then, connect to the new telnet server created on port 4212 (default for telnet) with the command:
telnet localhost 4212
Enter the password you created above to login.
Then enter:
load .vlm
Replace with the name of the exported VLM file you created above, when you export the list of media files. In this case, it is PlayList2.vlm (remember, this is Linux, so it is case sensitive).

You will see the reaction of «load».
That is, your media server is now fully configured with the full list of downloaded media files available for streaming, with any client application on the same network.
Now, let’s see how you set it up for the first time.
Set up the VLC Streaming Client
On each of your clients, whether it’s a Windows, Mac or Linux PC or even a mobile device, you will still be able to open streams from your new VLC streaming server in the same way.
You will only need to build the available media library for the client once. After that, the GUI maintains a library for all of them, and you can view them whenever you want.
First, open the VLC interface on the client device. Then, click on Media in the menu and select Open Network Stream .

In the Open Media window, fill in the Please enter a network URL field with the address IP of the server, including port 5554, and prefaced with ‘rtsp: //’ .
End the string with a forward slash and the name of the media (the name you set when you created the online media playlist above). For example, with Patrick James’s music video added to the online playlist, the string will look like this:
rtsp: //192.168.1.22: 5554 / PatrickJames
The name of the media is «PatrickJames».

If you don’t know the server’s IP, go back to your Linux machine, open a command prompt (Ctrl + Alt + T) and enter ‘ifconfig’ to see the current IP address.
If your Linux server is not static, you might consider assigning a static IP address. Or, if it’s too complicated, just use DynDNS — it’s a simple, smart solution that will really allow you to stream media outside your home network.
This will launch video or audio streams immediately. To add more threads to your library, just return to the VNC interface, open another stream and enter the URL with the new media name at the end. Repeat until you load all of that client’s library.
To view the library, simply click the menu from the navigation bar at the bottom of the video viewer window and the navigation panel will open on the left.‘Playlist’ will show you all the videos you have downloaded.

As you can see, VLC player looks great and many media streaming boxes, used to watch Internet content on TV today, also often include VLC streaming options. Just use the same URL there and so everything is done.
This is the content from the Linux VLC streaming server example that is playing on Android (using VLC for Android).
Because VLC is popular on many devices, you definitely have access to your growing media library, no matter which device you use and where.
There are many media center solutions, like Plex and even PS3. But some of them have a powerful command-based solution that allows you to stream all your personal storage media, which is stored locally as simply as possible.
Do you use VLC for your streaming needs? Which features of VLC do you like best? Share your own experience in the comment section below!
See more:
- Guide live streaming, streaming live video on Youtube using computer, laptop
- How to live stream Facebook with OBS Studio software
- How to play live video on YouTube?
Contents
- 1 Introduction
- 2 SERVER SETUP: Streaming using the streaming dialog
- 2.1 Source Dialog
- 2.2 Destinations
- 2.3 Options
- 3 CLIENT SETUP: Receiving the stream
Introduction
Since the documentation on streaming is fairly old, this wiki page was written to show how to do streaming on newer versions of VLC Media Player. EDIT: This page looked incomplete, and I figured out a way that worked for me on my particular system, so I thought I’d document it in the hopes that it helps someone else in the future. My setup is as follows:
- Server: Windows Vista Machine running VLC 1.1.11 (IP Address: 192.168.2.2)
- Client: Windows 7 Machine running VLC 1.1.11 (IP Address: 192.168.2.4)
- Two computers are on the same subnet (192.168.2.X). I am able to ping from each machine to the other.
Goal: I have a bunch of video files ripped from DVDs that I want to share between my server and my client(s). This is simply to be able to keep all my movies in one central location.
SERVER SETUP: Streaming using the streaming dialog
- Launch VLC and then push Media -> Streaming… (You should see a dialog like the one below)
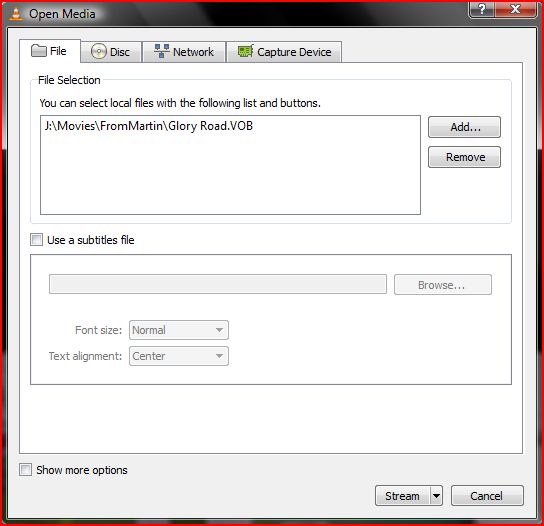
- On the window that pops up click on the tab of the media you want to stream from. I chose to stream from a file (a .vob file). I add this file to the «File Selection» list.
- I left «Use a subtitles file» unchecked
- Hit the «Stream» button at the bottom of the dialog. This pops up a new streaming options dialog. The streaming options dialog has 3 sections: Source, Destinations, and Options.
Source Dialog
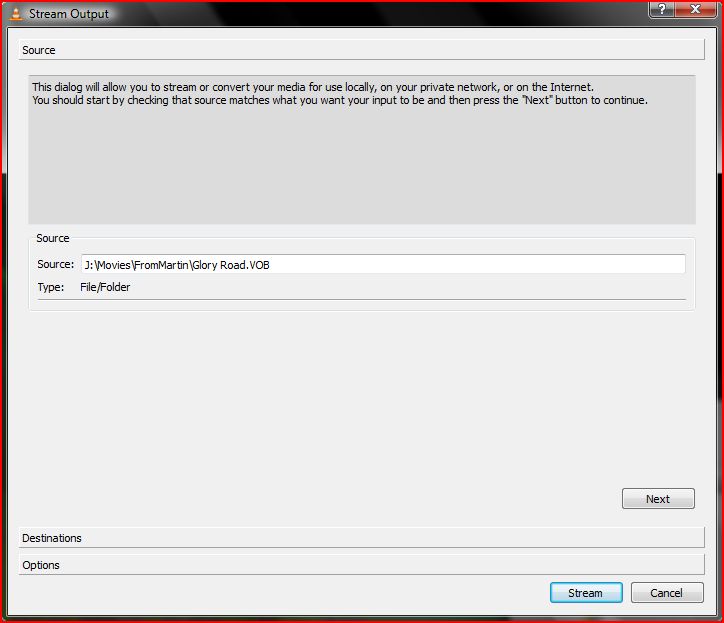
Source is already filled in with the file that I chose already, so I hit the Next button
Destinations
- Under Destinations, I selected «RTP / MPEG Transport Stream», since this is an awesome way to send data across the network (that’s what RTP is all about).
- In my case, I want to see the movie both on the server and the client (it gives me warm fuzzies to see the movie in both places), so I check the «Display locally» checkbox
- Under «Transcoding options», I uncheck «Activate Transcoding» because I happen to know that my videos are already encoded just fine (and when I tried transcoding, that didn’t seem to work so well for me)
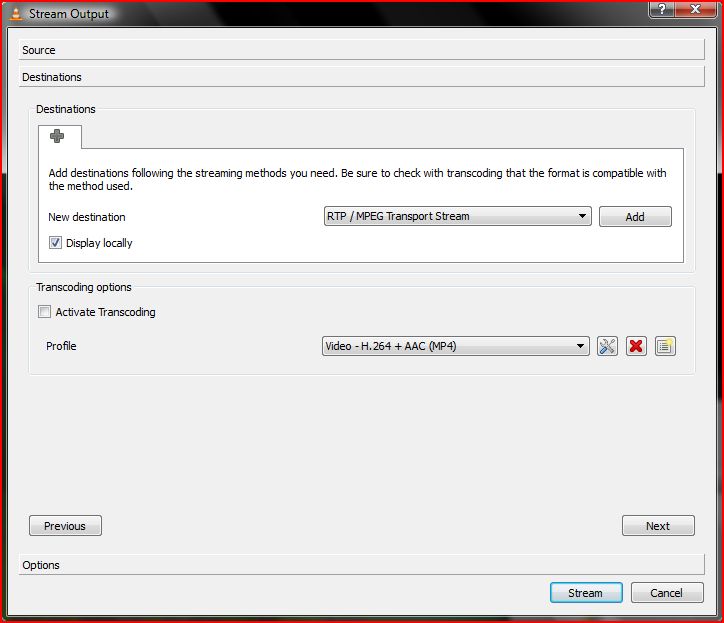
- Now click «Add». Specify the IP address of the client (in my case 192.168.2.4 — if you don’t know what yours is, open a command prompt (cmd.exe), and run «ipconfig /all»)
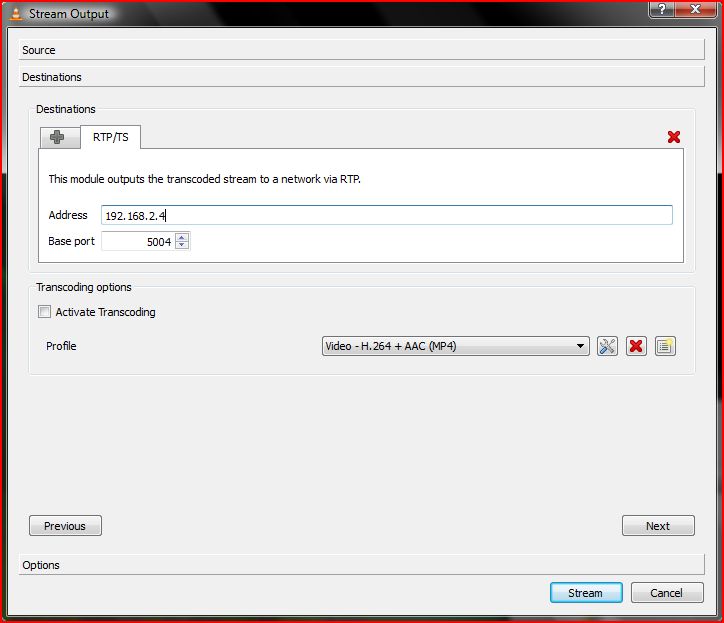
- Hit «Next» to go to the final options screen
Options
- Under «Options», I selected «Stream all elementary streams» (not completely necessary it turns out…this probably sends more than I really have to), and I also checked «SAP announce» and gave it a name (I chose the name of the video file…seemed logical) and a group name (doesn’t seem to be all that important)
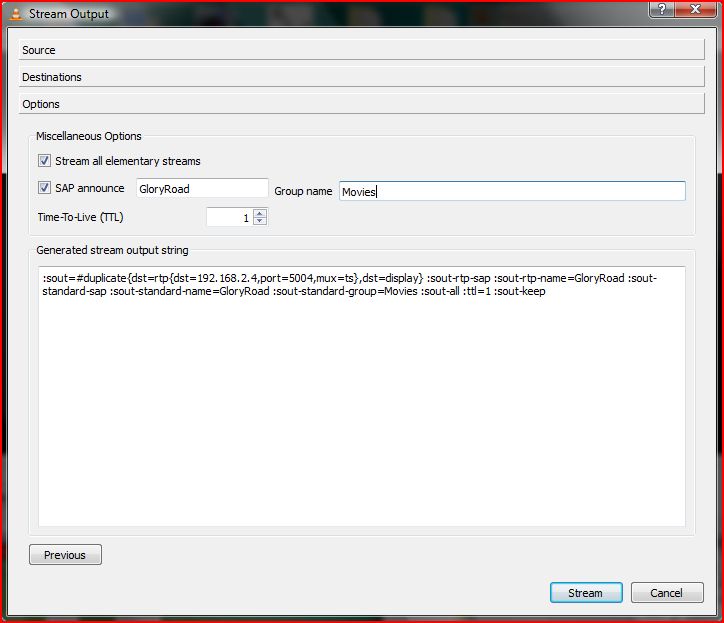
- Hit «Stream», and your movie should start playing locally (and it should start streaming)
CLIENT SETUP: Receiving the stream
Since I configured SAP in the server, it’s easy to open the stream on the client: I just open up the media browser view of VLC (by clicking on the button next to the full screen button) and look under «Local network». I see the name of my SAP stream show up, and I double click it. Voila!! Streaming video! **Football style chest bump**
Note: you can start and stop the stream on the client, just as long as you don’t catch up to the server. Pretty nice!