
По умолчанию во всех версиях Windows Server 2022/2016/2016/2012R2 отключена поддержка беспроводных WiFi сетей. Если вы подключите сетевой адаптер Wi-Fi (USB или PCI) к хосту с Windows Server, вы просто не сможете включить его в панели управления. В этой небольшой заметке я покажу, как включить поддержку Wi-Fi в Windows Server.
Подключите физический Wi-Fi адаптер к хосту Windows Server и установите драйвера. Убедитесь, что адаптер появился в диспетчере устройств (
devmgmt.msc
) в секции Network Adapters.
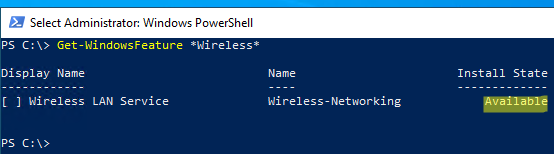
Откройте консоль PowerShell с правами администратора и убедитесь, что компонент Wireless LAN Service не установлен.
Get-WindowsFeature *Wireless*
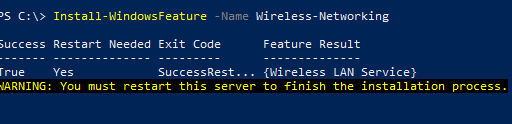
Чтобы установить компонент или роль Windows Server воспользуйтесь PowerShell командой Install-WindowsFeature:
Install-WindowsFeature -Name Wireless-Networking
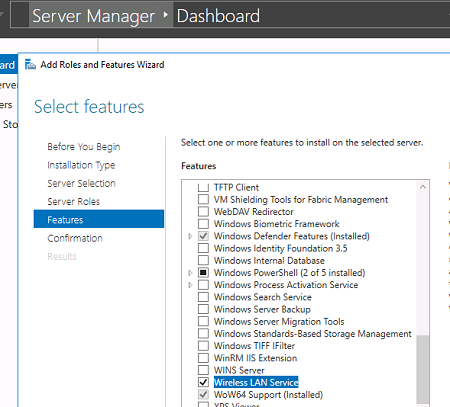
Или установите компонент Wireless LAN Service с помощью Server Manager (Add Roles and Features -> Features).
После завершения установки компонента нужно перезагрузить хост:
shutdown –f –r –t 0
После перезагрузки в Windows появится служба Wireless LAN Service (WLAN AutoConfig), но по умолчанию она отключена. Чтобы включить службу Windows и настроить ее на автоматический запуск, выполните:
Set-Service WlanSvc –startuptype automatic –passthru
Start-Service WlanSvc –PassThru
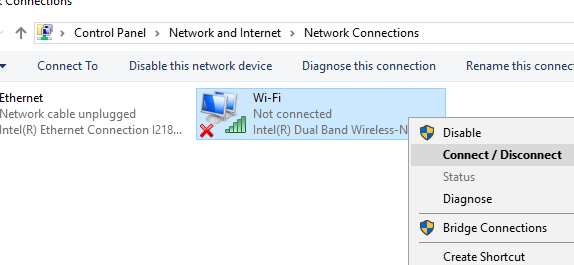
Теперь перейдите в центр управления сетями в Панели управления (
ncpa.cp
l) и включите Wi-Fi адаптер вручную (Правой кнопкой -> Enabled).
Теперь вы можете подключиться к Wi-Fi сети (уровень сигнала Wi-Fi доступных точек доступа можно получить с помощью PowerShell) или даже сделать точку доступа на базе вашего Windows Server.
Данная инструкция проверена на Windows Server 2019. В Server Core 2022 роль Wireless-Networking удалена, поэтому в Server Core настроить сеть на Wi-Fi не удастся.
By default, wireless (Wi-Fi) support is deactivated in Windows Server 2016/2019/2022 versions. When you connect a Wi-Fi network adapter (USB or PCI) to a host running Windows Server, or even if you installed Windows Server on a laptop, Wi-Fi cannot be enabled through the Control Panel.
In this brief note, I will demonstrate how to activate wireless support on Windows Server.
To enable Wi-Fi on Windows Server 2016, 2019 and 2022, manual installation of the WLAN service through Server Manager is required. This step-by-step guide outlines the process:
- Begin by logging in to your Windows server and opening Server Manager. Click Start and then Server Manager

- Once the Server Manager window is open, click on Add roles and features

- In the Before you begin page, click Next

- In the Installation Type page, choose Role-based or feature-based installation and proceed by clicking Next.
- In the Server Selection page, ensure Select a server from the server pool is selected, then choose your server from the list. Click Next to continue.
- In the Server Roles page, make no selections and click Next.
- In the Features page, scroll down and check the box for Wireless LAN Service, click Next to proceed.
- In the Confirmation installation selection page, select Restart the destination server automatically if required. A confirmation box will pop up, click Yes

- Click Install to initiate the installation of the Wireless LAN Service.
Installation will start and your server will restart automatically.
- After your server boot up, login to your server and the wizard will show your that installation is succeeded. Click Close
Congratulations! The Wireless LAN Service has been successfully installed.
You can connect now to the available Wi-Fi networks from your Windows Server 2016/2019/2022

Tarek Majdalani is an accomplished Windows Expert-IT Pro MVP, honored by Microsoft for eight consecutive years from 2007-2015. Holding a B.E. in Computer Engineering from the Lebanese American University, he pursued further education while working, earning various certificates showcased in his MVP profile. Tarek is currently serving as the Director of Engineering & Technology at Alrai Media Group in Kuwait. Since 2006, he has been actively contributing to the community by writing tutorials featuring tips and tricks, amassing over 300 tutorials on diverse systems.
Enable Wireless Networking on Windows Server 2016 and Windows Server 2012 R2
14
The wireless network card is disabled in Windows Server. If you want to connect your server through WiFi, you need to enable Wireless Networking first. By default in Windows Server 2016, you are not able to browse the internet with an admin account. So all these limitations are for security.
Enable Wireless in Windows Server 2016
With two methods you can enable Wireless in Windows Server. First by GUI using server manager and install it through Windows features. It’s really easy for all. But the command line is a sysadmin daily Windows Server configuration and maintenance tools. Then enable Wireless using the command line in Windows Server 2016.
Note: You can apply this article on all version of Windows Server 2008 to Windows Server 2016. I haven’t tested on Server Core, it must work well.
1. While you are login as admin on your Windows Server, run PowerShell and enable wireless. Type “Get-WindowsFeature” *Wireless* to show the Wireless LAN Service.
2. The Wireless LAN Service is not installed yet. So in order to install it, type “Install-WindowsFeature -Name Wireless-Networking” command.
3. The task complete successfully and the system needs to be restart. Type “Restart-Computer” command to restart the server.
4. After restarting the system, try to enable Wireless Service from Windows local services. Let’s do it with command. Type Net start “WlanSvc“. This net start command will start Wireless service.
5. Now connect the Windows server 2016 to the internet through a wireless network.
Yes, the server is connected to the wireless network card. Now you can use it an internet connection on your Windows server. Even enable ICS to share it for other physical network interface cards.
Video Tutorial – Enable Wireless in Windows Server 2016
Troubleshoot Server Wireless Network
This is important to find out the Server Wireless issue. Some common issue like wireless card driver problems, miss-configuration of Wireless card etc.
Sometimes the system wireless network card has not enabled. Because of lack of a bad installed or no compatible drivers.
Before applying this article to enable wireless on Windows server. Make sure that Wireless driver supports the current version of Windows server. If it has a problem with the driver, try to find the latest Wireless network card drivers from the official website of Wireless card. Do not download drivers from a non-trusted website or installing some third-party software to enable wireless on Windows server.
Your system Wireless card should be like the above screenshot of device management.
How you find this article helpful. Let us know what you do want to learn we don’t have on our website?
Related Search Queries:
Wifi adapter Windows server 2016
How to enable wifi in Windows server 2012 r2
Windows Server 2016 wireless drivers
Windows Server 2016 Bluetooth support
How to enable wifi in Windows server 2008 r2
Windows Server 2008 r2 wifi drivers download
How to enable internet access in Windows server 2016
Windows Server 2016 drivers

BELOW WE MAY GET STEP-BY-STEP SCREENSHOTS,
Step 1 — Get confirmed, its Windows Server 2016.
Step 2 — Open folder location «Control Panel\Network and Internet\Network Connections» and verify.
Step 3 — Open «Server Manager» and click on «Add roles and features«.
Step 4 — Click on «Next«.
Step 5 — Keep selected «Role-based or feature-based installation» and click on «Next«.
Step 6 — Select/Verify the server name and IP address, then click on «Next«.
Step 7 — Click on «Next«.
Step 8 — Locate «Wireless LAN Service» and click the check box.
Step 9 — Confirm the Tick mark and click on «Next«.
Step 10 — Click on the check box «Restart the destination server automatically if required«.
Step 11 — Click on «Yes«.
Step 12 — Click on «Install«.
Step 13 — Wait for some time until installation completes and system restarts.
Step 14 — Once completed, click on «Close«.
Step 15 — Open folder location «Control Panel\Network and Internet\Network Connections» and verify.
Step 16 — Open folder location «Control Panel\Network and Internet\Network and Sharing Center» and verify.
Step 17 — Moreover, browse http://www.dskoli.com/ or any other website to verify internet is working on new adapter.
“Thank You for being with me.”
Enabling Wireless Networking on Windows Server 2016
While Windows Server 2016 is a robust and powerful operating system designed primarily for managing server roles, there might be scenarios where you need to enable wireless network connectivity. Unlike client operating systems, Windows Server 2016 does not include the Wireless LAN Service installed by default. This means that even if you have a wireless adapter installed, you won’t be able to connect to Wi-Fi networks out of the box. Attempting to install wireless drivers directly might result in the frustrating error: “A service installation section in this inf is invalid.”
This article will guide you through the necessary steps to enable wireless networking on your Windows Server 2016 machine, allowing you to connect to Wi-Fi networks. We will specifically address the scenario of using a TP-Link Wireless USB Adapter, but the initial steps for enabling the Wireless LAN Service apply to most wireless adapters.
Understanding the Issue: The Missing Wireless LAN Service
The core reason for the “A service installation section in this inf is invalid” error is the absence of the underlying Wireless LAN Service. Wireless drivers rely on this service to function correctly. Without it, the operating system lacks the necessary framework to manage wireless connections, leading to installation failures.
Step 1: Installing the Wireless LAN Service using PowerShell
Fortunately, enabling the Wireless LAN Service is a straightforward process using PowerShell. Follow these steps:
-
Open PowerShell as Administrator: Click on the Start Menu, type “powershell,” right-click on “Windows PowerShell,” and select “Run as administrator.” You will need administrative privileges to install Windows features.
-
Execute the Installation Command: In the elevated PowerShell window, type or paste the following command:
1Add-WindowsFeature -Name Wireless-NetworkingPress Enter to execute the command.
-
Wait for the Installation to Complete: PowerShell will display the progress of the feature installation. Once the process is finished, you should see a “Success” message.
-
Restart Your Server: After the Wireless-Networking feature has been successfully installed, you must restart your Windows Server 2016 machine. This ensures that the newly installed service is properly initialized and running.
Step 2: Installing the Wireless Adapter Driver (Example: TP-Link TL-WN725N)
Once your server has restarted, you can proceed with installing the driver for your wireless adapter. In this example, we will focus on the TP-Link TL-WN725N Wireless USB Adapter.
-
Download the Correct Driver: Navigate to the TP-Link support website. For the TL-WN725N (version 3 in this case), the download link is: https://www.tp-link.com/in/support/download/tl-wn725n/v3/. Ensure you download the driver compatible with your operating system (Windows).
-
Extract the Driver Files (if necessary): The downloaded file is usually a compressed archive (ZIP or RAR). Extract the contents of this archive to a location on your server, such as a new folder on your desktop.
-
Open Device Manager: There are several ways to open Device Manager:
- Press Windows Key + R, type
devmgmt.msc, and press Enter. - Right-click on the Start Menu and select “Device Manager.”
- Press Windows Key + R, type
-
Locate Your Wireless Adapter: In the Device Manager window, look for a device listed under “Network adapters” or potentially under “Other devices” if the driver is not yet installed. It might be labeled with a generic name or have a yellow exclamation mark indicating a driver issue.
-
Update the Driver: Right-click on your TP-Link Wireless USB Adapter (or the unknown device representing it) and select “Update driver.”
-
Browse My Computer for Driver Software: In the “Update Drivers” window, select “Browse my computer for driver software.”
-
Specify the Driver Location: Click the “Browse…” button and navigate to the folder where you extracted the TP-Link driver files. Make sure the “Include subfolders” option is checked so that Windows can find the necessary driver files. Click “Next.”
-
Install the Driver: Windows will now attempt to install the driver for your wireless adapter. Follow any on-screen prompts that may appear.
-
Restart Your Server (Potentially): After the driver installation is complete, it is recommended to restart your Windows Server 2016 machine again. In some cases, like the user’s experience, a second restart might be necessary for the system to fully recognize the wireless adapter and allow connection to Wi-Fi networks.
Step 3: Connecting to a Wi-Fi Network
After restarting your server following the driver installation, you should now have the ability to connect to Wi-Fi networks.
-
Open Network Connections: You can access Network Connections in a few ways:
- Press Windows Key + R, type
ncpa.cpl, and press Enter. - Right-click on the network icon in the system tray (if visible) and select “Open Network and Sharing Center,” then click on “Change adapter settings.”
- Press Windows Key + R, type
-
Identify Your Wireless Adapter: You should now see your TP-Link Wireless USB Adapter listed as a network connection.
-
Connect to a Wi-Fi Network: Right-click on your wireless adapter and select “Connect/disconnect.” A list of available Wi-Fi networks should appear. Select the network you want to connect to, enter the password if required, and click “Connect.”
You should now be successfully connected to the Wi-Fi network.
Conclusion
Enabling wireless networking on Windows Server 2016 requires the crucial step of installing the Wireless LAN Service. By utilizing the Add-WindowsFeature -Name Wireless-Networking PowerShell command and subsequently installing the appropriate drivers for your wireless adapter (like the TP-Link TL-WN725N), you can overcome the “A service installation section in this inf is invalid” error and gain wireless connectivity on your server. Remember to restart your machine after installing the Wireless LAN Service and potentially again after installing the wireless drivers to ensure everything functions correctly. This process allows for greater flexibility in scenarios where a wired network connection is not feasible or convenient for your Windows Server 2016 environment.