
Протокол доступа к общим файлам SMB 1.0 (Server Message Block) по умолчанию отключен в последних версиях Windows 11 и 10, а также в Windows Server 2019/2022. Эта версия протокола является небезопасной/уязвимой, и не рекомендуется использовать ее на устройствах в локальной сети. Windows поддерживает более безопасные версии протокола SMB (2.x и 3.x).
SMB v1 может быть необходим, только если в вашей сети остались устаревшие устройства с Windows XP/2003, старые версии NAS, сетевые принтеры с поддержкой SMB, устройства со старыми версиями samba, и т.д. В этой статье мы рассмотрим, как включить или отключить протокол общего доступа к файлам SMB 1.0 в Windows.
Содержание:
- Включить/отключить SMB 1.0 в Windows 10 и 11
- Включение и отключение SMB 1.0 в Windows Server 2019/2022
- Аудит доступа к файловому серверу по SMB v1.0
- <Отключение SMB 1.0 с помощью групповых политик
Обратите внимание что протокол SMB состоит из двух компонентов, которые можно включать/отключать по отдельности:
- Клиент SMB0 – нужен для доступа к общим папками на других компьютерах
- Сервер SMB 0 – должен быть включен, если ваш компьютер используется в качестве файлового сервера, к которому подключаются другие компьютеры и устройства.
Включить/отключить SMB 1.0 в Windows 10 и 11
Начиная с Windows 10 1709, протокол SMB 1 отключен в десктопных версиях Windows, но его можно включить из вручную.
Откройте командную строку и проверить статус компонентов протокола SMBv1 в Windows с помощью команды DISM:
Dism /online /Get-Features /format:table | find "SMB1Protocol"
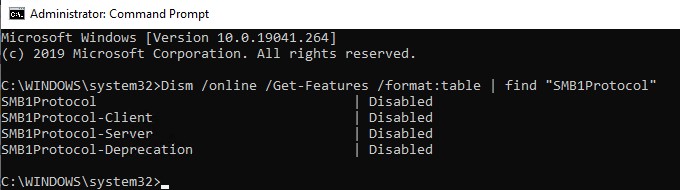
В нашем примере видно, что все компоненты SMBv1 отключены:
SMB1Protocol                                | Disabled
SMB1Protocol-Client                         | Disabled
SMB1Protocol-Server                         | Disabled
SMB1Protocol-Deprecation                    | Disabled
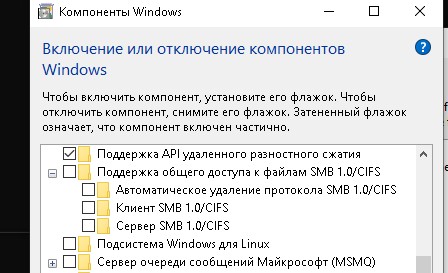
В Windows 10 и 11 также можно управлять компонентами SMB 1 из панели Windows Features (
optionalfeatures.exe
). Разверните ветку Поддержка общего доступа к файлам SMB 1.0 /CIFS (SMB 1.0/CIFS File Sharing Support). Как вы видите здесь также доступны 3 компонента:
- Клиент SMB 1.0/CIFS (SMB 1.0/CIFS Client)
- Сервер SMB 1.0/CIFS (SMB 1.0/CIFS Server)
- Автоматическое удаление протокола SMB0/CIFS (SMB 1.0/CIFS Automatic Removal)
Клиент SMB v1.0 нужно установить, если вашему компьютеру нужен доступ к сетевым папкам на старых устройствах. Если устаревшие сетевые устройства должны писать данные в сетевые папки на вашем компьютере, или использовать его общие сетевые принтеры, нужно включить сервер SMB 1.
Вы можете включить клиент или сервер SMB 1.0 в Windows 10/11 из панели окна управления компонентами или с помощью команд:
Dism /online /Enable-Feature /FeatureName:"SMB1Protocol"
Dism /online /Enable-Feature /FeatureName:"SMB1Protocol-Client"
Dism /online /Enable-Feature /FeatureName:"SMB1Protocol-Server"
Также можно включить сервер или клиент SMBv1 с помощью PowerShell:
Enable-WindowsOptionalFeature -Online -FeatureName SMB1Protocol-Server
Enable-WindowsOptionalFeature -Online -FeatureName SMB1Protocol-Client
Если после включения клиента SMBv1, он не используется более 15 дней, он автоматически отключается.
Чтобы выключить SMB1 в Windows, выполните следующие команды DISM:
Dism /online /Disable-Feature /FeatureName:"SMB1Protocol"
Dism /online /Disable-Feature /FeatureName:"SMB1Protocol-Client"
Dism /online /Disable-Feature /FeatureName:"SMB1Protocol-Server"
Или удалите компоненты SMB1Protocol с помощью PowerShell:
Disable-WindowsOptionalFeature -Online -FeatureName SMB1Protocol -Remove
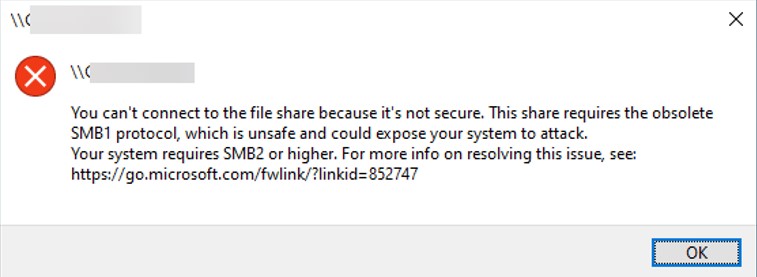
Если вы отключили поддержку SMBv1 клиента в Windows 10/11, то при доступе к сетевой папке на файловом сервере (устройстве), который поддерживает только SMBv1, появятся ошибки вида:
- 0x80070035 — не найден сетевой путь;
-
Вы не можете подключиться к общей папке, так как она небезопасна. Эта общая папка работает по устаревшему протоколу SMB1, который небезопасен и может подвергнуть вашу систему риску атаки. Вашей системе необходимо использовать SMB2 или более позднюю версию.
Unable to connect to file shares because it is not secure. This share requires the obsolete SMB1 protocol, which is not secure and could expose your system to attacks
;

-
Вы не можете подключиться к общей папке, так как она небезопасна. Эта общая папка работает по устаревшему протоколуSMB1, который небезопасен и может подвергнуть вашу систему риску атаки. Вашей системе необходимо использовать SMB2 или более позднюю версию.
You can’t connect to the file share because it’s not secure. This share requires the obsolete SMB1 protocol, which is unsafe and could expose your system to attack. Your system requires SMB2 or higher).
Также при отключении клиента SMBv1 на компьютере перестает работать служба Computer Browser (Обозреватель компьютеров), которая используется устаревшим протоколом NetBIOS для обнаружения устройств в сети. Для корректного отображения соседних компьютеров в сетевом окружении Windows нужно настроить службу Function Discovery Provider Host (см. статью).
Включение и отключение SMB 1.0 в Windows Server 2019/2022
В Windows Server 2019 и 2022 компоненты протокола SMBv1 также по умолчанию отключены. Включить SMB v1 в этих версиях можно через Server Manager (компонент SMB 1.0/CIFS File Sharing Support) или с помощью PowerShell.
Проверить, включен ли SMB 1.0 в Windows Server с помощью команды PowerShell:
Get-WindowsFeature | Where-Object {$_.name -like "*SMB1*"} | ft Name,Installstate

Чтобы установить клиент SMB 1, выполните команду:
Install-WindowsFeature FS-SMB1-CLIENT
Включить поддержку серверной части SMB 1.0:
Install-WindowsFeature FS-SMB1-SERVER
Затем проверьте, что протокол SMB 1 включен в настройках SMB сервера. Если протокол отключен, включите его:
Get-SmbServerConfiguration | select EnableSMB1Protocol
Set-SmbServerConfiguration -EnableSMB1Protocol $true -Force
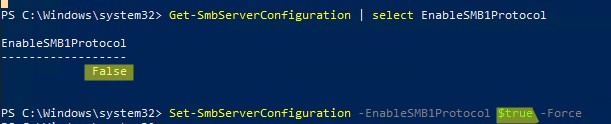
Если в EnableSMB1Protocol = True, значит этот сервер поддерживает SMB 1.0 клеинтов.
Чтобы отключить SMBv1 (понадобится перезагрузка), выполните:
Set-SmbServerConfiguration -EnableSMB1Protocol $false -Force
Disable-WindowsOptionalFeature -Online -FeatureName SMB1Protocol
Чтобы полностью удалить компоненты SMB1 с диска, выполните:
Uninstall-WindowsFeature -Name FS-SMB1 -Remove
В Windows 7/8 и Windows Server 2008 R2/ 2012 можно отключать службу и драйвер доступа SMBv1 командами:
sc.exe config lanmanworkstation depend= bowser/mrxsmb20/nsi
sc.exe config mrxsmb10 start= disabled

Аудит доступа к файловому серверу по SMB v1.0
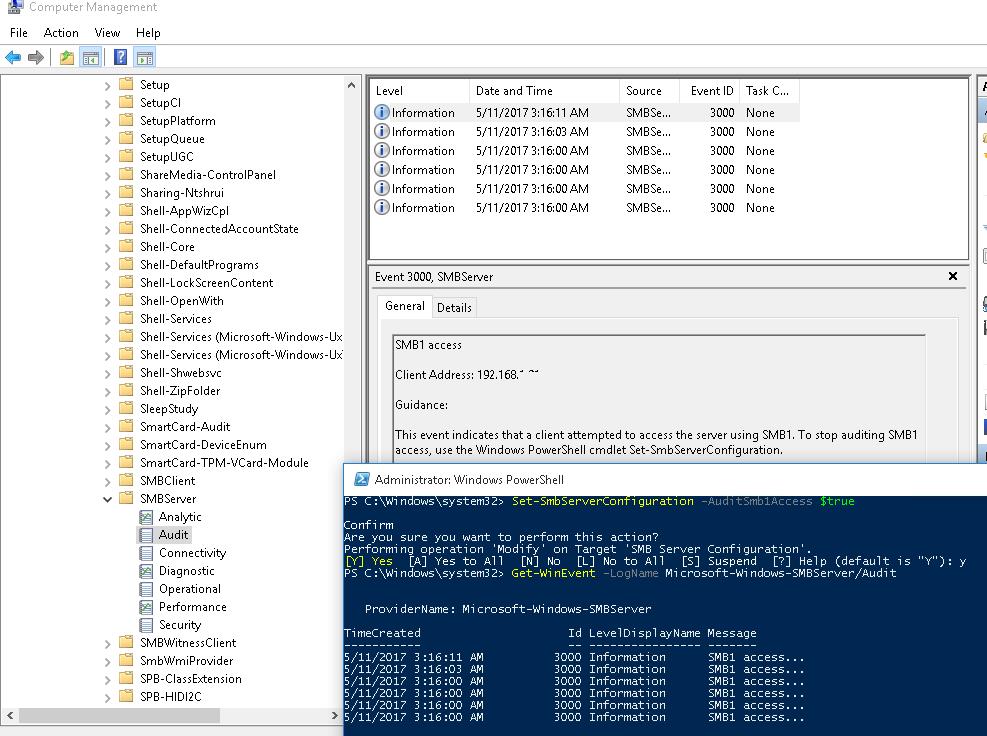
Перед отключением и полным удалением драйвера SMB 1.0 на стороне файлового сервера желательно убедится, что в сети не осталось устаревших клиентов, которые используют для подключения протокол SMB v1.0. Чтобы найти таких клиентов, нужно включить аудит доступа к файловому серверу по SMB1 протоколу:
Set-SmbServerConfiguration –AuditSmb1Access $true
Через пару дней откройте на сервере журнал событий Event Viewer -> Applications and Services -> Microsoft -> Windows -> SMBServer -> Audit и проверьте, были ли попытки доступа к ресурсам сервера по протоколу SMB1.
Проверьте, есть ли в журнале событие с EventID 3000 от источника SMBServer, в котором указано что клиент 192.168.1.10 пытается обратиться к сервере по протоколу SMB1.
SMB1 access
Client Address: 192.168.1.10
Guidance:
This event indicates that a client attempted to access the server using SMB1. To stop auditing SMB1 access, use the Windows PowerShell cmdlet Set-SmbServerConfiguration.
Вам нужно найти в сети компьютер или устройство с этим IP адресом. Если возможно обновите на нем ОС или прошивку, до версии поддерживающий, более новые протоколы SMBv2 или SMBv3. Если обновить такой клиент не удастся, придется включить SMBv1 на вашем файловом сервере.
Чтобы найти в Active Directory все компьютеры, на которых включен протокол SMB v1, выполните команду:
Get-ADComputer -Filter {(enabled -eq $True) } | % {Invoke-Command -ComputerName $_.DNSHostName -scriptblock {If ( (Get-ItemProperty -path "HKLM:\SYSTEM\CurrentControlSet\Services\LanmanServer\Parameters").SMB1 -eq 1 ) {Write-Output "SMBv1 is enabled on ${env:computername}"}}}
Эта команда получит список активных компьютеров в домене с помощью командлета Get-ADComputer. Затем с помощью Invoke-Command выполнит подключение через PowerShell Remoting к каждому компьютеру и проверит включен ли сервис SMB 1.0.
<Отключение SMB 1.0 с помощью групповых политик
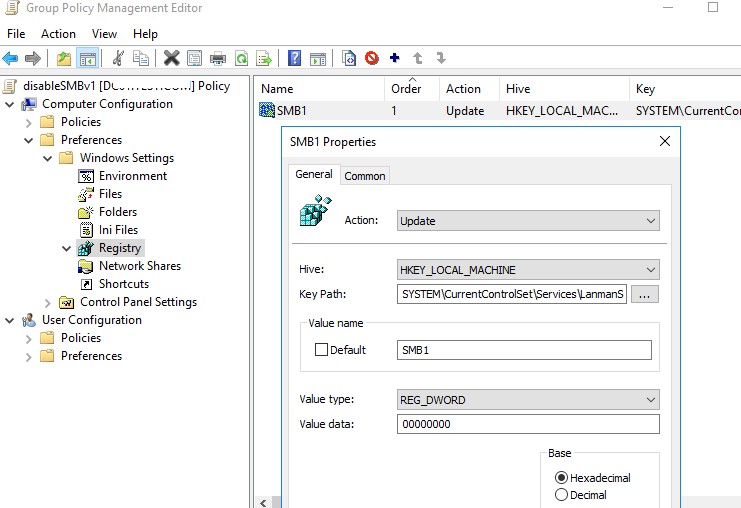
Если в вашем сети не осталось устаревших устройств, которые поддерживают только SMB 1.0, нужно полностью отключить эту версию протокола на всех компьютерах. Чтобы предотвратить ручную установку и включение компонентов SMB 1.0 на компьютерах в домене AF, можно внедрить групповую политику, которая будет принудительно отключить протокол SMB 1.0 на всех серверах и компьютерах. Т.к. в стандартных политиках Windows нет политики настройки компонентов SMB, придется отключать его через политику реестра.
- Откройте консоль управления Group Policy Management (
gpmc.msc
), создайте новый объект GPO (disableSMBv1) и назначьте его на OU с компьютерами, на которых нужно отключить SMB1; - Перейдите в режим редактирования политики. Выберите Computer Configuration -> Preferences -> Windows Settings -> Registry;
- Создайте новый параметр реестра (Registry Item) со следующими настройками:
Action:
Update
Hive:
HKEY_LOCAL_MACHINE
Key Path:
SYSTEM\CurrentControlSet\Services\LanmanServer\Parameters
Value name:
SMB1
Value type:
REG_DWORD
Value data:
0
- Данная политика отключит службу сервера SMBv1.
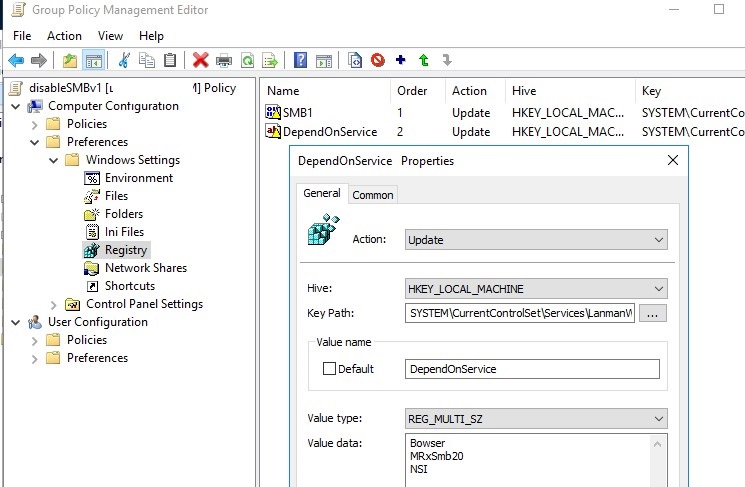
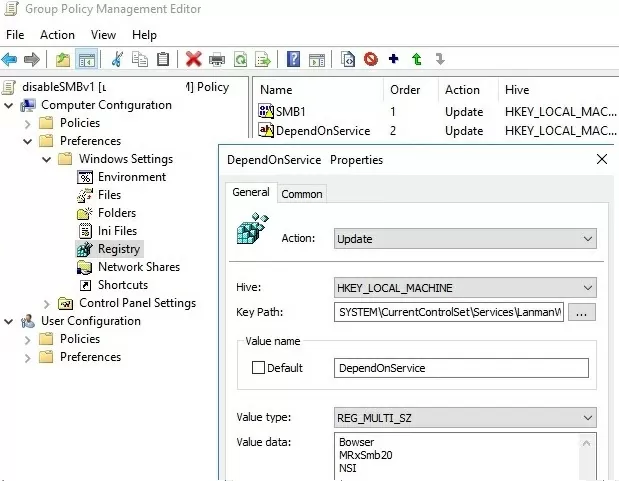
Если вы хотите через GPO отключить на компьютерах и клиент SMB 1.0, создайте дополнительно два параметра реестра:
- Параметр Start (типа REG_DWORD) со значением 4 в ветке реестра HKLM\SYSTEM\CurrentControlSet\services\mrxsmb10;
- Параметр DependOnService (типа REG_MULTI_SZ) со значением Bowser, MRxSmb20, NSI (каждое значение с новой строки) в ветке реестра HKLM\SYSTEM\CurrentControlSet\Services\LanmanWorkstation.
Осталось обновить настройки групповых политик на клиентах и после перезагрузки проверить, что компоненты SMBv1 полностью отключены.
С помощью WMI фильтр GPO можно сделать исключения для определенных версий Windows.
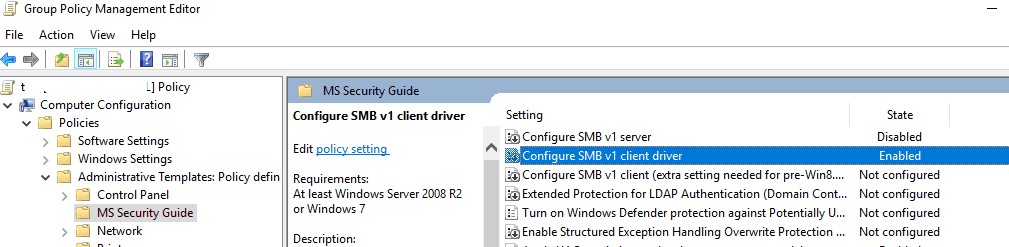
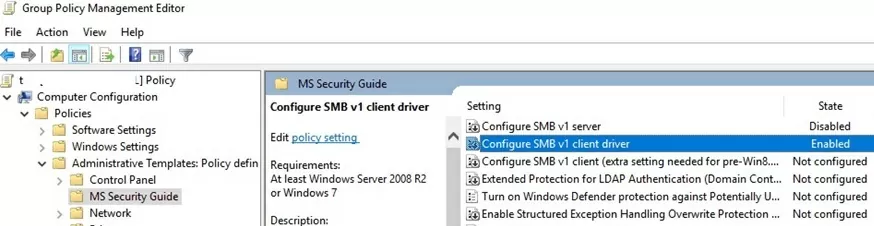
В групповых политиках Security Baseline из Microsoft Security Compliance Toolkit есть отдельный административный шаблон GPO (файлы SecGuide.adml и SecGuide.ADMX), в которых есть отдельные параметры для отключения сервера и клиента SMB:
- Configure SMB v1 server;
- Configure SMB v1 client driver.
If you are using Windows Server 2019 and need to enable SMB1 for compatibility reasons, follow these steps to enable it safely and securely.
What is SMB1?
SMB1 (Server Message Block version 1) is an older version of the file sharing protocol used by Windows operating systems. While SMB1 is considered outdated and less secure than newer versions like SMB2 and SMB3, some legacy systems may still rely on it for file sharing.
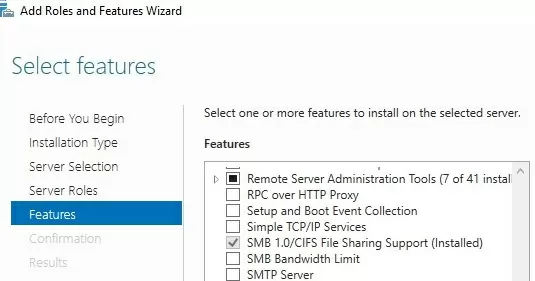
Enabling SMB1 on Windows Server 2019
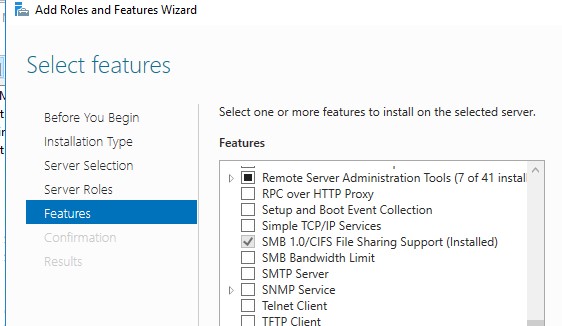
- Open the ‘Server Manager’ on your Windows Server 2019.
- Click on ‘Manage’ from the top menu and select ‘Add Roles and Features’.
- Click ‘Next’ until you reach the ‘Features’ section.
- Scroll down and locate ‘SMB 1.0/CIFS File Sharing Support’.
- Check the box next to ‘SMB 1.0/CIFS Client’ and ‘SMB 1.0/CIFS Server’.
- Click ‘Install’ to enable SMB1 support on your server.
- Restart the server for the changes to take effect.
Security Risks of SMB1
It’s important to note that SMB1 is highly vulnerable to security risks such as Ransomware attacks and EternalBlue exploits. Microsoft recommends disabling SMB1 whenever possible and using newer, more secure versions of the protocol.
Hashtags
#WindowsServer2019#SMB1#FileSharing
Windows OS Hub / Windows 10 / How to Enable or Disable SMB 1.0 in Windows 10/11 and Windows Server
The Server Message Block (SMB) 1.0 file-sharing protocol is disabled by default in the latest versions of Windows 11 and 10 and in Windows Server 2019/2022. This version of the protocol is insecure (vulnerable) and is not recommended for use in a network environment. Windows supports more secure versions of the SMB protocol (2.x and 3.x).
SMB v1 may only be necessary if you still have legacy Windows XP/2003 devices, old versions of NAS, SMB-enabled network printers, devices running older versions of Samba, etc. on your network. This article looks at how to enable or disable the SMB 1.0 file-sharing protocol on Windows.
Please note that the SMB protocol consists of two components that can be enabled or disabled separately:
- Client SMB 1.0 – used to access shared folders on other computers;
- Server SMB 1.0 – is enabled if your computer is used as a file server for other computers and devices.
Contents:
- How to Enable or Disable SMB 1.0 on Windows 10 and 11
- Enable or Disable SMB 1.0 Protocol on Windows Server 2019/2022
- Audit SMB 1.0 Access on Windows File Servers
- Disable SMB 1.0 via Group Policy
How to Enable or Disable SMB 1.0 on Windows 10 and 11
Starting with Windows 10 1709, SMB 1.0 is disabled by default on all desktop versions of Windows but can be manually enabled.
Open a command prompt and check the status of the SMBv1 protocol components in Windows using the DISM command:
Dism /online /Get-Features /format:table | find "SMB1Protocol"

In this example, you can see that all SMBv1 features are disabled:
SMB1Protocol                                | Disabled
SMB1Protocol-Client                         | Disabled
SMB1Protocol-Server                         | Disabled
SMB1Protocol-Deprecation                    | Disabled
In Windows 10 and 11, you can also manage SMB 1 features from the Control Panel (optionalfeatures.exe). Expand the SMB 1.0 /CIFS File Sharing Support option. There are three 3 SMB v 1.0 features available:
- SMB 1.0/CIFS Automatic Removal
- SMB 1.0/CIFS Client
- SMB 1.0/CIFS Server
SMB Client v1.0 must be installed if your computer needs to access shared folders hosted on legacy devices. If legacy network devices need to access network folders on your computer or use its shared network printers, you need to enable the SMB 1.0 server.
You can enable SMB 1.0 client or server in Windows 10/11 from the Windows Features dialog or by using the commands:
Dism /online /Enable-Feature /FeatureName:"SMB1Protocol"
 Dism /online /Enable-Feature /FeatureName:"SMB1Protocol-Client"
 Dism /online /Enable-Feature /FeatureName:"SMB1Protocol-Server"
You can also use PowerShell to enable the SMBv1 server or client on Windows:
Enable-WindowsOptionalFeature -Online -FeatureName SMB1Protocol-Server
 Enable-WindowsOptionalFeature -Online -FeatureName SMB1Protocol-Client
Once the SMBv1 client is enabled, it is automatically removed if it is not used for more than 15 days.
Run the following DISM commands to disable SMB 1.0 in Windows:
Dism /online /Disable-Feature /FeatureName:"SMB1Protocol"
 Dism /online /Disable-Feature /FeatureName:"SMB1Protocol-Client"
 Dism /online /Disable-Feature /FeatureName:"SMB1Protocol-Server"
Or use PowerShell to remove the SMB1Protocol components:
Disable-WindowsOptionalFeature -Online -FeatureName SMB1Protocol -Remove
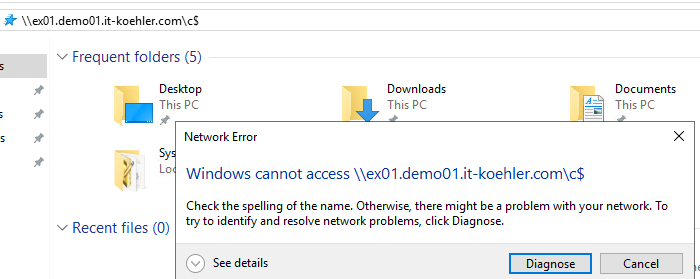
If you have disabled the SMBv1 client in Windows 10/11, you may receive the following errors when accessing a shared folder on a file server that only supports SMBv1:
-
0x80070035 The network path was not found;
-
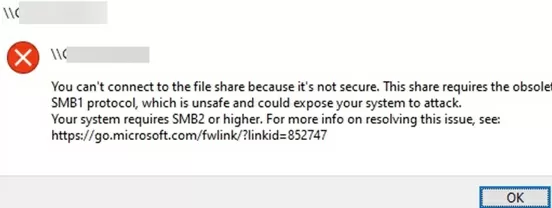
Unable to connect to file shares because it is not secure. This share requires the obsolete SMB1 protocol, which is not secure and could expose your system to attacks;
-
You can’t connect to the file share because it’s not secure. This share requires the obsolete SMB1 protocol, which is unsafe and could expose your system to attack. Your system requires SMB2 or higher.

The Computer Browser service will also stop working on your computer if you disable the SMBv1 client (it is used by the legacy NetBIOS protocol to discover devices on the network).To view neighboring computers on the Windows network, you need to configure the Function Discovery Provider Host service (check this article).
Enable or Disable SMB 1.0 Protocol on Windows Server 2019/2022
The SMBv1 protocol components are also disabled by default in Windows Server 2019 and 2022. You can install SMB v1 using the Server Manager (SMB 1.0/CIFS File Sharing Support feature) or PowerShell.
Use the PowerShell command to check whether SMB 1.0 is enabled on Windows Server:
Get-WindowsFeature | Where-Object {$_.name -eq "*SMB1*"} | ft Name,Installstate

To install the SMB 1.0 client, use the command:
Install-WindowsFeature FS-SMB1-CLIENT
Enable SMB 1.0 server:
Install-WindowsFeature FS-SMB1-SERVER
Check that the SMB1 protocol is enabled in file server settings. Enable the protocol if disabled:
Get-SmbServerConfiguration | select EnableSMB1Protocol
 Set-SmbServerConfiguration -EnableSMB1Protocol $true -Force

If EnableSMB1Protocol: True, then this server supports shared folder access from SMB 1.0 clients.
To disable SMBv1 (requires a reboot):
Set-SmbServerConfiguration -EnableSMB1Protocol $false -Force
 Disable-WindowsOptionalFeature -Online -FeatureName SMB1Protocol
To completely remove SMB1 components from the Windows image:
Uninstall-WindowsFeature -Name FS-SMB1 -Remove
You can disable the service and the SMBv1 access driver in Windows 7/8 and Windows Server 2008 R2/2012 with the commands:
sc.exe config lanmanworkstation depend= bowser/mrxsmb20/nsi
 sc.exe config mrxsmb10 start= disabled
Audit SMB 1.0 Access on Windows File Servers
Before disabling and completely removing the SMB 1.0 driver on the file server side, it is a good idea to make sure that there are no legacy clients on the network that use the SMB v1.0 protocol to connect to shared folders. To find such clients, you must enable auditing of access to the file server via the SMB1 protocol:
Set-SmbServerConfiguration –AuditSmb1Access $true
After several days, open the Event Viewer on the server, check the log Applications and Services -> Microsoft -> Windows -> SMBServer -> Audit, and check for any attempts to access the file server via the SMB1 protocol.
Check the Event Viewer logs and look for the entry with the EventID 3000 from the SMBServer source, which indicates that client 192.168.1.10 is trying to access the server using the SMB1 protocol.
SMB1 access
Client Address: 192.168.1.10
Guidance:
This event indicates that a client attempted to access the server using SMB1. To stop auditing SMB1 access, use the Windows PowerShell cmdlet Set-SmbServerConfiguration.

Find a computer or device on your network with this IP address. If possible, update the operating system or firmware to a version that supports the more secure SMBv2 or SMBv3 protocols. If you are unable to update such a client, you will need to enable SMBv1 on your file server.
To find all computers in Active Directory with SMB v1 enabled, run the command:
Get-ADComputer -Filter {(enabled -eq $True) } | % {Invoke-Command -ComputerName $_.DNSHostName -scriptblock {If ( (Get-ItemProperty -path "HKLM:\SYSTEM\CurrentControlSet\Services\LanmanServer\Parameters").SMB1 -eq 1 ) {Write-Output "SMBv1 is enabled on ${env:computername}"}}}
This command uses the Get-ADComputer cmdlet to get the list of enabled computers in the domain. It then uses Invoke-Command to connect to each computer via PowerShell Remoting and checks if SMB 1.0 is enabled.
Disable SMB 1.0 via Group Policy
If there are no legacy devices on your network that only support SMB 1.0, you must completely disable this protocol version on all computers. You can implement a GPO that forces the SMB 1.0 protocol to be disabled to prevent users from manually installing and enabling SMB 1.0 features on their computers. As there is no separate SMB configuration policy in the standard Windows Group Policy templates, you will need to disable it using the registry policy.
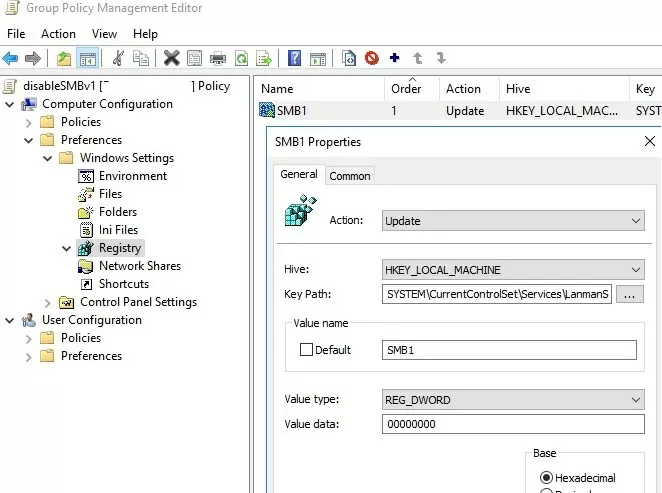
- Open the Group Policy Management console (
gpmc.msc), create a new GPO (disableSMBv1), and link it to the OU containing the computers where you want to disable SMB 1.0; - Edit the policy and navigate to Computer Configuration -> Preferences -> Windows Settings -> Registry;
- Create a new Registry Item with the following setting:
Action:Update
Hive:HKEY_LOCAL_MACHINE
Key Path:SYSTEM\CurrentControlSet\Services\LanmanServer\Parameters
Value name:SMB1
Value type:REG_DWORD
Value data:0

- This policy will disable the SMBv1 server component.
You can exclude certain versions of Windows from this policy by using the WMI GPO filter.
If you want to use the GPO to disable the SMB client on domain computers, create two additional registry parameters:
- The Start parameter (REG_DWORD type) with value 4 in the registry key HKLM\SYSTEM\CurrentControlSet\services\mrxsmb10;
- The DependOnService parameter (REG_MULTI_SZ type) with the value Bowser, MRxSmb20, NSI (each value on a new line) in the reg key HKLM\SYSTEM\CurrentControlSet\Services\LanmanWorkstation.
All you need to do is update the Group Policy settings on the clients and then, after the reboot, check that SMBv1 is completely disabled.
There is aSecurity Baseline GPO template in the Microsoft Security Compliance Toolkit with separate options for disabling server or client SMB 1.0 (SecGuide.adml and SecGuide.admx files):
- Configure SMB v1 server;
- Configure SMB v1 client driver.

I realize this is not a very exciting post, especially compared to my other wonderful musing on this site, but I felt I really had to write it to share the pain!
A colleague I work with needed to enable this feature on an Azure Windows Server 2019 machine to communicate with some old system that only supports Server Message Block version 1 (SMB1). Easy enough to add that right?
Trying the installation
Let’s first get some information about the feature:
Get-WindowsOptionalFeature -Online -FeatureName SMB1Protocol
The output:

Notice the State property? The feature is disabled and the payload (installation files) are not on the Azure virtual machine.
When you try to install the feature, you get:
I guess I need the Windows Server 2019 sources!
Downloading Windows Server 2019
I downloaded Windows Server 2019 (November 2019 version) from https://my.visualstudio.com/Downloads?q=SQL%20Server%202019. I am not sure if you can use the evaluation version of Windows Server 2019 because I did not try that. I downloaded the ISO to the Azure virtual machine.
Mount ISO and copy install.wim
On recent versions of Windows, you can right click an ISO and mount it. In the mounted ISO, search for install.wim and copy that file to a folder on your C: disk like c:\wim. Under c:\wim, create a folder called mount and run the following command:
dism /mount-wim /wimfile:c:\wim\install.wim /index:4 /mountdir:c:\wim\mount /readonly
The contents of install.wim is now available in c:\wim\mount. Now don’t try to enable the feature by pointing to the sources with the -source parameter of Enable-WindowsOptionalFeature. It will not work yet!
Patch the mounted files
The Azure Windows Server 2019 image (at time of writing, June 2020) has a cumulative update installed: https://support.microsoft.com/en-us/help/4551853/windows-10-update-kb4551853. For this installatin to work, I needed to download the update from https://www.catalog.update.microsoft.com/home.aspx and put it somewhere like c:\patches.
Now we can update the mounted files offline with the following command:
Dism /Add-Package /Image:"C:\wim\mount" /PackagePath="c:\patches\windows10.0-kb4551853-x64_ce1ea7def481ee2eb8bba6db49ddb42e45cba54f.msu"
It will take a while to update! You need to do this because the files mounted from the downloaded ISO do not match the version of the Windows Server 2019 image. Without this update, the installation of the SMB1 feature will not succeed.
Enable the SMB1 feature
Now we can enable the feature with the following command:
dism /online /Enable-Feature /FeatureName:SMB1Protocol /All /source:c:\wim\mount\windows\winsxs /limitaccess
You will need to reboot. After rebooting, from a PowerShell prompt run the command below to check the installation:
Get-WindowsOptionalFeature -Online -FeatureName SMB1Protocol
The State property should say: Enabled
Conclusion
Something this trivial took me way too long. Is there a simpler way? Let me know! 👍
And by the way, don’t enable SMB1. It’s not secure at all. But in some cases, there’s just no way around it.
The estimated reading time 1 minutes
Windows Server 2019 Core activate SMB-in rule via PowerShell
Today I deployed a brand new Windows Server 2019 Datacenter Core for installing the new Exchange Server 2019. I wrote a little PowerShell Script for joining domain and do IP configuration so on..
After enabling remote management, my windows admin center was able to manage the complete core server. Really nice, but what to do if you don’t have an windows admin center and you only want to activate SMB-in rule on the local firewall of this core server. (of course there are dozen way to do this, but this short article shows a really quick method)
To achieve this goal you have to change firewall settings directly on the core server. First step is to open powershell in the cmd console. Easy! Only type “powershell.exe” . Here we go

Have a look at the firewall rules with cmdlet
Get-NetFirewallRule | ft
To find the “ping allow” rule:
Get-NetFirewallRule *icmp4* | ft Name,DisplayName,Enabled
also see the “smb-in” rule:
Get-NetFirewallRule *smb-in* | ft Name,DisplayName,Enabled

To enable these rules just write these two lines:
Set-NetFirewallRule FPS-SMB-In-TCP -Enabled True
Set-NetFirewallRule FPS-ICMP4-ERQ-In -Enabled True


It is of course possible to disable, these rules for security reasons:
Set-NetFirewallRule FPS-ICMP4-ERQ-In -Enabled False
Set-NetFirewallRule FPS-SMB-In-TCP -Enabled False
If you liked this article, please click on “helpful” at the bottom of this page. Have fun with Windows Core Server.
Was this article helpful?
YesNo