
on October 2, 2010
Remote desktop can be enabled/disabled by opening My computer properties and then by changing the settings in the ‘Remote‘ tab. We can do the same by editing registry key settings. This is explained below. Remote desktop is also called Terminal services or TS or RDP. This is an in-built remote desktop software for Windows users.
Enable remote desktop from CMD
- Open registry editor by running regedit from Run.
- Go to the node
HKEY_LOCAL_MACHINE\SYSTEM\CurrentControlSet\Control\Terminal Server
- Change the data of the value
fDenyTSConnectionsto 0.
We can enable remote desktop from windows command line by running the following command.
reg add "HKEY_LOCAL_MACHINE\SYSTEM\CurrentControlSet\Control\Terminal Server" /v fDenyTSConnections /t REG_DWORD /d 0 /f
To disable remote desktop we need to run the below command.
reg add "HKEY_LOCAL_MACHINE\SYSTEM\CurrentControlSet\Control\Terminal Server" /v fDenyTSConnections /t REG_DWORD /d 1 /f
Reboot or logoff is not required after running the above command. I have tested this on Windows XP and Windows 7 and it has worked fine. It would work fine on Windows Vista too.
Enable Remote assistance:
reg add "HKEY_LOCAL_MACHINE\SYSTEM\CurrentControlSet\Control\Terminal Server" /v fAllowToGetHelp /t REG_DWORD /d 1 /f
Relevant Posts:
Run command for Remote Desktop
Remote desktop and Terminal Services : Frequently asked questions

- To enable Remote Desktop on Windows 10, open Command Prompt (admin) and run the “reg add “HKEY_LOCAL_MACHINE\SYSTEM\CurrentControlSet\Control\Terminal Server” /v fDenyTSConnections /t REG_DWORD /d 0 /f” and “netsh advfirewall firewall set rule group=”remote desktop” new enable=Yes” commands.
On Windows 10, you can use the Remote Desktop feature to remotely access a computer or server to help other users or manage services without being physically present at the location.
Although you can manage the feature through the Settings app, you can also turn Remote Desktop on or off on Windows 10 using commands with Command Prompt or PowerShell. You may want to use this method to create a script to configure Remote Desktop on multiple computers more quickly. Or you can send the script to a user, allowing them to set up the feature without additional steps automatically.
This guide will teach you the steps to use Command Prompt to enable or disable Remote Desktop and open the required firewall ports for a successful connection on Windows 10.
- Enable Remote Desktop from Command Prompt
- Disable Remote Desktop from Command Prompt
Important: Remote Desktop is not a feature available on Windows 10 Home. It is only on Windows 10 Pro, Enterprise, and Education. It is also recommended you create a full backup of your computer before proceeding, as modifying the registry can cause irreversible damage to your system.
To enable the remote desktop protocol with Command Prompt, use these steps:
-
Open Start on Windows 10.
-
Search for Command Prompt, right-click the top result, and select the Run as administrator option.
-
Type the following command to enable the remote desktop protocol and press Enter:
reg add "HKEY_LOCAL_MACHINE\SYSTEM\CurrentControlSet\Control\Terminal Server" /v fDenyTSConnections /t REG_DWORD /d 0 /f

-
(Optional) Type the following command to enable remote desktop through the Windows Firewall and press Enter:
netsh advfirewall firewall set rule group="remote desktop" new enable=Yes

Once you complete the steps, the protocol will enable on Windows 10, and you will be able to access the device remotely.
Disable Remote Desktop from Command Prompt
To turn off the remote desktop protocol with Command Prompt, use these steps:
-
Open Start.
-
Search for Command Prompt, right-click the top result, and select the Run as administrator option.
-
Type the following command to disable the remote desktop protocol and press Enter:
reg add "HKEY_LOCAL_MACHINE\SYSTEM\CurrentControlSet\Control\Terminal Server" /v fDenyTSConnections /t REG_DWORD /d 1 /f
-
(Optional) Type the following command to disable Remote Desktop through the Windows Firewall and press Enter:
netsh advfirewall firewall set rule group="remote desktop" new enable=No

After you complete the steps, the Remote Desktop service will be turned off, and the Windows Firewall port will be closed.
This guide focuses on Command Prompt, but you can use the same commands to manage the remote desktop protocol using PowerShell.
Mauro Huculak is a
Windows How-To Expert and founder of
Pureinfotech
(est. 2010). With over 21 years as a technology writer and IT Specialist,
Mauro specializes in Windows, software, and cross-platform systems such as Linux, Android, and macOS.
Certifications:
Microsoft Certified Solutions Associate (MCSA),
Cisco Certified Network Professional (CCNP),
VMware Certified Professional (VCP),
and
CompTIA A+ and Network+.
Mauro is a recognized Microsoft MVP and has also been a long-time contributor to Windows Central.
You can follow him on
YouTube,
Threads,
BlueSky,
X (Twitter),
LinkedIn and
About.me.
Email him at [email protected].
If you want to use the Remote Desktop feature without opening the Windows Settings panel, then you can enable Remote Desktop using Command Prompt or Windows PowerShell. If you have a remote desktop client on your mobile or another computer, you will be able to connect it and use your PC remotely.
Remote Desktop is a well-known facility for Windows 11/10 computers that lets you connect two computers or mobile so that an individual can access another computer remotely. You can fix some problems on the computer via mobile or do other jobs according to your requirements. You need a Remote Desktop client like Microsoft Remote Desktop or so on your mobile to connect two devices.
It is possible to enable to disable Remote Desktop via Windows Settings. You need to head to System > Remote Desktop to access the option. However, let’s assume that the Windows Settings panel is not opening due to some reasons, and you need to turn on the Remote Desktop feature. Then you can use this method to start the Remote Desktop using the command line.
To enable Remote Desktop using Command Prompt and Windows PowerShell, follow these steps-
- Open Command Prompt or PowerShell with administrator privilege
- Set value of fDenyTSConnections REG DWORD to 0
- Add a Firewall rule
- Restart your computer
- Start using Remote Desktop in Windows 10.
The commands are not the same for Command Prompt and Windows PowerShell.
1] Enable RDP firewall using Command Prompt

To get started, open the Command Prompt with administrator privilege. You can search for it in the Taskbar search box, and click the Run as administrator option that appears on your screen. After that, enter this following command and hit Enter:
reg add "HKLM\SYSTEM\CurrentControlSet\Control\Terminal Server" /v fDenyTSConnections /t REG_DWORD /d 0 /f
By default, the value of fDenyTSConnections is set to 1. This command will change the value to 0.
Next, execute the following command:
netsh advfirewall firewall set rule group="remote desktop" new enable=yes
This command will add and update three rules in the Firewall so that you can start using the Remote Desktop.
2] Enable RDP using Windows PowerShell
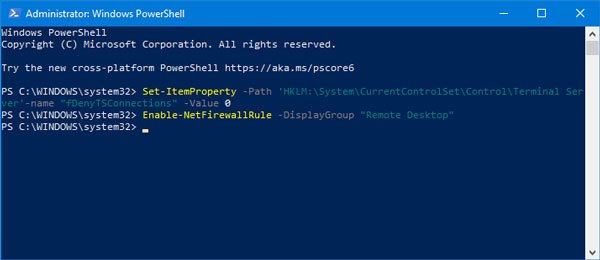
You need to open the Windows PowerShell with administrator privilege and enter the following command and hit Enter:
Set-ItemProperty -Path 'HKLM:\System\CurrentControlSet\Control\Terminal Server'-name "fDenyTSConnections" -Value 0
This command will change the fDenyTSConnections value to 0. Now, you need to execute the following command to add rules in the Firewall:
Enable-NetFirewallRule -DisplayGroup "Remote Desktop"
After that, you will be able to use Remote Desktop in Windows 10.
In case you want to disable Remote Desktop using Command Prompt and Windows PowerShell, you need to enter these steps.
Related: Remote Desktop option is greyed out.
Disable Remote Desktop using Command Prompt or PowerShell
To disable Remote Desktop using Command Prompt and Windows PowerShell, follow these steps-
- Open Command Prompt or PowerShell with administrator privilege
- Set value of fDenyTSConnections REG DWORD as 1
- Add a Firewall rule
- Restart computer.
To know more, you need to read on.
Disable Remote Desktop using Command Prompt
You need to set the default value of fDenyTSConnections as 1. For that, use this command-
reg add "HKLM\SYSTEM\CurrentControlSet\Control\Terminal Server" /v fDenyTSConnections /t REG_DWORD /d 1 /f
Now you need to remove rules from the Firewall. For that, use this command-
netsh advfirewall firewall set rule group="remote desktop" new enable=No
Disable Remote Desktop using PowerShell
You need to change the value of fDenyTSConnections as 1. You can do that by using this command-
Set-ItemProperty -Path 'HKLM:\System\CurrentControlSet\Control\Terminal Server'-name "fDenyTSConnections" -Value 1
The second command will let you remove the rules from the Firewall:
Disable-NetFirewallRule -DisplayGroup "Remote Desktop"
How do I know if RDP is enabled or not?
If you want to know the status of the RDP protocol on your Windows 11/10 system, then open the Registry Editor. After that, access the Terminal Services and Terminal Server Registry keys. There, look for the fDenyTSConnections DWORD (32-bit) Value. If the value data of this value is set to 0, then RDP is enabled. If it is set to 1, then RDP is disabled.
How to restart the RDP service using PowerShell?
If you want to restart the Remote Desktop Services using PowerShell, then first open the Windows PowerShell as administrator. After that, execute the command given below:
Restart-Service -Force -DisplayName "Remote Desktop Services"
You can also use the following command to restart the RDP service:
Restart-Service -Force -Name "TermService"
That’s all! I hope this simple tutorial will be helpful for you.
The Windows Remote desktop can be enable with the command line such as CMD and Powershell. Here we enable remote desktop using command prompt in Windows 10. You can use this method on all Microsoft Windows server and Workstation systems.
In Microsoft Windows operating systems, you can connect to a computer running Windows from another computer running Windows that’s connected to the same network or the Internet. For example, you can use all of your work computer’s programs, files, and network resources from your home computer, and it’s just like you’re sitting in front of your computer at work.
To connect to a remote computer, that computer must be turned on; it must have a network connection, Remote Desktop must be enabled. You must have network access to the remote computer (this could be through the Internet), and you must have permission to connect. For permission to connect, you must be on the list of remote desktop users. Before you start a connection, it’s a good idea to look up the name of the computer you’re connecting to and to make sure Remote Desktop connections are allowed through its firewall.
Enable Remote Desktop using Command Line
To enable remote desktop using command line, you must have administrator permission in Windows. The command line interfaces, command prompt or Powershell, must run as administrator.
Enable remote desktop process:
- Run Windows Command Prompt.
- Execute registry command to enable remote desktop.
- Enable Remote Desktop on system Firewall.
- Test Remote Desktop Connectivity between two systems.
Let’s run the command prompt as administrator and follow the article to enable remote desktop with command line.
1. Type the below command to enable remote desktop.
reg add "HKEY_LOCAL_MACHINE\SYSTEM\CurrentControlSet\Control\Terminal Server" /v fDenyTSConnections /t REG_DWORD /d 0 /f
The result must be the same as above screenshot. If you face any issue while running command, check the command structure and try again.
2. To disable remote desktop, just type the below command and run it.
reg add "HKEY_LOCAL_MACHINE\SYSTEM\CurrentControlSet\Control\Terminal Server" /v fDenyTSConnections /t REG_DWORD /d 1 /f
3. Allow the Remote desktop on your Windows firewall system with netsh command.
netsh advfirewall firewall set rule group="remote desktop" new enable=yes
Related: Configure Windows IP Address with Netsh
4. Now, you need to add a user account to remote desktop users group. To do this using the “net localgroup” command.
net localgroup "remote desktop users" Shais /add
The username “Shais” has been added successfully to “Remote Desktop Users” group. You can test the remote desktop user members with below command.
net user Shais
That’s all you need to enable remote desktop using command line on any Windows operating systems.
If you want to do all with a graphical interface, follow the below Microsoft step by step guide to enable remote desktop.
Enable Remote Desktop Connection with GUI
If your user account doesn’t require a password to sign in, you’ll need to add a password before you’re allowed to start a connection with a remote computer.
To allow remote connections on the computer, you want to connect to:
- Open System by clicking the Start button, right-clicking Computer, and then click Properties.
- Click Remote settings.If you’re prompted for an administrator password or confirmation, type the password or provide confirmation. Under Remote Desktop, select one of the three options.
- Click Select Users.If you’re an administrator on the computer, your current user account will automatically be added to the list of remote users, and you can skip the next two steps.
- In the Remote Desktop Users dialog box, click Add.
- In the Select Users or Groups dialog box, do the following:
- To specify the search location, click Locations, and then select the location you want to search.
- In entering the object names to select, type the name of the user that you want to add, and then click OK.
- The name will be displayed in the list of users in the Remote Desktop Users dialog box. Click OK, and then click OK again.
Note: You can’t connect to a computer that’s asleep or hibernating, so make sure the settings for sleep and hibernation on the remote computer are set to Never. (Hibernation is not available on all computers.)
To look up the computer name of the remote computer:
- On the remote computer, open System by clicking the Start button, right-clicking Computer, and then click Properties.
- Under Computer name, domain, and workgroup settings, you can find your computer name, and it’s full computer name if your computer is on a domain.
To allow Remote Desktop connections through a Windows Firewall:
If you’re having trouble connecting, Remote Desktop connections might be getting blocked by the firewall. Here’s how to change that setting on a Windows PC. If you’re using another firewall, make sure the port for Remote Desktop (usually 3389) is open.
- On the remote computer, click Start and select Control Panel.
- Click System and Security.
- Then click Allow a program through Windows Firewall under Windows Firewall.
- And click Change settings and then check the box next to Remote Desktop.
- Click OK to save the changes.
To set a password for your user account
Your user account must have a password before you can use Remote Desktop to connect to another computer.
- Click Start and select Control Panel.
- Double-click User Accounts.
- Select Change your Windows Password under User Accounts.
- Click Create a password for your account and follow the instructions on the screen.
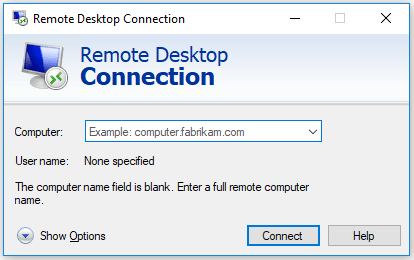
To start Remote Desktop on the computer, you want to work from:
- Open Remote Desktop Connection by clicking the Start button. In the search box, type Remote Desktop Connection, and then, in the list of results, click Remote Desktop Connection.
- In the Computer box, type the name of the computer that you want to connect to, and then click Connect. (You can also type the IP address instead of the computer name.)
Finally, hope you can enable remote desktop using command line in your network environment.
-
Home
-
Partition Magic
- How to Enable Remote Desktop Windows 10 via CMD and PowerShell
By Vicky |
Last Updated
Is Remote Desktop free? Is it secure? How do you know if Remote Desktop is enabled? In this post, MiniTool answers all the above questions. Furthermore, MiniTool also shows you how to enable this feature via Command Prompt and Windows PowerShell.
Windows 10 Remote Desktop
Remote Desktop is a feature that you can use to connect two computers or other devices so that you can access another computer remotely. With this feature, you can control other’s computer as if you have local access to the system in which you can move the mouse cursor, open programs, transfer files, and so on.
The Remote Desktop feature is quite useful if you run into some computer issues and you can ask help for your friends or other people to perform troubleshooting on your system without letting them visit your place.
But there is a pithy that this feature is unavailable on Windows 10 Home, but you can find it on Windows 10 Pro and Enterprise editions.
Is Remote Desktop Free and Secure?
The good news is that Microsoft asks for no charge of this feature. In terms of security, it can be said that the Remote Desktop feature offered by Microsoft is a perfectly viable option if you want to access other’s computer.
How to Know if Remote Desktop Is Enabled?
To check whether the Remote Desktop is enabled, you just need to complete the following steps.
Step 1: Right-click This PC or My Computer on your desktop and then select Properties from the menu.
Step 2: On the Properties window, click Remote settings on the left pane.
Step 3: Under the Remote tab, see if the box next to Don’t allow connections to this computer is checked to check if the Remote Desktop feature is enabled.

How to Enable Remote Desktop Windows 10?
If your Remote Desktop is not enabled on Windows 10, you can enable it now. You can enable this feature via Windows Settings, but some users ran into Windows Setting not working. So, in this post, I would like to show you how to enable Remote Desktop in two different ways, namely using Command Prompt and Windows PowerShell.
Enable Remote Desktop via Command Prompt
Step 1: Run Command Prompt as administrator.
- Type Command Prompt on the Cortana’s search bar.
- Right-click the result and then select Run as administrator.
Step 2: Type the following command on the Command Prompt window and then hit the Enter to run this command.
reg add “HKLMSYSTEMCurrentControlSetControlTerminal Server” /v fDenyTSConnections /t REG_DWORD /d 0 /f
Step 3: When the above command has been executed, you need to run another command and hit Enter to execute it. This command will add and update rules in the Firewall and after that, you can use Remote Desktop.
netsh advfirewall firewall set rule group=”remote desktop” new enable=yes
Enable Remote Desktop via Windows PowerShell
Step 1: Run Windows PowerShell as administrator.
- Type Windows PowerShell on the Cortana’s search bar.
- Right-click the result and then select Run as administrator.
Step 2: Type the following command and then hit the Enter key to run it.
Set-ItemProperty -Path ‘HKLM:SystemCurrentControlSetControlTerminal Server’-name “fDenyTSConnections” -Value 0
Step 3: Type another key and hit Enter.
Enable-NetFirewallRule -DisplayGroup “Remote Desktop”
If you want to disable the Remote Desktop feature on Windows 10, you can also run the following commands in Command Prompt and Windows PowerShell. Please do not forget to hit the Enter key after typing each command.
Disable Remote Desktop via Command Desktop:
- reg add “HKLMSYSTEMCurrentControlSetControlTerminal Server” /v fDenyTSConnections /t REG_DWORD /d 1 /f
- netsh advfirewall firewall set rule group=”remote desktop” new enable=No
Disable Remote Desktop via Windows PowerShell:
- Set-ItemProperty -Path ‘HKLM:SystemCurrentControlSetControlTerminal Server’-name “fDenyTSConnections” -Value 1
- Disable-NetFirewallRule -DisplayGroup “Remote Desktop”
About The Author
Position: Columnist
Vicky is a website editor who has been writing tech articles since she was graduated from university. Most of her articles talk about Windows PC and hard disk issues. Some of her articles also touch on YouTube usage and issues.
During her spare time, she likes to spend time reading, watching videos, and sitting on her Yoga mat to relax.