
Протокол Remote Desktop Protocol (RDP) позволяет удаленно подключиться к рабочему столу компьютера с Windows и работать с ним, как будто это ваш локальный компьютер. По умолчанию RDP доступ в Windows запрещен. В этой статье, мы покажем, как включить и настроить RDP доступ в Windows 10 и Windows Server 2016/2019.
Содержание:
- Включаем удаленный рабочий стол в Windows 10
- Как включить RDP доступ с помощью PowerShell?
- RDP доступ к Windows Server 2016/2019
- Включение RDP с групповых политик в домене Active Direcrtory
- Как удаленно включить RDP на компьютере Windows?
Включаем удаленный рабочий стол в Windows 10
Самый простой способ включить RDP доступ в Windows – воспользоваться графическим интерфейсом.
Откройте свойства системы через панель управления, или выполнив команду SystemPropertiesRemote.
Перейдите на вкладку Remote Settings (Удаленный доступ), включите опцию Allow remote connection to this computer (Разрешить удалённые подключения к этому компьютеру).
В целях безопасности желательно разрешить подключение только с клиентов RDP с поддержкой протокола NLA (Allow connections only from computers running Remote Desktop with Network Level Authentication/ Разрешить подключение только с компьютеров, на которых работает удаленный рабочий стол с проверкой подлинности на уровне сети).

Сохраните изменения, нажав ОК.
По умолчанию право на подключение к компьютеру через RDP есть только у членов группы локальных администраторов. Если вам нужно разрешить RDP доступ другим пользователям, нажмите кнопку Select Users.
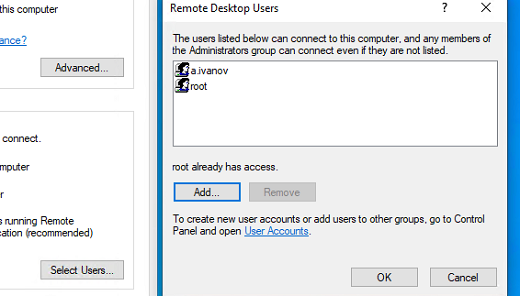
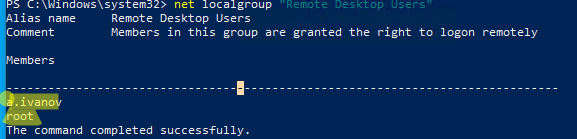
Все пользователи, которых вы укажете здесь будет добавлены в локальную группу Remote Desktop Users. Вы можете в командной строке вывести список пользователей в этой группе:
net localgroup "Remote Desktop Users"
или
net localgroup “Пользователи удаленного рабочего стола”
Чтобы добавить нового пользователя в группу доступа RDP, выполните:
net localgroup "Remote Desktop Users" /add publicuser
В русской версии Windows измените название группы на “Пользователи удаленного рабочего стола”.
В новых билдах Windows 10 классическая панель для включения RDP доступа теперь спрятана и Microsoft рекомендует пользоваться новой панелью Setting.
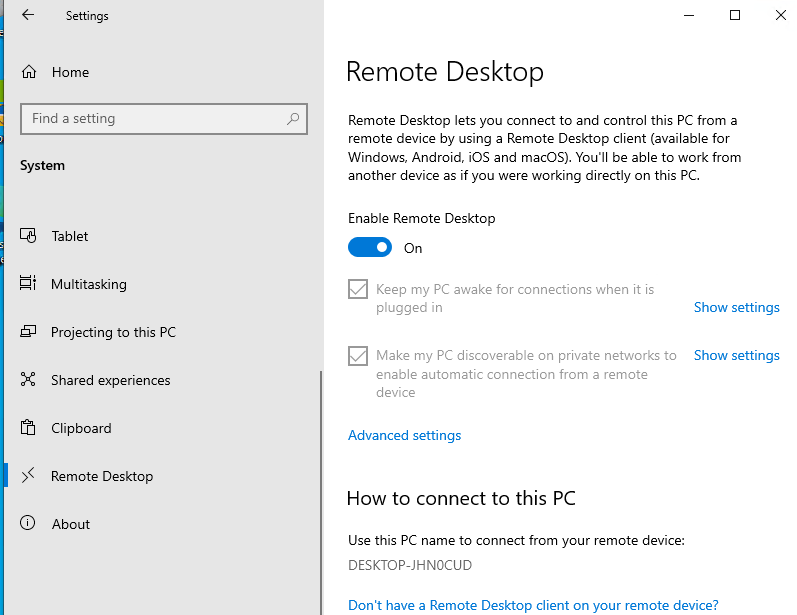
- Перейдите в Settings -> System —> Remote Desktop;
- Включите опцию Enable Remote Desktop;

- Подтвердите включение RDP на компьютере.
Обратите внимание, что вы не можете включить RDP доступ к редакции Windows 10 Home. RDP сервер работает только на Windows 10 Pro и Enterprise. Впрочем, есть обходное решение.
Обратите внимание, что по умолчанию при включении Remote Desktop, включаются две опции:
- Keep my PC awake for connection when it is plugged in ;
- Make my PC discoverable on private networks to enable automatic connection from a remote device
На жмите на ссылку “Advanced settings”. Здесь можно включить использование протокола “Network Level Authentication” для RDP подключений (рекомендуется).
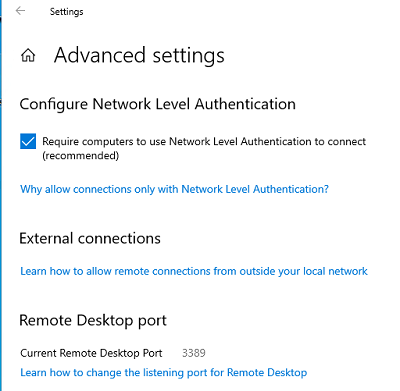
Если на компьютере включен Windows Defender Firewall (брандмауэр), то нужно проверить, что в нем разрешены входящие RDP подключения. По умолчанию для RDP подключений используется порт TCP
3389
, а в последних билдах Windows также используется
UDP 3389
( см. статью про кейс с черным экраном вместо рабочего стола при RDP доступе).
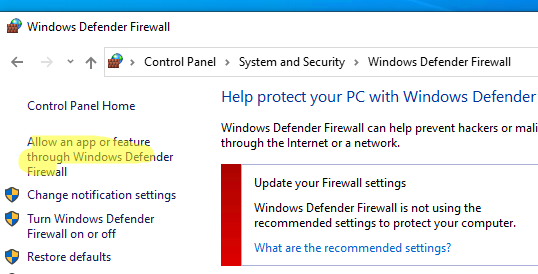
Перейдите в панель управления и выберите элемент Windows Defender Firewall. Откройте список стандартных правил брандмауэра Windows, щелкнув в левом столбце по ссылке Allow an app or feature through Windows Firewall.
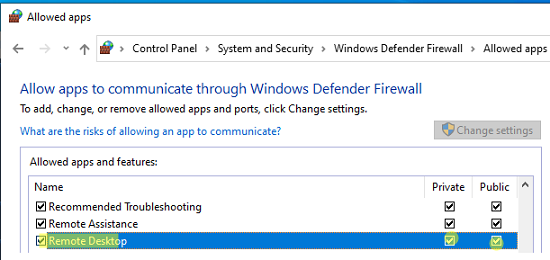
Проверьте, что правило Remote Desktop включено для профиля Private (домашняя или рабочая сеть) и, если необходимо, для профиля Public (общедоступные сети).
Подробнее про типы сетей и профили брандмауэра Windows здесь.
Если нужно, вы можете дополнительно ограничить длительность RDP сессий с помощью GPO.
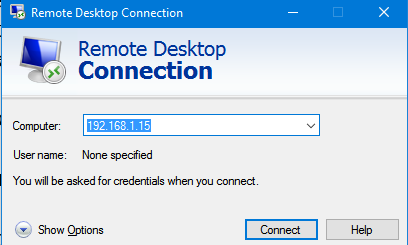
Теперь к данному компьютеру можно подключится с помощью RDP клиента. Встроенный RDP клиент Windows –
mstsc.exe
. Он сохраняет всю историю RDP подключений с компьютера. Поддерживается копирование файлов между локальным и удаленным компьютером прямо через буфер обмена RDP.
Также вы можете использовать менеджеры RDP подключений, такие как RDCMan или mRemoteNG, или альтернативные клиенты.
Для удобства пользователей пароль для RDP подключения можно сохранить в Windows Credential Manager.
Как включить RDP доступ с помощью PowerShell?
Вы можете включить RDP доступ в Windows с помощью пары PowerShell команд. Это гораздо быстрее:
- Запустите консоль PowerShell.exe с правами администратора;
- Включите RDP доступ в реестре с помощью командлета Set-ItemProperty:
Set-ItemProperty -Path 'HKLM:\System\CurrentControlSet\Control\Terminal Server' -name "fDenyTSConnections" -value 0Чтобы закрыть RDP доступ, измените значение fDenyTSConnections на 1.
- Разрешите RDP подключения к компьютеру в Windows Defender Firewall. Для этого включите предустановленное правило :
Enable-NetFirewallRule -DisplayGroup "Remote Desktop"
- Если нужно добавить пользователя в группу в локальную группу RDP доступа, выполните:
Add-LocalGroupMember -Group "Remote Desktop Users" -Member 'a.petrov'

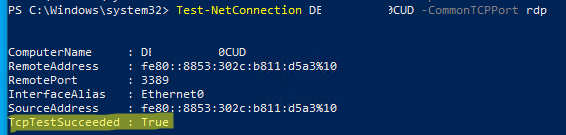
Чтобы проверить, что на компьютере открыт RDP порт, воспользуйтесь командлетом Test-NetConnection:
Test-NetConnection -ComputerName deskcomp323 -CommonTCPPort rdp
RDP доступ к Windows Server 2016/2019
В отличии от десктопной редакции Windows 10, в Windows Server по умолчанию поддерживается два одновременных RDP подключения. Эти подключения используются администраторами для управления сервером.
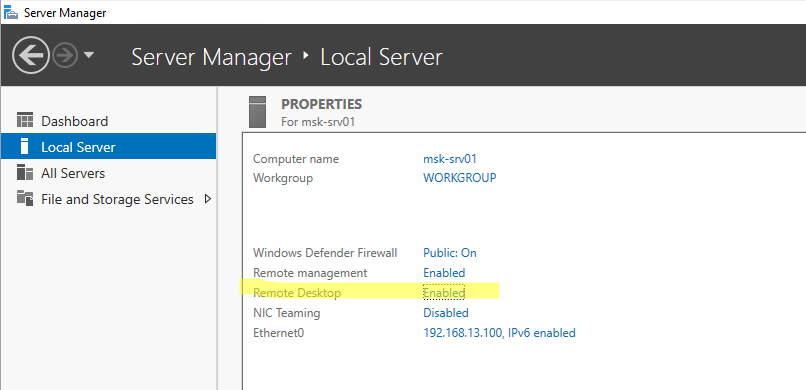
Включается RDP в Windows Server аналогично. Через SystemPropertiesRemote, через Server Manager или командами PowerShell, рассмотренными выше.
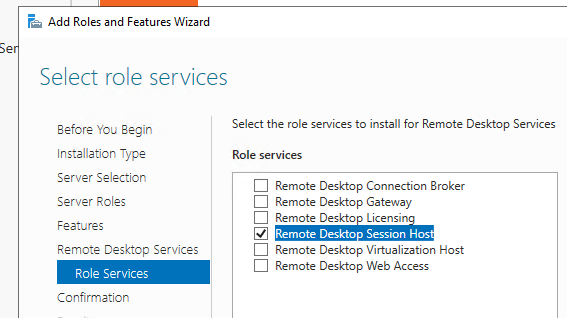
Вы можете использовать Windows Server в качестве терминального сервера. В этом случае множество пользователей могут одновременно подключаться к собственному рабочему столу на сервере. Для этого нужно установить и настроить на сервере роль Remote Desktop Session Host. Это требует приобретения специальных RDS лицензии (CAL). Подробнее о RDS лицензировании здесь.
Для дополнительно защиты RDP сессий можно использовать SSL/TLS сертификаты.
Включение RDP с групповых политик в домене Active Direcrtory
Если вам нужно включить RDP доступ сразу на большом количестве компьютеров, можно воспользоваться групповыми политиками (GPO). Мы подразумеваем, что все компьютеры включены в домен Windows.
- Запустите консоль управления доменными GPO
gpmc.msc
; - Создайте новую (или отредактируйте уже существующую) групповую политику и привяжите ее к целевой OU с компьютерами или серверами;
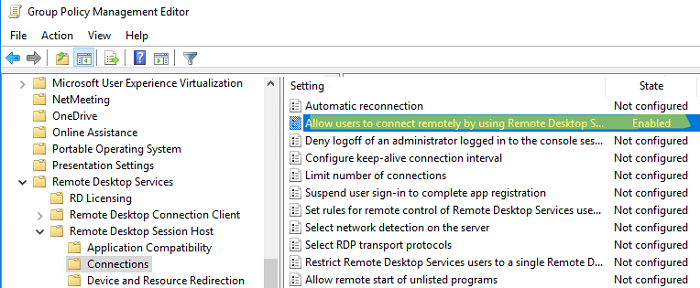
- Переключитесь в режим редактирования политики и перейдите в секцию GPO Computer Configuration -> Administrative Templates -> Windows Components -> Remote Desktop Services -> Remote Desktop Session Host -> Connections;
- Найдите и включите политику Allow Users to connect remotely by using Remote Desktop Services, установив ее в Enable;
- Обновите параметры групповых политик на клиентах;
- После применения данной политики вы сможете подключится ко всем компьютерам по RDP (политика применится как к десктопным клиентам с Windows 10, так и к Windows Server). Если нужно, вы можете более тонко нацелить политики на компьютеры с помощью WMI фильтров GPO.
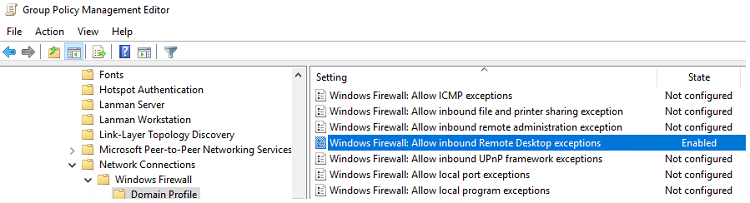
- Если на компьютерах включен Windows Defender Firewall, нужно в этой же GPO разрешить RDP-трафик для доменного профиля. Для этого нужно активировать правило Windows Firewall: Allow inbound Remote Desktop Exceptions (находится в разделе Computer Configuration -> Administrative Templates -> Network -> Network Connections -> Windows Firewall -> Domain Profile).
Подробнее о настройке правил брандмаура Windows через GPO рассказано здесь.
Как удаленно включить RDP на компьютере Windows?
Также вы можете удаленно включить RDP на любом компьютере Windows. Для этого у вас должен быть удаленный доступ к этому компьютеру (через PowerShell или WMI) и ваша учетная запись состоять в группе локальных администраторов на этом компьютере.
Вы можете удаленно включить RDP через реестр. Для этого на удаленном компьютере должна быть включена служба Remote Registry (по умолчанию она отключена). Чтобы запустить службу:
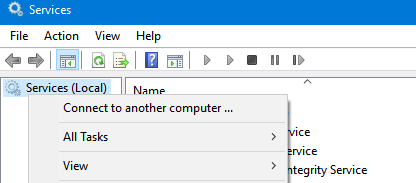
- Запустите консоль управления службами (
services.msc
); - Выберите Connect to another computer и укажите имя удаленного компьютера;
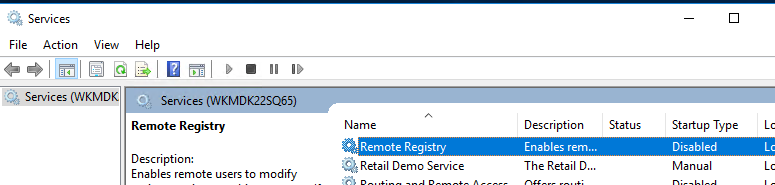
- Найдите в списке службу Remote Registry, измените тип запуска на Manual (ручной) и затем запустите службу – Start.
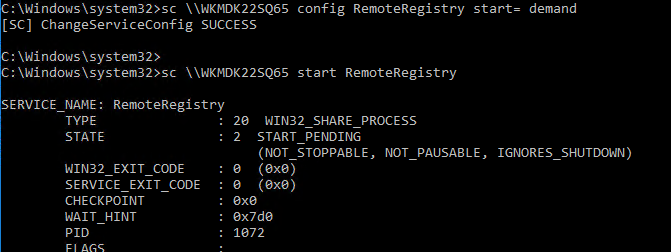
Тоже самое можно выполнить удаленно из командной строки с помощью встроенной утилиты
sc
(позволяет создавать, управлять или удалять службы Windows):
sc \\WKMDK22SQ65 config RemoteRegistry start= demand
sc \\WKMDK22SQ65 start RemoteRegistry
Затем на локальном компьютере
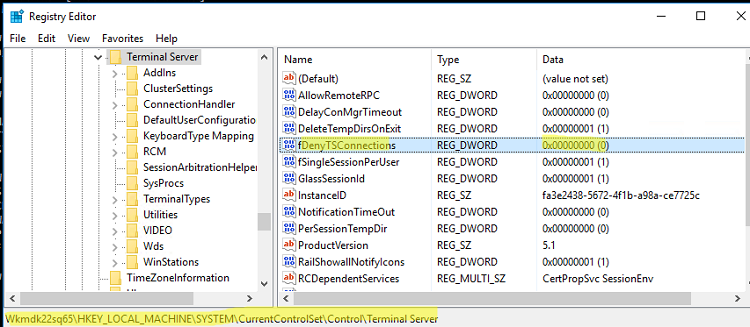
- Запустите редактор реестра
regedit.exe - Выберите в меню Файл пункт Connect Network Registry (Подключить сетевой реестр)
- Укажите имя или IP адрес удаленного компьютера, на котором нужно включить службу RDP;
- Перейдите в раздел
HKEY_LOCAL_MACHINE\SYSTEM\CurrentControlSet\Control\Terminal Server
; - Найдите параметр fDenyTSConnections (тип REG_DWORD). Если данный ключ отсутствует – создайте его. Измените его значение на 0, чтобы включить RDP.
Для отключения RDP доступа нужно изменить значение fDenyTSConnections на 1.
Сразу после этого без перезагрузки удаленный компьютер должен стать доступным по RDP.
Но гораздо быстрее можно включить RDP в реестре удаленого компьютера через командную строку:
REG ADD "\\WKMDK22SQ65\HKLM\SYSTEM\CurrentControlSet\Control\Terminal Server" /v fDenyTSConnections /t REG_DWORD /d 0 /f
Если на удаленном компьютере настроен PowerShell remoting, вы можете выполнить на нем удаленную команду через Invoke-Command:
Invoke-Command -Computername WKMDK22SQ65 -ScriptBlock {Set-ItemProperty -Path "HKLM:\System\CurrentControlSet\Control\Terminal Server" -Name "fDenyTSConnections" –Value 0}
Если в Windows установлен OpenSSH сервер, вы можете подключиться к нему любым ssh клиентом и внести изменения в реестр в локальной ssh сессии.
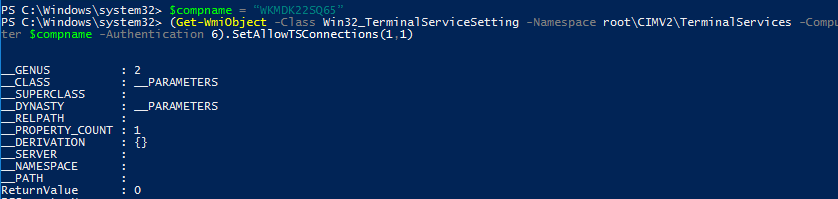
Также вы можете подключиться к удаленному компьютеру и включить RDP через WMI:
$compname = “WKMDK22SQ65”
(Get-WmiObject -Class Win32_TerminalServiceSetting -Namespace root\CIMV2\TerminalServices -Computer $compname -Authentication 6).SetAllowTSConnections(1,1)
In this article, you’ll learn how to enable Remote Desktop using Group policy. On Active Directory domain joined computers, you can enable Remote Desktop using GPO.
Remote desktop is an operating system feature that allows a user to connect to a computer in another location, see that computer’s desktop and interact with it as if it were local.
Windows 11 Remote Desktop feature is majorly used by IT for remote administration. Typically, the IT teams relies on Remote Desktop access to connect to the devices such as Windows 11, Windows Server 2022 and manage tasks.

The need for enabling the Remote Desktop comes when you have a remote site, and you have to support remote users. Enabling the Remote Desktop via group policy on all computers seems to be the best solution.
In most organizations, the remote desktop feature is enabled by default. Typically, in an Active Directory environment, a GPO is used to enable the Remote Desktop. So let’s get started with enabling the Remote Desktop feature.
Read: Intune Remote Help Feature in Endpoint Manager
Table of Contents
Steps to Enable Remote Desktop Using Group Policy
There are three configurations you require to enable the remote desktop on computers:
- Allow users to connect remotely by using Remote Desktop Services
- Require user authentication for remote connections by using Network Level Authentication
- Allow Port 3389 (Remote Desktop Port) through Windows Firewall
All the above configurations needs to be in place for the Remote Desktop feature to work on computers. And all the configurations can be applied via group policy.
Learn: How to Disable Check for Updates using Group Policy (GPO)
When you create a group policy, you need not apply it at domain level. You can either apply it for selected OU’s or link the GPO to multiple OU’s.
In this article, I am going to create and apply the GPO at domain level as I am doing this in my lab setup. Applying the GPO at domain level means you are enabling the remote desktop feature on all domain joined computers.
In your case, you might have to test the policy first on a pilot batch of computers and then link the GPO to the required OU’s or group of systems. The steps to enable remote desktop will remain the same no matter where and how you apply the policy.
Also Read: How to Enable Remote Assistance Using Group Policy
Note: You can create a separate GPO for every configuration or create a single GPO and add all the above configurations in a single GPO.
Step 1 – Create a GPO to Enable Remote Desktop
We will now look at the steps to enable Remote Desktop using Group Policy.
- Log in to Windows Server and open the Group Policy Management console (GPMC)
- Expand the Domains and right-click your domain and select Create a GPO in this domain and link it here.
 1")
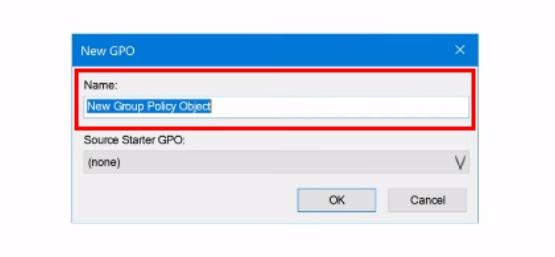
Enter the name of this new GPO as “Enable Remote Desktop” and click OK.
 2")
You have to edit the GPO and proceed with configuring the following policies.
Step 2 – Enable Allow users to connect remotely by using Remote Desktop Services
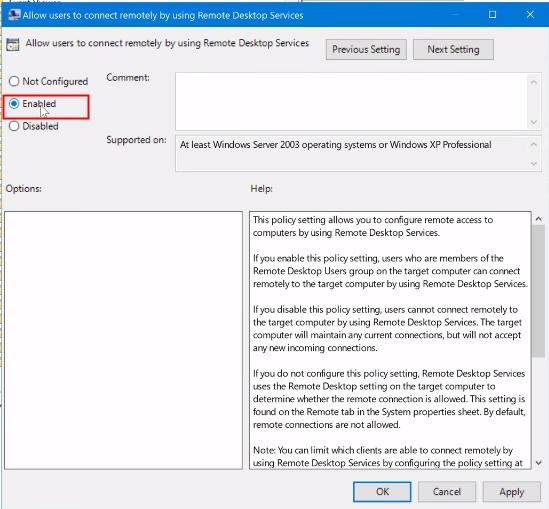
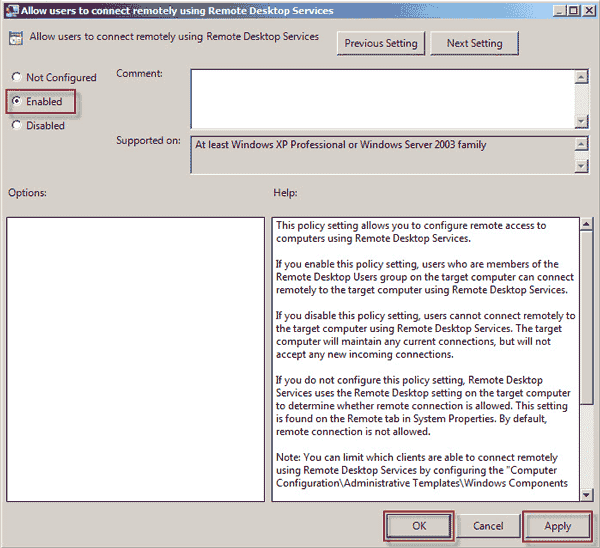
The first policy that we will configure is to Allow users to connect remotely by using Remote Desktop Services. This policy setting allows you to configure remote access to computers by using Remote Desktop Services.
If you enable this policy setting, users who are members of the Remote Desktop Users group on the target computer can connect remotely to the target computer by using Remote Desktop Services.
If you disable this policy setting, users cannot connect remotely to the target computer by using Remote Desktop Services. The target computer will maintain any current connections, but will not accept any new incoming connections.
Read: How to Allow logon through Remote Desktop Services
In the Group policy management editor, navigate to Computer Configuration > Policies > Administrative Templates > Windows Components > Remote Desktop Services > Remote Desktop Session Host > Connections.
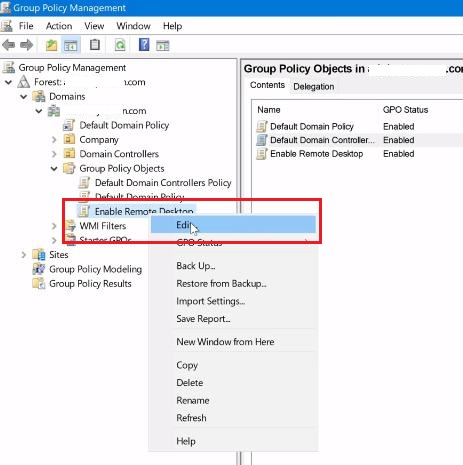
Right-click the policy setting “Allow users to connect remotely by using Remote Desktop Services” and select Edit. Now enable this policy setting by selecting Enabled. Click Apply and OK.
 3")
Step 3 – Enable Network Level Authentication for Remote Connections
The “Require user authentication for remote connections by using Network Level Authentication” policy setting allows you to specify whether to require user authentication for remote connections to the RD Session Host server by using Network Level Authentication.
Network Level Authentication is a method used to enhance RD Session Host server security by requiring that a user be authenticated to the RD session Host Server before a session can be created.
This policy setting enhances security by requiring that user authentication occur earlier in the remote connection process.
If you enable this policy setting, only client computers that support Network Level Authentication can connect to the RD Session Host server.
Read: Disable Windows Spotlight using GPO
To determine whether a client computer supports Network Level Authentication, start Remote Desktop Connection on the client computer, click the icon in the upper-left corner of the Remote Desktop Connection dialog box, and then click About. In the About Remote Desktop Connection dialog box, look for the phrase Network Level Authentication supported.
If you disable this policy setting, Network Level Authentication is not required for user authentication before allowing remote connections to the RD Session Host server.
It is recommended that you enable this policy setting when you enable Remote Desktop using Group Policy.
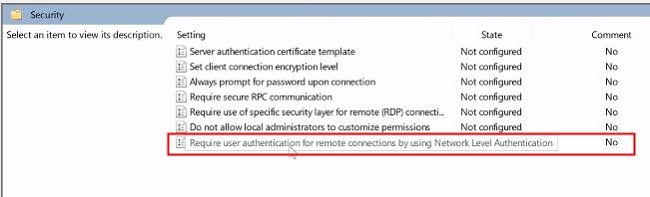
In the Group policy management editor, navigate to Computer Configuration > Policies > Administrative Templates > Windows Components > Remote Desktop Services > Remote Desktop Session Host > Security.
Right-click the policy setting “Require user authentication for remote connections by using Network Level Authentication” and click Edit. Enable this policy setting by selecting Enabled. Click Apply and OK.
 4")
With the above policy settings enabled, you can select the “Enable Remote Desktop” GPO and take a look at the configured settings. The settings are visible when you select the Settings tab of the GPO in GPM console.
 5")
Step 4 – Allow Port 3389 (Remote Desktop Port) through Windows Firewall
Remote Desktop Protocol listens on TCP port 3389 and UDP port 3389. If your domain firewall doesn’t have the port 3389 allowed, the RDP connections will fail.
The below procedure shows how to open RDP port 3389 through Windows Firewall. In case the port 3389 is allowed though firewall, jump to next section.
Recommended: Configure Domain Controller Interactive logon Message
As mentioned earlier, you can either edit an existing GPO and allow port 3389 or create a new GPO to enable Remote Desktop Port 3389.
In the Group Policy Management Editor, go to Computer Configuration > Windows Settings > Security Settings > Windows Defender Firewall with Advanced Security.
We want to allow the incoming RDP connection to all computers (TCP 3389 port). Right-click the Inbound Rules section and select New Rule.
On the Rule Type window, select Port. Click Next.
 6")
On the Protocol and Ports window, configure the following:
- Does this rule apply to TCP or UDP – Select TCP.
- Does this rule apply to all local ports or specific local ports? – Select Specific local ports and enter the port number – 3389.
Click Next to continue.
 7")
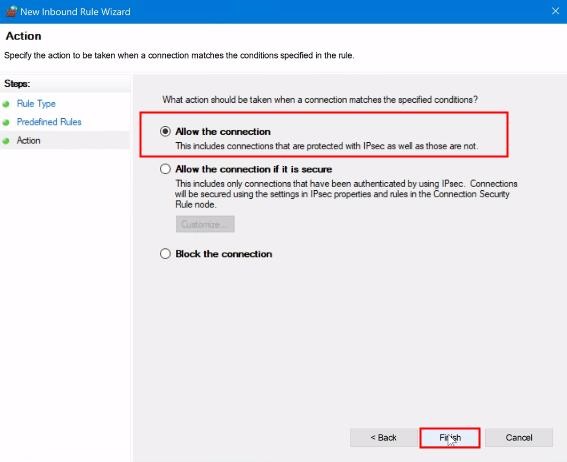
As we want to allow port 3389 through our firewall, select Allow the connection. Click Next.
 8")
This is an important section where you have to select a profile and specify when does this rule apply. Ultimately, domain profile is where you want the port 3389 to be allowed. Click Next.
 9")
Specify the name and description of this rule and click Finish.
 10")
We have successfully created an inbound rule allowing port 3389 along with enable remote desktop GPO policy.
 11")
Step 5 – Test the “Enable Remote Desktop GPO” on Client Machines
This is the final step where we check if the GPO has been successfully deployed to client machines. By default, the group policy refresh interval is 90 minutes. You can modify the GP refresh interval if required.
On the client computer, launch the CMD as administrator and run the command gpupdate. Wait for the computer policy update and user policy update to finish.
 12")
Now go to System Properties and select the Remote tab. Notice that Allow remote connections to this computer is enabled along with Network Level authentication for RDP connections. This confirms that we have successfully enabled the Remote Desktop using Group Policy.
 13")
Still Need Help?
If you need further assistance on the above article or want to discuss other technical issues, check out some of these options.
Rick Akura
In this guide, you will learn about what’s a remote desktop and how to enable it via group policy and Powershell. Click here to get started.
Assume a situation whereby you have just set up a remote site and now you find yourself having users or support servers that you can’t physically gain access. This means walking to the desk is out of your options. So how do you go about it to access the data and information you may be in need of?
To get it right, you need to figure out how to enable Remote Desktop via Group Policy, so that it can get applied to all devices at your site. Configuration of remote desktop forms the basis of our guide today. Let’s get started.
Jump to Section
- What is Remote Desktop Group Policy
- How to Enable RDP on Windows 10 using Setting or GUI
- How to Enable Remote Desktop Remotely Using PowerShell
- How to Enable/Disable Remote Desktop Using Group Policy
- Network Level Authentication NLA on the remote RDP server
- Enable remote connections on Windows using the Control Panel
- Conclusion
What is Remote Desktop Group Policy
Almost all users who are interested in building safe connections between computers on the internet might have heard about RDP or VPN. RDP stands for the Remote Desktop Protocol. It is a network of communications protocol developed by Microsoft, to allow users to connect to another computer.
With RDP, one can connect to any computer that runs Windows. With RDP, you can connect to the remote PC, view the same display and interact as if you are working on that machine locally.
Some instances where you may need to use RDP include;
- When traveling or when on vacation and you need to access your work computer
- When you can’t go to your office due to certain reasons and you still need to fulfill your daily tasks
- When you are a system admin and you need to perform administrative duties on your PC such as computer troubleshooting, tune-up, ID protection setting, printer set-up, software installation, email setup, virus and spyware removal, among others.
- When you need to give a demo and you need to access data from a private device
- When you want to personalize your remote desktop on experiences such as resolution, connection setting, screen setting, toolbar, start menu, icons among others.
1. How to Enable RDP on Windows 10 using Setting or GUI
The easiest way to enable Remote Desktop on the Windows operating system family is to use a Graphical User Interface (GUI).Using the Settings app, follow the steps below to enable remote access on Windows 10:
-
Open the “System” control panel
- Go to “Remote Desktop”
- Toggle the “Enable Remote Desktop” switch to “On”.
-
Enable the “Allow remote connection to this computer” option in the Remote Desktop section.
- Hit “Confirm”.


Once you’ve allowed Remote Desktop on Windows 10, there will be two additionally enabled options:
- Keep my PC awake for connection when it’s plugged in.
- Make my PC discoverable on private networks to enable automatic connection from a remote device.
These settings ensure that users always can connect to the remote machine whenever they like.

However, performing the above process will need local access to the computer on which you want to enable the RD.
By default, remote desktop is disabled in both desktop versions of Windows and in Windows Server.
If users go to the “Advanced settings” window, they’ll see extra advanced features, such as the option to require computers to utilize “Network Level Authentication” when connecting remotely. This setting ensures the connections are more secure by restricting access only to those who can authorize the connection with the network before they can access the device.

The “Advanced settings” page also has the current Remote Desktop port. This information is useful if the user ever needs to reconfigure a router to permit remote desktop access from outside of their network.
Note: By default, the port number is set to 3389.
2. How to Enable Remote Desktop Remotely Using PowerShell
Suppose you want to remotely enable RDP on Windows Server 2012 R2/2016/2019. Here is the procedure to achieve the same;
- On your computer, open the PowerShell console and run the following commands to connect to your remote server. Enter-PSSession -ComputerName server.domain.local -Credential domain\administrator.
- You will have established a remote session with a computer and now you can execute PowerShell commands on it. To enable Remote Desktop, you need to change registry parameter fDenyTSConnections from 1 to 0 on the remote machine. Run the command; Set-ItemProperty -Path ‘HKLM:\System\CurrentControlSet\Control\Terminal Server’-name «fDenyTSConnections» -Value 0
- When RDP is enabled this way (as opposed to GUI method) the rule that allows remote RDP connections is not enabled in the Windows Firewall rules.
- To allow incoming RDP connections in Windows Firewall, run the command; Enable-NetFirewallRule -DisplayGroup «Remote Desktop»
- If for some reason the firewall rule is deleted, you can create it manually using the following commands. netsh advfirewall firewall add rule name=»allow RemoteDesktop» dir=in protocol=TCP localport=3389 action=allow
- In case you need to allow secure RDP authentication (NLA – Network Level Authentication) run the command; Set-ItemProperty -Path ‘HKLM:\System\CurrentControlSet\Control\Terminal Server\WinStations\RDP-Tcp’ -name «UserAuthentication» -Value 1
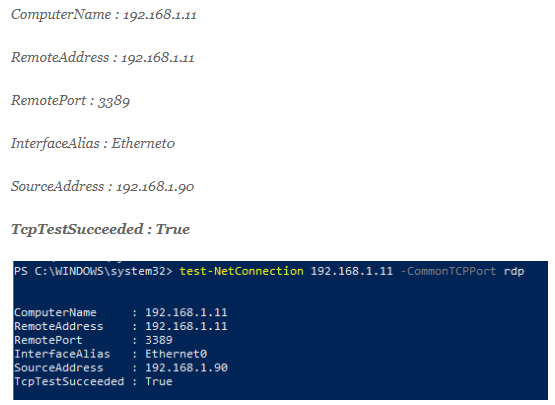
- Now from your computer, you can check the TCP 3389 port on the remote host to see if it has become available. To do so, run the command below’ Test-NetConnection 192.168.1.11 -CommonTCPPort RDP.
- If successful, you should get results similar to what is shown below’

The above results mean RDP on the remote host is enables and you can establish a remote desktop connection using mstsc client.
3. How to Enable/Disable Remote Desktop Using Group Policy
You can enable or disable remote desktop using group policy. To do so, perform the following steps.
-
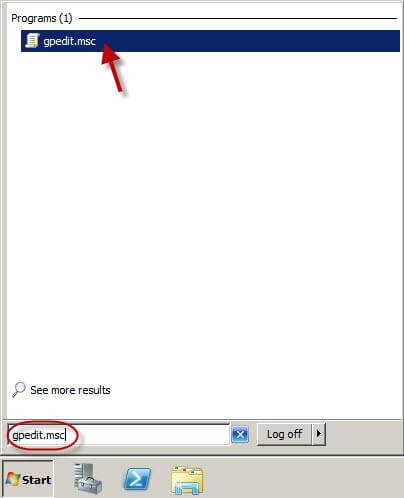
Search gpedit.msc in the Start menu. In the program list, click gpedit.msc as shown below;
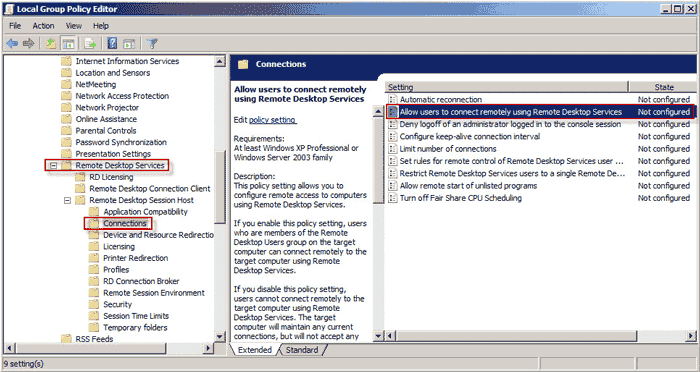
- After Local Group Policy Editor opens, expand Computer Configuration >> Administrative Templates >> Windows Components >> Remote Desktop Services >> Remote Desktop Session Host >> Connections.
-
On the right-side panel. Double-click on Allow users to connect remotely using Remote Desktop Services. See below;
- Select Enabled and click Apply if you want to enable Remote Desktop. Select Disabled and click Apply if you need to disable it.


Now you will have enabled or disabled remote desktop using group policy
4. Network Level Authentication NLA on the remote RDP server
Network Level Authentication is a method used to enhance RD Session Host server security by requiring that a user be authenticated to RD session Host Server before a session can be created.
If you want to restrict who can access your PC, you can choose to allow access only with Network Level Authentication (NLA). NLA is an authentication tool used in RDP Server. When a user tries to establish a connection to a device that is NLA enabled, NLA will delegate the user’s credentials from the client-side Security Support Provider to the server for authentication, before creating a session.
The advantages of Network Level Authentication is;
- It requires fewer remote computer resources initially.
- It can provide better security by reducing the risk of denial of service attacks.
To configure Network Level Authentication for a connection, follow the steps below.
- On the RD Session Host Server, open Remote Desktop Session Host Configuration. To do so, click Start>>Adminstrative Tools1>>Remote Desktop Services>> Remote Desktop Session Host Configuration.
- Under Connections, right-click the name of the connection and then click Properties.
- On the General tab, select Allow the connection only from computers running Remote Desktop with Network Level Authentication checkbox
- Click OK
Note, under step 3, if the “Allow connections only from computers running a remote desktop with network-level authentication” checkbox is not enabled, the “Require user authentication for remote connections by using network-level authentication” Group Policy setting has to be enabled, and has been applied to the RD Session Host Server.
5. Enable remote connections on Windows using the Control Panel
Even though the Settings app and Control panel are easy options for enabling remote desktop access, you can also enable RDP access using the Control Panel. Below you’ll find the instructions on how to enable remote desktop on Windows 10 or 11 via the Control Panel:
- Open the Control Panel. The most optimal way would be to type in the «control panel» query in the search box.
- In the control panel, select “System and Security”.
- Under the “System” section, click “Allow remote access”.
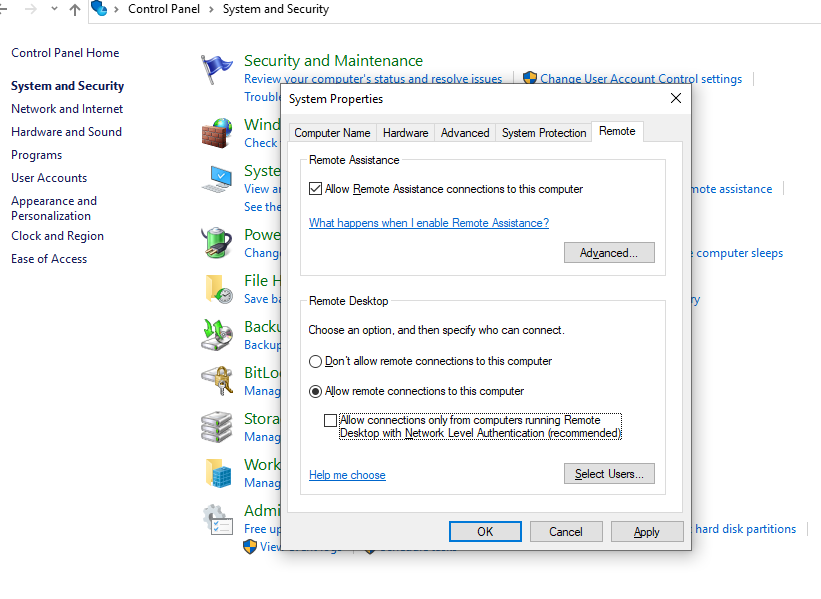
- The System Properties window will appear.
- In the Remote tab, check the box “Allow Remote Assistance connections to this computer” in the section Remote Assistance. Then, select “Allow remote connections to this computer” in the section Remote Desktop.
- Hit “Apply” and then “OK”.
- Voila!


Conclusion
After turning on the remote desktop access on Windows 10/11, it’s time to connect to the remote computer. You can use the modern Remote Desktop application (recommended) or the built-in Remote Desktop Connection (RDC) utility with every Windows version.
If you would then need to disable Remote Desktop access, you should not experience any issues since you’ll only need to reverse the steps from this guide.
That’s it, from us’ Now to you.
We’re glad you’ve read this article up to here, thank you 
If you have an extra minute, please share the article on your socials; Someone else may benefit.
And, subscribe to our newsletter below for more articles like this. We also share deals and promotions on the email that you shouldn’t miss.
Also Read
» Remote Access Software: A Guide to Choosing the Right Solution for Your Business
» How To Fix «Remote Desktop Can’t Connect to the Remote Computer»
» Working Remotely Tips: Remote work tips and tools for beginners
» Benefits and Major Challenges of Hybrid Work?
»8 Best Practices for Secure Remote Working
For IT administrators managing multiple computers in a network domain, remote desktop access is a vital tool. It allows for efficient troubleshooting, software installation, and overall system management without physically visiting each machine.
Imagine you’re managing a network of computers in a company. Rather than visiting each machine individually to enable remote desktop, Group Policy allows you to configure this setting centrally, saving you significant time and effort.
It is a powerful feature within Windows Server environments that provides a centralized method to configure settings across a group of computers. This article will guide you through enabling remote desktop access on target computers using Group Policy.
Note : To enable Remote Desktop using Group Policy, you need to install Server Manager on your Windows computer. Therefore, if you don’t know how to install this application, please continue reading Part 1. If you have already installed it, please skip to Part 2.
- Part 1: How to Install Server Manager on Windows 10
- Part 2: How to Enable Remote Desktop Using Group Policy
- Bonus: Improve Efficiency for IT Admins to Remote Access and Manage Desktop
- Part 3: Extra: How to Add Administrator Rights to Target Computers
Part 1: How to Install Server Manager on Windows 10
Before diving into the installation process, let’s establish a clear understanding of RSAT and Server Manager. RSAT is a suite of tools designed to manage roles and features on Windows Server machines from a remote Windows 10 client.
Server Manager, included within RSAT, acts as the central hub for administering these servers. It provides an intuitive interface to monitor server health, configure roles and features, and perform various administrative tasks.
So, here are the step-by-step guidelines:
Step 1: Check System Requirements
Ensure your Windows 10 version is Professional or Enterprise, as Server Manager cannot be installed on Windows 10 Home edition.
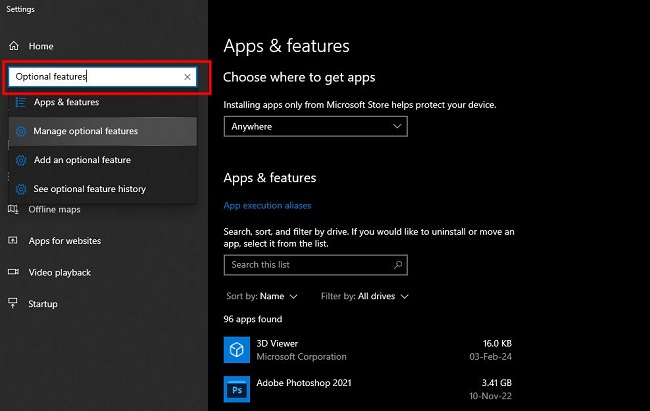
Step 2: Open Windows Settings
1. Press Win + I or type «Settings» in the start menu to open the Settings window.
2. Navigate to Apps & Features -> Optional Features.
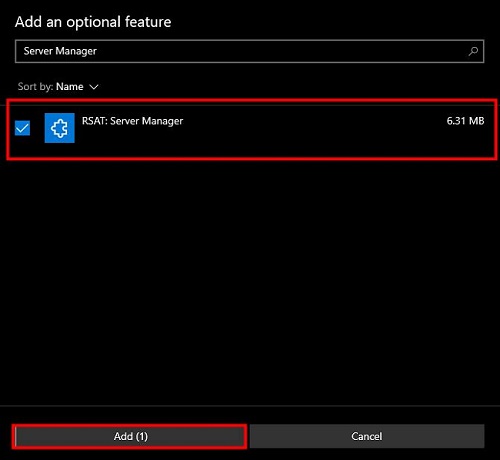
Step 3: Add a Feature & Install Server Manager
1. Click on «Add a feature» at the top of the page.

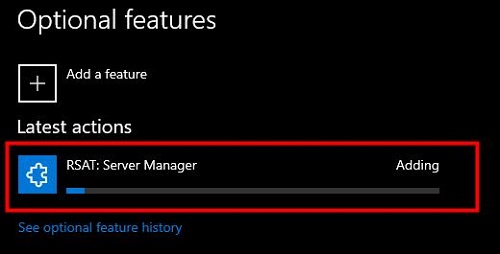
2. In the search box, type «Server Manager» to find the feature. From the list, select «RSAT: Server Manager» by checking the box next to it. Click the «Add» button to begin the installation process.
Be patience in this stage. The installation may take a few minutes.
Step 4: Install the RSAT Group Policy Management Tools
After adding the server manager, you also need to install the «RSAT: Group Policy Management Tools.» Procedure is the same like installing server manager.
1. Just go to Settings, click on «Apps».
2. Type «optional features» on the search bar and select «Add an optional feature» from the drop down menu.
3. Now, type «RSAT: Group Policy Management Tools» in its search bar and check mark on it.
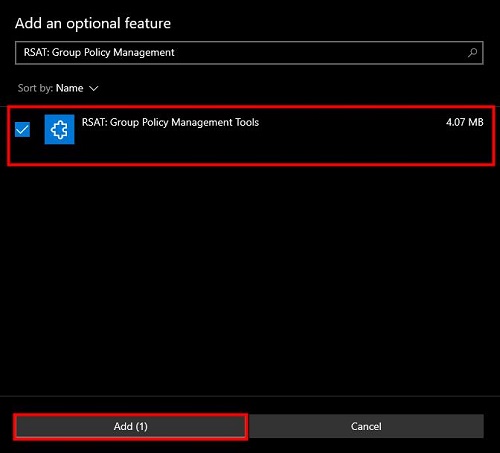
4. Then click on the «Add» button.
It will take some moments to install the application.
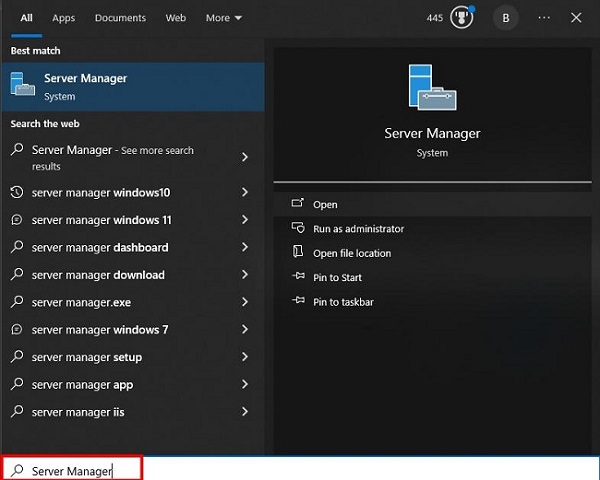
Step 5: Access Server Manager
Once installed, you can access Server Manager by searching for it in the Start menu or by typing servermanager in PowerShell or Command Prompt.
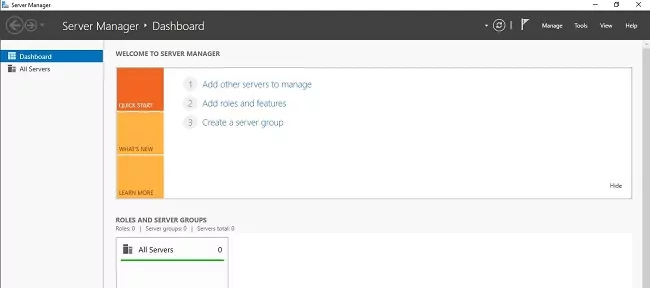
Step 6: Manage Your Servers
Congrats! You’ve successfully installed Server Manager on your Windows 10 PC, and you’re ready to manage your servers more efficiently.
With Server Manager open, you can now add or remove roles and features, create server groups, and manage servers remotely.
Note : If you encounter any issues during the installation, make sure you have a stable internet connection and sufficient permissions on your PC to install features.
Part 2: How to Enable Remote Desktop Using Group Policy
Here’s a step-by-step guide to allow rdp group policy or enabling remote desktop access using Group Policy:
Step 1: Creating a GPO to Enable Remote Desktop
1. Open the Group Policy Management Console (GPMC). You can access it by searching for «gpmc.msc» in the Windows Start menu.
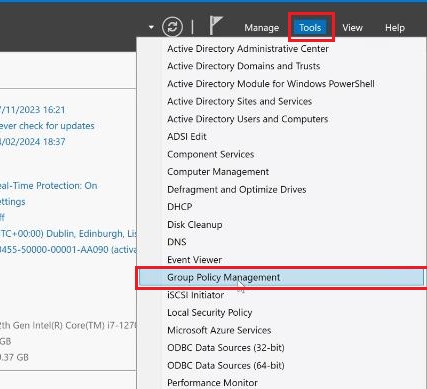
2. Alternatively, open the Server Manager application in the Windows Start menu. In the top bar, click on the «Tools» option and select the «Group Policy Management» from the drop-down menu.
3. Expand the forest and domain nodes in the left-hand pane. Next, right click on the «Group Policy Object (GPO)» and select «New» in the drop-down menu.
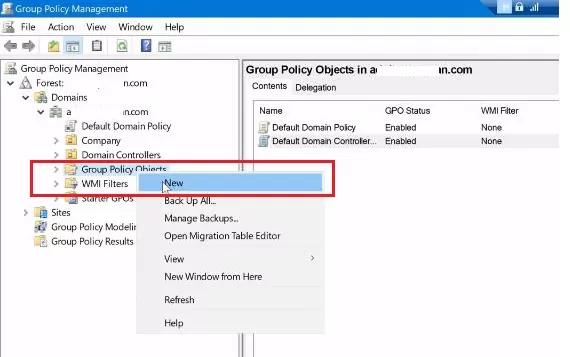
4. Provide a descriptive name for the GPO (Group Policy Object), such as «Enable Remote Desktop.» Then Click «OK» to create the new gpo to allow remote desktop.
Step 2: Enable Allow Users to Connect Remotely by Using Remote Desktop Services
1. In the GPMC console, right-click on the newly created GPO and select «Edit.» This will launch the Group Policy Management Editor (GPME). Also, the gpo allow remote desktop smoothly.
2. Navigate to the following location within the Group Policy settings:
Computer Configuration > Policies > Administrative Templates > Windows Components > Remote Desktop Services > Remote Desktop Session Host > Connections
3. Next, locate the policy setting named «Allow users to connect remotely by using Remote Desktop Services.» Then, double-click on this policy setting.
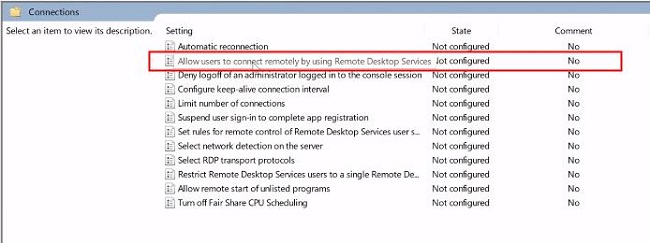
4. You will get a new pop menu regarding allow users to connect remotely by using Remote Desktop Services. This box indicates a «Not configured» option.
5. In the new window, select the «Enabled» option. Click «Apply» and «OK» to save the changes.
Step 3: Enable Network Level Authentication for Remote Connections
1. While still within the GPME, navigate to: Computer Configuration > Policies > Administrative Templates > Windows Components > Remote Desktop Services > Remote Desktop Session Host > Security.
2. Then, locate the policy setting named «Require user authentication for remote connections by using Network Level Authentication.» Double-click on this policy setting.
3. Select the «Enabled» option for enhanced security. Network Level Authentication (NLA) adds an extra layer of security during remote desktop connections. Click «Apply» and «OK» to save the changes.

Step 4: Allow Port 3389 (Remote Desktop Port) through Windows Firewall
By default, Windows Firewall might block incoming connections on port 3389, the standard port used for remote desktop access.
1. Within the GPME, navigate to: Computer Configuration > Policies > Administrative Templates > Network > Network Connection > Windows Defender Firewall > Domain Profile
2. Locate the policy setting named «Windows Defender Firewall with Advanced Security»
3. Next, right click on the «Inbound Rules» and select «New Rule» from the drop-down menu.
4. Now, mark on the «Predefined» box. Then scroll down and select «Remote Desktop».
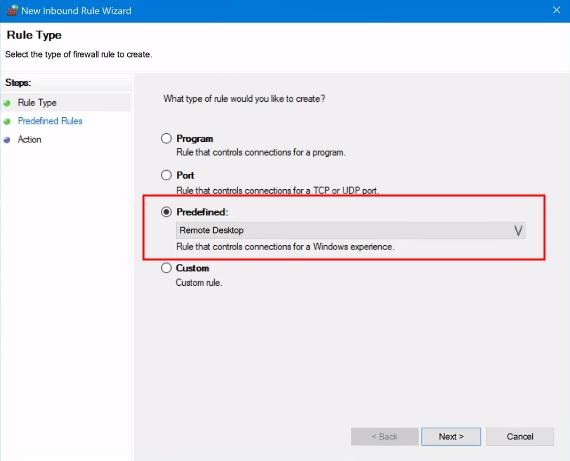
5. Click on the «Next» button.
6. Therefore, you will see the whole things about «New Inbound Rule Wizard»
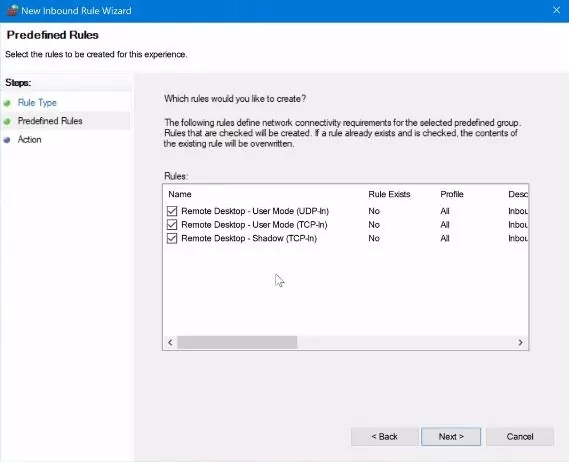
7. Click on the «Next» button.
8. Allow the connection and press on the «Finish» button.
Now, you will see that your group policy is set off with indicating green mark.
Step 5: Update Group Policy and Check Remote Desktop Settings
After configuring the necessary settings within the GPO, it’s crucial to enforce the policy on the target computers. Hence, we need to take our enabled remote desktop group policy and then apply it to our servers organizational units.
So for mine all of my servers are house within a servers OU, so I can take my enable remote desktop and then drag it over the servers. Then you will get a new pop-up named «Group Policy Management» and press «OK» to link it to that.
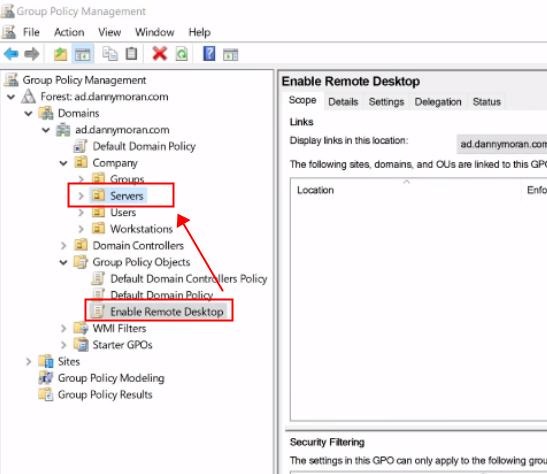
Now if I select servers, we can see that we’ve got enabled remote desktop linked.
Using Command Prompt
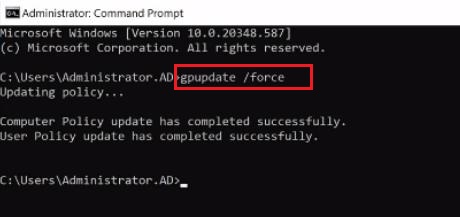
You can also manually trigger a Group Policy refresh on the target computers by running gpupdate /force from the command prompt.
1. To do this, Open the «Command Prompt» application.
2. Then use a command prompt- gpupdate /force, and press «Enter» this prompt. It will take some moments to update both your computer policy and user policy successfully.
3. Now, we come back to the system properties and then press on the «Remote» tab. We can see that «Allow remote connection to this computer» is ticked and we are unable to change it.
Because it set by group policy. Also the «Allow connections only using network level authentication» that is also ticked and can’t be changed as it is set by using Group Policy.
Next, if we come to our Windows Firewall and then under in bound rules, we just want to make sure that our remote desktop inbound rules are set so.
However, we can see that we’ve got remote desktop user in «Port 3389» and that is set to be enabled. It’s got the green tick that means there won’t be any firewall issues for connecting with remote desktop from the local network.
Connection
Once the policy update is complete and other settings are okay, you should verify remote desktop access on a target computer. To do this function quickly, you can use the «Remote Desktop Connection» application to attempt a connection.
1. Open «Remote Desktop Connection» on your PC and put your computer’s name (username) and press «connect».
2. Next, place your password and click on the «OK» option.
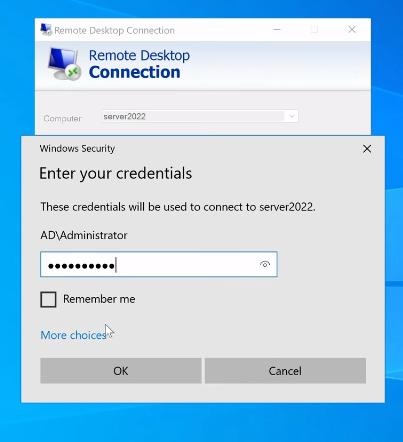
It will take some seconds connecting to that initial server using remote desktop connection.
That’s it. Congratulations! You are finally learned on how to enable Remote Desktop using Group Policy.
Part 3: Extra: How to Add Administrator Rights to Target Computers
By default, users attempting remote desktop connections might require local administrator rights on the target computer. Here’s how to configure Group Policy to allow specific user groups remote access:
Step 1: Within the GPME, navigate to: Computer Configuration > Windows Settings > Security Settings > Restricted Groups
Step 2: Right-click on «Restricted Groups» and select «Add Group.»
Step 3: In the «Group» field, type the name of the security group containing the users you want to grant remote desktop access.
Step 4: Click «Check Names» to verify the group name is recognized.
Step 5: Click «OK» to add the group.
Step 6: In the «This group is a member of» section, click «Add.»
Step 7: Type «Remote Desktop Users» in the «Enter the object names to select» field and click «Check Names» again.
Step 8: Click «OK» to add the «Remote Desktop Users» group. This grants the specified security group permission to connect remotely using Remote Desktop.
Step 9: Click «Apply» and «OK» on all open windows to save the changes within the Group Policy Editor.
Bonus for Business: Improve Efficiency for IT Admins to Remote Access and Manage Desktop
Remote desktop access is important for IT administrators who manage multiple computers in a network domain. If your enterprise has the need to remotely access and manage desktop and mobile devices, you can try AirDroid Remote Support.

AirDroid Remote Support is a comprehensive enterprise remote access and support solution. It provides instant remote support or collaboration and is ideal for IT operations. IT administrators can remotely monitor the health of corporate devices or applications in real time, make configuration adjustments, or keep them running optimally.
Reap the Benefits of AirDroid Remote Support
- Quick and Easy to Connect: Get secure, easy & quick access to devices with just a few clicks, without the need of sharing ID and password.
- Industry-leading Security: All remote support sessions secured by AES-256-bit encryption, TLS 1.2, and other industry-grade security features, such as two-factor authentication, conditional access and more.
- Reduced Downtime: Help IT teams address technical issues on the air and save all the hassle of on-site supports anywhere, at any time.
- Scalability: Best for support a large number of devices and users, making them ideal for growing businesses across different locations.
Key Considerations
1# Workgroup vs Domain Environments
This guide focused on enabling remote desktop access on domain-joined computers, which are managed centrally through Active Directory.
For workgroups, a less centralized approach is needed. You’ll likely need to configure Remote Desktop on each machine individually.
But the core steps remain similar: enabling remote desktop, configuring user permissions, and ensuring firewall rules allow remote connections.
2# Testing and Validation
Before deploying any Group Policy Object (GPO) across a large number of computers, it’s crucial to validate the configuration in a non-production environment. This could involve creating a separate OU containing a representative sample of machines.
By testing the GPO in this isolated environment, you can identify and rectify any potential issues before impacting your core production systems.
3# Multi-Factor Authentication (MFA)
While Network Level Authentication (NLA) offers a layer of security for remote desktop connections, it can be further enhanced by implementing multi-factor authentication (MFA).
MFA requires users to provide an additional verification factor beyond just a username and password. This could involve a code from an authenticator app, a fingerprint scan, or a security token.
By requiring MFA, you significantly reduce the risk of unauthorized access to your network, even if attackers manage to steal a user’s credentials.
4# Client Compatibility
It’s also important to consider the compatibility of remote desktop client software. Ensure that the version of Remote Desktop Connection (RDC) used to connect remotely is compatible with the operating system version running on the target computers.
Microsoft regularly releases updates for RDC, so it’s advisable to keep both client and server software up-to-date for optimal performance and security.
Final Thoughts
In a nutshell, enabling Remote Desktop through Group Policy offers a centralized and efficient way to manage multiple computers in a Windows domain environment.
By following the steps outlined in this guide, you can empower IT administrators and support specialists to remotely troubleshoot, install software, and manage systems with greater ease.
Imagine that you have just put up a remote site and that you are now faced with users or support servers to which you are unable to physically acquire access. This means that you have no choice but to stand at the desk. How do you, therefore, go about getting access to the data and information you might need?
In order to do it correctly, you must learn how to apply Remote Desktop via Group Policy to all machines at your site. Our guide today is built around remote desktop configuration. Let’s get going.
RDP and VPN are two terms that almost all users who are interested in creating secure connections between computers on the internet may be familiar with. The Remote Desktop Protocol is known as RDP. Microsoft created a network communications protocol to enable users to connect to other computers.
One can connect to any Windows-powered computer using RDP. RDP enables you to connect to a remote PC, view the same display, and interact with it as if you were physically present there.
You might need to use RDP in the following circumstances;
- When on vacation or when travelling, you must access your work computer.
- When you need to complete your daily activities but are unable to go to work for some reason
- When you need to execute administrative tasks on your PC as a system administrator, such as virus and spyware eradication, computer tune-up, ID protection setting, printer setup, software installation, and so forth.
- When presenting a demo and requiring access to data from a personal device
- When you wish to alter the resolution, connection settings, screen settings, toolbar, start menu, and icons, among other things, on your remote desktop.
How to Turn on Remote Desktop in Windows 10?
Using a Graphical User Interface is the simplest approach to enabling Remote Desktops on the Windows operating system family (GUI).
The “Allow remote connection to this computer” option may be found in the Remote Desktop section of the “System” control panel.
However, you will require local access to the computer on which you wish to enable the RDP in order to carry out the aforementioned procedure.
Both the desktop and server editions of Windows by default disable remote desktop.
How to Use PowerShell to Remotely Enable Remote Desktop?
Let’s say you wish to use Windows Server 2012 R2/2016/2019 to remotely enable RDP. Here is how to carry out the process;
- Run the commands listed below in the PowerShell console on your computer to connect to your remote server. Enter-PSSession -ComputerName server.domain.local -Credential administrator is the domain.
- Once a remote session has been established, you can run PowerShell commands on the computer. On the remote machine, you must set the registry setting fDenyTSConnections from 1 to 0.
- This will enable Remote Desktop. Run the following command to disable TS connections: Set-ItemProperty -Path ‘HKLM:SystemCurrentControlSetControlTerminal Server’ -name “fDenyTSConnections” -Value 0.
- When RDP is enabled in this manner (as opposed to the GUI technique), the Windows Firewall rule that permits remote RDP connections is disabled.
- Run the following command in Windows Firewall to allow incoming RDP connections: Enable-NetFirewallRule -DisplayGroup “Remote Desktop”
- You can manually create the firewall rule using the following commands if it is accidentally erased. Allow Remote Desktop: netsh advfirewall firewall add rule name=”allow RemoteDesktop” dir=in protocol=”TCP” localport=”3389″ action=allow
- Run the command if you need to enable secure RDP authentication (NLA, or Network Level Authentication);S et-ItemProperty”UserAuthentication”-Path “HKLM:SystemCurrentControlSetControlTerminal ServerWinStationsRDP-Tcp” -name
- You can now check the distant host’s TCP 3389 port from your machine to see if it has opened up. Run the command below to achieve this. 192.168.1.11 Test-NetConnection -CommonTCPPort RDP
- If you’re successful, you should get results like the ones below.
The aforementioned outcomes indicate that RDP is enabled on the remote host and that you can connect to a remote desktop using the mstsc client.
How to Use Group Policy to Enable/Disable Remote Desktop?
Using group policy, you can allow or disable remote desktops. To do this, take the accompanying actions:
- Go to the Start menu and type gpedit.msc. Click gpedit.msc in the programme list, as shown below;
- Expand Computer Configuration >> Administrative Templates >> Windows Components >> Remote Desktop Services >> Remote Desktop Session Host >> Connections after Local Group Policy Editor has opened.
- On the panel to the right, allow users to connect remotely using Remote Desktop Services by double-clicking. View below
- To activate Remote Desktop, select Enabled and then click Apply. If you want to make it inactive, choose Disabled and press Apply.
You can now use the group policy to enable or disable remote desktops.
Authentication at the Network Level On the distant RDP server, NLA
By demanding user authentication on the RD Session Host Server before a session can be formed, Network Level Authentication is a technique for enhancing server security.
You can choose to only allow access with Network Level Authentication if you wish to limit who has access to your computer (NLA). RDP Server uses NLA as an authentication technique. NLA will transfer the user’s credentials from the client-side Security Support Provider to the server for authentication before initiating a session when a user wants to connect to a device that has NLA enabled.
Network-level authentication has these benefits.
- Initially, fewer resources are needed from faraway computers.
- Lowering the possibility of denial of service attacks, it can improve security.
The steps listed below should be followed to configure Network Level Authentication for a connection.
- Open Remote Desktop Session Host Configuration on the RD Session Host Server. To achieve this, select Remote Desktop Session Host Configuration by clicking Start>>Adminstrative Tools1>>Remote Desktop Services.
- Right-click the connection’s name under Connections and select Properties.
- Choose the Allow the connection only from machines running Remote Desktop with Network Level Authentication checkbox on the General tab.
- Input OK.
The “Require user authentication for remote connections by using network-level authentication” Group Policy setting must be enabled and applied to the RD Session Host Server if the checkbox for “Allow connections only from computers running a remote desktop with network-level authentication” is not selected under step 3.