
Все способы:
- Способ 1: «Панель управления»
- Способ 2: «Редактор реестра»
- Что делать, если параметры быстрого запуска недоступны
- Дополнительно: Ускорение загрузки Windows
- Вопросы и ответы: 0
Обратите внимание! Активация быстрого запуска не дает даже минимально заметного преимущества, если операционная система установлена на SSD — в этом случае она и так функционирует достаточно быстро. Более того, условия, необходимые для работы данной функции, пусть и незначительно, но все же могут негативно сказаться на сроке службы твердотельного накопителя. Если же вы пользуетесь HDD, выполнение предложенных далее рекомендаций позволит ускорить загрузку Виндовс 10 на несколько секунд. Однако важно отметить, что быстрый запуск как таковой распространяется только на непосредственное включение компьютера, который был отключен через пункт меню «Завершение работы», то есть при перезагрузке запуск будет длиться как обычно.
Способ 1: «Панель управления»
Управление функцией быстрого запуска в Windows 10 осуществляется в одном из разделов классической «Панели управления». Для того чтобы перейти к нему, сделайте следующее:
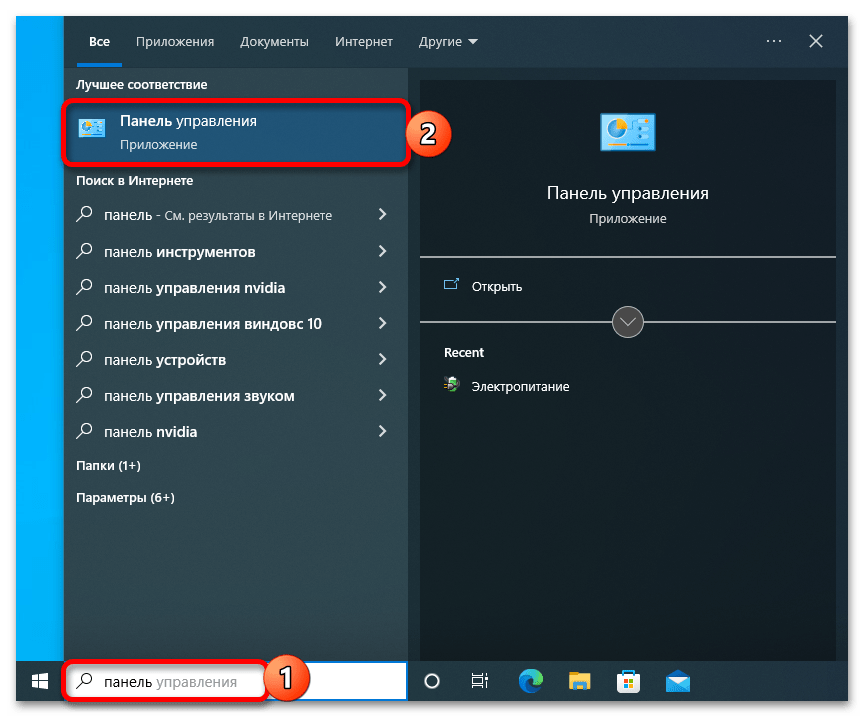
- Откройте «Панель управления». Проще всего это осуществить через поиск, но есть и другие способы.

Читайте также: Как открыть «Панель управления» в Виндовс 10
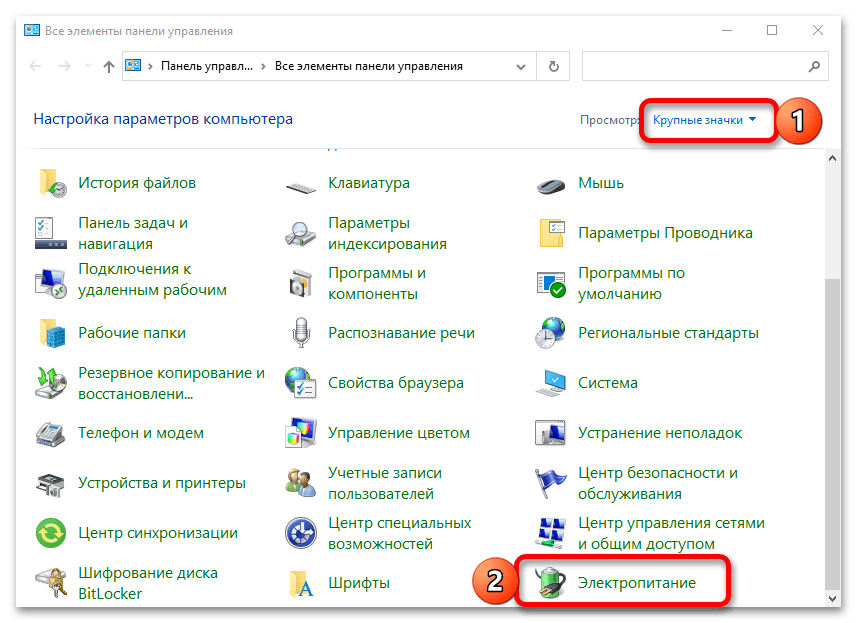
- Переключите режим просмотра на «Крупные значки» и откройте раздел параметров «Электропитание».
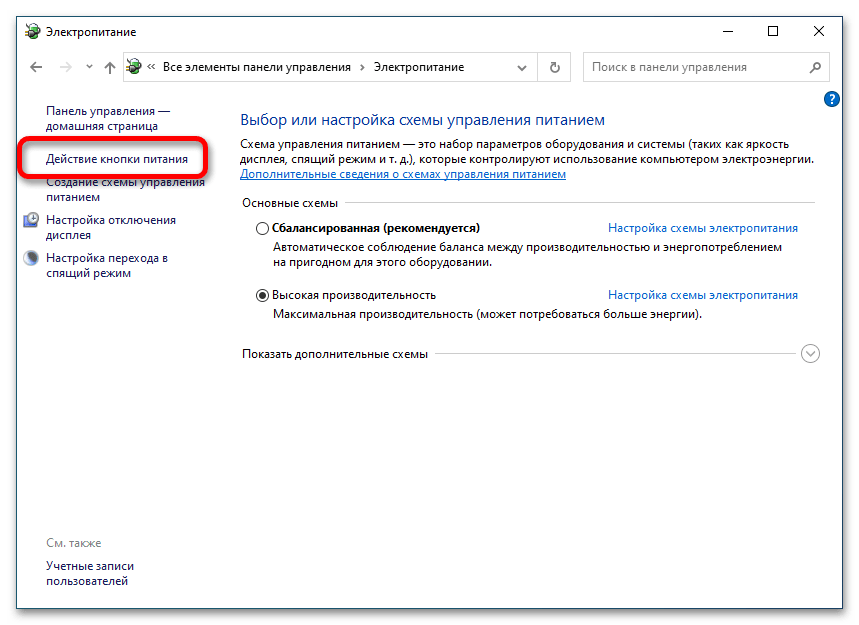
- В расположенном слева блоке кликните по пункту меню «Действия кнопки питания».
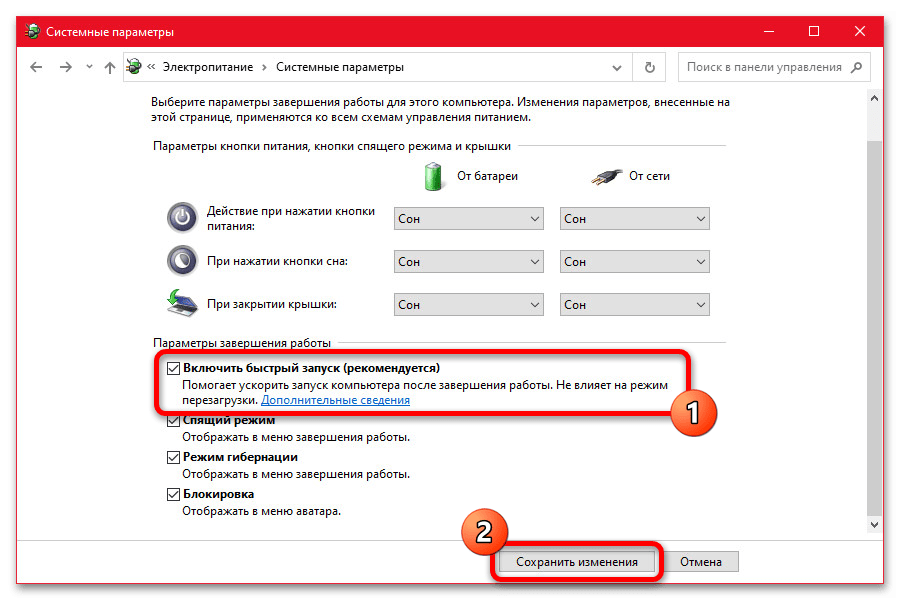
- Далее нажмите на ссылку «Изменение параметров, которые сейчас недоступны», чтобы получить возможность взаимодействия с представленными в интересующем нас разделе опциями («Параметры завершения работы»).
- Установите галочку напротив пункта «Включить быстрый запуск (рекомендуется)». Для подтверждения нажмите на кнопку «Сохранить изменения», закройте все окна и перезагрузите компьютер.
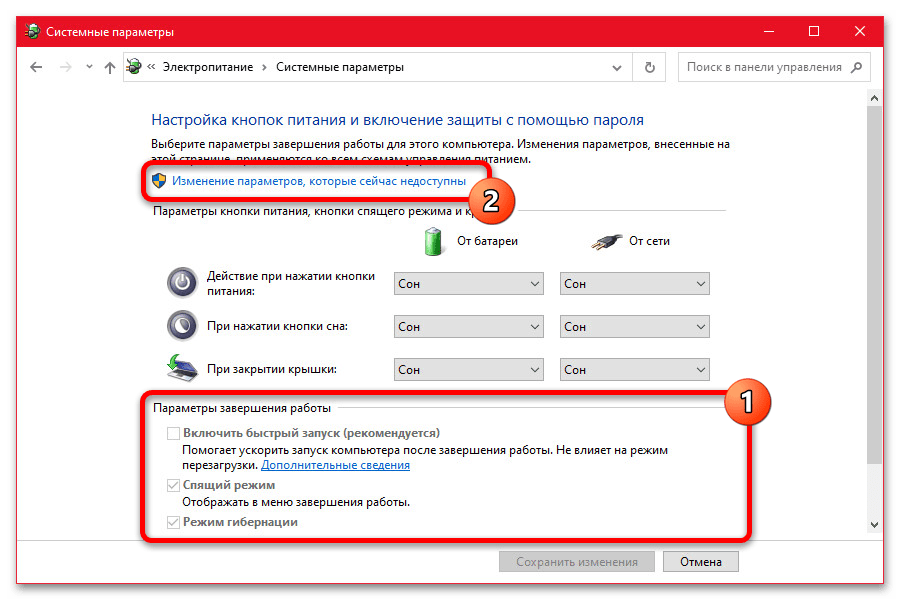
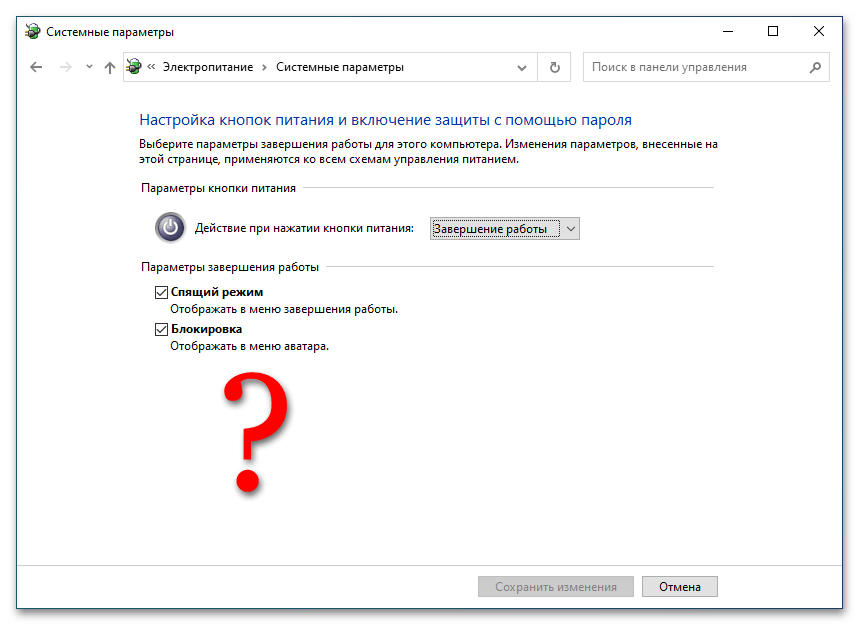
Обратите внимание! В ряде случаев можно столкнуться с тем, что в списке «Параметры завершения работы» будет отсутствовать опция «Включить быстрый запуск (рекомендуется)» и «Спящий режим» (пример показан на изображении ниже). О том, почему возникает такая проблема, и как ее устранить, будет рассказано в последней части настоящей статьи.
Способ 2: «Редактор реестра»
Альтернативой предыдущему методу решения нашей задачи будет изменение значения одного из параметров в системном реестре.
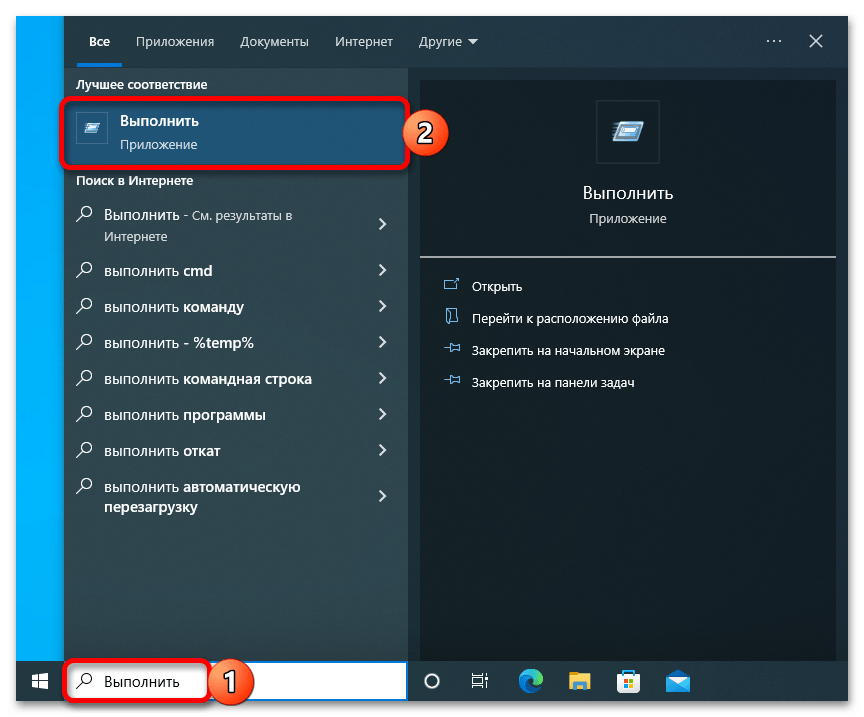
- Запустите «Редактор реестра». Это можно сделать через системный поиск либо окно «Выполнить» (вызывается сочетанием клавиш «Win+R»),
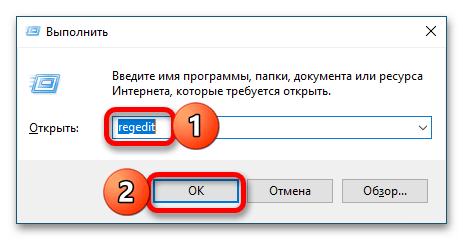
в которое потребуется ввести представленную ниже команду и нажать «ОК» или «Enter».
regedit
Читайте также: Как открыть «Редактор реестра» в Windows 10
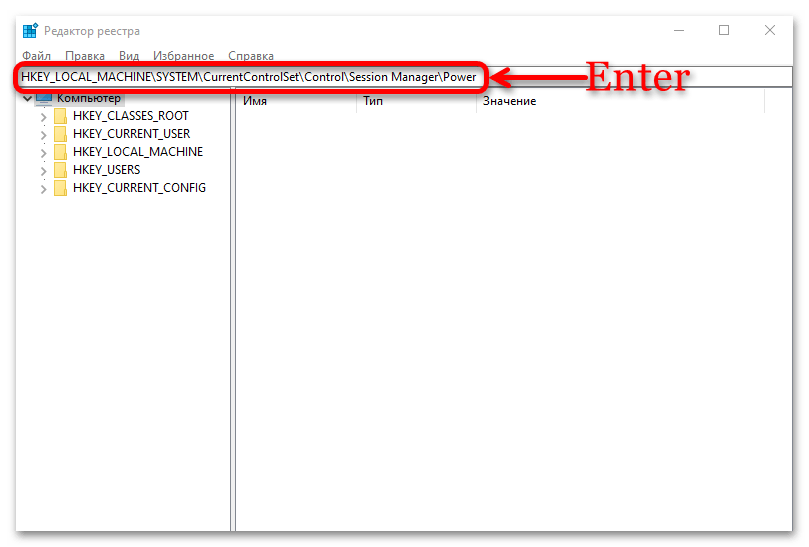
- Скопируйте указанный ниже путь, вставьте его в адресную строку и нажмите клавишу «Enter» для перехода. Вы также можете самостоятельно открыть данное расположение, используя представленный слева перечень каталогов.
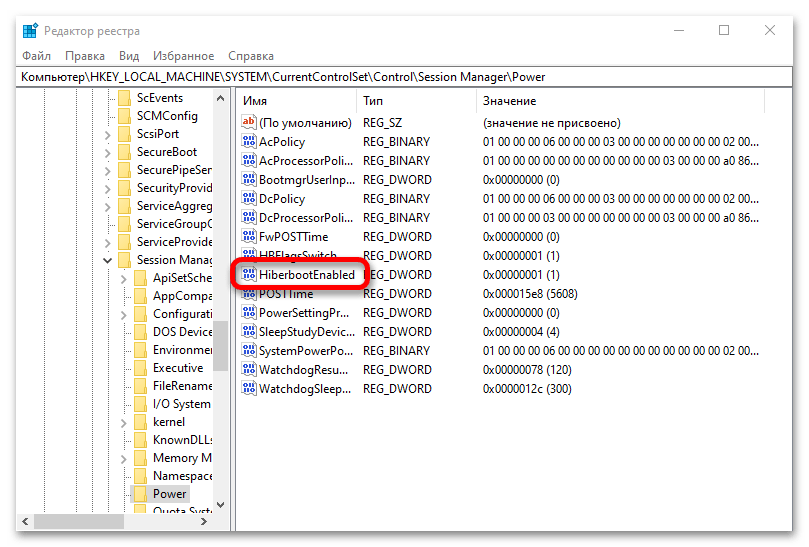
HKEY_LOCAL_MACHINE\SYSTEM\CurrentControlSet\Control\Session Manager\Power - Двойным щелчком левой кнопки мышки откройте параметр «HiberbootEnabled»,

в поле «Значение» введите «1» и нажмите «ОК» для подтверждения.
Быстрый запуск будет активирован, но внесенные изменения вступят в силу только после перезагрузки. Правда, как уже было сказано выше, наблюдать эффективность данной функции можно только при включении компьютера после завершения его работы обычным способом.
Что делать, если параметры быстрого запуска недоступны
Если вы столкнулись с тем, что в разделе «Электропитание» классической «Панели управления» отсутствует параметр, отвечающий за быстрый запуск, значит, в системе не активирована гибернация — это отдельный режим, переводящий компьютер в состояние пониженного потребления энергии и ускоряющий его запуск. О том, как включить данную функцию, рассказывается в инструкции на нашем сайте, ссылка на которую дана ниже. После того как вы это сделаете, потребуется повторно выполнить рекомендации из первой части настоящей статьи.
Подробнее: Как включить гибернацию в Виндовс 10
Обратите внимание! Включение гибернации, как и быстрого запуска, не рекомендуется в тех случаях, когда Windows установлена на SSD. К тому же важно отметить, что активация первой из обозначенных функций создает на системном диске достаточно большой файл (несколько гигабайт), что может быть критично для накопителей небольшого объема и/или недостаточном количестве свободного места.
Дополнительно: Ускорение загрузки Windows
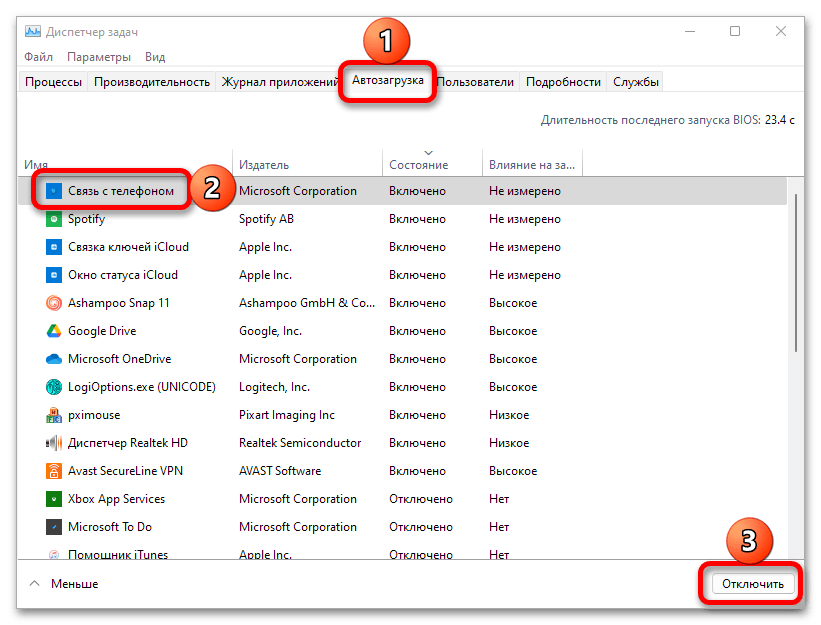
Активация рассмотренной в рамках настоящей статьи функции — далеко не единственный и даже не самый эффективный способ ускорения запуска операционной системы. Куда более действенным является последовательное выполнение комплекса действий, включающих изменение параметров автозагрузки, освобождение места на системном диске, отключение ненужных служб и т. д. Более детально обо всем этом рассказывается в отдельной инструкции на нашем сайте, доступной по указанной ниже ссылке.
Подробнее: Как ускорить запуск Виндовс 10
Наша группа в TelegramПолезные советы и помощь
115
115 people found this article helpful
Tired of pinning apps? You can get your quick launch toolbar back!
Updated on August 4, 2021
What to Know
- The quick launch toolbar has been gone since Windows 7, but you can bring it back.
- Right-click the taskbar and navigate to Toolbars > New Toolbar to add a quick launch toolbar.
- Consider using the pin feature if you want easy access to a handful of commonly used apps.
This article explains how to add a Quick Launch toolbar to the taskbar in Windows 10.
How to Add the Quick Launch Toolbar in Windows 10
Microsoft added the quick launch toolbar in Windows XP to provide an easy way to access common apps from your taskbar, but it disappeared with the introduction of Windows 7. If you miss the quick launch toolbar and pinning apps to the taskbar isn’t good enough, it’s pretty easy to add a quick launch toolbar yourself.
Here’s how to add a quick launch toolbar to the taskbar in Windows 10:
-
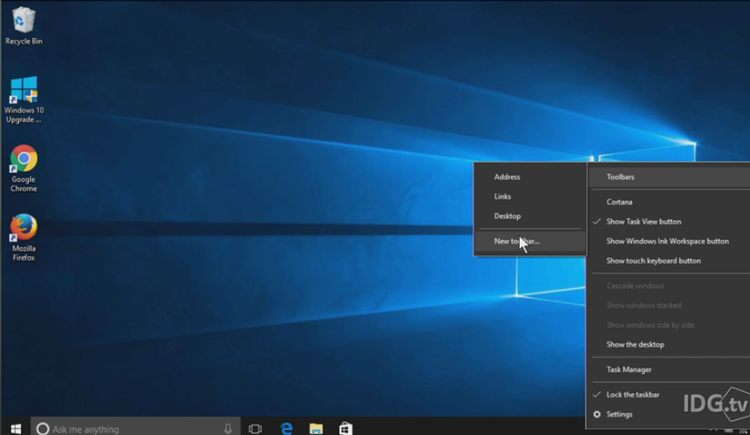
Right-click your taskbar to bring up the menu.
Make sure to click a blank area. Don’t click an app icon, the search field, the system tray, or anything other than a blank area of the main taskbar.
-
Navigate to Toolbars > New toolbar.
-
Enter %APPDATA%\Microsoft\[AppName]Quick Launch\ into the navigation field at the top of the window, and press Enter.
-
Click Select Folder.
-
You now have a quick launch toolbar on your taskbar. However, it’s on the right side, and the original quick launch was on the left. If you prefer it on the left, continue following these directions.
-
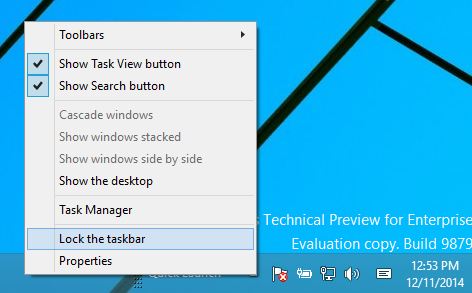
Right-click the taskbar, and make sure the taskbar is unlocked.
If there’s a check next to Lock the taskbar, click the check to unlock the taskbar. If there is no check, it’s already unlocked.
-
Click the vertical line that’s located to the right of the search field and Cortana button, and drag it all the way to the right.
If you do this successfully, it will push the quick launch menu to the left side of the taskbar.
-
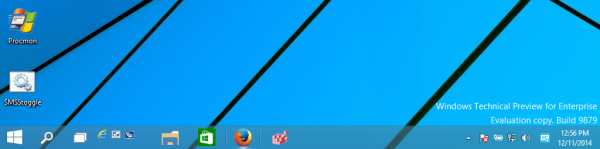
The quick launch bar is now on the left.
-
To hide the icons, click the vertical line that’s between your quick launch icons and the rest of the taskbar, and drag it left.
-
You now have a quick launch toolbar on your taskbar. Click the >> icon to access your quick launch toolbar.
-
If you want to hide the quick launch text, right-click the quick launch toolbar and click the checkmark next to Show title. When the checkmark is gone, the quick launch text will disappear from your taskbar, leaving just the >> icon.
-
For a more classic Windows XP look and feel, right-click the taskbar and navigate to Search > Hidden to hide the search box. Then click the checkmarks next to the Show Cortana text and Show task view button.
-
You now have a quick launch toolbar directly next to the Start menu, just like Windows XP, either with or without the quick launch title text, depending on your own preference.
Why Was the Quick Launch Toolbar Removed?
While the Quick Launch toolbar was quite helpful, and many people liked it, the ability to pin apps to the taskbar took its place in the default Windows design. If you don’t already take advantage of app pinning, it’s pretty useful in its own right. You can right-click any app on your taskbar and choose to pin it to either the start menu or taskbar for easy access.
If you have a set of apps that you use regularly but don’t necessarily want them to run on startup, consider pinning them to the taskbar. The quick launch menu is better if you have more than a handful of apps you want easy access to, but pinning is convenient for a handful of your most commonly used apps.
Thanks for letting us know!
Get the Latest Tech News Delivered Every Day
Subscribe
Windows XP set a standard for many Windows operating systems which followed – the Quick Launch bar was a useful feature that got lost in Windows 7 and and above. Here’s how to get it back in Windows 10. Also see:
Windows 10 review.
We would like to thank your US colleagues at
PCWorld for the screenshots.
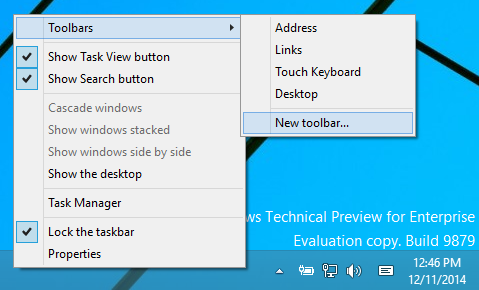
Right-click on an empty space on your taskbar and hover over ‘Toolbars’ to reveal another menu and click on ‘New toolbar…’
Once you’ve opened it, click on the address bar found at the top of Windows Explorer and paste this location: %appdata%MicrosoftInternet ExplorerQuick Launch
Once you’ve pasted (or typed out) the above location click on ‘Select Folder’

This will now present you with a Quick Launch bar at the right-hand side of your taskbar. Also see:
How to get Windows 10 Anniversary
How to get Quick Launch bar in Windows 10: Customise the Quick Launch bar in Windows 10
Now that you’ve got the Quick Launch bar on your taskbar you can customise the positioning and what’s found inside. First you’ll want to unlock the taskbar, by right-clicking on an empty space on your taskbar and untick the option.
Once it is unlocked you can right-click the dotted separator lines to dive into its settings and even customise the look of the bar.
You can also drag the bar by long-pressing it using your left-click button on the dotted separator lines – this will allow you to position it to the left or right side on your taskbar.
Once you’ve finished customising your taskbar and Quick Launch, lock your taskbar again: right-click on an empty space on your taskbar and tick the option. Also see:
How to stop Windows 10 update
How to get Quick Launch bar in Windows 10: How to remove the Quick Launch bar in Windows 10
If you no longer want to see the Quick Launch bar on your taskbar, right-click on an empty space on your taskbar, hover over ‘Toolbars’ and untick Quick Launch – the bar will now disappear. Also see:
Should I upgrade to Windows 10?
One of my favorite features of the taskbar is the Quick Launch toolbar. This small yet useful toolbar was located near the Start button in previous Windows versions like Windows XP and earlier. It was enabled by default for the last time in Windows Vista, but with the release of Windows 7, Microsoft decided to drop official support for the Quick Launch toolbar in favor of pinning icons to the taskbar. Quick Launch has not been completely removed and can be revived in Windows 10. It is not so obvious to a novice user how to enable Quick Launch in Windows 10 as it involves numerous steps and cannot be automated. In this article, we will see how to add the Quick Launch back to the taskbar in Windows 10.
There are a number of reasons why you might want to enable Quick Launch.
- Even if you set pinned icons to a small size, they are still spaced too far apart from one another.
- The taskbar mixes running programs with non-running ones, whereas if you use the Quick Launch toolbar, running programs will always appear to its right.
- Quick Launch has a more customizable appearance; you can easily put any shortcut or folder there without having to use tools like Winaero Taskbar Pinner or Pin to 8. You can change their icons, have multiple rows of icons if you make the taskbar larger, and save overall space on the taskbar.
To restore the Quick Launch toolbar, follow these simple steps:
Right click on an empty space of the taskbar. From its context menu select the Toolbars -> New Toolbar… item.
The following dialog will appear on the screen:
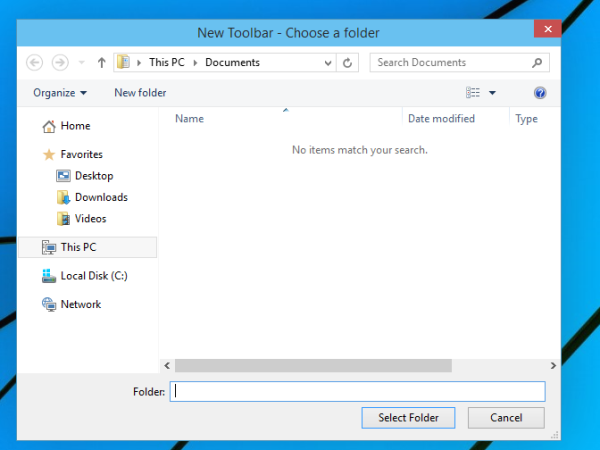
In this dialog, select the following folder:
C:\Users\YOUR USER NAME\AppData\Roaming\Microsoft\Internet Explorer\Quick Launch
Replace the «YOUR USER NAME» text with your actual user name in Windows 10.
Alternatively, you can type or copy-paste the following text into the Folder text box in the dialog above and then press Enter:
shell:Quick Launch
The shell: protocol gives quick access to special folders as I covered previously.
Yet another way to access the Quick Launch folder is by entering the following path instead of the shell command:
%userprofile%\AppData\Roaming\Microsoft\Internet Explorer\Quick Launch
%userprofile% is an environment variable which points directly to your user profile in Windows 10. This way, you don’t have to enter your user name in the path.
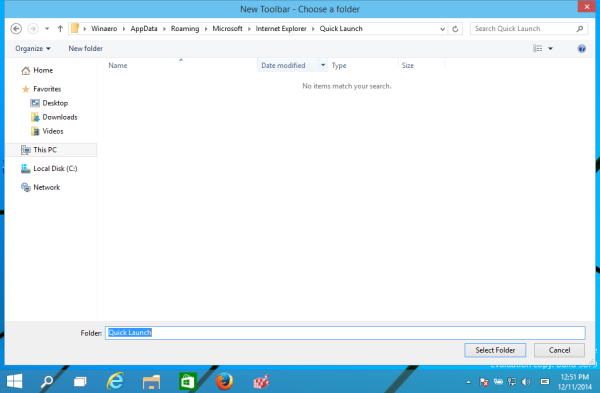
Now click the Select Folder button.
The Quick Launch toolbar will get added to the taskbar:
As you can see, it is locked to the right side of the taskbar and has a title. Let’s move it to the left side and hide the title.
Right click on the taskbar and untick Lock the taskbar.
Now drag the Quick Launch toolbar from the right to the left, using the dotted bar which appears after your have unlocked the taskbar. Drag all the way to the left of any pinned icons you may have.
After that, right click on the Quick Launch toolbar and untick the following options:
- Show title
- Show text
That’s it. Now you have the good old Quick Launch enabled in Windows 10.
Now see: Add Quick Launch to the Send To menu to create new shortcuts faster
.
This trick to enable Quick Launch also works on Windows 7 and Windows 8. You can also get rich tooltips to show useful information if you do this Registry tweak:

Support us
Winaero greatly relies on your support. You can help the site keep bringing you interesting and useful content and software by using these options:
If you like this article, please share it using the buttons below. It won’t take a lot from you, but it will help us grow. Thanks for your support!
Do you want to enable Windows 10 Quick Launch toolbar to open programs quickly? Learn how to add Quick Launch toolbar in Windows 10 / 8 / 7 PC.
Are you familiar with the usefulness of Quick Launch toolbar in Windows 10 or other versions of Windows?
The Quick Launch toolbar is a useful section of the Microsoft Windows taskbar which provides you the option to add and launch the most frequently used programs quickly.
If you have used Windows XP and Vista operating system in the past, you might have noticed the Quick Launch toolbar located right next to the Start button. However, if you are using a latest Windows operating system after Windows Vista then you won’t get Quick Launch bar by default.

(Disclosure: This post contains affiliate links and images. I earn advertising/referral fees if you make a purchase by clicking them. There is no extra cost to you. See our full disclosure here. )
With the new versions of Windows, the idea of Quick Launch toolbar was dropped. So, if you are using Windows 10 operating system and wish to use Quick Launch toolbar feature then you are at the right place as today we are going to tell you how to add quick launch to Windows 10 PC.
Why Do You Need to Add Quick Launch Toolbar in Windows 10?
Before we tell you how to enable Windows 10 Quick Launch toolbar, let’s find out why you need to use Quick Launch Windows 10 toolbar.
We have listed few reasons below which might interest you to add quick launch bar on your Windows PC:
- Pinning multiple apps and folders lead to more space because they spaced too far apart from one another. This limits you from adding more applications and there is no space left for new applications which are opened. But with Windows quick launch bar, you don’t need to worry about spaces.
- It’s a fact that running programs get mixed with non-running programs on the taskbar which lead to a lot of confusion, whereas if you use the Quick Launch toolbar, all the running programs will always appear to its right.
- With Quick Launch bar, you get plenty of options to customize the appearance of your desktop. You get the ability to pin shortcuts or folders without using any tools. One of the best things which you get to use with the Windows quick launch is that it allows you to increase and decrease icon’s size.
We hope now you understand the importance of Quick Launch toolbar in Windows 10.
As we all know that by default, the Quick Launch toolbar is not available in Windows 10, Windows 8, and Windows 7 operating system. However, you can follow the below explained steps to restore and show Quick Launch button as it was in Microsoft Windows Vista and Windows XP.
Here’s how to add Quick Launch toolbar on Windows 10 / 8 / 7 computer:
Step (1): First of all, right click on the Taskbar and then go to Toolbars and select New toolbar from the menu.

Step (2): In the New toolbar dialog box, copy and paste the following text and then hit Enter key or click on the Select Folder button:
%UserProfile%\AppData\Roaming\Microsoft\Internet Explorer\Quick Launch

Step (3): Now you will be able to see the Quick Launch bar with the text on the right side of the taskbar.

Step (4): In case, if you want to hide the Quick Launch text and all program titles, just right-click on the Quick Launch bar and then uncheck Show Text and Show title option.

Step (5): You can also drag the Quick Launch bar to the left side of the taskbar. If you are unable to move the Quick Launch bar, right-click on the taskbar and then uncheck Lock the taskbar option.
Step (6): Accessing the Quick Launch items is pretty simple, click on the double arrow available right next to the Quick Launch toolbar on the taskbar and then select the desired program you want to open as per your preference.

Thus, you can see how simple is to add Windows 10 Quick Launch toolbar. You can follow the same process if you wish to add quick launch bar on Windows 7 or Windows 8 operating systems.
How to Add Programs to Quick Launch Windows 10
Adding programs in the Quick Launch toolbar is also a quite easy thing. If you decide to add an application in the Quick Launch bar, you have to only copy and paste the application shortcut and you are done.
Follow the steps mentioned below and learn how to add programs to Quick Launch toolbar in Windows 10 PC:
Step (1): To add a program in the Quick Launch bar, simply open File Explorer and copy and paste the following text and then hit Enter key to open Quick Launch folder:
%APPDATA%\Microsoft\Internet Explorer\Quick Launch

Step (2): Now add all the program’s shortcuts in this Quick Launch folder which you want to add in the Windows 10 Quick Launch bar.

Step (3): Once you have added the shortcuts of your desired programs in the Quick Launch folder, those programs will appear in the Quick Launch toolbar.
By following the exact same steps, you can add as much as programs you want in the Windows 10 Quick Launch toolbar.
Conclusion
We hope now you know everything about Quick Launch toolbar and why do you need to add quick launch bar in Windows 10 / 8 / 7 PC.
Follow the instructions explained above to enable Quick Launch in Windows 10 and place shortcuts to your most frequently used applications and open them quickly,
If you are still facing any difficulties in order to enable Windows 10 Quick Launch Toolbar or add programs to Quick Launch Windows 10 operating system then do let us know using the comments section below.
You might also like to know: How to Change Virtual Memory in Windows 10