
Все способы:
- Вариант 1: «Программы и компоненты» (включение Hyper-V)
- Вариант 2: BIOS
- Вариант 3: Виртуальные машины
- Вопросы и ответы: 1
Обратите внимание! Перед тем как выполнять действия, описанные в этой инструкции, рекомендуется проверить статус виртуализации в операционной системе. Есть вероятность, что она уже включена или вовсе отсутствует, что делает невозможным ее активацию. Для этого перейдите по ссылке ниже, чтобы ознакомиться с тематической статьей на нашем сайте.
Подробнее: Как проверить, включена ли виртуализация в Windows 10
Вариант 1: «Программы и компоненты» (включение Hyper-V)
По умолчанию в Windows 10 функция виртуализации отключена, и для ее включения потребуется в специальном меню операционной системы активировать соответствующий компонент. Делается это следующим образом:
Отметим, что программная виртуализация Hyper-V нужна только для определенных программ, в то время как часть софта требует включения аппаратной виртуализации, о чем пойдет речь в Варианте 2. Аппаратный компонент конфликтует с программным, поэтому перед тем как включать Hyper-V, узнайте, какой тип виртуализации требует софт, ради которого вы его включаете. К примеру, эмуляторам и некоторым виртуальным машинам нужно включение аппаратной технологии, а Hyper-V должен быть как раз отключен.
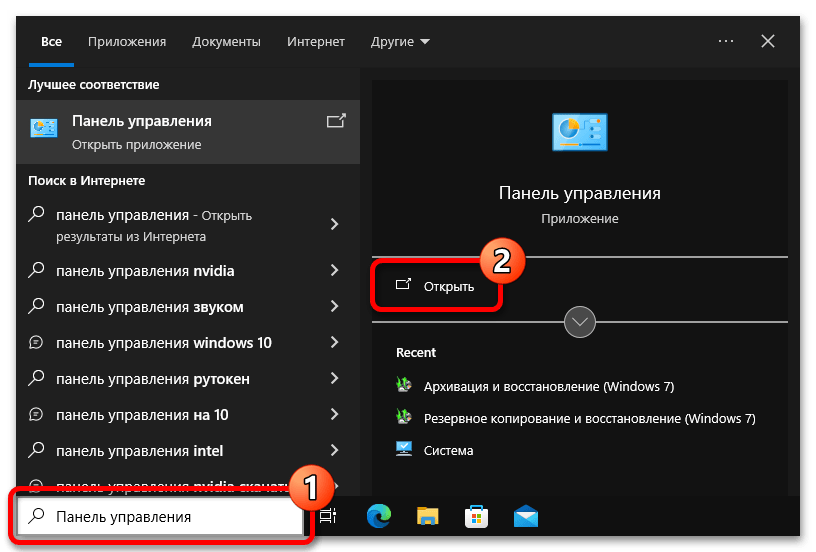
- Откройте «Панель управления» любым доступным способом. Например, сделать это можно посредством поиска: установите курсор в соответствующее поле на панели задач, введите запрос «Панель управления» и щелкните по пункту «Открыть».

Читайте также: Как открыть «Панель управления» в Windows 10
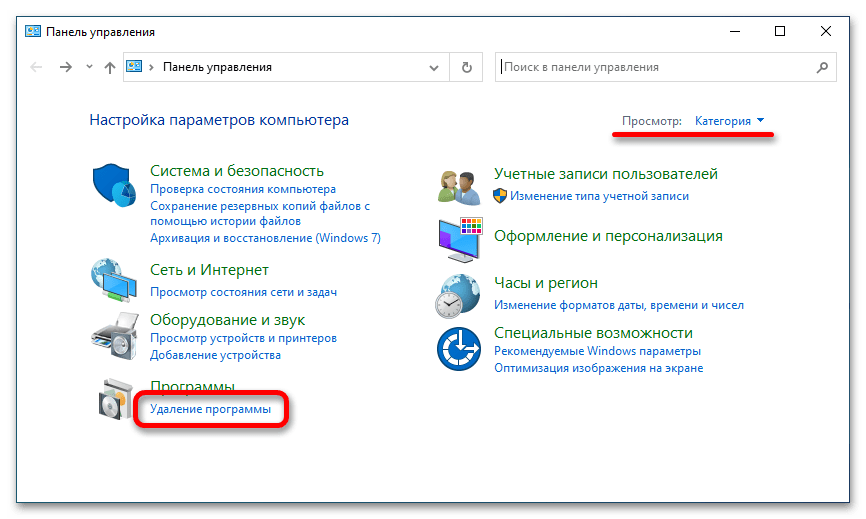
- В появившемся окне первостепенно проверьте, чтобы в верхнем правом углу был выбран режим отображения элементов меню «Категория». Если это не так, выберите нужное значение вручную. Затем кликните по пункту «Удаление программы».
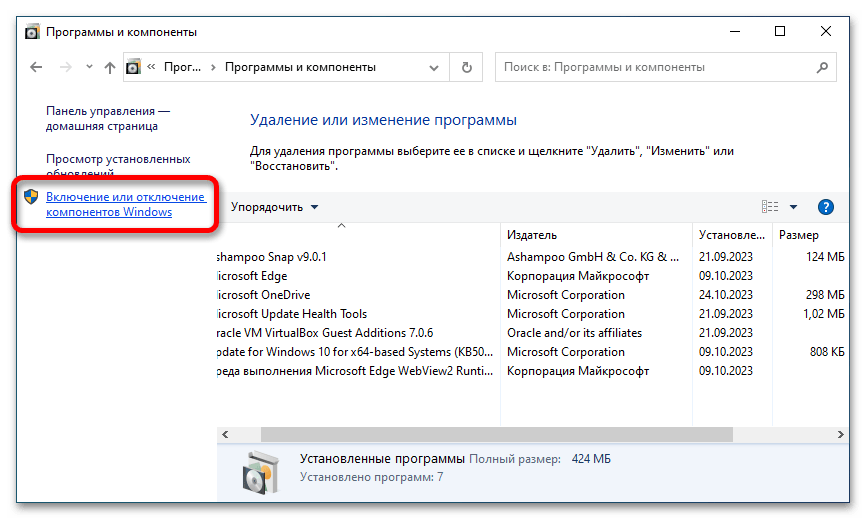
- На боковой панели слева нажмите по ссылке «Включение или отключение компонентов Windows».
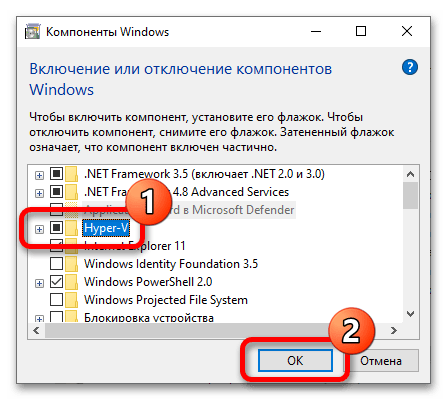
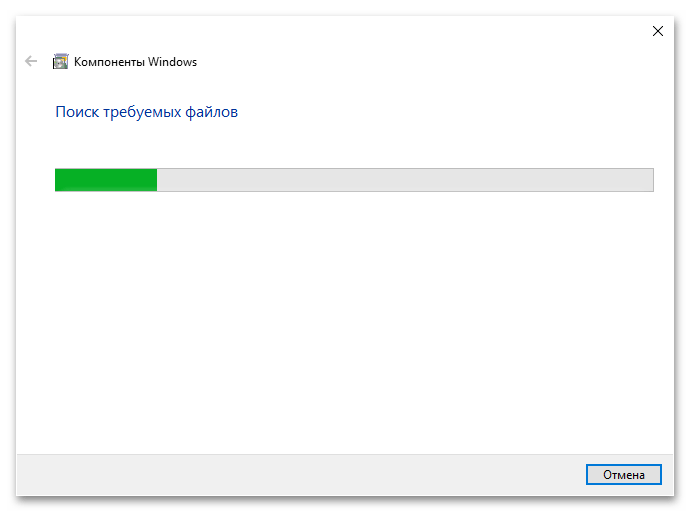
- В отобразившемся окне найдите в списке компонент под названием «Hyper-V», поставьте напротив него отметку, после чего щелкните по кнопке «ОК».
- Дождитесь завершения процесса поиска и активации компонента. За ходом выполнения этой процедуры можно следить в появившемся диалоговом окне.
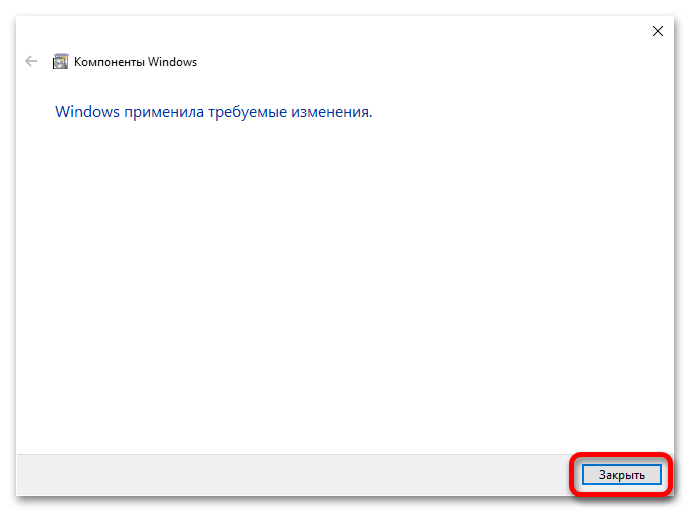
- В завершение кликните по кнопке «Закрыть». После выполнения всех этих действий перезапустите компьютер, чтобы окончательно активировать функцию виртуализации в операционной системе.
Обратите внимание! Если в списке компонентов вы не нашли «Hyper-V», есть вероятность, что ваш компьютер попросту не поддерживает функцию виртуализации. Необходимо это проверить — воспользуйтесь инструкцией, опубликованной в другой статье на нашем сайте.
Подробнее: Что делать, если в Windows 10 отсутствует Hyper-V
Вариант 2: BIOS
Включить виртуализацию в Windows 10 можно без взаимодействия с графическим интерфейсом операционной системы — через BIOS. Еще раз отметим, что важно понимать, какой тип виртуализации вам нужен, — об этом более подробно сказано в самом начале предыдущего варианта.
Для включения аппаратной виртуализации потребуется войти в базовую утилиту ввода и вывода и активировать соответствующий параметр, после чего не забыть при выходе сохранить все внесенные изменения. На нашем сайте есть отдельная статья, в которой этот процесс описывается более подробно.
Подробнее: Как включить виртуализацию в BIOS

Вариант 3: Виртуальные машины
Иногда появляется необходимость включить функцию виртуализации в Windows 10, запущенной на виртуальной машине в VirtualBox или VMware. Чтобы это сделать, предварительно включите функцию в основной системе, воспользовавшись одним из вышеописанных способов. После этого проделайте следующие действия в виртуальной машине:
VirtualBox
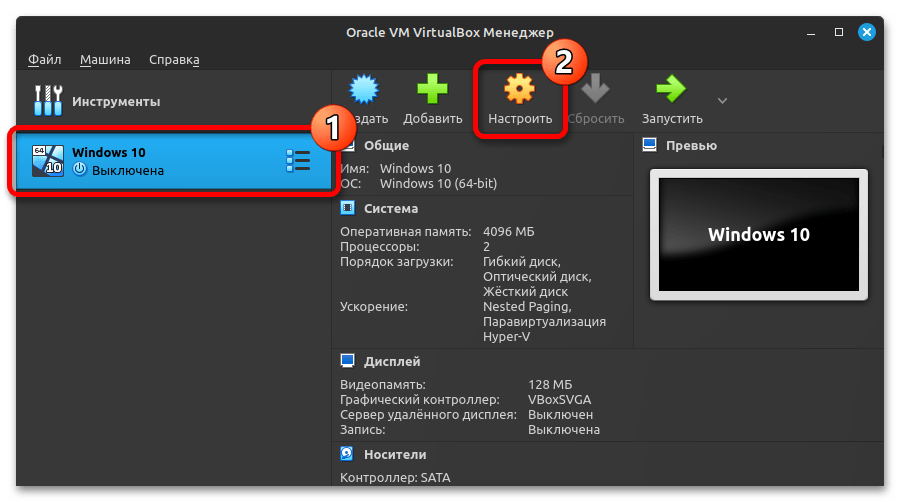
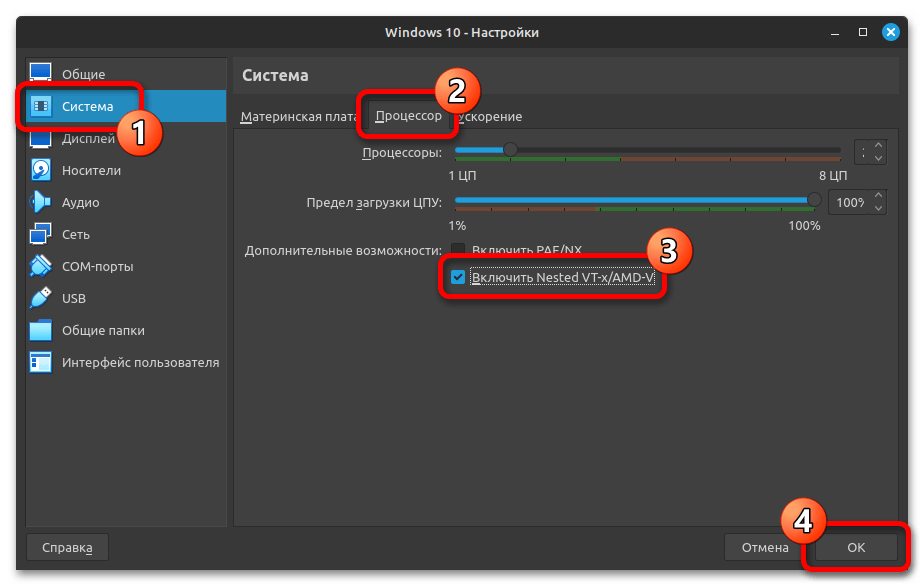
- Запустите VirtualBox, выберите на левой панели операционную систему и кликните сверху по кнопке «Настроить».
- В левой части появившегося окна перейдите в раздел «Система», после чего в основной области откройте вкладку «Процессор», а затем установите галочку напротив пункта «Включить Nested VT-x/AMD-V». Кликните в завершение по кнопке «ОК», чтобы сохранить внесенные изменения.
- Запустите непосредственно саму операционную систему в VirtualBox и воспользуйтесь первым вариантом из этой статьи, чтобы включить функцию виртуализации там.
VMware
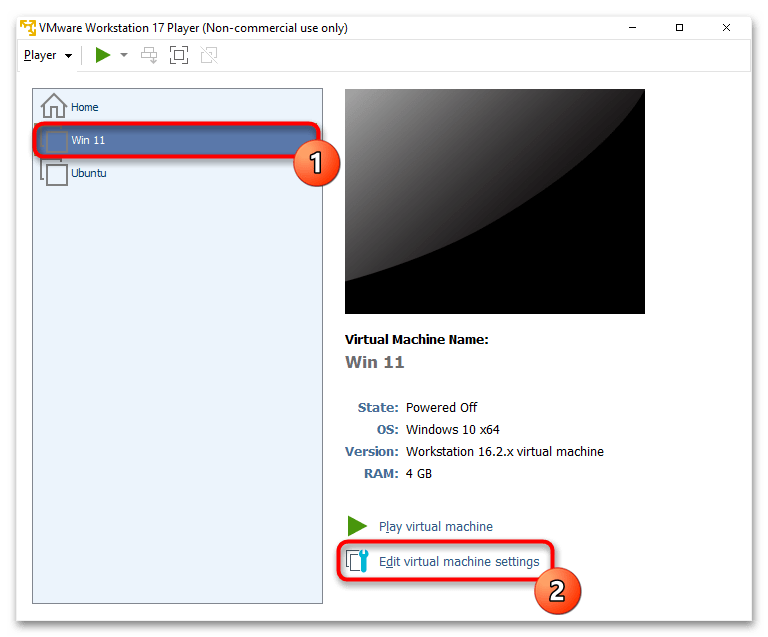
- Откройте VMware Workstation, в левой части окна выделите свою виртуальную машину и в центре кликните по ссылке «Edit virtual machine settings».
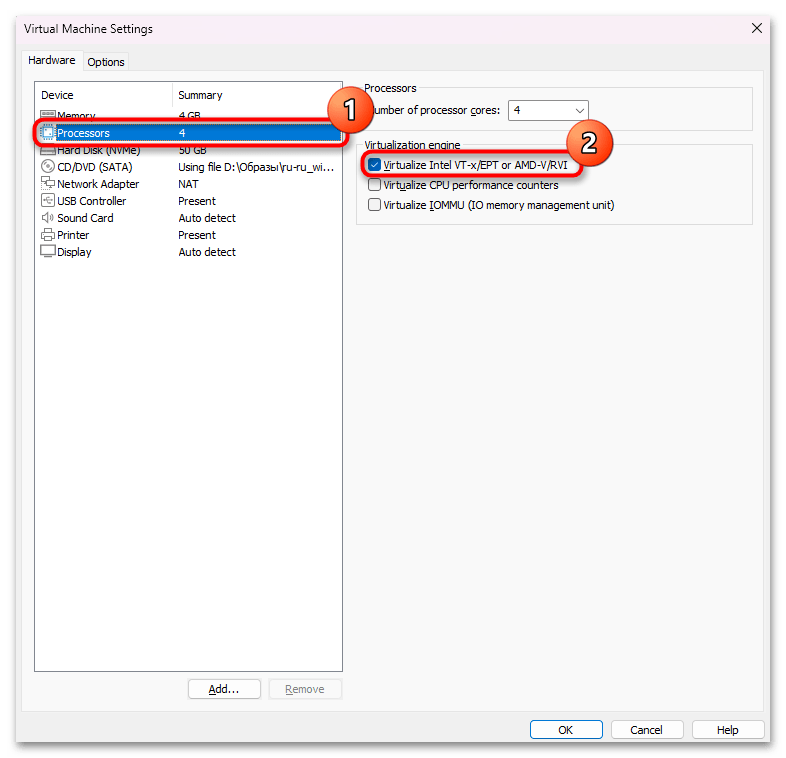
- Переключитесь на вкладку «Processors» и поставьте галочку около пункта «Virtualize Intel VT-x/EPT or AMD-V/RVI». Сохраните изменения кнопкой «ОК».
- Теперь вы сможете включить виртуализацию уже внутри виртуальной машины первым рассмотренным в этой статье вариантом.
Наша группа в TelegramПолезные советы и помощь
Платформа виртуализации Hyper-V доступна не только в Windows Server, но и в десктопных редакциях Windows 10 и 11. С помощью встроенного гипервизора Hyper-V пользователи могут создавать и запускать виртуальные машины. В этой статье мы рассмотрим, как включить компоненты Hyper-V в Windows 10 и 11.
Компоненты роли виртуализации Hyper-V можно установить в Pro и Enterprise редакциях Windows 10 и 11. Сначала, нужно проверить, поддерживает ли ваш компьютер виртуализацию Hyper-V. Откройте командную строку с правами администратор и выполните:
systeminfo
Промотайте в конец вывода и проверьте, что включены следующие компоненты в разделе Hyper-V Requirements:
VM Monitor Mode Extensions: Yes
Virtualization Enabled In Firmware: Yes
Second Level Address Translation: Yes
Data Execution Prevention Available: Yes

Если здесь указано Virtualization Enabled in Firmware: No, попробуйте включить аппаратную поддержку виртуализации в настройках BIOS/UEFI компьютера (может называться Intel VT-X или AMD-V).
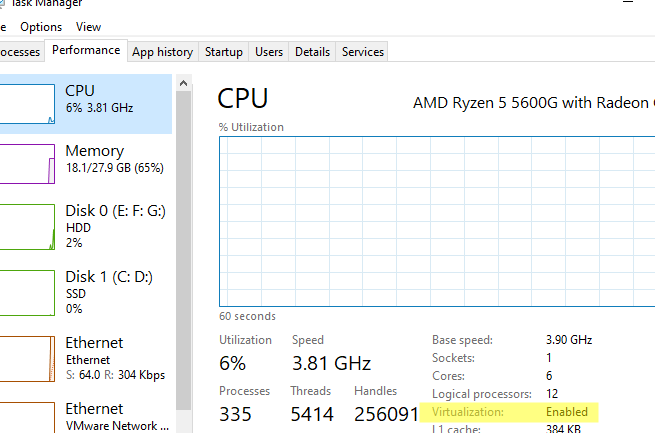
Также проверить совместимость вашего процессора можно на вкладке CPU в диспетчере задач Windows. Здесь должно быть указано
Virtualization: Enabled
.
Если тут указано
A hypervisor has been detected. Features required for Hyper-V will not be displayed
, значит компоненты Hyper-V уже установлены.
Включить роль Hyper-V в Windows 10 и 11 можно через панель управления компонентами Windows Features. Выполните команду
optionalfeatures
и выберите для установки компоненты Hyper-V Platform и Management Tools.
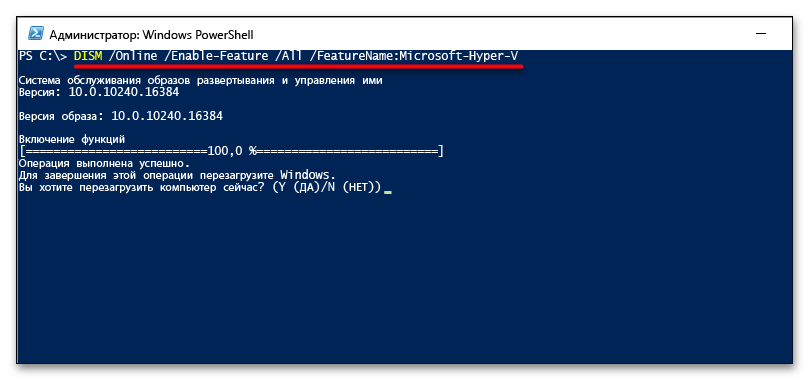
Также вы можете включить компоненты Hyper-V в Windows из командной строки. С помощью PowerShell команды:
Enable-WindowsOptionalFeature -Online -FeatureName Microsoft-Hyper-V -All
Или с помощью DISM:
dism.exe /Online /Enable-Feature:Microsoft-Hyper-V-All

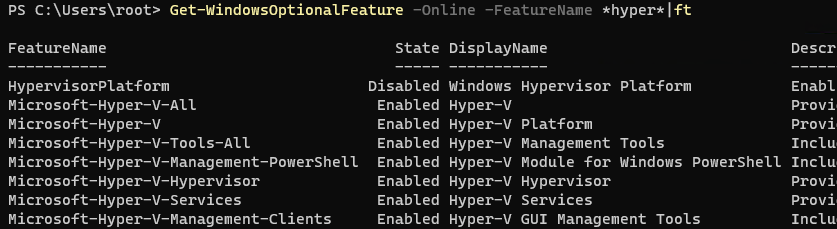
После завершения установки компонентов перезагрузите компьютер. Проверьте, что компоненты гипервизора установлены:
Get-WindowsOptionalFeature -Online -FeatureName *hyper*|ft
Включите автоматический запуск Hyper-V при загрузке:
bcdedit /set HypervisorLaunchType auto
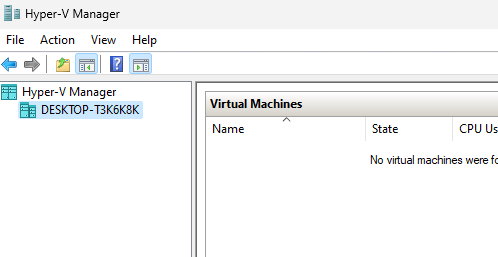
Для управления Hyper-V и виртуальными машинами используется графическая консоль Hyper-V Manager (
virtmgmt.msc
). Запустите ее и можете начать создавать виртуальные машины.
Также для управления гипервизором и ВМ можно использовать командлеты PowerShell из встроенного модуля Hyper-V.
Компонент виртуализации Hyper-V отсутствует в домашних (Home) редакциях Windows 10 и 11. Однако есть небольшой трюк, который позволяет установить роль Hyper-V из зранилища компонентов WinSxS даже в Home редакции Windows.
Создайте на рабочем столе файл enable-hyperv.bat с кодом
pushd "%~dp0"
dir /b %SystemRoot%\servicing\Packages\*Hyper-V*.mum >hyper-v.txt
for /f %%i in ('findstr /i . hyper-v.txt 2^>nul') do dism /online /norestart /add-package:"%SystemRoot%\servicing\Packages\%%i"
del hyper-v.txt
 Dism /online /enable-feature /featurename:Microsoft-Hyper-V -All /LimitAccess /ALL
pause
Запустите BAT файл с правами администратора.
После завершения установки компонентов, перезагрузите компьютер. Проверьте, что виртуализация Hyper-V теперь доступна в вашей Home редакции Windows.
Включение технологии виртуализации вам может потребоваться при необходимости использовать Android эмулятор или виртуальные машины, а, возможно, и для других задач, но не каждый начинающий пользователь знает, как именно это сделать.
В этой инструкции подробно о том, как включить виртуализацию в БИОС/UEFI и о возможных проблемах, которые могут возникнуть при её включении на компьютерах и ноутбуках с Windows 10, 8.1 или Windows 7.
- Включение виртуализации в БИОС/UEFI
- Проблемы при включении виртуализации
- Видео инструкция
Включение виртуализации в БИОС/UEFI компьютера или ноутбука
Основное действие для включения виртуализации — включить соответствующую опцию в БИОС/UEFI. Эта опция может носить название Virtualization, Intel Virtualization Technology, Intel VT-x, AMD-v и находиться в слегка разных разделах настроек БИОС, но логика действия всегда будет одной и той же:
- Зайдите в БИОС компьютера или ноутбука. Обычно на ПК это делается нажатием клавиши Del, на ноутбуке — F2 или F10 (иногда в сочетании с клавишей Fn). В Windows 10 простой вход может не получиться, тогда можно использовать способ входа в UEFI через особые варианты загрузки, подробнее: Как зайти в БИОС/UEFI Windows 10.
- После входа найдите, где включается опция виртуализации (далее будут показаны некоторые примеры), включите её (установите значение в Enabled).
- Сохраните настройки БИОС (обычно можно выбрать Save&Exit на вкладке Exit).
А теперь несколько примеров, где именно может находиться включение виртуализации на разных марках материнских плат и ноутбуков. По аналогии вы, вероятнее всего, сможете найти и у себя:
- Материнская плата Gigabyte — вкладка BIOS Features, опция Intel Virtualization Technology (еще одну опцию — VT-d тоже лучше включить).

- InsydeH2O на ноутбуках — вкладка Configuration (но, по-моему, встречал и иные варианты в этом же БИОС).

- Материнская плата Asus — раздел Advanced, либо Advanced — CPU Configuration.

- Некоторые ноутбуки Dell — раздел Virtualization support.

- Многие другие варианты БИОС — просто на вкладке Advanced Configuration, иногда далее нужно пройти в подраздел CPU Feature или CPU Configuration.


Логика расположения необходимого пункта для включения виртуализации у всех производителей похожа и, зная обычные пути включения опции, вы найдете нужный пункт даже на материнской плате другого производителя.
Проблемы при включении виртуализации
Самые распространенные проблемы, когда вы хотите включить виртуализацию на своем компьютере:
- Пункт включения Virtualization Technology не активен в БИОС
- В БИОС/UEFI нет пункта для включения виртуализации
- Виртуализация включена в БИОС/UEFI, но эмулятор или виртуальная машина в Windows 10 или 8.1 пишет, что отключена.
В первых двух случаях проблема может крыться в том, что ваш процессор не поддерживает виртуализацию. Поищите официальные спецификации вашего процессора в Интернете, обычно там есть и информация о поддержке виртуализации. Также, на некоторых ноутбуках процессор может поддерживать технологию виртуализации, но она отключена и в БИОС не предусмотрено опции для её включения — в этом случае, к сожалению, предложить не могу ничего, но можно попробовать обновить БИОС (теоретически, опцию могут добавить).
Во втором случае причина обычно заключается в том, что в Windows 10 или 8.1 включена виртуальная машина Hyper-V или Песочница. Отключите её в компонентах:
- Откройте панель управления, перейдите в «Программы и компоненты».
- Откройте слева пункт «Включение и отключение компонентов Windows».
- Отключите компоненты Hyper-V и «Песочница» (если есть).
- Примените настройки и обязательно перезагрузите компьютер.
Если указанные действия не помогли, попробуйте такой вариант: запустите командную строку от имени администратора, в ней введите команду (нажав Enter после неё)
bcdedit /set {current} hypervisorlaunchtype off
Закройте командную строку и перезагрузите компьютер.
Как включить виртуализацию — видео инструкция
Если в вашем случае не сработало, опишите в комментариях, что именно не получается, какая программа или Android эмулятор сообщают, что виртуализация не включена и что уже было сделано: возможно, решение найдется.
Virtualization is the process of creating a virtual (rather than physical) version of a physical computer or server, It allows multiple operating systems and applications to run on a single physical computer. Microsoft’s Hyper-V is a native virtualization platform built into Windows 11 Pro, Enterprise, and Education editions. It allows you to create and manage multiple virtual machines (VMs) for testing, development, or running different operating systems without third-party tools like VirtualBox or VMware Workstation. This article explores how to enable and configure Hyper-V on Windows 11, check system requirements, and create your first virtual machine.
Contents
- 1 What is Hyper-V on Windows 11 PC?
- 1.1 System Requirements for Hyper-V on Windows 11
- 1.2 Enable Virtualization in BIOS/UEFI
- 1.3 Enable Hyper-V from Windows Features
- 1.4 Configure networking for the Hyper-V environment
- 1.5 Create a New Virtual Machine On Hyper-V
- 1.6 Best Practices for Hyper-V on Windows 11
- 1.7 Hyper-V Missing on Windows 11 Home?
What is Hyper-V on Windows 11 PC?
Windows 11, Hyper-V (also known as the Hypervisor) is Microsoft’s virtualization technology that allows you to run multiple operating systems (virtual machines) on a single physical computer. It essentially creates a software layer between the physical hardware and the virtual machines, and enable them to run in isolated environments.
Hyper-V offers several advantages for virtualization on Windows 11:
- It’s built into Windows 11, and Hyper-V is free with Pro, Enterprise, or Education editions, so you don’t need external software to run virtual machines.
- Each VM runs in its own isolated environment, protect your host system from crashes or malware.
- It allows running multiple operating systems, including Windows, Linux, or older versions, for testing, development, or sandboxing
- It has built-in Features like dynamic memory allocation, optimize resource usage for better performance.
- Hyper-V supports secure boot and Trusted Platform Module (TPM) for enhanced VM security
System Requirements for Hyper-V on Windows 11
Before enable Hyper-V on Windows 11, check and ensure your system meets the following requirements:
- Hyper-V is available on Windows 11 Pro, Enterprise, and Education editions (not on Home by default)
- A 64-bit CPU with Second Level Address Translation (SLAT) and hardware virtualization support (Intel VT-x or AMD-V)
- Minimum 4 GB RAM (8 GB or more recommended for smooth VM performance).
- Hardware virtualization (Intel VT-x or AMD-V) and Data Execution Prevention (DEP) must be enabled in the BIOS/UEFI.
Note: Hyper-V isn’t available in Windows 11 Home edition.
To check if your system supports Hyper-V, open Command Prompt and run: systeminfo
Look for a section titled Hyper-V Requirements. All entries should say “Yes”.
After performing the command check all of these requirements have a value of Yes, then your system is ready for Hyper-V installation. If some of these values have a value of No, such as Virtualization Enabled in Firmware and Data Execution Prevention Available. Then you may have to enable them in your system BIOS.
Enable Virtualization in BIOS/UEFI
Hardware virtualization is often disabled by default in the BIOS/UEFI. Here’s how to enable it:
- Shut down your computer and restart it.
- During startup, press the key to enter BIOS/UEFI (commonly F2, DEL, or ESC, depending on your manufacturer).
- Navigate to the Advanced, Configuration, or Security tab (names vary by manufacturer).
- Look for options like “Intel VT-x,” “Intel Virtualization Technology,” “AMD-V,” or “SVM Mode.”
- Select the virtualization option and set it to Enabled.
- Ensure Data Execution Prevention (DEP) is enabled (labeled as XD bit for Intel or NX bit for AMD).
- Press F10 (or the designated key) to save changes and exit. Your PC will restart.
Enable Hyper-V from Windows Features
Hyper-V is an optional feature in Windows 11 that you can enable through the Settings app, Control Panel, PowerShell, or Command Prompt.
- Press Win + I to open the Settings app.
- Go to System> Optional features, under “Related settings,” click More Windows features.
- In the Windows Features window, scroll to Hyper-V.
- Check the box for Hyper-V (ensure both Hyper-V Management Tools and Hyper-V Platform are selected). Click OK.
- Click Restart now to apply the changes.
Alternatively, you can open PowerShell as Administrator and run the following command to enable Hyper-V on Windows 11 PC.
Enable-WindowsOptionalFeature -Online -FeatureName Microsoft-Hyper-V -All
When prompted, restart your computer to complete the installation.
If you prefer the command prompt, run this command: DISM /Online /Enable-Feature /All /FeatureName:Microsoft-Hyper-V. The Deployment Image Servicing and Management (DISM) tool will enable Hyper-V and restart Windows when prompted to finalize the setup.
Configure networking for the Hyper-V environment
Now Configure networking for the Hyper-V environment to support external network connections. Such as your pc to virtual machine computer, or any other network connected pc. To do this, select Virtual Switch Manager in the Actions pane.
Select New virtual network switch and choose a type: External
- External: Connects VMs to the physical network (e.g., for internet access).
- Internal: Connects VMs to the host but not the external network.
- Private: Isolates VMs from the host and external network.
Now, click Create Virtual Switch in the Virtual Switch Properties pane. Here, name the virtual switch Public and allow the management operating system to share the network adapter bound to the virtual switch Click Apply.
You will see a warning message indicating a potential loss of network connectivity while Hyper-V creates the new virtual switch. Click Yes to proceed with the virtual switch creation. Click OK to close the Virtual Switch Manager.
Create a New Virtual Machine On Hyper-V
Now, on Hyper-V Manager, move to the Actions pane, click New, and then click Virtual Machine. Follow the New Virtual Machine Wizard:
- Name and Location: Specify a name and storage location for VM files.
- Generation: Choose Generation 1 for legacy systems or Generation 2 for modern OSs with UEFI and secure boot.
- Memory: Allocate startup memory (e.g., 2048 MB) and enable Dynamic Memory for efficient resource use.
- Networking: Select the virtual switch created earlier.
- Virtual Hard Disk: Create a new VHD or use an existing one. Specify size (e.g., 20 GB).
- Installation Options: Choose to install an OS from an ISO file, DVD, or network.
Review the settings, and then click Finish to create the virtual machine and close the wizard. After Hyper-V creates the new virtual machine, you can view it in Hyper-V Manager.
Best Practices for Hyper-V on Windows 11
- For better performance, allocate at least 4 GB RAM and enough CPU cores for each VM.
- Use Checkpoints to create snapshots before making major changes inside a VM.
- You can run multiple VMs, but performance depends on your hardware.
- Install Guest Integration Services in supported OSes for better compatibility.
To maximize performance and stability, install the latest Windows 11 updates, especially those related to virtualization components. VMs consume CPU, memory, and disk resources. Use Task Manager to monitor usage and avoid overloading your system.
Enable dynamic memory to allocate RAM efficiently across VMs. Limit the number of simultaneous VMs (typically 2–3 on a standard PC) to prevent performance issues.
Hyper-V may conflict with VirtualBox or VMware due to exclusive use of VT-x/AMD-V. Disable Hyper-V via Control Panel > Programs and Features > Turn Windows features on or off if needed.
Hyper-V Missing on Windows 11 Home?
Hyper-V is officially not available on Windows 11 Home, but it can be unofficially enabled through manual workarounds. However, for stability and support, it’s better to upgrade to Windows 11 Pro.
- Hyper-V Not Appearing in Windows Features: Ensure you’re using Windows 11 Pro, Enterprise, or Education. For the Home edition, use third-party tools like VirtualBox.
- Virtualization Disabled in BIOS: Revisit BIOS/UEFI settings to enable Intel VT-x or AMD-V.
- VM Fails to Start: Check if Hyper-V is enabled and virtualization is active in Task Manager. Verify sufficient RAM and disk space.
Whether you’re experimenting with Linux, trying out Windows Insider builds, or isolating software, Hyper-V gives you control and safety all in one.
Hyper-V is Microsoft’s virtualization platform. It is available on Windows Server operating systems and Microsoft has also added the Hyper-V functionality to Windows 8.1, Windows 10, and Windows 11.
Unfortunately, the Hyper-V feature is only available in Windows 10 Professional, Enterprise, and Education editions. You can’t install it on Windows 10 Home edition by default.
However, using the steps in this article, we’ll show you how to enable Hyper-V in the Windows 10 Home edition.
Table of Contents
Does Your System Support Virtualization?
Before moving forward, we need to check if our system supports virtualization. Hardware virtualization is required for Hyper-V to function correctly. Otherwise, you can use other virtualization platforms like Virtualbox and VMWare.
There are four basic requirements for Hyper-V to be installed on a Windows 10 computer:
- VM Monitor Mode Extensions
- Virtualization enabled in firmware
- Second Level Address Translation (SLAT)
- Data Execution Prevention
All four of these requirements can be easily checked through a Command Prompt cmdlet. Run the following cmdlet in an elevated Command Prompt and obtain the results on the four requirements:
systeminfoThis will generate a list, and you will find the section “Hyper-V Requirements” at the end of the list containing the details of the 4 requirements, as in the image below:
 1")
If these requirements are met, the results will display “Yes.” However, if you find that “Virtualization Enabled In Firmware” states “No,” you need to enable it using the guide below.
Enable Virtualization in Firmware/BIOS
Most modern computers support all the requirements of Hyper-V. But some systems have virtualization disabled from BIOS. You can go to the BIOS setup computer at the startup and enable Virtualization using the following steps:
-
Restart your computer and enter the BIOS setup using the hotkey.
-
Here, look for the “Virtualization” tab and click on it, or use the arrow keys on the keyboard to highlight it and press Enter.
-
Now enable Virtualization.
 2")
Enable virtualization from BIOS -
Now save the new settings and exit BIOS. The system will now reboot normally.
 2")
When it reboots, continue with the following steps to install and enable Hyper-V.
Install Hyper-V in Windows 10 Home
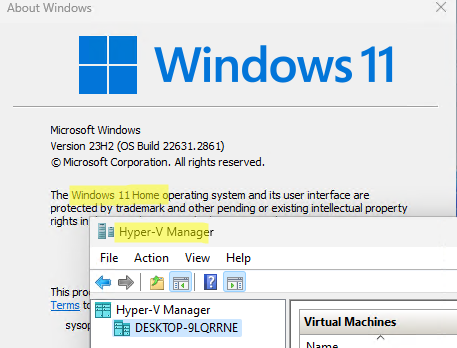
Note: Since Windows Home edition comes without Hyper-V, you must first install it. If you have the Pro, Education, or Enterprise editions, then you may skip this step and proceed to the next section of this article. To check which edition you have, type in winver in the Run Command box and obtain your operating system’s details.
Follow the steps below to install and enable Hyper-V in Windows 10 Home:
-
Download Hyper-V Installer by clicking on the following link:
Hyper-V installer and enabler for Windows 10 Home (317 bytes, 41,061 hits)
-
Once downloaded, right-click on the file and select Run as Administrator from the context menu. This will trigger the installation script.
 4")
Run as admin -
If prompted with a UAC, click Yes.
Click Yes on User Access Control It may take some time to complete the installation. Please let it complete without interruption.
-
Once complete, press Y to continue.
Press Y to continue The computer will now reboot and update.
 4")
 5")
 6")
Once rebooted, Hyper-V will have installed and automatically enabled on your Windows Home.
How to Enable Hyper-V on Windows 10 (Pro, Enterprise, Education)
The method given above automatically enables Hyper-V as well as installing it on a Windows Home. However, if you are running Windows Pro, Education, or Enterprise edition, then you can enable Hyper-V using any one of the following methods.
Enable Hyper-V from Optional Features
Since Hyper-V is an optional feature that one can enable when needed, you can enable it from the Optional Features applet. Here is how:
-
Open the Optional Features applet by typing in optionalfeatures in the Run Command box.
Open the Optional Features applet -
Now look for the “Hyper-V” option from the list and check the box next to it. Then click Ok.
 8")
Enable Hyper V from Optional Features -
You will now see a window applying the changes. Click Close when it is done.
 9")
Close installation window
 8")
 9")
Hyper-V will now be installed and enabled. You can now access the Hyper-V manager by searching for it in the search box in the taskbar or through the Start menu.
 10")
Alternatively, you can also use the other 2 command-line methods to enable Hyper-V on Windows 10.
Enable Hyper-V from Command Prompt
Follow these steps to enable Hyper-V using the DISM command tool in the Command Prompt:
-
Run the following cmdlet in an elevated Command Prompt:
DISM /Online /Enable-Feature /All /FeatureName:Microsoft-Hyper-V
Enable Hyper V from Command Prompt -
When asked, enter Y to restart the computer:
Enter Y
 11")
 12")
The computer will now restart, When it does, Hyper-V should be enabled successfully.
Enable Hyper-V from Windows PowerShell
If you’d rather prefer to use Windows PowerShell, here is how to enable Hyper-V:
-
Run the following cmdlet in an elevated PowerShell:
Enable-WindowsOptionalFeature -Online -FeatureName Microsoft-Hyper-V-All
Enable Hyper V using PowerShell -
When asked, enter Y and hit Enter to restart the computer:
Enter Y When the computer reboots, Hyper-V will have installed successfully.
 13")
 14")
These are the 3 methods to enable Hyper-V in Windows 10, provided that the hardware is supported and Hyper-V is installed.
How to Disable Hyper-V in Windows 10 (Home, Pro, Enterprise, Education)
If you don’t want this functionality on your computer, you can always disable it. There are three ways to disable it:
-
From Optional Features
-
Open the Optional Features applet by typing in optionalfeatures in the Run Command box.
Open Optional Features applet -
Uncheck the box next to Hyper-V and click Ok.
 16")
Disable Hyper-V from Optional Features -
When done, click Restart now to finalize the changes.
Restart PC
-
-
From Command Prompt
Run the following cmdlet in an elevated Command Prompt to disable Hyper-V:
DISM /Online /Disable-Feature /FeatureName:Microsoft-Hyper-V-allIf asked for a reboot, enter Y for Yes.
Disable Hyper V from Command Prompt -
From PowerShell
Run the following cmdlet in an elevated PowerShell to disable Hyper-V:
Disable-WindowsOptionalFeature -Online -FeatureName Microsoft-Hyper-V-AllIf asked for a reboot, enter Y for Yes.
Disable Hyper V from Windows PowerShell
 16")
 17")
 18")
 19")
Closing Thoughts
Sometimes Hyper-V is very useful even for home users. It can be used to test and evaluate new software without hurting the host system. But there are times when enabling virtualization support or installing Hyper-V is not recommended.
Hyper-V requires some system resources to run its virtual machines. For example, if you have 4 GB RAM, you won’t be able to give any resources to the virtual machine. So it would not be wise to enable Hyper-V functionality.
For what purpose do you want to enable Hyper-V functionality on your Windows 10 Home computer? Please share your thoughts in the comments below.