
Introduction
Hyper-V is Microsoft’s native hypervisor for running virtual machines on Windows. With Hyper-V, you can create and manage virtual environments on Windows Server to efficiently utilize your hardware resources and provide flexibility for different workloads.
In this comprehensive guide, we will walk you through the entire process of setting up and managing Hyper-V virtual environments on Windows Server. We will cover the basics of Hyper-V architecture, creating your first virtual machine, networking configuration, storage options, virtual machine management, backup and disaster recovery, security considerations, and more.
By the end of this guide, you will have the skills and knowledge needed to create and optimize virtual environments with Hyper-V on Windows Server. Whether you need to set up test environments, consolidate servers, run legacy workloads, or provide infrastructure for developers – Hyper-V provides a robust and cost-effective virtualization solution.
Prerequisites
Before we begin setting up Hyper-V, let’s go over the prerequisites:
- Hardware that supports virtualization – Intel VT or AMD-V CPU extensions. You can verify this in the BIOS.
- Windows Server OS installed – Hyper-V role is available on Windows Server 2008, 2012, 2016, 2019, and newer. We will be using Windows Server 2019 in this guide.
- Sufficient resources – CPU cores, RAM, and disk space for running the intended workloads. A good starting point is 4 cores, 8 GB RAM, and 100 GB disk space.
Enable Hyper-V Role
The first step is to enable the Hyper-V role on your Windows Server installation.
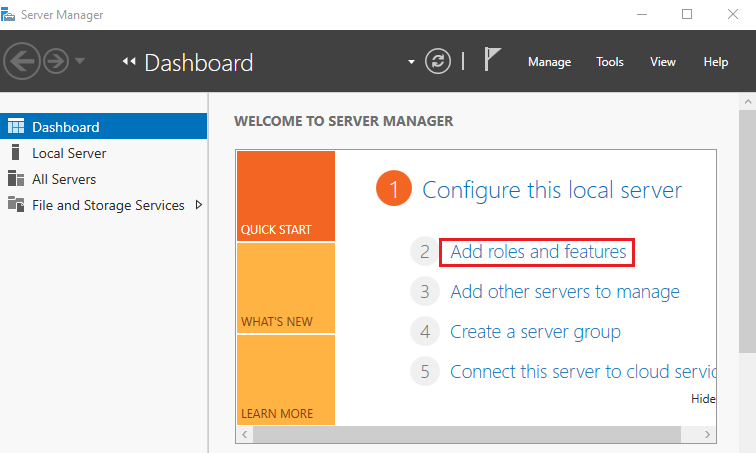
- Open Server Manager and click “Manage” to add roles and features.
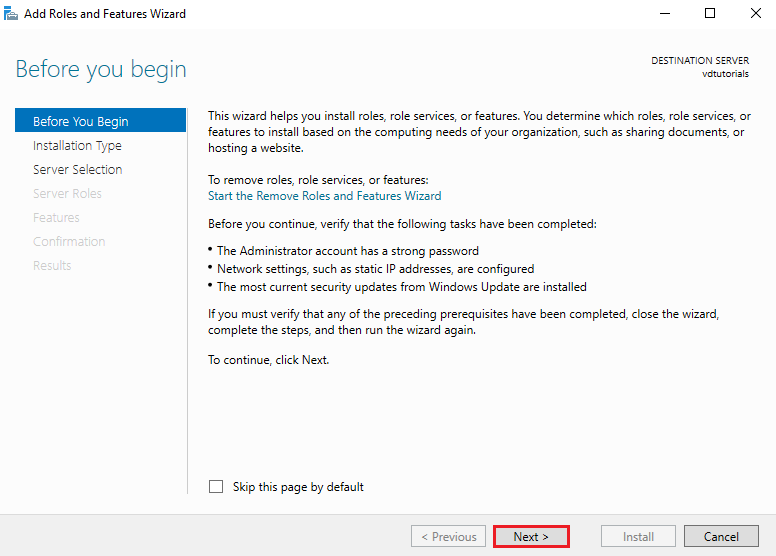
- In the Add Roles and Features Wizard, click Next on the Before You Begin page.
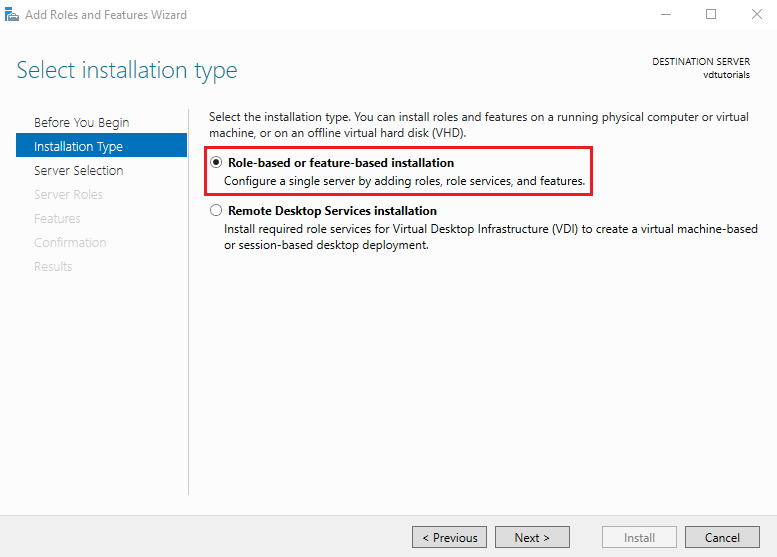
- On the Installation Type page, leave Role-based or feature-based installation selected and click Next.
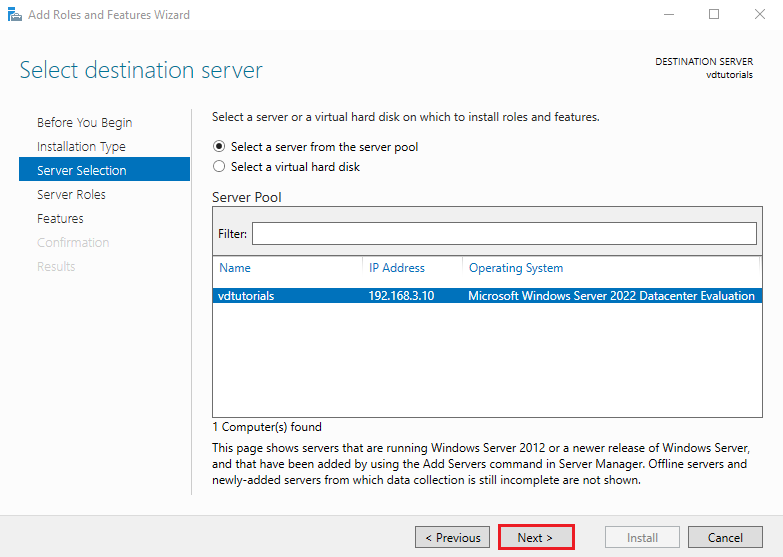
- On the Server Selection page, select your server and click Next.
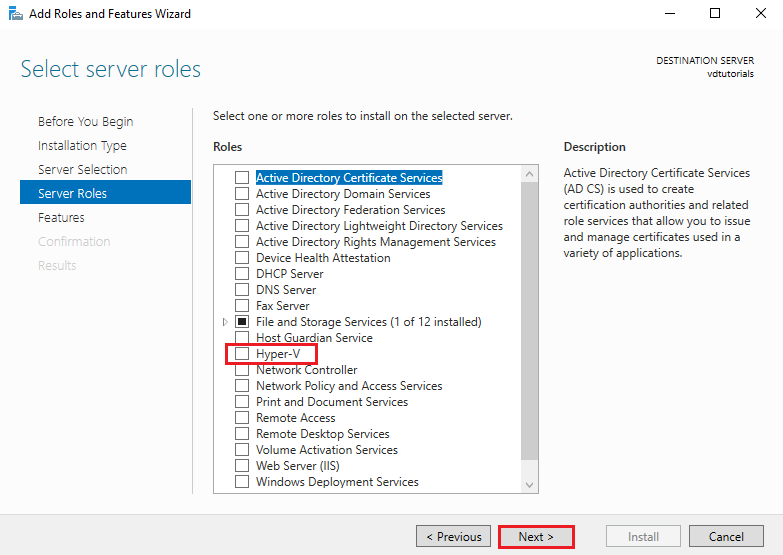
- On the Server Roles page, check Hyper-V and click Next.
- On the Features page, accept the defaults and click Next.
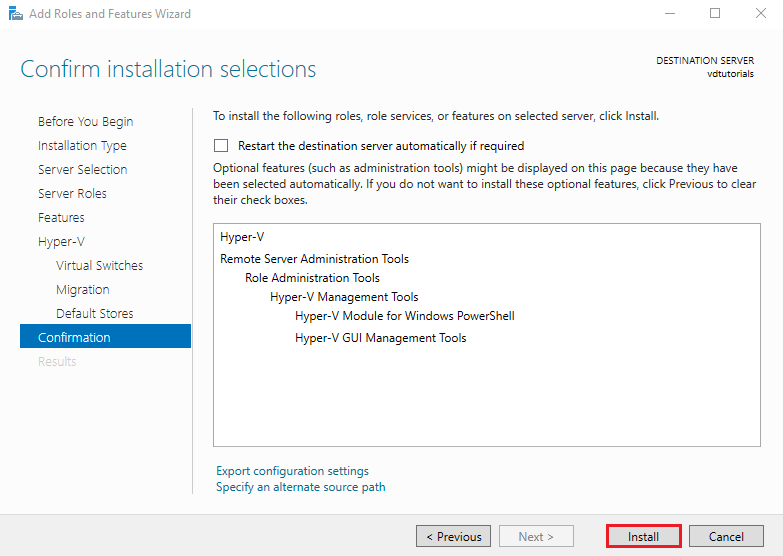
- On the Confirmation page, click Install to begin installing the Hyper-V role and management tools.
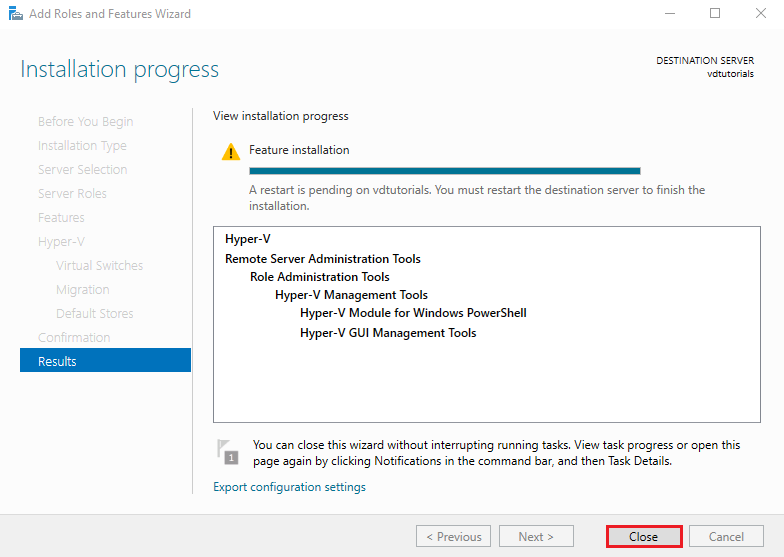
- Once the installation completes, click Close to exit the wizard.
- You may need to restart the server for changes to take effect.
Hyper-V role and management tools are now installed and ready to be configured.
Create Virtual Switch
Before creating any virtual machines, we need to set up a virtual network switch to connect the VMs to. This virtual switch acts similarly to a physical switch, providing network connectivity and routing for virtual machines.
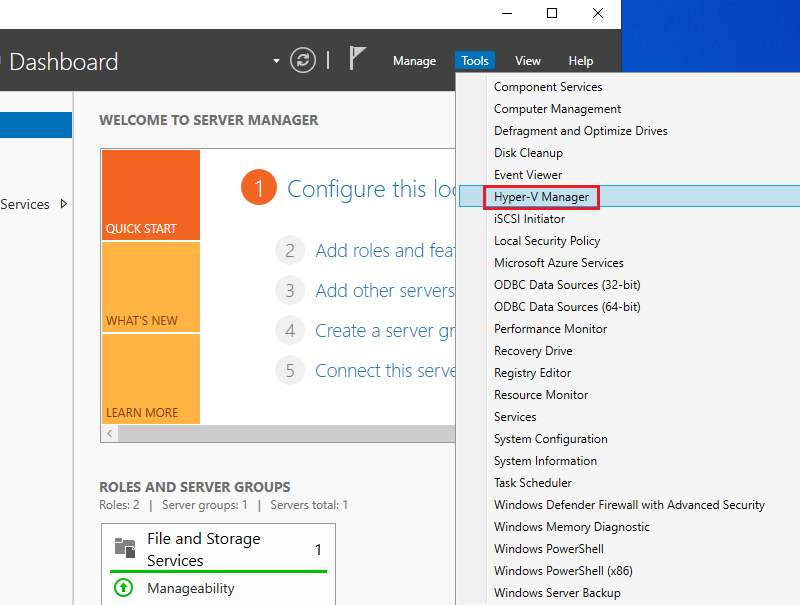
- Open Hyper-V Manager from the Tools menu in Server Manager.
- In the Actions pane on the right, click Virtual Switch Manager.
- Click New virtual network switch.
- Select the type of virtual switch you want to create. We will use an External network, which allows VMs to access a physical network.
- Click Create Virtual Switch.
- Give the virtual switch a name like “External vSwitch” and select the physical network interface it should bind to.
- Click Apply.
We now have a virtual switch set up that can route traffic between the virtual machines and the physical network.
Create Virtual Machine
Now we can create our first virtual machine using the Hyper-V Manager console.
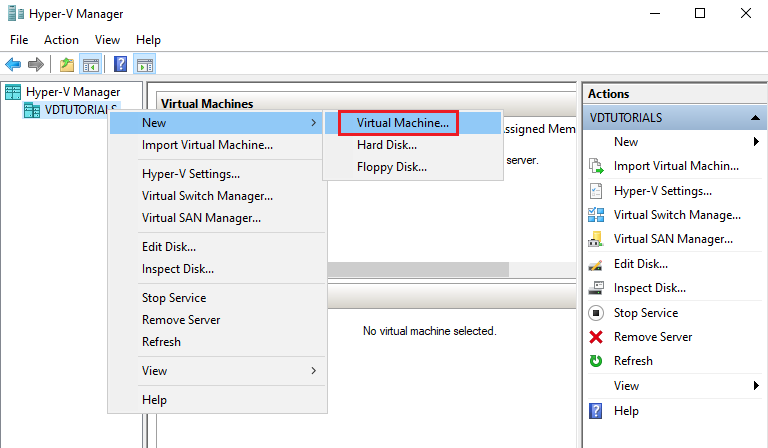
- In the Hyper-V Manager, click New in the right Actions pane.
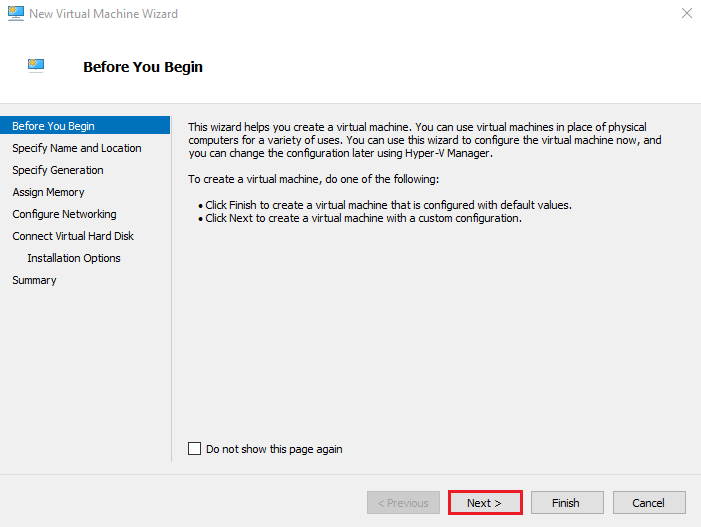
- On the New Virtual Machine Wizard, click Next on the Before You Begin page.
- On the Specify Name and Location page, give the VM a name like “VM-1” and choose where its configuration files will be stored. Click Next.
- Choose the generation of the virtual machine.
- On the Assign Memory page, allocate startup RAM such as 2048 MB. Click Next.
- On the Configure Networking page, select the virtual switch we just created. Click Next.
- On the Connect Virtual Hard Disk page, leave the option to Create a virtual hard disk unchecked since we will add one later. Click Next.
- On the Summary page, verify the details and click Finish to create the virtual machine.
The new VM will now show up in the Virtual Machines list in Hyper-V Manager.
Configure Virtual Machine
With the virtual machine created, we can now configure additional options and resources before starting it up.
- Right-click the VM and select Settings.
- In the Settings window, go to Security and enable Secure Boot if desired. Click OK.
- Under Processor in Settings, adjust the Number of virtual processors if needed. Click Apply.
- Under Memory, change Startup RAM if needed. Click Apply.
- Go to the SCSI Controller and choose to add a Hard Drive.
- On the Hard Disk page, select Virtual hard disk and choose a name and location for the VHDX disk file. Set the desired disk size.
- Go to the SCSI Controller choose to add a DVD Drive, and choose to insert the installation media for the OS, such as a Windows ISO.
- Under Network Adapter, verify that the Virtual Switch is set to the external network.
With these settings configured, our virtual machine is ready to be powered on and installed with an OS.
Start Virtual Machine
Starting the VM will boot it from the configured OS media and begin installation.
- In Hyper-V Manager, select the virtual machine and click Start in the right Actions pane.
- The VM will boot and load the OS installer from the attached ISO image. Proceed with OS installation steps.
- After the OS is installed and configured, eject the installation media by going to the VM Settings.
- With the ISO removed, you can now start the VM to boot into the newly installed OS.
Our first virtual machine is now installed and ready to use! We can follow the same steps to create additional VMs as needed.
Managing Virtual Machines
Hyper-V provides a full suite of management tools for monitoring and administering your virtual machines. Here are some key capabilities:
- Live Migrate – Move running VMs between Hyper-V hosts with no downtime.
- Snapshot – Take point-in-time backups of VM state. Useful for testing patches or upgrades.
- Replication – Asynchronously replicate VMs to another host for disaster recovery.
- Virtual Machine Connection – Connect directly to a running VM’s console and interface.
- Resource Metering – Track resource utilization like CPU, memory, disk, and network usage.
- PowerShell Direct – Manage VMs using PowerShell commands and remoting.
Using these features, you can maintain high availability, quickly restore to known good states, migrate workloads, and automate management tasks.
Networking and Storage
Hyper-V offers advanced networking and storage configurations for virtual environments.
For networking, you can create virtual switches that connect to the physical network, private switches between VMs on the host, and apply network security rules.
For storage, VMs can use virtual hard disks (VHD/VHDX), pass-through disks for SAN access, and Hyper-V virtual Fibre Channel for maximum performance.
Features like SMB storage, iSCSI, and ODX further enhance storage performance and flexibility. You can also replicate VMs and their storage across different servers and sites.
With a strong understanding of Hyper-V networking and storage capabilities, you can build robust and resilient infrastructure for your critical workloads.
Backup and Disaster Recovery
It is crucial to implement backup and disaster recovery strategies to protect your Hyper-V deployment from outages and data loss.
Hyper-V includes built-in backup capabilities in Windows Server, allowing you to back up VMs and configuration:
- Windows Server Backup can be used to schedule backups of VM storage VHD(X) files.
- Hyper-V replication asynchronously copies VM storage and configuration files to another host.
- Windows Failover Clustering provides high availability with automated VM failover.
Third-party tools like System Center DPM can also perform host-level and guest-level backups across multiple Hyper-V servers.
Test your disaster recovery plan regularly to ensure VMs and services can successfully failover and recover if the primary Hyper-V host goes down.
Security Best Practices
It is important to lock down the Hyper-V hosts and virtual machine environments using security best practices. Here are some key considerations:
- Isolate Hyper-V management network
- Harden the parent partition
- Use secure boot and UEFI for VMs
- Disable unnecessary services and protocols
- Restrict administrative access
- Implement the least privilege permissions
- Enable virtual TPM for integrity protection
- Use BitLocker to encrypt VM files and volumes
- Secure VHD files and limit paths
- Disable internet access for unnecessary VMs
Applying security configurations, policies, and tools like firewalls and anti-malware will help harden your overall Hyper-V security posture. Routinely scan and patch for the latest updates.
Conclusion
In this comprehensive guide, we covered the end-to-end process for designing, deploying, managing, and securing virtual machine environments with Hyper-V on Windows Server.
You should now have a solid understanding of Hyper-V architecture, creating virtual switches, building VMs, configuring resources, working with storage and networking, backup and disaster recovery, and security best practices.
With the powerful capabilities of Hyper-V, you can efficiently consolidate and streamline workloads, ensure high availability, quickly scale hosts up or down, test application updates or patches, provide development environments, and much more.
By following the steps and guidance in this guide, you will be well on your way to leveraging the full potential of Hyper-V and building a robust and flexible virtualized infrastructure.
A Windows computer needs to support virtualization technology in order to run guest operating systems (virtual machines), Windows Subsystem for Linux (WSL), and Windows Subsystem for Android (WSA).
If your computer supports virtualization, then it can be enabled from the UEFI/BIOS settings. However, in the case of a Virtual Machine (VM), you cannot access its BIOS settings. However, one can need to run a VM, an Android application, or a Linux distro inside a VM. So what do you do then?
In such an instance, you must enable nested virtualization on a guest operating system. This is our topic for today, and this post gives you a step-by-step guide on how to enable nested virtualization on VMs configured on Microsoft Hyper-V, Oracle VirtualBox, and VMware Workstation on a Windows computer.
Note: Enabling nested virtualization for VMWare Workstation and Oracle VirtualBox on operating systems other than Windows is different. In this post, we have only discussed how to enable it if your host computer is running a Windows operating system.
Table of Contents
What is Nested Virtualization
Nested virtualization, often referred to as “nested VT-x,” is running a virtualized environment inside a device that is already virtualized. In other words, running a VM inside of another VM.
When enabling a nested virtualization environment, you are nesting a hypervisor. A hypervisor is software that runs and manages virtual machines on top of the host computer.
The hypervisor running the main virtual machine is considered a “Level 0 (L0)” hypervisor. The hypervisor running inside the VM is referred to as a “Level 1 (L1)” hypervisor. Further nested virtualization would result in a Level 2 (L2) hypervisor, and so on.
At this point, most users come to think “How many nested virtualization environments can you run simultaneously?” There is no definitive answer to this at the moment. However, it all depends on your system’s resources. If you have the CPU and the RAM, as well as the storage for it, you can run as many nested hypervisors as you want.
Prerequisites for Nested Virtualization
To enable nested virtualization, the hypervisor needs to support it. Hyper-V first supported nested virtualization in Windows 10/Windows Server 2016. Before that, this technology was not available in the Hyper-V hypervisor.
If you are using Oracle VirtualBox, versions 6.1 and above support nested virtualization.
Moreover, to be able to run nested virtualization, your processor must be an Intel processor with VT-x and EPT technology, or an AMD EPYC or Ryzen processor. You can verify this information by checking on the OEM website or checking hardware virtualization compatibility from Command Prompt.
Once it is confirmed that both your hardware and software are compatible, let us move on to enabling nested virtualization.
How To Enable Nested Virtualization (VT-x) On Hyper-V
Learn how to make a Windows 11 VM on Hyper-V, VirtualBox, and Workstation.
If you try installing and running a Hyper-V VM inside a VM, you will encounter an error such as the one in this image:
 On Hyper-V, VMWare, VirtualBox VMs In Windows 1")
To enable nested VT-x on a Hyper-V VM (or any other supported hypervisor), the VM must already be created and must be turned off before performing the steps below.
The Hyper-V hypervisor does not give you the option to enable nested virtualization on a VM through the settings menu. Therefore, this needs to be done using the Command Line Interface (CLI).
-
Make sure that the VM is shut down/powered off and note down the VM’s exact name.
-
On the host computer, open Windows PowerShell with elevated privileges.
-
Now run the following cmdlet to enable nested virtualization on the VM while replacing [NameOfVM] with the complete name of the virtual machine.
Set-VMProcessor -VMName "[NameOfVM]" -ExposeVirtualizationExtensions $true On Hyper-V, VMWare, VirtualBox VMs In Windows 2")
Enable nested virtualization on Hyper V VM using PowerShell
 On Hyper-V, VMWare, VirtualBox VMs In Windows 2")
Nested virtualization on that particular VM will now be enabled. You can now confirm this by running a guest OS on top of that VM.
 On Hyper-V, VMWare, VirtualBox VMs In Windows 3")
In the case you wish to disable nested virtualization, use this cmdlet in PowerShell while the VM is disabled:
Set-VMProcessor -VMName "[NameOfVM]" -ExposeVirtualizationExtensions $falseHow To Enable Nested Virtualization (VT-x) On VMWare WorkStation
Similar to Hyper-V, the WorkStation VM must be already created and powered off to enable nested virtualization. Then, follow these steps to enable nested VT-x:
-
From VMWare WorkStation, open the VM’s settings.
 On Hyper-V, VMWare, VirtualBox VMs In Windows 4")
Open VM settings -
Under the Hardware tab, select Processors, and then check the box next to “Virtualize Intel VT-x/EPT or AMD-V/RVI,” and then click Ok.
 On Hyper-V, VMWare, VirtualBox VMs In Windows 5")
Enable nested virtualization on VMWare Workstation VM
 On Hyper-V, VMWare, VirtualBox VMs In Windows 4")
 On Hyper-V, VMWare, VirtualBox VMs In Windows 5")
Nested virtualization will now be enabled on the VM. You may now run another guest OS on top of that VM.
To disable nested VT-x on the VM, simply shut down the VM, return to the Processor settings page, and uncheck the box.
How To Enable Nested Virtualization (VT-x) On Oracle VirtualBox
According to Oracle, VirtualBox now supports nested virtualization for the supported Intel and AMD processors. We also found the option to enable it from the VirtualBox VMs’ setting page. However, the option was greyed out.
 On Hyper-V, VMWare, VirtualBox VMs In Windows 6")
Upon researching, we came to know that many people ran into this option because apparently, VirtualBox has not yet enabled it for Intel processors (we do not know why).
However, there is a workaround for this and you can enable nested virtualization on VMs created in VirtualBox as well. Here is how:
-
Using File Explorer, navigate to the path where VirtualBox is installed. By default, it has the following path:
C:\Program Files\Oracle\VirtualBox
-
Copy this path and then open an elevated Command Prompt. Use the “cd” cmdlet to change your directory to the VirtualBox folder. Use the copied path from File Explorer.
cd /d [PathToVirtualBoxFolder] On Hyper-V, VMWare, VirtualBox VMs In Windows 7")
Change directory 2 -
Now, run the following cmdlet while replacing [NameOfVM] with the name of the virtual machine on which you want to enable nested virtualization.
VBoxManage modifyvm <YourVirtualMachineName> --nested-hw-virt on
Enable nested virtualization on VirtualBox VM
 On Hyper-V, VMWare, VirtualBox VMs In Windows 7")
 On Hyper-V, VMWare, VirtualBox VMs In Windows 8")
Nested VT-x will now be enabled on the selected VM. You can confirm this by opening the VM’s settings again, clicking System, and then clicking the Processor tab, where you shall now be able to check and uncheck the box next to “Enable nested VT-x/AMD-V” to enable or disable nested virtualization.
 On Hyper-V, VMWare, VirtualBox VMs In Windows 9")
Note that, like Hyper-V, this cmdlet will need to be run for each individual VM that you want to enable nested VT-x on.
After running the cmdlet in the steps above, nested virtualization is enabled by default. If you wish to disable it, simply uncheck the box next to “Enable Nest VT-x/AMD-V” on the Processor settings page.
Final Analysis
Virtual machines can be used for different purposes, like performing isolated tests, running special services and tasks, etc. However, if you want to perform virtualization-related tests, then we suggest you perform it on a VM inside another VM. This way, you won’t be putting the parent host computer in harm’s way.
Nested virtualization is another great way to use limited resources while achieving more. You can use the same VM, on a physical computer or on the cloud, create multiple VMs on it, and then distribute those VMs to your students/subordinates; all while only using one level 1 VM.
Do you need to set up a lab that needs multiple hosts? Or test an application in an isolated environment? Hyper-V nested virtualization could be the right setup you need. Hyper-V is a built-in feature or role to Windows you only need to enable to start using. And it’s free!
Not a reader? Watch this related video tutorial!
Not seeing the video? Make sure your ad blocker is disabled.
Keep reading, and you will learn how to set up Hyper-V to enable nested virtualization. By the end of this article, you will have created, installed, and configured nested virtual machines (VM) with one physical host. Let’s begin!
Prerequisites
This article is a hands-on, how-to approach. And to follow along with the instructions, you’ll need the following requirements.
- A host (physical) machine with a CPU that supports hardware virtualization (VT-x, AMD-V).
- The host machine must have enough memory to run the Hyper-V virtual machines. The VM in this tutorial will use 4GB of memory.
- For hosts with an Intel CPU, the host operating system (OS) must be Windows Server 2016, Windows 10 version 1607 (Anniversary Update), or later. For AMD-powered hosts, the minimum operating system is Windows 10 Build 19636. This article will use Windows 10 Pro version 20H2.
- An operating system installation ISO file. In this article, the OS installer ISO filename is c:\ISO\windows_server_2016.iso. You’ll use this ISO file to install the nested VM guest OS.
- Hyper-V for Windows 10 or Hyper-V for Windows Server, depending on your host’s operating system. This article uses Hyper-V on a Windows 10 host.
Creating A NAT-Enabled Virtual Switch
To set up Hyper-V nested virtualization, you must first create a network for VM hosted on a host to communicate. To do that, you’ll need to create a NAT-enabled virtual switch that all VMs will use and reach the Internet.
On a Windows 10 Hyper-V host, a NAT-enabled virtual switch already exists called Default Switch. But, to experience an end-to-end Hyper-V nested virtualization setup, let’s assume that the Default Switch does not exist on your Hyper-V host even if your host OS is Windows 10.
To create a NAT-enabled virtual switch, follow these steps.
1. First, on your Hyper-V host computer, open PowerShell as admin.
2. Next, run the command below in PowerShell to create a new internal virtual switch called vNAT.
Creating a virtual switch installs a new virtual network adapter in Windows called vEthernet (vmSwitchName), where vmSwitchName is the virtual switch name.
In this example, since the virtual switch name is vNAT, the new virtual network adapter name will be vEthernet (vNAT).
# Create a new virtual switch with the new vNAT and the type is Internal.
# This command also automatically creates a virtual network adapter with the name "vEthernet (vNAT)"
 New-VMSwitch -SwitchName vNAT -SwitchType Internal
3. Now, assign an IP address and subnet mask to the vEthernet (vNAT) network adapter by running the command below in PowerShell. This command will assign the IP address of 192.168.200.1 and the subnet mask of 255.255.255.128 (/25) to the network adapter.
The IP address and subnet mask in this command are only examples and may not apply to your environment. To avoid connectivity issues, choose a subnet mask that is not already in use in your home or office network.
# Assign an IP address and subnet to the "vEthernet (vNAT)" network adapter.
 New-NetIPAddress -IPAddress 192.168.200.1 -PrefixLength 25 -InterfaceAlias "vEthernet (vNAT)"
4. Next, create a NAT object on your Hyper-V host that will translate your VM’s internal network address. Do so by running the command below in PowerShell.
# Create a new NAT object called vNATNetwork in Windows for the virtual switch's internal IP address
 New-NetNat -Name vNATNetwork -InternalIPInterfaceAddressPrefix 192.168.200.0/25 -Verbose
Creating the First-Level Guest Virtual Machine
To set up Hyper-V nested virtualization, you must first create and configure the first-level virtual machine which is the VM that you intend to eventually be a Hyper-V host. This tutorial will refer to this first-level virtual machine as L1-VM.
There are two methods to create a virtual machine: Hyper-V Manager (GUI) and PowerShell. Either method will produce the same virtual machine.
Method 1: Creating a Virtual Machine using the Hyper-V Manager
To create the L1-VM using the Hyper-V Manager, follow these steps.
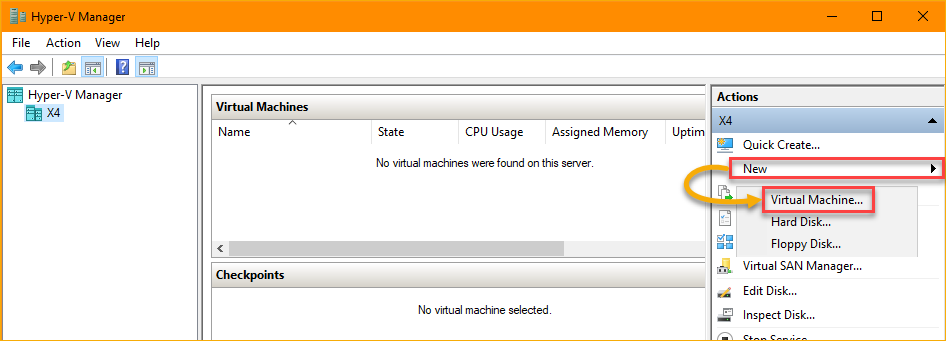
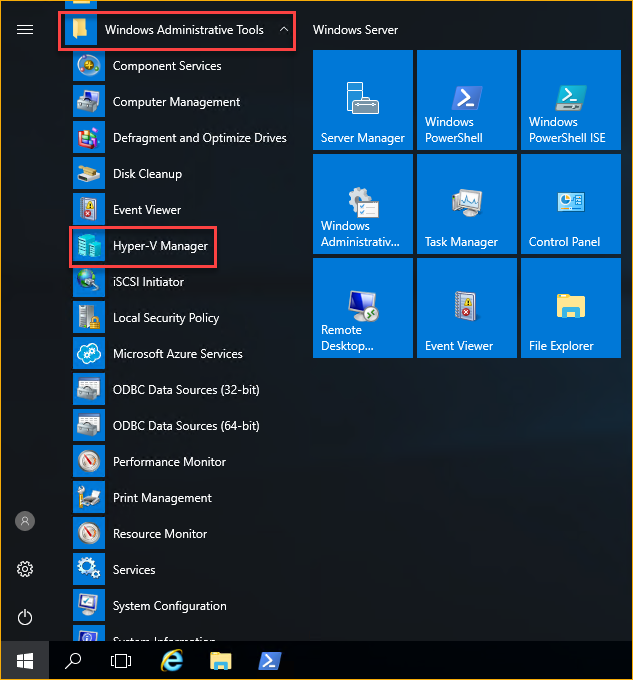
1. On your host machine, open the Hyper-V Manager. To do so, click on Start —> Windows Administrative Tools —> Hyper-V Manager.
2. Once the Hyper-V Manager window is open, on the Action pane, click New —> Virtual Machine.
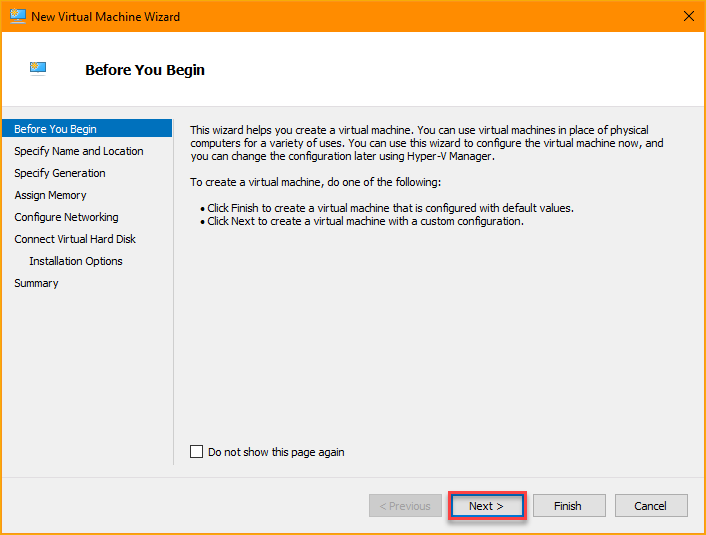
3. Once in the New Virtual Machine Wizard window, on the Before You Begin page, click Next.
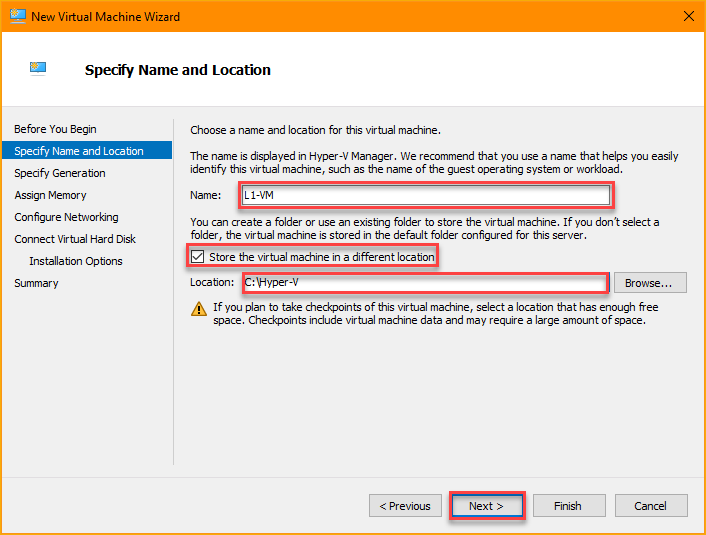
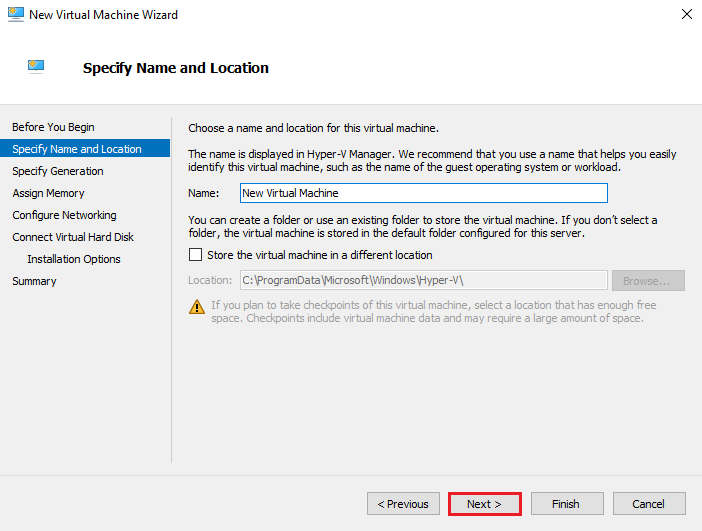
4. On the Specify Name and Location page, type the new virtual machine’s name in the Name box. In this example, the VM name is L1-VM.
If you need to change the location for the new VM, put a check on the Store the virtual machine in a different location box, then browse or enter the path in the Location box. If the folder path you specify does not exist, the wizard will create it.
Changing the VM location is useful when you need to choose a location with enough storage space. Or to organize the VMs location in your preferred folder.
Otherwise, to accept the default location, leave the box unchecked. In this example, the new VM’s location is C:\Hyper-V. Click Next after configuring the VM name and location.
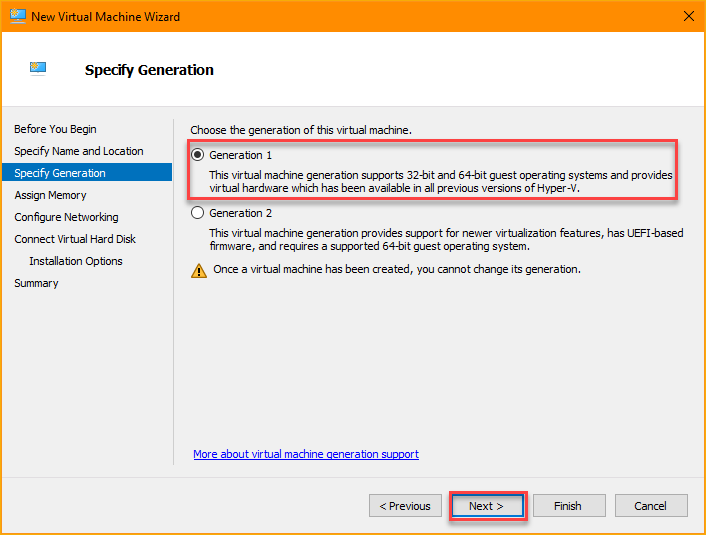
5. Next, on the Specify Generation page, choose the VM generation version. The options are:
Generation 1 – Supports 32-bit and 64-bit guest operating systems from Windows 7 and Windows Server 2008 onwards. This example will use a Generation 1 VM.
Generation 2 – Supports only 64-bit guest operating systems from Windows 8 and Window Server 2012 onwards. This generation also has UEFI-based firmware. After selecting a VM generation, click Next.
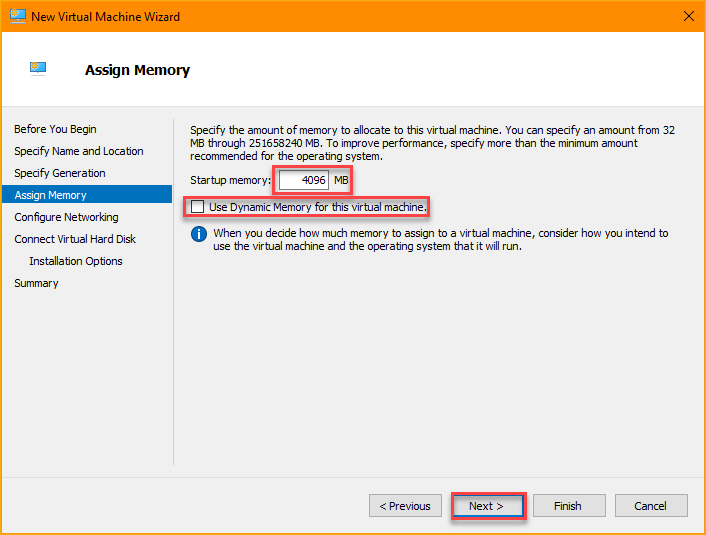
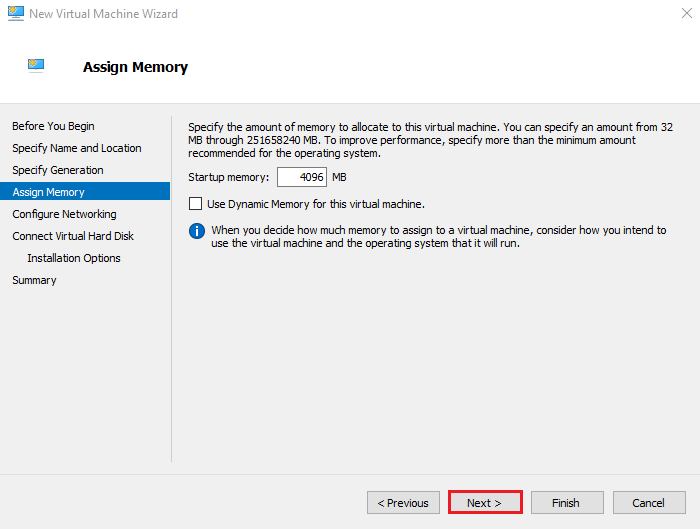
6. On the Assign Memory page, specify how much memory to assign the VM. This example assigns 4GB (4096 MB) of memory to the VM.
7. Uncheck the Use Dynamic Memory for this virtual machine box. Hyper-V nested VMs does not support dynamic memory. After finalizing the memory settings, click Next.
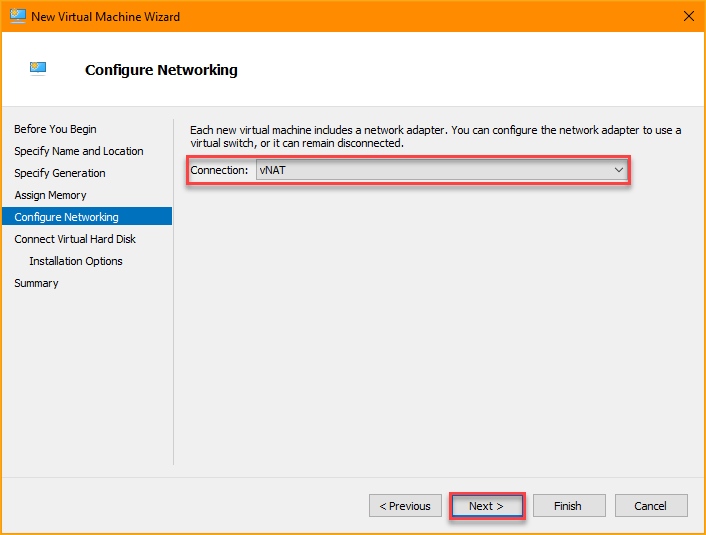
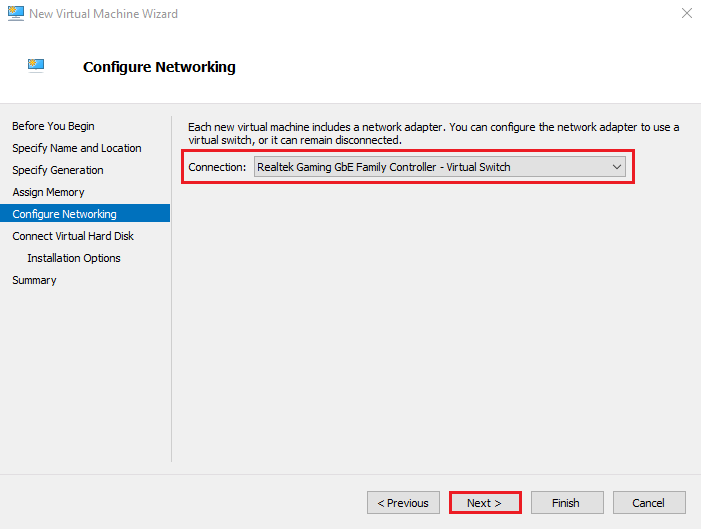
8. On the Configure Networking page, select the virtual switch call vNat that you created earlier in this article.
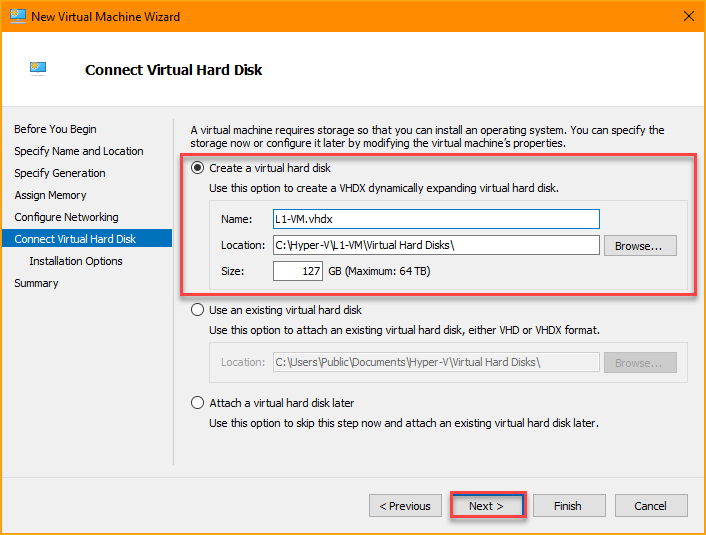
9. Next, on the Connect Virtual Hard Disk page, you have the option to:
- Create a virtual hard disk – This option creates a new virtual hard disk (VHD) and lets you customize the name, location, and size. The new VHD will be empty, and you will have to install an operating system afterward.
- Use an existing virtual hard disk – This option lets you choose an existing VHD (if you have one) that you want to be attached to the VM instead of creating a new one.
- Attach a virtual hard disk later – Choose this option if you want to skip this step and continue creating the VM without a VHD. You can still create a new or attach an existing VHD after you’ve created the VM.
This example selects the Create a virtual hard disk option and leaves the default name, location, and size values. Customize these values if you prefer. After making your selection, click Next.
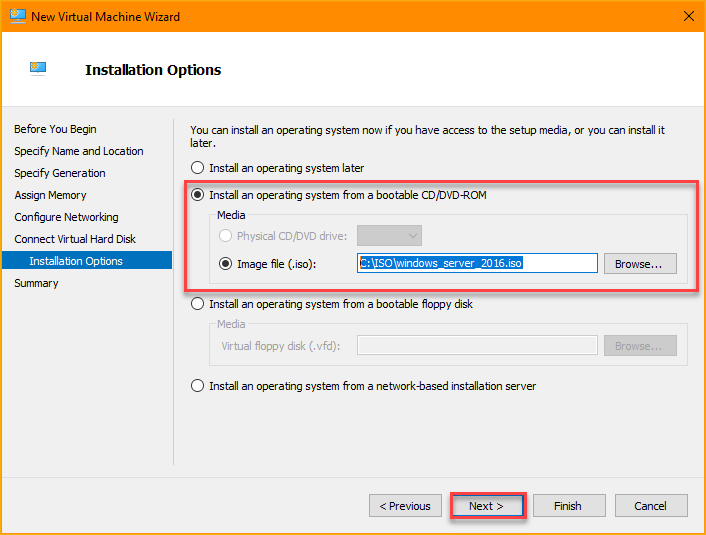
10. On the Installation Options page, choose how you want to install the operating system (OS):
In this example, the VM will install the OS using the bootable CD/DVD-ROM option. The OS installation media is an ISO file in C:\ISO\windows_server_2016.iso. When you’ve made your selection, click Next.
11. Finally, on the Completing the New Virtual Machine Wizard page, review the new VM’s Description. When you’re sure that you didn’t miss a step, click Finish.
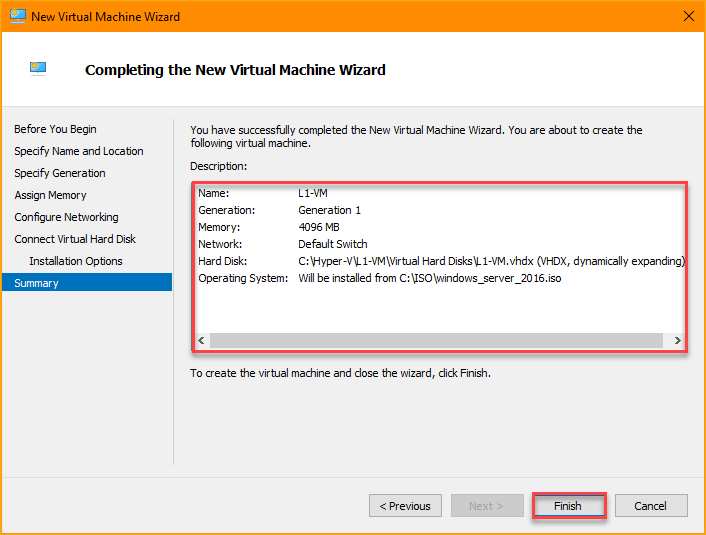
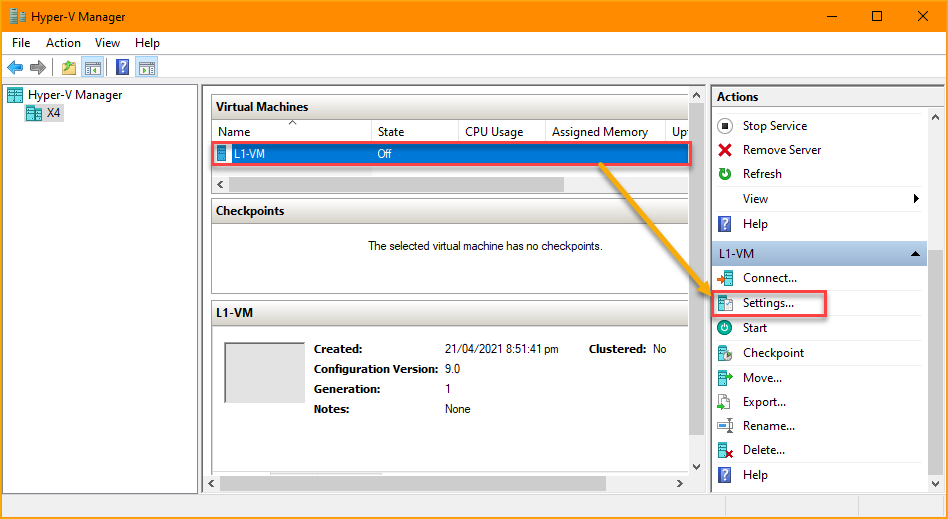
12. Now that you’ve created the VM, increasing the VM’s processor count is optional but recommended to improve the VM’s performance. To do so, click to select the VM and click on the Settings menu on the Action pane.
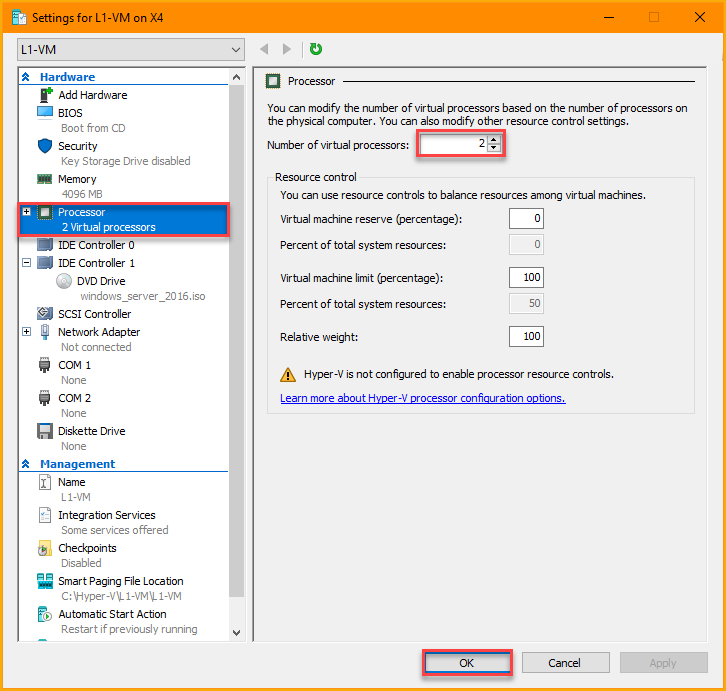
13. Once you’re on the Settings window, click Processor on the left pane. Next, increase the Number of virtual processors. In this example, the new processor count is 2. You can assign more if your host the capacity.
Method 2: Creating a Virtual Machine using PowerShell
Instead of clicking through multiple steps when creating a VM in Hyper-V Manager, another method to create a Hyper-V VM is by PowerShell.
To create and configure a new VM, follow the steps below.
1. On the Hyper-V host computer, open PowerShell as admin.
2. Next, run the code below in PowerShell to create a new VM called L1-VM. The code snippet below uses splatting to prepare the new VM’s parameter values. Refer to the inline comments to know what each parameter does.
# Prepare the new VM's properties.
 $newVM_splat = @{
     # Set the name of the new VM.
     Name = 'L1-VM'
     # Set the VM's generation version to generation 1.
     Generation = 1
     # Set the VM's memory size to 4GB
     MemoryStartupBytes = 4GB
     # Set the boot option to CD.
     BootDevice = 'CD'
     # Set the virtual switch called vNAT the VM will use to connect.
     SwitchName = 'vNAT'
     # Set the location where to create the new VM.
     Path = 'C:\Hyper-V\L1-VM'
     # Set the location where to create the new VM's virtual hard disk.
     NewVHDPath = 'C:\Hyper-V\L1-VM\VHD\L1-VM.vhdx'
     # Set the new virtual hard disk size to 100GB
     NewVHDSizeBytes = 100GB
 }
 # Create the new VM.
 New-VM @newVM_splat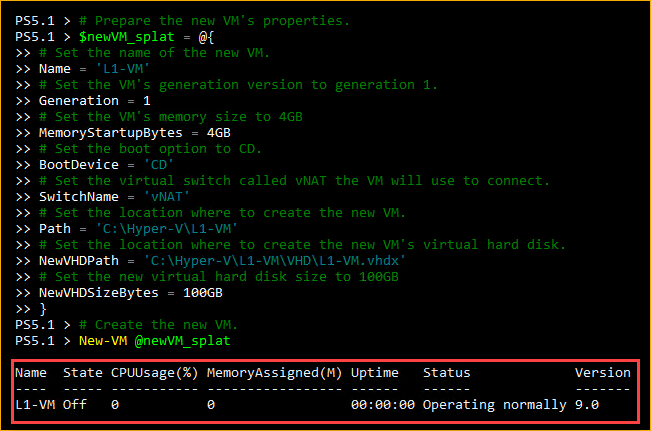
3. After creating the VM, run the command below to increase the VM’s processor count. The default processor count of a new VM is 1, which may cause the VM to run slow. The command below increases the CPU count to 2. You may add more if your host has the capacity.
# Set the VM's processor count to 2. You may increase the CPU if your host has the capacity.
 Set-VM -VMName L1-VM -ProcessorCount 2
4. Next, disable the dynamic memory on the VM by running the command below. Hyper-V nested virtualization does not support dynamic memory.
# Disable VM's Dynamic Memory.
 Set-VMMemory -VMName L1-VM -DynamicMemoryEnabled $false
5. Run the command below to mount the ISO file to the VM’s DVD drive. You’ll use this ISO file to install the operating system later on L1-VM.
# Set the ISO file's path to mount on the VM's DVD drive.
 Set-VMDvdDrive -VMName L1-VM -Path C:\ISO\windows_server_2016.iso
Enabling Nested Virtualization
To enable nested virtualization in Hyper-V, you have to expose the host’s virtualization extensions, such as VT-x for Intel and AMD-V for AMD, to the virtual machine. These virtualization extensions add functionality to the logical processors on a VM to support virtualizing an already virtualized CPU.
To enable the virtualization extension, invoke the Set-VMProcessor cmdlet as shown below.
1. Open PowerShell as admin on your Hyper-V host machine.
2. Next, copy the code below and run it in PowerShell. This command will enable the virtualization extensions on the VM’s virtual processor.
# Enable the VM's virtualization extensions
 Set-VMProcessor -VMName L1-VM -ExposeVirtualizationExtensions $true
3. Lastly, to confirm that the command was successful, run the command below in PowerShell. This command gets the value of the VM processor’s ExposeVirtualizationExtensions value. The value should be True, as you can see in the screenshot below.

Installing The Guest Operating System
Now that you’ve created the first-level (soon-to-be virtualized Hyper-V host) guest VM and configured its settings, it’s time to install the operating system on the soon-to-be Hyper-V host. To do so, proceed as follows.
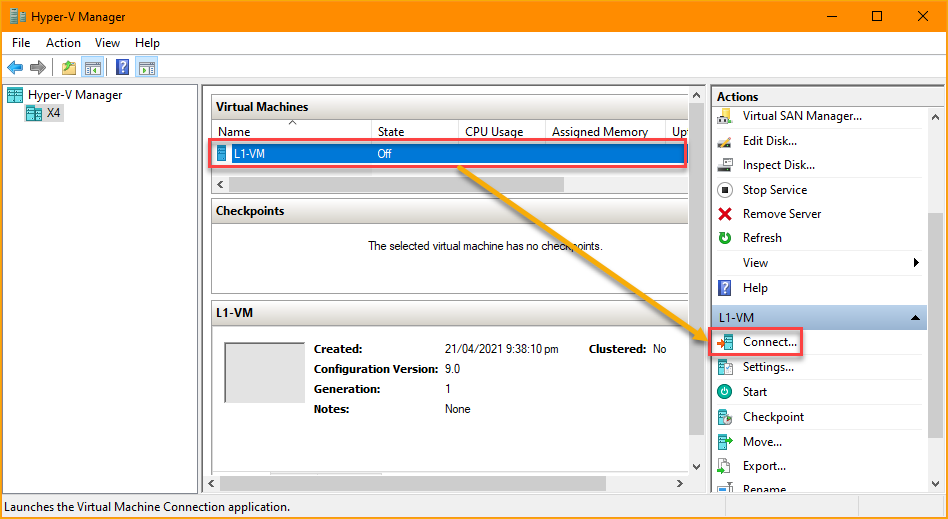
1. Open Hyper-V Manager on your Hyper-V host.
2. Click to select the VM name, in this example, L1-VM, and click Connect. Doing so will launch the Virtual Machine Connection window.
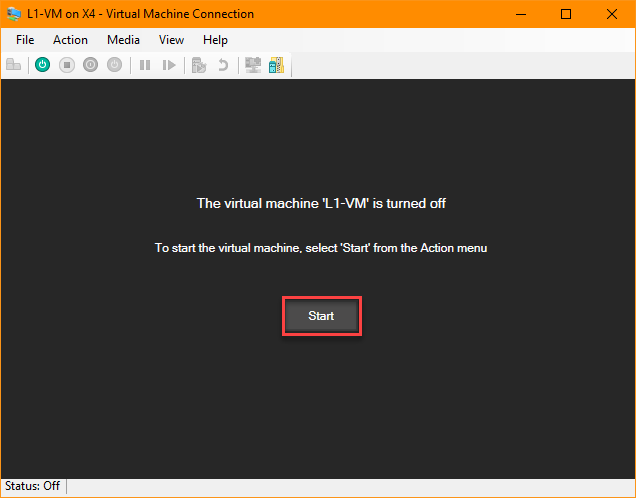
3. On the Virtual Machine Connection windows, click Start to boot up the virtual machine.
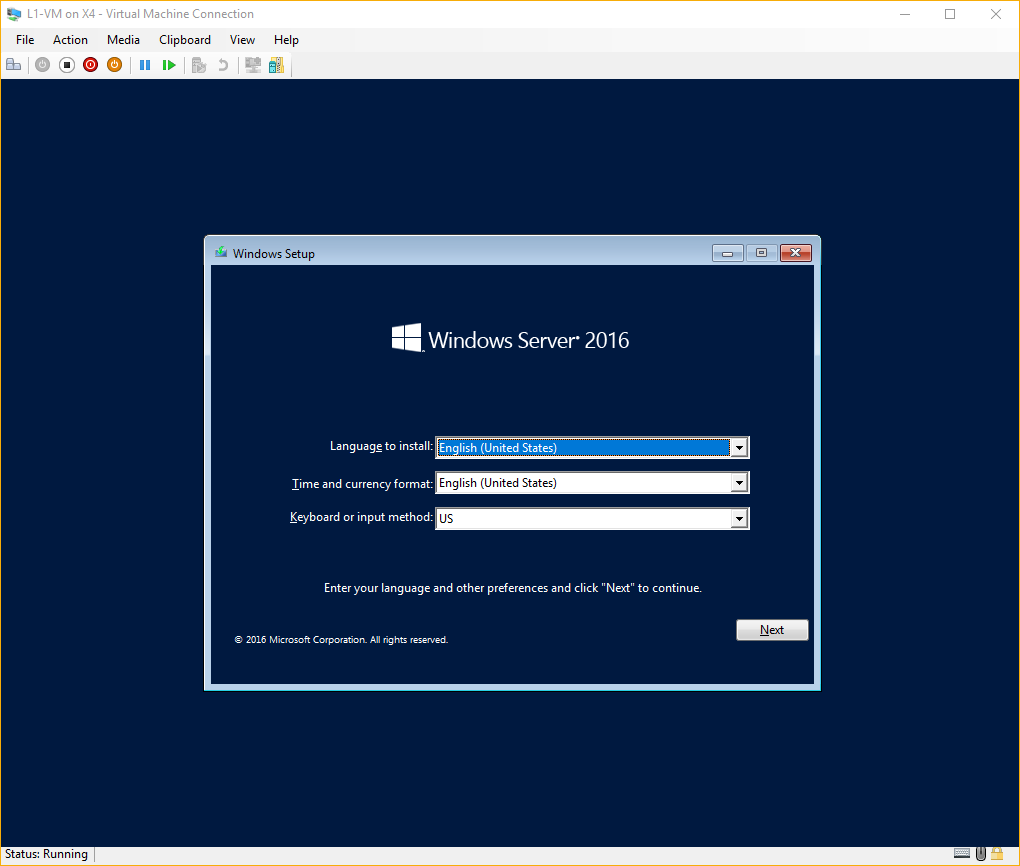
4. Now, proceed with the operating system installation to completion.
Connecting To The Network
After you’ve installed the operating system on the VM, you’ll notice that the network status on the system tray shows a warning symbol. This warning symbol means that the VM is not connected to the network and has no access to the internet.
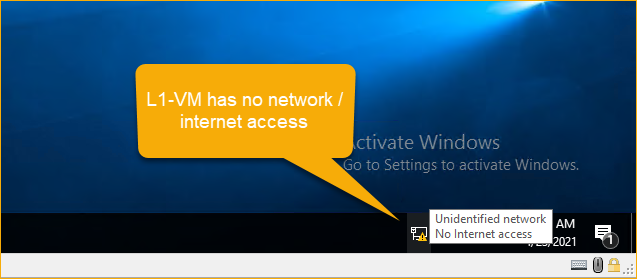
To resolve this error, you need to configure the network adapter settings on L1-VM by assigning an IP address, subnet mask, default gateway, and DNS address. To do so, follow these steps.
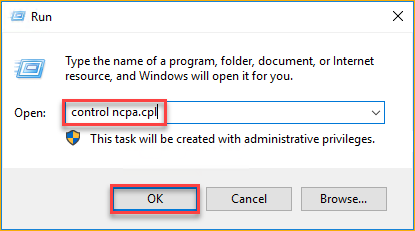
1. On L1-VM, right-click on the Start button and click Run.
2. Type control ncpa.cpl in the Open box and click OK. This command will launch the Network Connections applet.
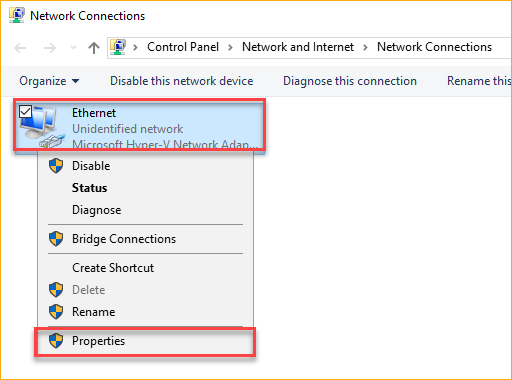
3. On the Network Connections applet window, there should only be one network adapter by default called Ethernet. Right-click on Ethernet and click on Properties.
4. Next, click to highlight (DO NOT UNCHECK!!!) Internet Protocol Version 4 on the Ethernet Properties page and click the Properties button.
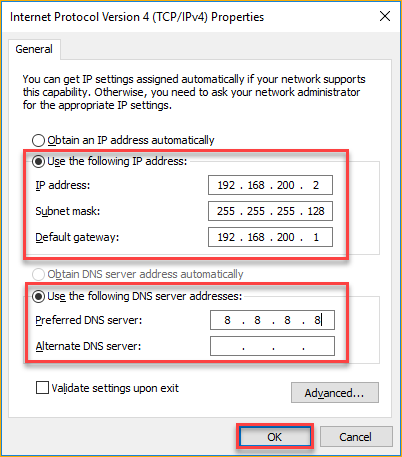
5. Inside the Internet Protocol Version 4 (TCP/IPv4) Properties windows, click on Use the following IP address and enter the values for:
- IP address – Enter the IP address you want to assign to L1-VM. The IP address you enter has to be within the range of the virtual switch you created on the Hyper-V host. For example, the vNAT virtual switch IP range is 192.168.200.0/25, making the available IP address range from 192.168.200.2 to 192.168.200.126. In this example, the IP address for L1-VM is 192.168.200.2.
- Subnet mask – Specify the netmask address of the virtual switch’s IP address range. For 192.168.200.0/25, the subnet mask is 255.255.255.128.
- Default gateway – Enter the IP address of the virtual switch. In this example, the virtual switch IP address is 192.168.200.1.
6. Next, enter the Preferred DNS server IP address. If you have a DNS server, perhaps in your home or office network, use that address. Otherwise, you can use a public DNS server address. In this example, the DNS server address is 8.8.8.8, which is Google’s public DNS server.
You can also add an Alternate DNS server if needed. But for this example, the preferred DNS server is enough. When you’ve completed the network address configuration, click OK.
Back on the Ethernet Properties window, click Close to apply the changes.
You’ll see that the network status has changed to connected.
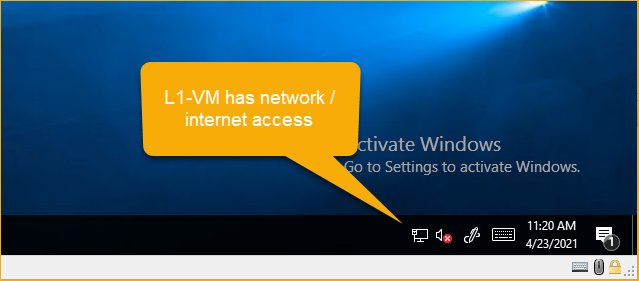
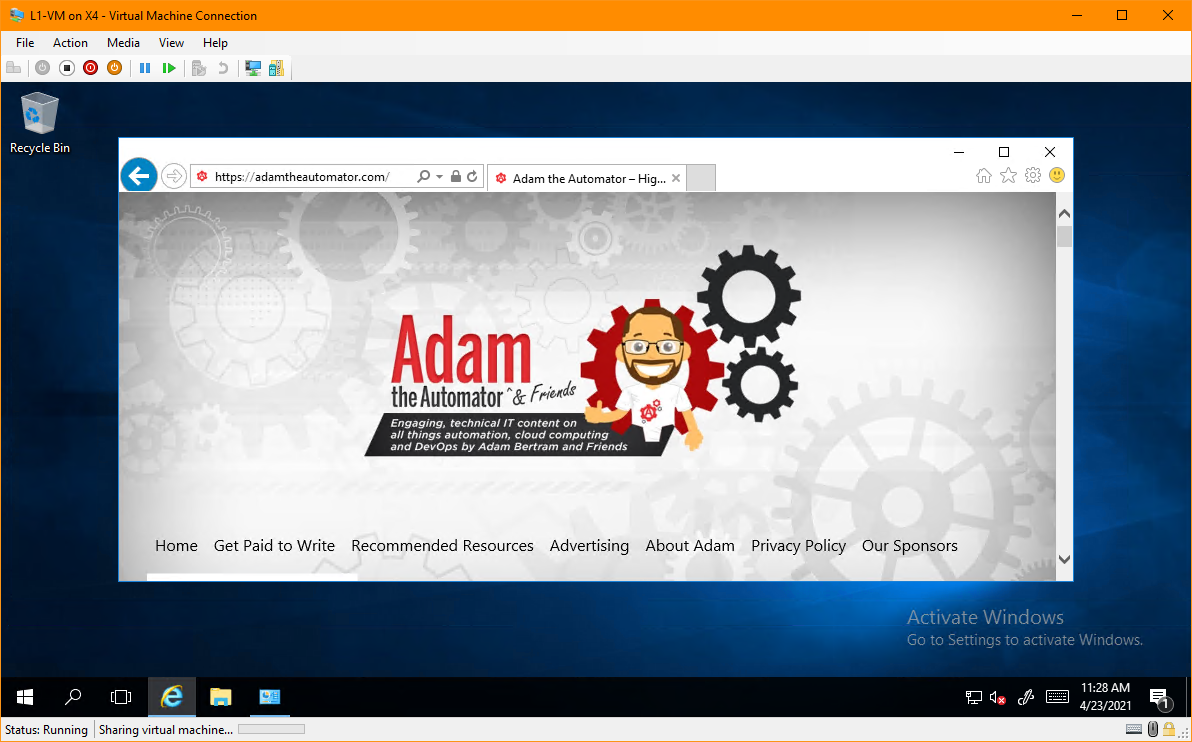
8. Finally, to test the network, open a web browser on L1-VM and navigate to a website.
Installing Hyper-V On The First-Level Virtual Machine
So far, you’ve created the soon-to-be Hyper-V host VM of your nested virtualization setup. But, the ultimate test is to install Hyper-V inside L1-VM and create the second-level (guest) VM.
Hyper-V installation will vary depending on L1-VM’s operating system. Refer to Hyper-V for Windows 10 or Hyper-V for Windows Server. This example installs Hyper-V on Windows Server 2016.
To install Hyper-V on L1-VM, ensure you’re at the L1-VM console and:
1. Open PowerShell as admin.
2. Run the command below in PowerShell to install Hyper-V. The -IncludeManagementTools switch installs Hyper-V management tools, such as the Hyper-V Manager and the Hyper-V PowerShell module. The -Restart parameter reboots L1-VM after the installation.
Install-WindowsFeature Hyper-V -IncludeManagementTools -RestartYou’ll see an install progress indicator, as shown below. Wait for the installation to finish, and L1-VM should reboot automatically.

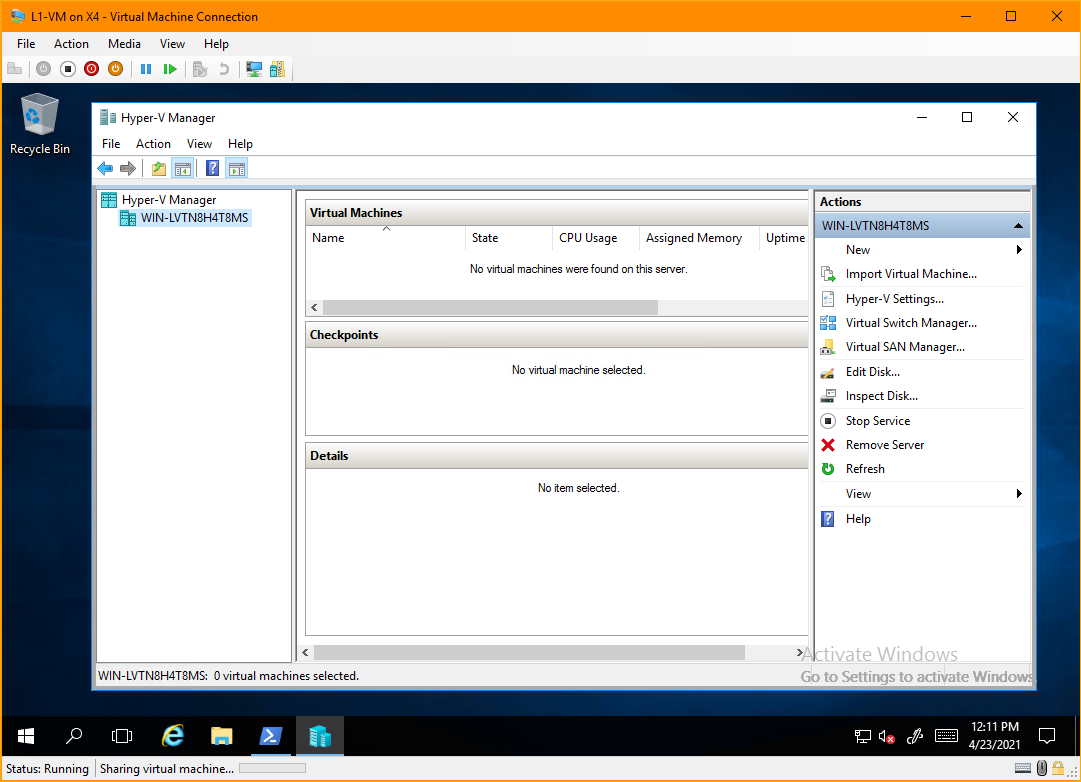
When L1-VM has restarted, launch the Hyper-V Manager on L1-VM. To do so, click Start —> Windows Administrative Tools —> Hyper-V Manager.
Congratulations! You have now installed Hyper-V inside a Hyper-V guest VM!
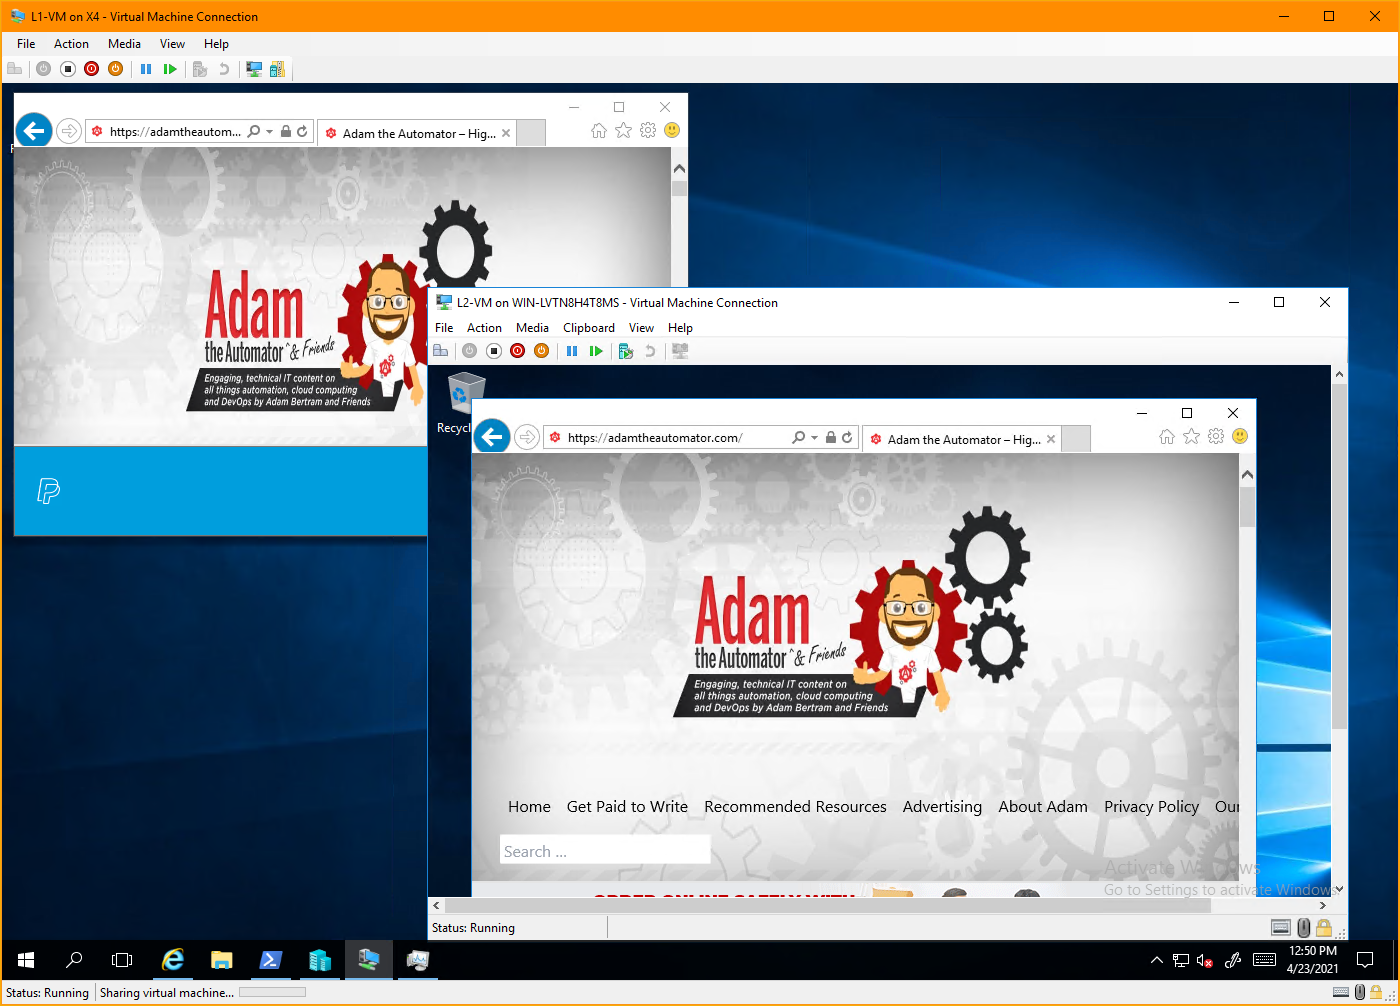
At this point, you’ve successfully enabled nested virtualization in Hyper-V, and you can now create and set up your second-level VM (call it L2-VM) using the same steps as when you created L1-VM.
Conclusion
This article took you through the step-by-step process of setting up nested virtualization with Hyper-V. With nested virtualization, you can run a guest VM inside another guest VM, ideal for testing, lab environment, or simulating a production environment.
What do you think of Hyper-V nested virtualization? Is it something you’d use in your job? Or do you think there are better alternatives?
This Windows Server 2022 Tutorial covers how to Install and Configure Hyper V on Windows Server 2022. Hyper-V is a hardware virtualization product developed by Microsoft. Hyper-V can create and run virtual machines, each virtual machine acts like a complete computer. Hyper-V is a Type-2 hypervisor, that runs inside the Windows operating system. The type-2 hypervisor runs inside an operating system of a physical host machine.
Table of Contents
- Install Hyper V on Windows Server 2022
- Configure Virtual Machine on Hyper V
Demo environment
- Computer Name: vdtutorials
- Operating System: Windows Server 2022 Datacenter
- IP Address: 192.168.3.10
Steps for Install Hyper-V on Windows Server 2022
- Open Add roles and features Wizard
- Select installation type
- Select the destination server
- Select server roles
- Select features
- Configure Hyper-V
- Confirm installation selections
1. Open Add roles and features Wizard
Open the Server Manager dashboard and click Add roles and features.
Before you begin, click Next.
2. Select installation type
Select Role-based or feature-based installation and click Next.
3. Select destination server
Select a Host to which you’d like to add services and click Next.
4. Select server roles
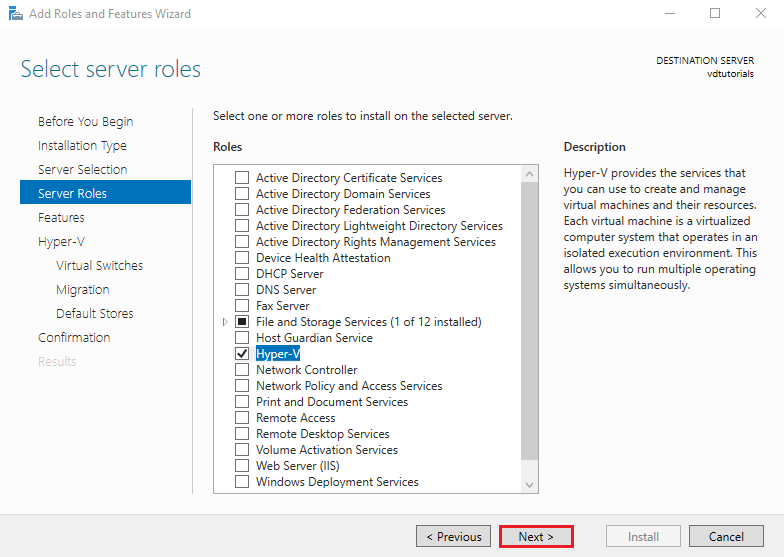
Choose the Hyper V box from the server roles page.
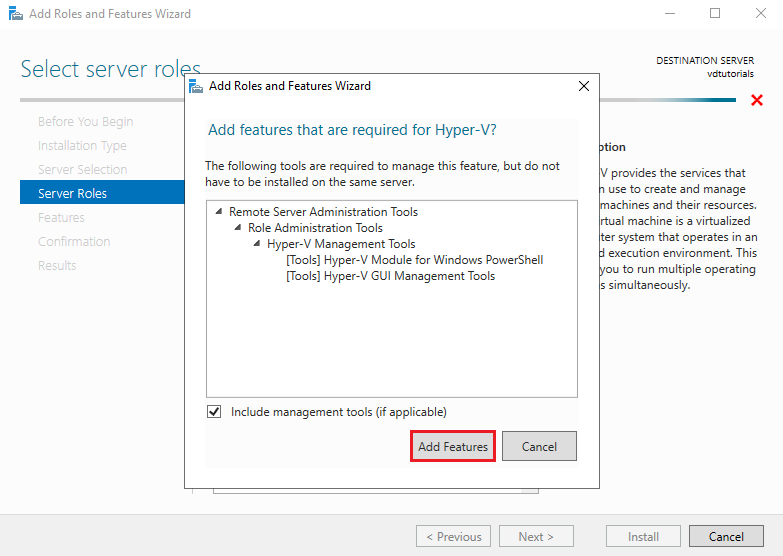
As soon as you choose Hyper-V a new window appears. Click Add Features.
Click Next to continue.
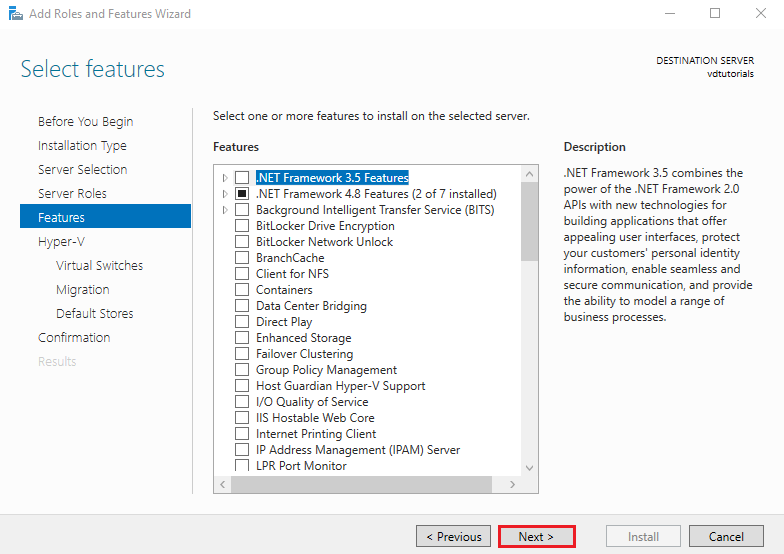
5. Select features
On the select features console, just click Next because we do not require any extra features at the moment.
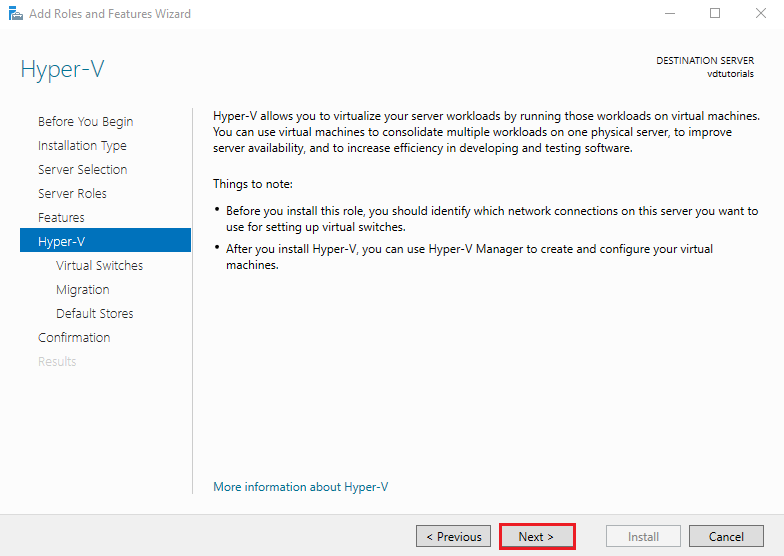
6. Configure Hyper-V
On the Hyper-V console, you can read brief information about the Hyper-V server. Click Next to continue.
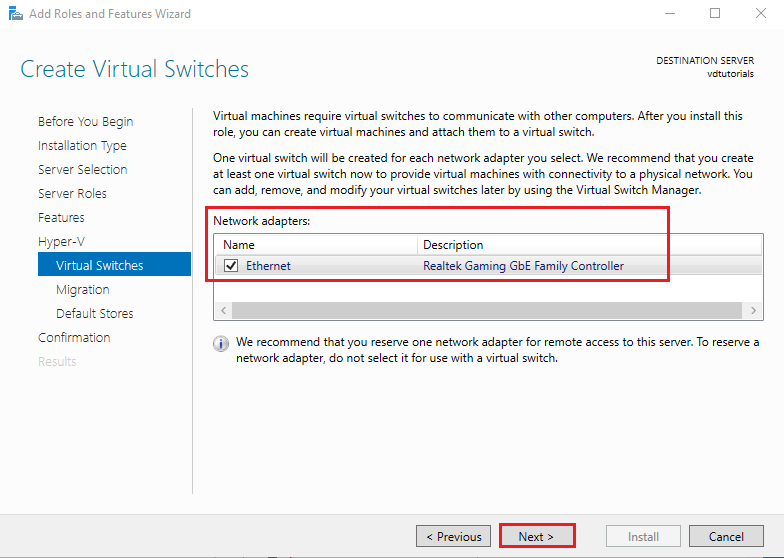
In Virtual Switches, select a Network adapter for Virtual Switch and click Next.
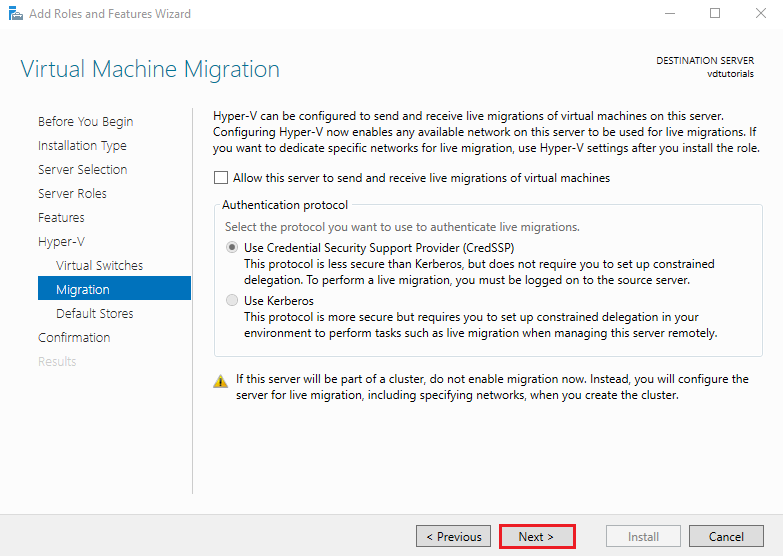
This is the section for Migration for Virtual Machines, on this tutorial keep it default and click Next.
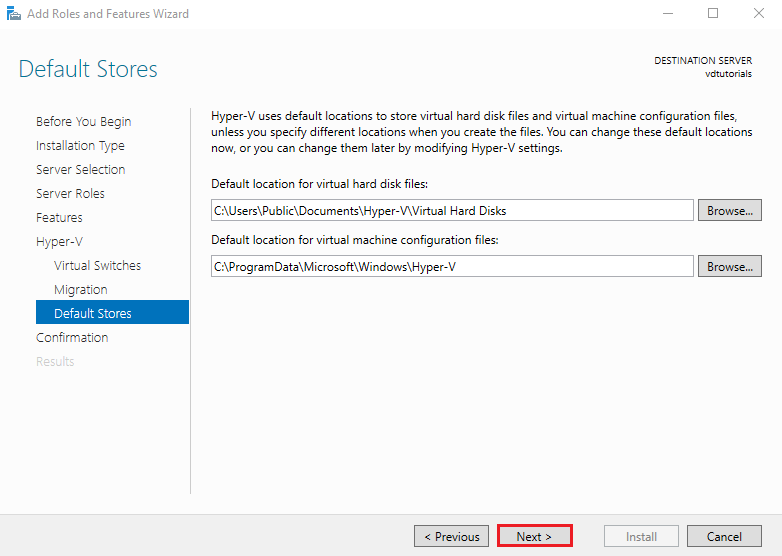
Specify the Default location for virtual hard disk files and virtual machine configuration files and click Next.
7. Confirm installation selections
Confirm installation selections and click on Install to start the installation process.
After finishing the installation, click Close and restart the Server.
Configure Virtual Machine on Hyper V
Steps for Configure Virtual Machine on Hyper V
- Open Hyper-V Manager
- Open New Virtual Machine Wizard
- Specify Name and Location
- Specify Generation
- Assign Memory
- Configure Networking
- Connect Virtual Hard Disk
- Configure Installation Options
1. Open Hyper-V Manager
Open Server Manager, click Tools, and select Hyper-V Manager.
2. Open New Virtual Machine Wizard
Right click on Hostname select New and click Virtual Machine.
Before you begin, click Next.
3. Specify Name and Location
Choose the name for Virtual Machine and click Next.
- Name: New Virtual Machine
- Location: Default Location.
4. Specify Generation
Choose the generation of this virtual machine and click Next.
- Generation: Generation1.

5. Assign Memory
Assign Memory for Virtual Machine and click Next.
- Memory: 4096.
6. Configure Networking
Select Virtual Switch to use networking of Virtual Machine and click Next.
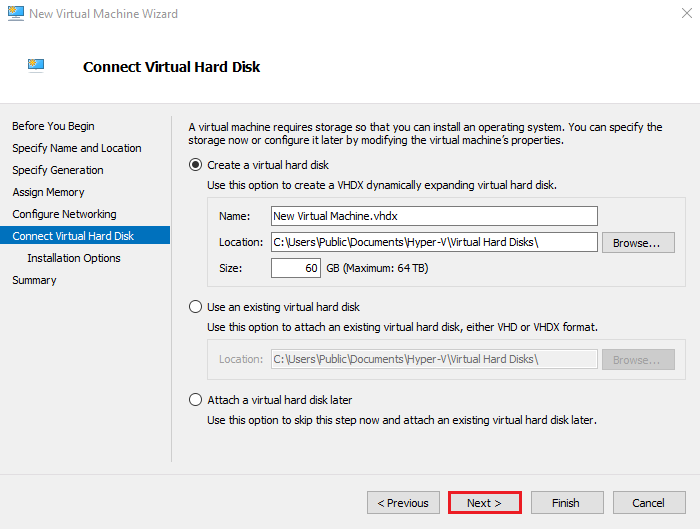
7. Connect Virtual Hard Disk
Configure the Virtual hard disk for the new virtual machine and click Next.
- Name: New Virtual Machine.vhdx
- Location: Default Location
- Size: 60GB
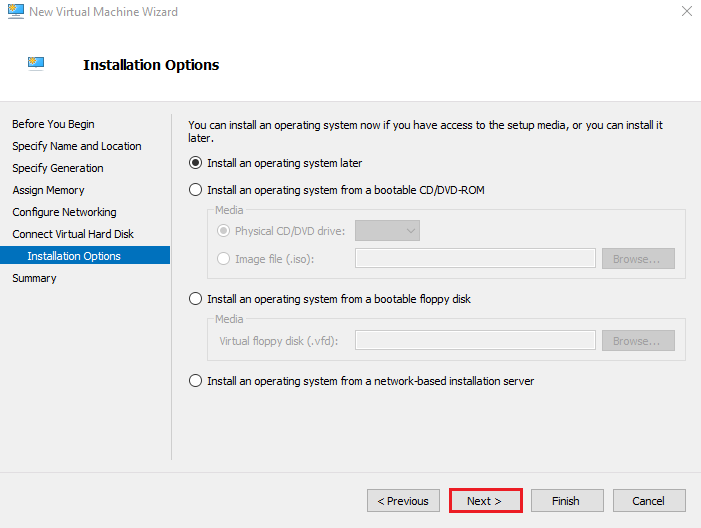
8. Configure Installation Options
Select Installation Options and click Next.
- Installation Options: Install the operating system later.
To create the virtual machine and close the wizard, click Finish.

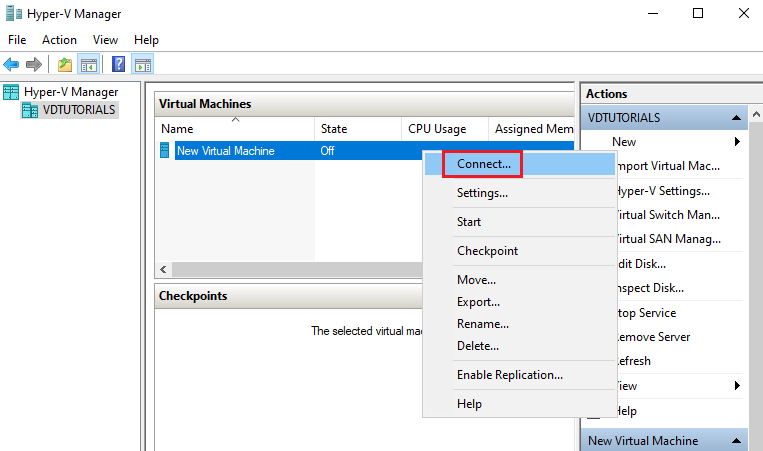
The virtual machine has been created. To connect Virtual Machine, Right click on the virtual machine and click Connect.
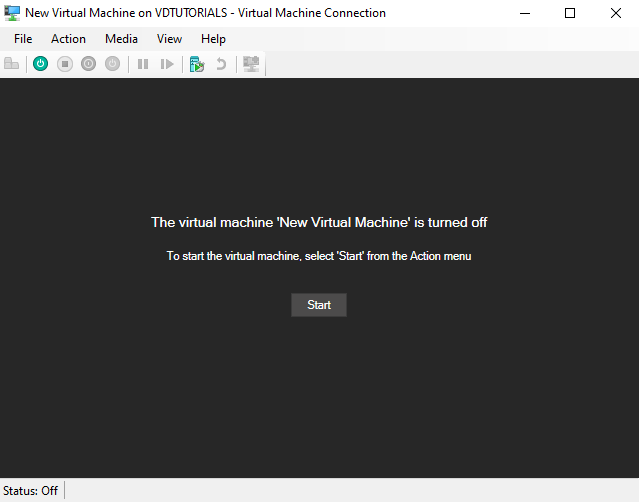
To start the virtual machine, select Start.
To install Windows Server 2022 on this Virtual Machine Read Install Windows Server 2022 tutorial.
Вложенная виртуализация (Nested Virtualization) позволяет запустить Hyper-V внутри виртуальной машины и создать в таком гипервизоре Hyper-V еще несколько виртуальных машин. Чаще всего вложенная виртуализация используется в различных стендах, лабах и тестовых средах.
Microsoft Hyper-V поддерживает вложенную виртуализацию начиная с Windows Server 2016. Если попытаться установить роль Hyper-V внутри ВМ на гостевом Hyper-V с Windows Server 2012 R2, вы получите ошибку:
Hyper-V can not be installed: The hypervisor is already running.
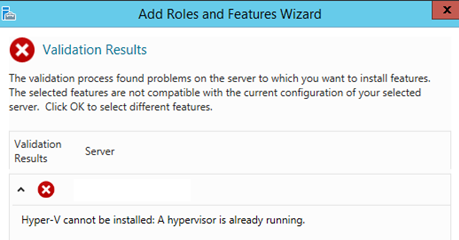
Эта ошибка связана с тем что хостовой Hyper-V специально маскировал от гостевых ОС наборы аппаратных инструкций (Virtualization Extensions) Intel VT-x и AMD-V.
В Windows Server 2016 архитектура Hyper-V была изменена. Изменились и требования к процессорам. Теперь для работы вложенной виртуализации кроме поддержки Intel VT-x, процессор должен поддерживать Intel EPT (предоставляет виртуальным машинам прямой доступ к памяти, минуя гипервизор).
Другие ограничения при использовании вложенной виртуализации:
- В хостовой и гостевой Hyper-V должны быть установлены Windows Server 2016 или Windows 10 с ролью Hyper-V;
- Версия виртуального оборудования Hyper-V (VM hardware version) 8.0 и выше;
- Для виртуальных машин, запушенных во вложенной виртуализации не поддерживается динамическая память, динамическая миграция, снимки ВМ и состояние Save/Restore.
Рассмотрим, как включить и использовать вложенную виртуализацию в Windows Server 2016.
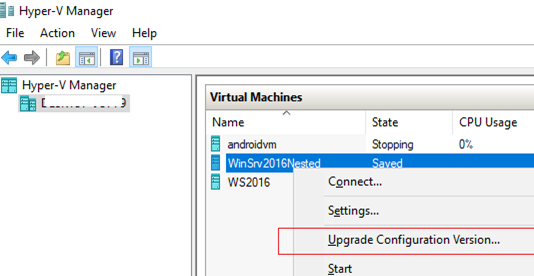
Прежде всего вам нужно обновить версию конфигурации ВМ Hyper-V для которой вы хотите включить вложенную виртуализацию до версии 8.0 или выше (виртуальная машина должна быть выключена). Для этого запустите консоль Hyper-V Manager, найдите ВМ, щелкните по ней правой кнопкой и выберите Upgrade Configuration Version.
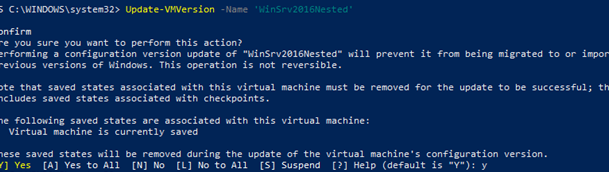
Также вы можете обновить HW версию виртуальной машины через PowerShell:
Update-VMVersion -Name ‘WinSrv2016Test’
Вы можете обновить версию виртуального оборудования сразу для всех ВМ на хосте:
Get-VM | Update-VMVersion
Теперь для выбранной виртуальной машины нужно включить поддержку вложенной виртуализации. По умолчанию гипервизор маскирует от гостевых ОС аппаратные наборы инструкций, отвечающих за виртуализацию. Чтобы исправить это, воспользуйтесь командой:
Set-VMProcessor -VMName VMName -ExposeVirtualizationExtensions $true
Т.к. для вложенных Hyper-V не поддерживается динамическая память, вы должны отключить эту опцию в настройках ВМ (VM -> Settings -> Memory -> снимите чекбокс Enable Dynamic Memory).
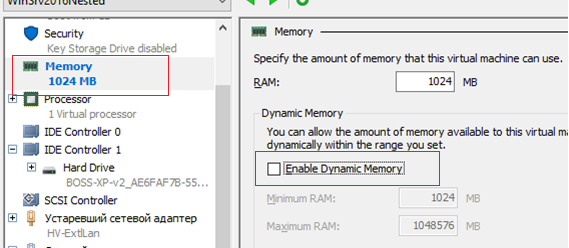
Или вы можете отключить динамическую память через PowerShell:
Set-VMMemory 'WinSrv2016Nested' -DynamicMemoryEnabled $false
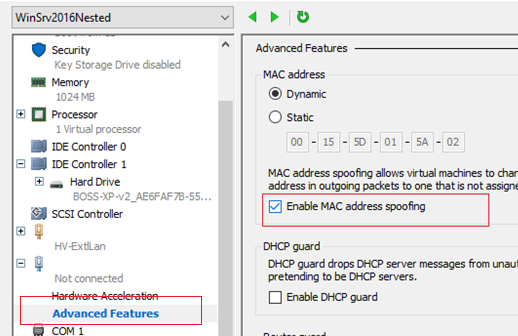
Если вы планируете предоставлять доступ вложенным виртуальным машинам во внешнюю сеть, хостовой Hyper-V может увидеть несколько MAC адресов на единственном сетевом адаптере виртуальной машины. Поэтому вам нужно разрешить спуфинг MAC-адресов для сетевого адаптера ВМ.
Откройте свойства ВМ в консоли Hyper-V, найдите сетевой адаптер ВМ и в секции Advanced features включите опцию Enable MAC address spoofing.
Также вы можете включить эту опцию через PowerShell:
Get-VMNetworkAdapter -VMName 'WinSrv2016Test' | Set-VMNetworkAdapter -MacAddressSpoofing On
Для быстрой проверки ВМ и включения динамической памяти вы можете использовать готовый скрипт Enable-NestedVm.ps1.
Invoke-WebRequest https://raw.githubusercontent.com/Microsoft/Virtualization-Documentation/master/hyperv-tools/Nested/Enable-NestedVm.ps1 -OutFile ~/Enable-NestedVm.ps1 ~/Enable-NestedVm.ps1 -VmName 'WinSrv2016Test'
Теперь вам осталось установить роль Hyper-V в виртуальной машине (Install-WindowsFeature -Name Hyper-V -IncludeManagementTools -Restart) и вы можете создавать вложенные виртуальные машины.