
Салимжанов Р.Д
Part 2 Basic Configuration of Windows Server 2019 (RDP, DHCP)
Salimzhanov R.D.
В первой части, мы рассмотрели, как настроить сетевые компоненты, а также рассмотрели создание учетных записей пользователей и настройку прав доступа.
Сейчас мы рассмотрим настройку удаленного доступа и установку необходимых служб (DHCP-сервер).
Воспользуемся протоколом Remote Desktop Protocol (RDP) — это протокол удаленного рабочего стола, который предоставляет возможность удаленного управления компьютером через сеть. Пользователь может подключаться к удаленному компьютеру и управлять им, как если бы он находился непосредственно перед ним. Протокол RDP обеспечивает безопасное и зашифрованное соединение, что позволяет защитить данные и предотвратить несанкционированный доступ к компьютеру.
Для подключения удаленного стола, следует перейти “Диспетчер серверов” и найти там в локальном сервере пункт “Удаленный рабочий стол”:
Нажимаем на него, и выбираем “Разрешить удаленные подключения к этому компьютеру”:
Далее выбираем пользователей, которым разрешим подключение:
Нажимаем “Добавить”:
Выбираем пользователя “USER_admin”:
Нажимаем “ok” и теперь этот пользователь может подключится к серверу, проверим подключение через основной ПК, заранее дав ему доступ:
Открываем основной ПК, пишем в поиске “Подключение к удалённому рабочему столу”:
Далее прописываем IP сервера:
Прописываем пользователя и пароль:
Нажимаем “да”:
Теперь мы подключились:
DHCP-сервер (Dynamic Host Configuration Protocol) — это сервис, который автоматически распределяет IP-адреса между устройствами в сети. Это позволяет упростить процесс настройки сетевых устройств и обеспечивает централизованное управление IP-адресами.
Установка и настройка DHCP-сервера на Windows Server может понадобиться в следующих случаях:
1. Автоматическое назначение IP-адресов: DHCP-сервер автоматически назначает IP-адреса устройствам в сети, что облегчает управление сетью. Это устраняет необходимость вручную настройки IP-адресов на каждом устройстве и помогает избежать конфликтов IP-адресов.
2. Управление адресами: DHCP-сервер управляет пулом доступных IP-адресов и может динамически выделять и освобождать их по мере необходимости. Это позволяет эффективно использовать доступные адреса и предотвращает избыточное расходование адресов.
3. Улучшенное контроль безопасности: DHCP-сервер обеспечивает возможность контроля доступа к сети через использование фильтра MAC-адресов и других методов аутентификации. Это помогает обеспечить безопасность сети и предотвратить несанкционированный доступ.
Для настройки и установки DHCP в диспетчере серверов нажимаем на “Управление” и “Добавить роли и компоненты”:
После следуем инструкции в скринах:
Далее уже выбраны нужные нам компоненты, но для определенных задач следует выбирать конкретно что вам нужно, оставляю ссылку на описание компонентов URL: https://info-comp.ru/softprodobes/572-components-in-windows-server-2016.html
Ждем установки:
После установки слева появился DHCP сервер:
Далее переходим в меню “Средства” и выбираем “DHCP”:
В разделе IPv4 создаем область:
Далее мы можем, добавить машину как отдельный DNS сервер, или создать на этой машине, просто нажав “Далее”.
Точно также, если надо мы можем добавить WINS серверы, если требуется:
Теперь появился пул адресов:
А да и еще, нажав на флажок, диспетчер попросит создать вас две новые группы:
(там нажимаем “Фиксировать” и они автоматически создаются)
Осталось теперь только протестировать:
В следующий части базовой настройки Windows Server 2019, разберем:Настройка DNS-сервера и Active Directory (AD)
1) Как включить и настроить удаленный рабочий стол (RDP) в Windows? // [электронный ресурс]. URL: https://winitpro.ru/index.php/2013/04/29/kak-vklyuchit-udalennyj-rabochij-stol-v-windows-8/ / (дата обращения 01.08.2024).
2) Помощник Админа // [канал]. URL: https://t.me/channel_adminwinru (дата обращения 01.08.2024).
Estimated reading: 3 minutes
999 views
RDP (Remote Desktop Protocol) is the protocol that allows a user to connect to a Windows Server through a graphical interface over any network.
In fact, there are several ways to enable Remote Desktop on Windows Server 2019 and 2022. So you can choose one of them that is suitable for you to enable RDP on Server 2019. After RDP is enabled, you can access the remote server from your local device
Method 1. Enable Server 2019 RDP from Server Manager
- Step 1. Click on the Start button and you can see Server Manager.

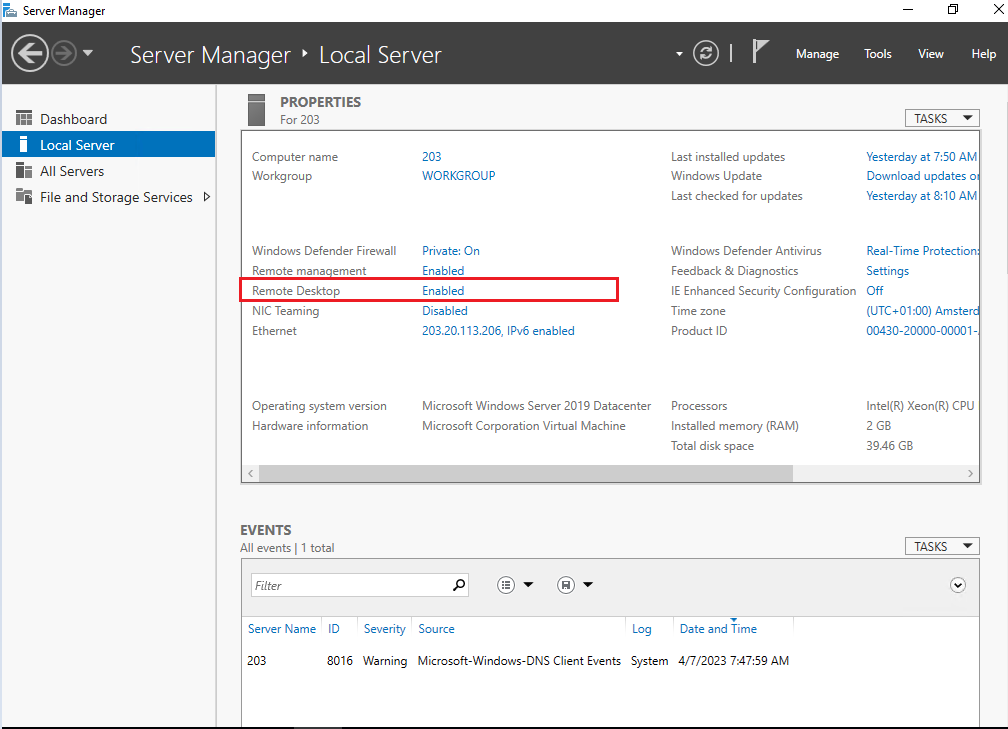
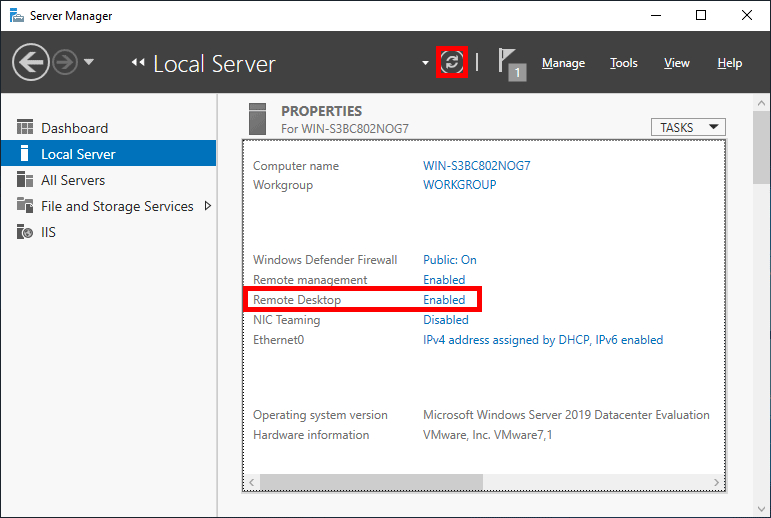
- Step 2. Click on “Local Server” on the left in Server Manager window. We can see that Remote Desktop is “Disabled”.

- Step 3. Click on the “Disabled” text to open the “System Properties” window, and then locate on the “Remote” tab.

NOTE: The System Properties window can also be accessed from Control Panel option by clicking on System and then on Remote settings in the left panel or from the Windows command prompt by executing the below command.
SystemPropertiesRemote


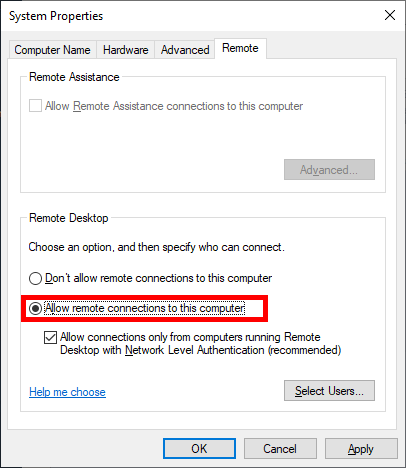
- Step 4. Tick “Allow remote connections to this computer” in the “Remote Desktop” tab.

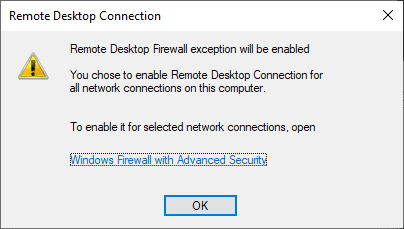
- Step 5. You’ll receive a warning message after the above step, click on “OK”

Now, Remote Desktop may still show as “Disabled”; you can refresh or press Control + F5 to refresh to “Enabled”.
Method 2: Using the Command Prompt
- Step 1. Search cmd in the search box to open Command Prompt.
- Step 2.In the Command Prompt window, type the following command and press the enter key: net start termservice

Method 3. Allow Remote Desktop on Win Server 2019 from Powershell
If you can’t enable RDP from Server Manager, you can try to enable Remote Desktop in Windows Server 2019 with Powershell.
- Step 1. Search “PowerShell” in the Search box and then select Run as Administrator.

- Step 2. The registry value that enables/disables Remote Desktop can be modified using the Set-ItemProperty cmdlet
Set-ItemProperty -Path 'HKLM:\System\CurrentControlSet\Control\Terminal Server' -name "fDenyTSConnections" -value 0
- Step 3. Once this is completed, the
Enable-NetFirewallRulecmdlet can be used to set the Windows firewall to allow remote desktop connections.
Enable-NetFirewallRule -DisplayGroup "Remote Desktop"Note:With this method if you want to disable Remote Desktop connection you can change the value 0 to 1
Set-ItemProperty -Path 'HKLM:\System\CurrentControlSet\Control\Terminal Server' -name "fDenyTSConnections" -value 1
Method 4. Using Windows Firewall
- Step1: Press Start and enter firewall.cpl in the text box and press the enter key.
- Step 2.On the Windows Defender Firewall page, click on the Allow an app or feature through the Windows Defender Firewall option.

- Step 3. Click on the Change settings button. Scroll down and tick the Remote Desktop and Remote Desktop (WebSocket) option in the list.

Method 5.Using Group Policy
In addition, Remote Desktop can also be enabled by using Group Policy.
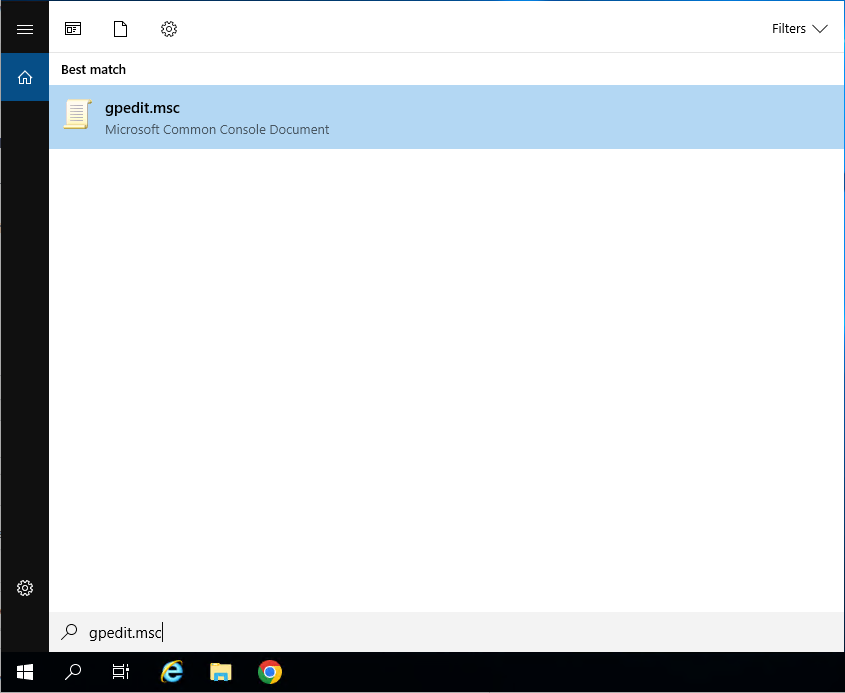
- Step 1. Press Start and enter “gpedit.msc” to open Group Policy .
- Step 2. Navigation:
Computer Configuration -> Administrative Templates -> Windows Components -> Remote Desktop Services -> Remote Desktop Session Host\Connections
- Step 3. In the right pane, double click on “ Allow users to connect remotely by using Remote Desktop Services.”

- Step 4. Select “Enabled” and click on “OK”.

There you have it. Once you’ve completed these steps, you’ll be able to use Remote Desktop on Windows Server. You can now enjoy wider connectivity and access to your files, data, and apps.

Posted by
on December 20, 2018
By default in Windows Server 2019 remote desktop is disabled. This post will cover how to turn on and enable Remote Desktop Protocol (RDP) in Windows Server 2019, using either PowerShell or the GUI.
Note: In Windows Server 2019 Essentials edition, remote desktop is already enabled by default so you will not need to manually do this.
Remote desktop can be enabled through the graphical user interface (GUI) with the following easy steps.
Allowing Remote Desktop With The GUI
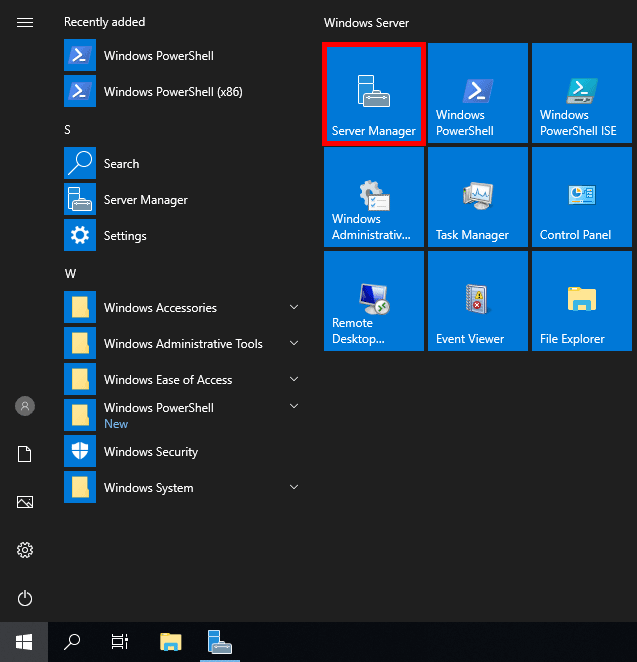
- Open Server Manager. This can be found by opening the start menu, as shown below.

If Server Manager does not show here, simply type “Server Manager” into the start menu to search for it. By default Server Manager will open when you log in to the GUI, otherwise you can select it from the task bar.
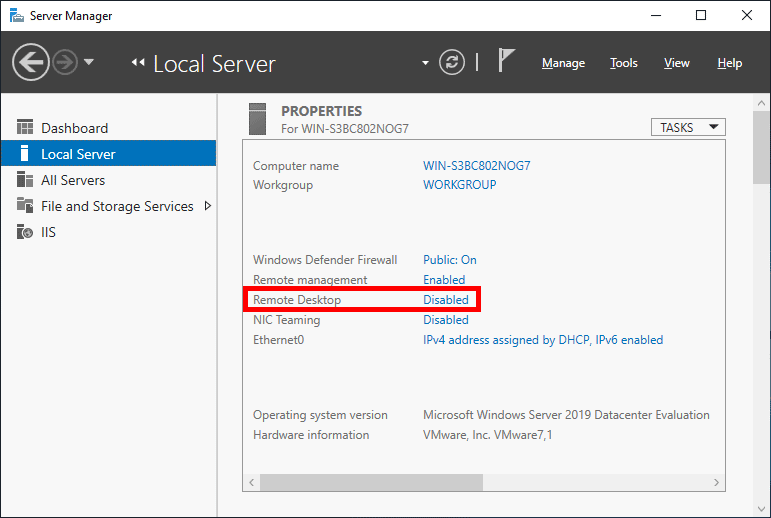
- Within the Server Manager window, select Local Server from the left hand side. You may need to wait a little for it to detect the current state of your system. You should see that Remote Desktop is listed as Disabled as shown below.

- Click on the Disabled text which will open the System Properties window in the Remote tab.
- From the System Properties window, select “Allow remote connections to this Computer” as shown below.

Tip: You can also open the System Properties window shown above by entering “SystemPropertiesRemote” into a Command Prompt or PowerShell terminal.
- Once you select “Allow remote connections to this computer” the below warning message will appear, advising that this will create the required firewall rules in Windows firewall to allow remote desktop traffic in from any source address, select OK to proceed.

- At this point you can optionally click the “Select Users…” button to define specific users or groups that have permission to connect via remote desktop. Select the OK button to close out of the System Properties window and enable remote desktop.
- Back in Server Manager, Remote Desktop may still show as Disabled until you refresh the view. After clicking the refresh button as highlighted below (or pressing F5 on the keyboard), the status should update to Enabled.
That’s it, remote desktop should now be ready to use!
Allowing Remote Desktop With PowerShell
While there isn’t currently an explicit PowerShell cmdlet used for enabling remote desktop, we can use the Set-ItemPropery cmdlet to modify the registry value that enables or disables Remote Desktop:
Set-ItemProperty -Path 'HKLM:\System\CurrentControlSet\Control\Terminal Server' -name "fDenyTSConnections" -value 0
Once complete we can use the ‘Enable-NetFirewallRule’ to configure Windows Firewall to allow remote desktop connections in:
Enable-NetFirewallRule -DisplayGroup "Remote Desktop"
Remote Desktop should now be accessible in Windows Server 2019.
By default this will allow all connections in, the same as if we had just enabled it using the GUI steps shown above. It is highly recommended that you configure more specific firewall rules where possible to only allow inbound traffic from known hosts.
Summary
By default Windows Server 2019 sets external remote desktop access to disabled as a security measure, we can easily optionally enable it from within the server console or via PowerShell to allow everyone or a specific set of users or groups.
XP/VS Terminal Server
A multi-user Remote Desktop access solution to turn any modern Windows system into a fully-featured RDP server.
Version 1.0.968 • Windows • 9.7 MB • Changelog
Written on 01 October 2023
On Windows Server 2019 the ability to enable Remote Desktop lets you access your device from another location using the Remote Desktop Protocol (RDP) to offer assistance or control a device without being physically present at the location.
By default, only two users can access your Windows Server 2019 remotely. With Thinstuff XP/VS Terminal Server, you can effortlessly overcome this limitation and connect with multiple users at the same time.
In this guide, you will learn the steps to enable Remote Desktop to manage or access files and apps with multiple users on Windows Server 2019 remotely.
In case you are using Windows Server 2019 Essentials edition, Remote Desktop is already enabled by default so you might want to continue with installing XP/VS Server directly.

Due to security reasons Remote Desktop is disabled by default on Windows Server 2019!
Step 1: Enable Remote Desktop on Windows Server 2019 using the Server Manager
To enable Remote Desktop on Windows Server 2019 with the Server Manager, use these steps:
Step 2: Install XP/VS Terminal Server
To grant remote access for multiple users on Windows Server 2019 download and install XP/VS Terminal Server as following:
- 1. Download XP/VS Terminal Server from here.
- 2. Open the installation package as local administrator.
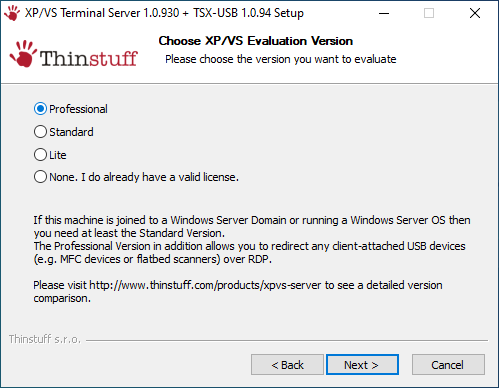
- 3. The installation package automatically includes a 14-day trial license. Please make sure to choose at least the Standard version for your trial.
- 4. After successful installation of XP/VS Server you have to reboot your machine.
- 5. You might also want to add additional Remote Desktop users as per default only Administrators can connect on server operating systems.
Once you have completed these steps, you can connect to your computer using any modern Remote Desktop app (recommended). You can also silently install XP/VS Server as described here.
Is my version of Windows supported?
Why can I only connect with my Administrator account?
this article will show you tutorial enable RDP on Windows Server 2019. Remote Desktop service means the ability of computers to connect and remotely control via the Internet or in the internal network platform. The Remote Desktop service or RDP, is a protocol owned by Microsoft, and the software is available on all Windows by default from Windows XP onwards. Using Remote Desktop is very useful in connecting to servers with Windows operating system.
Buy Admin RDP Server Online from eldernode.com.
Remote Desktop Protocol service can be enabled on Windows Server 2019 from the PowerShell or through the Server console interface. Enabling RDP Service on Windows Server 2019 is faster on PowerShell that the GUI procedure.
A) Enabling RDP Service Using PowerShell
1. First, run PowerShell with administrator access.
2. After opening PowerShell, type and execute the following command.
Set-ItemProperty -Path 'HKLM:\System\CurrentControlSet\Control\Terminal Server' -name "fDenyTSConnections" -value 0 3. Because Windows Firewall does not allow the remote desktop connection, so you should configure the firewall to allow for RDP remote connections.
Enable-NetFirewallRule -DisplayGroup "Remote Desktop" 4. To disable RDP, run:
Set-ItemProperty -Path 'HKLM:\System\CurrentControlSet\Control\Terminal Server' -name "fDenyTSConnections" -value 1 B) Enabling RDP Service from Server Manager GUI
1. You must first open the server manager from the Start menu.
2. After opening Server Manager, click Local Server in the left column.
3. Click Disabled in front of the Remote Desktop option.
4. In the window that opens, click Allow remote connections to this Computer and click OK.
5. Now select the Select Users option to agree to Remote Desktop firewall exception warning and add users to allow.
6. Enter Username and click Check names. Once you confirm the username, click OK to save.
7. Click OK at the end.
Dear user, we hope you would enjoy this tutorial, you can ask questions about this training in the comments section, or to solve other problems in the field of Eldernode training, refer to the Ask page section and raise your problem in it as soon as possible. Make time for other users and experts to answer your questions.
Enable RDP on Windows Server 2019.
Goodluck.