
Telnet service is disabled in the Windows server by default, but enabling it is easier than it seems. In this article, we will guide you through how to enable telnet service in Windows Server 2019. We will provide a straightforward step-by-step tutorial on how to do it. However, it is better to know the usage of telnet service first.
What is a Telnet?
It is a network protocol with security vulnerabilities. It essentially connects with other remote computers under certain rules and conditions; it works by making connections between the local device you are working with and the remote device you want to connect to.
It creates a text-based communication channel. The difference between a telnet and an SSH connection is that a telnet is like a basic phone line, which means everyone on the line can hear you.
But SSH is like a secure phone call, and no one can hear the things you and the person you are talking to is talking about.
Telnet is a simple connection, and it is also very useful for text-based connections with remote systems, but you can’t transfer a file through the telnet protocol, so you need to use other protocols.
It is especially used for troubleshooting, and it can also be used to test network services. If you need to learn more about Telnet, visit Microsoft’s website.
Did you know you can use Telnet to connect routers and switches?
Enabling Telnet service in Windows Server 2019
Requirements
- Windows Server 2019
- Administrator privileges
Enabling Telnet service in Windows Server 2019
“Server manager”
Click on the start button, find and select server manager from the list of applications, or simply search it in the box.
“Add roles and features”
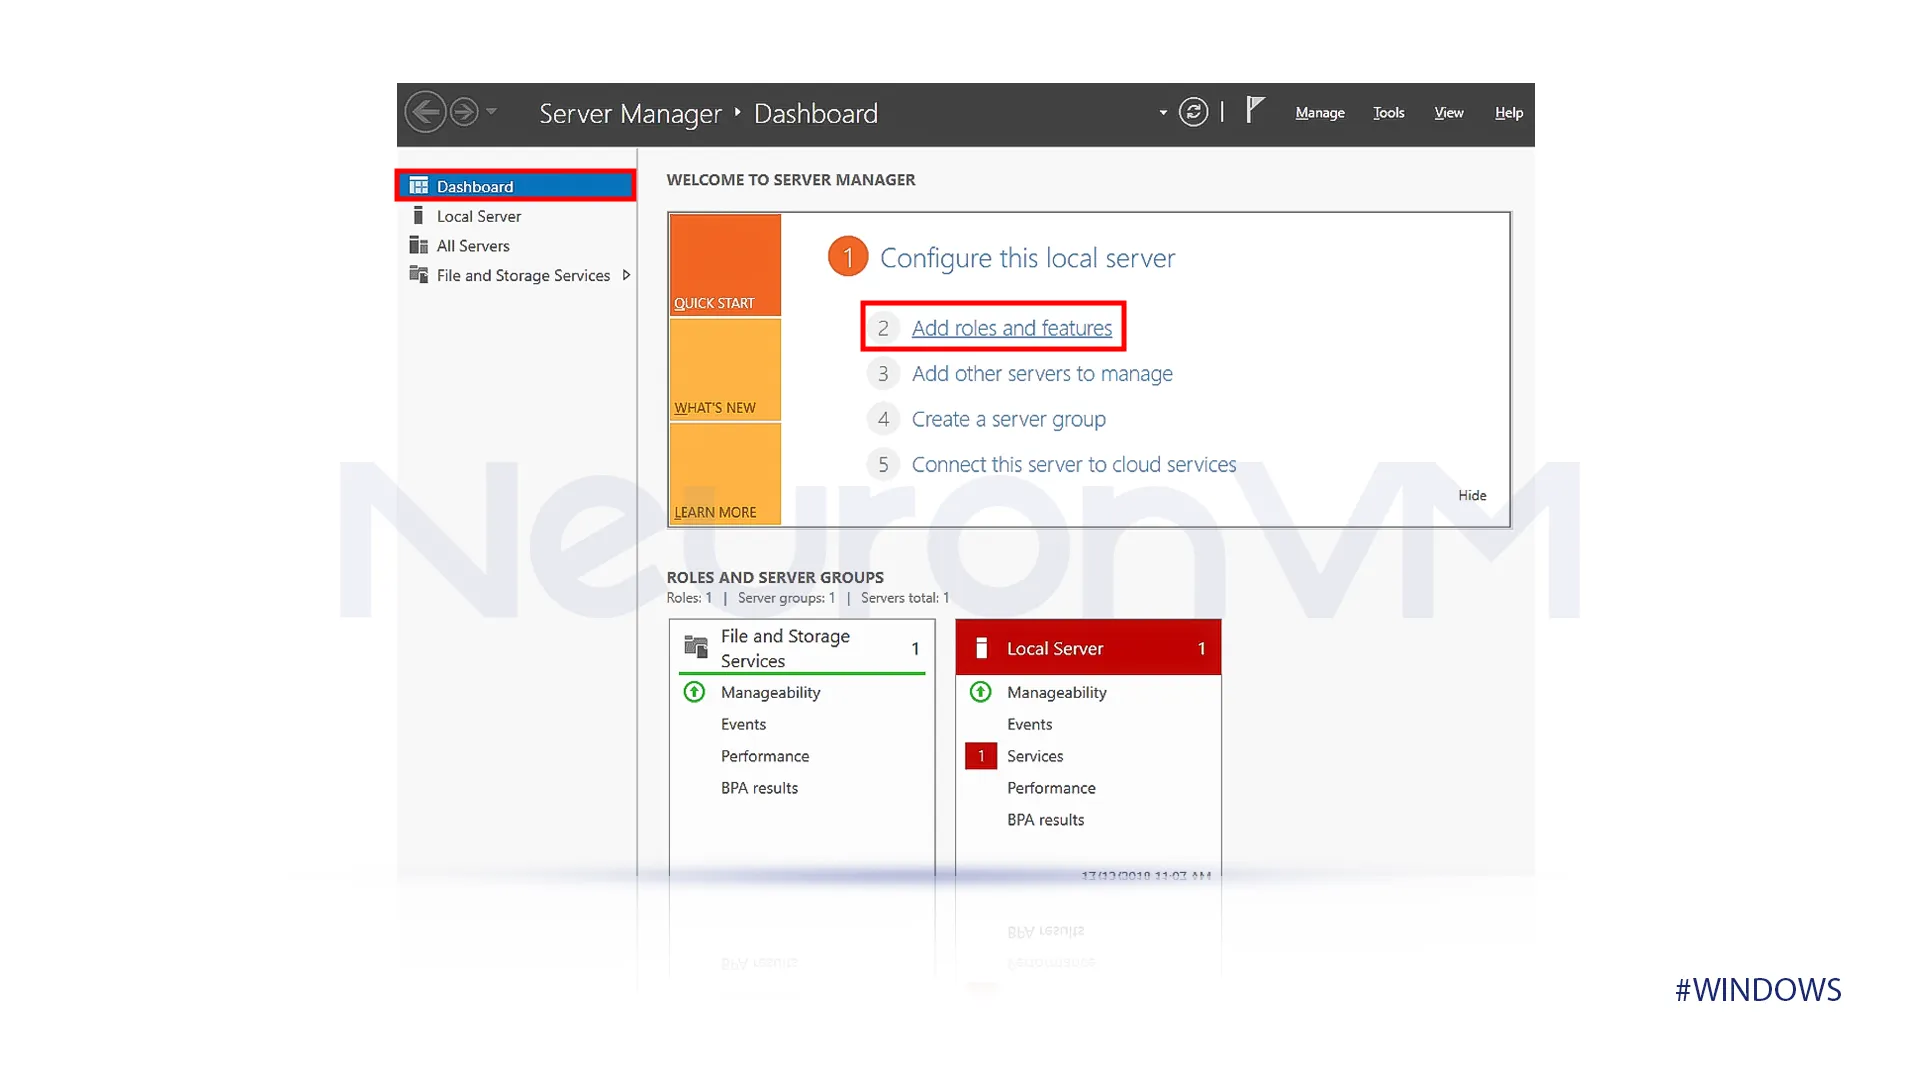
After opening Server Manager, navigate to the “Dashboard” section and click Add new roles and features.
“Roles and Features Wizard”
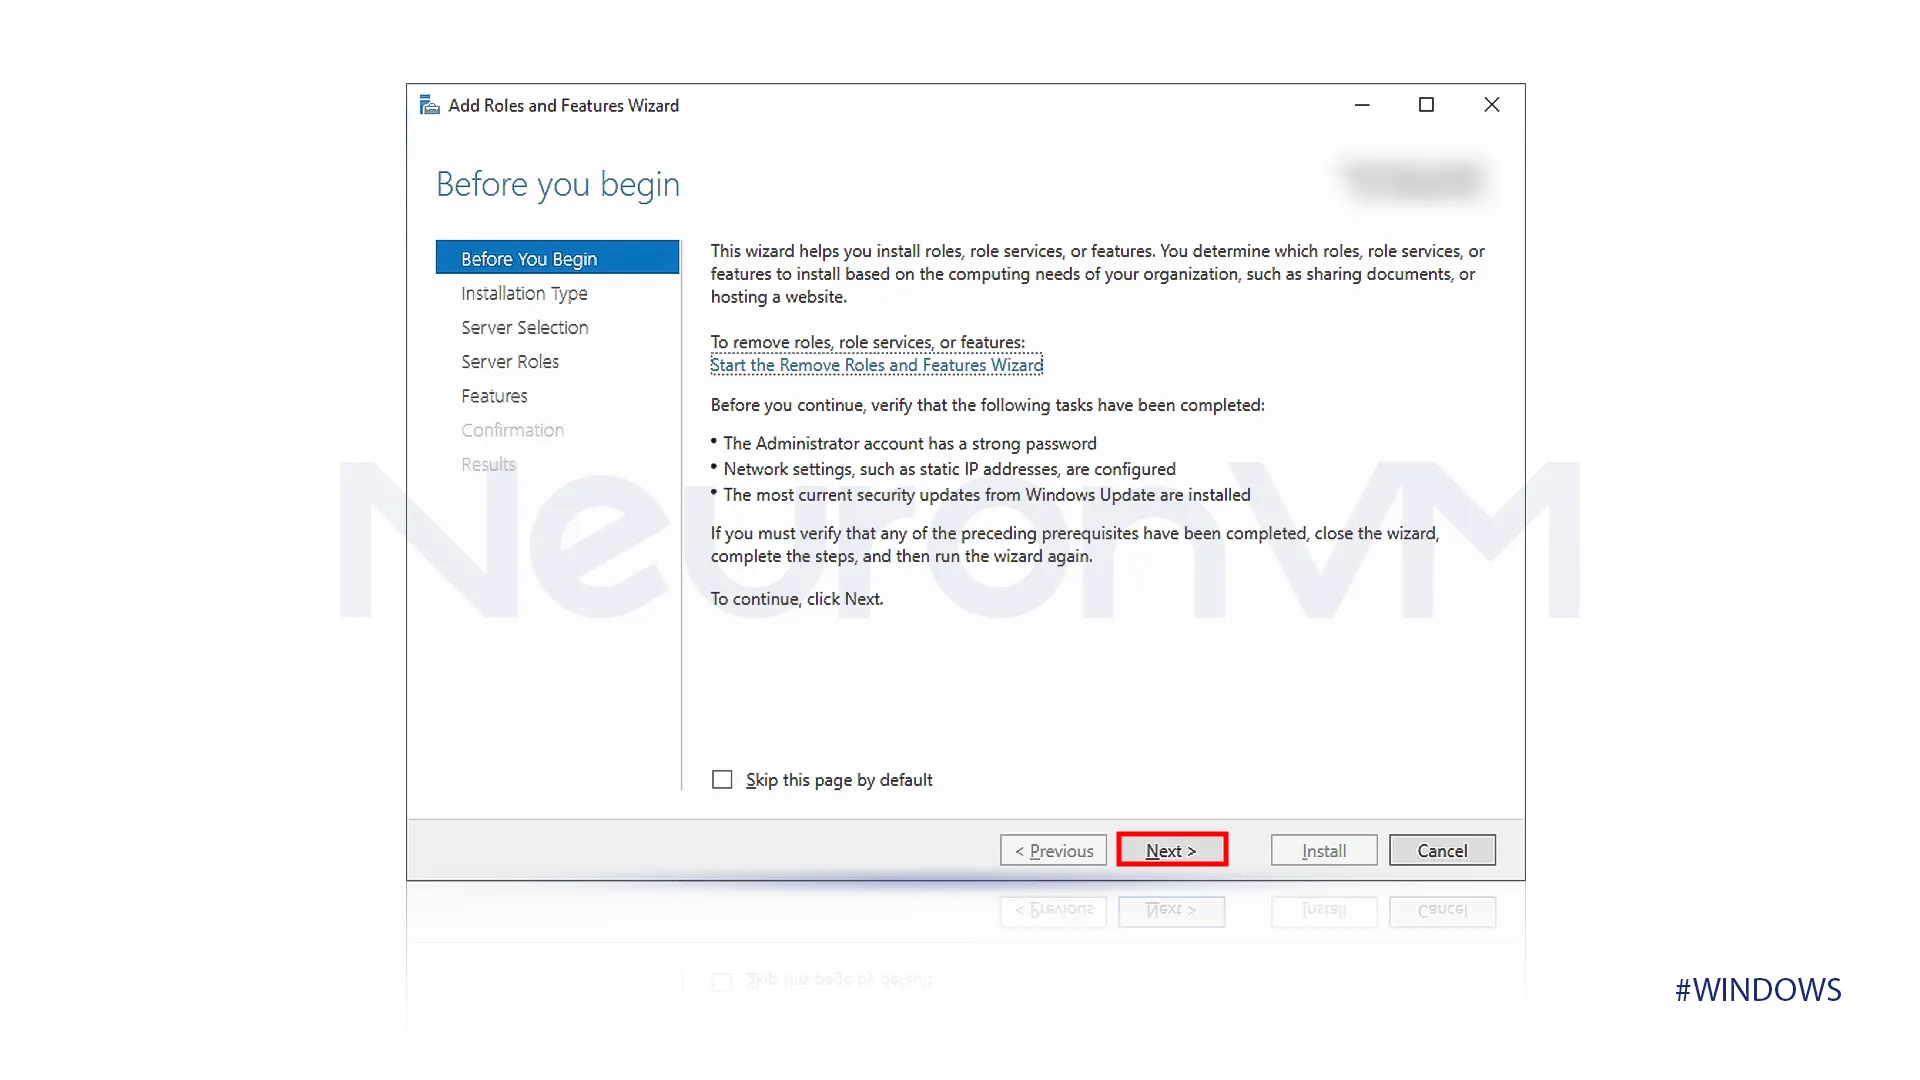
After you select “Add Roles and Features,” Make sure to review any provided information and click on the next button at the bottom of the screen.
“Installation Type”
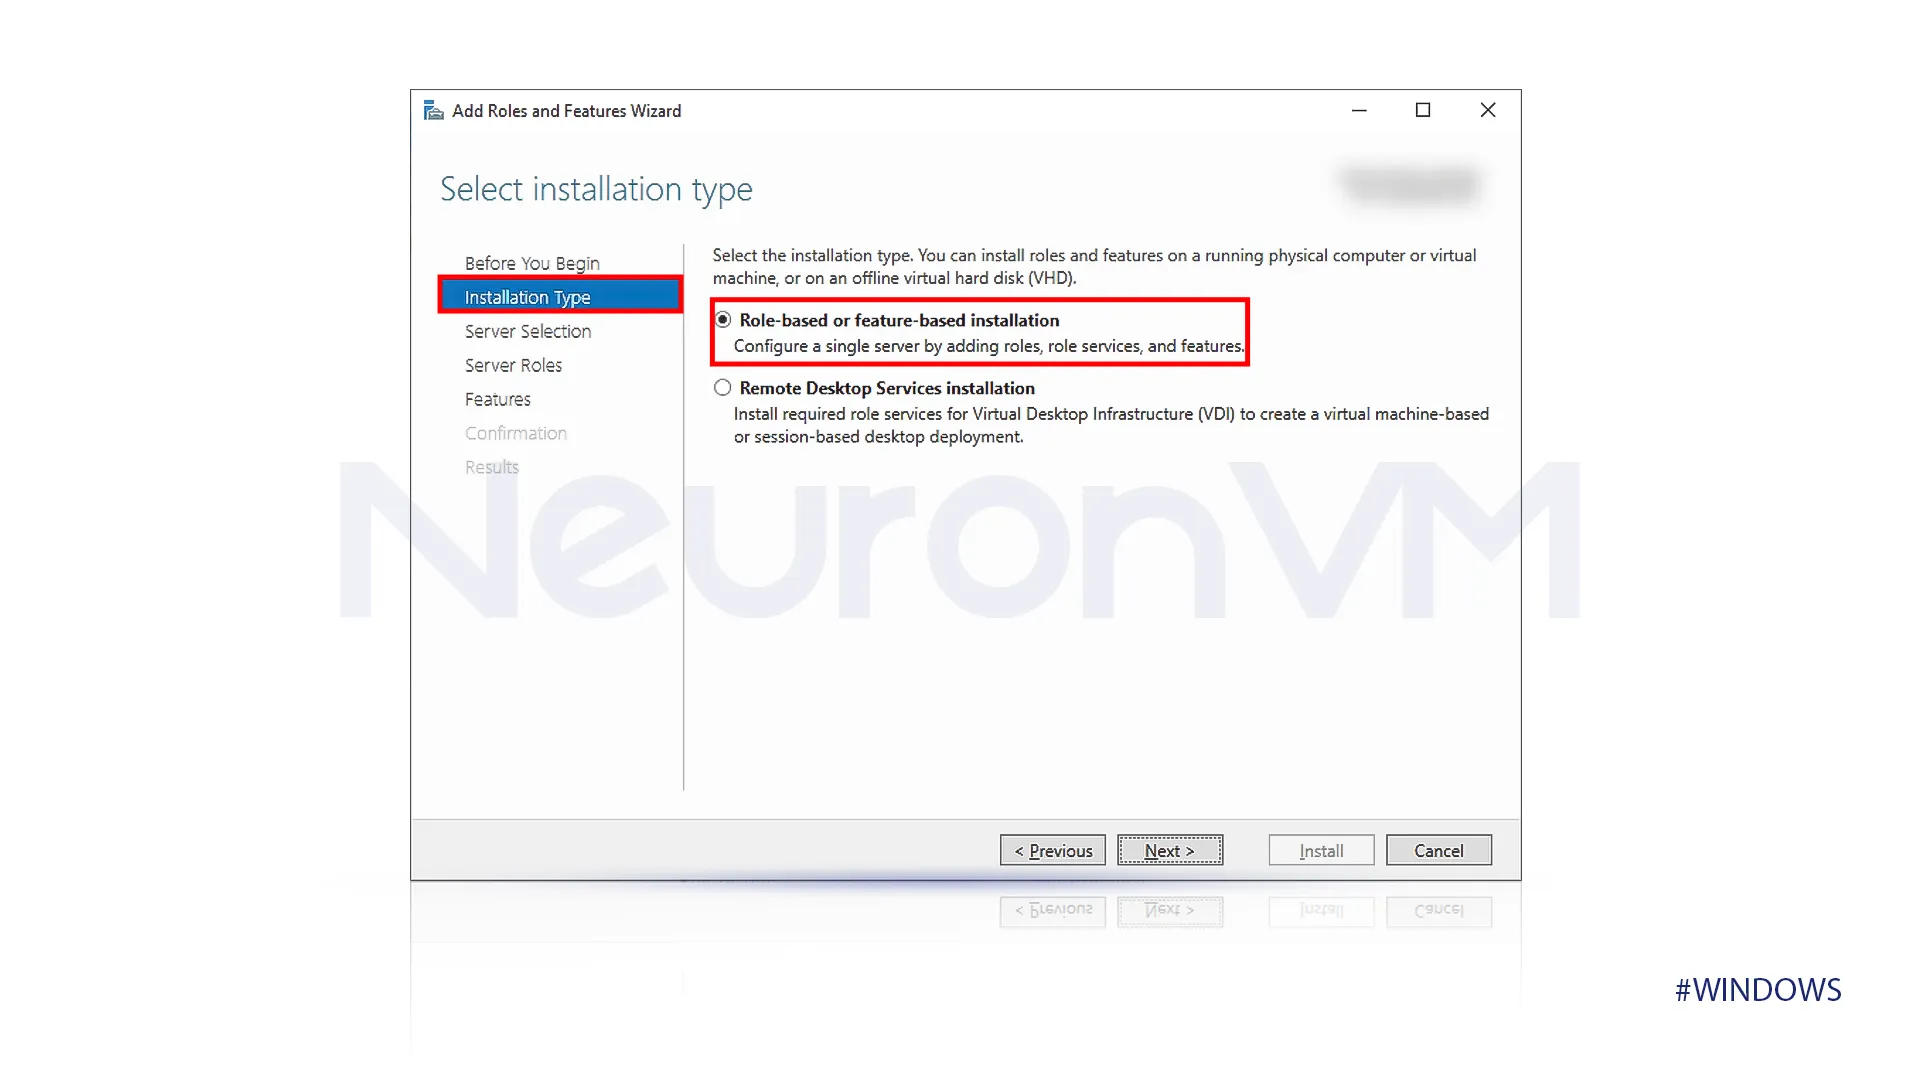
Select the role-based or feature-based as the installation type. This step confirms that you install individual features rather than a complete server role.
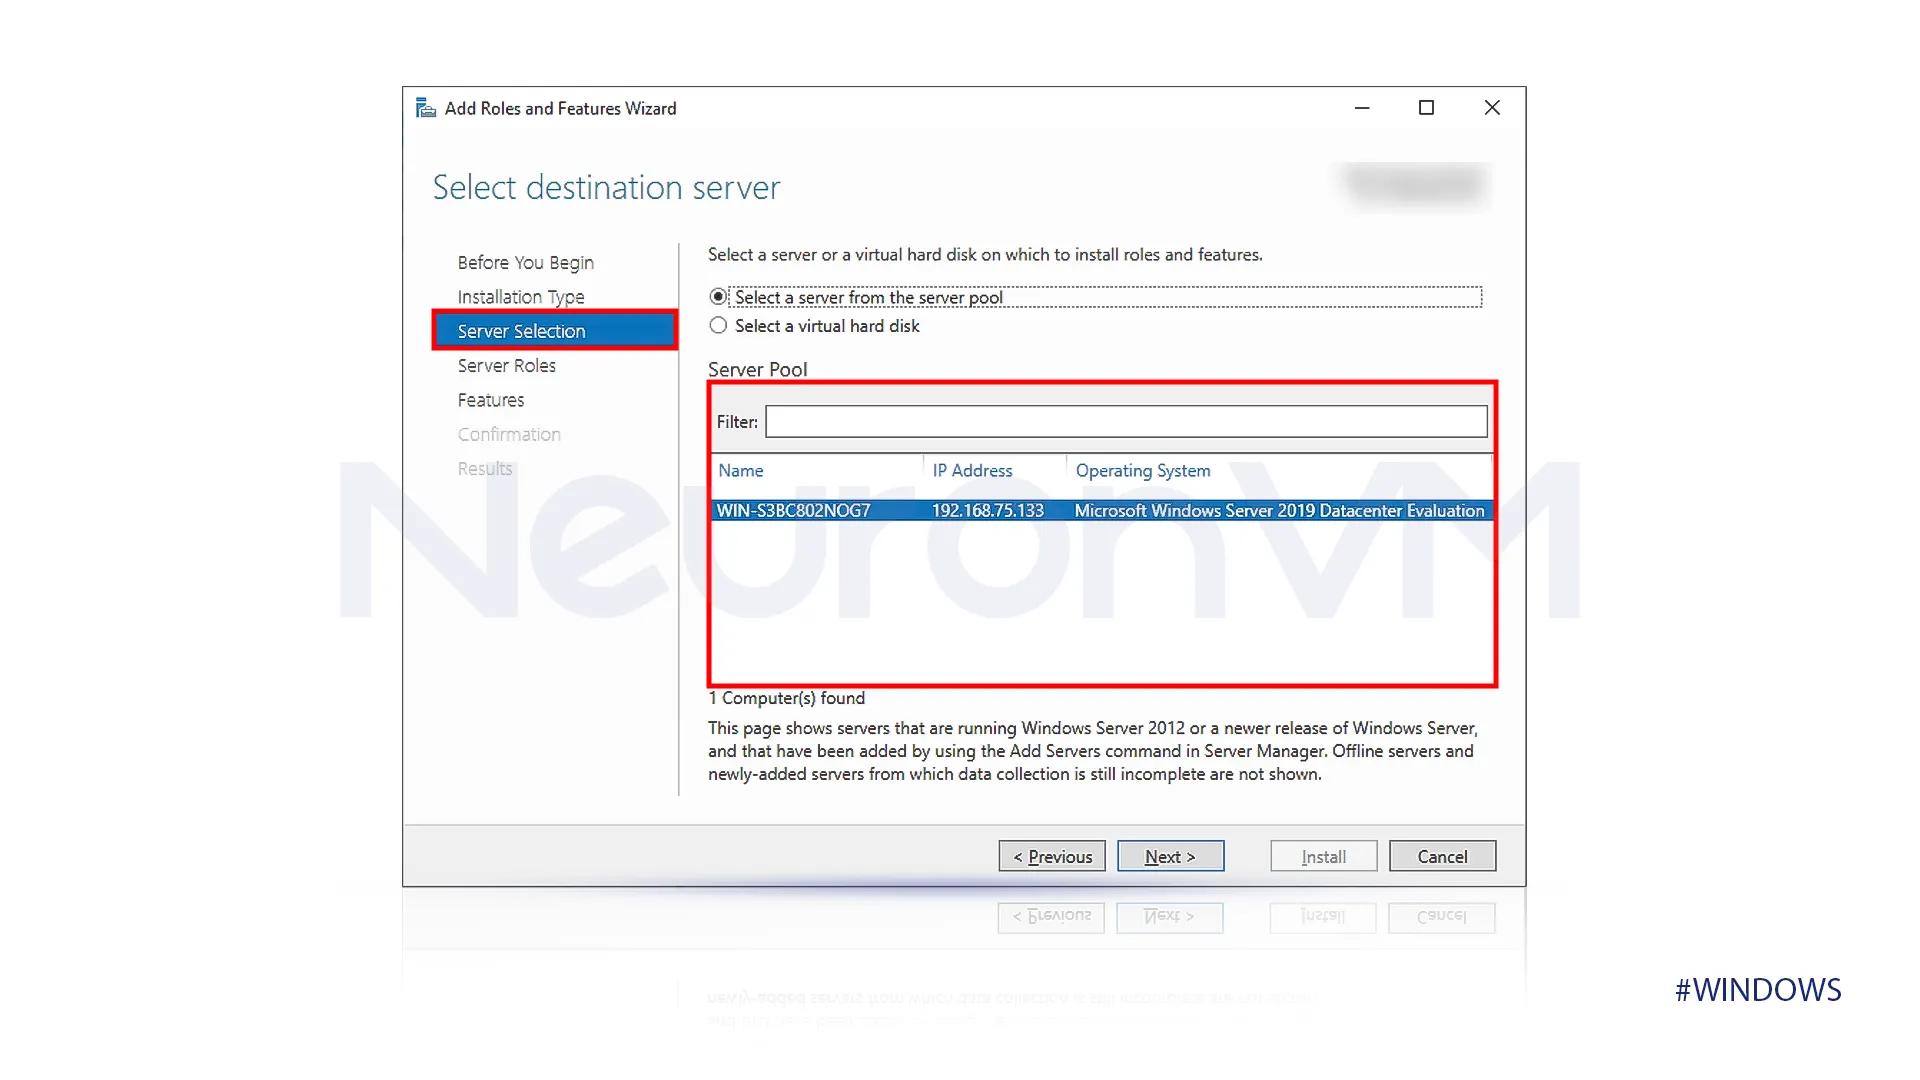
“Server Selection”
There will be a list of available servers on the “Server Destination Server” screen. The local server should be selected by default; if it is not, select the server you want to install the telnet client features. This step ensures that features are installed on the correct servers.
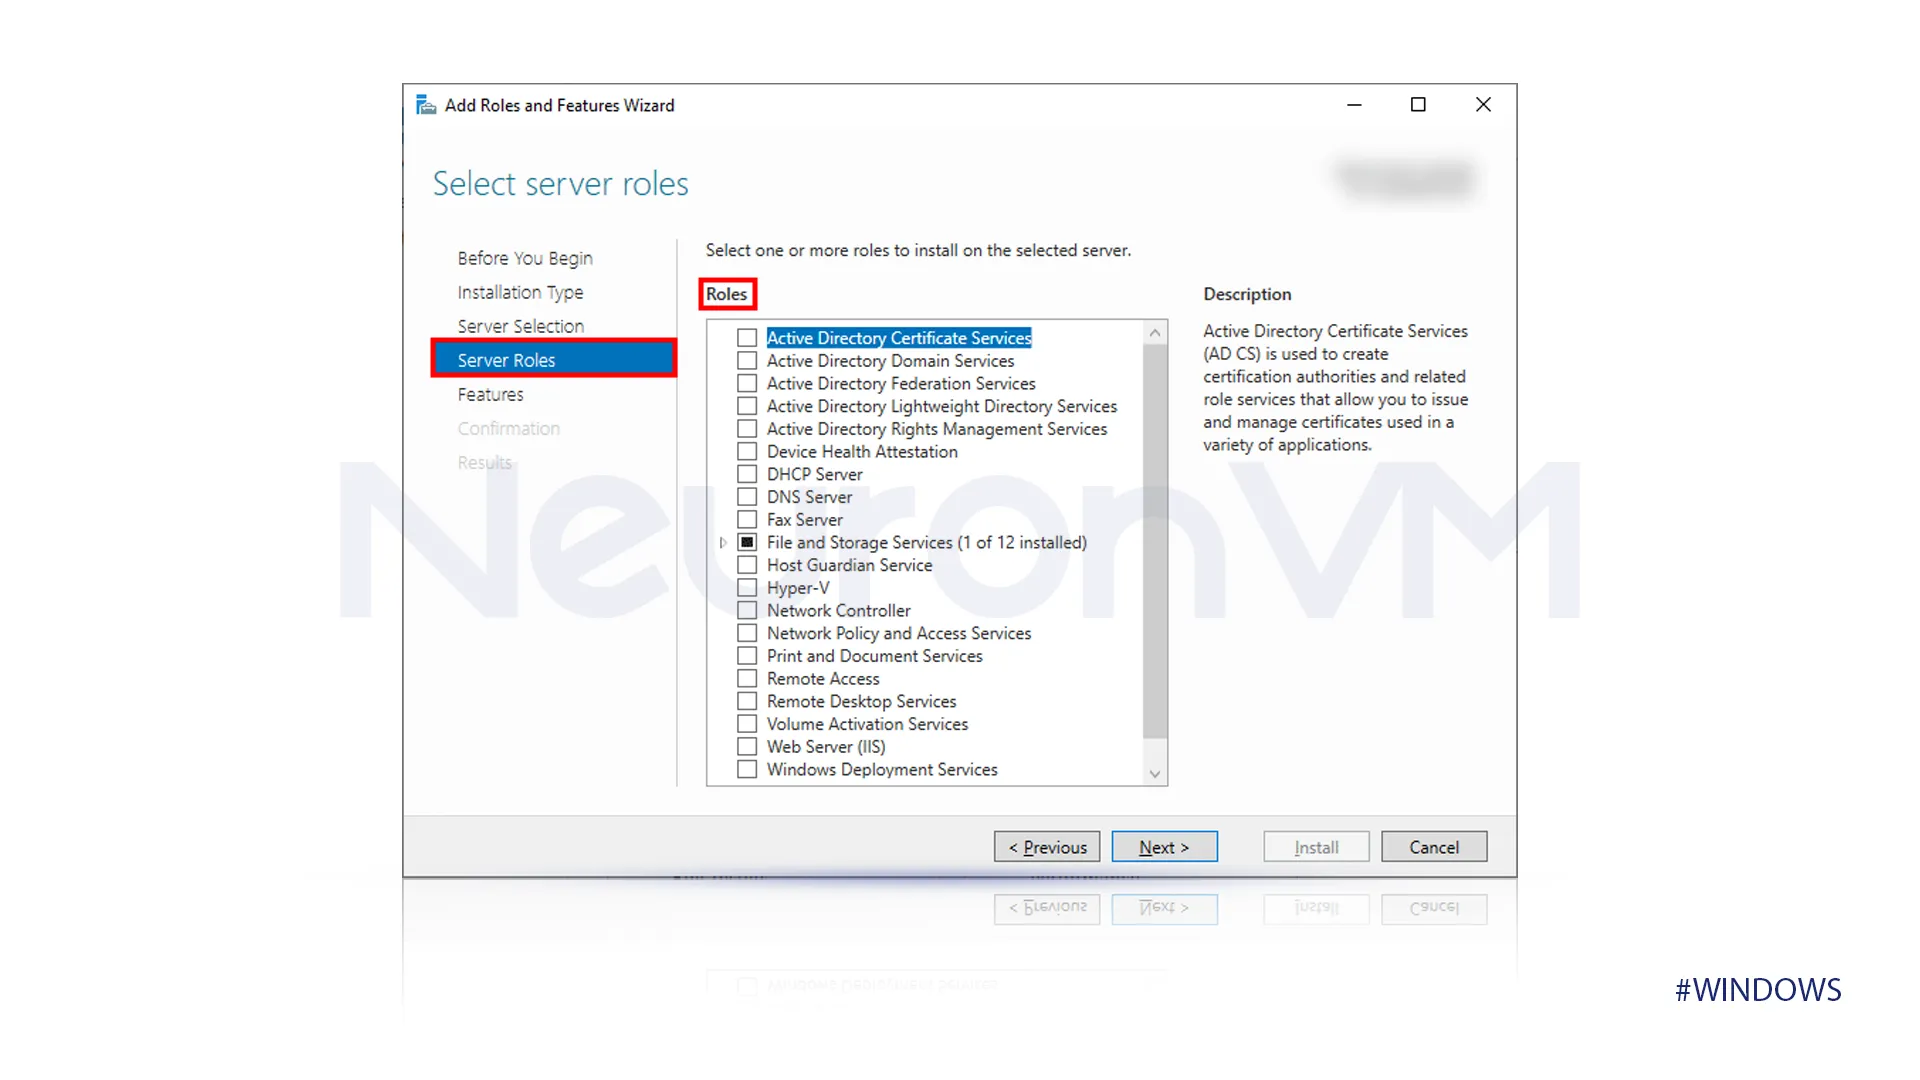
“Server Roles”
In the server roles section, do not select any server roles because we are installing a feature, not a full server role.
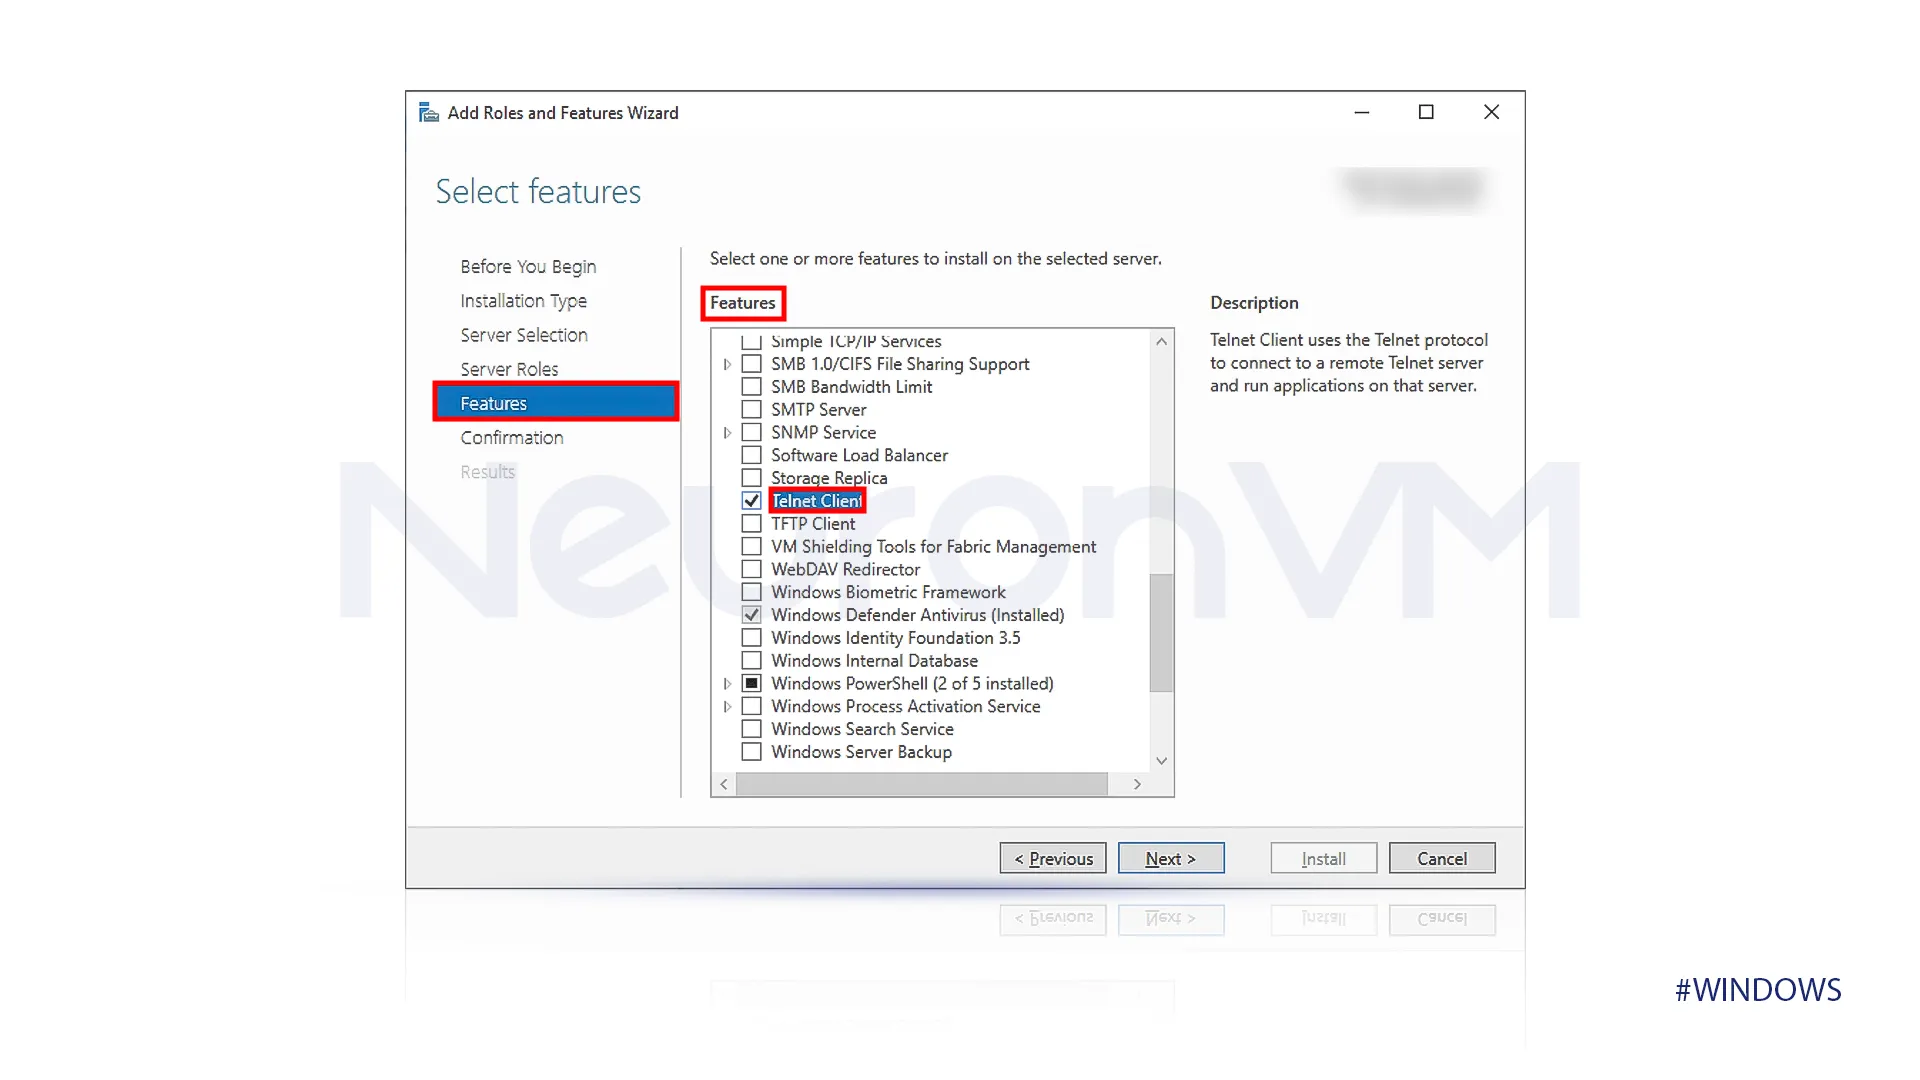
“Features”
A list of available features is presented on the “select features.” Select the “Talent client” this action marks this feature for installation.
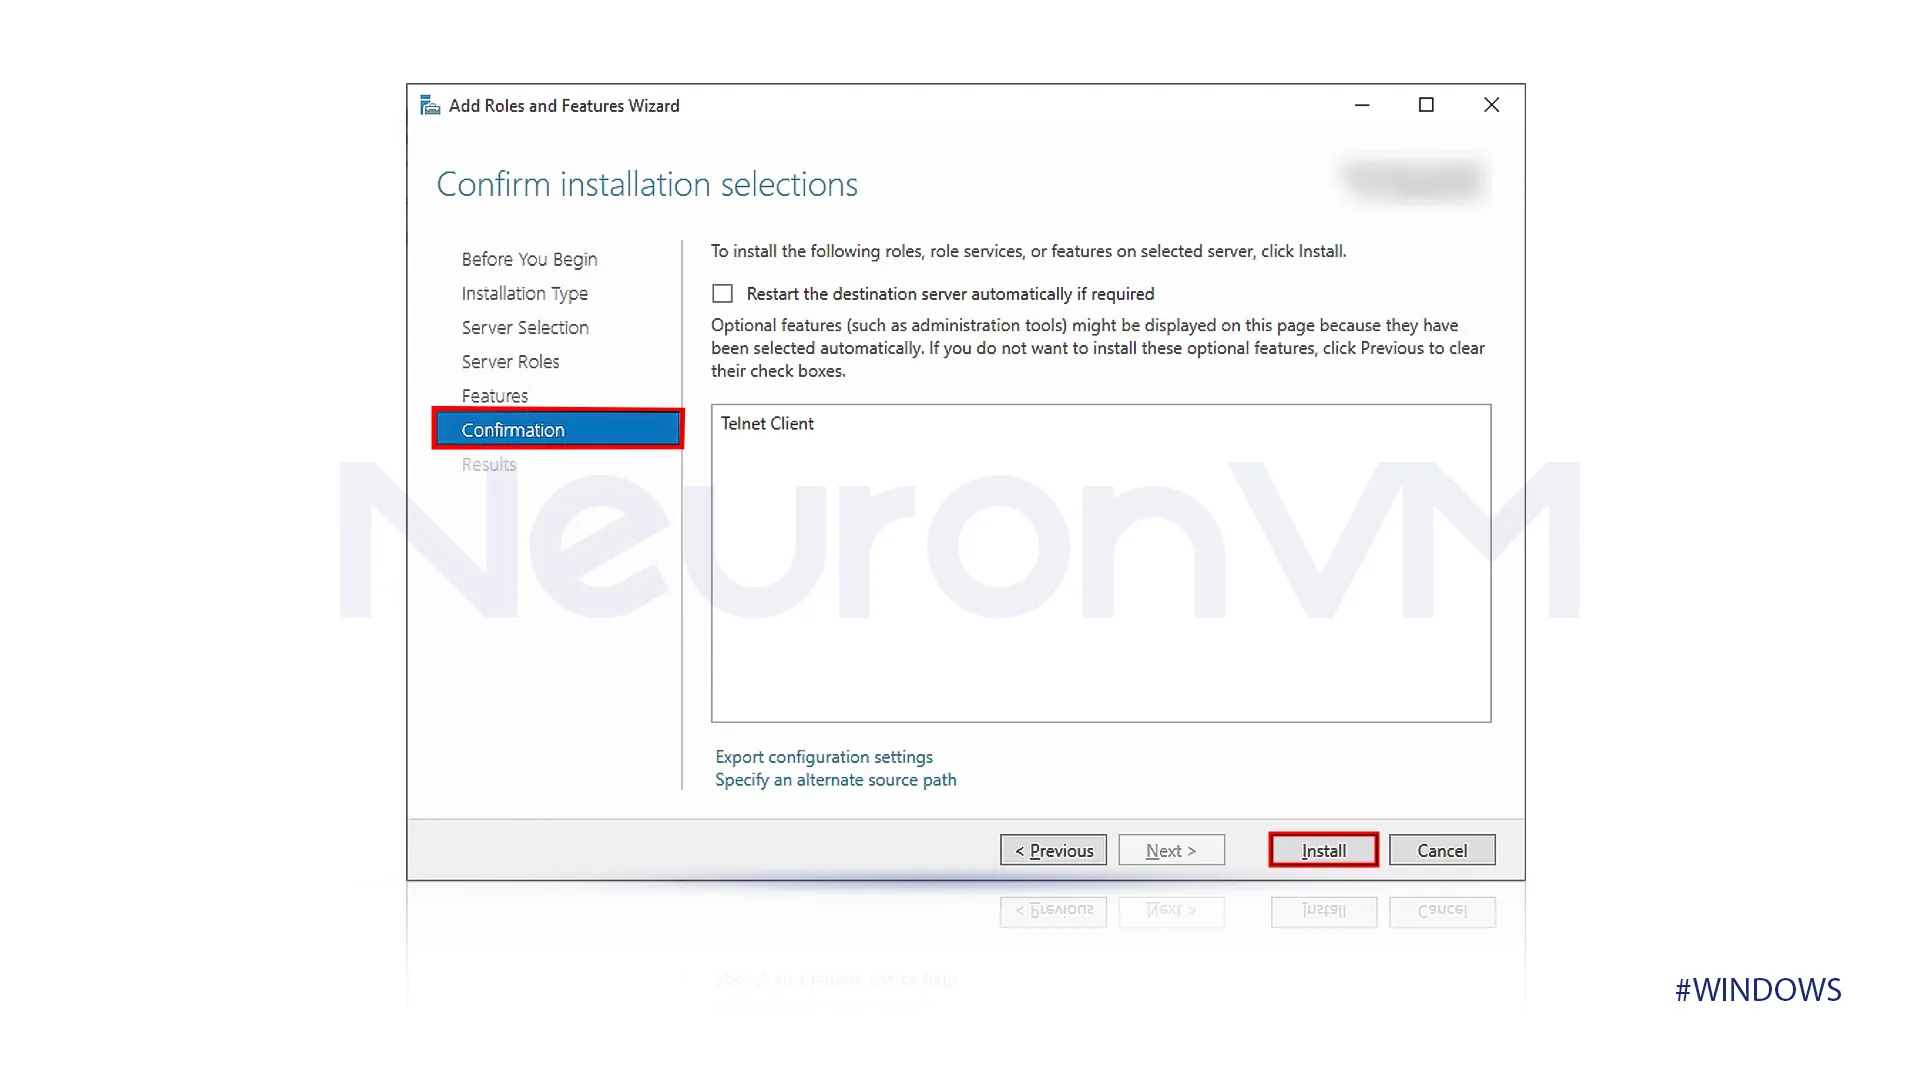
“Confirmation”
Review the settings and click on Install.
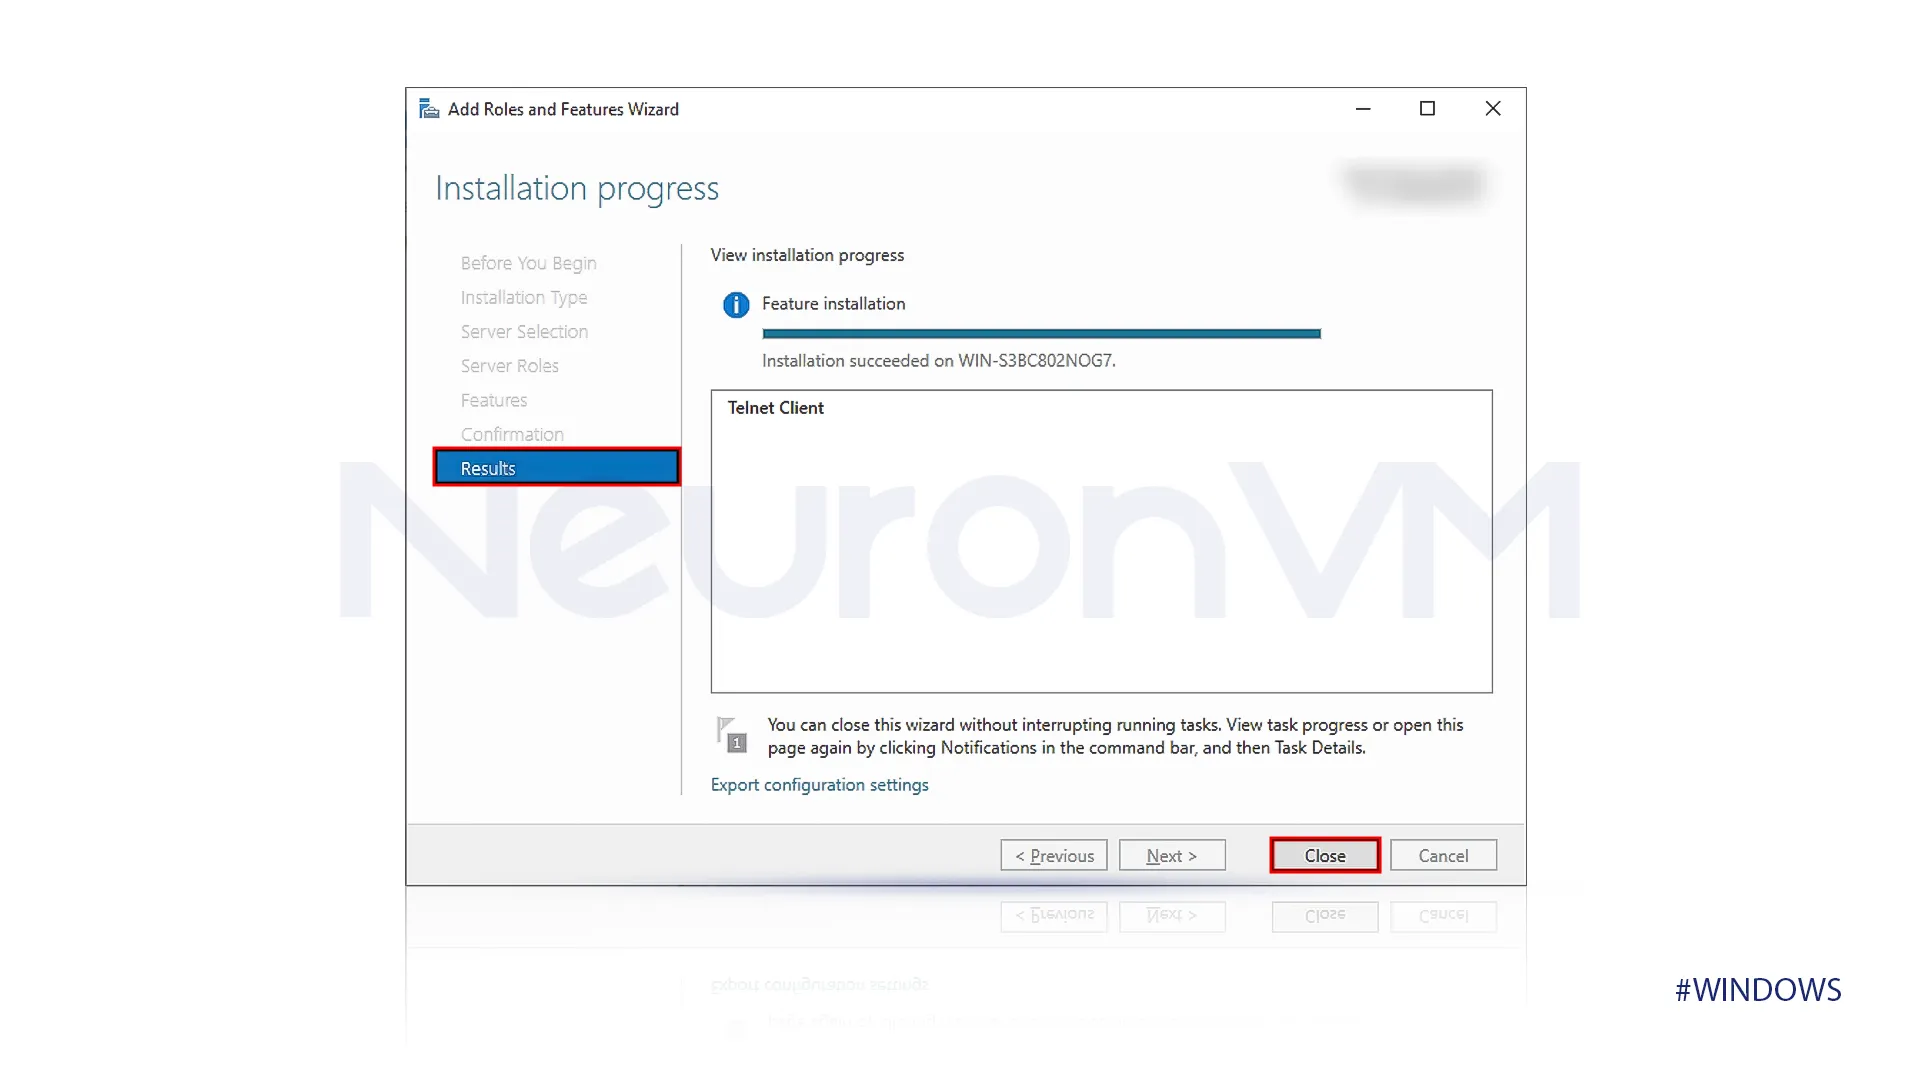
“Results”
After the installation process is successfully finished, click on the close button to exit the wizard.
The talent client feature is now installed and can be used.
How should I verify Telnet service installation?
Open CMD or Powershell as you prefer, type the command “Telnet,” and press enter.
If Telnet is enabled on your computer, you should see a command similar to this.
Welcome to Microsoft Telnet Client


Escape Character is 'CTRL+]'


Microsoft Telnet>
Conclusion
After following this simple step-by-step guide, you can enable the Telnet Service on Windows Server 2019. We provided a simple tutorial on enabling Telnet, covering the concept of Telnet, its advantages, usage, and more.
Telnet is a powerful, lightweight, and valuable tool for network troubleshooting. But if you need more security, using more secure options like SSH for most remote administration tasks is better.
,
By default, In Windows Server Editions, the Telnet command, «is not recognized as an internal or external command, operable program or batch file». This is happening, because the Telnet client, is disabled by default in n Windows Server 2012/2016 or 2019.

In this article you will find several methods to enable the Telnet client on a Windows Server 2019, 2016 or 2012.
How to Install Telnet Client in Server 2019, Server 2016 or Server 2012.
Method 1. Install Telnet client from PowerShell.
Method 2. Enable Telnet Client from Command Prompt.
Method 3. Add the Telnet Client feature from Server Manager.
Method 1. How Install Telnet Client Feature from PowerShell in Server 2012, 2016 or 2019.
1. Open Windows PowerShell.
2. In PowerShell, give the following command to enable the Telnet client:
- Install-WindowsFeature -name Telnet-Client

3. When the installation is completed, you ‘re ready to use Telnet. *
* Note: If you want to disable the Telnet client, give this command in PowerShell:
- Remove-WindowsFeature -name Telnet-Client
Method 2. How to Install Telnet Client from Command Prompt in Server 2012,2016, 2019, using DISM.
1. Open Command Prompt (or PowerShell)
2. Then, give the following DISM command and press Enter to install the Telnet client.
- dism /online /Enable-Feature /FeatureName:TelnetClient

Method 3. How to Install Telnet client Feature from the Server Manager.
1. To install the Telnet client feature on Windows Server 2016, 2019 r 2012, open ‘Server Manager’ and click on Add Roles and Features.

2. At the first screen of ‘Add Roles and Features wizard’, leave the Role-based or feature-based installation option and click Next.

3. At the next screen, leave the default option «Select server from the server pool» and click Next.

4. At Server Roles options, click Next.

5. At Features options, check the Telnet client and click Next.

6. Finally click Install at the confirmation screen

7. When the installation is completed. click Close.

That’s it! Let me know if this guide has helped you by leaving your comment about your experience. Please like and share this guide to help others.
If this article was useful for you, please consider supporting us by making a donation. Even $1 can a make a huge difference for us in our effort to continue to help others while keeping this site free:
- Author
- Recent Posts
Konstantinos is the founder and administrator of Wintips.org. Since 1995 he works and provides IT support as a computer and network expert to individuals and large companies. He is specialized in solving problems related to Windows or other Microsoft products (Windows Server, Office, Microsoft 365, etc.).
In this article, we’ll show you how to enable Telnet in windows server 2019 in just a few steps. If you’re looking to use Telnet on Windows Server 2019, you’re likely familiar with its role in testing connectivity and managing remote servers. While it’s less secure than SSH, it’s still commonly used in various environments. However, Telnet is not enabled by default in Windows Server 2019.
To enable the Telnet feature in Windows Server 2019, follow these steps:
What is Telnet?
Telnet is a protocol that allows users to communicate with remote servers or devices over a network via command-line interface. It’s useful for troubleshooting network issues, testing open ports, and remotely accessing devices.
Using Server Manager:
- Open Server Manager:
- Click on the Start menu and select Server Manager.
- Add Roles and Features:
- In the Server Manager dashboard, click on Manage in the top right corner and select Add Roles and Features.
- Navigate through the Wizard:
- Click Next on the initial page.
- Choose Role-based or feature-based installation and click Next.
- Select your server from the server pool and click Next.
- Select Features:
- In the Features section, scroll down and find Telnet Client.
- Check the box next to Telnet Client.
- Click Next, then Install.
- Complete Installation:
- Wait for the installation to complete, then click Close.
Using PowerShell:
- Open PowerShell:
- Right-click the Start button and select Windows PowerShell (Admin).
- Run the Installation Command:
- Type the following command and press Enter:
Install-WindowsFeature -Name Telnet-Client
- Wait for the Installation:
- After a few moments, you should see a success message indicating that the Telnet Client has been installed.
- Verify Installation:
- Open Command Prompt (you can type cmd in the Start menu).
- Type the command:
telnet
If the installation was successful, you should see the Telnet prompt.
You can now use Telnet to connect to other servers. For example, to connect to a Telnet server, use:
telnet [hostname or IP address] [port]
Example: telnet towel.blinkenlights.nl 23


Get Flat 60%OFF on Yearly Windows Hosting Plans
for more info contact to sales team
Introduction:
Telnet is a simple text-based protocol that allows remote access to a server’s command-line interface. While Telnet is considered insecure and is not recommended for production environments, there may be situations where you need to enable the Telnet client for troubleshooting or specific requirements. In this tutorial, we’ll guide you through the process of enabling the Telnet client on Windows Server 2016, 2019, and 2022 using Server Manager.
To Enable Telnet in Windows Server, follow the below step:
- Initiate the process by launching Server Manager. Click Start and then Server Manager

- Once Server Manager is open, Click Add Roles and Features. This action initiates the Add Roles and Features Wizard.

- In the Before you begin page, click Next

- In the Installation Type page, choose Role-based or feature-based installation and proceed by clicking Next.
- In the Server Selection page, ensure Select a server from the server pool is selected, then choose your server from the list. Click Next to continue.
- On the Server Roles page, we will not be selecting anything from here, so click Next
- On the Features page, scroll down till you see Telnet Client, select the checkbox beside it and click Next
- Review your selections, ensuring that Telnet Client is listed. Telnet Client does not require to restart the server once installation is completed, so no need to select the Restart the destination server automatically if required. Click Install
- Keep an eye on the installation progress displayed on the Results page. After the installation concludes, click on Close.

To Verify Telnet Client Installation
- Open a command prompt

- In the command prompt, type the telnet and click Enter

- If Telnet is installed, the command prompt will display the Telnet prompt, indicating a successful installation.

Congratulations! You have successfully enabled the Telnet Client on your Windows Server 2016, 2019, or 2022 using Server Manager. Keep in mind that while Telnet can be useful for specific tasks, it is generally recommended to use more secure alternatives, such as Secure Shell (SSH), for remote access to servers.
Tarek Majdalani is an accomplished Windows Expert-IT Pro MVP, honored by Microsoft for eight consecutive years from 2007-2015. Holding a B.E. in Computer Engineering from the Lebanese American University, he pursued further education while working, earning various certificates showcased in his MVP profile. Tarek is currently serving as the Director of Engineering & Technology at Alrai Media Group in Kuwait. Since 2006, he has been actively contributing to the community by writing tutorials featuring tips and tricks, amassing over 300 tutorials on diverse systems.
Enabling Telnet on Windows Server 2019: A Step-by-Step Guide
What is Telnet?
Telnet is a protocol that allows remote access to a server, allowing users to execute commands and view data from a distance. It is commonly used in network administration, security, and disaster recovery.
Why Enable Telnet on Windows Server 2019?
In a Windows Server 2019 environment, telnet is an essential protocol for remote access, especially when considering the following scenarios:
- Secure remote access: Telnet provides an encrypted connection, ensuring secure remote access to sensitive data and systems.
- Automated troubleshooting: Telnet enables administrators to remotely troubleshoot and test applications, networks, and devices.
- Troubleshooting remote access: Telnet allows administrators to quickly identify and resolve issues that arise during remote access, improving overall system reliability.
Enableing Telnet on Windows Server 2019: A Step-by-Step Guide
Enabling telnet on Windows Server 2019 involves several steps. Here’s a comprehensive guide to help you set up telnet:
Step 1: Open Telnet
To open Telnet on Windows Server 2019, follow these steps:
- Windows 10 and Windows Server 2019: Right-click on the Start menu and select System. Click on Advanced system settings. In the right panel, click on Environment Variables.
- Windows 8 and Windows 8.1: Right-click on the Start menu and select Command Prompt (Admin). Click on Run as administrator.
Step 2: Add the Telnet Server Program File
To enable Telnet, you need to add the program file that provides the Telnet server. You can use the following steps:
- Windows 10 and Windows Server 2019: Navigate to C:Program FilesTelnetTelnet Server.exe.
- Windows 8 and Windows 8.1: Navigate to C:Program FilesTelnetTelnet Server.exe.
Step 3: Set the Telnet Port
To enable Telnet, you need to specify the port number. The default port number is 23. However, you may need to change it based on your specific requirements.
- Windows 10 and Windows Server 2019: Navigate to ProgramDataMicrosoftWindowsOnline Services
and open theTelnet Server.exe` file. Look for the «Use Telnet»** option and select the desired port number. - Windows 8 and Windows 8.1: Navigate to %LOCALAPPDATA%MicrosoftWindowsOnline Services
and open theTelnet Server.exe` file. Look for the «Use Telnet»** option and select the desired port number.
Step 4: Configure Telnet Settings
To further configure Telnet settings, you can use the following steps:
- Windows 10 and Windows Server 2019: Navigate to ProgramDataMicrosoftWindowsOnline Services
and open theTelnet Server.exe` file. Look for the «Use Telnet»** option and select the desired port number. - Windows 8 and Windows 8.1: Navigate to %LOCALAPPDATA%MicrosoftWindowsOnline Services
and open theTelnet Server.exe` file. Look for the «Use Telnet»** option and select the desired port number.
Step 5: Verify Telnet Configuration
To verify that Telnet is enabled correctly, you can use the following commands:
- Windows 10 and Windows Server 2019: Open a command prompt and type
telnet ip addressto test Telnet connectivity. - Windows 8 and Windows 8.1: Open a command prompt and type
telnet ip addressto test Telnet connectivity.
Significant Content Highlighted
- Telnet Server Program File: To enable Telnet, you need to add the program file that provides the Telnet server.
- Port Number: The default port number is 23, but you may need to change it based on your specific requirements.
- Use Telnet: This option is used to enable Telnet on the Windows Server 2019 environment.
Additional Tips and Recommendations
- Security: Telnet is an insecure protocol and should be used with caution. Ensure that only authorized users have access to the Telnet server.
- Version Compatibility: Make sure that the Windows Server 2019 version you are using is compatible with the Telnet Server Program File.
- Troubleshooting: If you encounter issues with Telnet, you can try the following troubleshooting steps:
- Check the Windows Server 2019 event logs for any error messages.
- Use the
telnetcommand to test Telnet connectivity. - Check the Windows Server 2019 event logs for any firewall or network configuration issues.
By following these steps and tips, you can successfully enable Telnet on your Windows Server 2019 environment and take advantage of its remote access capabilities.