В Windows 10 и Windows Server 2019 появился встроенный SSH клиент, который вы можете использовать для подключения к *Nix серверам, ESXi хостам и другим устройствам по защищенному протоколу, вместо Putty, MTPuTTY или других сторонних SSH клиентов. Встроенный SSH клиент Windows основан на порте OpenSSH и предустановлен в ОС, начиная с Windows 10 1809.
Содержание:
- Установка клиента OpenSSH в Windows 10
- Как использовать SSH клиенте в Windows 10?
- SCP: копирование файлов из/в Windows через SSH
Установка клиента OpenSSH в Windows 10
Клиент OpenSSH входит в состав Features on Demand Windows 10 (как и RSAT). Клиент SSH установлен по умолчанию в Windows Server 2019 и Windows 10 1809 и более новых билдах.
Проверьте, что SSH клиент установлен:
Get-WindowsCapability -Online | ? Name -like 'OpenSSH.Client*'

В нашем примере клиент OpenSSH установлен (статус: State: Installed).
Если SSH клиент отсутствует (State: Not Present), его можно установить:
- С помощью команды PowerShell:
Add-WindowsCapability -Online -Name OpenSSH.Client* - С помощью DISM:
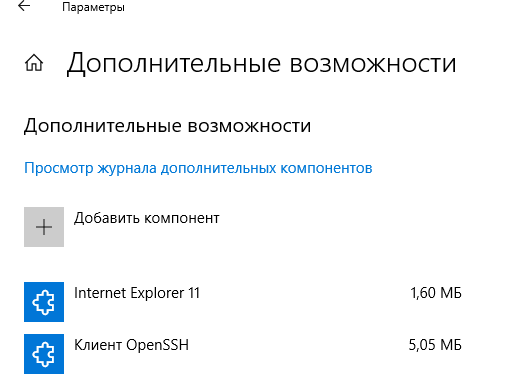
dism /Online /Add-Capability /CapabilityName:OpenSSH.Client~~~~0.0.1.0 - Через Параметры -> Приложения -> Дополнительные возможности -> Добавить компонент. Найдите в списке Клиент OpenSSH и нажмите кнопку Установить.
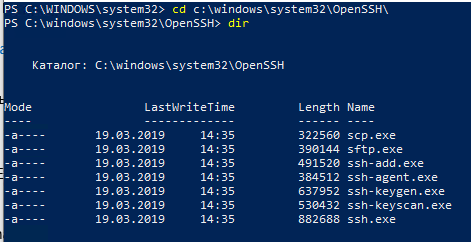
]Бинарные файлы OpenSSH находятся в каталоге c:\windows\system32\OpenSSH\.
- ssh.exe – это исполняемый файл клиента SSH;
- scp.exe – утилита для копирования файлов в SSH сессии;
- ssh-keygen.exe – утилита для генерации ключей аутентификации;
- ssh-agent.exe – используется для управления ключами;
- ssh-add.exe – добавление ключа в базу ssh-агента.
Вы можете установить OpenSSH и в предыдущих версиях Windows – просто скачайте и установите Win32-OpenSSH с GitHub (есть пример в статье “Настройка SSH FTP в Windows”).
Как использовать SSH клиенте в Windows 10?
Чтобы запустить SSH клиент, запустите командную строку
PowerShell
или
cmd.exe
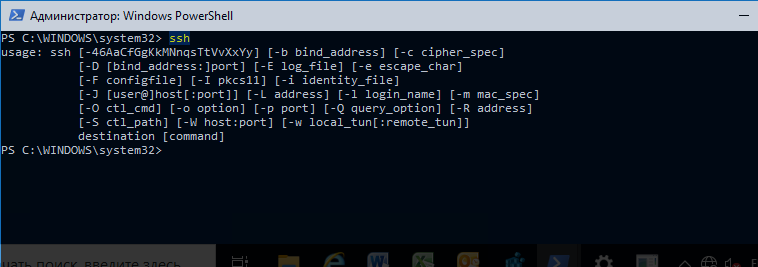
. Выведите доступные параметры и синтаксис утилиты ssh.exe, набрав команду:
ssh
usage: ssh [-46AaCfGgKkMNnqsTtVvXxYy] [-b bind_address] [-c cipher_spec]
[-D [bind_address:]port] [-E log_file] [-e escape_char]
[-F configfile] [-I pkcs11] [-i identity_file]
[-J [user@]host[:port]] [-L address] [-l login_name] [-m mac_spec]
[-O ctl_cmd] [-o option] [-p port] [-Q query_option] [-R address]
[-S ctl_path] [-W host:port] [-w local_tun[:remote_tun]]
destination [command]
Для подключения к удаленному серверу по SSH используется команда:
ssh username@host
Если SSH сервер запущен на нестандартном порту, отличном от TCP/22, можно указать номер порта:
ssh username@host -p port
Например, чтобы подключиться к Linux хосту с IP адресом 192.168.1.202 под root, выполните:
ssh [email protected]
При первом подключении появится запрос на добавление ключа хоста в доверенные, наберите yes -> Enter (при этом отпечаток ключа хоста добавляется в файл C:\Users\username\.ssh\known_hosts).
Затем появится запрос пароля указанной учетной записи, укажите пароль root, после чего должна открытся консоль удаленного Linux сервера (в моем примере на удаленном сервере установлен CentOS 8).

С помощью SSH вы можете подключаться не только к *Nix подобным ОС, но и к Windows. В одной из предыдущих статей мы показали, как настроить OpenSSH сервер на Windows 10 и подключиться к нему с другого компьютера Windows с помощью SSH клиента.
Если вы используете SSH аутентификацию по RSA ключам (см. пример с настройкой SSH аутентификации по ключам в Windows), вы можете указать путь к файлу с закрытым ключом в клиенте SSH так:
ssh [email protected] -i "C:\Users\username\.ssh\id_rsa"
Также вы можете добавить ваш закрытый ключ в SSH-Agent. Сначала нужно включить службу ssh-agent и настроить ее автозапуск:
set-service ssh-agent StartupType ‘Automatic’
Start-Service ssh-agent
Добавим ваш закрытый ключ в базу ssh-agent:
ssh-add "C:\Users\username\.ssh\id_rsa"
Теперь вы можете подключиться к серверу по SSH без указания пути к RSA ключу, он будет использоваться автоматически. Пароль для подключения не запрашивается (если только вы не защитили ваш RSA ключ отдельным паролем):
ssh [email protected]
Еще несколько полезных аргументов SSH:
-
-C
– сжимать трафик между клиентом и сервером (полезно на медленных и нестабильных подключениях); -
-v
– вывод подробной информации обо всех действия клиента ssh; -
-R
/
-L
– можно использовать для проброса портов через SSH туннель.
SCP: копирование файлов из/в Windows через SSH
С помощью утилиты scp.exe, которая входит в состав пакета клиента SSH, вы можете скопировать файл с вашего компьютера на SSH сервер:
scp.exe "E:\ISO\CentOS-8.1.1911-x86_64.iso" [email protected]:/home

Можно рекурсивно скопировать все содержимое каталога:
scp -r E:\ISO\ [email protected]:/home
И наоборот, вы можете скопировать файл с удаленного сервера на ваш компьютер:
scp.exe [email protected]:/home/CentOS-8.1.1911-x86_64.iso e:\tmp
Если вы настроите аутентификацию по RSA ключам, то при копировании файлов не будет появляться запрос на ввод пароля для подключения к SSH серверу. Это удобно, когда вам нужно настроить автоматическое копирование файлов по расписанию.
Итак, теперь вы можете прямо из Windows 10 подключаться к SSH серверам, копировать файлы с помощью scp без установки сторонних приложений и утилит.
SSH (Secure Socket Shell) is a network protocol that can be used to securely access other machines across a network. From our perspective, using SSH can be valuable, especially if you’re looking to interact with Linux virtual machines such as Matillion servers. For example, SSH protocols could be used to:
- Log into a Linux virtual machine
- Copy files to/from a Linux virtual machine
- Generate SSH keys that can be used for SSH authentication
- Configure authentication to a remote Git repository without entering a password each time you push, pull, etc.
How to Enable SSH Commands in Windows 10
In Windows 10, SSH commands can be executed through PowerShell natively; however, the functionality must be enabled by following these steps:
Open the START menu and open Manage optional features:
Select Add a feature:
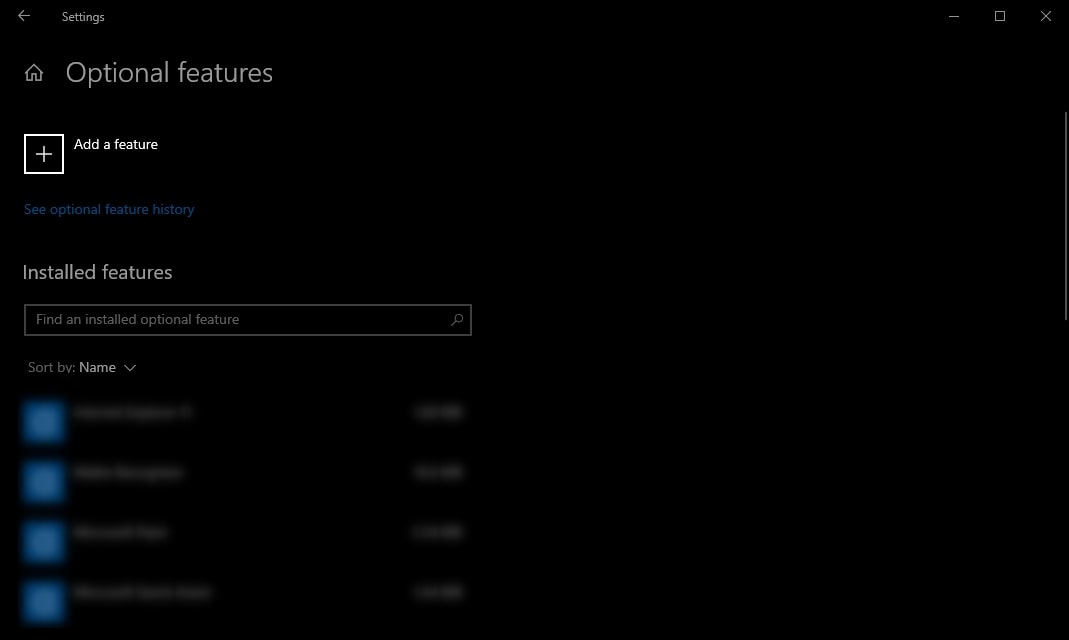
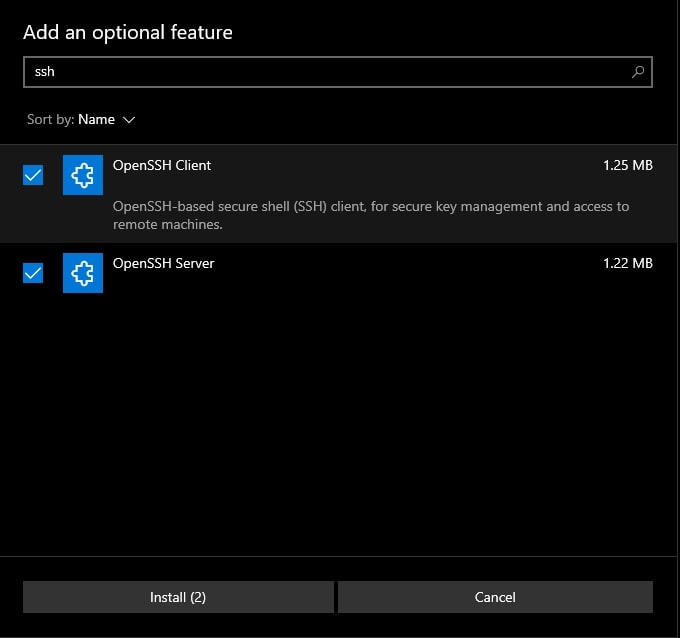
Search for SSH and install both the OpenSSH Client and the OpenSSH Server:
Restart your machine (or sign out and in again) to automatically add the set of SSH commands to your PATH environment variable. You should now be able to execute the ssh command from PowerShell:

If you see the usage message above, you can stop here and everything is set up. If not, you may have an error similar to the following:

If you see this error, keep reading to add the commands to your PATH environment variable directly.
Adding the OpenSSH Commands to Your PATH Environment Variable
Open the START menu and open Edit the system environment variables:
Select Environment Variables:
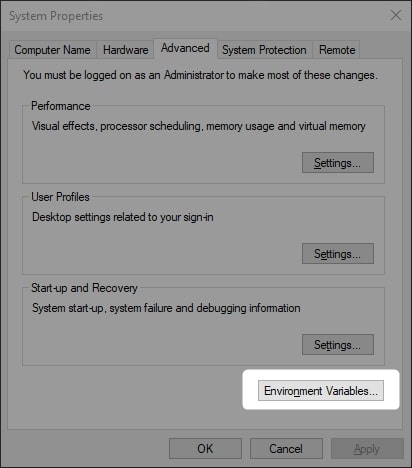
Select your Path system variable and select Edit:
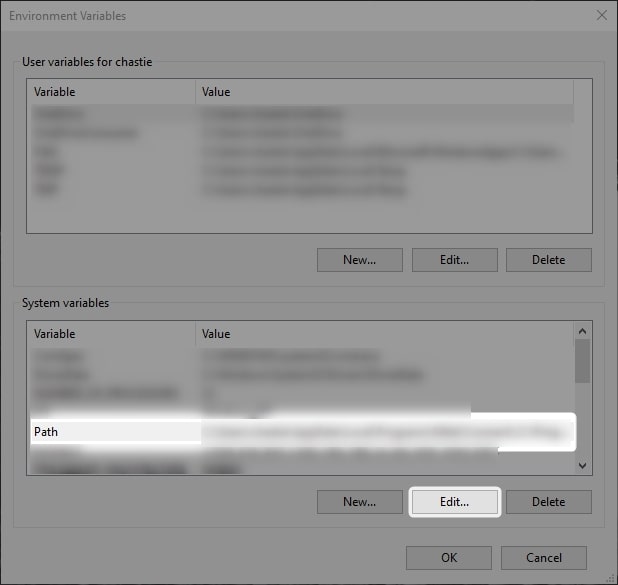
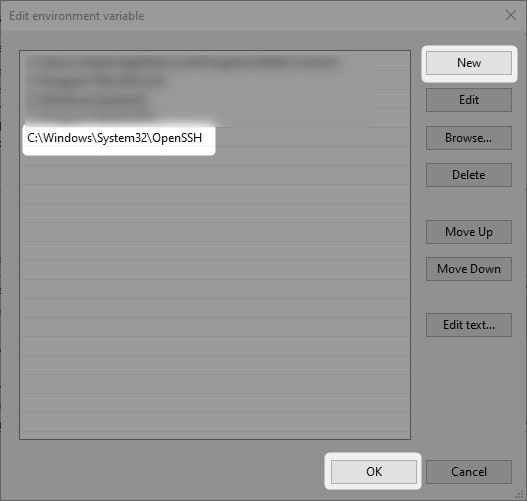
Select to add a New variable and enter the location of the OpenSSH folder as a variable. By default, this should be C:\Windows\System32\OpenSSH. Then hit OK a few times to close the various menus:
You should now be able to execute the ssh command from PowerShell:

Congratulations! You now have a working SSH command that could be used to do a variety of things, as mentioned at the top of this post:
- Log into a Linux virtual machine
- Copy files to/from a Linux virtual machine
- Generate SSH keys that can be used for SSH authentication
- Configure authentication to a remote Git repository without entering a password
Check back next week for another post that builds upon this one!
The latest builds of Windows 10 and Windows 11 include a build-in SSH server and client that are based on OpenSSH.
This means now you can remotely connect to Windows 10/11 or Windows Server 2019 using any SSH client, like Linux distros.
Let’s see how to configure OpenSSH on Windows 10 and Windows 11, and connect to it using Putty or any other SSH client.
OpenSSH is an open-source, cross-platform version of Secure Shell (SSH) that is used by Linux users for a long time.
This project is currently ported to Windows and can be used as an SSH server on almost any version of Windows.
In the latest versions of Windows Server 2022/2019 and Windows 11, OpenSSH is built-in to the operating system image.
How to install SSH Server on Windows 10?
Make sure our build of Windows 10 is 1809 or newer. The easiest way to do this is by running the command:
Note. If you have an older Windows 10 build installed, you can update it through Windows Update or using an ISO image with a newer version of Windows 10 (you can create an image using the Media Creation Tool). If you don’t want to update your Windows 10 build, you can manually install the Win32-OpenSSH port for Windows with GitHub.
Enable feature
We can enable OpenSSH server in Windows 10 through the graphical Settings panel:
-
Go to the
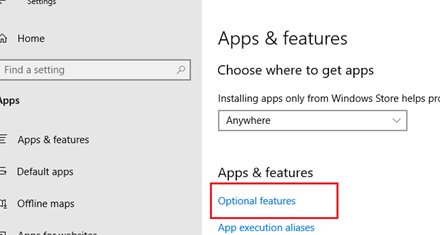
Settings>Apps>Apps and features>Optional features(or run thecommand ms-settings:appsfeatures) -
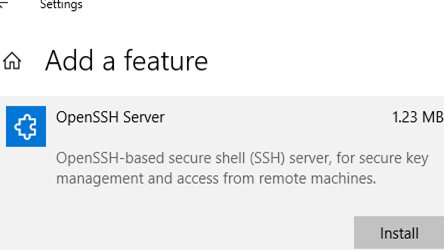
Click Add a feature, select
OpenSSH Server(OpenSSH-based secure shell (SSH) server, for secure key management and access from remote machines), and clickInstall
Install using PowerShell
We can also install sshd server using PowerShell:
Add-WindowsCapability -Online -Name OpenSSH.Server*
Install using DISM
Or we can also install sshd server using DISM:
dism /Online /Add-Capability /CapabilityName:OpenSSH.Server~~~~0.0.1.0
If you want to make sure the OpenSSH server is installed, run the following PS command:
Get-WindowsCapability -Online | ? Name -like 'OpenSSH.Server*'
How to uninstall SSH Server?
Use the following PowerShell command to uninstall the SSH server:
Remove-WindowsCapability -Online -Name OpenSSH.Server~~~~0.0.1.0
How to Install SSH Server on Windows 11?
Also, you can add the OpenSSH Server on Windows 11.
- Go to Settings > Apps > Optional features;
- Click View Features;
Select OpenSSH Server from the list and click Next > Install;
Wait for the installation to complete.
The OpenSSH binaries are located in the C:\Windows\System32\OpenSSH\ folder.
Configuring SSH Service on Windows 10 and 11
Check the status of ssh-agent and sshd services using the PowerShell command Get-Service:
As we can see, both services are in a Stopped state and not added to the automatic startup list. To start services and configure autostart for them, run the following commands:
Start-Service sshd
Set-Service -Name sshd -StartupType 'Automatic'

Start-Service 'ssh-agent'
Set-Service -Name 'ssh-agent' -StartupType 'Automatic'
We also need to allow incoming connections to TCP port 22 in the Windows Defender Firewall. We can open the port using netsh:
netsh advfirewall firewall add rule name=”SSHD service” dir=in action=allow protocol=TCP localport=22
Or we can add a firewall rule to allow SSH traffic using PowerShell:
New-NetFirewallRule -Name sshd -DisplayName 'OpenSSH Server (sshd)' -Enabled True -Direction Inbound -Protocol TCP -Action Allow -LocalPort 22
Now we can connect to Windows 10 using any SSH client. To connect from Linux, use the command:
ssh -p 22 admin@192.168.1.90
Here, the admin is a local Windows user under which we want to connect. 192.168.1.90 is an IP address of your Windows 10 computer.
After that, a new Windows command prompt window will open in SSH session.
Hint. To run the PowerShell.exe cli instead of cmd.exe shell when logging in via SSH on Windows 10, we need to run the following command in Windows 10 (under admin account):
New-ItemProperty -Path "HKLM:\SOFTWARE\OpenSSH" -Name DefaultShell -Value "C:\Windows\System32\WindowsPowerShell\v1.0\powershell.exe" -PropertyType String -Force
Now, we change the default OpenSSH shell. From here, when connecting to Windows via SSH, you will immediately see PowerShell prompt instead of cmd.exe.
If you want to use key-based ssh authentication instead of password authentication, you need to generate a key using ssh-keygen on your client.
Then, the contents of the id_rsa.pub file must be copied to the c:\users\admin\.ssh\authorized_keys file in Windows 10.
After that, you can connect from your Linux client to Windows 10 without a password. Use the command:
ssh -l admin@192.168.1.90
Configuration
We can configure various OpenSSH server settings in Windows using the %programdata%\ssh\sshd_config configuration file.
For example, we can disable password authentication and leave only key-based auth with:
PubkeyAuthentication yes
PasswordAuthentication no
Here we can also specify a new TCP port (instead of the default TCP 22 port) on which the SSHD will accept connections. For example:
Using the directives AllowGroups, AllowUsers, DenyGroups, DenyUsers, you can specify users and groups who are allowed or denied to connect to Windows via SSH:
DenyUsers theitbros\jbrown@192.168.1.15— blocks connections to username jbrown from 192.168.1.15 hostsжDenyUsers theitbros\*— prevent all users from theitbros domain to connect host using sshжAllowGroups theitbros\ssh_allow— only allow users from theitbtos\ssh_allow connect hostю- The allow and deny rules of sshd are processed in the following order:
DenyUsers,AllowUsers,DenyGroups, andAllowGroups.
After making changes to the sshd_config file, you need to restart the sshd service:
Get-Service sshd | Restart-Service –force
In previous versions of OpenSSH on Windows, all sshd service logs were written to the text file C:\ProgramData\ssh\logs\sshd.log by default.
On Windows 11, SSH logs can be viewed using the Event Viewer console (eventvwr.msc). All SSH events are available in a separate section Application and Services Logs > OpenSSH > Operational.
For example, the screenshot shows an example of an event with a successful connection to the computer via SSH. You can see the ssh client’s IP address (hostname) and the username used to connect.
sshd: Accepted password for jbrown from 192.168.14.14. port 49833 ssh2
В последних билдах Windows 10 появился встроенный SSH сервер и клиент на базе OpenSSH. Это значит, что теперь вы можете удаленно подключаться к компьютеру Windows 10/11 (Windows Server 2019/2022) с помощью любого SSH клиента, как к Linux. В этой статье мы покажем, как настроить OpenSSH в Windows 10 и подключится к нему с помощью putty или любого другого SSH клиента.
Убедитесь, что ваша версия Windows 10 1809 или выше. Проще всего это сделать, выполнив команду:
winver
Совет. Если у вас более старая версия Windows 10 вы можете обновить ее через Windows Update или с помощью ISO образа с более новой версией Windows 10 (можно создать его с помощью Media Creation Tool). Если вы не хотите обновлять Windows 10, вы можете вручную установить порт OpenSSH для Windows с GitHub — Win32-OpenSSH (https://github.com/PowerShell/Win32-OpenSSH).
Вы можете включить OpenSSH сервера в Windows 10 через панель Параметры:
- Перейдите в Settings -> Apps -> Optional features;
- Нажмите Add a feature, выберите OpenSSH Server и нажмите Install;
Также вы можете установить sshd сервер в Windows с помощью PowerShell:
Add-WindowsCapability -Online -Name OpenSSH.Server*

Или с помощью DISM:
dism /Online /Add-Capability /CapabilityName:OpenSSH.Server~~~~0.0.1.0
Если вы хотите убедитесь, что OpenSSH сервер установлен, выполните следующую команду:
Get-WindowsCapability -Online | ? Name -like 'OpenSSH.Server*'
Name : OpenSSH.Server~~~~0.0.1.0
State : Installed

Проверьте статус служб ssh-agent и sshd с помощью командлета Get-Service:
Get-Service -Name *ssh*

Как вы видите, обе службы находятся в состоянии Stopped и не добавлены в автозагрузку. Чтобы запустить службы и настроить для них автозапуск, выполните команды:
Start-Service sshd
Set-Service -Name sshd -StartupType 'Automatic'
Start-Service ‘ssh-agent’
Set-Service -Name ‘ssh-agent’ -StartupType 'Automatic'

Также нужно разрешить входящие подключения на порт TCP 22 в Windows Defender Firewall:
netsh advfirewall firewall add rule name="SSHD service" dir=in action=allow protocol=TCP localport=22
Теперь вы можете подключиться к Windows 10 с помощью любого SSH клиента. Для подключения из Linux используете команду:
ssh -p 22 admin@192.168.1.90
где, admin – имя локального пользователя Windows, под которым вы хотите подключиться
192.168.1.90 – ip адрес вашего компьютера с Windows 10
После этого откроется окно командной строки Windows.
Совет. Чтобы вместо оболочки cmd.exe при подключении к Windows 10 через SSH запускалась консоль PoweShell, нужно выполнить команду:
New-ItemProperty -Path "HKLM:\SOFTWARE\OpenSSH" -Name DefaultShell -Value "C:\Windows\System32\WindowsPowerShell\v1.0\powershell.exe" -PropertyType String –Force
Так вы измените оболочку, которая стартует через OpenSSH. Теперь при подключении к Windows по SSH у вас будет сразу открываться консоль PowerShell вместо командной строки cmd.exe.

Если вы хотите использовать key-based ssh authentification вместо парольной аутентификации, нужно на вашем клиенте сгенерировать ключ с помощью ssh-keygen.exe.
Затем содержимое файла id_rsa.pub нужно скопировать в файл c:\users\admin\.ssh\authorized_keys в Windows 10.
После этого вы сможете подключаться с вашего Linux клиента к Windows 10 без пароля. Используйте команду:
ssh -l admin@192.168.1.90
Вы можете настроить различные параметры OpenSSH сервера в Windows с помощью конфигурационного файла %programdata%\ssh\sshd_config
Например, вы можете отключить аутентификацию по паролю и разрешить вход только по ключу:
PubkeyAuthentication yes
PasswordAuthentication no
Windows has offered a native SSH client and integrated SSH tools since the Windows 10 version. With these, you can connect to SSH servers without third-party software and even run your own Windows 10 SSH server.
Quick summary of how to activate Windows 10 SSH
Activate Client:
- Open “Settings” > “Apps” > “Apps & Features” > “Optional Features” and check if the OpenSSH client is installed — if necessary, install it via “Add Feature”.
- Open command prompt as administrator, e.g. with Windows search > “cmd.exe” > “run as administrator”.
- Enter CMD command
ssh. - Connect to the desired server with
ssh name@server. - If necessary, consider the port: default is port 22, change port with -pPortnumber behind the server name.
- If necessary, confirm host key fingerprint with Yes and enter password for the first connection.
Set up a Windows 10 SSH server:
- Open “Settings” > “Apps” > “Apps & Features” > “Optional Features.
- Select “Add Features” and “OpenSSH Server” and “Install” (admin rights required).
- Set the startup type for “OpenSSH Authentication Agent” and “OpenSSH Server” to “Automatic” in the Windows “Services” app.
- Check firewall rules in the Run dialog with
Get-NetFirewallRule -Name *SSH*. - Connect to the SSH server by entering
ssh <server_name>.
What is Windows 10 SSH (Secure Shell)?
The Secure Shell (SSH) is used to establish a secure network connection between computers or servers. This works thanks to native Windows SSH tools via CMD commands and remote desktop without having to sit at the computer in question in the network. Just like Ubuntu SSH you don’t need any third-party software and is done securely over connections which are encrypted via SCP and SFTP.
This offers many advantages for administrators who use an SSH server-client connection to do tasks remotely. A connection between Linux and Windows computers, remote control of the computer, and transfer of encrypted data are also possible.
The advantage of the SSH protocol is secure remote access, thanks to the following security features:
- Client-server authentication
- Encrypted data transfer
- Data integrity
If you want to use SSH in Windows 11, follow our guide to Windows 11 SSH.
How do you use the Windows 10 SSH client?
These are the requirements for using SSH remote access in Windows:
- At least Windows 2019 or Windows 10 (version 1809)
- At least PowerShell 5.1
- Administrator rights
Follow these steps to use the Windows 10 OpenSSH client:
Step 1: Check via “Settings” > “Apps” > “Apps & Features” > “Optional Features” whether the OpenSSH client is already installed. If not, go to “Add Feature”, enter “OpenSSH Client” and click “Install”.
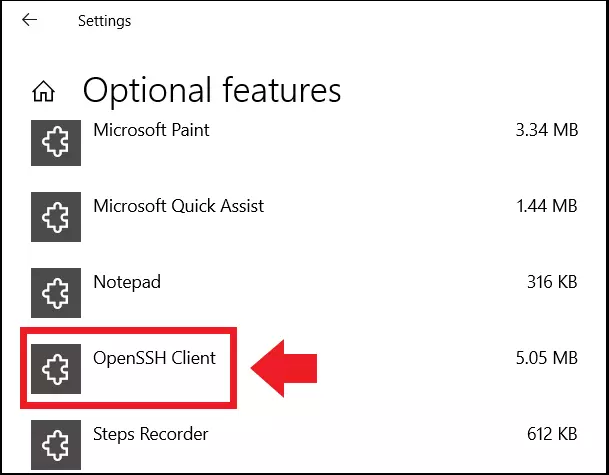
Step 2: Once the client is installed, open the command prompt as an administrator by typing “cmd.exe” in the Windows search and then selecting “run as administrator”.
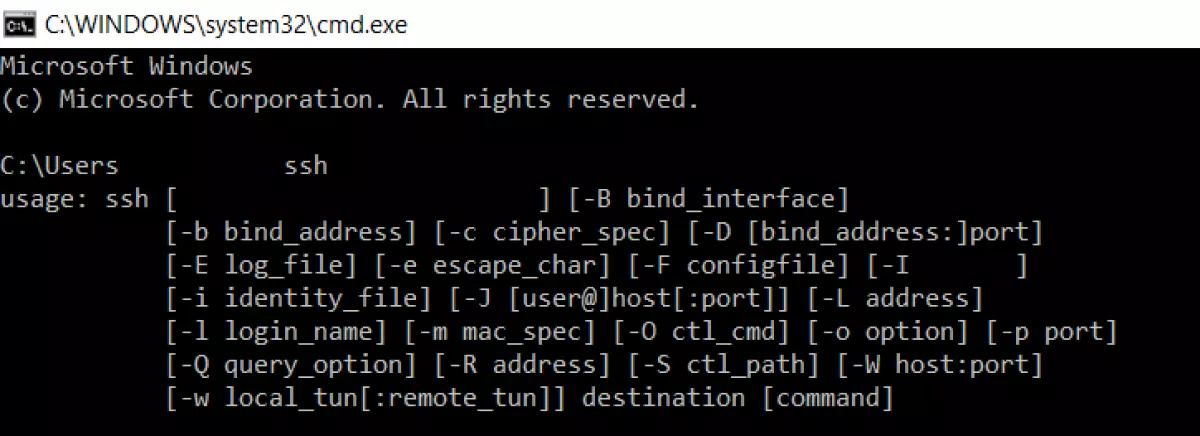
Step 3: To open the native SSH tool in Windows 10, enter the following CMD command:
You’ll see the SSH User Guide with the command syntax and all the current possible parameters offered by the SSH client.
Step 4: If you want to access Raspberry Pi, for example, follow similar steps to macOS and Linux. Connect to the remote server on the required Raspberry device with the following command:
In the address, “Pi” stands for the username on the remote server and “raspberrypi” for the remote server. If it should be an IP address in the network or also an external remote server, use this command syntax:
ssh name@mywebsite.mydomainname.comCMD
Step 5: By default, the SSH client uses port 22. If the addressed server uses a different port, for example, port 7200, establish the connection by specifying the port as follows:
ssh pi@raspberrypi -p 7200CMD
Step 6: If connecting to the server for the first time, confirm the host key fingerprint by entering “Yes”. If you have set up a remote server yourself, you do not need to worry about this because the remote server belongs to you. Enter the user password to control the remote computer via SSH and terminal commands.
How do you set up a Windows 10 SSH server?
If you want to set up an SSH server in addition to accessing your computer remotely, follow these steps. You’ll need to install an OpenSSH server. This is usually not pre-installed under Windows but can be quickly added.
Both Linux and Windows are suitable for setting up and operating a private web server. Our comparison “Linux vs. Windows Servers” reveals the advantages of each solution.
Here’s how to do it:
Step 1: Follow the “Settings” > “Apps” > “Apps & Features” > “Optional Features” path.
Step 2: Go to “Add Features” and click “OpenSSH Server” in the list and click “Install”. This step can be performed only with administrator privileges.
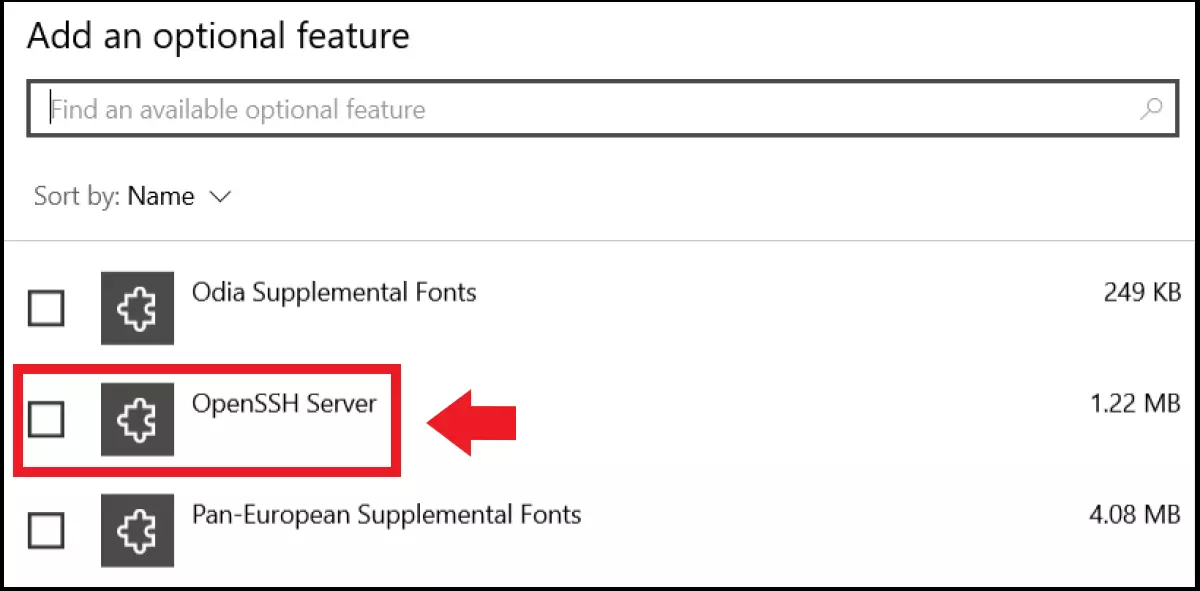
Step 3: For the SSH server, Windows installs the OpenSSH Authentication Agent (if not already installed) and OpenSSH Server services. If you want to use SSH regularly, change the startup type of the services to “Automatic”. To do this, enter “Services” in the Windows search and launch the Services app. Right-click on the corresponding services and go to “Properties”. Now change the startup type to “Automatic”.
Step 4: Check whether the SSH firewall rules have been activated. To do this, enter the following command in the “Run” dialog and check the firewall rules:
Get-NetFirewallRule -Name *SSH*CMD
Step 5: To connect to the Windows 10 SSH server, enter the following command:
If you encounter issues with your connection, you can follow our tips for fixing SSH errors.
Was this article helpful?

