
Все способы:
- Шаг 1: Активация компонента
- Шаг 2: Проверка и настройка
- Вариант 1: Клиент
- Вариант 2: Сервер
- Шаг 3: Подключение
- Вопросы и ответы: 2
Шаг 1: Активация компонента
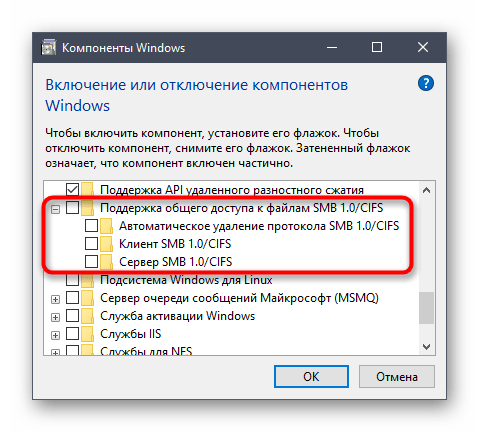
По умолчанию компонент, отвечающий за работу службы Samba (SMB), отключен в Windows 10, поэтому перед настройкой его следует активировать. Делается это в специальном меню «Панели управления». Достаточно будет открыть окно «Компоненты Windows» и установить отметку напротив пункта «Поддержка общего доступа к файлам SMB 1.0/CIFS». В завершение следует перезапустить компьютер, чтобы внесенные изменения зарегистрировались в системе. При надобности обратитесь за помощью к тематической статье на нашем сайте — в ней автор описал эту процедуру более подробно. Там же вы сможете найти альтернативные методы выполнения поставленной задачи. Для ознакомления с темой перейдите по ссылке ниже.
Подробнее: Как включить SMBv1 в Windows 10
Шаг 2: Проверка и настройка
После того как компонент «Поддержка общего доступа к файлам SMB 1.0/CIFS» будет включен, необходимо проверить его работу и выполнить запуск. Для клиентской и серверной части эти действия выполняются по-разному. Подробнее о них будет рассказано дальше по тексту.
Вариант 1: Клиент
Если вы собираетесь настроить клиентскую часть SMB, запустите оболочку «Windows PowerShell» от имени администратора и выполните несколько команд. Делается это следующим образом:
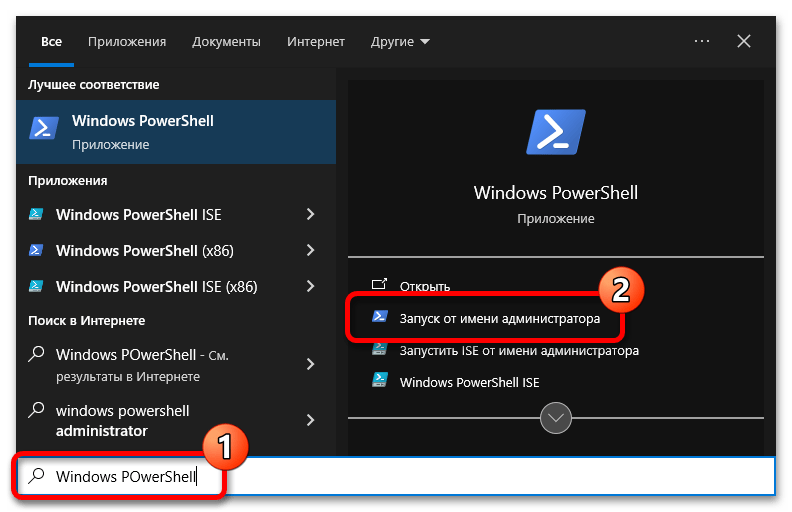
- Запустите оболочку любым доступным способом. Например, сделать это можно посредством поиска по системе. Установите курсор в соответствующее поле на панели задач, введите запрос «Windows PowerShell» и в результате щелкните по пункту «Запуск от имени администратора».

Читайте также: Как открыть Windows PowerShell в Windows 10
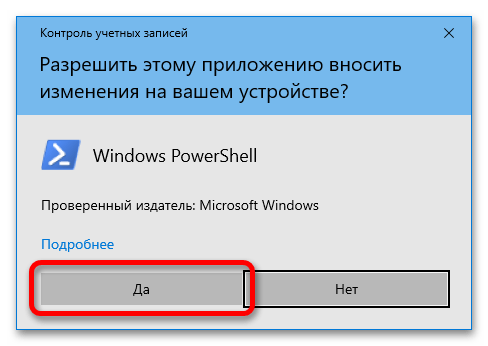
- При появлении диалогового окна контроля учетных записей щелкните по кнопке «Да», чтобы разрешить запуск оболочки.
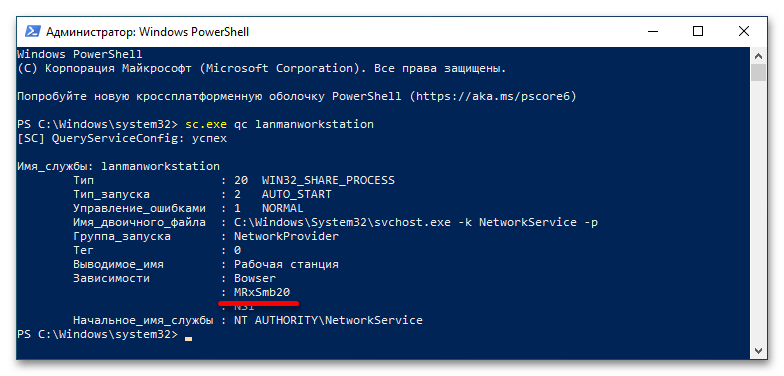
- В появившееся окно «Windows PowerShell» вставьте команду
sc.exe qc lanmanworkstationи нажмите Enter для ее выполнения.В результате появится информация, касающаяся клиентской части службы SMB. Здесь вам необходимо обратить внимание на строку «Зависимости». Важно, чтобы в списке была указана службы под названием «MRxSmb20». Если она есть, значит, все нормально и клиент Samba настроен правильно.
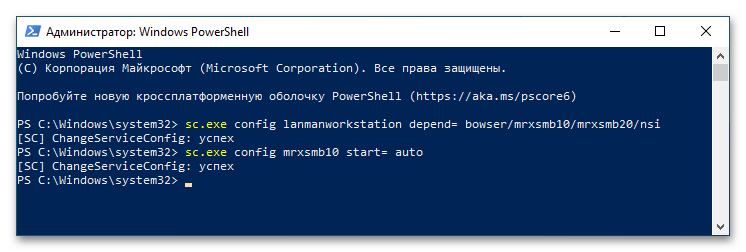
- Если в списке «MRxSmb20» отсутствует, следует вручную включить эту службу. Сделать это можно посредством редактирования системного реестра или путем ввода специальных команд в «Windows PowerShell». Во втором случае воспользуйтесь приведенными ниже командами. Поочередно вставьте их в консоль и нажмите по клавише Enter для выполнения.
sc.exe config lanmanworkstation depend= bowser/mrxsmb10/mrxsmb20/nsi
sc.exe config mrxsmb10 start= auto
Если после ввода команд на экране появлялось сообщение «[SC] ChangeServiceConfig: успех», значит, вы все выполнили верно и клиентская часть Samba полностью настроена.
Вариант 2: Сервер
Серверная часть SMB настраивается похожим образом, но прежде следует проверить ее статус посредством специальной команды, приведенной ниже. Откройте «Windows PowerShell» от имени администратора, как это было показано ранее, а затем выполните команду.
PowerShell Get-SmbServerConfiguration | Select EnableSMB1Protocol
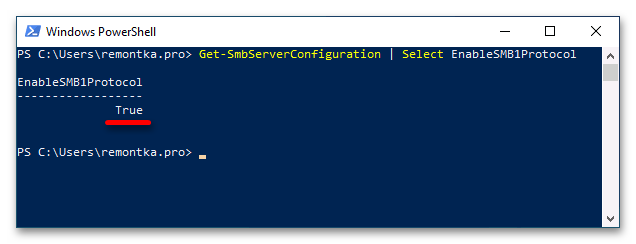
Наличие в столбце «EnableSMB1Protocol» значения «True» означает, что сервер настроен корректно и готов к работе. В противном случае вам необходимо выполнить настройку вручную. Для этого сделайте следующие действия:
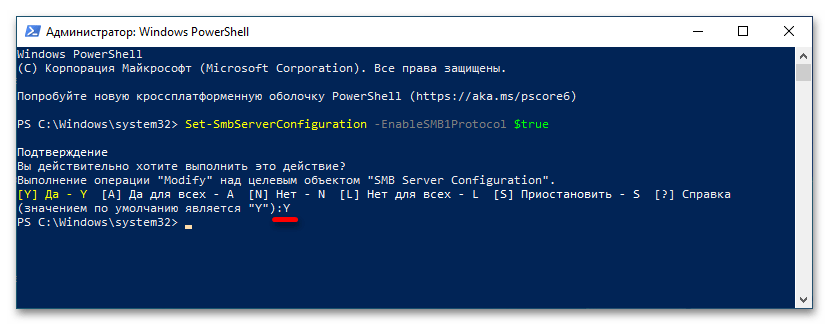
- Впишите в «Windows PowerShell» команду
Set-SmbServerConfiguration -EnableSMB1Protocol $trueи нажмите Enter, чтобы ее выполнить.
При появлении запроса подтверждения впишите символ «Y» (без кавычек) и нажмите по клавише Enter. Это нужно для завершения выполнения команды.
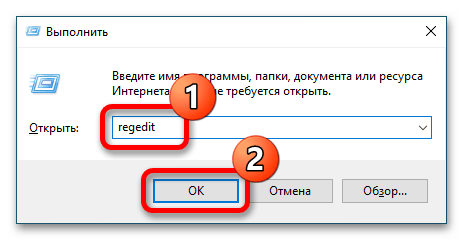
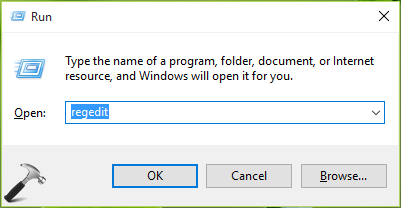
- После этого окно консоли вы можете закрыть, оставшиеся действия выполняются в «Редакторе реестра». Откройте его через системный поиск или утилиту «Выполнить», вызываемую сочетанием клавиш Win + R. Вставьте в поле «Открыть» команду
regeditи кликните по кнопке «ОК».
При появлении диалогового окна контроля учетных записей кликните по кнопке «Да», чтобы разрешить запуск «Редактора реестра».
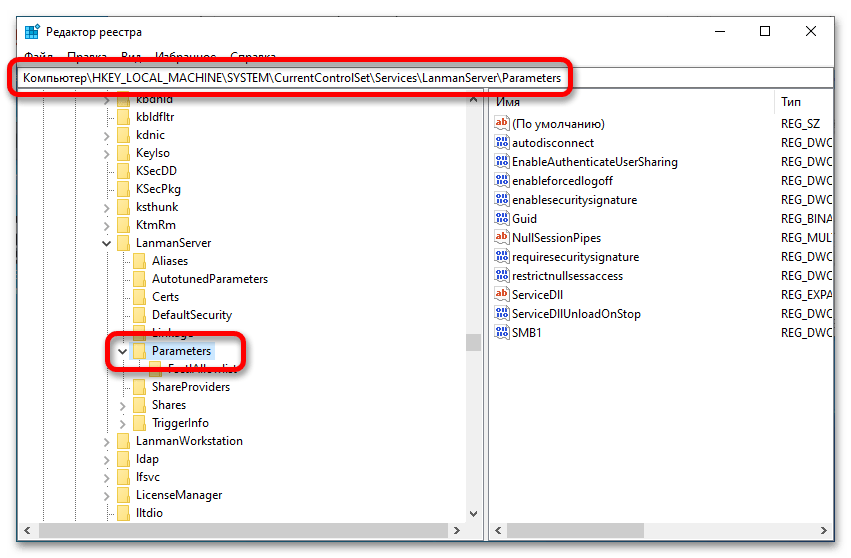
- В появившемся окне приложения воспользуйтесь древовидной структурой каталогов в левой части интерфейса, чтобы перейти по указанному далее пути. Вы также можете сделать это намного быстрее — вставив адрес в адресную строку, находящуюся сверху. Просто скопируйте путь и вставьте его туда, а для перехода нажмите по клавише Enter.
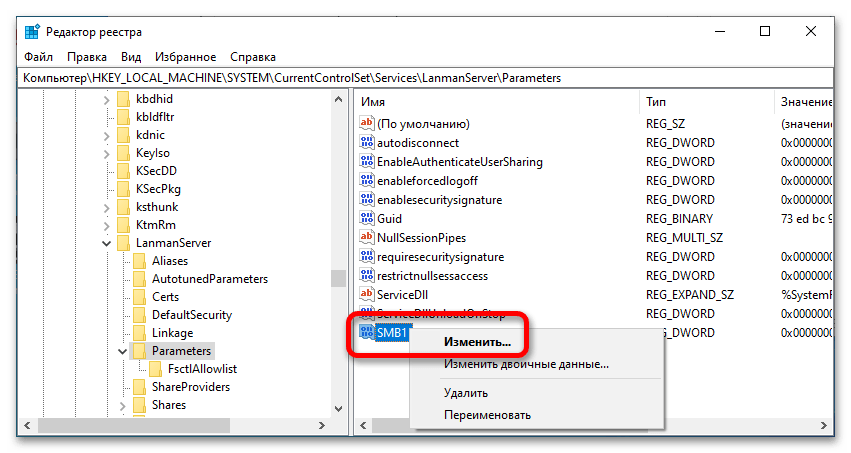
HKEY_LOCAL_MACHINE\SYSTEM\CurrentControlSet\Services\LanmanServer\Parameters - Находясь в целевой директории, найдите в ней параметр под названием «SMB1» и откройте его свойства. Для этого щелкните по нему правой кнопкой мыши и из появившегося контекстного меню выберите пункт «Изменить».
- В поле «Значение» введите цифру «1» (без кавычек) и нажмите по кнопке «ОК», чтобы сохранить внесенные изменения.
Как только все описанные действия будут выполнены, настройку серверной части службы Samba можно считать оконченной.
Шаг 3: Подключение
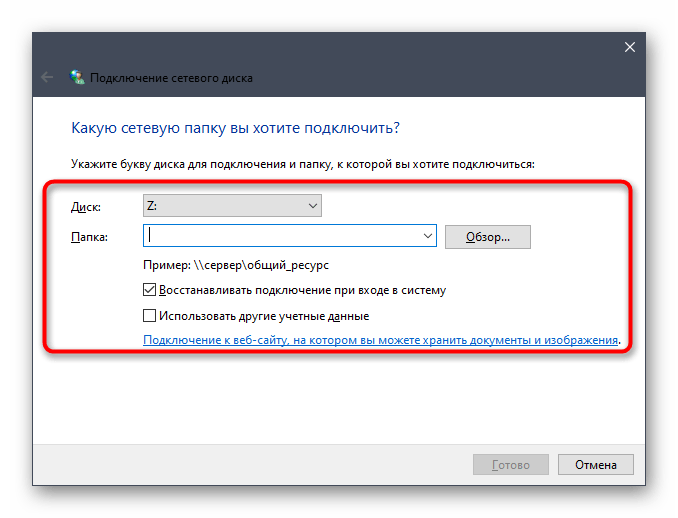
Теперь, когда служба SMB настроена, можно непосредственно пробовать подключаться к серверу. Делается это стандартным способом через меню сетевого диска. Открыть его вы можете через файловый менеджер «Проводник». По итогу вам нужно будет присвоить букву новому диску, ввести адрес сервера Samba и нажать на «Готово». Подробнее об этом рассказывается в другой статье на нашем сайте. Ознакомиться с ее содержанием вы можете посредством следующей ссылки.
Подробнее: Как подключить сетевой диск в Windows 10
Читайте также: Что делать, если не удается подключить сетевой диск в Windows 10
Наша группа в TelegramПолезные советы и помощь
Сетевой протокол SMB (Server Message Block) используется для предоставления совместного удаленного доступа к файлам, принтерам и другим устройствам через порт TCP 445. В этой статье мы рассмотрим: какие версии (диалекты) протокола SMB доступны в различных версиях Windows (и как они соотносятся с версиями samba в Linux); как определить версию SMB на вашем компьютере; и как включить/отключить клиент и сервер SMBv1, SMBv2 и SMBv3.
Содержание:
- Версии протокола SMB в Windows
- Как проверить поддерживаемые версии SMB в Windows?
- Вывести используемые версии SMB с помощью Get-SMBConnection
- Об опасности использования SMBv1
- Включение и отключение SMBv1, SMBv2 и SMBv3 в Windows
Версии протокола SMB в Windows
Есть несколько версии протокола SMB (диалектов), которые последовательно появлялись в новых версиях Windows:
Для реализации протокола SMB в Linux/Unix системах используется samba. В скобках мы указали в каких версиях samba поддерживается каждый диалект SMB.
- CIFS — Windows NT 4.0;
- SMB 1.0 — Windows 2000;
- SMB 2.0 — Windows Server 2008 и Windows Vista SP1 (поддерживается в Samba 3.6);
- SMB 2.1 — Windows Server 2008 R2 и Windows 7 (поддерживается в Samba 4.0);
- SMB 3.0 — Windows Server 2012 и Windows 8 (поддерживается в Samba 4.2);
- SMB 3.02 — Windows Server 2012 R2 и Windows 8. 1 (не поддерживается в Samba);
- SMB 3.1.1 – Windows Server 2016 и Windows 10 (не поддерживается в Samba).
Начиная с версии Samba 4.14, по умолчанию используется SMB2.1.
При сетевом взаимодействии по протоколу SMB между клиентом и сервером используется максимальная версия протокола, поддерживаемая одновременно и клиентом, и сервером.
Ниже представлена сводная таблица, по которой можно определить версию протокола SMB, которая выбирается при взаимодействии разных версий Windows:
| Операционная система | Win 10, Server 2016 | Windows 8.1, Server 2012 R2 |
Windows 8, Server 2012 |
Windows 7, Server 2008 R2 |
Windows Vista, Server 2008 |
Windows XP, Server 2003 и ниже |
| Windows 10 ,
Windows Server 2016 |
SMB 3.1.1 | SMB 3.02 | SMB 3.0 | SMB 2.1 | SMB 2.0 | SMB 1.0 |
| Windows 8.1 , Server 2012 R2 |
SMB 3.02 | SMB 3.02 | SMB 3.0 | SMB 2.1 | SMB 2.0 | SMB 1.0 |
| Windows 8 , Server 2012 |
SMB 3.0 | SMB 3.0 | SMB 3.0 | SMB 2.1 | SMB 2.0 | SMB 1.0 |
| Windows 7, Server 2008 R2 |
SMB 2.1 | SMB 2.1 | SMB 2.1 | SMB 2.1 | SMB 2.0 | SMB 1.0 |
| Windows Vista, Server 2008 |
SMB 2.0 | SMB 2.0 | SMB 2.0 | SMB 2.0 | SMB 2.0 | SMB 1.0 |
| Windows XP, 2003 и ниже | SMB 1.0 | SMB 1.0 | SMB 1.0 | SMB 1.0 | SMB 1.0 | SMB 1.0 |
К примеру, при подключении клиентского компьютера с Windows 8.1 к файловому серверу с Windows Server 2016 будет использоваться протокол SMB 3.0.2.
Согласно таблице Windows XP, Windows Server 2003 для доступа к общим файлам и папкам на сервере могут использовать только SMB 1.0, который в новых версиях Windows Server (2012 R2 / 2016) может быть отключен. Таким образом, если в вашей инфраструктуре одновременно используются компьютеры с Windows XP (снятой с поддержки), Windows Server 2003/R2 и сервера с Windows Server 2012 R2/2016/2019, устаревшие клиенты не смогут получить доступ к файлам и папкам на файловом сервере с новой ОС.
Если Windows Server 2016/2012 R2 с отключенным SMB v1.0 используется в качестве контроллера домена, значить клиенты на Windows XP/Server 2003 не смогут получить доступ к каталогам SYSVOL и NETLOGON на контроллерах домена и авторизоваться в AD.
На старых клиентах при попытке подключиться к ресурсу на файловом сервере с отключенным SMB v1 появляется ошибка:
The specified network name is no longer available
Как проверить поддерживаемые версии SMB в Windows?
Рассмотрим, как определить, какие версии протокола SMB поддерживаются на вашем компьютере Windows.
В Windows 10, 8.1 и Windows Server 2019/2016/2012R2 вы можете проверить состояние различных диалектов SMB протокола с помощью PowerShell:
Get-SmbServerConfiguration | select EnableSMB1Protocol,EnableSMB2Protocol

Данная команда вернула, что протокол SMB1 отключен (
EnableSMB1Protocol=False
), а протоколы SMB2 и SMB3 включены (
EnableSMB1Protocol=True
).
Обратите внимание, что протоколы SMBv3 и SMBv2 тесно связаны между собой. Нельзя отключить или включить отдельно SMBv3 или SMBv2. Они всегда включаются/отключаются только совместно, т.к. используют один стек.
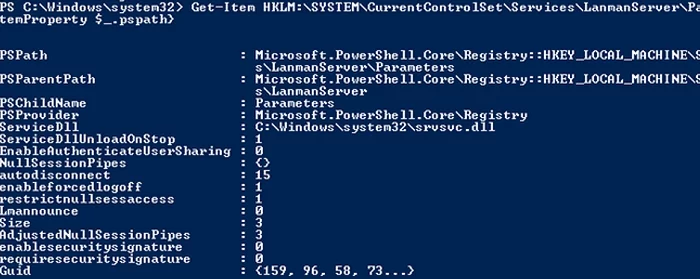
В Windows 7, Vista, Windows Server 2008 R2/2008:
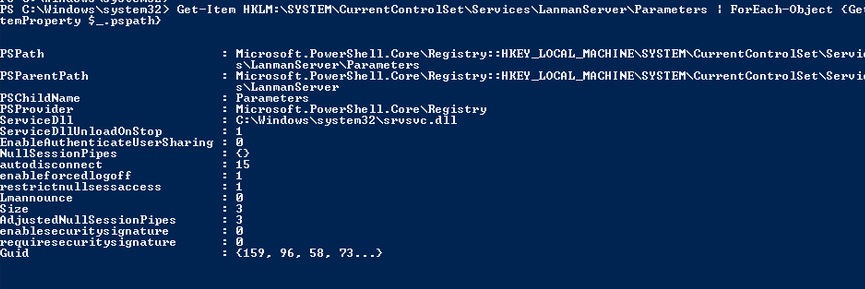
Get-Item HKLM:\SYSTEM\CurrentControlSet\Services\LanmanServer\Parameters | ForEach-Object {Get-ItemProperty $_.pspath}
Если в данной ветке реестра нет параметров с именами SMB1 или SMB2, значить протоколы SMB1 и SMB2 по умолчанию включены.
Также в этих версиях Windows вы можете проверить, какие диалекты SMB разрешено использовать в качестве клиентов с помощью команд:
sc.exe query mrxsmb10
SERVICE_NAME: mrxsmb10
TYPE : 2 FILE_SYSTEM_DRIVER
STATE : 4 RUNNING
(STOPPABLE, NOT_PAUSABLE, IGNORES_SHUTDOWN)
WIN32_EXIT_CODE : 0 (0x0)
SERVICE_EXIT_CODE : 0 (0x0)
CHECKPOINT : 0x0
WAIT_HINT : 0x0
sc.exe query mrxsmb20
SERVICE_NAME: mrxsmb20
TYPE : 2 FILE_SYSTEM_DRIVER
STATE : 4 RUNNING
(STOPPABLE, NOT_PAUSABLE, IGNORES_SHUTDOWN)
WIN32_EXIT_CODE : 0 (0x0)
SERVICE_EXIT_CODE : 0 (0x0)
CHECKPOINT : 0x0
WAIT_HINT : 0x0
В обоих случаях службы запущены (
STATE=4 Running
). Значит Windows может подключаться как к SMBv1, так и к SMBv2 серверам.
Вывести используемые версии SMB с помощью Get-SMBConnection
Как мы говорили раньше, компьютеры при взаимодействии по протоколу SMB используют максимальную версию, поддерживаемую как клиентом, так и сервером. Для определения версии SMB, используемой для доступа к удаленному компьютеру можно использовать командлет PowerShell
Get-SMBConnection
:
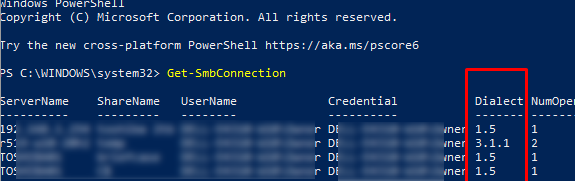
Версия SMB, используемая для подключения к удаленному серверу (ServerName) указана в столбце Dialect.
Можно вывести информацию о версиях SMB, используемых для доступа к конкретному серверу:
Get-SmbConnection -ServerName servername
Если нужно отобразить, используется ли SMB шифрование (появилось в SMB 3.0), выполните:
Get-SmbConnection | ft ServerName,ShareName,Dialect,Encrypted,UserName
В Linux вывести список SMB подключения и используемые диалекты в samba можно командой:
$ sudo smbstatus
Чтобы на стороне сервера вывести список используемых клиентами версий протокола SMB и количество клиентов, используемых ту или иную версию протокола SMB, выполните команду:
Get-SmbSession | Select-Object -ExpandProperty Dialect | Sort-Object -Unique

В нашем примере имеется 825 клиентов, подключенных к серверу с помощью SMB 2.1 (Windows 7/Windows Server 2008 R2) и 12 клиентов SMB 3.02.
С помощью PowerShell можно включить аудит версий SMB, используемых для подключения:
Set-SmbServerConfiguration –AuditSmb1Access $true
События подключения затем можно извлечь из журналов Event Viewer с помощью PowerShell:
Get-WinEvent -LogName Microsoft-Windows-SMBServer/Audit
Об опасности использования SMBv1
Последние несколько лет Microsoft из соображений безопасности планомерно отключает устаревший протокол SMB 1.0. Связано это с большим количеством критических уязвимостей в этом протоколе (вспомните историю с эпидемиями вирусов-шифровальщиков wannacrypt и petya, которые использовали уязвимость именно в протоколе SMBv1). Microsoft и другие IT компании настоятельно рекомендуют отказаться от его использования.
Однако отключение SMBv1 может вызвать проблемы с доступом к общий файлам и папкам на новых версиях Windows 10 (Windows Server 2016/2019) с устаревших версий клиентов (Windows XP, Server 2003), сторонних ОС (Mac OSX 10.8 Mountain Lion, Snow Leopard, Mavericks, старые версии Linux), различных старых NAS устройствах.
Если в вашей сети не осталось legacy устройств с поддержкой только SMBv1, обязательно отключайте эту версию диалекта в Windows.
В том случае, если в вашей сети остались клиенты с Windows XP, Windows Server 2003 или другие устройства, которые поддерживают только SMBv1, их нужно как можно скорее обновить или тщательно изолировать.
Включение и отключение SMBv1, SMBv2 и SMBv3 в Windows
Рассмотрим способы включения, отключения различных версий SMB в Windows. Мы рассматриваем отдельно включение клиента и сервера SMB (это разные компоненты).
Windows 10, 8.1, Windows Server 2019/2016/2012R2:
Отключить клиент и сервер SMBv1:
Disable-WindowsOptionalFeature -Online -FeatureName smb1protocol
Отключить только SMBv1 сервер:
Set-SmbServerConfiguration -EnableSMB1Protocol $false
Включить клиент и сервер SMBv1:
Enable-WindowsOptionalFeature -Online -FeatureName smb1protocol
Включить только SMBv1 сервер:
Set-SmbServerConfiguration -EnableSMB1Protocol $true
Отключить сервер SMBv2 и SMBv3:
Set-SmbServerConfiguration -EnableSMB2Protocol $false
Включить сервер SMBv2 и SMBv3:
Set-SmbServerConfiguration -EnableSMB2Protocol $true

Windows 7, Vista, Windows Server 2008 R2/2008:
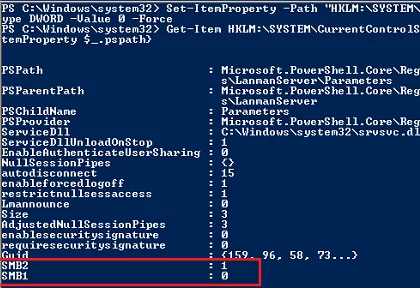
Отключить SMBv1 сервер:
Set-ItemProperty -Path "HKLM:\SYSTEM\CurrentControlSet\Services\LanmanServer\Parameters" SMB1 -Type DWORD -Value 0 –Force

Включить SMBv1 сервер:
Set-ItemProperty -Path "HKLM:\SYSTEM\CurrentControlSet\Services\LanmanServer\Parameters" SMB1 -Type DWORD -Value 1 –Force
Отключить SMBv1 клиент:
sc.exe config lanmanworkstation depend= bowser/mrxsmb20/nsi
sc.exe config mrxsmb10 start= disabled
Включить SMBv1 клиент:
sc.exe config lanmanworkstation depend= bowser/mrxsmb10/mrxsmb20/nsi
sc.exe config mrxsmb10 start= auto
Отключить SMBv2 сервер:
Set-ItemProperty -Path "HKLM:\SYSTEM\CurrentControlSet\Services\LanmanServer\Parameters" SMB2 -Type DWORD -Value 0 -Force
Включить SMBv2 сервер
Set-ItemProperty -Path "HKLM:\SYSTEM\CurrentControlSet\Services\LanmanServer\Parameters" SMB2 -Type DWORD -Value 1 –Force
Отключить SMBv2 клиент:
sc.exe config lanmanworkstation depend= bowser/mrxsmb10/nsi
sc.exe config mrxsmb20 start= disabled
Включить SMBv2 клиент:
sc.exe config lanmanworkstation depend= bowser/mrxsmb10/mrxsmb20/nsi
sc.exe config mrxsmb20 start= auto
Для отключения сервера SMBv1 на всех компьютерах независимо от версии Windows можно распространить параметр реестра типа REG_DWORD с именем SMB1 и значением 0 (HKEY_LOCAL_MACHINE\SYSTEM\CurrentControlSet\Services\LanmanServer\Parameters)на через GPO.
Для отключения SMBv2 нужно в этой же ветке установить параметр SMB2=0.
Для отключения SMBv1 клиента нужно распространить такой параметр реестра:
- Key: HKEY_LOCAL_MACHINE\SYSTEM\CurrentControlSet\services\mrxsmb10
- Name: Start
- Type: REG_DWORD
- Value: 4
При отключении SMB 1.0/CIFS File Sharing Support в Windows вы можете столкнуться с ошибкой “0x80070035, не найден сетевой путь”, ошибкой при доступе к общим папкам, и проблемами обнаружения компьютеров в сетевом окружении. В этом случае вместо служба обозревателя компьютеров (Computer Browser) нужно использовать службы обнаружения (линк).
The Server Message Block (SMB) protocol is basically a file sharing protocol present in Windows. It allows applications to read/write to files and urge requests for services from server manager for network connected computers. There are three versions of this protocol, SMB Version 1 (SMBv1), SMB Version 2 (SMBv2), SMB Version 3 (SMBv3). SMBv3 is the current version and SMBv1 is quite outdated on the present date. Windows comes with SMBv1 enabled by default.
With the increased ransomware attacks and due to most recent WannaCry ransomware hiccup, Microsoft has recommended users to disable the outdated SMBv1 protocol from their systems. As SMBv1 is much older technology so it is highly vulnerable and can be easily used by ransomware attackers to target the victim machines. However, Microsoft also recommends that you do not leave SMBv2, SMBv3 disabled, otherwise it will break functionality of your Windows.
So in this article, we’ll show you how to enable or disable these protocols on your Windows system.
Page Contents
How To Enable Or Disable SMB Protocols In Windows 10/8.1/8/7
WAY 1 – Using Windows Features Applet (Disable SMBv1 Protocol)
1. Using Cortana or Windows Search, look for term features. From results, click Turn Windows Features On or Off. See this fix, if you find Turn Windows Features On or Off applet blank.
2. In Turn Windows Features On or Off window, scroll down and look for SMB 1.0/CIFS File Sharing Support which must be checked by default. Uncheck this option to disable SMBv1 and click OK.
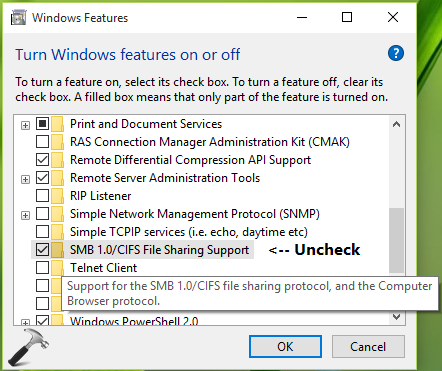
Using this way you can’t disable other SMB protocols such as SMBv2 and SMBv3. So for that, you can tweak registry as mentioned below.
WAY 2 – Using Registry (Disable SMBv1, SMBv2, SMBv3 Protocols)
Registry Disclaimer: The further steps will involve registry manipulation. Making mistakes while manipulating registry could affect your system adversely. So be careful while editing registry entries and create a System Restore point first.
1. Press + R and put regedit in Run dialog box to open Registry Editor (if you’re not familiar with Registry Editor, then click here). Click OK.
2. In the Registry Editor window, navigate to following registry key:
HKEY_LOCAL_MACHINE\SYSTEM\CurrentControlSet\Services\LanmanServer\Parameters
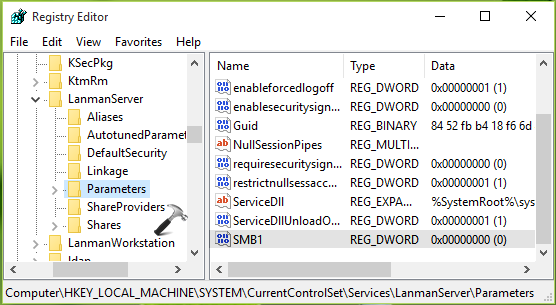
3. In the right pane of Parameters registry key, simply create a new registry DWORD (REG_DWORD) named SMB1 to disable SMBv1 protocol and set its Value data to 0. Similarly, to disable SMBv2 and SMBv3 protocols simultaneously, create SMB2 registry DWORD (REG_DWORD) and set its Value data to 0. Once done, close the Registry Editor and reboot to make changes effective.
You can re-enable SMBv1, SMBv2, SMBv3 protocols anytime in future, by simply deleting SMB1, SMB2 registry DWORDs created above. However, better if you keep SMBv1 disabled at all (in case if you’re on an older Windows edition/build). Also its worth to mention here, keep your system updated with latest security updates offered by Microsoft, to stay safe from Ransomware phenomenon.
That’s it!
RELATED ARTICLES
How to detect, enable and disable SMBv1, SMBv2, and SMBv3 in Windows
Источник: здесь
Источник 2: https://remontka.pro/0x80004005-unspecified-network-error/
Disabling SMBv2 or SMBv3 for troubleshooting
We recommend keeping SMBv2 and SMBv3 enabled, but you might find it useful to disable one temporarily for troubleshooting. For more information, see How to detect status, enable, and disable SMB protocols on the SMB Server.
In Windows 10, Windows 8.1, Windows Server 2019, Windows Server 2016, Windows Server 2012 R2, and Windows Server 2012, disabling SMBv3 deactivates the following functionality:
- Transparent Failover — clients reconnect without interruption to cluster nodes during maintenance or failover
- Scale Out — concurrent access to shared data on all file cluster nodes
- Multichannel — aggregation of network bandwidth and fault tolerance if multiple paths are available between client and server
- SMB Direct — adds RDMA networking support for high performance, with low latency and low CPU use
- Encryption — Provides end-to-end encryption and protects from eavesdropping on untrustworthy networks
- Directory Leasing — Improves application response times in branch offices through caching
- Performance Optimizations — optimizations for small random read/write I/O
In Windows 7 and Windows Server 2008 R2, disabling SMBv2 deactivates the following functionality:
- Request compounding — allows for sending multiple SMBv2 requests as a single network request
- Larger reads and writes — better use of faster networks
- Caching of folder and file properties — clients keep local copies of folders and files
- Durable handles — allow for connection to transparently reconnect to the server if there’s a temporary disconnection
- Improved message signing — HMAC SHA-256 replaces MD5 as hashing algorithm
- Improved scalability for file sharing — number of users, shares, and open files per server greatly increased
- Support for symbolic links
- Client oplock leasing model — limits the data transferred between the client and server, improving performance on high-latency networks and increasing SMB server scalability
- Large MTU support — for full use of 10 Gigabit Ethernet (GbE)
- Improved energy efficiency — clients that have open files to a server can sleep
The SMBv2 protocol was introduced in Windows Vista and Windows Server 2008, while the SMBv3 protocol was introduced in Windows 8 and Windows Server 2012. For more information about SMBv2 and SMBv3 capabilities, see the following articles:
- Server Message Block overview
- What’s New in SMB
How to remove SMBv1 via PowerShell
Here are the steps to detect, disable and enable SMBv1 client and server by using PowerShell commands with elevation.
Note
The computer will restart after you run the PowerShell commands to disable or enable SMBv1.
-
Detect:
Get-WindowsOptionalFeature -Online -FeatureName SMB1Protocol -
Disable:
Disable-WindowsOptionalFeature -Online -FeatureName SMB1Protocol -
Enable:
Enable-WindowsOptionalFeature -Online -FeatureName SMB1Protocol
Tip
You can detect SMBv1 status, without elevation, by running: Get-SmbServerConfiguration | Format-List EnableSMB1Protocol.
Windows Server 2012 Windows Server 2012 R2, Windows Server 2016, Windows Server 2019: Server Manager method
To remove SMBv1 from Windows Server:
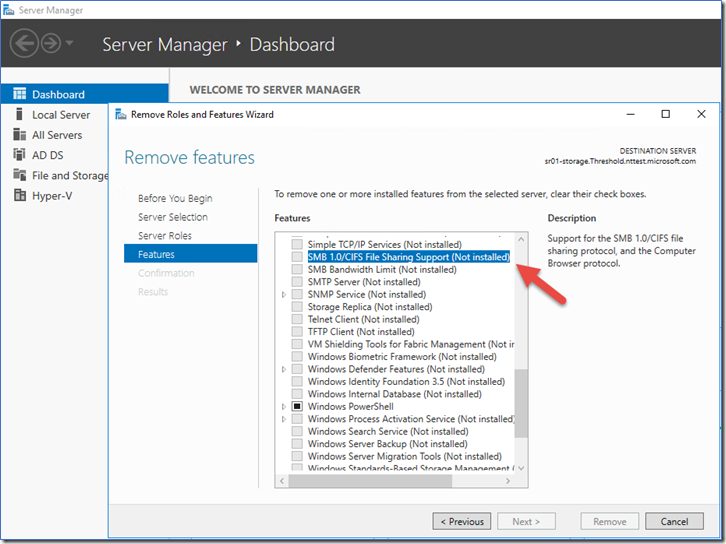
- On the Server Manager Dashboard of the server where you want to remove SMBv1, under Configure this local server, select Add roles and features.
- On the Before you begin page, select Start the Remove Roles and Features Wizard, and then on the following page, select Next.
- On the Select destination server page under Server Pool, ensure that the server you want to remove the feature from is selected, and then select Next.
- On the Remove server roles page, select Next.
- On the Remove features page, clear the check box for SMB 1.0/CIFS File Sharing Support and select Next.
- On the Confirm removal selections page, confirm that the feature is listed, and then select Remove.
Windows 8.1, Windows 10, and Windows 11: Add or Remove Programs method
To disable SMBv1 for the mentioned operating systems:
- In Control Panel, select Programs and Features.
- Under Control Panel Home, select Turn Windows features on or off to open the Windows Features box.
- In the Windows Features box, scroll down the list, clear the check box for SMB 1.0/CIFS File Sharing Support and select OK.
- After Windows applies the change, on the confirmation page, select Restart now.
How to detect status, enable, and disable SMB protocols
Note
When you enable or disable SMBv2 in Windows 8 or Windows Server 2012, SMBv3 is also enabled or disabled. This behavior occurs because these protocols share the same stack.
- Server
- Client
Windows 8 and Windows Server 2012 introduced the new Set-SMBServerConfiguration Windows PowerShell cmdlet. The cmdlet enables you to enable or disable the SMBv1, SMBv2, and SMBv3 protocols on the server component.
You don’t have to restart the computer after you run the Set-SMBServerConfiguration cmdlet.
SMBv1
-
Detect:
Get-SmbServerConfiguration | Select EnableSMB1Protocol -
Disable:
Set-SmbServerConfiguration -EnableSMB1Protocol $false -
Enable:
Set-SmbServerConfiguration -EnableSMB1Protocol $true
For more information, see Server storage at Microsoft.
SMB v2/v3
-
Detect:
Get-SmbServerConfiguration | Select EnableSMB2Protocol -
Disable:
Set-SmbServerConfiguration -EnableSMB2Protocol $false -
Enable:
Set-SmbServerConfiguration -EnableSMB2Protocol $true
For Windows 7, Windows Server 2008 R2, Windows Vista, and Windows Server 2008
To enable or disable SMB protocols on an SMB Server that is running Windows 7, Windows Server 2008 R2, Windows Vista, or Windows Server 2008, use Windows PowerShell or Registry Editor.
Additional PowerShell methods
Note
This method requires PowerShell 2.0 or later.
SMBv1 on SMB Server
Detect:
Get-Item HKLM:\SYSTEM\CurrentControlSet\Services\LanmanServer\Parameters | ForEach-Object {Get-ItemProperty $_.pspath}
Default configuration = Enabled (No registry named value is created), so no SMB1 value will be returned
Disable:
Set-ItemProperty -Path "HKLM:\SYSTEM\CurrentControlSet\Services\LanmanServer\Parameters" SMB1 -Type DWORD -Value 0 -Force
Enable:
Set-ItemProperty -Path "HKLM:\SYSTEM\CurrentControlSet\Services\LanmanServer\Parameters" SMB1 -Type DWORD -Value 1 -Force
Note You must restart the computer after you make these changes. For more information, see Server storage at Microsoft.
SMBv2/v3 on SMB Server
Detect:
Get-ItemProperty HKLM:\SYSTEM\CurrentControlSet\Services\LanmanServer\Parameters | ForEach-Object {Get-ItemProperty $_.pspath}
Disable:
Set-ItemProperty -Path "HKLM:\SYSTEM\CurrentControlSet\Services\LanmanServer\Parameters" SMB2 -Type DWORD -Value 0 -Force
Enable:
Set-ItemProperty -Path "HKLM:\SYSTEM\CurrentControlSet\Services\LanmanServer\Parameters" SMB2 -Type DWORD -Value 1 -Force
Note
You must restart the computer after you make these changes.
Registry Editor
Important
Follow the steps in this section carefully. Serious problems might occur if you modify the registry incorrectly. Before you modify it, back up the registry for restoration in case problems occur.
To enable or disable SMBv1 on the SMB server, configure the following registry key:
HKEY_LOCAL_MACHINE\SYSTEM\CurrentControlSet\Services\LanmanServer\Parameters
Registry entry: SMB1
REG_DWORD: 0 = Disabled
REG_DWORD: 1 = Enabled
Default: 1 = Enabled (No registry key is created)
To enable or disable SMBv2 on the SMB server, configure the following registry key:
HKEY_LOCAL_MACHINE\SYSTEM\CurrentControlSet\Services\LanmanServer\Parameters
Registry entry: SMB2
REG_DWORD: 0 = Disabled
REG_DWORD: 1 = Enabled
Default: 1 = Enabled (No registry key is created)
Note
You must restart the computer after you make these changes.
Disable SMBv1 by using Group Policy
This section introduces how to use Group Policy to disable SMBv1. You can use this method on different versions of Windows.
- Server
- Client
SMBv1
This procedure configures the following new item in the registry:
HKEY_LOCAL_MACHINE\SYSTEM\CurrentControlSet\Services\LanmanServer\Parameters
- Registry entry: SMB1
- REG_DWORD: 0 = Disabled
To use Group Policy to configure this, follow these steps:
-
Open the Group Policy Management Console. Right-click the Group Policy object (GPO) that should contain the new preference item, and then click Edit.
-
In the console tree under Computer Configuration, expand the Preferences folder, and then expand the Windows Settings folder.
-
Right-click the Registry node, point to New, and select Registry Item.


In the New Registry Properties dialog box, select the following:
- Action: Create
- Hive: HKEY_LOCAL_MACHINE
- Key Path: SYSTEM\CurrentControlSet\Services\LanmanServer\Parameters
- Value name: SMB1
- Value type: REG_DWORD
- Value data: 0
This procedure disables the SMBv1 Server components. This Group Policy must be applied to all necessary workstations, servers, and domain controllers in the domain.
The Server Message Block (SMB) network protocol is used to share and access folders, files, printers, and other devices over network (TCP port 445). In this article, we will look at which versions (dialects) of SMB are available in different versions of Windows (and how they relate to samba versions on Linux); how to check the SMB version in use on your computer; and how to enable or disable the SMBv1, SMBv2, and SMBv3 dialects.
Contents:
- SMB Protocol Versions in Windows
- How to Check SMB Version on Windows?
- Checking Used SMB Dialects with Get-SMBConnection
- Stop Using the Insecure SMBv1 Protocol
- How to Enable and Disable SMBv1, SMBv2, and SMBv3 on Windows?
SMB Protocol Versions in Windows
There are several versions of the SMB protocol (dialects) that have consistently appeared in new Windows versions (and samba) :
- CIFS – Windows NT 4.0
- SMB 1.0 – Windows 2000
- SMB 2.0 – Windows Server 2008 and Windows Vista SP1 (supported in Samba 3.6)
- SMB 2.1 – Windows Server 2008 R2 and Windows 7 (Samba 4.0)
- SMB 3.0 – Windows Server 2012 and Windows 8 (Samba 4.2)
- SMB 3.02 – Windows Server 2012 R2 and Windows 8.1 (not supported in Samba)
- SMB 3.1.1 – Windows Server 2016 and Windows 10 (not supported in Samba)
Samba is used to implement the SMB protocol in Linux/Unix . Samba 4.14 and newer uses SMB 2.1 by default.
In SMB network communication, the client and server use the maximum SMB protocol version supported by both the client and the server.
The summary table of SMB version compatibility looks like this. Using this table, you can determine the version of the SMB protocol that is selected when different versions of Windows interact:
| Operating System | Windows 10, Win Server 2016 | Windows 8.1, Win Server 2012 R2 | Windows 8,Server 2012 | Windows 7,Server 2008 R2 | Windows Vista,Server 2008 | Windows XP, Server 2003 and earlier |
| Windows 10, Windows Server 2016 | SMB 3.1.1 | SMB 3.02 | SMB 3.0 | SMB 2.1 | SMB 2.0 | SMB 1.0 |
| Windows 8.1, Server 2012 R2 | SMB 3.02 | SMB 3.02 | SMB 3.0 | SMB 2.1 | SMB 2.0 | SMB 1.0 |
| Windows 8, Server 2012 | SMB 3.0 | SMB 3.0 | SMB 3.0 | SMB 2.1 | SMB 2.0 | SMB 1.0 |
| Windows 7, Server 2008 R2 | SMB 2.1 | SMB 2.1 | SMB 2.1 | SMB 2.1 | SMB 2.0 | SMB 1.0 |
| Windows Vista, Server 2008 | SMB 2.0 | SMB 2.0 | SMB 2.0 | SMB 2.0 | SMB 2.0 | SMB 1.0 |
| Windows XP, 2003 and earlier | SMB 1.0 | SMB 1.0 | SMB 1.0 | SMB 1.0 | SMB 1.0 | SMB 1.0 |
For example, if a client computer running Windows 8.1 connects to a file server with Windows Server 2016, the SMB 3.0.2 protocol will be used.
According to the table, Windows XP and Windows Server 2003 can use only SMB 1.0 to access shared folders and files. The SMBv1 is disabled in newer versions of Windows Server (2012 R2/2016). So, if you are still using Windows XP and Windows Server 2003 devices on your network, they won’t be able to access shared folders on the file server running Windows Server 2016.
If Windows Server 2019/2016 with disabled SMB v1.0 is used as a domain controller, then Windows XP/Server 2003 clients won’t be able to access the SYSVOL and NETLOGON folders on domain controllers and authenticate with AD.
You may receive the following error when trying to connect to a shared folder on a file server with SMBv1 disabled:
The specified network name is no longer available
How to Check SMB Version on Windows?
Let’s look on how to find out which versions of the SMB are enabled on your Windows device.
On Windows 10/8.1 and Windows Server 2019/2016/2012R2, you can check the status of various dialects of the SMB protocol using PowerShell:
Get-SmbServerConfiguration | select EnableSMB1Protocol,EnableSMB2Protocol

This command returned that the SMB1 protocol is disabled (EnableSMB1Protocol = True), and the SMB2 and SMB3 protocols are enabled (EnableSMB1Protocol = False).
Note that the SMBv3 and SMBv2 protocols are closely related. You cannot disable or enable SMBv3 or SMBv2 separately. They are always enabled/disabled only together because they share the same stack.
On Windows 7, Vista, and Windows Server 2008 R2/2008:
Get-Item HKLM:\SYSTEM\CurrentControlSet\Services\LanmanServer\Parameters | ForEach-Object {Get-ItemProperty $_.pspath}
If there are no parameters named SMB1 or SMB2 in this registry key, then the SMBv1 and SMBv2 protocols are enabled by default.
Also on these Windows versions, you can check which SMB client dialects are allowed to connect to remote hosts:
sc.exe query mrxsmb10
SERVICE_NAME: mrxsmb10
TYPE : 2 FILE_SYSTEM_DRIVER
STATE : 4 RUNNING
(STOPPABLE, NOT_PAUSABLE, IGNORES_SHUTDOWN)
WIN32_EXIT_CODE : 0 (0x0)
SERVICE_EXIT_CODE : 0 (0x0)
CHECKPOINT : 0x0
WAIT_HINT : 0x0
sc.exe query mrxsmb20
SERVICE_NAME: mrxsmb20
TYPE : 2 FILE_SYSTEM_DRIVER
STATE : 4 RUNNING
(STOPPABLE, NOT_PAUSABLE, IGNORES_SHUTDOWN)
WIN32_EXIT_CODE : 0 (0x0)
SERVICE_EXIT_CODE : 0 (0x0)
CHECKPOINT : 0x0
WAIT_HINT : 0x0
In both cases, the services are running (STATE = 4 Running). This means that the current Windows device can connect to both SMBv1 and SMBv2 hosts.
Checking Used SMB Dialects with Get-SMBConnection
When communicating over SMB, computers use the maximum SMB version supported by both the client and the server. The Get-SMBConnection PowerShell cmdlet can be used to check the SMB version used to access a remote computer:

The SMB version used to connect to the remote server (ServerName) is listed in the Dialect column.
You can display information about the SMB versions used to access a specific server:
Get-SmbConnection -ServerName srvfs01
If you want to display if SMB encryption is in use (introduced in SMB 3.0):
Get-SmbConnection | ft ServerName,ShareName,Dialect,Encrypted,UserName
On Linux, you can display a list of SMB connections and used dialects in samba using the command:
$ sudo smbstatus
On the Windows SMB server side, you can display a list of the versions of the SMB protocols that the clients are currently using. Run the command:
Get-SmbSession | Select-Object -ExpandProperty Dialect | Sort-Object -Unique

In this example, there are 898 clients connected to the server using SMB 2.1 (Windows 7/ Windows 2008 R2) and 8 SMB 3.02 clients.
You can use PowerShell to enable auditing of the SMB versions used for the connection:
Set-SmbServerConfiguration –AuditSmb1Access $true
SMB connection events can then be exported from Event Viewer logs:
Get-WinEvent -LogName Microsoft-Windows-SMBServer/Audit
Stop Using the Insecure SMBv1 Protocol
Over the past few years, Microsoft has systematically disabled the legacy SMB 1.0 protocol in all products for security reasons. This is due to the large number of critical vulnerabilities in this protocol (remember the incidents with wannacrypt and petya ransomware, which exploited a vulnerability in the SMBv1 protocol). Microsoft and other IT companies strongly recommend that you stop using SMBv1 in your network.
However, disabling SMBv1 can cause problems with accessing shared files and folders on newer versions of Windows 10 (Windows Server 2016/2019) from legacy clients (Windows XP, Windows Server 2003), third-party OS (Mac OSX 10.8 Mountain Lion, Snow Leopard, Mavericks, old Linux distros), old NAS devices.
If there are no legacy devices left on your network that support only SMBv1, be sure to disable this SMB dialect in Windows.
If you have clients running Windows XP, Windows Server 2003, or other devices that only support SMBv1, they should be updated or isolated.
How to Enable and Disable SMBv1, SMBv2, and SMBv3 on Windows?
Let’s look at ways to enable and disable different SMB versions on Windows. We’ll cover SMB client and server management (they are different Windows components).
Windows 10, 8.1, and Windows Server 2019/2016/2012R2:
Disable SMBv1 client and server:
Disable-WindowsOptionalFeature -Online -FeatureName smb1protocol
Disable SMBv1 server only:
Set-SmbServerConfiguration -EnableSMB1Protocol $false
Enable SMBv1 client and server:
Enable-WindowsOptionalFeature -Online -FeatureName smb1protocol
Enable only SMBv1 server:
Set-SmbServerConfiguration -EnableSMB1Protocol $true
Disable SMBv2 and SMBv3 server:
Set-SmbServerConfiguration -EnableSMB2Protocol $false
Enable SMBv2 and SMBv3 server:
Set-SmbServerConfiguration -EnableSMB2Protocol $true

Windows 7, Vista, and Windows Server 2008 R2/2008:
Disable SMBv1 server:
Set-ItemProperty -Path "HKLM:\SYSTEM\CurrentControlSet\Services\LanmanServer\Parameters" SMB1 -Type DWORD -Value 0 –Force
Enable SMBv1 server:
Set-ItemProperty -Path "HKLM:\SYSTEM\CurrentControlSet\Services\LanmanServer\Parameters" SMB1 -Type DWORD -Value 1 –Force
Disable SMBv1 client:
sc.exe config lanmanworkstation depend= bowser/mrxsmb20/nsi
 sc.exe config mrxsmb10 start= disabled
Enable SMBv1 client:
sc.exe config lanmanworkstation depend= bowser/mrxsmb10/mrxsmb20/nsi
 sc.exe config mrxsmb10 start= auto
Disable SMBv2 server:
Set-ItemProperty -Path "HKLM:\SYSTEM\CurrentControlSet\Services\LanmanServer\Parameters" SMB2 -Type DWORD -Value 0 -Force
Enable SMBv2 server:
Set-ItemProperty -Path "HKLM:\SYSTEM\CurrentControlSet\Services\LanmanServer\Parameters" SMB2 -Type DWORD -Value 1 –Force
Disable SMBv2 client:
sc.exe config lanmanworkstation depend= bowser/mrxsmb10/nsi
 sc.exe config mrxsmb20 start= disabled
Enable SMBv2 client:
sc.exe config lanmanworkstation depend= bowser/mrxsmb10/mrxsmb20/nsi
 sc.exe config mrxsmb20 start= auto
You can disable SMBv1 server on domain joined computers by deploying the following registry parameter through the GPO:
- Key: HKEY_LOCAL_MACHINE\SYSTEM\CurrentControlSet\Services\LanmanServer\Parameters
- Name: SMB1
- Type: REG_DWORD
- Value: 0
Set the registry parameter SMB2=0 in order to disable the SMBv2 server.
To disable the SMBv1 client, you need to propagate the following registry setting:
- Key: HKEY_LOCAL_MACHINE\SYSTEM\CurrentControlSet\services\mrxsmb10
- Name: Start
- Type: REG_DWORD
- Value: 4