
На одном из компьютеров перестала отображаться вкладка Безопасность (Security) в свойствах папок и файлов в проводнике Windows 10. Соответственно, из File Explorer нельзя изменить NTFS права доступа к файлу/папке, назначить владельца, или получить результирующие разрешения. Пользователь может просмотреть/изменить NTFS разрешения только из командной строки с помощью утилиты icacls или с помощью PowerShell командлетов Get-ACL/Set-ACL.
Прежде всего проверьте, что для данного диска используется файловая система NTFS. Если диск отформатирован в файловой системе FAT32 или exFAT (сейчас встречаются в основном на USB флешках), то вкладка Security не будет отображаться (на объектах этих файловых систем ACL отсутствуют by-design).
Чтобы вывести тип файловой системы на дисках, доступны в Windows, можно воспользоваться встроенным модулем PowerShell для управления локальными дисками и разделами. Выполните команду:
get-volume

В нашем примере все диски отформатированы в NTFS.
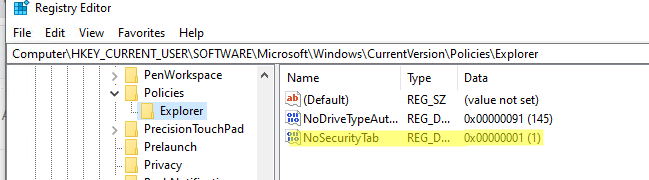
В Windows есть отдельный параметр GPO, который позволяет скрыть вкладку безопасность в интерфейсе проводника Windows. Чтобы проверить, включен ли этот параметр групповой политики для текущего пользователя на компьютере, проверьте значение параметра реестра NoSecurityTab с помощью PowerShell:
Get-ItemProperty -Path "HKCU:\Software\Microsoft\Windows\CurrentVersion\Policies\Explorer"|select NoSecurityTab

Если значение параметра
NoSecurityTab=1
, значит для пользователя включено скрытие вкладки Security в свойствах папок и файлов в проводнике.
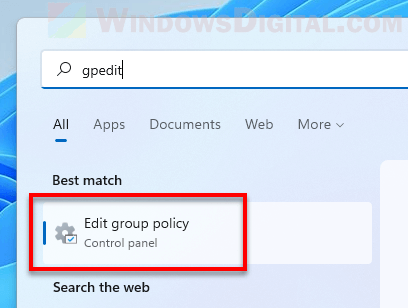
Проверьте, включен ли данный параметр через локальную групповую политику:
- Откройте редактор локальной GPO (
gpedit.msc
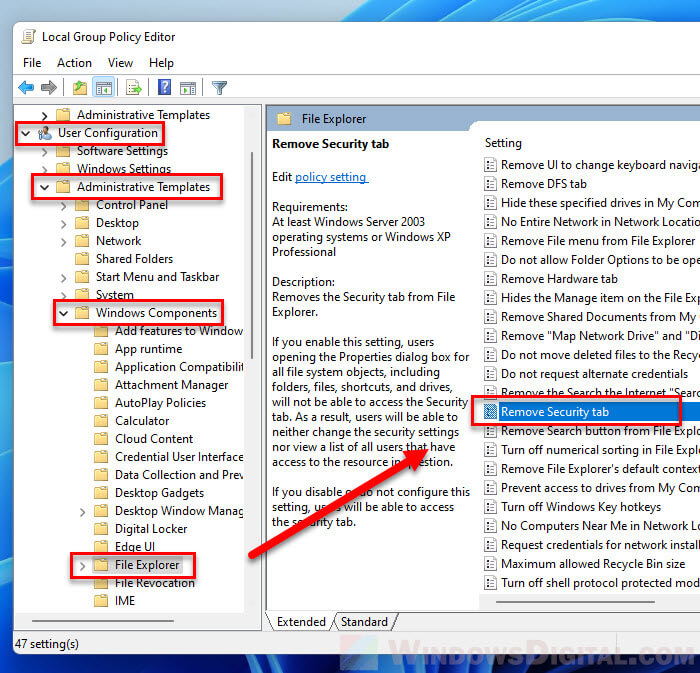
); - Перейдите в раздел User Configuration -> Windows Components -> File Explorer;
- Измените значение параметра Remove Security Tab на Disabled или Not Configured;

- Обновите настройки групповых политик на компьютере командой gpresult /force
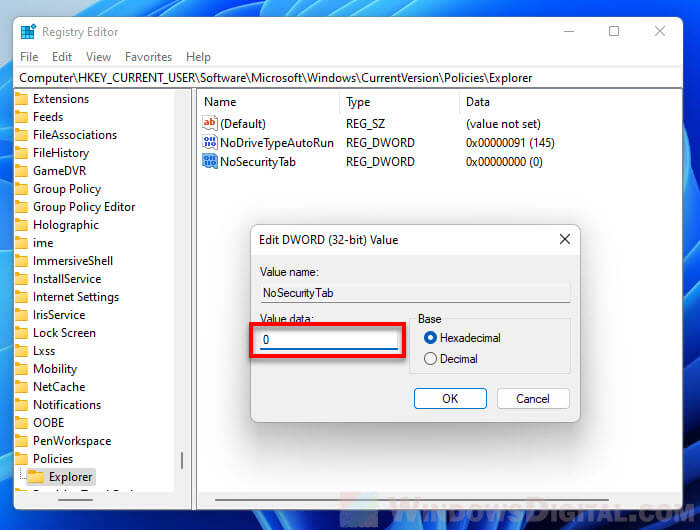
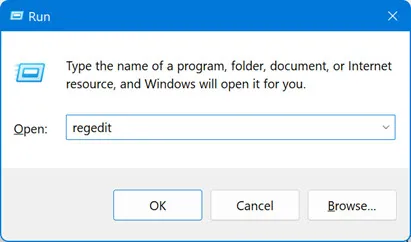
Если параметр GPO не настроен, а вкладка Security не отображается, попробуйте вручаю задать значение параметра реестра NoSecurityTab=1 с помощью редактора реестра (
regedit.exe
) или командой:
REG add HKCU\Software\Microsoft\Windows\CurrentVersion\Policies\Explorer /v Nosecuritytab /t REG_DWORD /d 0 /f
Также проверьте результирующие настройки GPO, которые действуют на пользователя, с помощью команды
rsop.msc
и консольной утилитой gpresult. Возможно данный параметр политики применяется через доменные GPO или множественные локальные политики (MLGPO). Найдите GPO и отключите в ней параметр Remove Security Tab.
Если вкладка Безопасность все еще отсутствует, проверьте что в реестре есть следующие разделы. Если они отсутствуют, проводник Windows не будет отображать вкладку Безопасность. Создайте данные разделы вручную или с помощью REG файла, указанного ниже. Создайте и примените файл fixsecuritytab.reg со следующим кодом:
Windows Registry Editor Version 5.00
[HKEY_CLASSES_ROOT\*\shellex\PropertySheetHandlers\{1f2e5c40-9550-11ce-99d2-00aa006e086c}]
[HKEY_CLASSES_ROOT\Directory\shellex\PropertySheetHandlers\{1f2e5c40-9550-11ce-99d2-00aa006e086c}]
[HKEY_CLASSES_ROOT\Drive\shellex\PropertySheetHandlers\{1f2e5c40-9550-11ce-99d2-00aa006e086c}]
Проверьте, что в свойствах папок/файлов теперь отображается вкладка Безопасность.

Applies ToWindows 11 Windows 10
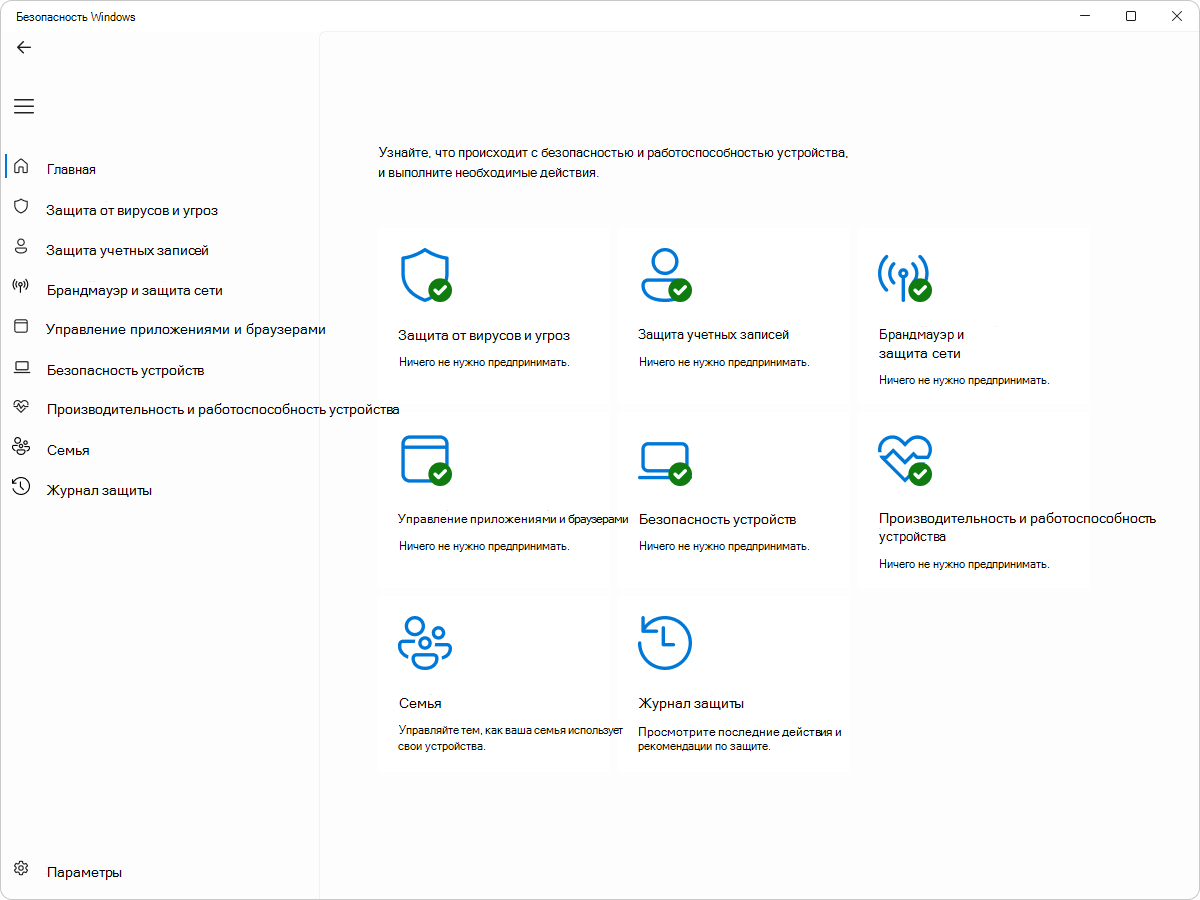
Приложение Безопасность Windows — это комплексное решение для обеспечения безопасности, интегрированное в Windows, предназначенное для защиты устройства и данных от различных угроз. Он включает в себя такие функции, как антивирусная программа Microsoft Defender, брандмауэр Windows и интеллектуальное управление приложениями, которые совместно обеспечивают защиту от вирусов, вредоносных программ и других угроз безопасности в режиме реального времени. Приложение встроено в Windows, гарантируя, что ваше устройство защищено с момента его запуска.
Совет: Если вы являетесь подписчиком Microsoft 365 для семьи или персонального, вы получаете Microsoft Defender, наше расширенное программное обеспечение безопасности для Windows, Mac, iOS и в рамках вашей подписки. Подробнее см. в руководстве Начало работы с Microsoft Defender.
Одним из ключевых преимуществ приложения Безопасность Windows является его возможность обеспечить защиту в режиме реального времени. антивирусная программа Microsoft Defender постоянно сканирует устройство на наличие потенциальных угроз и принимает немедленные меры для их нейтрализации. Этот упреждающий подход помогает предотвратить заражение вредоносными программами и обеспечивает бесперебойную работу устройства. Кроме того, функция брандмауэра отслеживает входящий и исходящий сетевой трафик, блокируя любые подозрительные действия для защиты данных и конфиденциальности.
Чтобы открытьПриложение «Безопасность Windows» , найдите его в меню Пуск или используйте следующее сочетание клавиш:
Безопасность Windows
Основные задачи
Ниже приведен краткий список распространенных задач, которые можно выполнять из приложения Безопасность Windows. Разверните каждый раздел, чтобы узнать больше:
Если вас беспокоит определенный файл или папка на локальном устройстве, вы можете щелкнуть файл или папку правой кнопкой мыши в проводнике, а затем выбрать Проверить с помощью Microsoft Defender.
Совет: В Windows 11 вам может потребоваться выбрать Показать дополнительные параметры после того, как вы щелкните правой кнопкой мыши, чтобы увидеть параметр сканирования файла или папки.
Если вы подозреваете, что устройство может содержать вирусы или вредоносные программы, необходимо незамедлительно проверить ваше устройство, выполнив быструю проверку.
В приложении «Безопасность Windows» на компьютере, выберите Защита от угроз & вирусов > Быстрая проверка или используйте следующий ярлык:
Запуск быстрой проверки
Если проверка не обнаружила никаких проблем, но вы все еще обеспокоены, возможно проверить устройство более тщательно.
Иногда может потребоваться краткое прекращение работы защиты в режиме реального времени. Когда защита в режиме реального времени отключена, открываемые или скачиваемые файлы не проверяются на наличие угроз. Однако скоро защита в режиме реального времени будет включена автоматически для возобновления защиты вашего устройства.
В приложении «Безопасность Windows» на компьютере, выберите Защита от вирусов & угроз > Управление параметрами или воспользуйтесь следующим сочетанием клавиш:
Параметры защиты от угроз & вирусов
Вы можете включить или отключить защиту в режиме реального времени с помощью переключателя.
Дополнительные сведения оПриложение «Безопасность Windows» и всех его функциях см. в статье Обзор Безопасность Windows приложения.
Нужна дополнительная помощь?
Нужны дополнительные параметры?
Изучите преимущества подписки, просмотрите учебные курсы, узнайте, как защитить свое устройство и т. д.
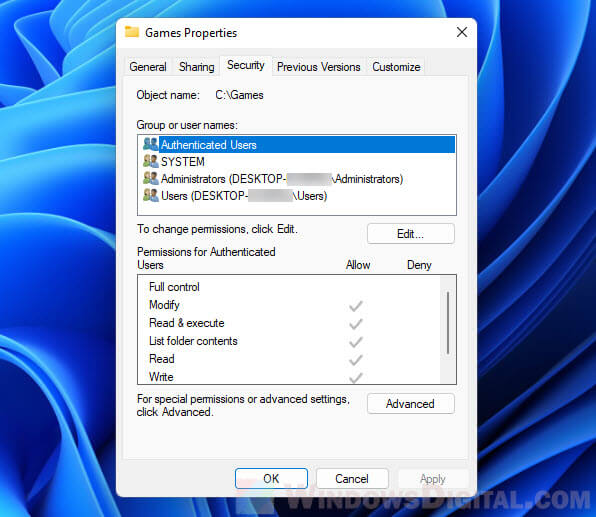
In Windows 11, when you open the Properties of a file, folder or drive, there is a tab called Security which displays the information about the permission settings of the file. The Security tab also allows you to configure various permission settings for different groups or users. By clicking the Edit or Advanced button, you will be able to change the permissions for each group or user name.
If you don’t see the Security tab in the Properties window for a file or folder and there is no other relevant tab that allows you to configure the permissions of the file or folder, read on to learn how to fix the issue and bring back the missing Security tab in the Properties window in Windows 11.
Also see: How to Take Ownership of a File, Folder or Drive in Windows 11
Fix: Security tab missing from File Properties in Windows 11
In Windows 11, you are allowed to disable the Security tab of the properties window for any file or folder by editing a simple registry value. By default, the Security tab is set as enabled to allow users to easily control user’s access to files and folders.
However, some users prefer to have it disabled so that other users (e.g. their children) who use the same computer cannot configure the permission of any file or folder.
If the Security tab was disabled previously, it will not show up as a tab in the Properties window of any file, folder or drive when you right-click it and select Properties. To bring the Security tab back to the Properties window, you need to re-enable the Security Tab in Windows 11. This can be easily done by editing (or adding) a simple registry value via Registry Editor.
Related: How to Restrict User Access to a Folder or Drive in Windows 11
Enable Security Tab in Windows 11
Using Registry Editor
To enable Security tab in file Properties on Windows 11, follow the steps below.
Caution: This instruction involves registry editing. Editing registry in Windows can cause serious issue and may potentially corrupt your operating system if done incorrectly. Therefore, it’s recommended that you create a system restore point or make a full backup of your Registry before making any changes. Please proceed at your own risk.
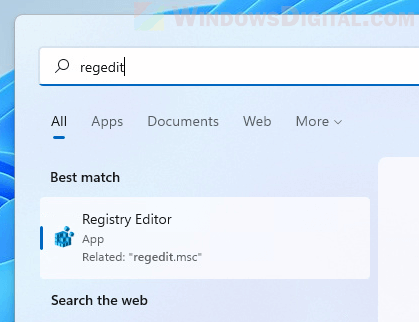
- Search for “Registry Editor” via Start and open it.

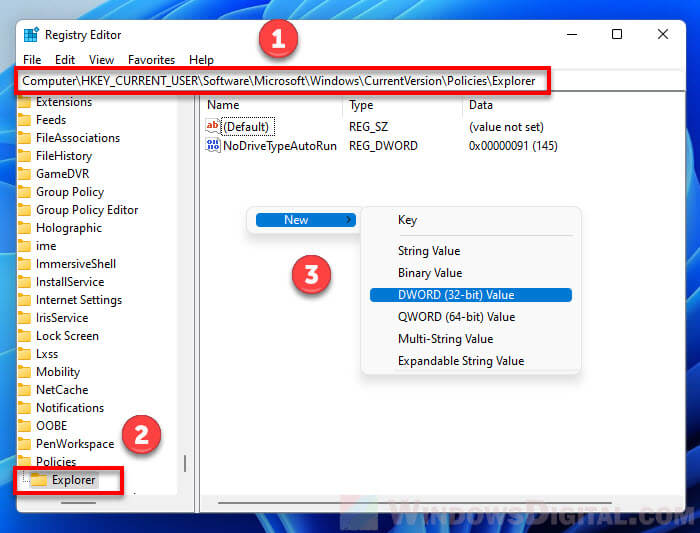
- Next, copy and paste the following path to the address bar in the Registry Editor window.
HKEY_CURRENT_USER\Software\Microsoft\Windows\CurrentVersion\Policies\Explorer
- In the Explorer registry key, if you don’t see any registry value called “NoSecurityTab”, right-click anywhere in the right pane and select New > DWORD (32-bit) Value.

- Rename the newly created DWORD value as
NoSecurityTab.
- Next, double-click the “NoSecurityTab” value and change the “Value data” field to “0“. This will tell Windows to ignore the “No Security Tab” setting and enable the Security tab in the Properties.

- Restart your computer for changes to take effect.
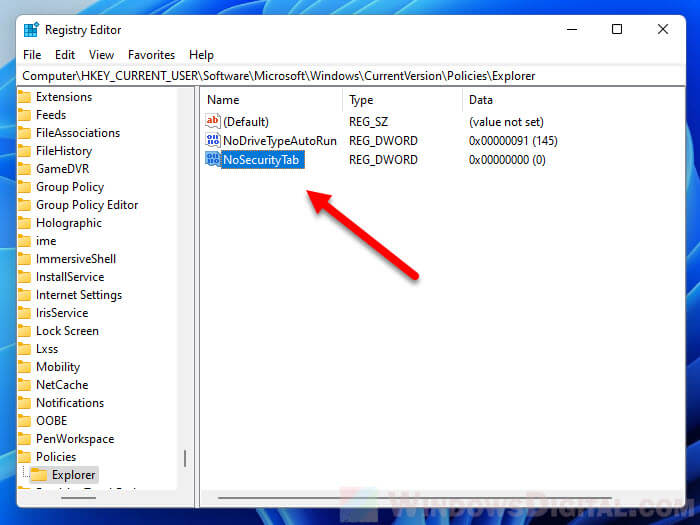
On the contrary, if you want to disable the Security tab, change the “NoSecurityTab” value data to “1“. This will tell Windows to respect the setting and disable Security tab in file and folder Properties.
Read next: How to Lock Drive in Windows 11
Using Group Policy Editor
If you are using Windows 11 Pro edition or higher, you can use the local group policy editor instead to enable the Security tab in file properties. Here’s how to do it.
- Go to Start menu and type “gpedit”. Select Edit Group Policy to open it.

- In the Local Group Policy Editor window, on the left pane, navigate to the following policy.
User Configuration > Administrative Templates > Windows Components > File Explorer
- Next, double-click the policy called “Remove Security tab” from the right pane.

- In the Remove Security tab policy setting window, select Disable to disable the policy. As this setting controls if the Security tab can appear in the Properties dialog or not, if you disable this setting, Windows will show the Security tab in the Properties window for all files, folders, shortcuts and drives.

- Restart your PC for changes to take effect. Retry opening the Properties of any file or folder. You should be able to see the Security tab now.
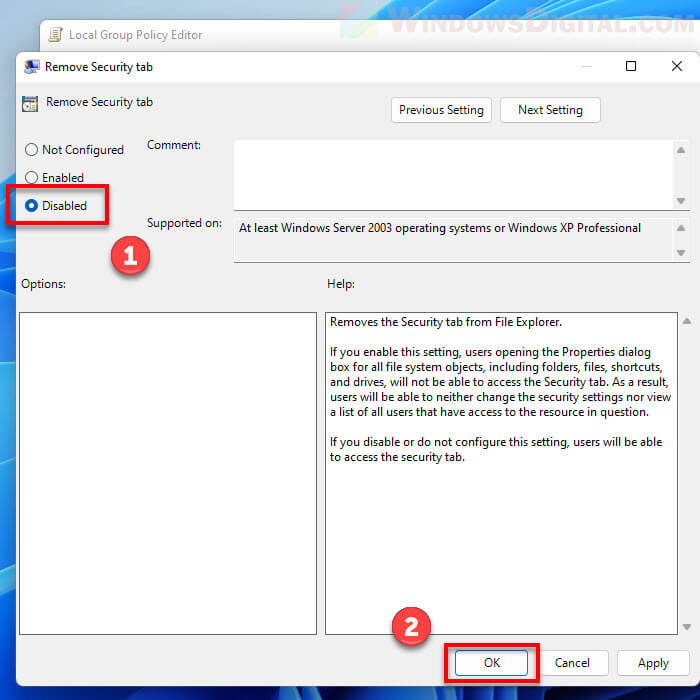
Conversely, if you would like to remove the Security tab from the Properties dialog for all files and folders, repeat the steps above and enable the “Remove Security Tab” setting.
Frequently Asked Questions
Where is the Security Tab in Windows 11?
The Security Tab can be found in the Properties dialog of a file, folder, shortcut or drive. You can access the Properties dialog by right-clicking a file or folder and then select Properties.
How do I enable Security tab in folder properties?
To enable the Security tab in file and folder properties, you need to disable the “Remove Security tab” policy setting via Local Group Policy Editor, or edit the “NoSecurityTab” value via Registry Editor.
How do I get permission to access a folder?
You can configure the permission of a file or folder via the Security tab in the properties window of the file or folder. You can access the Security tab by right-clicking the file or folder and select Properties. Next, click the Security tab and click the Edit or Advanced button to configure the permission of the selected file or folder.
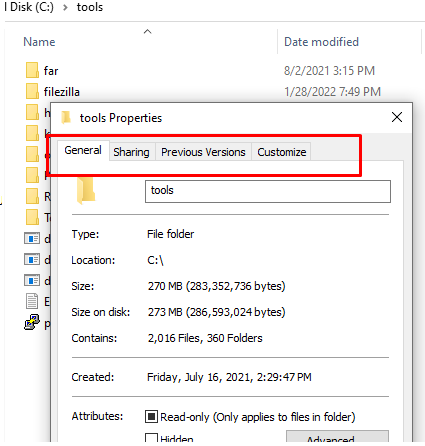
The properties dialog box in Windows offers complete details of a file, folder or a drive. You can right-click on any item and select “Properties” option or highlight an item and press “Alt + Enter” keys to open its properties. There are many tabs in “Properties” dialog box like General, Security, Details, Previous Versions, etc. If you are missing the “Security” tab in properties dialog, here is how you can fix the issue.
The purpose of Security tab is to show the access permissions for the selected file, folder or drive. You can view which users on the computer has access to the file and what kind of permissions they have. As an administrator, you can also edit file permissions to allow or deny the access for other users. Without the Security tab visible in properties dialog, it will be a difficult task to manage file permissions.

Generally, the problem happens at entire system level affecting all files and folders. However, it can also happen at drive level affecting items from only that drive. Depending up on the situation, try the following options to fix the missing security tab in properties dialog.
1. Check File System of Drives
If you notice the problem with only particular drive then the file system is the first thing you should check. The latest Windows versions use NTFS, and all your disk drives by default should use NTFS file system. However, if the file system is showing as FAT32 or exFAT then it does not support Security tab. You can view this information for your drives from File Explorer.
- Press “Win + E” to open File Explorer.
- Expand “This PC” and select the drive you want to check.
- Press “Alt + Enter” keys to open the drive’s properties.
- Check the “File system” under “General” tab.
As you can see in the below screenshots, C drive with NTFS shows security tab while D drive with FAT32 does not.

This will be a problem especially for external drives like USB formatted with FAT32 system. In such case, you may not be able to transfer files or fix file permission errors as the USB drive properties will not show Security tab. The solution here is to backup all your data from the drive and format it with NTFS system. For this, right-click on the drive and select “Format” option. Make sure to select “NTFS (Default)” option in the pop-up under “File system” dropdown. Click “Start” to delete all data and format the drive with NTFS system. Learn more on how to format USB in Windows computer.

2. Check Group Policy is Enabled
If you are using Windows Pro or Enterprise editions, then there is a possibility that your administrator disabled the policy to remove Security tab. Administrators do this to prevent people from mistakenly changing file permissions under Security tab. If you are an administrator and using Windows Pro version, then follow the below instructions. Remember, Windows Home edition does not have Group Policy Editor. Hence, this is method is not applicable for Home edition.
- Press “Win + R” keys to Run prompt, enter gpedit.msc and press “OK” button.

- This will open Local Group Policy Editor and navigate to “User Configuration > Administrative Templates > Windows Components > File Explorer” section.
- Scroll down on the right pane and select “Remove Security tab” setting.
- You can read the description explaining enabling this setting helps to disable Security tab in Properties dialog box of files, folders, shortcuts and drives.

- By default, “Remove security tab” setting should be in “Not configured” state allowing users to view the Security tab. If you see the state as enabled, then double click on it.
- On the pop-up that appears, make sure to select “Not Configure” or “Disabled” option and click “OK” button.

Restart your computer and check any file properties dialog box to confirm you can see the Security tab now.
3. Enable Security Tab Using Registry Editor
The last option is to use edit registry entries and enable the Security tab in properties dialog box. Make sure to take a backup of your Registry Editor before doing this.
- Press “Win + R” to open Run prompt, type regedit command and press “OK” button.
- This will open Registry Editor and navigate to the following section. You can copy paste this path in the Registry Editor’s address bar to quickly access the location.
Computer\HKEY_CURRENT_USER\Software\Microsoft\Windows\CurrentVersion\Policies\Explorer
- Go to “Edit > New > DWORD (32-bit) Value” menu or right-click on the empty area and select “New > DWORD (32-bit) Value” option.
- Rename the newly created DWORD as NoSecurityTab.

- Double click on NoSecurityTab and set the “Value Data” as 1 in the pop-up. Value 1 is for removing the Security tab from properties dialog and value 0 is for showing.
- Click “OK” button to close the pop-up and close Registry Editor.

Now, restart your system and check if the Security tab is visible in properties dialog.
Final Words
When you are using shared computers like in many organizations, IT administrator disables Security tab in properties dialog. This is intentional to avoid you changing the file permissions of content which can be accessed in network by administrators or other users. If you do not have administrator access, then ask your IT admin help to enable the policy in Local Group Policy Editor. If the problem happens with external drives on your own system, then check the file system and format the drive if required. For problems with local drives on your own system, take a backup of registry and modify the entries to enable Security tab.
Как удалить вкладки «Настройка», «Безопасность» и «Подробно» в свойствах файлов и папок
Наложение ограничений на использование функционала Windows — обычное дело для системного администратора. Ограничения эти могут быть очень разными и касаться как служб и программного обеспечения, так и элементов графической оболочки системы. Сегодня мы узнаем, как скрыть в свойствах папки вкладки «Настройка» и «Безопасность», а в свойствах файла вкладки «Безопасность» и «Подробно».
Как удалить вкладки «Настройка», «Безопасность» и «Подробно» в свойствах файлов и папок
Вкладка «Настройка» в свойствах каталогов позволяет применять к последним шаблоны для более удобной идентификации данных, устанавливать изображения для значков и сменять сами значки.
Сделаем ее недоступной. Откройте командой regedit редактор реестра и перейдите к ключу:
HKEY_CURRENT_USER\Software\Microsoft\Windows\CurrentVersion\Policies\Explorer
В правой колонке создайте новый 32-битный параметр типа DWORD с именем NoCustomizeThisFolder и установите в качестве его значения 1.


Чтобы настройки вступили в силу, выйдите и заново войдите в учетную запись Windows.
Если твик не сработает, перейдите к ключу:
HKEY_CLASSES_ROOT\Directory\shellex\PropertySheetHandlers
и удалите отвечающий за отображение вкладки «Настройка» подраздел {ef43ecfe-2ab9-4632-bf21-58909dd177f0}.

Изменения должны вступить в силу немедленно.
- Примечание: вместо удаления подраздела можно его переименовать, добавив в начало один символ, также раздел можно экспортировать в REG-файл, это позволит вам быстро восстановить исходную конфигурацию.
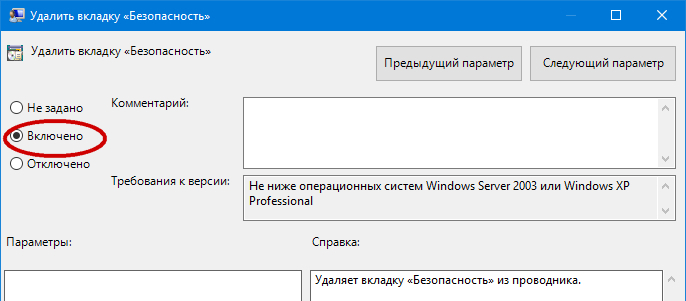
Теперь скроем вкладку «Безопасность, лишив пользователя возможности управлять группами и разрешениями.
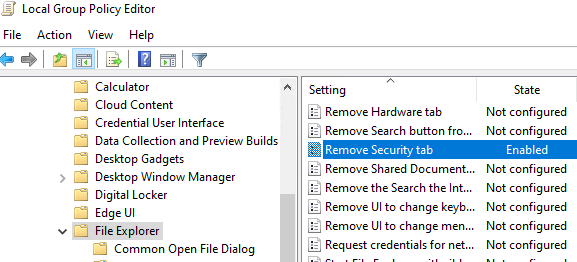
На этот раз вместо редактора реестра воспользуемся редактором локальных групповых политики. Запускаем его командой gpedit.msc, переходим по цепочке Конфигурация пользователя → Административные шаблоны → Компоненты Windows → Проводник, находим справа политику «Удалить вкладку «Безопасность» и кликаем по ней два раза.

В открывшемся окне активируем радиокнопку «Включено» и применяем настройку.
С папками разобрались, займемся файлами. В свойствах файлов есть вкладка «Подробно», в ней отображаются дополнительные сведения о файле, здесь же пользователь может удалит личную о файле информацию. Лишим его такой возможности. Запустите редактор реестра, разверните ветку
HKEY_CLASSES_ROOT\*\shellex\PropertySheetHandlers
и удалите в правой колонке подраздел {883373C3-BF89-11D1-BE35-080036B11A03},

на забыв перед этим создать его резервную копию. Вкладка «Подробно» в свойствах файла исчезнет.

Что касается вкладки «Безопасность», вы, наверное, заметили, что на скриншоте свойств файла у нас её нет, скрывается она точно так же, как и вкладка «Безопасность» в свойствах папок — через редактор локальных групповых политик.