
Если у вас возникла необходимость записи звука, воспроизводимого на компьютере или ноутбуке, существуют различные способы сделать их, самые популярные из которых описывались в инструкции Как записать звук с компьютера.
Однако на некотором оборудовании случается, что приведенными способами не удается воспользоваться. В этом случае можно использовать VB Audio Virtual Audio Cable (VB-Cable) — бесплатную программу, устанавливающую виртуальные аудио устройства, которые позволяют в дальнейшем записать воспроизводимый на компьютере звук.
Установка и использование VB-CABLE Virtual Audio Device
Virtual Audio Cable очень проста в использовании, при условии, что вы знаете, где в системе или программе, которую вы используете для записи, настраиваются устройства записи (микрофон) и воспроизведения.
Примечание: есть еще одна аналогичная программа, которая также называется Virtual Audio Cable, более продвинутая, но платная, упоминаю об этом, чтобы не было путаницы: здесь рассматривается именно бесплатный вариант VB-Audio Virtual Cable.
Шаги для установки программы в Windows 10, 8.1 и Windows 7 будут следующими
- Прежде всего потребуется скачать Virtual Audio Cable с официального сайта https://www.vb-audio.com/Cable/index.htm и распаковать архив.
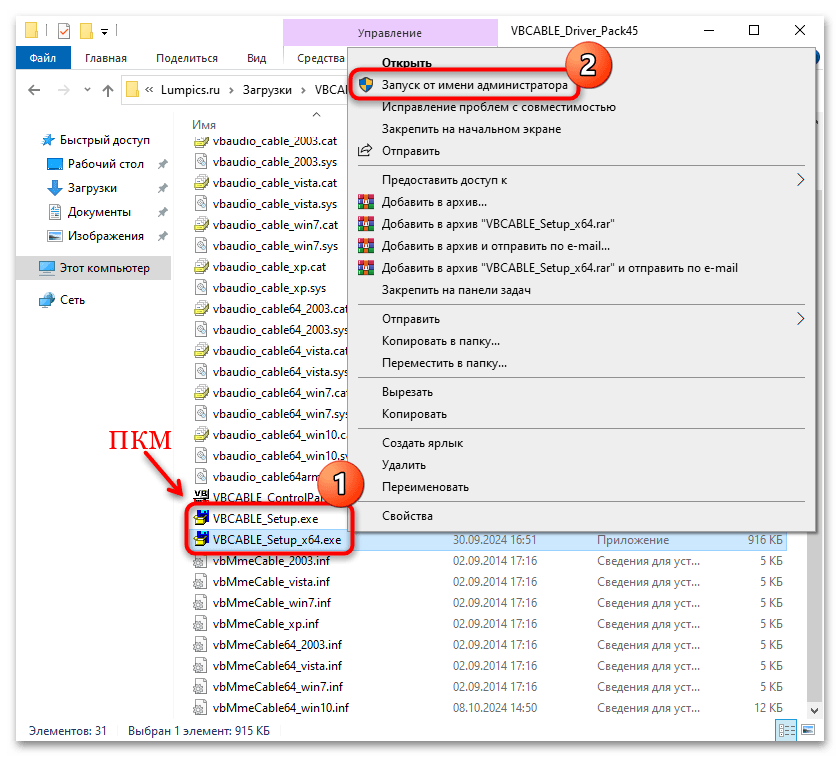
- После этого запустите (обязательно от имени Администратора) файл VBCABLE_Setup_x64.exe (для 64-бит Windows) или VBCABLE_Setup.exe (для 32-бит).

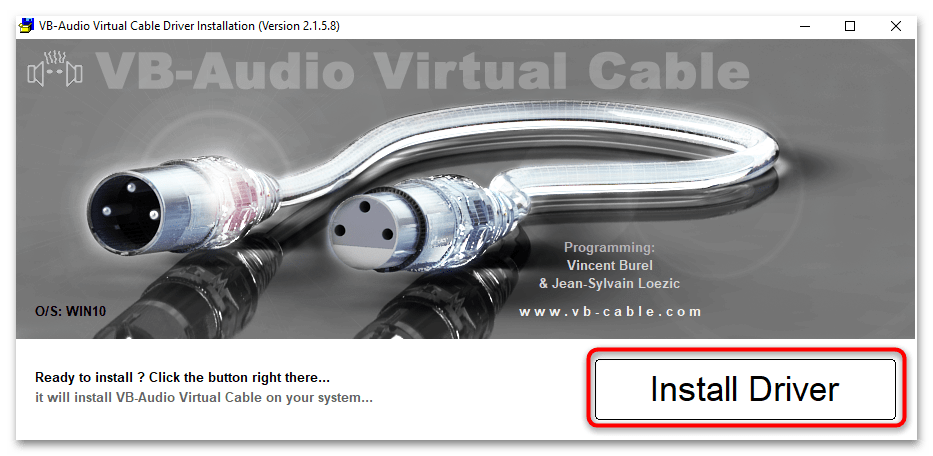
- Нажмите кнопку Install Driver.

- Подтвердите установку драйвера, а в следующем окне нажмите «Ок».

- Вам предложат перезагрузить компьютер — это на ваше усмотрение, в моем тесте работало и без перезагрузки.


На этом Virtual Audio Cable установлен на компьютер (если в этот момент у вас пропадет звук — не пугайтесь, достаточно просто изменить устройство воспроизведения по умолчанию в параметрах звука) и его можно использовать для записи воспроизводимого аудио.
Для этого:
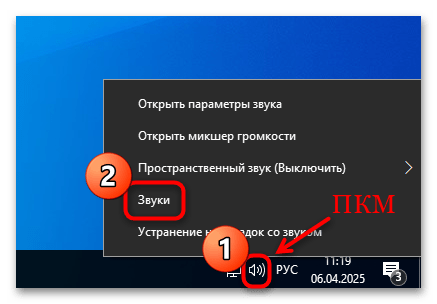
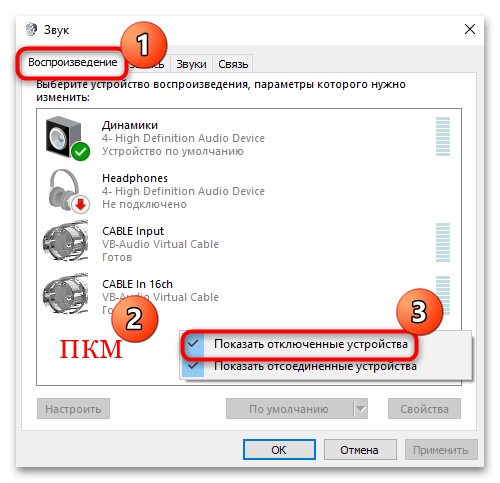
- Зайдите в список устройств воспроизведения (В Windows 7 и 8.1 — правый клик по значку динамика — устройства воспроизведения. В Windows 10 для этого можно нажать правой кнопкой мыши по значку динамика в области уведомлений, выбрать «Звуки», а потом перейти на вкладку «Воспроизведение»).
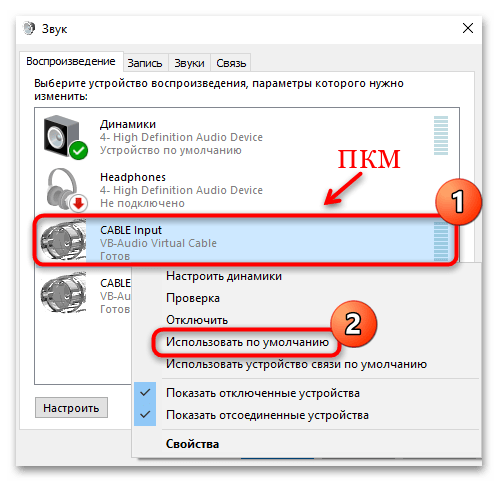
- Нажмите правой кнопкой мыши по пункту Cable Input и выберите пункт «Использовать по умолчанию».

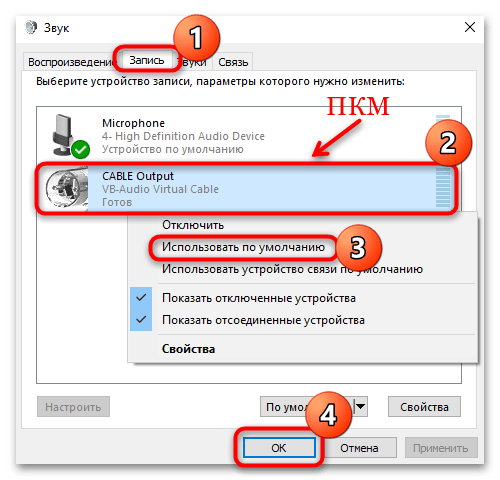
- После этого либо установите Cable Output в качестве устройства записи по умолчанию (на вкладке «Запись»), либо выберите это устройство в качестве микрофона в программе записи звука.

Теперь, звуки, воспроизводимые в программах, будут перенаправляться на виртуальное устройство Cable Output, которое в программах для записи звука будет работать как обычный микрофон и, соответственно, записывать воспроизводимое аудио. Однако при этом есть один недостаток: во время этого вы не будете слышать то, что записываете (т.е. звук вместо динамиков или наушников будет направляться на виртуальное устройство записи).
Для удаления виртуального устройства, зайдите в панель управления — программы и компоненты, удалите VB-Cable и перезагрузите компьютер.
У этого же разработчика есть и более сложное бесплатное ПО для работы с аудио, которое подойдет, в том числе, для записи звука с компьютера (в том числе сразу с нескольких источников, с возможностью одновременного прослушивания) — Voicemeeter.

Если для вас не сложно разобраться в английском интерфейсе и пунктах управления, почитать справку — рекомендую попробовать.
Все способы:
- Шаг 1: Скачивание инсталляционного файла
- Шаг 2: Установка ПО и драйверов
- Шаг 3: Настройка системы
- Вопросы и ответы: 0
Шаг 1: Скачивание инсталляционного файла
Virtual Audio Cable – это бесплатная программа, которая устанавливает виртуальные драйвера аудиоустройства, позволяющие записать звук на компьютере. Софт распространяется на официальном сайте разработчика, поэтому сначала разберем, как скачать и распаковать файлы, нужные для установки ПО на компьютер с Windows 10:
Скачать Virtual Audio Cable с официального сайта
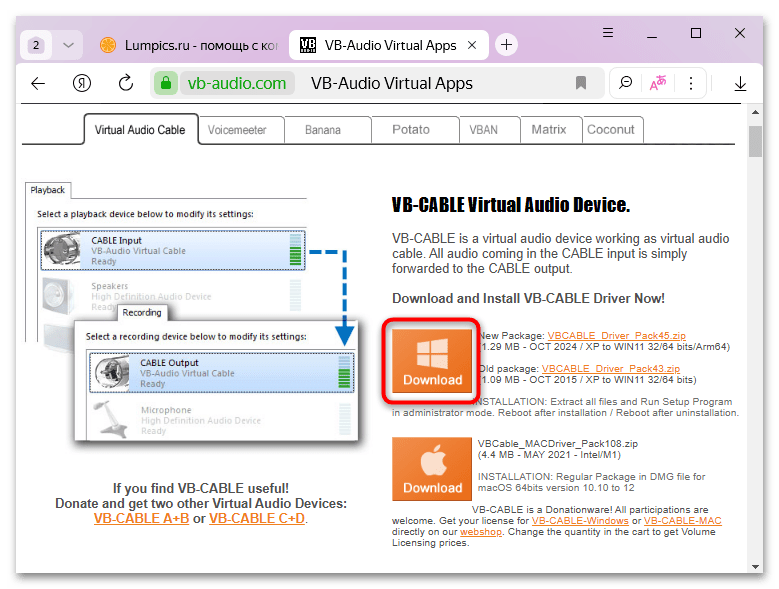
- Перейдите по ссылке выше, и вы попадете на официальный сайт разработчика. Кликните по кнопке со значком Windows под названием «Download», чтобы загрузить актуальную версию программы.

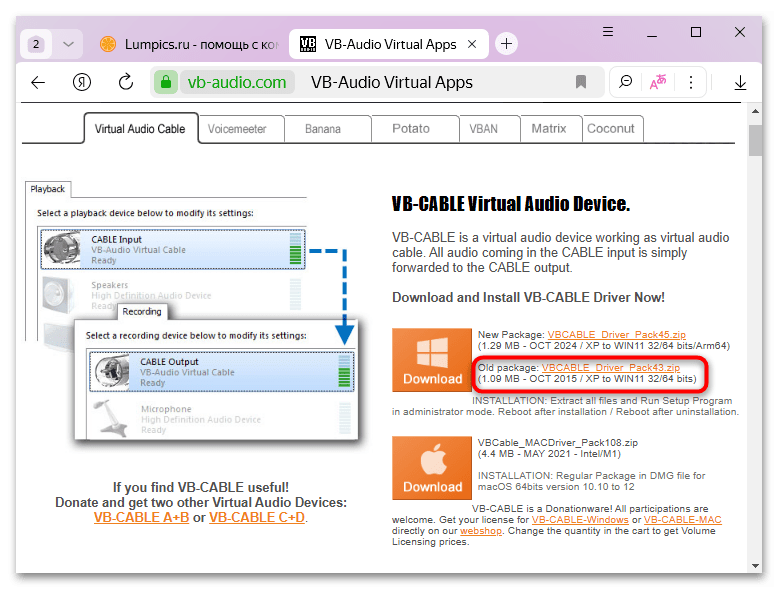
Если требуется установить более ранний пакет приложений, щелкните по соответствующей ссылке правее.
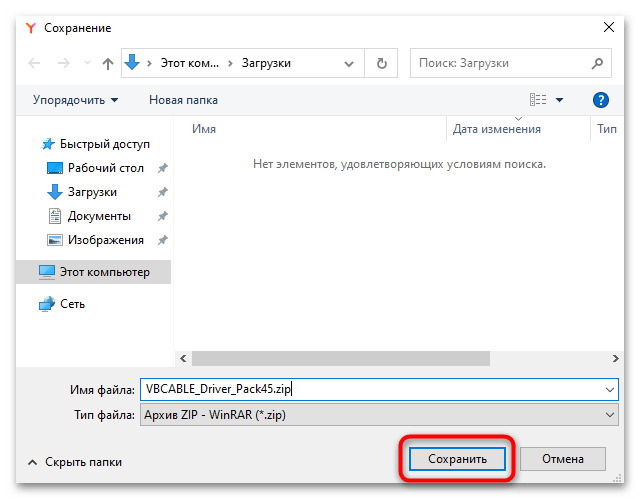
- Если браузер запросит, куда сохранять архив, укажите директорию и нажмите на кнопку «Сохранить».
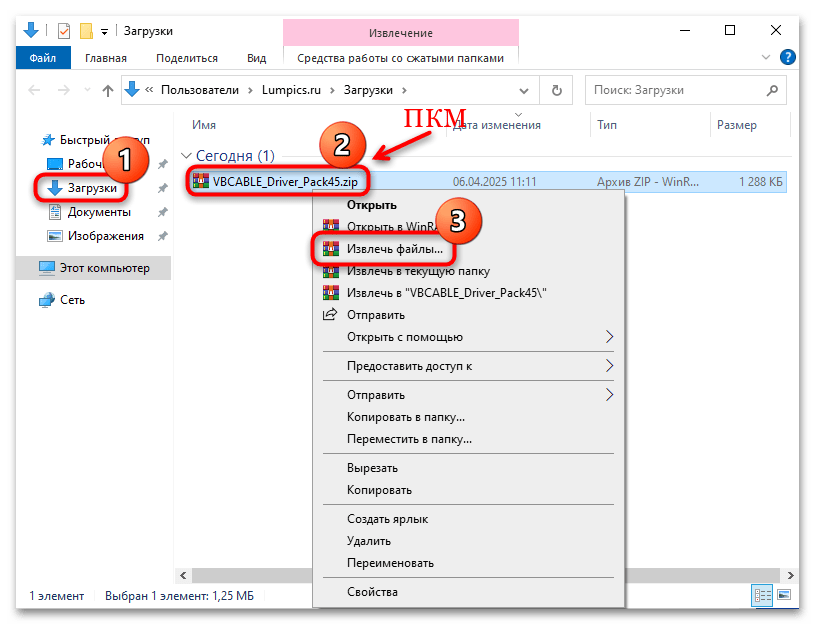
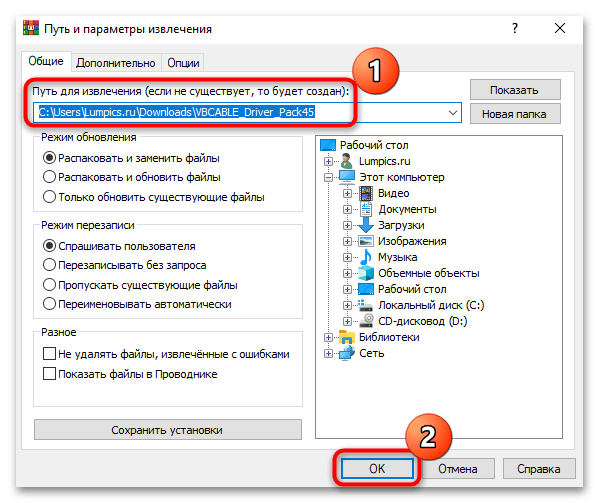
- Дождитесь окончания скачивания ZIP-архива, а после загрузки извлеките все его содержимое. Для этого перейдите в раздел с загрузками, кликните по нему правой кнопкой мыши и выберите в контекстном меню пункт «Извлечь все»/«Извлечь файлы».
- В следующем окне укажите, куда будут разархивированы файлы и подтвердите операцию.
После того, как вы извлекли все файлы, переходите к Шагу 2, то есть, непосредственной установке ПО на компьютер.
Шаг 2: Установка ПО и драйверов
Прежде, чем запускать инсталляционный файл, проверьте, какая у вас разрядность операционной системы, поскольку именно от этого зависит, какой из них выбирать. О том, как это сделать, читайте у нас на сайте.
Подробнее: Определяем разрядность используемой ОС Windows 10
- Если у вас 64-битная ОС, потребуется файл под названием «VBCABLE_Setup_x64.exe». В случае с 32-битной системой это «VBCABLE_Setup.exe». Инсталляционный файл необходимо запустить с расширенными правами, поэтому щелкните по одному из них (в зависимости от разрядности ОС) правой кнопкой мыши и выберите «Запуск от имени администратора».
- В открывшемся окне кликните по кнопке «Install Driver».
- Далее отобразится системное окно, где нужно подтвердить перезагрузку компьютера для установки виртуального драйвера. Обязательно сделайте это, чтобы новые параметры вступили в силу, а виртуальный драйвер заработал.
На этом установка компонентов программы завершена.
Шаг 3: Настройка системы
Так как после инсталляции виртуального драйвера значка для запуска программы нет (ведь установлен драйвер), то следует еще разобраться, как включить этот виртуальный драйвер, если потребуется, и сделать его устройством воспроизведения по умолчанию:
- Кликните правой кнопкой мыши по значку громкости в трее и выберите пункт «Звуки».
- На вкладке «Воспроизведение» найдите устройство «CABLE Input». Если его нет, тогда, вероятно, оно отключено. Щелкните правой кнопкой мыши по свободной области и отметьте в меню опцию «Показать отключенные устройства».
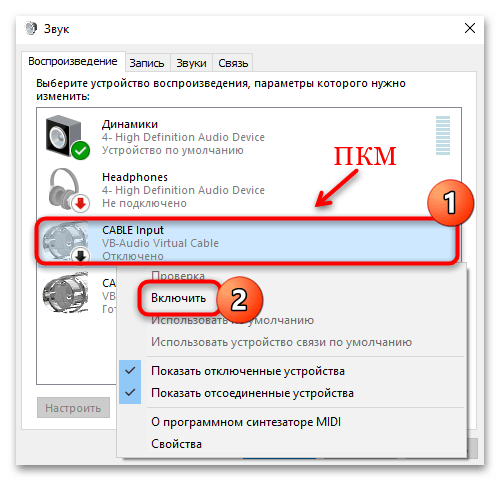
- Активируйте виртуальный драйвер, если он по каким-то причинам не работает, нажав правой кнопкой по нему и выбрав пункт «Включить».
- Чтобы сделать его устройством по умолчанию, выберите соответствующий пункт в контекстном меню.
- Переключитесь на вкладку «Запись» и проделайте все то же самое, сделав устройство «CABLE Output» устройством по умолчанию. Не забудьте сохранить настройки.
После выполненных действий все звуки, которые воспроизводятся в системе или в программах, будут перенаправлены на виртуальное устройство «CABLE Output». Драйвер будет работать в качестве микрофона, что позволит выполнить запись воспроизводимого аудио.
Обратите внимание, что у программы есть один существенный недостаток: услышать то, что записываете, не будет возможности, поскольку звук будет перенаправляться на виртуальное устройство записи, а не в стандартное аудио оборудование (например, колонки или наушники).
Наша группа в TelegramПолезные советы и помощь
Warning
This software is in beta and requires test signing to be enabled.
Virtual Audio Driver by MikeTheTech
Welcome to the Virtual Audio Driver by MikeTheTech! This project provides two key drivers based on the Windows Driver Kit (WDK):
- Virtual Audio Driver – Creates a virtual speaker output device and a virtual microphone input device.
Both features in the driver are suitable for remote desktop sessions, headless configurations, streaming setups, and more. They support Windows 10 and Windows 11, including advanced audio features like Windows Sonic (Spatial Sound), Exclusive Mode, Application Priority, and volume control.

Overview
A virtual audio driver set consists of:
-
Virtual Audio («fake» speaker output)
- Essential for headless servers, remote desktop streaming, testing audio in environments without physical speakers, etc.
-
Virtual Microphone («fake» mic input)
- Ideal for streaming setups, voice chat tests, combining or routing audio internally, or feeding software-generated audio to apps expecting a microphone input.
By installing these drivers, you can process or forward audio without physical hardware present, making them incredibly useful for various development, testing, and media production scenarios.
Key Features
| Feature | Virtual Speaker | Virtual Microphone |
|---|---|---|
| Emulated Device | Emulates a speaker device recognized by Windows. | Emulates a microphone device recognized by Windows. |
| Supported Audio Formats | 8-bit, 8000 Hz (lowest quality) up to 32-bit, 192,000 Hz (studio quality). This includes various presets such as Telephone Quality (8-bit, 11025 Hz) and DVD/Studio Quality (16/24/32-bit, up to 192 kHz). | 16-bit 44,100 Hz, 16-bit 48,000 Hz, 24-bit 96,000 Hz, 24-bit 192,000 Hz, 32-bit 48,000 Hz (for testing or specialized scenarios). |
| Spatial Sound Support (Speaker Only) | Integrates with Windows Sonic, enabling immersive 3D audio features. | Integrated with Audio Enhancements such as Voice Focus and Background Noise Reduction. |
| Exclusive Mode and App Priority | Applications can claim exclusive control of the device. | Same WDK architecture applies, allowing exclusive access in supported workflows. |
| Volume Level Handling | Handles global and per-application volume changes (Windows mixer). | Microphone level adjustments accessible via Windows Sound Settings or audio software. |
| High Customizability | Built to be extended with future features and audio enhancements. | Allows flexible configuration of sampling rates and bit depths for specialized audio requirements. |
Compatibility
- OS: Windows 10 (Build 1903 and above) and Windows 11
- Architecture: x64 (tested); ARM64
Installation
-
Enable Test Signing (Optional)
If you have a test-signed driver, you may need to enable test signing mode:bcdedit /set testsigning onNote: A production-signed driver can skip this step.
-
Open Device Manager
- Choose Audio inputs and outputs, then in the top Action menu, choose Add Legacy Hardware.
- Choose Install the hardware that I manually select from a list (Advanced)
- Choose Sound, video and game controllers
- Choose «Have Disk…» and locate the VirtualAudioDriver.inf
- Continue with the installation.
-
Verify Installation
- Open Device Manager.
- Check under Sound, video and game controllers for “Virtual Audio Driver” (speaker).
- Check under Audio inputs and outputs for “Virtual Mic Driver” (microphone).
Usage
Using the Virtual Speaker
-
Select as Default Device
- Open Sound Settings → Output → Choose “Virtual Audio Driver” as your default output device.
- Or use the Volume Mixer to route specific apps to the virtual speaker.
-
Remote Desktop or Streaming
- When initiating a remote desktop session, the virtual speaker device can appear as a valid playback device.
- Streaming or capture apps can detect the virtual speaker for capturing system audio.
-
Choosing Quality Settings
- In Sound Settings, under Playback Devices, right-click the “Virtual Audio Driver” and select Properties → Advanced tab.
- Choose from the newly added sample rates and bit depths (ranging from 8-bit, 8000 Hz to 32-bit, 192,000 Hz) to match your desired use case (e.g., “Telephone Quality,” “DVD Quality,” or “Studio Quality”).
-
Spatial Sound
- In Sound Settings, right-click the device, select Properties → Spatial Sound tab, and enable Windows Sonic for Headphones or another supported format.
Using the Virtual Microphone
-
Select as Default Recording Device
- Open Sound Settings → Input → Choose “Virtual Mic Driver” as your default input device.
- Alternatively, in the Volume Mixer or your specific application’s audio settings, route or select the “Virtual Mic Driver” for input.
-
Supported Formats
- The Virtual Microphone Driver supports:
- 16-bit, 44,100 Hz
- 16-bit, 48,000 Hz
- 24-bit, 96,000 Hz
- 24-bit, 192,000 Hz
- 32-bit, 48,000 Hz
- The Virtual Microphone Driver supports:
-
Use Cases
- Voice Chat / Conference Apps: Emulate or inject audio into Zoom, Teams, Discord, etc.
- Streaming / Broadcasting: Feed application-generated audio to OBS, XSplit, or other streaming tools.
- Audio Testing: Confirm that your software or game engine’s microphone-handling logic works without real hardware.
-
Volume & Level Controls
- Adjust input levels in Sound Settings → Recording tab.
- Per-app mic levels can be configured in certain software or system volume mixers (where supported).
Configuration
-
Exclusive Mode (Speaker and Mic)
By default, shared mode is enabled. For real-time, low-latency usage, open device properties, go to the Advanced tab, and uncheck “Allow applications to take exclusive control.” -
Application Priority
Supported through Windows APIs. To prioritize a specific application for either the speaker or microphone, configure it via Windows advanced sound options or in your audio software. -
Volume/Level Management
- For the Virtual Speaker, adjust in the main Sound Settings or the Volume Mixer.
- For the Virtual Microphone, adjust input levels in the Recording tab of Sound Settings or in your audio software’s device preferences.
Future Plans
- Advanced Diagnostics: Logging and debugging tools
- New Modes & Additional Formats: Continued expansion of supported audio qualities.
- Additional Features: Such as Automatic Volume Leveling (AVL), further spatial audio improvements, and custom routing tools.
This project is maintained and actively improved. We welcome contributions, suggestions, and issue reports!
Thank you for using the Virtual Audio Driver!
Feel free to open issues or submit pull requests if you encounter any problems or have ideas to share. Happy audio routing!
Sometimes, you need to use the audio of one program to be used by another application. For example, if your friends want to listen to music over Messenger or Skype. The only option is to turn on your mic and play the music loud so they can listen. The problem is that the sound quality is not right and will also carry external noise. In this post, we will share software that can create fake speakers and fake microphone in Windows 10 and Windows 11 using Windows virtual microphone.
Virtual Audio Cable Software allows you to create virtual speakers and virtual mic for PC. Even though they are programs, they are identified as hardware by any other program. That includes Windows Media Player or any messenger service like Skype or Yahoo Messenger. So now you can do two things:
- Play music on your Windows Media Player or VLAN and stream it to Virtual Speakers
- Stream to a Virtual Speaker and Record it using Audacity.

How to set up Virtual Audio Cable
- Download it from here and Install it with admin privilege.
- Then, launch the Control Panel of the application.
- By default, it will create one cable for you. Check the box that says Mic under Connected source lines.
- Leave the rest of the settings to default.

Here is an example using Windows Media Player and Yahoo Messenger. It works almost the same way for any other software. You need to figure out how to configure speaker and microphone settings for those apps.
Play Music on Your Windows Media Player and Stream It to Messenger
- Launch Windows Media Player. Press Alt and Go to Tools > Options >Devices > Speakers.
- Change the speaker choice to Line 1 (Virtual Audio Cable).
- Keep a song ready to play.
- Now Launch Yahoo Messenger and Go to Preferences > Video and Voice.
- In Microphone, select Mic 1 (Virtual Audio Cable).

When you play music from Windows Media Player, it is streamed out using Line 1 Audio and captured by Mic 1 Audio to the messenger. Since this is a virtual microphone Windows and not a physical mic, it will be noise-free.
Stream What Your Friend Is Saying to a Virtual Speaker and Record It Using Audacity
This method is helpful if you want to record your friend’s speech. Keep the messenger settings the same, but in Audacity, you need to change PlayBack Device to preference to Line 1 (Virtual Audio Cable). Make sure to close Windows Media Player, or else it will mix both sounds.
So here is how it works. The audio from your friend is streamed to Line 1, a virtual speaker. Audacity records the sound from this virtual speaker. It is the same as recording online audio using your real speakers as your output and mic as input. The difference is you will get better quality here.

What else can you do?
- Play Music from two media players, use two different virtual speakers, and then record it.
- Create virtual audio cable in Windows 11, Windows 10, and any other version the software works on.
- Record Calls on Skype, Yahoo, or similar instant messenger programs using the fake mic input.
- If you have encoding software, stream directly from virtual speakers to it.
How does it work?
VAC contains a Windows WDM/KS virtual device driver that creates virtual audio devices. This driver is a kernel-mode module that must be installed with administrator rights.
Being a WDM/KS filter, VAC represents the lowest-level audio layer in Windows. It can be effectively used by any upper-level layer (KS-aware applications, WASAPI, MME or DirectSound subsystems, ASIOwrappers, and so on).
Is it Free?
Yes and No, both. The free version has a limitation on several speakers you can create, and it emits a female voice after every few seconds. If you use it for personal use, you can ignore it, but if you use it for professional work, you can buy it.
What About Video?
The software only supports audio, but if you want to stream a video to your webcam or create a virtual webcam that the messenger program can use, I suggest you look at the list of Webcam Tools we discussed. This software only teaches you on how to make a fake microphone.
This application Works on Windows 11, Windows 10, Windows 8.1, Windows 7, Vista, and XP: 32 and 64-bit systems. You can download both free and trial versions.
Do Microphones Need Loudspeakers Or Headphones To Work?
They do not, but these devices usually co-exist. You cannot hear anything if you don’t have a speaker or loudspeaker. That said, if you are wondering if you need to keep the speaker on record, the answer is no. You can use the virtual Microphone to send audio to the recording device, which will record without playing it to the speaker. This way, you can have peace of mind while listening to something else.
(Many of the links in this article redirect to a specific reviewed product. Your purchase of these products through affiliate links helps to generate commission for AudioLover.com, at no extra cost. Learn more)
Table of Contents
- Introduction
- What is a Virtual Audio Cable?
- Benefits of Using a Virtual Audio Cable
- Step 1: Downloading and Installing Virtual Audio Cable
- Step 2: Configuring Virtual Audio Cable Settings
- Step 3: Setting Up Virtual Audio Cable as a Playback Device
- Step 4: Setting Up Virtual Audio Cable as a Recording Device
- Step 5: Adjusting Audio Settings in Windows 10
- Troubleshooting Tips
- Conclusion
Introduction
Welcome to the world of virtual audio cables! If you’re a music enthusiast, podcaster, or gamer, you’ve probably come across the term “virtual audio cable” in your quest for the perfect audio setup. But what exactly is a virtual audio cable? How does it work, and how can it benefit you?
In simple terms, a virtual audio cable is a software application that allows you to route audio signals between different programs and devices on your computer. It acts as a virtual conduit, enabling you to send audio from one application to another or from one device to another, just like physical audio cables would.
The beauty of virtual audio cables is that they offer incredible flexibility and convenience. They eliminate the need for physical cables and audio interfaces, making it easier than ever to manage and control your audio setup. Whether you want to record music, livestream gaming sessions with crisp audio, or create a professional podcast, a virtual audio cable can be a game-changer.
In this article, we’ll guide you through the process of setting up a virtual audio cable in Windows 10. We’ll cover everything from downloading and installing the software to configuring the settings and adjusting audio preferences. So, let’s dive in and explore the world of virtual audio cables!
What is a Virtual Audio Cable?
Before we delve into the technicalities of setting up a virtual audio cable, let’s first understand what it actually is. As mentioned earlier, a virtual audio cable is a software application that allows you to route audio signals between different programs and devices on your computer.
Think of it as a virtual version of the physical audio cables that you might use to connect your headphones, microphone, or speakers to your computer. Instead of physically plugging in cables, a virtual audio cable creates a virtual connection within your computer’s software, allowing audio to be sent and received digitally.
Here’s how it works: When you install a virtual audio cable, it creates a pair of virtual audio devices – one for playback and one for recording. These devices act as endpoints for audio signals. You can then use these virtual devices to connect different applications, allowing them to send and receive audio through the virtual cable.
For example, let’s say you’re using a software-based music production program to create a song. With a virtual audio cable, you can route the output of that program directly into another application, such as a digital audio workstation or streaming software, without any loss of quality or need for additional physical connections.
Furthermore, virtual audio cables typically offer several customization options, allowing you to adjust audio settings like sample rate, buffer size, and channel configuration. This level of control gives you the flexibility to tailor your audio setup according to your specific needs and preferences.
Overall, a virtual audio cable empowers you to seamlessly connect and manage audio signals within your computer, opening up a world of possibilities for music production, streaming, content creation, and more.
Benefits of Using a Virtual Audio Cable
Now that we have a basic understanding of what a virtual audio cable is, let’s explore some of the key benefits it offers. Whether you’re a musician, podcaster, gamer, or content creator, incorporating a virtual audio cable into your setup can bring numerous advantages. Here are a few notable benefits:
1. Flexibility and Versatility: Virtual audio cables allow you to route audio signals between different applications and devices on your computer. This flexibility enables you to seamlessly connect multiple software programs, enhancing your workflow and making it easier to manage your audio setup.
2. Elimination of Physical Cables: With virtual audio cables, you can say goodbye to the clutter of physical cables. No more tangling wires or limited connection options. Instead, you can create virtual connections within your computer, saving space and simplifying your audio setup.
3. High-Quality Audio Transmission: Virtual audio cables transmit audio digitally, ensuring optimal sound quality without any loss or degradation. This is particularly essential for musicians, podcasters, and streamers who require crystal-clear audio for their productions.
4. Real-Time Audio Monitoring: With virtual audio cables, you can monitor your audio in real time while it’s being processed or recorded. This feature is especially useful for musicians who want to monitor their instrument’s sound or for podcasters who need to hear their own voices while recording.
5. Increased Control and Customization: Virtual audio cables provide extensive control over audio settings such as sample rate, buffer size, and channel configuration. This level of customization allows you to tailor the audio setup to meet your specific requirements and achieve optimal performance.
6. Enhanced Streaming Experience: Gamers and streamers can greatly benefit from virtual audio cables. By capturing game audio and microphone input separately, you can have more control over audio levels and easily achieve professional-quality streams.
7. Integration with Third-Party Software: Many virtual audio cable applications seamlessly integrate with popular software programs such as music production software, digital audio workstations, streaming platforms, and VoIP applications, allowing for a smooth and streamlined experience.
With these benefits in mind, it’s clear that virtual audio cables offer a wide range of advantages for audio enthusiasts and professionals. Whether you’re seeking a flexible audio setup, improved sound quality, or enhanced control over your audio, incorporating a virtual audio cable into your system can be a game-changer.
Step 1: Downloading and Installing Virtual Audio Cable
Now that you understand the benefits of using a virtual audio cable, let’s dive into the process of setting one up. In this step-by-step guide, we’ll walk you through downloading and installing a virtual audio cable on your Windows 10 computer.
1. Research and choose a virtual audio cable software: There are several virtual audio cable software options available, both free and paid. Do some research to find the one that best fits your needs. Some popular choices include Virtual Audio Cable, Voicemeeter, and VB-Audio Cable.
2. Visit the software’s official website: Once you’ve decided on the virtual audio cable software you wish to use, visit the official website or trusted source to download the installer. Be cautious of downloading from unknown or unreliable sources to ensure the safety of your computer.
3. Download the installation file: Look for the download link on the website and click on it to start the download. Choose the appropriate version based on your operating system (Windows 10).
4. Run the installer: Once the download is complete, locate the installation file in your downloads folder or designated location. Double-click on the file to run the installer.
5. Follow the on-screen instructions: The installation process will vary depending on the software you’re using. Follow the on-screen instructions provided by the installer to proceed with the installation. Make sure to read any prompts or agreements carefully before accepting them.
6. Choose installation options: During the installation, you may be prompted to select certain options or components to install. Review the options and choose the ones that align with your requirements. It’s generally recommended to leave the default settings unless you have specific preferences.
7. Complete the installation process: Once you’ve chosen the installation options, click on the “Install” or “Finish” button to begin the installation. The process may take a few moments to complete depending on your computer’s speed.
8. Confirm installation: After the installation is finished, you may receive a confirmation message. Take note of any additional instructions provided, such as restarting your computer for the changes to take effect.
Congratulations! You’ve successfully downloaded and installed a virtual audio cable on your Windows 10 computer. In the next steps, we’ll guide you through the process of configuring the virtual audio cable and setting it up as a playback and recording device.
Step 2: Configuring Virtual Audio Cable Settings
Now that you have installed a virtual audio cable on your Windows 10 computer, it’s time to configure its settings to ensure optimal performance. Configuring these settings will allow you to customize the virtual audio cable according to your specific needs and preferences. Follow these steps to configure the settings:
1. Open the virtual audio cable application: Locate the installed application in your Start menu or desktop and open it by double-clicking on its icon.
2. Access the settings: Look for a “Settings” or “Options” menu within the application’s interface. Click on it to access the configuration settings.
3. Adjust the audio buffer size: The buffer size determines the amount of audio data that is temporarily stored before it is played or recorded. A larger buffer size can help prevent audio glitches or latency issues. Adjust the buffer size based on your system’s performance and the specific requirements of your audio applications.
4. Set the sample rate: The sample rate refers to the number of audio samples captured or played back per second. Higher sample rates provide better audio quality but require more processing power. Set the sample rate based on the capabilities of your audio devices and the applications you plan to use.
5. Configure the channel settings: Virtual audio cables often support various channel configurations, such as stereo, 5.1 surround sound, or even custom channel mappings. Choose the appropriate channel setting based on your audio system and the requirements of your applications.
6. Enable additional features: Some virtual audio cable applications offer additional features that can enhance your audio experience. These features may include audio mixing, equalizer settings, or advanced routing options. Enable these features if they align with your needs.
7. Test the audio configuration: Once you have adjusted the settings, it’s a good idea to test the audio configuration. Use different applications to play back or record audio through the virtual audio cable and ensure that the signal is properly routed and the quality is satisfactory.
8. Save the settings: After you have configured the virtual audio cable settings to your liking, save the changes. This will ensure that the settings are applied each time you use the virtual audio cable.
By taking the time to configure the virtual audio cable settings, you can optimize its performance and maximize the benefits it offers. In the next steps, we’ll guide you through setting up the virtual audio cable as a playback and recording device in Windows 10.
Step 3: Setting Up Virtual Audio Cable as a Playback Device
Now that you have configured the settings for your virtual audio cable, it’s time to set it up as a playback device in Windows 10. This will allow you to route audio output from different applications or media players through the virtual audio cable. Follow these steps to set up the virtual audio cable as a playback device:
1. Open the Sound settings: Right-click on the speaker icon in your system tray and select “Sounds” from the context menu. This will open the Sound settings window.
2. Navigate to the Playback tab: In the Sound settings window, navigate to the “Playback” tab. This tab displays a list of audio playback devices available on your computer.
3. Select the virtual audio cable: Look for the entry representing your virtual audio cable in the list of playback devices. It is usually labeled with the name of the virtual audio cable software you installed. Right-click on the virtual audio cable entry and select “Set as Default Device” from the context menu.
4. Adjust the volume and properties: Once you have set the virtual audio cable as the default playback device, you can adjust its volume level and properties. Right-click on the virtual audio cable entry again and select “Properties” from the context menu. In the Properties window, you can adjust the volume, enhancements, and other playback settings.
5. Test the playback: To ensure that the virtual audio cable is working correctly as a playback device, open a media player or any application that produces sound. Play an audio file or video and verify that the sound is being routed through the virtual audio cable.
6. Configure individual application settings (optional): Some applications have their own audio settings and might need to be configured individually to use the virtual audio cable as the playback device. Look for audio settings or preferences within the application and select the virtual audio cable as the preferred output device.
Setting up the virtual audio cable as a playback device allows you to route audio output from various applications through the virtual cable, providing you with more control and flexibility. In the next step, we’ll guide you through setting up the virtual audio cable as a recording device, enabling you to capture audio input from different sources.
Step 4: Setting Up Virtual Audio Cable as a Recording Device
After setting up the virtual audio cable as a playback device, it’s time to configure it as a recording device in Windows 10. This will allow you to capture audio input from various sources, such as microphones or external devices, through the virtual audio cable. Follow these steps to set up the virtual audio cable as a recording device:
1. Open the Sound settings: Right-click on the speaker icon in your system tray and select “Sounds” from the context menu. This will open the Sound settings window.
2. Navigate to the Recording tab: In the Sound settings window, go to the “Recording” tab. This tab displays a list of audio recording devices available on your computer.
3. Enable show disabled devices: Right-click anywhere in the Recording tab and make sure that the “Show Disabled Devices” and “Show Disconnected Devices” options are checked. This will ensure that the virtual audio cable is visible in the list of recording devices.
4. Select the virtual audio cable: Scroll through the list of recording devices and look for the entry representing your virtual audio cable. It is usually labeled with the name of the virtual audio cable software you installed. Right-click on the virtual audio cable entry and select “Enable” if it is disabled. Then, right-click on it again and select “Set as Default Device” from the context menu.
5. Adjust the volume and properties: Once you have set the virtual audio cable as the default recording device, you can adjust its volume level and properties. Right-click on the virtual audio cable entry and select “Properties” from the context menu. In the Properties window, you can adjust the volume, enhancements, and other recording settings.
6. Test the recording: To ensure that the virtual audio cable is working correctly as a recording device, open a recording software or any application that allows you to capture audio input. Start a recording session and verify that the virtual audio cable is selected as the input device and that it is successfully capturing audio from the desired source.
7. Configure individual application settings (optional): Some applications have their own audio settings and might need to be configured individually to use the virtual audio cable as the recording device. Look for audio settings or preferences within the application and select the virtual audio cable as the preferred input device.
Setting up the virtual audio cable as a recording device enables you to capture audio input from various sources through the virtual cable, expanding your possibilities for recording and capturing high-quality audio. In the next step, we’ll guide you through adjusting audio settings in Windows 10 to further enhance your audio experience.
Step 5: Adjusting Audio Settings in Windows 10
After setting up the virtual audio cable as both a playback and recording device, it’s important to adjust the audio settings in Windows 10 to ensure optimal performance and enhance your overall audio experience. Here are some key settings you can adjust:
1. Volume: Adjust the volume levels for both playback and recording devices to your desired level. Right-click on the speaker icon in the system tray, select “Sounds,” and navigate to the “Playback” or “Recording” tab to adjust the volume sliders.
2. Playback and Recording Levels: In the Sound settings window, select the virtual audio cable as the default playback or recording device and click on “Properties.” In the Properties window, navigate to the “Levels” tab to fine-tune the levels for playback and recording. Ensure that the levels are balanced and not too low or too high.
3. Enhancements: Depending on your audio requirements, you can enable or disable audio enhancements in the Properties window of the virtual audio cable. Experiment with enhancements such as bass boost, virtual surround, or equalizer settings to enhance the audio quality according to your preferences.
4. Default Format: In the Properties window of the virtual audio cable, navigate to the “Advanced” tab and select the desired default format for both playback and recording. The default format determines the audio quality and sample rate used by the virtual audio cable.
5. Communications: Windows 10 has a feature called “Communications” that can automatically adjust the volume levels when it detects communication activity, such as voice calls. In the Sound settings window, navigate to the “Communications” tab and select the desired setting, whether you want to reduce the volume of other sounds during communication or keep them unchanged.
6. Audio Routing: If your virtual audio cable software offers advanced routing options, explore the configuration settings to route specific audio sources to different destinations. This can be useful for separating audio streams or directing audio to specific applications or outputs.
7. Notification Sounds: Customize the system notification sounds, such as email alerts or message notifications, in the Sound settings window. Navigate to the “Sounds” tab and select the desired sounds or disable them according to your preference.
Adjusting these audio settings in Windows 10 will allow you to fine-tune your audio experience and optimize the virtual audio cable’s performance. Take some time to experiment with the settings and find the configuration that best suits your needs. In case you encounter any issues, refer to the troubleshooting tips in the next section.
Troubleshooting Tips
While setting up and using a virtual audio cable can greatly enhance your audio experience, it’s possible to encounter some challenges along the way. Here are some troubleshooting tips to help you address common issues and ensure a smooth operation:
1. No audio input or output: If you’re not hearing any audio or not seeing any signal coming through the virtual audio cable, double-check that it is set as the default playback and recording device in Windows’ Sound settings. Also, ensure that the volume levels are properly adjusted and that the audio source or destination application is correctly configured.
2. Audio distortion or latency: If you experience audio distortion or noticeable latency, try adjusting the buffer size in the virtual audio cable settings. Increasing the buffer size can help reduce audio glitches or latency issues. Experiment with different buffer sizes until you achieve the desired audio quality and responsiveness.
3. Conflicting audio devices: If you’re having trouble with audio devices conflicting with the virtual audio cable, try disabling or disconnecting unnecessary devices. This can help prevent routing conflicts and ensure that the virtual audio cable is the primary audio device being used.
4. Update audio drivers: Outdated or incompatible audio drivers can cause audio issues. Make sure to keep your audio drivers updated by visiting the manufacturer’s website or using driver management software. Updating the drivers can often resolve compatibility or performance-related problems.
5. Restart applications: If you’re experiencing issues with specific applications not recognizing or utilizing the virtual audio cable, try restarting those applications. Sometimes, applications might need a restart to properly detect and use the newly configured audio devices.
6. Reinstall virtual audio cable software: If all else fails, consider reinstalling the virtual audio cable software. Uninstall the current installation, restart your computer, and then reinstall the software following the provided instructions. This can help resolve any software-related issues or conflicts.
7. Check system requirements: Ensure that your computer meets the minimum system requirements for the virtual audio cable software. Inadequate hardware, insufficient RAM, or an outdated operating system can lead to performance problems or compatibility issues.
Remember, every system and configuration is unique, so troubleshooting steps may vary. If you encounter more complex issues or need additional assistance, refer to the software’s documentation or support channels for specific troubleshooting advice tailored to your virtual audio cable software.
Conclusion
Congratulations! You have successfully set up a virtual audio cable in Windows 10. By installing and configuring the virtual audio cable, you have unlocked a world of possibilities for managing and controlling your audio setup. Whether you’re a musician, podcaster, gamer, or content creator, virtual audio cables offer flexibility, convenience, and improved audio quality.
Throughout this guide, we covered the essential steps to download and install a virtual audio cable, configure its settings, and set it up as both a playback and recording device. We also explored how to adjust audio settings in Windows 10 to further enhance your audio experience.
Remember, each virtual audio cable software may have its own unique features and settings, so it’s essential to refer to the software’s documentation for specific details and instructions.
With your virtual audio cable set up, you have the power to route audio signals between different applications and devices, record audio from various sources, and create professional-quality music, podcasts, streams, and more.
Should you encounter any challenges along the way, we provided troubleshooting tips to help you resolve common issues and ensure the smooth operation of your virtual audio cable.
Now, go forth and explore the endless possibilities that virtual audio cables offer. Unleash your creativity, experiment with different audio setups, and elevate your audio experience to new heights. Enjoy the flexibility, convenience, and improved audio quality that virtual audio cables bring to your digital world.