
Virtual Sound Card
для Windows
Virtual Sound Card — эмулятор звуковой карты, который имитирует наличие полнофункциональной звуковой карты в операционной системе. Приложение можно использовать для записи звука, изменения голоса, создания аудио трансляций и пр.
Основные возможности:
- Захват звука в приложениях.
- Одновременный захват звука в приложениях и вашего голоса через микрофон одновременно.
- Запись звука из онлайн-чатов, голосовых сообщений (например, разговор по Skype).
- Запись DRM-защищенной музыки, мультимедиа.
- Запись звука из видео/аудиофайла, онлайн-видео/музыки и т.д.
- Изменение своего голоса (мужчина, женщина или ребенок) с помощью функции «Pitch control».
- Отсутствие потери качества звука.
- Поддержка командной строки.
- Поддержка 32- и 64-битной ОС.
ТОП-сегодня раздела «Эмуляторы»
DS4Windows 3.3.3
Эмулятор контроллера Xbox 360 для использования геймпада Sony DualShock 4 во многих компьютерных…
Android SDK 35.0.0
Android SDK — универсальная оболочка для моделирования и разработки различных программных продуктов под операционную систему Android…
Отзывы о программе Virtual Sound Card
Аристарх про Virtual Sound Card 2.1 [26-09-2021]
В программе один большой недостаток,- цена…
4 | 10 | Ответить
0611 про Virtual Sound Card 2.0.11.351 [07-08-2020]
А лекарство есть? А то в России покупать программы всегда считалось дурным тоном.
16 | 5 | Ответить
Я_не_робот в ответ 0611 про Virtual Sound Card 2.1 [16-11-2021]
В российском интернете есть всё…но это не тот сайт, где пишут про лекарства. xD
4 | 7 | Ответить
Все способы:
- Шаг 1: Скачивание инсталляционного файла
- Шаг 2: Установка ПО и драйверов
- Шаг 3: Настройка системы
- Вопросы и ответы: 0
Шаг 1: Скачивание инсталляционного файла
Virtual Audio Cable – это бесплатная программа, которая устанавливает виртуальные драйвера аудиоустройства, позволяющие записать звук на компьютере. Софт распространяется на официальном сайте разработчика, поэтому сначала разберем, как скачать и распаковать файлы, нужные для установки ПО на компьютер с Windows 10:
Скачать Virtual Audio Cable с официального сайта
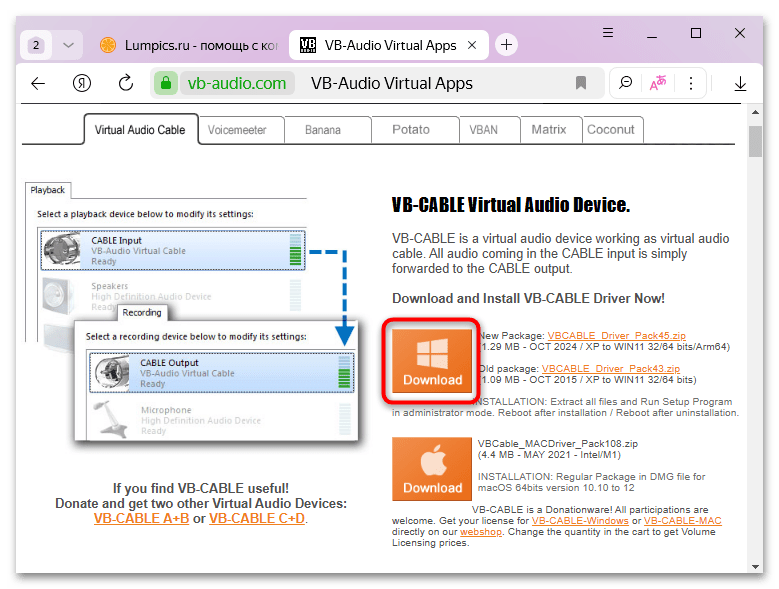
- Перейдите по ссылке выше, и вы попадете на официальный сайт разработчика. Кликните по кнопке со значком Windows под названием «Download», чтобы загрузить актуальную версию программы.

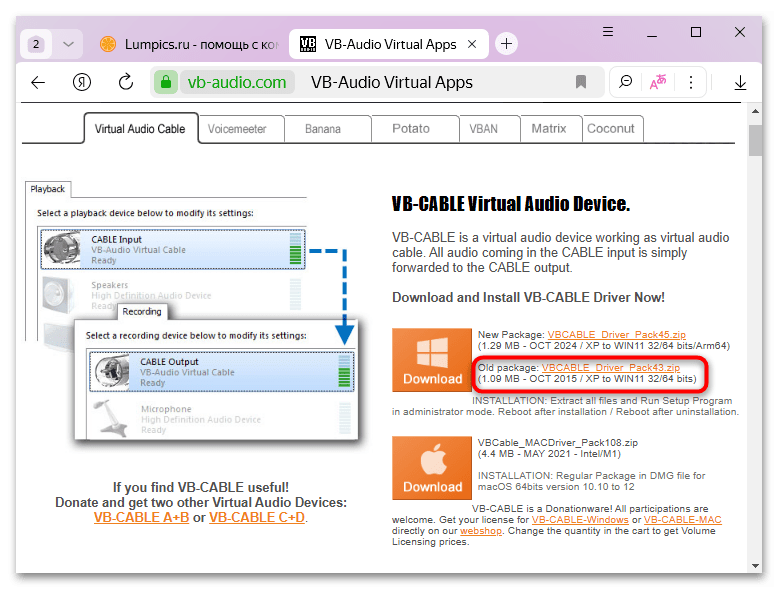
Если требуется установить более ранний пакет приложений, щелкните по соответствующей ссылке правее.
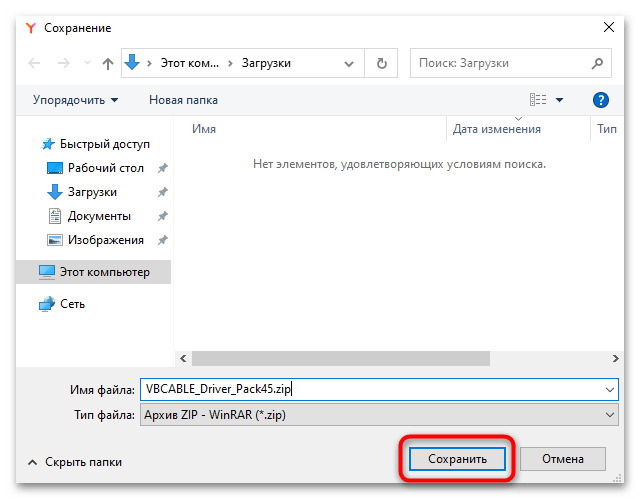
- Если браузер запросит, куда сохранять архив, укажите директорию и нажмите на кнопку «Сохранить».
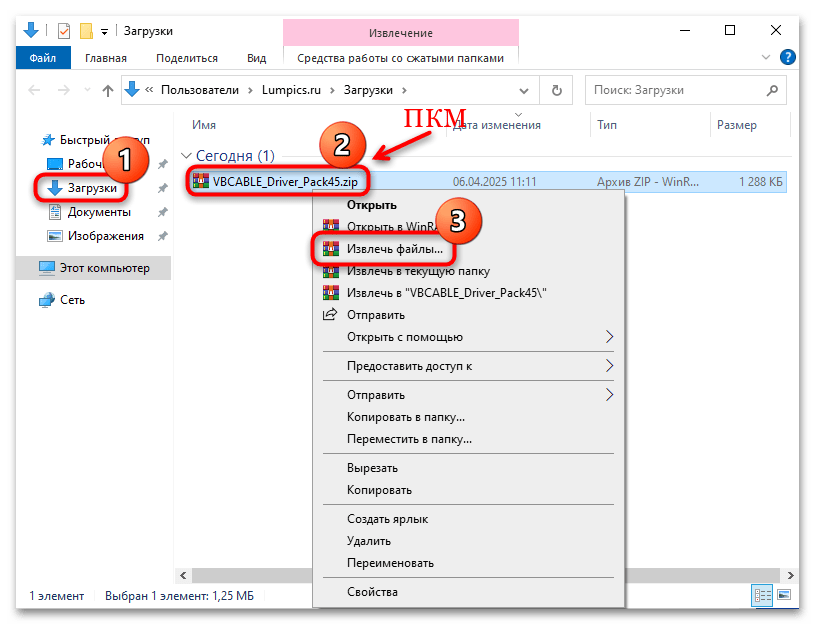
- Дождитесь окончания скачивания ZIP-архива, а после загрузки извлеките все его содержимое. Для этого перейдите в раздел с загрузками, кликните по нему правой кнопкой мыши и выберите в контекстном меню пункт «Извлечь все»/«Извлечь файлы».
- В следующем окне укажите, куда будут разархивированы файлы и подтвердите операцию.
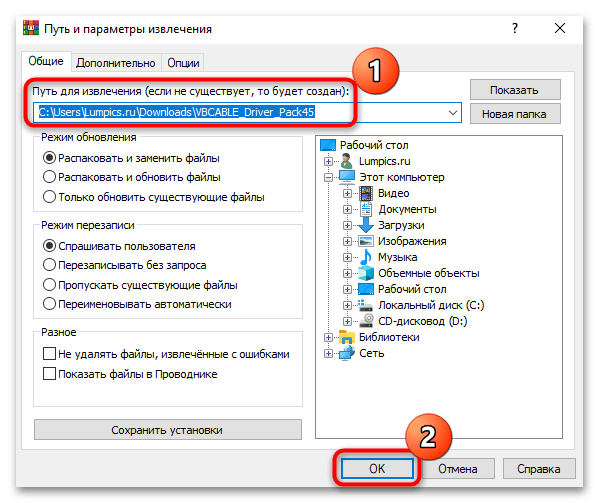
После того, как вы извлекли все файлы, переходите к Шагу 2, то есть, непосредственной установке ПО на компьютер.
Шаг 2: Установка ПО и драйверов
Прежде, чем запускать инсталляционный файл, проверьте, какая у вас разрядность операционной системы, поскольку именно от этого зависит, какой из них выбирать. О том, как это сделать, читайте у нас на сайте.
Подробнее: Определяем разрядность используемой ОС Windows 10
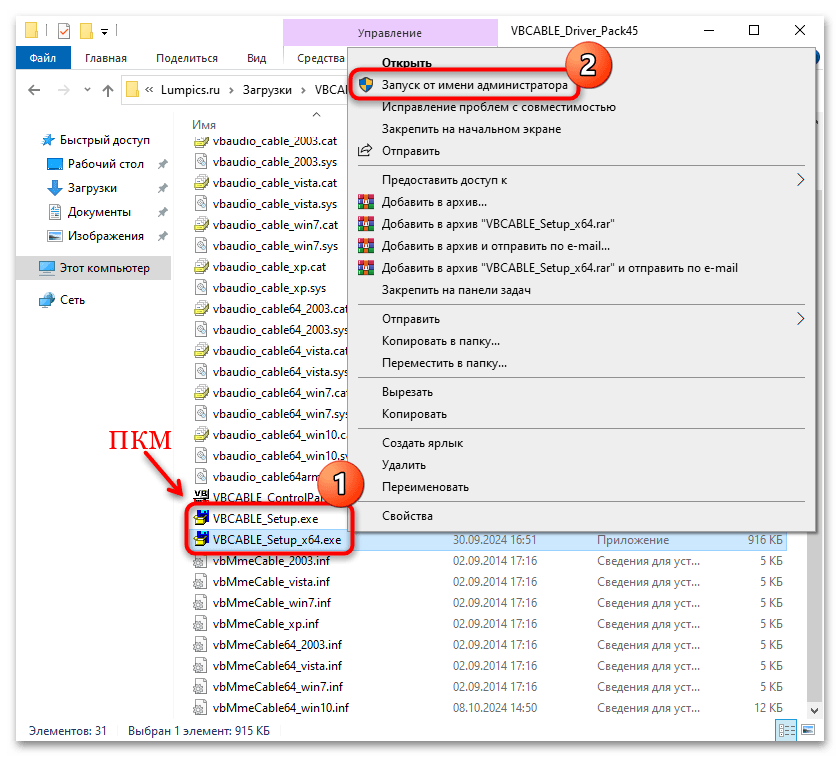
- Если у вас 64-битная ОС, потребуется файл под названием «VBCABLE_Setup_x64.exe». В случае с 32-битной системой это «VBCABLE_Setup.exe». Инсталляционный файл необходимо запустить с расширенными правами, поэтому щелкните по одному из них (в зависимости от разрядности ОС) правой кнопкой мыши и выберите «Запуск от имени администратора».
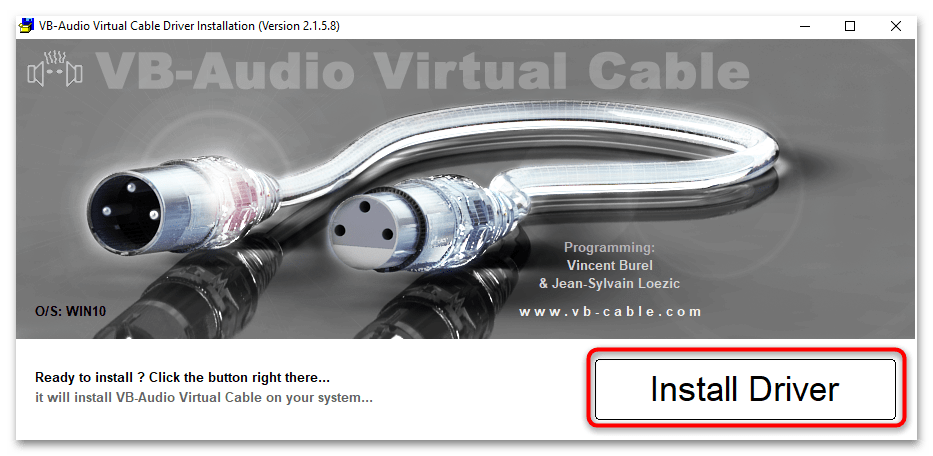
- В открывшемся окне кликните по кнопке «Install Driver».
- Далее отобразится системное окно, где нужно подтвердить перезагрузку компьютера для установки виртуального драйвера. Обязательно сделайте это, чтобы новые параметры вступили в силу, а виртуальный драйвер заработал.
На этом установка компонентов программы завершена.
Шаг 3: Настройка системы
Так как после инсталляции виртуального драйвера значка для запуска программы нет (ведь установлен драйвер), то следует еще разобраться, как включить этот виртуальный драйвер, если потребуется, и сделать его устройством воспроизведения по умолчанию:
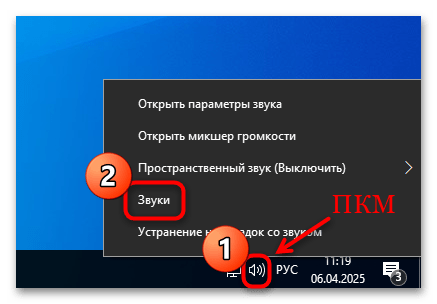
- Кликните правой кнопкой мыши по значку громкости в трее и выберите пункт «Звуки».
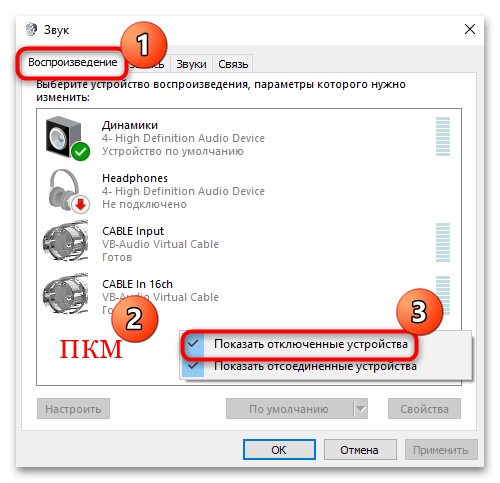
- На вкладке «Воспроизведение» найдите устройство «CABLE Input». Если его нет, тогда, вероятно, оно отключено. Щелкните правой кнопкой мыши по свободной области и отметьте в меню опцию «Показать отключенные устройства».
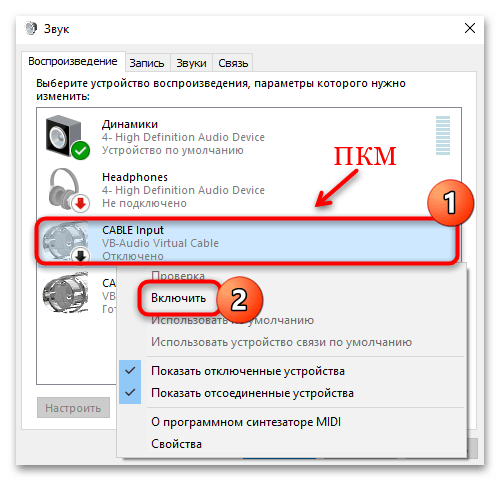
- Активируйте виртуальный драйвер, если он по каким-то причинам не работает, нажав правой кнопкой по нему и выбрав пункт «Включить».
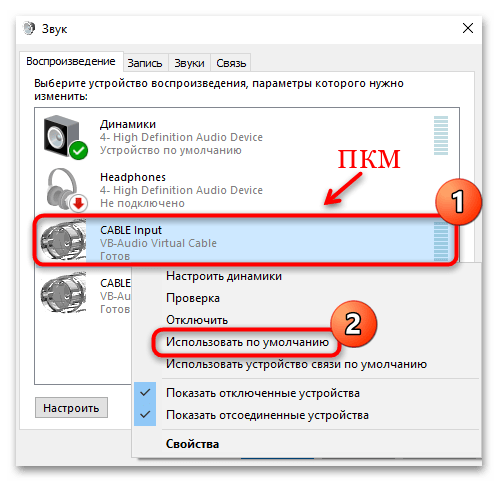
- Чтобы сделать его устройством по умолчанию, выберите соответствующий пункт в контекстном меню.
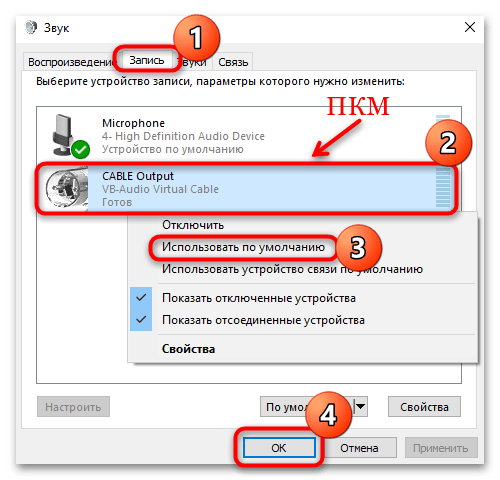
- Переключитесь на вкладку «Запись» и проделайте все то же самое, сделав устройство «CABLE Output» устройством по умолчанию. Не забудьте сохранить настройки.
После выполненных действий все звуки, которые воспроизводятся в системе или в программах, будут перенаправлены на виртуальное устройство «CABLE Output». Драйвер будет работать в качестве микрофона, что позволит выполнить запись воспроизводимого аудио.
Обратите внимание, что у программы есть один существенный недостаток: услышать то, что записываете, не будет возможности, поскольку звук будет перенаправляться на виртуальное устройство записи, а не в стандартное аудио оборудование (например, колонки или наушники).
Наша группа в TelegramПолезные советы и помощь
Scream — Virtual network sound card for Microsoft Windows
Scream is a virtual device driver for Windows that provides a
discrete sound device. Audio played through this device is
published on your local network as a PCM multicast stream.
Receivers on the network can pick up the stream and play it
through their own audio outputs. Receivers are available for
Unix/Linux (interfacing with PulseAudio or ALSA) and for Windows.
For the special scenario of a Windows guest on a QEMU host,
@martinellimarco has contributed support for transferring audio
via the IVSHMEM driver mechanism, similar to the GPU
pass-through software «Looking Glass». See the section on
IVSHMEM below.
Scream is based on Microsoft’s MSVAD audio driver sample code.
The original code is licensed under MS-PL, as are my changes
and additions. See LICENSE for the actual license text.
Download and install
A ZIP file containing signed builds for Windows 10 on x64, x86
and arm64 is available on the GitHub releases page.
The «installer» is a batch file that needs to be run with
administrator rights.
Installation on Windows 10 version 1607 and newer
Microsoft has recently tightened the rules for signing kernel
drivers. These new rules apply to newer Windows 10 installations
which were not upgraded from an earlier version. If your installation
is subject to these rules, the driver will not install.
However, cross-signed kernel drivers are still accepted by Windows 10 version 1607 (and greater) if any of the following exceptions apply:
- The driver is a boot-up driver
- Windows 10 was upgraded from a version preceding 1607
- Secure Boot is disabled in BIOS or not available at all
- The driver was signed with a certificate issued before 29 July 2015
- A special registry value has been set, thereby allowing cross-signed drivers to load on systems with Secure Boot enabled
Workaround #1: Disable secure boot in BIOS.
For more information, see this issue.
Workaround #2: Add this special registry value:
[HKEY_LOCAL_MACHINE\SYSTEM\CurrentControlSet\Control\CI\Policy]
"UpgradedSystem"=dword:00000001
Please review the following resources for more information.
- «Back Doors for Cross-Signed Drivers», a blogpost by Geoff Chappell
- «Windows 10 Anniversary Update — Digital Signature Question», a forum thread on MyDigitalLife
Installation on Windows 11
The installation methods above will not work on Windows 11, as the installation batch file relies on devcon-x64, which is not compatible with Windows 11. You can install unsigned drivers for Windows 11 with an alternative method, leveraging devcon’s successor, pnputil and bcdedit to put Windows 11 in Test Mode. To install Scream for Windows 11:
- Ensure that Secure Boot is not enabled.
- Enable Test Mode: Open an administrator command prompt, and issue
bcdedit /set testsigning on. Reboot your machine, and ensure you see «Test Mode» on the bottom-right corner of your wallpaper. - Install the driver: Open an administrator command prompt, and navigate your terminal to
<scream folder>/Install/driver/<architecture>/. Then, issue:pnputil /add-driver .\Scream.inf /install. - Turn Off Test Signing: From an administrator command prompt, issue
bcdedit /set testsigning off. Then, restart your computer. Ensure that Test Mode is now disabled by ensuring there is no message of «Test Mode» present on the bottom-right corner of your wallpaper. You should now see the Scream audio device in your audio devices, and can proceed with client setup.
Receivers
-
Unix with Pulseaudio, JACK or ALSA: Not included in the installer package.
Please see the README in the Receivers/unix folder.
Various contributors have written code for this receiver:- @roovio: JACK support.
- @ivan: Original ALSA code.
- @martinellimarco: IVSHMEM support.
- @accumulator: Refactoring into single binary and cmake support.
- @F5OEO: Raw output support.
-
Windows: ScreamReader, contributed by @MrShoenel. Included in
the installer package as of version 1.2. This receiver does not
support positional mapping of multichannel (more than stereo)
setups — meaning a mismatch in speaker setup can lead to channels
being played in the wrong position. -
A 3rd-party receiver that supports Scream streams is
https://github.com/mincequi/cornrow. It’s primarily meant for
embedded devices. -
@tomek-o wrote receivers for low-power embedded systems, great
for building ethernet-attached active speakers.- STM32F429 (ARM) Scream Receiver
- ESP32 Scream (and RTP) Receiver
Receivers can usually be run as unprivileged users. Receiver
systems that have an input firewall need to open UDP port 4010,
or whatever custom port you use.
Functional description
All audio played through the Scream device will be put onto
the local LAN as a multicast stream (using unicast is optional —
see below). Delay is minimal, since all processing is done
on kernel level. There is no userspace portion.
The multicast target address and port is «239.255.77.77:4010».
The audio is a raw PCM stream. The default sampling rate and
size can be set as the «Default format» in the driver «Advanced»
property page. The default speaker/channel configuration can be
set on the «Configure» dialog of the Scream sound device.
Data is transferred in UDP frames with a payload size of max.
1157 bytes, consisting of 5 bytes header and 1152 bytes PCM data.
The latter number is divisible by 4, 6 and 8, so a full number
of samples for all channels will always fit into a packet.
The first header byte denotes the sampling rate. Bit 7 specifies
the base rate: 0 for 48kHz, 1 for 44,1kHz. Other bits specify the
multiplier for the base rate. The second header byte denotes the
sampling width, in bits. The third header byte denotes the number
of channels being transferred. The fourth and fifth header bytes
make up the DWORD dwChannelMask from Microsofts WAVEFORMATEXTENSIBLE
structure, describing the mapping of channels to speaker positions.
Receivers simply need to read the stream off the network and
stuff it into a local audio sink. The receiver system’s kernel
should automatically do the necessary IGMP signalling, so it’s
usually sufficient to just open a multicast listen socket and
start reading from it. Minimal buffering (~ 4 times the UDP
payload size) should be done to account for jitter.
Setting the sampling rate (optional)
To satisfy your audiophile feelings, or to reduce unnecessary
resampling, you might want to set a higher sampling rate and/or
sampling width. You can do that on the driver «Advanced» property
page, as shown below. Warning: using high sampling freqs with 24/32
bits width in combination with multichannel can lead to high bit rates
on the network. We recommend to stick to 48kHz/16 bits for 5.1 or
higher channel modes, or 44.1kHz/16 if you are going to listen to
music from CDs.

width=»700″/>
Setting up default speaker configuration (optional)
Thanks to the great work of @martinellimarco, if your target
system has a multichannel speaker setup, you can extend that to
Windows as well. Use the «Configure» wizard of the sound device
driver dialog, as shown below. Please note that this is just a
system default, and that application software (like games) may
require their own settings to be made.

Using unicast instead of multicast (optional)
This is only recommended if multicast gives you problems.
Tweak the registry in the manner depicted in this screenshot
(you will have to create the «Options» key), then reboot:

Using silence suppression (optional)
Silence suppression will avoid sending data over the network
if there is silence. Once a set number of consecutive silent
samples are processed, Scream will stop sending data. Add the
following registry key — the suggested value is 10000 samples
(~1/4 second at 44100Hz).
Tweak the registry in the manner depicted in this screenshot
(you will have to create the «Options» key), then reboot:

Using IVSHMEM between Windows guest and Linux host
⚠️ Note: While this setup is possible, it is generally
only advised if you can’t use network transfer via a standard virtio-net device.
Scream on QEMU does not benefit from using IVSHMEM. It increases CPU
load and latency due to the polling nature of the implementation.
This can be used as an alternative to the default networked
transfer when using QEMU/KVM.
- Add a IVSHMEM device to your VM. We recommend a size of 2MB.
If you use other IVSHMEM devices, we recommend to use the same
domain and bus, just varying the slot numbers. Here is a config
example:
...
<device>
...
 <shmem name='scream-ivshmem'>
   <model type='ivshmem-plain'/>
   <size unit='M'>2</size>
   <address type='pci' domain='0x0000' bus='0x00' slot='0x11' function='0x0'/>
 </shmem>
 ...
</device>
...
Alternatively, for those who don’t use libvirt, here is an example for the relevant parts of a QEMU command line:
...
-device ivshmem-plain,memdev=ivshmem_scream \
-object memory-backend-file,id=ivshmem_scream,share=on,mem-path=/dev/shm/scream-ivshmem,size=2M \
...
- Install the IVSHMEM driver from here. As is Windows will automatically install a dummy driver for the IVSHMEM device. To use the IVSHMEM device the
PCI standard RAM Controllerin theSystem Devicesnode must be manually updated with the one downloaded above. - To make the driver use IVSHMEM, add a DWORD
HKLM\SYSTEM\CurrentControlSet\Services\Scream\Options\UseIVSHMEM,
with the value being the size of the device in MB (2, as recommended). Please
note that scream will identify the device by its size, so you should only
have one IVSHMEM device with that specific size. Also note that you
might have to create theOptionskey. You can also paste this command into an
admin CMD shell to create both key and DWORD:REG ADD HKLM\SYSTEM\CurrentControlSet\Services\Scream\Options /v UseIVSHMEM /t REG_DWORD /d 2 - When the VM is running, check if the device exists as /dev/shm/scream-ivshmem,
and if the user you want to run the receiver as has read access.
If so, run a IVSHMEM-capable receiver with the path of the SHM file
as commandline parameter, for example:
scream -m /dev/shm/scream-ivshmem
Building
Visual Studio and a recent WDK are required. Good luck!
by e2eSoft
Makes it simple to record and play back all sound from your computer, including microphone and running programs.
Operating system: Windows
Publisher:
e2eSoft
Release : Virtual Sound Card (VSC) 2.1
Antivirus check: passed
Report a Problem
Although there are programs available to record audio from the speakers of your computer, not all of them can record sound produced by running programmes. Try Virtual Sound Card as a solution if you’re seeking one (VSC). It’s a Windows tool that you may use to broadcast audio to various channels in addition to grabbing it from programs. The utility may deliver audio data to a sound card that it imitates physically. For instance, with VSC, noises captured from the microphone can be heard on the speakers. After a quick setup process that shouldn’t cause you any problems, a straightforward window with recording and broadcasting instructions appears.
To begin, you must go to Windows’ sound settings panel and choose Virtual Sound Card as the default sound device. When you go back to the main program window, you can choose how many audio transfer channels to utilize and choose the sender and recipient for each channel using dropdown menus. You may change the pitch (male or female) when speaking into a microphone, which is very useful for hiding your natural voice. The default sample rate, bits per sample, buttfer count, and duration can all be changed in terms of other audio parameters. The interface is available in a variety of languages, and volume control may be manually turned on.
You may simultaneously broadcast sound on various channels thanks to the support for multiple instances. In our tests, the program’s influence on the computer’s performance was minor because it used few system resources. For instance, you may simply capture iPhone audio or Skype talks with the Virtual Sound Card (VSC). Anyone can use it since it is useful and simple.
The Virtual Sound Card (VSC) software allows you to record all application sounds and your microphone voice simultaneously.
Features:
- Record / Broadcast the sound of all applications and your MIC voice at the same time
- Record Online chatting / meeting voice conversation
- Record DRM-protected music, media
- Record the audio of / audio file , Online video/ music ect
- Pure digital data transfer, No audio quality loss.
Requires Windows operating system
Minimum 1 GB RAM
Sound card present in the system
Enables digital audio streaming without need for physical sound card.
Easily customizable sound settings for different applications.
Supports multiple simultaneous audio streams.
May not support all types of audio formats or devices.
Potential latency issues can affect audio recording or playback quality.
Confusing interface for non-technically savvy individuals.
👨💻️ USER REVIEWS AND COMMENTS 💬
image/svg+xmlBotttsPablo Stanleyhttps://bottts.com/Florian Körner
Jack
Virtual Sound Card (VSC) for Windows is a sound card emulator. It will record all kind of sounds of all application, and also record your mic sound at the same time .It will record audio and video files and also record online videos. While using this app there is no sound loss quality. It also supports on command line . It supports both windows 32 bit and 64 bit version.
image/svg+xmlBotttsPablo Stanleyhttps://bottts.com/Florian Körner
Cole X********b
Virtual Sound Card (VSC) is a software application that emulates a physical sound card on a computer. It allows users to record and playback audio without the need for a physical sound card. It also allows users to route audio from one application to another, and to use audio from one application in another. Additionally, it allows users to mix multiple audio sources and apply audio effects.
image/svg+xmlBotttsPablo Stanleyhttps://bottts.com/Florian Körner
Joshua S*****c
I recently used the Virtual Sound Card (VSC) software for a recording session and I was very impressed with the results. The software was easy to install and set up and provided a great level of control and flexibility. I was able to adjust the volume, microphone input and other settings with ease. The sound quality was also great and I didn’t experience any latency issues. I found the software to be intuitive and had no issues navigating the various menus. The software also provided clear visual feedback when making adjustments. Overall, I was very satisfied with the experience and would recommend it to anyone who needs a reliable and easy to use virtual sound card.
image/svg+xmlBotttsPablo Stanleyhttps://bottts.com/Florian Körner
Michael I.
VSC software is easy to set up and has great sound quality. It is a great tool for recording, mixing and mastering audio. The interface is intuitive and the sound is clean and clear. The software is also lightweight and doesn’t require too many system resources.
image/svg+xmlBotttsPablo Stanleyhttps://bottts.com/Florian Körner
Angus Plymire
Virtual Sound Card (VSC) software is a program that emulates a physical sound card on a computer. It allows users to create a virtual audio device that can be used to play or record audio from different sources. This software enables users to route audio from one application to another, mix multiple audio streams, and adjust volume levels. It also supports different audio formats and provides low-latency performance. VSC software can be useful in situations where a physical sound card is not available or when multiple audio devices need to be used simultaneously.
image/svg+xmlBotttsPablo Stanleyhttps://bottts.com/Florian Körner
Lucas
Versatile, efficient tool for audio routing.
Useful for podcasting, broadcasting endeavors.
Boosts audio quality significantly.
Easily creates multiple audio channels.
Effortless streaming and recording.
Seamless audio mixing capabilities.
Solves variety of sound issues.
Convenient for teleconferencing and online meetings.
Complex yet manageable user interface.
Potential latency issues occasionally.
image/svg+xmlBotttsPablo Stanleyhttps://bottts.com/Florian Körner
Finn
Reliable, Enhanced Audio Quality
«Transmit audio from various channels.»
Clipnote Studio is a powerful animation creation and editing tool for creating animation sequences using various types of media.
Decimort2 is a high-quality bit crusher and sample rate reducer VST plugin for adding vintage character to your sound.
NVIDIA Canvas is a powerful, intuitive painting and illustration application for creating and sharing stunning artwork.
Metadata++ is a free software program for viewing, editing, and converting file metadata.
A sound recording and playback programme that lets you import or export WAV, AIFF, or MP3 files in a variety of working situations.The spectrogram mode is used to display frequencies.
Если у вас возникла необходимость записи звука, воспроизводимого на компьютере или ноутбуке, существуют различные способы сделать их, самые популярные из которых описывались в инструкции Как записать звук с компьютера.
Однако на некотором оборудовании случается, что приведенными способами не удается воспользоваться. В этом случае можно использовать VB Audio Virtual Audio Cable (VB-Cable) — бесплатную программу, устанавливающую виртуальные аудио устройства, которые позволяют в дальнейшем записать воспроизводимый на компьютере звук.
Установка и использование VB-CABLE Virtual Audio Device
Virtual Audio Cable очень проста в использовании, при условии, что вы знаете, где в системе или программе, которую вы используете для записи, настраиваются устройства записи (микрофон) и воспроизведения.
Примечание: есть еще одна аналогичная программа, которая также называется Virtual Audio Cable, более продвинутая, но платная, упоминаю об этом, чтобы не было путаницы: здесь рассматривается именно бесплатный вариант VB-Audio Virtual Cable.
Шаги для установки программы в Windows 10, 8.1 и Windows 7 будут следующими
- Прежде всего потребуется скачать Virtual Audio Cable с официального сайта https://www.vb-audio.com/Cable/index.htm и распаковать архив.
- После этого запустите (обязательно от имени Администратора) файл VBCABLE_Setup_x64.exe (для 64-бит Windows) или VBCABLE_Setup.exe (для 32-бит).

- Нажмите кнопку Install Driver.

- Подтвердите установку драйвера, а в следующем окне нажмите «Ок».

- Вам предложат перезагрузить компьютер — это на ваше усмотрение, в моем тесте работало и без перезагрузки.


На этом Virtual Audio Cable установлен на компьютер (если в этот момент у вас пропадет звук — не пугайтесь, достаточно просто изменить устройство воспроизведения по умолчанию в параметрах звука) и его можно использовать для записи воспроизводимого аудио.
Для этого:
- Зайдите в список устройств воспроизведения (В Windows 7 и 8.1 — правый клик по значку динамика — устройства воспроизведения. В Windows 10 для этого можно нажать правой кнопкой мыши по значку динамика в области уведомлений, выбрать «Звуки», а потом перейти на вкладку «Воспроизведение»).
- Нажмите правой кнопкой мыши по пункту Cable Input и выберите пункт «Использовать по умолчанию».

- После этого либо установите Cable Output в качестве устройства записи по умолчанию (на вкладке «Запись»), либо выберите это устройство в качестве микрофона в программе записи звука.

Теперь, звуки, воспроизводимые в программах, будут перенаправляться на виртуальное устройство Cable Output, которое в программах для записи звука будет работать как обычный микрофон и, соответственно, записывать воспроизводимое аудио. Однако при этом есть один недостаток: во время этого вы не будете слышать то, что записываете (т.е. звук вместо динамиков или наушников будет направляться на виртуальное устройство записи).
Для удаления виртуального устройства, зайдите в панель управления — программы и компоненты, удалите VB-Cable и перезагрузите компьютер.
У этого же разработчика есть и более сложное бесплатное ПО для работы с аудио, которое подойдет, в том числе, для записи звука с компьютера (в том числе сразу с нескольких источников, с возможностью одновременного прослушивания) — Voicemeeter.

Если для вас не сложно разобраться в английском интерфейсе и пунктах управления, почитать справку — рекомендую попробовать.