
Applies ToWindows 11 Windows 10
Виртуальная сенсорная панель — это экранная сенсорная панель, которую можно использовать для управления указателем мыши. Выберите, следует ли включить или отключить виртуальную сенсорную панель из следующего списка:
-
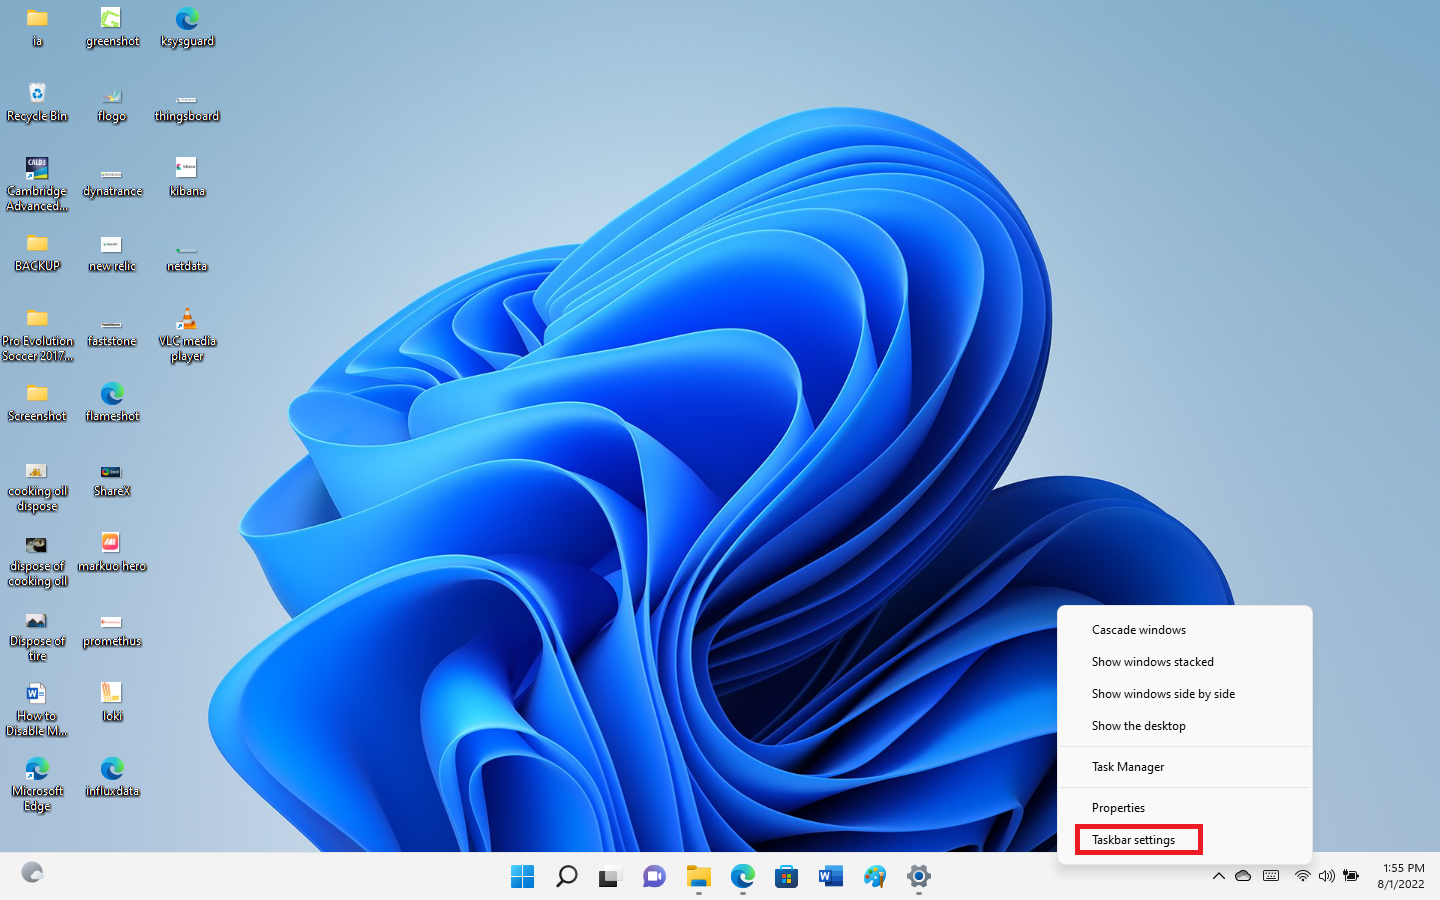
Совет: Для сенсорных экранов нажмите и удерживайте панель задач, а затем выберите Параметры панели задач.
-
В окне Персонализация > панели задач в разделе Значки панели задач убедитесь, что виртуальная сенсорная панельвключена.
-
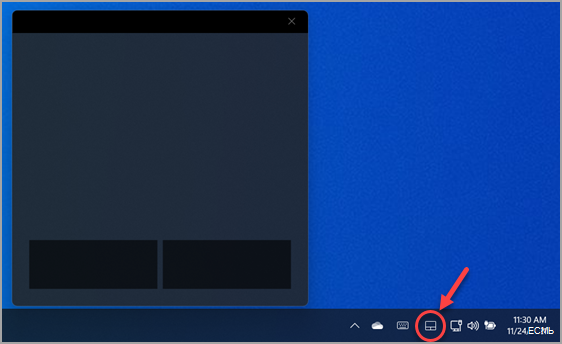
В разделе панели задач в области задач выберите значок виртуальной сенсорной панели . Системный лоток расположен рядом с временем и датой на панели задач.

-
Появится виртуальная сенсорная панель.
-
Если виртуальная сенсорная панель видна, закройте ее, выбрав в окне виртуальной сенсорной панели.
-
Совет: Для сенсорных экранов нажмите и удерживайте панель задач, а затем выберите Параметры панели задач.
-
В окне Персонализация > панели задач в разделе Значки панели задач убедитесь, что виртуальная сенсорная панельотключена.
-
Значок виртуальной сенсорной панели больше не отображается в разделе панели задач в области задач.
Нужна дополнительная помощь?
Нужны дополнительные параметры?
Изучите преимущества подписки, просмотрите учебные курсы, узнайте, как защитить свое устройство и т. д.
If you are using the touchscreen functionality of your laptop frequently, you can take it to the next level by enabling the virtual touchpad in Windows 11.
As the name implies, once enabled, Windows 11 shows an on-screen virtual touchpad that functions just like the physical touchpad on your laptop. It allows you to navigate the entire screen without having to move your hand across the touchscreen awkwardly.
In this article, let me show the steps to enable the on-screen virtual touchpad in Windows 11, how to use it, and disable it when not needed.
Table of contents:
- How to enable virtual touchpad in Windows 11
- How to use the virtual touchpad in Windows 11
- How to disable virtual touchpad in Windows 11
- Limitations of virtual touchpad
- Conclusion
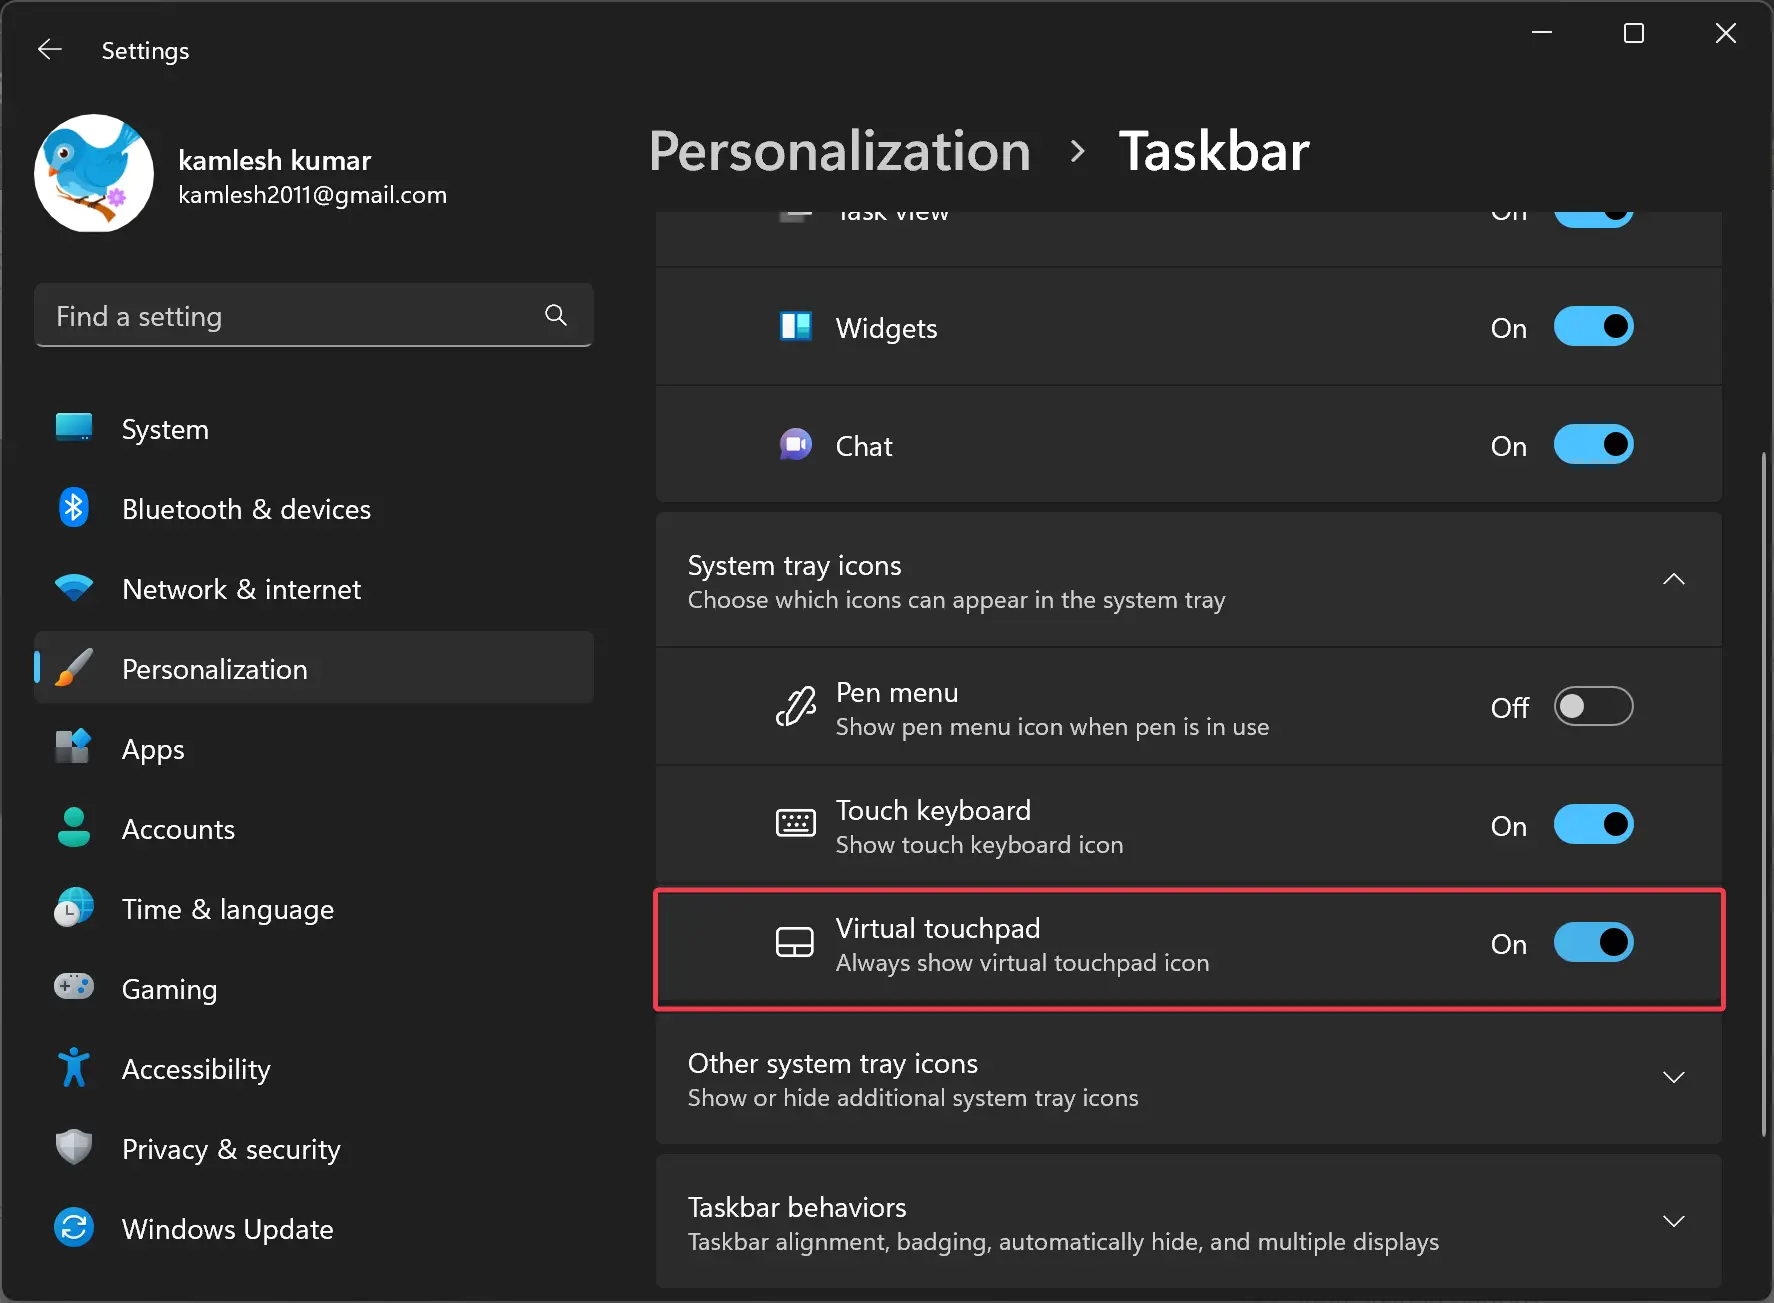
You can enable the virtual touchpad in Windows 11 using the taskbar settings page in the Settings app.
Here’s how to enable the virtual touchpad in Windows 11:
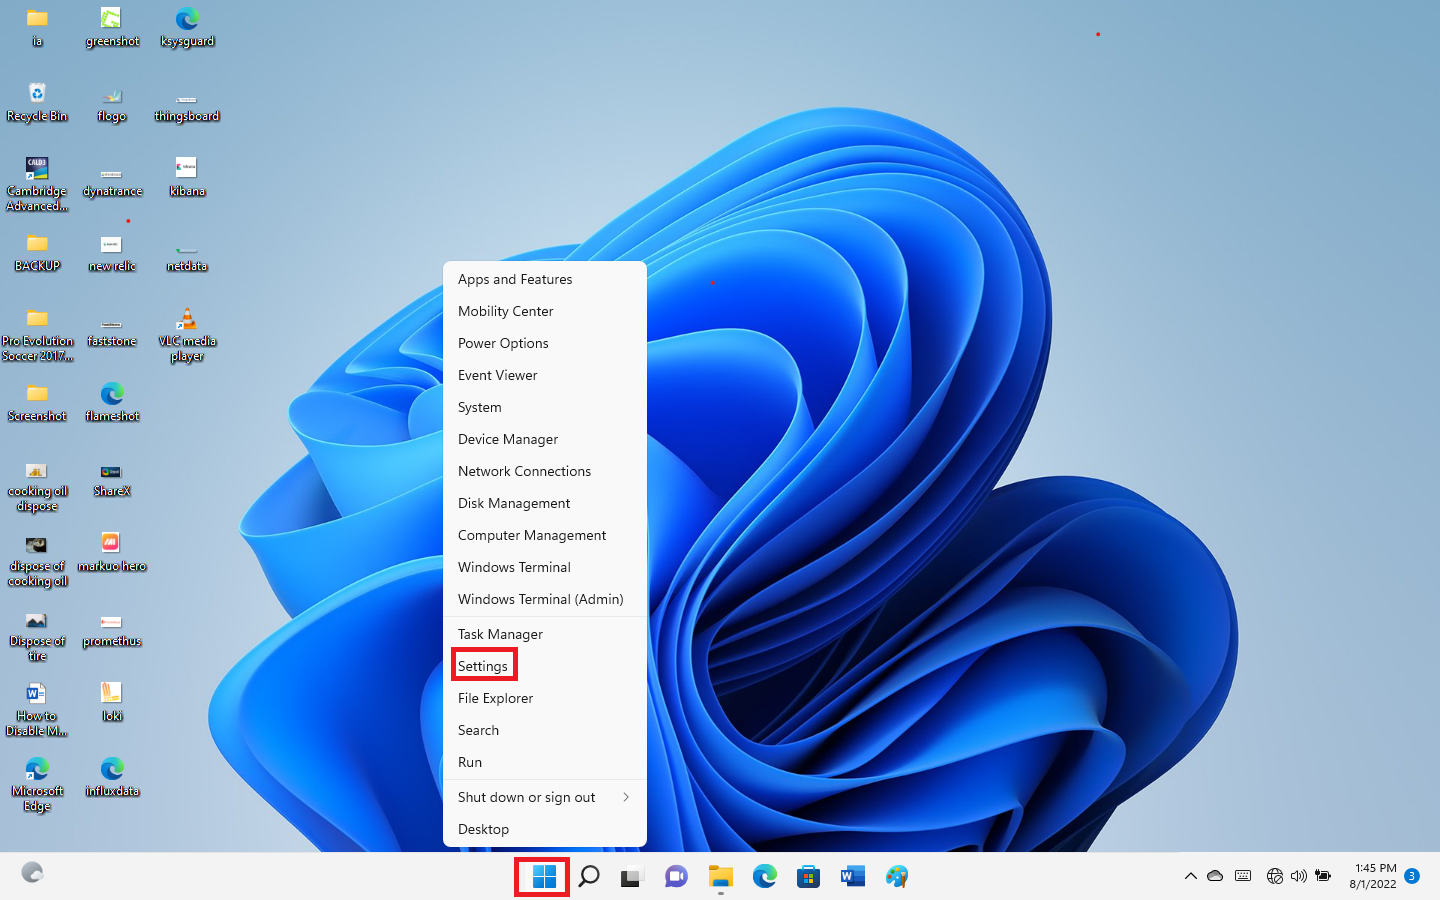
- Select the “Start icon” on the taskbar.
- Search and open “Settings.”
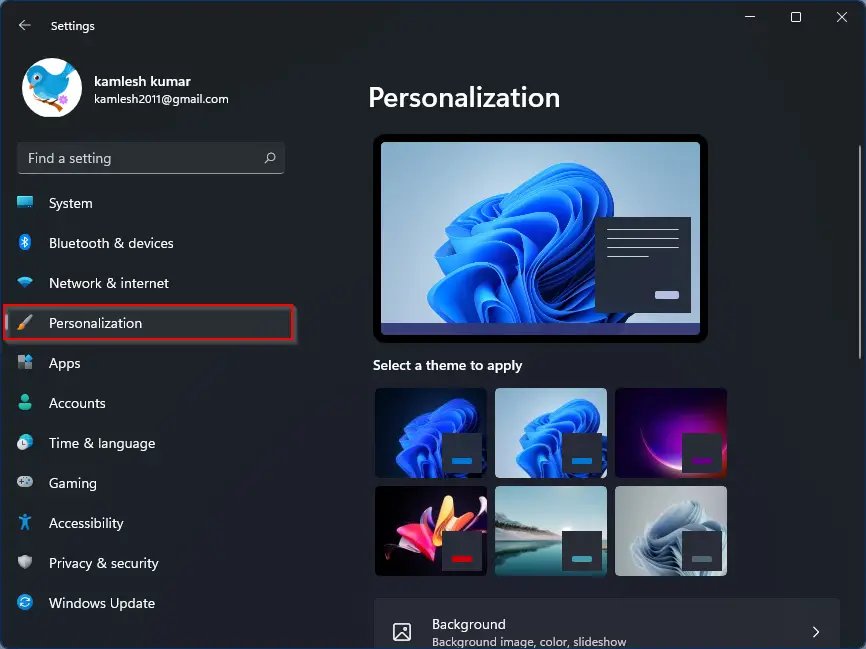
- Click on “Personalization” on the sidebar.
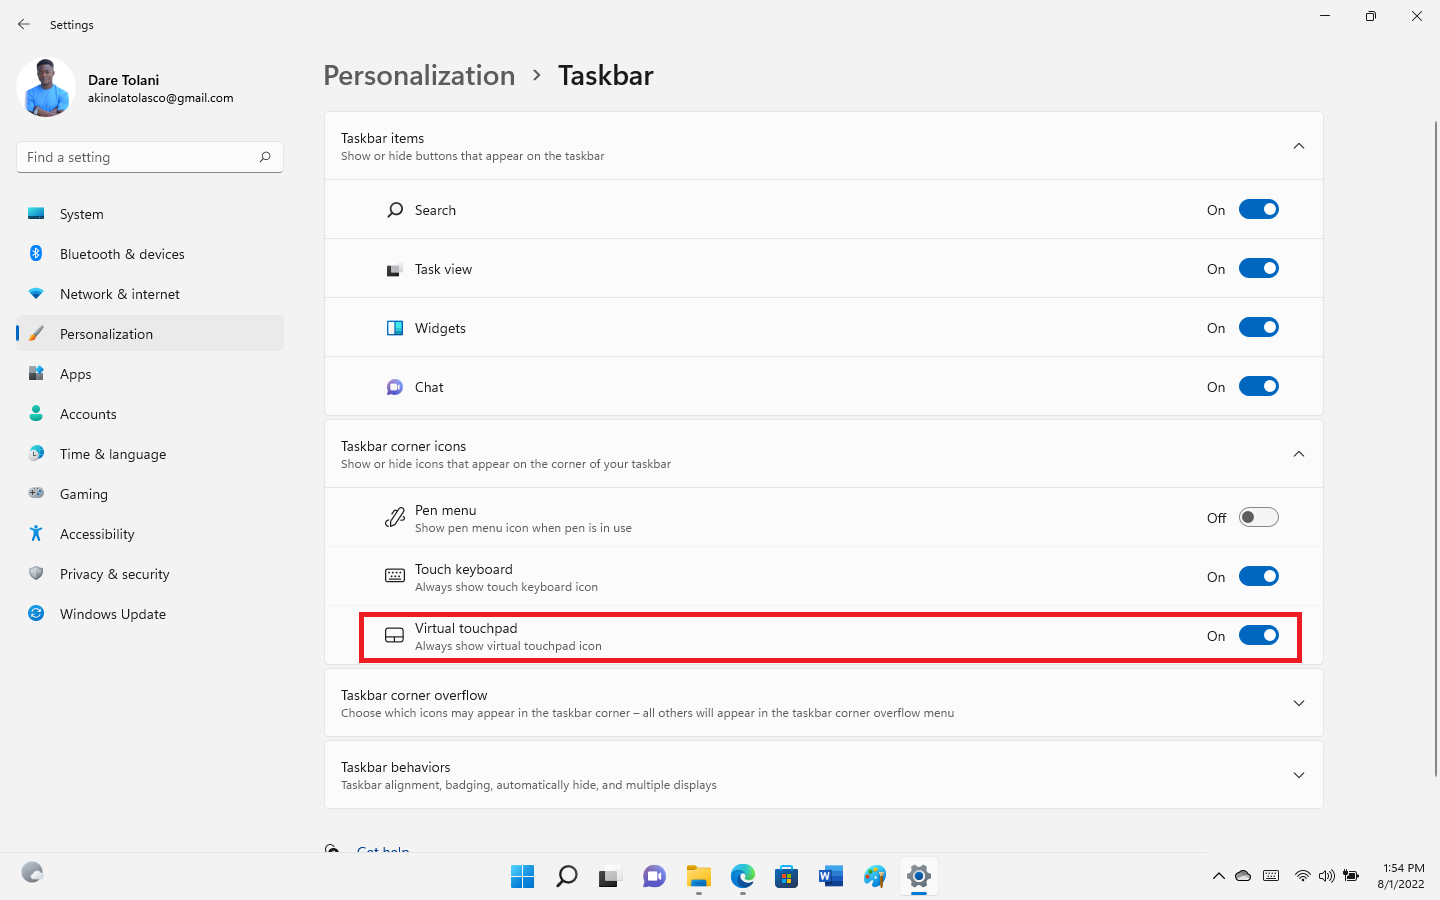
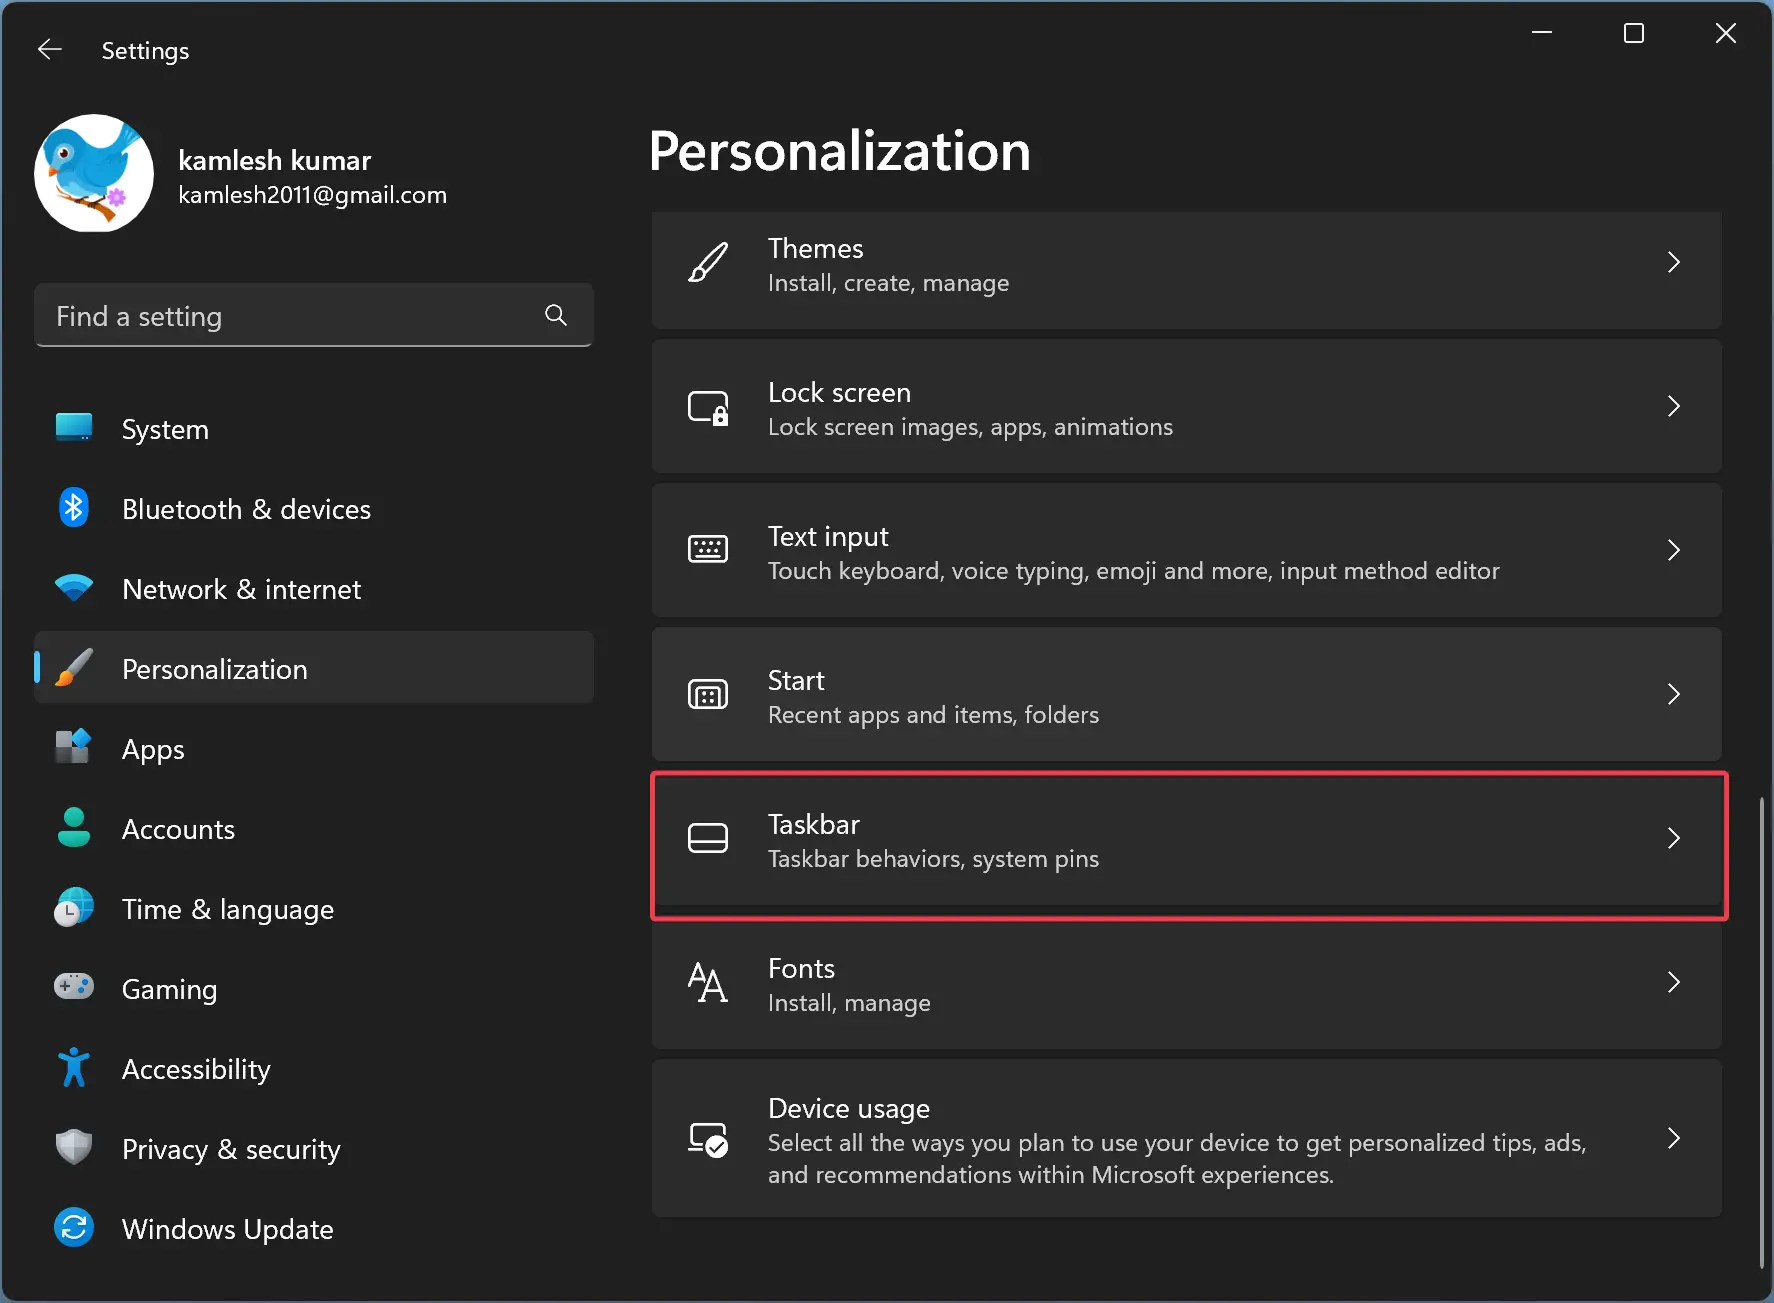
- Scroll down and click on “Taskbar” on the main page.
- Expand the “System tray icons” section.
- Turn on the “Virtual touchpad” option.
- With that, the virtual touchpad is enabled in Windows 11.

How to use the virtual touchpad in Windows 11
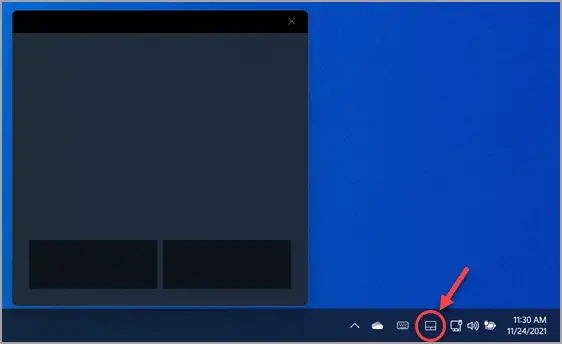
As soon as you enable the virtual touchpad in Windows 11, you will see a new touchpad icon on the taskbar. Touch or click on it to launch the on-screen touchpad.
Once you see the on-screen touchpad, you can use it like a physical touchpad and perform all the familiar gestures. To move the cursor, place your finger on the virtual touchpad and move. To left-click, tap once. To right-click, tap once with two fingers. To scroll, place two-finger on the touchpad and move up, down, or sideways. The same is true for three and four-finger gestures. Of course, you can also use the virtual buttons to perform left and right clicks.

To close the virtual touchpad, either close the on-screen touchpad window or click/touch on the touchpad icon on the taskbar.
It might take a little practice, but you’ll find that the virtual touchpad in Windows 11 is a convenient and efficient way to navigate.
How to disable virtual touchpad in Windows 11
If you no longer need the on-screen touchpad, you can disable it. Here’s how to do it.
- Right-click on the taskbar.
- Select the “Taskbar settings” option.
- Expand the “System tray icons” section.
- Turn off the “Virtual touchpad” option.
- With that, the virtual touchpad is disabled in Windows 11.

Limitations of virtual touchpad
The virtual touchpad feature in Windows 11, although convenient and efficient for many users, does have some limitations.
One of the main limitations is that it may not work well with certain applications that require using a physical touchpad or an external mouse. This can be a problem if you frequently use such applications, as you might have to switch to a physical touchpad or an external mouse.
Another limitation is that the virtual touchpad may not be as responsive as a physical touchpad. This can be due to the touchscreen not being calibrated properly. As you might expect, this will make it harder to perform precise actions, such as fine cursor movement and gestures.
Additionally, some of you may find it difficult to use the virtual touchpad compared to the physical touchpad. There may be any number of reasons for this, like the lack of support for custom gestures, different touch feel, and more.
Enabling virtual touchpad — Conclusion
All in all, if you ever need it, the built-in virtual touchpad helps you navigate the screen just like using a physical touchpad. This is convenient if you often use Windows 11 in touch mode, as it eliminates the need to move your hand all over the touchscreen.
Of course, there are a few limitations, but the benefits outweigh the cons. So, give it a try and see how it works for you.
—
That is all. It is that simple to enable the virtual touchpad in Windows 11.
I hope this simple and easy Windows how-to guide helped you.
If you are stuck or need help, send an email, and I will try to help as much as possible.
This post shows students and new users steps to show or hide the virtual touchpad on Windows 11. One can use the on-screen or virtual touchpad to control the mouse pointer with their Windows touchscreen.
Once the virtual touchpad is enabled, it can be dragged to any screen location simply by holding it down and moving it to the desired location.
One can follow the posts below to turn other touchscreen-related tasks on or off when using a Windows touchscreen device. For example, you can turn off touchscreen usage in Windows 11, enable an on-screen keyboard, and more.
Below is how to turn the on-screen or virtual touchpad on or off when using Windows 11.
How to enable or disable virtual touchpad on Windows 11
As mentioned above, one can use the on-screen or virtual touchpad to control the mouse pointer with their touchscreen Windows device.
Below is how to turn on or off the virtual touchpad on Windows 11.
Windows 11 has a centralized location for the majority of its settings. As a result, everything can be done, from system configurations to creating new users and updating Windows from its Settings app.
To get to System Settings, you can use the Windows key + I shortcut or click on Start ==> Settings, as shown in the image below:

Alternatively, you can use the search box on the taskbar to search for Settings. Then select to open it.
Windows Settings pane should look similar to the image below. In Windows Settings, click Personalization > Taskbar tile to expand it.

On the Personalization > Taskbar settings pane, under Taskbar corner icons, toggle the buttons to On or Off for Virtual touchpad.

You can now exit the Settings app.
Alternatively, use the steps below to turn the virtual touchpad on or off:
- First, press and hold (or right-click) the taskbar, then select Taskbar settings.
- Under Taskbar corner icons, set Virtual touchpad to On.
- Finally, select the touchpad button on the taskbar.
That should do it!
Conclusion:
- Enabling or disabling the virtual touchpad on Windows 11 is a straightforward process that can significantly enhance user experience on touchscreen devices.
- Accessing the Settings app via the Windows key + I shortcut, or the Start menu provides a convenient path to the required configuration options.
- Utilizing the Taskbar settings allows quick toggling of the virtual touchpad via the Taskbar corner icons, streamlining the process.
- Visual aids and step-by-step instructions make it simple for users to maneuver through the settings and customize their touchpad preferences.
In the previous article, I mentioned How To Open And Use Emoji Keyboard On Windows 11, but in this article, I have mentioned how to enable or disable a virtual touchpad in Windows 11.
Windows 11 features a virtual TouchPad that works like the physical TouchPad on your keyboard. It is an on-screen feature that lets you move and control your mouse pointer on a touchscreen PC.
You can try out this feature if you use a touchscreen PC and disable it if you do not prefer using it. This post will show you how to enable or disable the virtual touchpad in Windows 11.
How to Enable Virtual TouchPad in Windows 11
You can turn on the virtual touchpad on your Windows 11 PC in two ways. Find them out below:
Method 1: Enable Virtual TouchPad with the System Settings
You can enable the virtual touchpad in the system settings with the following steps:
Step 1: Settings
The first step is to open the Settings app on your PC with any of the options below.
- Click on the start icon on your keyboard’s taskbar or the Windows button and select settings under the pinned apps section.
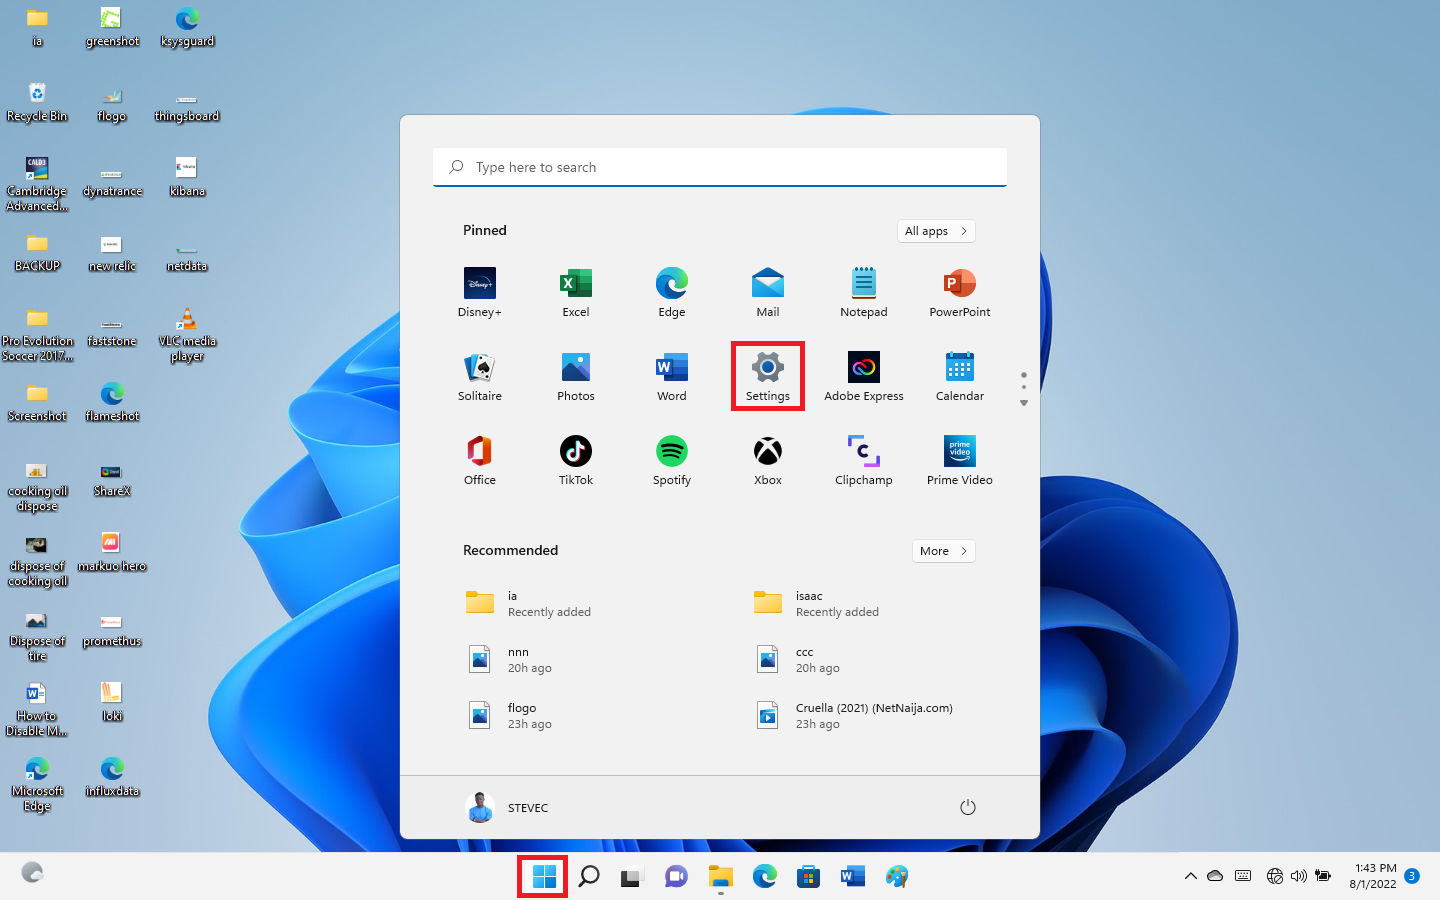
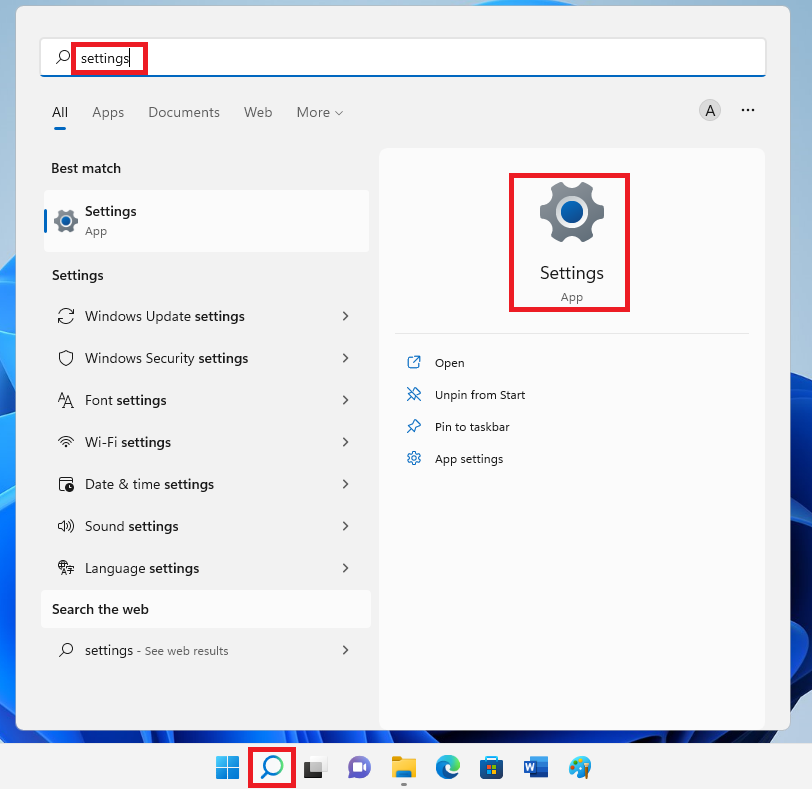
- Click the search button from the taskbar. Type Settings in the search field when the Search page displays, then click the settings icon in the search result.
- Press the Windows button + I anywhere on your keyboard.
Step 2: Personalization
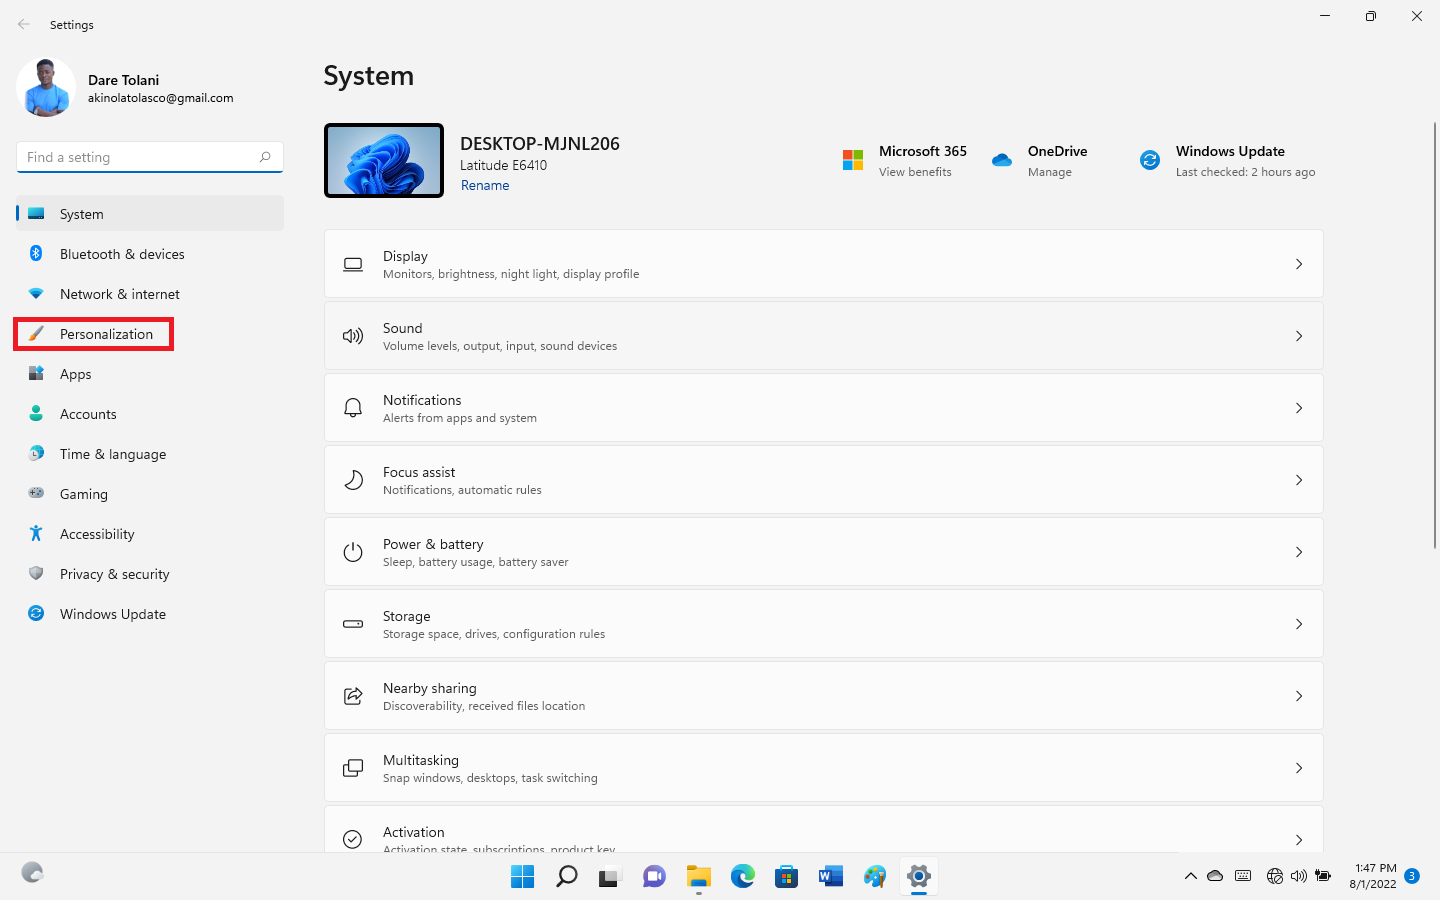
The next step is to click on the personalization tile when the settings window opens. You will find it in the sidebar of the page.
Step 3: Taskbar
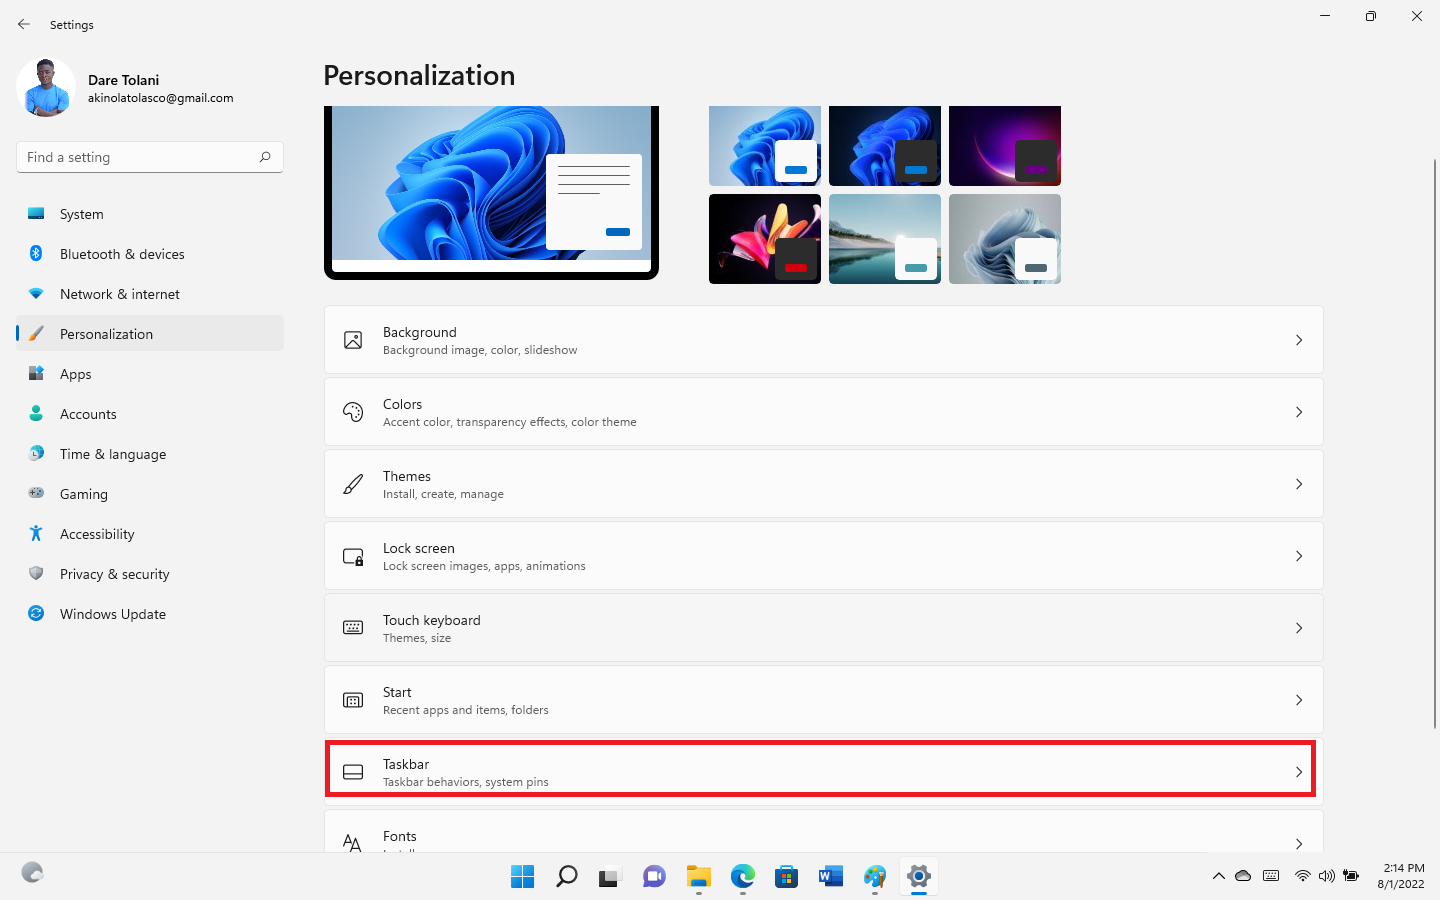
The settings under the personalization tab will display on the right pane of the Settings page. Scroll through the options in the right pane and click on the taskbar tile.
Step 4: Virtual TouchPad
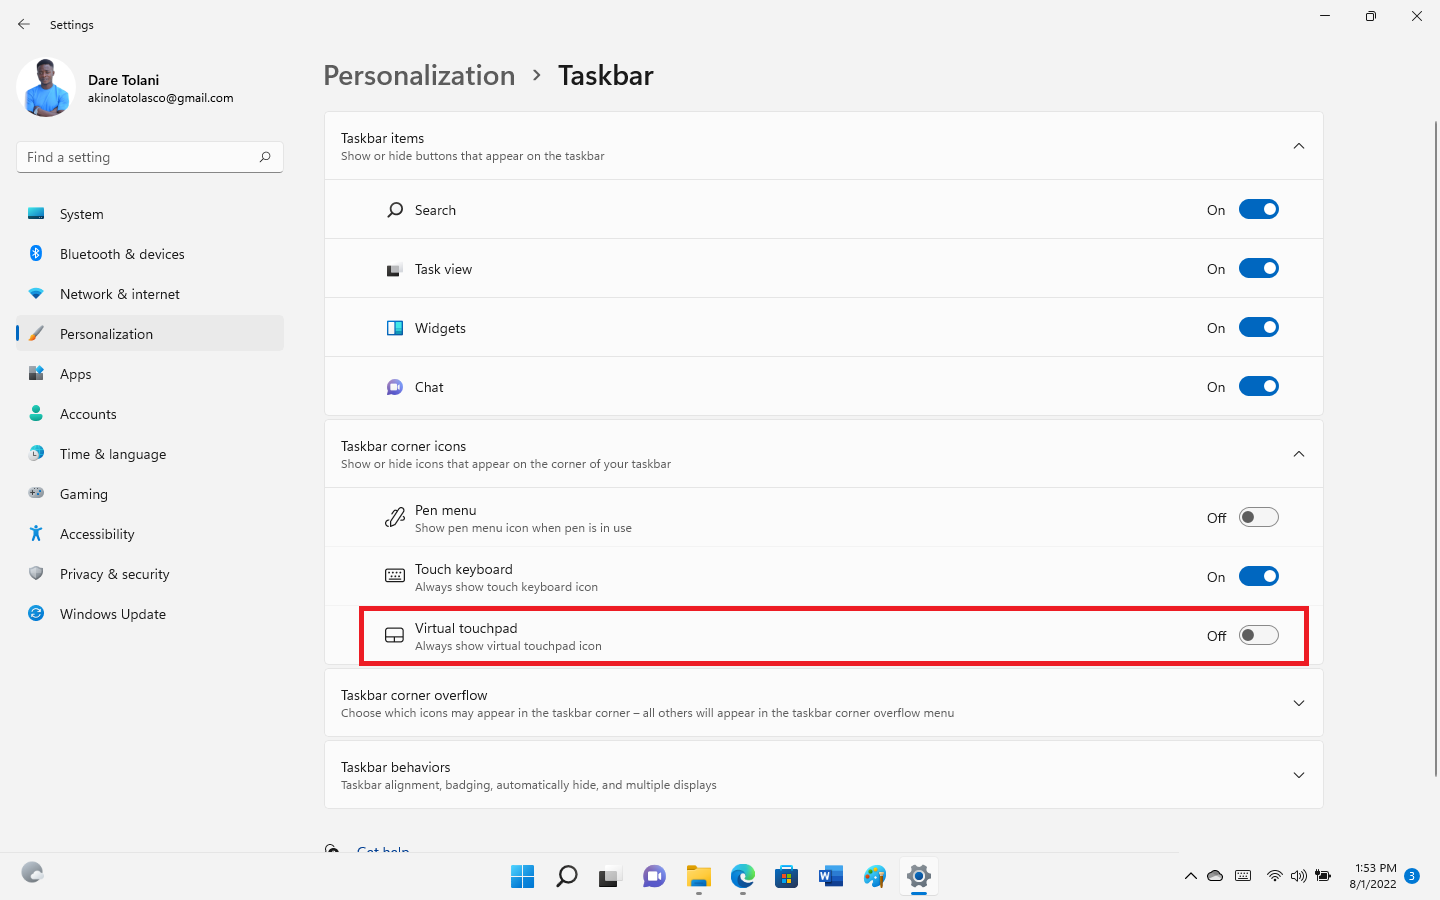
Now in the taskbar settings, locate ‘virtual touchpad’ in the on-screen options. Click on the toggle next to it to turn it on, and it will be enabled.
Since you have clicked on the toggle, you will see the virtual touchpad icon on the taskbar.
Method 2: Enable Virtual TouchPad from the Taskbar
You can enable the virtual touchpad from the taskbar as follows.
- Long-press or right-click on the taskbar. You can only long-press if you use a touchscreen PC.
- Click on Taskbar settings from the context menu.
- Scroll to the virtual touchpad tile and click the toggle to enable it.
How to Open and Use the Virtual TouchPad
If you have successfully enabled the virtual touchpad, you only need to open it from the taskbar whenever you want to use it. Here is how.
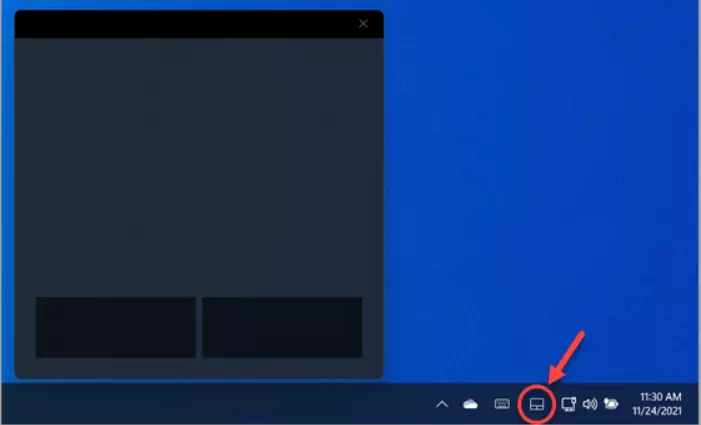
Locate the icon in the notification area on the right side of the taskbar, and click on it to open and use the virtual touchpad.
How to Disable Virtual TouchPad in Windows 11
The Windows virtual touchpad is not for everyone, and you may be more productive on your computer without it. In that case, it is best to disable it with the steps below:
Step 1: Settings
Open the Settings app with any of the options you saw earlier in this post. See them below again.
- Click on the start icon on your keyboard’s taskbar or the Windows button and select settings under the pinned apps section.
- Search for Settings with the Windows search button and click the Settings icon in the search result.
- Press the Windows button + I anywhere on your keyboard.
- You can also right-click on the start icon on the taskbar and select Settings from the context menu.
Step 2: Personalization
Click on the personalization tile in the settings window in the sidebar of the settings window.
Step 3: Taskbar
Scroll through the personalization options in the right pane and click on the taskbar tile.
Step 4: Virtual TouchPad
Locate ‘virtual touchpad’ in the on-screen options, and click on the toggle next to it to turn it off.
How Does the Virtual TouchPad Work?
A virtual touchpad is a tool that enhances on-screen cursor navigation. Creators introduced this feature to replace the physical mouse or trackpad.
It lets you move the cursor across your computer screen without an optical mouse by dragging it with your finger.
Like the physical touchpad, you can configure the virtual touchpad sensitivity and a few other settings. However, the feature can only work on touchscreen computers.
Conclusion
You can use the virtual touchpad in place of your optical mouse on Windows 10 and 11 PCs. The steps in this post will guide you to enable it successfully, and you should disable it if you are more effective without it.
You may also like to read:
How to Turn On Storage Sense In Windows 11
Drag and Drop is not working in Windows 11
IIS Not Found in Windows 11 (Install IIS in windows 11)
With the rise of touchscreen devices, Windows 11 and 10 have introduced a convenient feature for users to control their mouse pointer without the need for a physical touchpad or mouse. The virtual touchpad is a built-in feature that functions similar to the physical touchpad, but it is displayed on-screen. Once enabled, this feature allows you to control the mouse pointer with your touchscreen by using the virtual touchpad. In this article, we will walk you through the simple steps required to enable and use the virtual touchpad on Windows 11 and 10, making your touchscreen experience more seamless and efficient.
How to Enable Virtual Touchpad on Windows 11?
To turn on the virtual touchpad on Windows 11, use these steps:-
Step 1. Open Windows 11 Settings.
Step 2. Select Personalization in the left sidebar of the Settings window.
Step 3. On the right sidebar, click on the Taskbar tab.
Step 4. Toggle on the Virtual touchpad switch under the ‘System tray icons‘ option.
Once you complete the above steps, the Virtual touchpad will be enabled on your Windows 11 machine, and you will see a new icon in the notification area. Clicking this icon, you can open and use the Virtual touchpad on your PC.
To disable the “Virtual touchpad,” repeat the above steps, and in step 4 above, touch off the toggle switch Virtual touchpad.
How to Turn On Virtual Touchpad on Windows 10?
To enable the virtual touchpad on Windows 10, either long-press or right-click on the taskbar and select/check the Show touchpad button in the pop-up menu. Please note that you’ll not find this option if you use a Windows 10 machine without a touch screen.
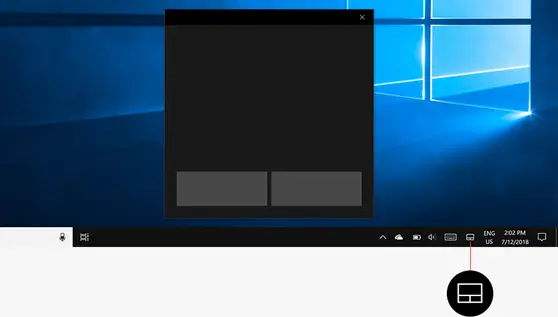
Once you complete the above steps, the Virtual touchpad will be enabled on your Windows 10 machine, and you will see a new icon in the notification area. Clicking this icon, you can open and use the Virtual touchpad on your PC.
The virtual touchpad works exactly like a physical touchpad. You can use every touchpad function as you can in a physical touchpad. You can left-click or right-click by tapping the left or right mouse buttons at the bottom of the window. You can also perform a single-finger tap to left-click and a two-finger tap to right-click.
Placing three fingers on the virtual touchpad and swiping them upwards will open the Task View interface for switching windows, for instance. You can place three fingers on the touchpad and swipe downwards to show your desktop.
For moving the cursor around the screen, just place your finger on the touchpad and move it around just like a standard touchpad. The mouse cursor will move around the screen as you move your finger.
Moreover, you can move the virtual touchpad window on the screen according to your convenience. Just touch the title bar of the window and move your finger to move the window.
Conclusion
To sum up, the virtual touchpad is a useful feature that provides an alternative to physical touchpads or mice for controlling the mouse pointer on touchscreen devices. Whether you are using Windows 10 or 11, enabling and using the virtual touchpad is a straightforward process that can significantly improve your touchscreen experience. With the virtual touchpad, you can easily perform all the functions of a physical touchpad and utilize gestures to switch between windows and display your desktop. Give it a try and see how it can boost your productivity and efficiency.